Arduino Mega - OLED 128x32 Display

This guide shows you how to use an Arduino Mega with a 128x32 OLED display using I2C. You'll learn:

Arduino Mega OLED I2C display

Hardware Preparation

1×Arduino Mega
1×USB 2.0 cable type A/B (for USB-A PC)
1×USB 2.0 cable type C/B (for USB-C PC)
1×SSD1306 I2C OLED Display 128x32
1×Jumper Wires

Or you can buy the following kits:

1×DIYables Sensor Kit (30 sensors/displays)
1×DIYables Sensor Kit (18 sensors/displays)
Disclosure: Some of the links provided in this section are Amazon affiliate links. We may receive a commission for any purchases made through these links at no additional cost to you.
Additionally, some of these links are for products from our own brand, DIYables .

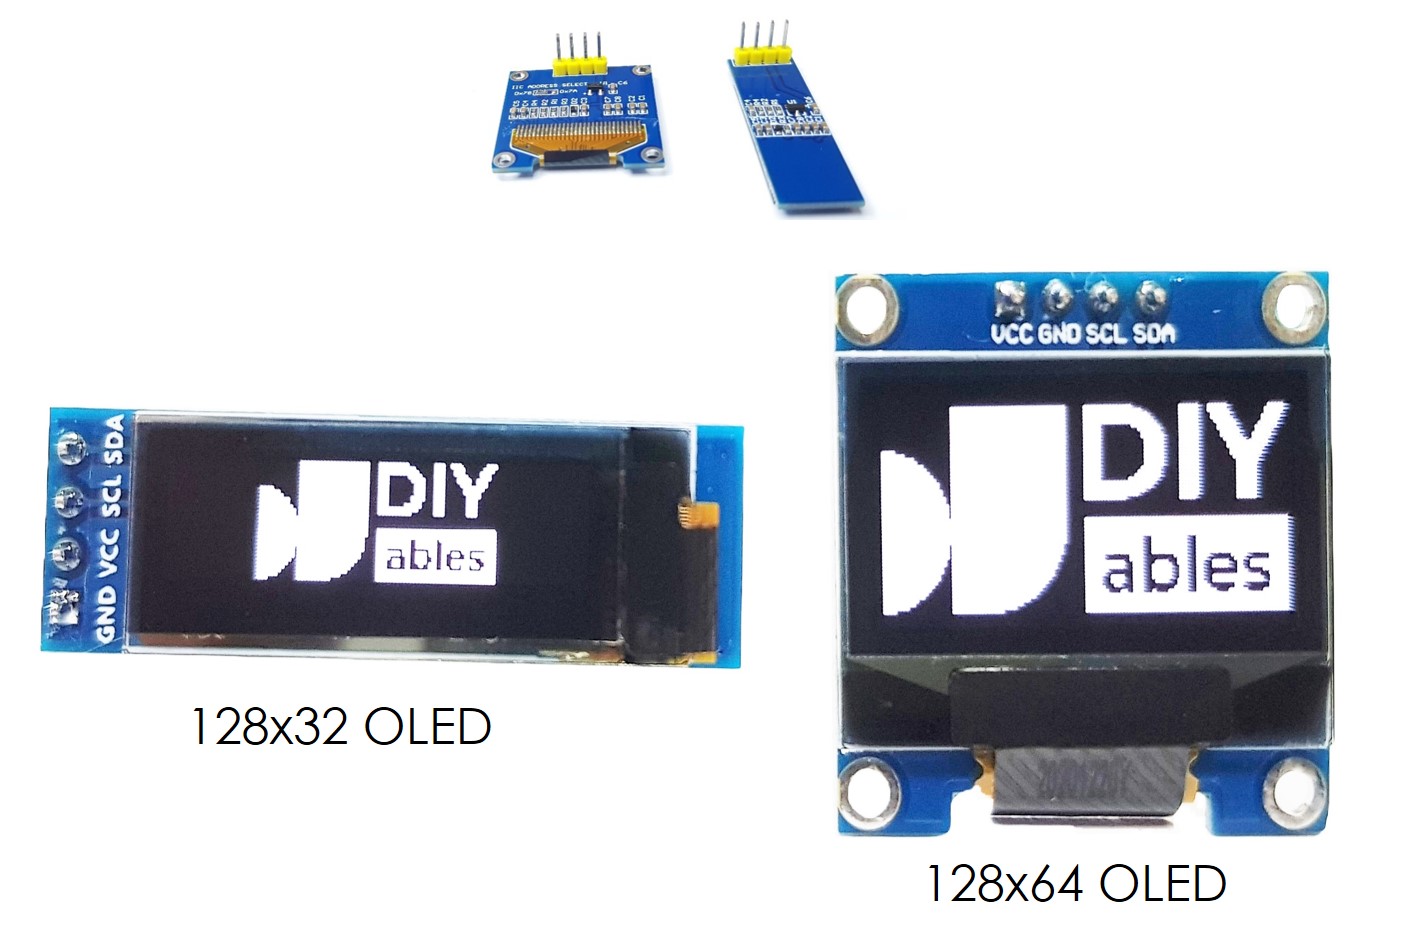
Overview of OLED Display

I2C OLED Display Pinout

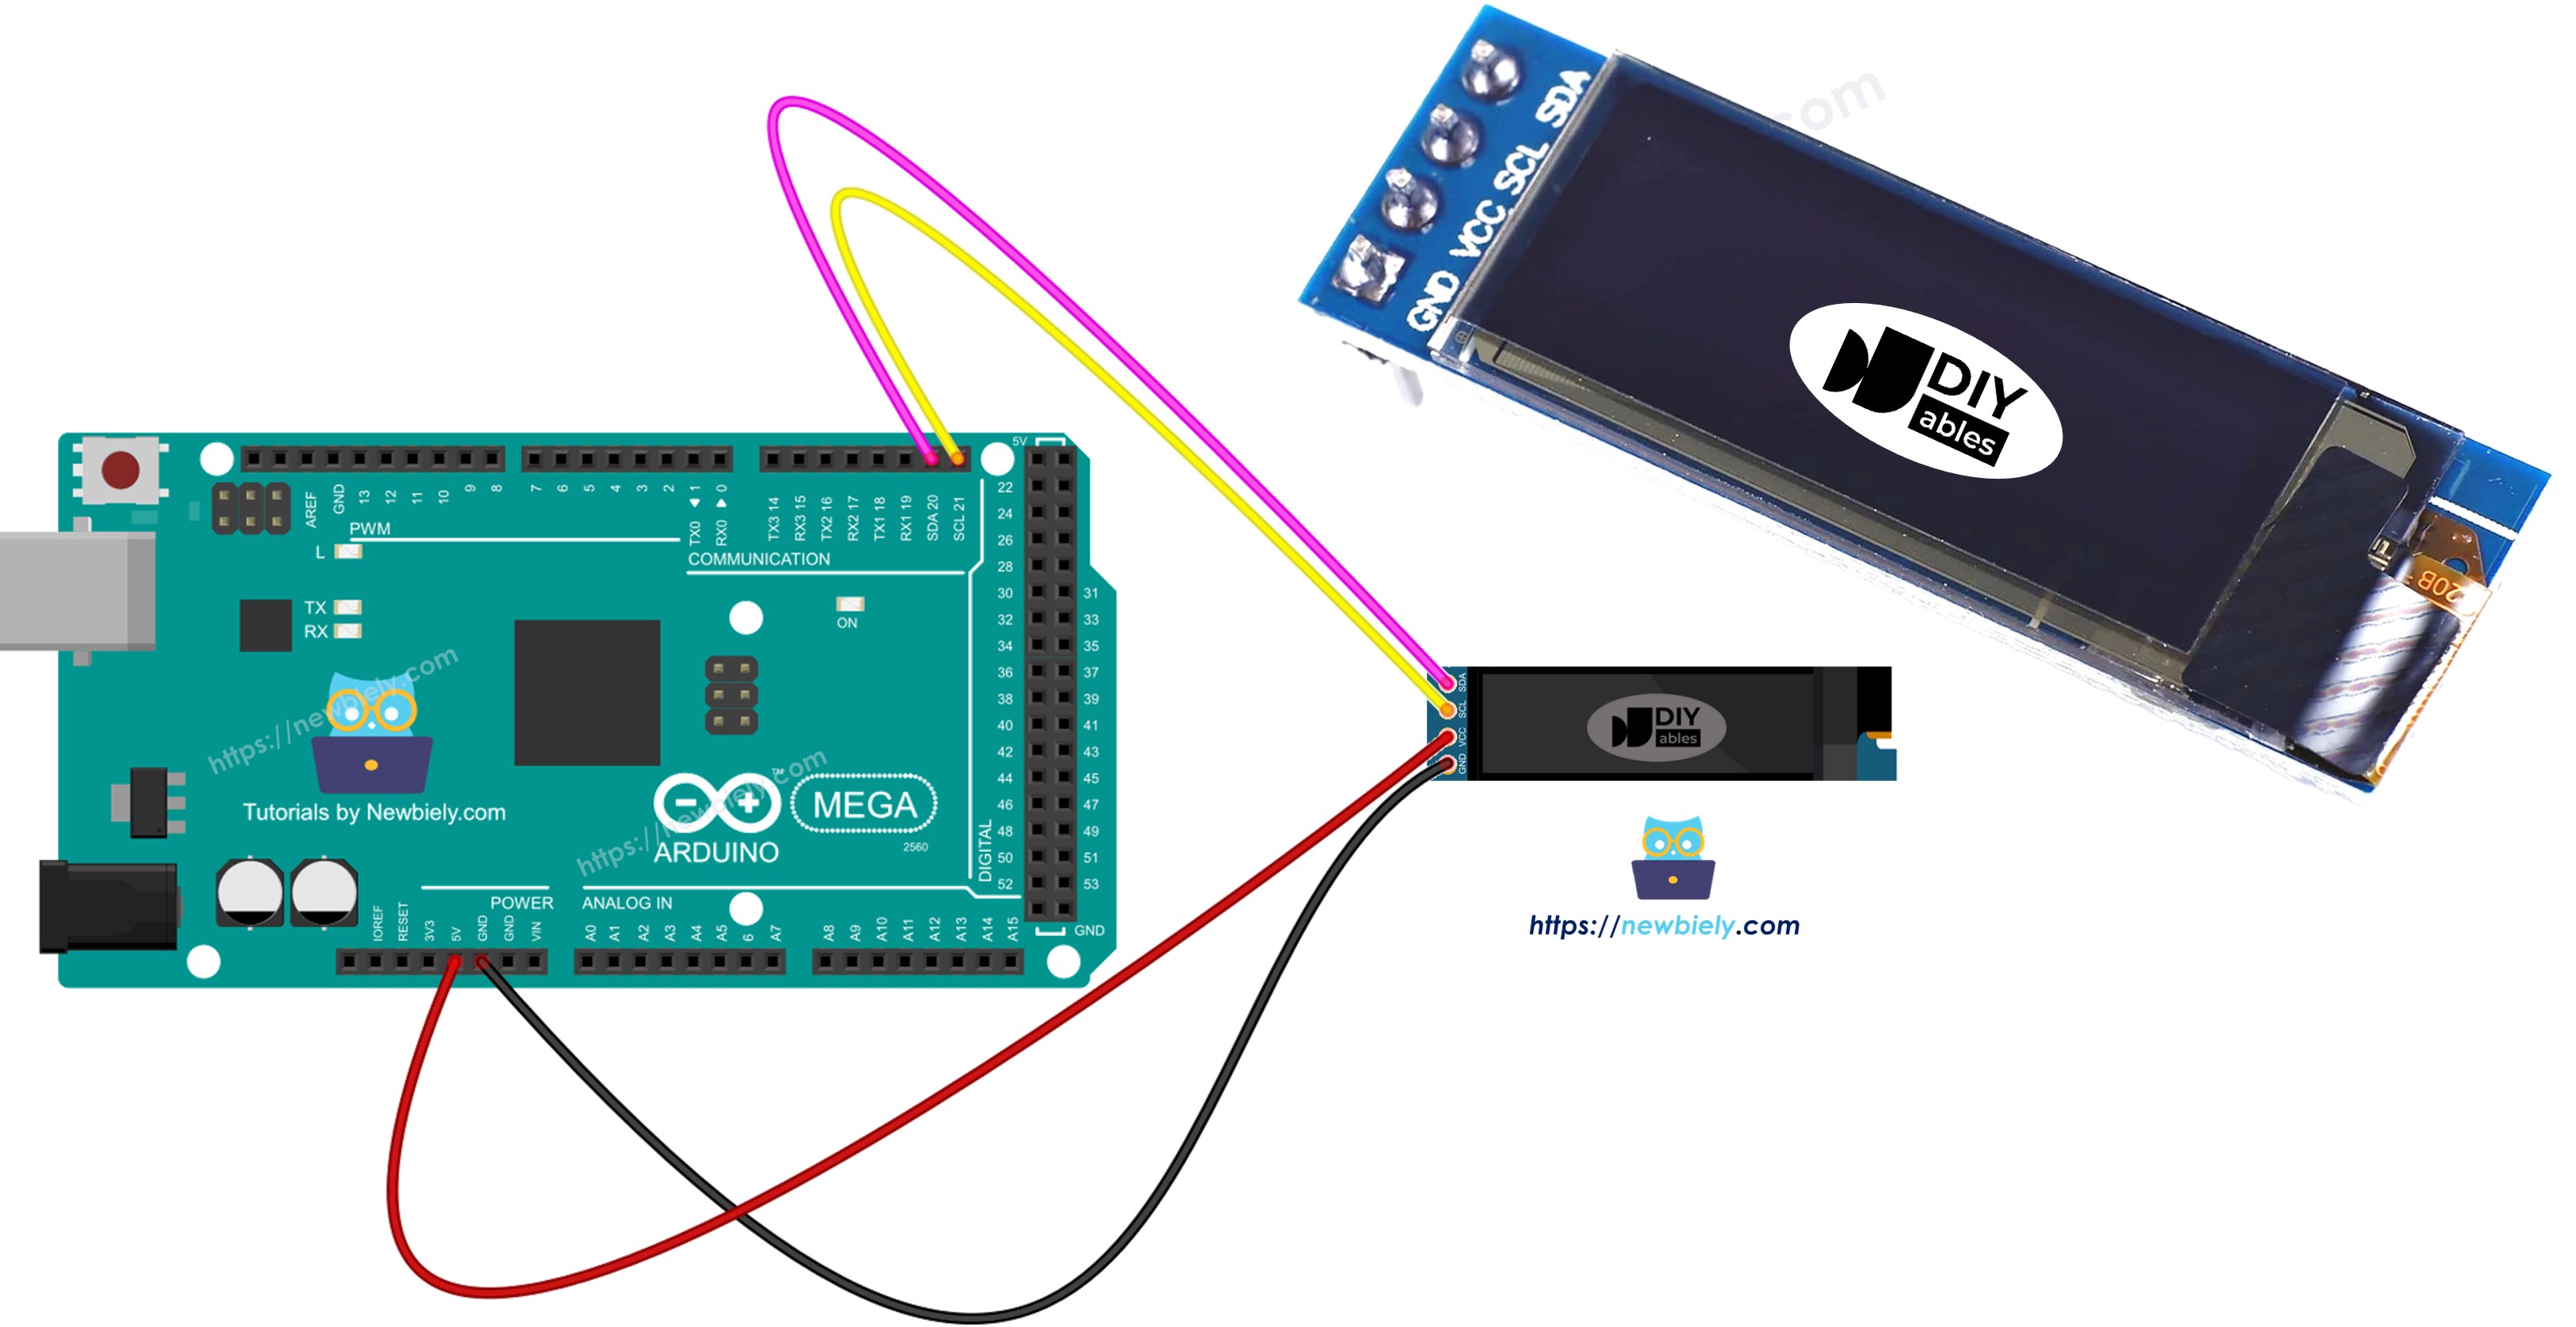
  • GND pin: connect to the Arduino Mega ground.
  • VCC pin: power for the display; connect to the Arduino Mega 5V pin.
  • SCL pin: I2C clock line.
  • SDA pin: I2C data line.
OLED Pinout

※ NOTE THAT:

The pin layout on an OLED module can be different depending on who makes it and the model. Always check the labels on the OLED module and follow them. Pay attention!

This guide is for an OLED display that uses the SSD1306 I2C driver. We tested it with an OLED display from DIYables. It works perfectly, with no problems.

Wiring Diagram

The wiring diagram between Arduino Mega OLED 128x32

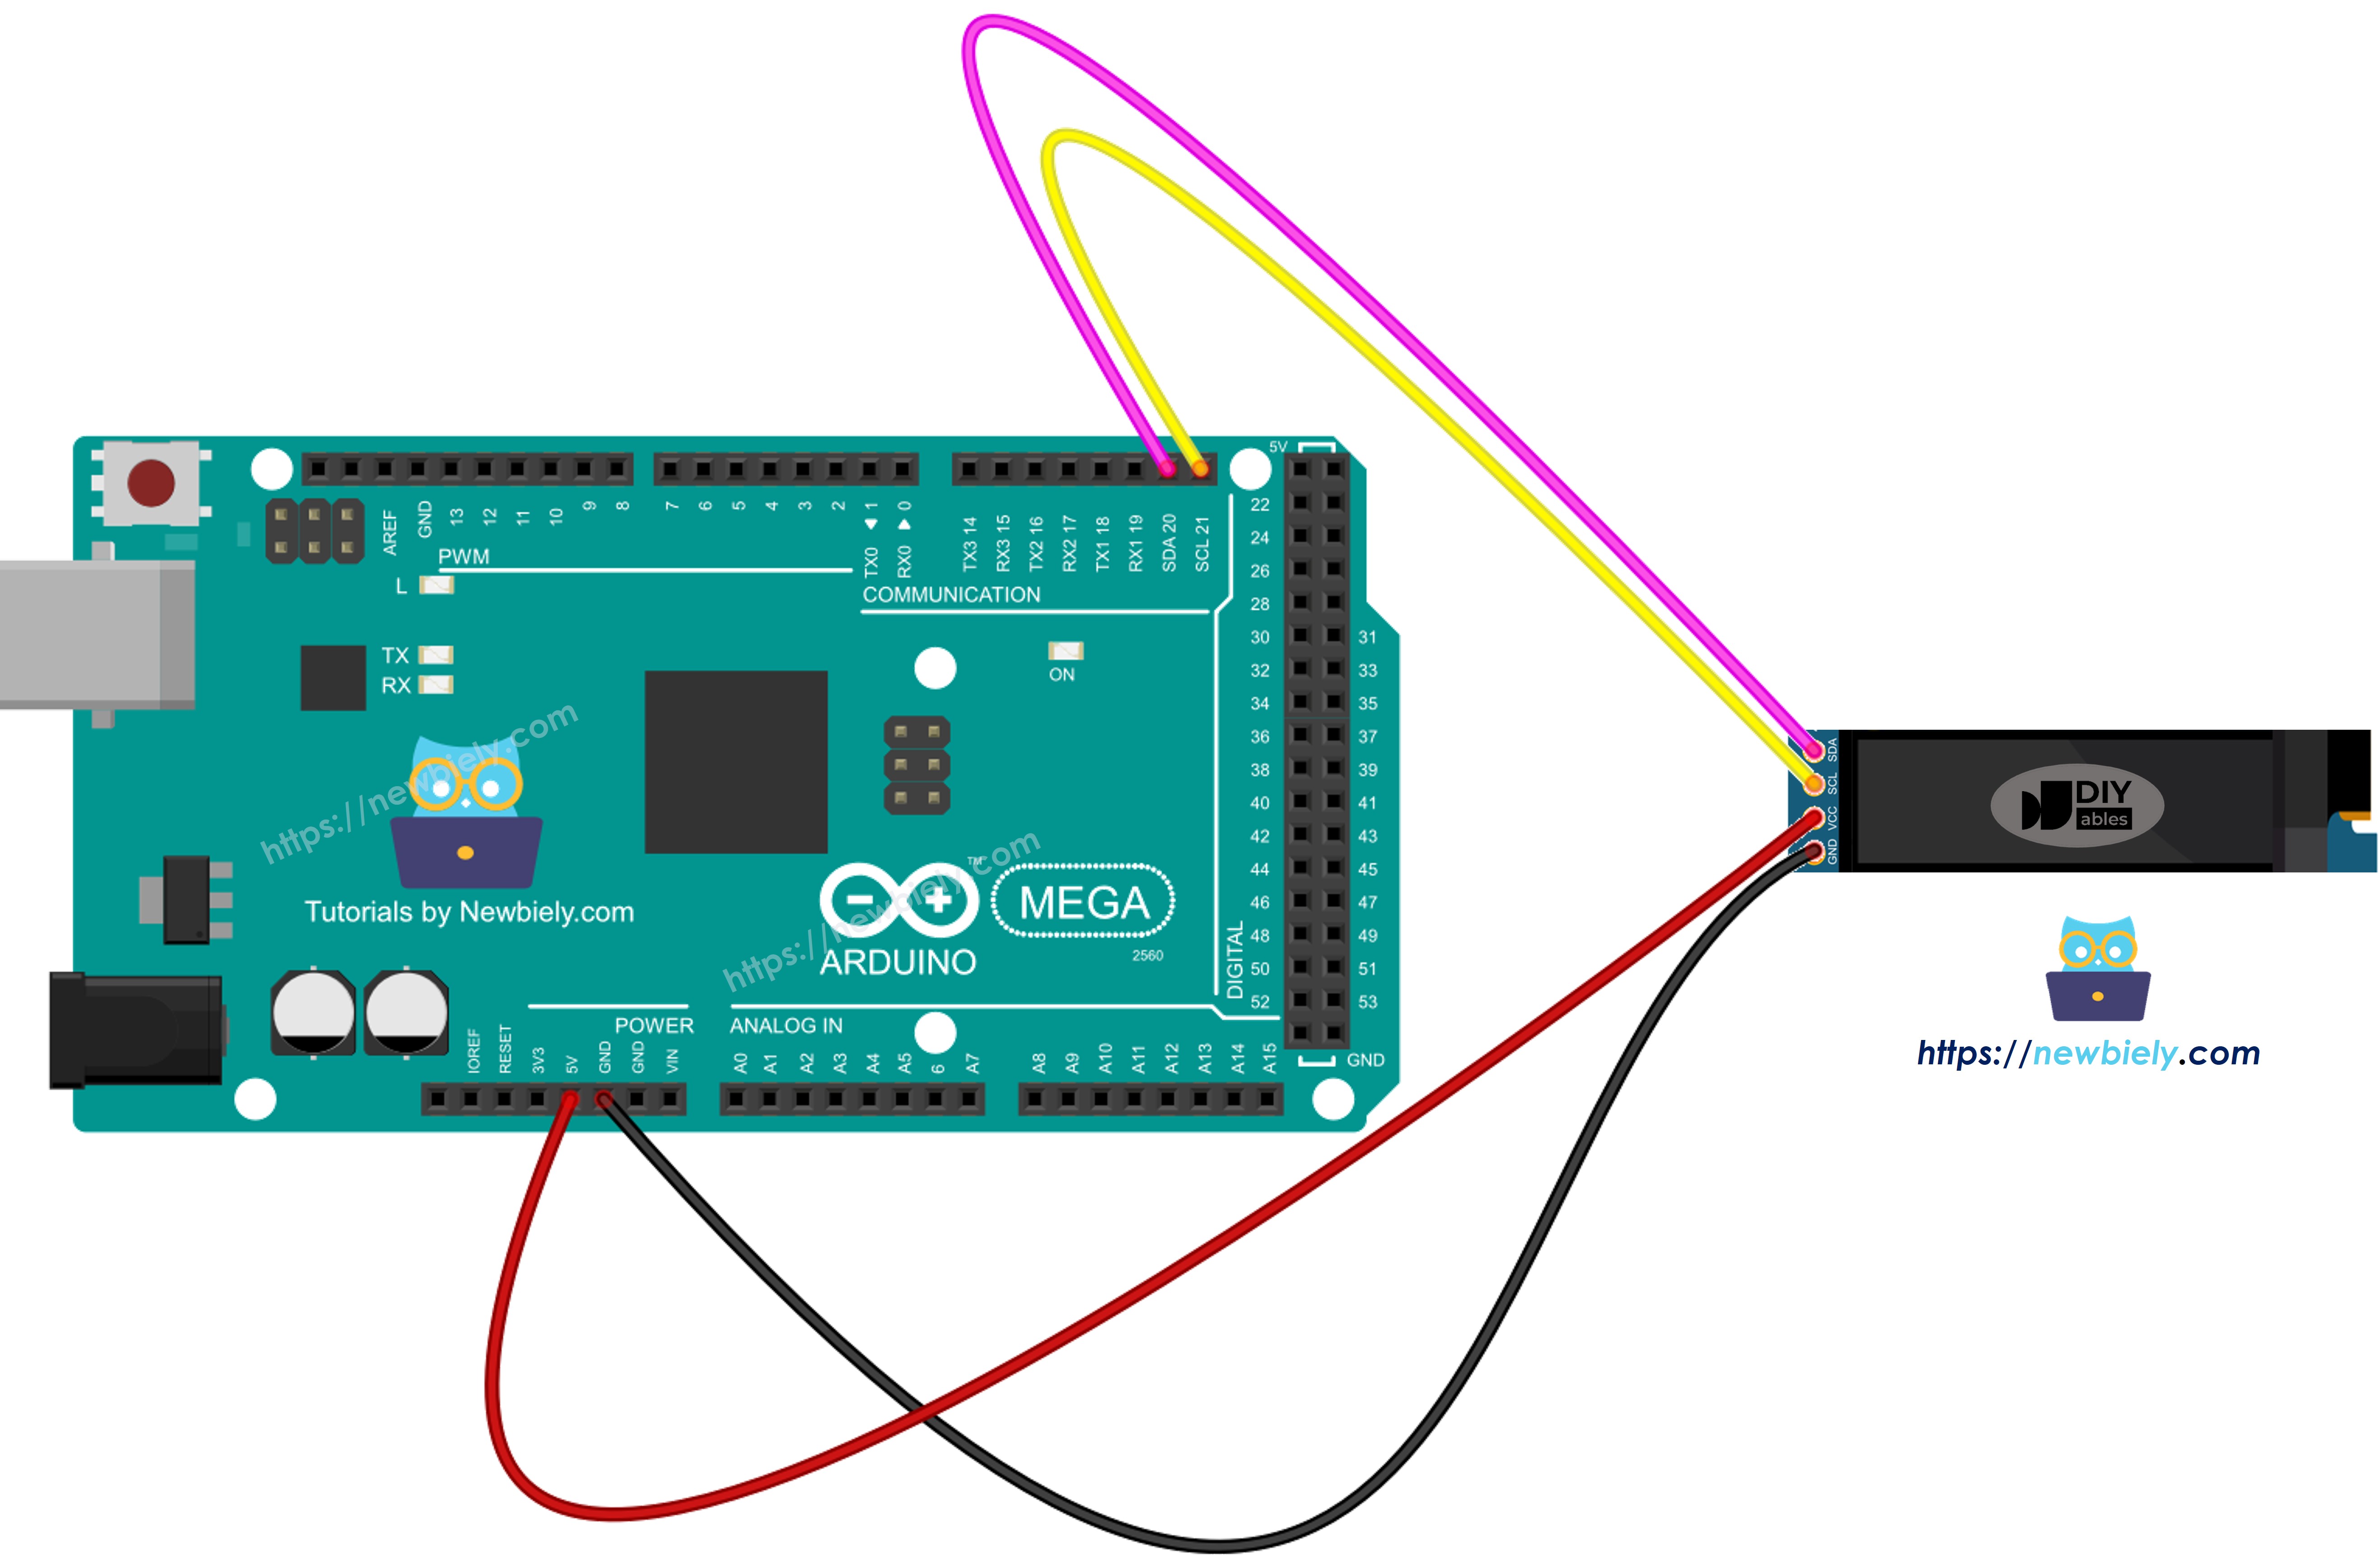
This image is created using Fritzing. Click to enlarge image

If you use a different Arduino Mega, the pin layout will be different from the Uno. See the table below for information about other Arduino Mega models.

128x32 OLED Module Arduino Mega
Vin 5V
GND GND
SDA A4
SCL A5

How To Use OLED with Arduino Mega

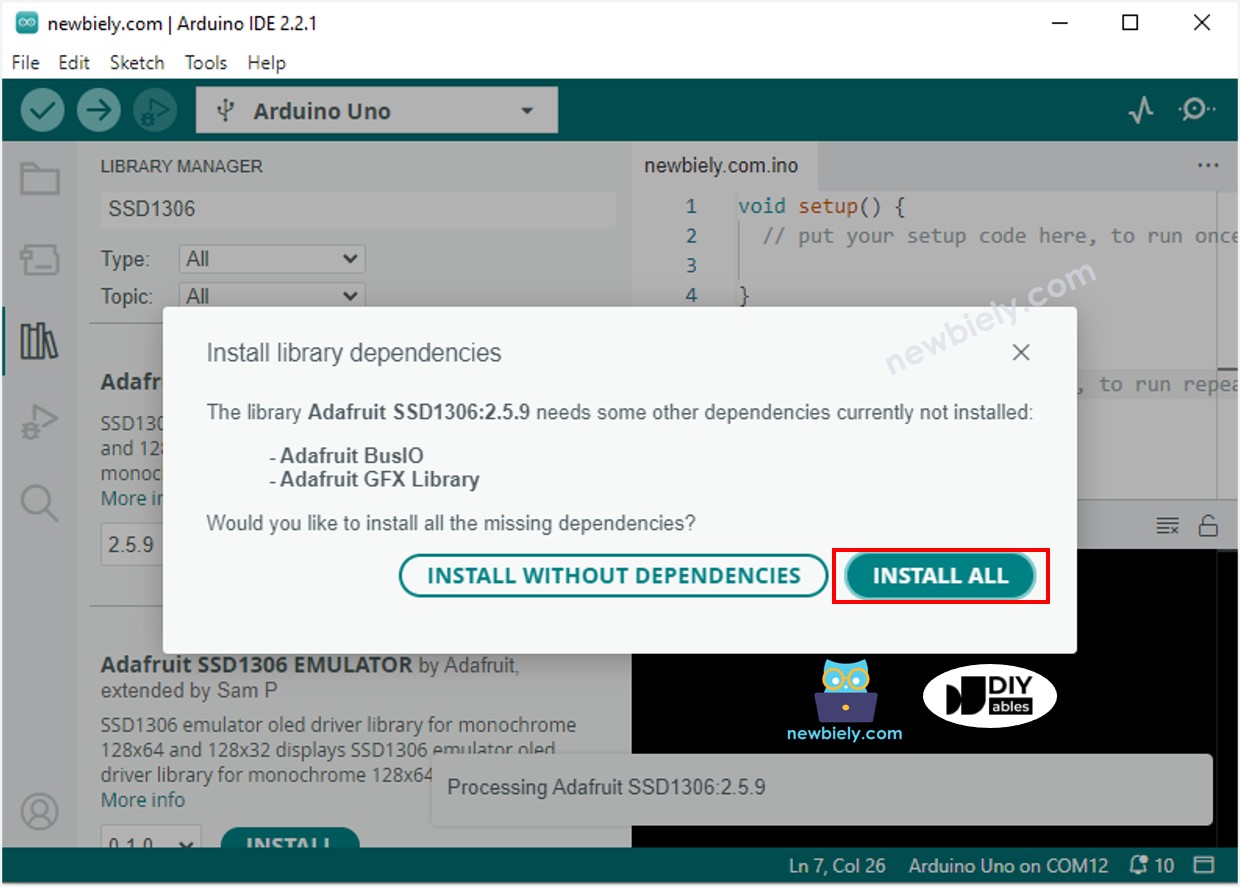
Install SSD1306 OLED library

  • Find the Libraries icon on the left side of the Arduino IDE.
  • Type "SSD1306" into the search box and find the SSD1306 library by Adafruit.
  • Click Install to add the library.
Arduino Mega OLED library
  • You need to install some extra libraries.
  • Click the Install All button to install all the needed libraries.
Arduino Mega Adafruit GFX sensor library

How to program for OLED

  • Add a library.
#include <Wire.h> #include <Adafruit_GFX.h> #include <Adafruit_SSD1306.h>
  • Set the screen size to OLED 123 by 32.
#define SCREEN_WIDTH 128 // OLED display width in pixels #define SCREEN_HEIGHT 32 // OLED display height in pixels
  • Make an SSD1306 OLED display.
// Instantiate the SSD1306 OLED object for I2C communication (no reset pin) Adafruit_SSD1306 oled(SCREEN_WIDTH, SCREEN_HEIGHT, &Wire, -1);
  • In the setup() function, get the OLED screen ready.
// Initialize OLED display using I2C address 0x3C for a 128x32 display if (!oled.begin(SSD1306_SWITCHCAPVCC, 0x3C)) { Serial.println(F("SSD1306 allocation failed")); // Output error message if initialization fails while (true); // Stay in an endless loop to stop further processing }
  • Then you can show text, pictures and draw lines.

Arduino Mega Code - Display Text on OLED

/* * This Arduino Mega code was developed by newbiely.com * * This Arduino Mega code is made available for public use without any restriction * * For comprehensive instructions and wiring diagrams, please visit: * https://newbiely.com/tutorials/arduino-mega/arduino-mega-oled-128x32-display */ #include <Wire.h> #include <Adafruit_GFX.h> #include <Adafruit_SSD1306.h> #define SCREEN_WIDTH 128 // OLED display width, in pixels #define SCREEN_HEIGHT 32 // OLED display height, in pixels // declare an SSD1306 display object connected to I2C Adafruit_SSD1306 oled(SCREEN_WIDTH, SCREEN_HEIGHT, &Wire, -1); void setup() { Serial.begin(9600); // initialize OLED display with address 0x3C for 128x32 if (!oled.begin(SSD1306_SWITCHCAPVCC, 0x3C)) { Serial.println(F("SSD1306 allocation failed")); while (true); } delay(2000); // wait for initializing oled.clearDisplay(); // clear display oled.setTextSize(1); // text size oled.setTextColor(WHITE); // text color oled.setCursor(0, 10); // position to display oled.println("Hello World!"); // text to display oled.display(); // show on OLED } void loop() { }

These are a few functions you can use to display text on the OLED screen:

  • Oled.clearDisplay(): turns off all pixels.
  • Oled.drawPixel(x, y, color): draws a dot at position x, y.
  • Oled.setTextSize(n): changes text size; choose from 1 to 8.
  • Oled.setCursor(x, y): sets where text starts.
  • Oled.setTextColor(WHITE): makes the text color white.
  • Oled.setTextColor(BLACK, WHITE): makes the text black and the background white.
  • Oled.println("message"): shows text.
  • Oled.println(number): shows a number.
  • Oled.println(number, HEX): shows a number in hex (base-16).
  • Oled.display(): refreshes the screen to show changes.
  • Oled.startscrollright(start, stop): moves text from left to right.
  • Oled.startscrollleft(start, stop): moves text from right to left.
  • Oled.startscrolldiagright(start, stop): moves text diagonally from bottom left to top right.
  • Oled.startscrolldiagleft(start, stop): moves text diagonally from bottom right to top left.
  • Oled.stopscroll(): stops any scrolling text.

Arduino Mega Code - Drawing on OLED

/* * This Arduino Mega code was developed by newbiely.com * * This Arduino Mega code is made available for public use without any restriction * * For comprehensive instructions and wiring diagrams, please visit: * https://newbiely.com/tutorials/arduino-mega/arduino-mega-oled-128x32-display */ #include <Wire.h> #include <Adafruit_GFX.h> #include <Adafruit_SSD1306.h> #define SCREEN_WIDTH 128 // OLED display width, in pixels #define SCREEN_HEIGHT 32 // OLED display height, in pixels // declare an SSD1306 display object connected to I2C Adafruit_SSD1306 oled(SCREEN_WIDTH, SCREEN_HEIGHT, &Wire, -1); void setup() { Serial.begin(9600); // initialize OLED display with address 0x3C for 128x32 if (!oled.begin(SSD1306_SWITCHCAPVCC, 0x3C)) { Serial.println(F("SSD1306 allocation failed")); while (true); } delay(2000); // wait for initializing oled.setCursor(0, 0); } void loop() { // draw rectangle oled.clearDisplay(); oled.drawRect(0, 15, 60, 40, WHITE); oled.display(); delay(2000); // fill rectangle oled.clearDisplay(); oled.fillRect(0, 15, 60, 40, WHITE); oled.display(); delay(2000); // draw the round rectangle oled.clearDisplay(); oled.drawRoundRect(0, 15, 60, 40, 8, WHITE); oled.display(); delay(2000); // fill the round rectangle oled.clearDisplay(); oled.fillRoundRect(0, 15, 60, 40, 8, WHITE); oled.display(); delay(2000); // draw circle oled.clearDisplay(); oled.drawCircle(20, 35, 20, WHITE); oled.display(); delay(2000); // fill circle oled.clearDisplay(); oled.fillCircle(20, 35, 20, WHITE); oled.display(); delay(2000); // draw triangle oled.clearDisplay(); oled.drawTriangle(30, 15, 0, 60, 60, 60, WHITE); oled.display(); delay(2000); // fill triangle oled.clearDisplay(); oled.fillTriangle(30, 15, 0, 60, 60, 60, WHITE); oled.display(); delay(2000); }

Arduino Mega Code – Display Image

To show a picture on an OLED screen, first turn the picture (any format) into a bitmap array. You can use this online tool https://javl.github.io/image2cpp/ to convert it. Look at the image below to see how to change a picture into a bitmap array. I turned the Arduino icon into a bitmap array.

image to bitmap array

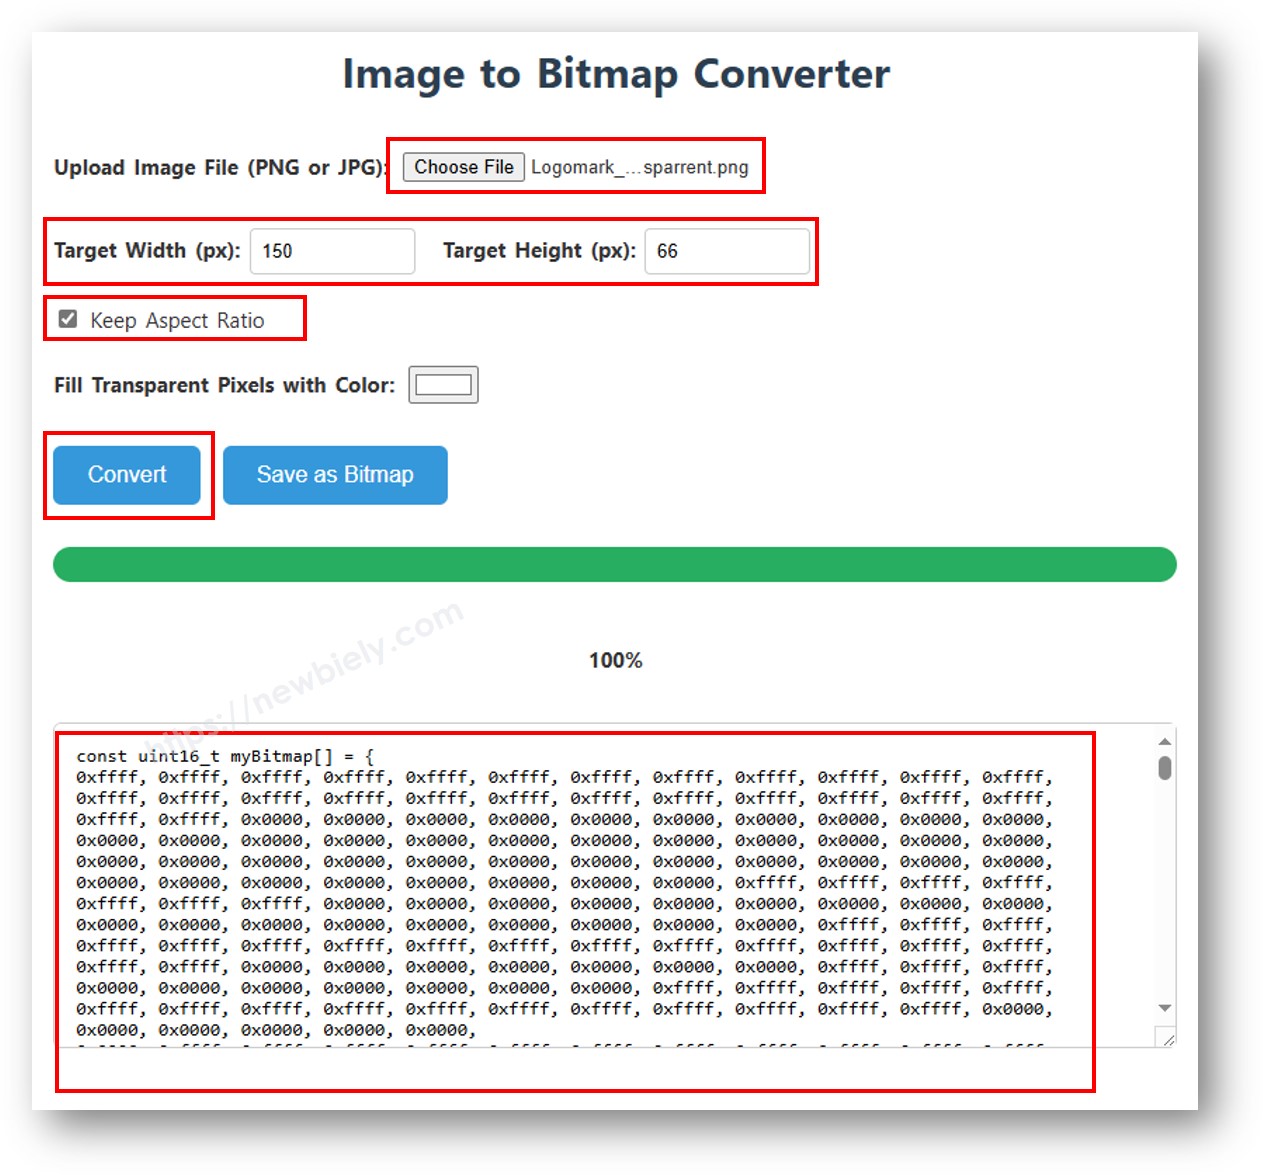
Copy the new array code and paste it into the Arduino icon array in the code below.

The video below shows how to do it with an OLED 128x64 display, an Arduino Uno, and the Arduino logo.

We can do it the same way to make it work with Arduino Mega and the 128x32 OLED. The code below displays the DIYables icon on the 128x32 OLED.

/* * This Arduino Mega code was developed by newbiely.com * * This Arduino Mega code is made available for public use without any restriction * * For comprehensive instructions and wiring diagrams, please visit: * https://newbiely.com/tutorials/arduino-mega/arduino-mega-oled-128x32-display */ #include <Wire.h> #include <Adafruit_GFX.h> #include <Adafruit_SSD1306.h> #define SCREEN_WIDTH 128 // OLED display width, in pixels #define SCREEN_HEIGHT 32 // OLED display height, in pixels // declare an SSD1306 display object connected to I2C Adafruit_SSD1306 oled(SCREEN_WIDTH, SCREEN_HEIGHT, &Wire, -1); // bitmap of DIYable-icon image int bitmap_width = 72; // MUST match to bitmap image size int bitmap_height = 32; // MUST match to bitmap image size const unsigned char bitmap_DIYables [] PROGMEM = { // 'DIYables Icon', 72x32 0x00, 0x0f, 0xff, 0xff, 0x8f, 0xf8, 0x07, 0x38, 0x07, 0x00, 0x0f, 0xff, 0xff, 0x8f, 0xfe, 0x07, 0x1c, 0x0e, 0x00, 0x0f, 0xff, 0xff, 0x8f, 0xff, 0x07, 0x1c, 0x1c, 0x00, 0x0f, 0xff, 0xff, 0x8e, 0x07, 0x87, 0x0e, 0x1c, 0x00, 0x0f, 0xff, 0xff, 0x8e, 0x03, 0xc7, 0x0f, 0x38, 0x00, 0x0f, 0xff, 0xff, 0x8e, 0x01, 0xc7, 0x07, 0x38, 0x00, 0x0f, 0xff, 0xff, 0x8e, 0x01, 0xc7, 0x03, 0xf0, 0xf0, 0x0f, 0xff, 0xff, 0x8e, 0x01, 0xc7, 0x03, 0xe0, 0xfc, 0x0f, 0xff, 0xff, 0x8e, 0x01, 0xc7, 0x01, 0xe0, 0xfe, 0x0f, 0xff, 0xff, 0x8e, 0x03, 0xc7, 0x01, 0xc0, 0xff, 0x8f, 0xff, 0xff, 0x8e, 0x03, 0x87, 0x01, 0xc0, 0xff, 0x8f, 0xff, 0xff, 0x8e, 0x0f, 0x87, 0x01, 0xc0, 0xff, 0xcf, 0xff, 0xff, 0x8f, 0xff, 0x07, 0x01, 0xc0, 0xff, 0xef, 0xff, 0xff, 0x8f, 0xfc, 0x07, 0x01, 0xc0, 0xff, 0xef, 0xff, 0xff, 0x80, 0x00, 0x00, 0x00, 0x00, 0xff, 0xff, 0xff, 0xff, 0x80, 0x00, 0x00, 0x00, 0x00, 0xff, 0xff, 0xff, 0xff, 0x80, 0x00, 0x00, 0x00, 0x00, 0xff, 0xff, 0xff, 0xff, 0x80, 0x00, 0x00, 0x00, 0x00, 0xff, 0xff, 0xff, 0xff, 0x8f, 0xff, 0xff, 0xff, 0xff, 0xff, 0xff, 0xff, 0xff, 0x8f, 0xff, 0xff, 0xff, 0xff, 0xff, 0xff, 0xff, 0xff, 0x0f, 0xfc, 0xfd, 0xff, 0xff, 0xff, 0xff, 0xff, 0xff, 0x0f, 0xfc, 0xfc, 0xff, 0xff, 0xff, 0xff, 0xff, 0xff, 0x0f, 0xfc, 0xfc, 0xff, 0xff, 0xff, 0xef, 0xff, 0xff, 0x0e, 0x0c, 0x0c, 0xc3, 0x07, 0xff, 0xef, 0xff, 0xfe, 0x0f, 0xec, 0xec, 0x99, 0x7f, 0xff, 0xef, 0xff, 0xfe, 0x0f, 0x04, 0xe4, 0x81, 0x0f, 0xff, 0xcf, 0xff, 0xfc, 0x0e, 0x32, 0xe4, 0x9f, 0xc7, 0xff, 0x8f, 0xff, 0xf8, 0x0e, 0x32, 0x4c, 0x9b, 0x67, 0xff, 0x0f, 0xff, 0xf0, 0x0e, 0x04, 0x0c, 0xc3, 0x0f, 0xfe, 0x0f, 0xff, 0xe0, 0x0f, 0xff, 0xff, 0xff, 0xff, 0xfc, 0x0f, 0xff, 0x80, 0x0f, 0xff, 0xff, 0xff, 0xff, 0xe0, 0x0f, 0xfc, 0x00, 0x0f, 0xff, 0xff, 0xff, 0xff }; void setup() { Serial.begin(9600); // initialize OLED display with address 0x3C for 128x32 if (!oled.begin(SSD1306_SWITCHCAPVCC, 0x3C)) { Serial.println(F("SSD1306 allocation failed")); while (true); } delay(2000); // wait for initializing } void loop() { oled.clearDisplay(); // display bitmap to the center int x = (SCREEN_WIDTH - bitmap_width) / 2; int y = (SCREEN_HEIGHT - bitmap_height) / 2; oled.drawBitmap(x, y, bitmap_DIYables, bitmap_width, bitmap_height, WHITE); oled.display(); delay(2000); }

※ NOTE THAT:

  • The image should fit the screen or be smaller.
  • If you want to use the code with an OLED 128x32, you need to resize the image and change the width and height in the oled.drawBitmap() function.

How to vertical and horizontal center align text/number on OLED

/* * This Arduino Mega code was developed by newbiely.com * * This Arduino Mega code is made available for public use without any restriction * * For comprehensive instructions and wiring diagrams, please visit: * https://newbiely.com/tutorials/arduino-mega/arduino-mega-oled-128x32-display */ #include <Wire.h> #include <Adafruit_GFX.h> #include <Adafruit_SSD1306.h> #define SCREEN_WIDTH 128 // OLED display width, in pixels #define SCREEN_HEIGHT 32 // OLED display height, in pixels Adafruit_SSD1306 oled(SCREEN_WIDTH, SCREEN_HEIGHT, &Wire, -1); // // create SSD1306 display object connected to I2C void setup() { Serial.begin(9600); // initialize OLED display with address 0x3C for 128x32 if (!oled.begin(SSD1306_SWITCHCAPVCC, 0x3C)) { Serial.println(F("SSD1306 allocation failed")); while (true); } delay(2000); // wait for initializing oled.clearDisplay(); // clear display oled.setTextSize(2); // text size oled.setTextColor(WHITE); // text color oled.setCursor(0, 10); // position to display } void loop() { // display string String text = "DIYables"; oledDisplayCenter(text); delay(2000); // display number int number = 21; String str = String(number); oledDisplayCenter(str); delay(2000); } void oledDisplayCenter(String text) { int16_t x1; int16_t y1; uint16_t width; uint16_t height; oled.getTextBounds(text, 0, 0, &x1, &y1, &width, &height); // display on horizontal and vertical center oled.clearDisplay(); // clear display oled.setCursor((SCREEN_WIDTH - width) / 2, (SCREEN_HEIGHT - height) / 2); oled.println(text); // text to display oled.display(); }

OLED Troubleshooting

If the OLED screen is blank, please follow these steps:

  • Make sure the wiring is correct.
  • Check that your I2C OLED uses an SSD1306 driver.
  • Check the I2C address of your OLED using the I2C Address Scanner code on the Arduino Mega board.
// I2C address scanner program #include <Wire.h> void setup() { Wire.begin(); Serial.begin(9600); Serial.println("I2C Scanner"); } void loop() { byte error, address; int nDevices; Serial.println("Scanning..."); nDevices = 0; for(address = 1; address < 127; address++ ) { Wire.beginTransmission(address); error = Wire.endTransmission(); if (error == 0) { Serial.print("I2C device found at address 0x"); if (address < 16) Serial.print("0"); Serial.print(address,HEX); Serial.println(" !"); nDevices++; } else if (error==4) { Serial.print("Unknown error at address 0x"); if (address < 16) Serial.print("0"); Serial.println(address,HEX); } } if (nDevices == 0) Serial.println("No I2C devices found"); else Serial.println("done"); delay(5000); // wait 5 seconds for next scan }

What you see on the Serial Monitor:

COM6
Send
Scanning... I2C device found at address 0x3C ! done Scanning... I2C device found at address 0x3C ! done
Autoscroll Show timestamp
Clear output
9600 baud  
Newline  

※ OUR MESSAGES

  • As freelancers, We are AVAILABLE for HIRE. See how to outsource your project to us
  • Please feel free to share the link of this tutorial. However, Please do not use our content on any other websites. We invested a lot of effort and time to create the content, please respect our work!