Arduino Mega - NeoPixel LED Strip
Ready to create amazing light displays with your Arduino Mega? You're in the perfect place! This tutorial will walk you through everything you need to know about controlling NeoPixel RGB LED strips with Arduino. Whether you're dreaming of colorful room lighting, mesmerizing art installations, or interactive costume elements, NeoPixel strips are your gateway to incredible LED projects.
The NeoPixel RGB LED strip is a truly remarkable piece of technology - it's a strip of individually addressable LEDs where you can control the color and brightness of each LED separately. Think of it like having a tiny computer inside each LED that listens to your commands! What makes this even more exciting is that you can control hundreds of LEDs using just a single Arduino Mega pin. This means less wiring complexity and more time for creativity.
In this comprehensive tutorial, we'll explore how to use Arduino Mega to control NeoPixel RGB LED strips step by step. Don't worry if you're new to Arduino Mega programming or working with LED strips - we'll guide you through each concept with clear explanations and practical examples. You'll learn how to create stunning color effects, control individual pixels, adjust brightness levels, and even build your own custom lighting patterns.
By the end of this tutorial, you'll have the knowledge and confidence to create your own amazing NeoPixel projects. From simple color-changing strips to complex animated displays, the possibilities are truly endless. Let's dive in and bring some brilliant colors to life!
Hardware Preparation
Or you can buy the following kits:
| 1 | × | DIYables Sensor Kit (18 sensors/displays) |
Additionally, some of these links are for products from our own brand, DIYables .
Overview of NeoPixel RGB LED Strip
NeoPixel RGB LED strips are intelligent addressable LED strips that revolutionize how we create lighting projects. Think of them as a chain of tiny, smart lights where each LED (called a "pixel") contains its own controller chip. This means you can tell each individual LED exactly what color to display and how bright to shine, all while using just one data wire from your Arduino Mega.
What makes NeoPixel strips so amazing is their simplicity combined with incredible capability. Each pixel contains red, green, and blue LEDs that can mix to create over 16 million different colors. The built-in controller chip (usually WS2812B) handles all the complex timing and color mixing, so you don't have to worry about the technical details. You simply send color commands, and the strip does the rest!
These strips are perfect for beginners because they eliminate the need for complex multiplexing circuits or multiple control pins. Whether you're building ambient lighting for your room, creating wearable tech projects, or designing interactive art installations, NeoPixel strips provide professional-quality results with beginner-friendly simplicity. The strips come in various lengths, pixel densities, and form factors, making them incredibly versatile for any project you can imagine.
The Arduino Mega is an excellent choice for NeoPixel projects because it has plenty of memory for storing complex animation patterns and multiple pins for controlling several strips simultaneously. Plus, its 5V logic level matches perfectly with NeoPixel requirements, ensuring reliable communication between your Arduino Mega and the LED strip.
Pinout
Let's take a look at the NeoPixel strip pinout - don't worry, it's simpler than it looks! Understanding these three connections is key to getting your project working smoothly, and once you see how straightforward it is, you'll wonder why you were ever worried about it.
- GND pin: This is the ground connection pin. Connect this to the GND (ground) pin on your Arduino Mega to complete the electrical circuit. Think of this as the "return path" for electricity - every electronic project needs this connection to work properly.
- VCC pin: This is the power supply pin that provides energy to light up your LEDs. Connect this to a 5V external power supply (not directly to Arduino's 5V pin for longer strips). NeoPixel strips can be quite power-hungry, especially when displaying bright white colors, so proper power supply is crucial for reliable operation.
- Din pin: This is the data input pin where the magic happens! This receives the control signals from your Arduino Mega that tell each LED what color to display. Connect this to any digital pin on your Arduino Mega - we'll use pin 4 in our examples.
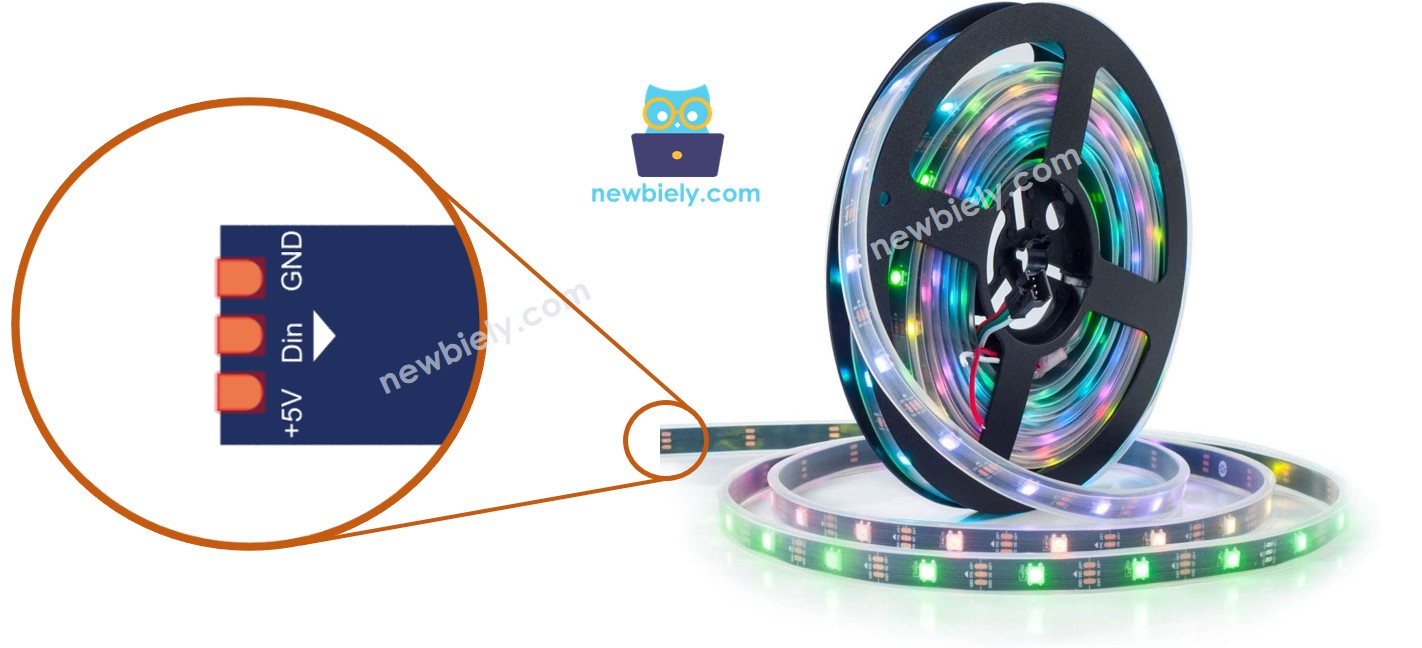
Here's a helpful tip to avoid confusion: the data signal travels in one direction along the strip. If your strip has both Din (data in) and Dout (data out) connections, make sure you're connecting to the Din end - this is where your signal enters the strip. Some strips also have arrows printed on them showing the data direction.
Common Beginner Mistake to Avoid: Don't forget that longer NeoPixel strips need external power! While a few LEDs can run off Arduino's power, longer strips will either dim significantly or not work at all without proper external power supply.
※ NOTE THAT:
The order of pins can vary between manufacturers. ALWAYS use the labels printed on the LED Strip.
Wiring Diagram
Now let's connect everything together! The wiring diagram below shows the proper way to connect your NeoPixel RGB LED strip to your Arduino Mega. Take your time with the connections - getting this right is important for both functionality and safety.
Important Safety Note: You'll notice we're using a 1000uF capacitor and a 470Ω resistor in our setup. The capacitor helps smooth out power delivery to prevent voltage spikes that could damage your LEDs, while the resistor protects the first pixel's data input from potential signal issues. These components are especially important when working with longer strips or when switching colors rapidly.
When working with NeoPixel strips, always remember that they can draw significant current, especially when displaying bright white colors. A strip of 30 LEDs can potentially draw up to 1.8 amps at full brightness! This is why we use an external 5V power adapter rather than trying to power the strip directly from the Arduino.
This image is created using Fritzing. Click to enlarge image
Here's how everything connects together:
| NeoPixel Strip Pin | Arduino Mega Pin | Notes |
|---|---|---|
| GND | GND | Ground connection for the strip |
| Din | Pin 2 | Data signal (through 470Ω resistor) |
| VCC | External 5V Power Supply | Never use Arduino's 5V for long strips |
| Capacitor + | 5V Power Supply + | Place near the strip's power connection |
| Capacitor - | GND | Helps stabilize power delivery |
How To Program For NeoPixel RGB LED Strip
Now for the fun part - let's bring this project to life with code! Don't worry if you're new to programming; we'll walk through everything step by step. The NeoPixel library makes controlling LED strips surprisingly straightforward, and the code examples below will show you exactly how to create beautiful lighting effects.
Programming NeoPixel strips involves a few key concepts that are easier to understand than you might think. We'll start by setting up the strip, then learn how to control colors and brightness, and finally put it all together to create amazing effects. Remember, it's perfectly okay if some concepts take time to sink in - that's how we all learn!
Here are the essential programming steps for working with NeoPixel LED strips:
Setting Up Your NeoPixel Strip:
First, we need to tell Arduino Mega about our LED strip and create a way to communicate with it:
This code creates a "NeoPixel object" - think of it as creating a remote control for your LED strip. We tell it which Arduino Mega pin we're using (pin 4), how many LEDs are on our strip (30), and what type of strip we have.
Initializing the NeoPixel Strip:
Before we can control any LEDs, we need to initialize (start up) our strip:
This is like turning on the remote control - it prepares everything for communication with your LED strip.
Setting Individual LED Colors:
Here's where the magic happens! You can set the color of each individual LED (called a "pixel") on your strip:
This command tells a specific pixel what color to display. The numbers (255, 0, 0) represent Red, Green, and Blue values from 0-255. In this example, we're setting maximum red (255) with no green (0) or blue (0), creating a bright red color.
Controlling Strip Brightness:
You can easily adjust the brightness of your entire LED strip:
This is perfect for creating mood lighting or saving power. A value of 0 means completely dark, while 255 gives you maximum brightness.
※ NOTE THAT:
- NeoPixel.setBrightness() affects all pixels on the LED strip at once. To set different brightness levels for individual pixels, you can scale the color values instead (for example, use 128 instead of 255 for half brightness).
- Remember that color and brightness changes set by NeoPixel.setBrightness() and NeoPixel.setPixelColor() only take effect when you call NeoPixel.show() - think of this as pressing "send" to update your strip!
Arduino Mega Code
Let's put everything together with a complete example! The code below creates a beautiful light show that demonstrates the key concepts of NeoPixel programming. Don't worry if it looks complex at first - we'll break down what's happening so you can understand each part.
This Arduino Mega sketch does several exciting things:
- Turns pixels to green one by one with a delay between each pixel (creating a "chase" effect)
- Turns off all pixels for two seconds (giving a dramatic pause)
- Turns on all pixels to red at the same time for two seconds (creating a bright flash effect)
- Repeats the entire sequence infinitely for continuous entertainment
Detailed Instructions
First time working with Arduino? We recommend checking out our Arduino Mega Getting Started guide - it'll help everything make sense!
- Install the NeoPixel Library: Navigate to the Libraries icon on the left bar of the Arduino IDE. This is where you'll find all the special code libraries that make working with components like NeoPixel strips much easier.
- Search for Adafruit NeoPixel: In the library manager, search for "Adafruit NeoPixel", then find the NeoPixel library by Adafruit. This library contains all the special functions that make controlling NeoPixel strips simple and fun.
- Install the Library: Click the Install button to install the NeoPixel library. This might take a moment, but once it's done, you'll have access to all the NeoPixel functions we use in our code.
- Upload Your Code: Copy the code from above and open it with Arduino IDE. Take your time to look through the code - you don't need to understand everything right away, but it's good to get familiar with the structure.
- Upload to Arduino: Click the Upload button on Arduino IDE to upload the code to your Arduino Mega. You'll see some lights flashing on your Arduino Mega board during the upload process - this is completely normal!
- Watch the Magic: Once the upload is complete, watch your LED strip come to life! You should see the green chase effect followed by the red flash pattern. If something doesn't work right away, don't worry - double-check your wiring and make sure your power supply is connected properly.
- Experiment and Have Fun: Once you see the basic pattern working, try modifying the colors or timing in the code. Change the delay values to make effects faster or slower, or try different color combinations. This is the best way to learn!
Pro Tip: Start with lower brightness values when testing your strip - it's easier on your eyes and uses less power. You can always increase the brightness once everything is working perfectly!
※ NOTE THAT:
For any complicated LED effect, we offer the paid programming service
Application Ideas
Application Ideas: Now that you've mastered the basics, your creativity is the only limit! Here are some exciting project ideas to get you started and inspire your next creation:
You could create ambient room lighting that changes colors based on the time of day or your mood, build a sound-reactive display that pulses and dances to your favorite music, or set up stair lighting that illuminates each step as you walk up or down. For the more adventurous makers, consider building a wearable LED costume for parties or cosplay events, creating a weather display that shows current conditions through colors (blue for cold, red for hot, flashing for storms), or designing an interactive art installation that responds to motion sensors.
The possibilities extend even further with gaming applications - imagine LED strips that react to your game status, holiday decorations with custom animation patterns for different seasons, aquarium lighting that mimics natural day/night cycles, or even a notification system that displays different colors for emails, messages, or calendar events. You could also create exercise equipment lighting that motivates your workouts, photography lighting for perfect shots, or party lighting that creates an amazing atmosphere for gatherings.
What will you build first? Remember, every expert started exactly where you are now, so don't be afraid to experiment and try new things!
Challenge Yourself
Challenge Yourself: Ready to take your NeoPixel skills to the next level? Try these fun challenges that will help you grow as a maker and programmer:
Easy Challenges (Perfect for building confidence):
- Change the colors in the example code - try purple, orange, or cyan instead of red and green
- Modify the delay times to make the chase effect faster or slower
- Create a simple color fade between two colors of your choice
Medium Challenges (Time to combine concepts):
- Add a potentiometer to control the brightness of your strip in real-time
- Create a "rainbow" effect that cycles through all colors smoothly
- Build a simple color mixer using three buttons for red, green, and blue
- Add a temperature sensor and change strip colors based on room temperature
Advanced Challenges (For the ambitious makers):
- Create a sound-reactive display using a microphone sensor that pulses with music
- Build a clock display using different colored segments for hours, minutes, and seconds
- Design a motion-activated stair lighting system with smooth animations
- Combine multiple NeoPixel strips to create a large LED matrix display
Start with the easy ones and work your way up - there's no rush! Don't worry if you get stuck on the advanced challenges; that's exactly how we learn and grow. Each challenge will teach you something new and bring you closer to becoming a true NeoPixel master. The Arduino Mega community is incredibly helpful, so don't hesitate to ask questions and share your creations!