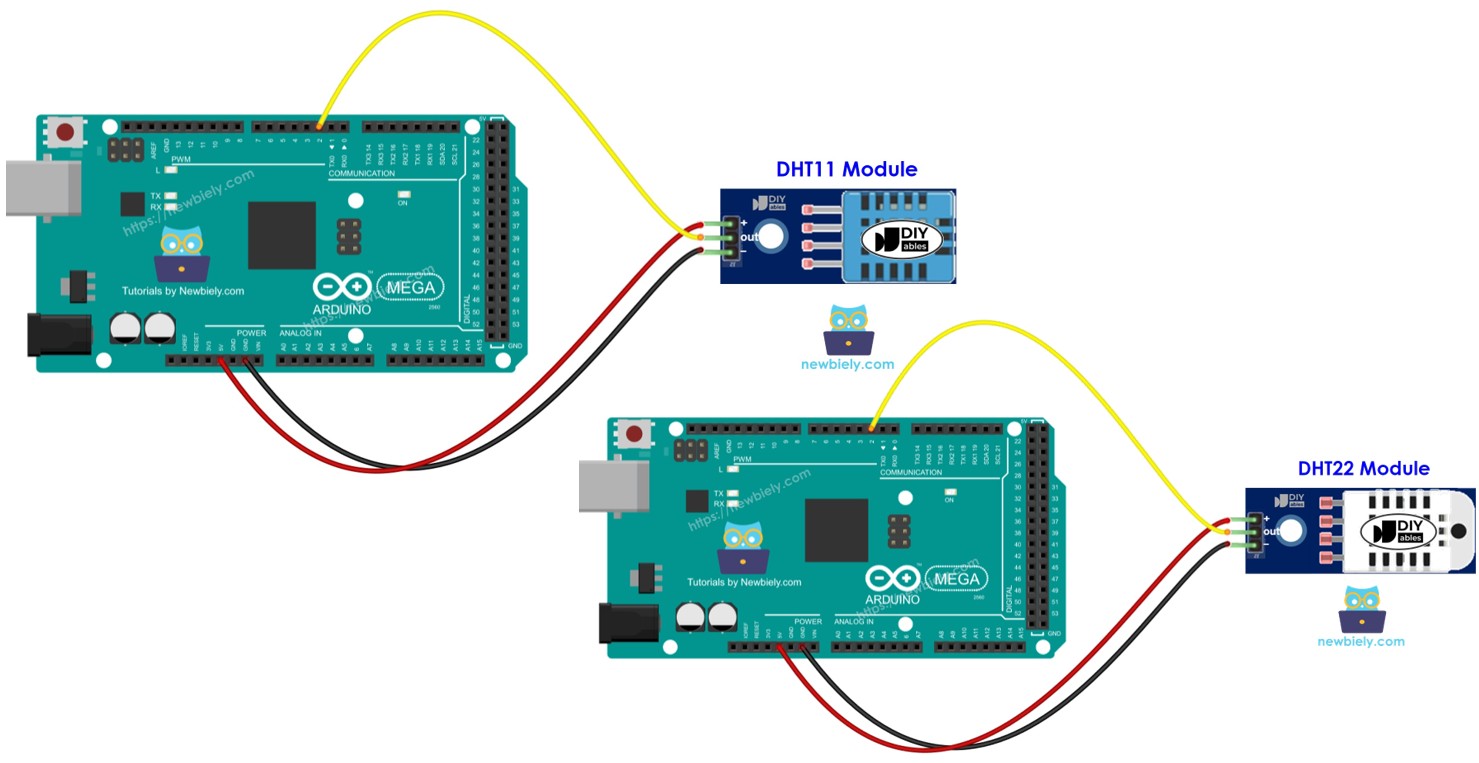
Arduino Mega - Temperature Humidity Sensor
Ready to learn about temperature and humidity monitoring with Arduino? You're in the perfect place! This comprehensive Arduino Mega DHT11 and DHT22 tutorial will walk you through everything you need to know to start measuring environmental conditions like a pro. Whether you're building a weather station, creating a home automation system, or just exploring the fascinating world of Arduino Mega sensors, this guide has you covered.
Temperature and humidity sensors are among the most popular and useful components in the Arduino Mega ecosystem, and for good reason! These versatile DHT sensors open up a world of possibilities for environmental monitoring projects. In this tutorial, we'll explore both the budget-friendly DHT11 and the more precise DHT22 sensors, showing you exactly how to wire them up, program them, and get accurate readings every time.
Don't worry if you're new to Arduino Mega programming or sensor interfacing - we'll take everything step by step, explaining not just what to do, but why we're doing it. You'll learn the key differences between DHT11 and DHT22 sensors, master the wiring techniques, understand the code structure, and discover practical applications that will inspire your next project.
In this tutorial, we are going to learn:
- The differences between DHT11 and DHT22 temperature and humidity sensor
- How to read temperature and humidity value from DHT11 using Arduino
- How to read temperature and humidity value from DHT22 using Arduino
- Best practices for reliable sensor readings and troubleshooting common issues
- Creative project ideas to put your new skills to work
If you only want to get temperature, we recommend using a waterproof DS18B20 temperature sensor instead. It is an inexpensive and neat sensor. You can put it in hot or cold water. However, if you need both temperature AND humidity measurements, the DHT sensors we're covering today are your best bet for accuracy and affordability.
Hardware Preparation
Or you can buy the following kits:
| 1 | × | DIYables Sensor Kit (18 sensors/displays) |
Additionally, some of these links are for products from our own brand, DIYables .
Overview of DHT11 and DHT22 Temperature and Humidity Sensor
DHT11 and DHT22 are digital temperature and humidity sensors that make environmental monitoring incredibly straightforward with your Arduino Mega projects. Think of them as your project's weather reporters - they continuously monitor the air around them and provide accurate digital readings that your Arduino Mega can easily understand and process.
These sensors are beloved by makers worldwide because they combine reliability, affordability, and ease of use in one compact package. Unlike analog sensors that require complex calibration, DHT sensors handle all the heavy lifting internally and communicate with your Arduino Mega using a simple one-wire digital protocol. This means fewer wires, less complexity, and more reliable readings for your projects.
What makes these sensors particularly appealing is their built-in calibration and digital output. Each sensor contains a dedicated NTC thermistor for temperature sensing and a humidity sensing component, plus a basic chip that performs analog-to-digital conversion and spits out a digital signal with the temperature and humidity data. This eliminates the need for you to handle complex analog calculations or worry about signal noise that can affect accuracy.
The key advantage of digital sensors like the DHT series is their immunity to electrical interference and their ability to maintain accuracy over long cable runs. Whether you're building a greenhouse monitor, a home weather station, or a smart home automation system, these sensors provide the reliability and precision you need for professional-quality results.
The commons between DHT11 and DHT22
- Pinouts are the same - you can use identical wiring for both sensors
- Wiring to Arduino Mega is the same - no need to learn different connection methods
- Programming (with a library) is similar (only one line of code is different)
- Both use the same communication protocol and timing requirements
- Both provide calibrated digital output for easy integration
- Both operate on the same voltage levels (3.3V or 5V compatible)
The differences between DHT11 and DHT22
Understanding the differences between DHT11 and DHT22 will help you choose the right sensor for your specific project needs. Here's a detailed comparison to guide your decision:
| DHT11 | DHT22 | |
|---|---|---|
| Price | ultra low cost | low cost |
| Temperature Range | 0°C to 50°C | -40°C to 80°C |
| Temperature Accuracy | ± 2°C | ± 0.5°C |
| Humidity Range | 20% to 80% | 0% to 100% |
| Humidity Accuracy | 5% | ± 2 to 5% |
| Reading Rate | 1Hz (once every second) | 0.5Hz (once every 2 seconds) |
| Body size | 15.5mm x 12mm x 5.5mm | 15.1mm x 25mm x 7.7mm |
| Operating Voltage | 3 to 5V | 3 to 5V |
As you can see, the DHT22 is significantly more accurate with a much wider operating range, making it ideal for precision applications or extreme environment monitoring. However, the DHT11 offers excellent value for basic projects where extreme accuracy isn't critical. The DHT22's slower reading rate (every 2 seconds vs every 1 second) is rarely a limitation for most environmental monitoring applications.
Pro Tip: For indoor home automation projects, the DHT11 is usually perfectly adequate and cost-effective. Choose the DHT22 when you need outdoor monitoring, laboratory precision, or operation in extreme temperature conditions.
Pinout
Let's take a look at the DHT sensor pinout - don't worry, it's simpler than it looks! Understanding these connections is key to getting your temperature and humidity monitoring project working smoothly, and once you see how straightforward it is, you'll feel confident tackling any DHT sensor project.
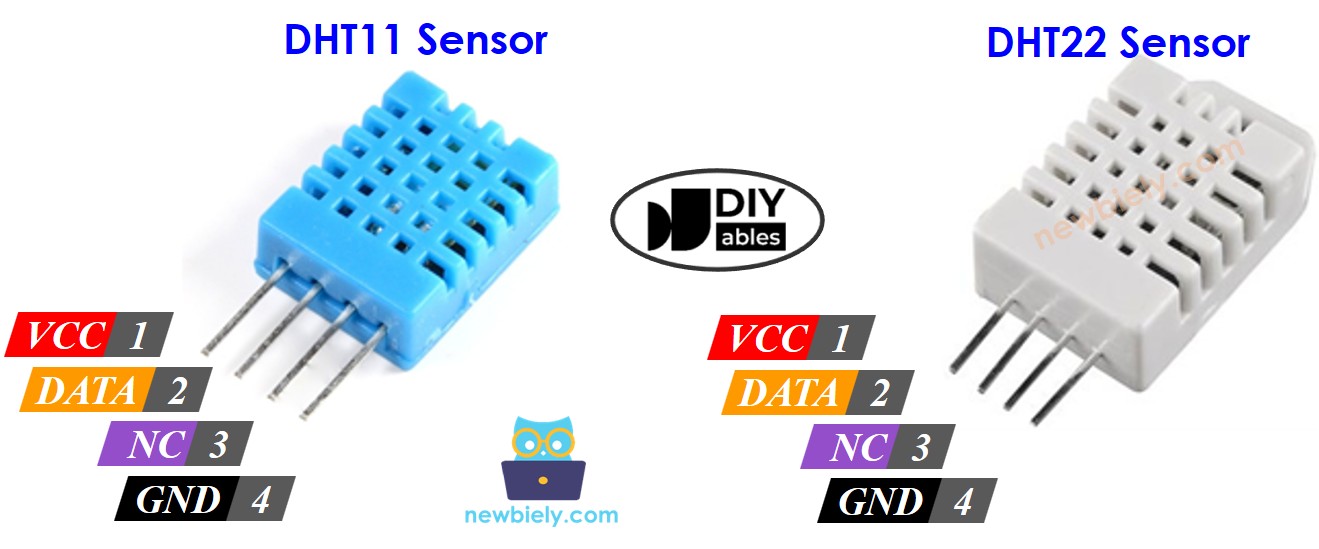
DHT11 and DHT22 sensor in original form have four pins:
- GND pin: This is the ground connection pin. Connect this to GND (0V) on your Arduino Mega to complete the electrical circuit and provide a reference point for all measurements.
- VCC pin: This is the power supply pin. Connect this to VCC (5V, or 3.3V) on your Arduino Mega to provide operating power to the sensor's internal circuitry.
- DATA pin: This is the communication pin. The sensor uses this single pin to send both temperature and humidity data to your Arduino Mega using a special one-wire digital protocol.
- NC pin: Not connected - this pin serves no function in the circuit. You can safely ignore this pin in your wiring.
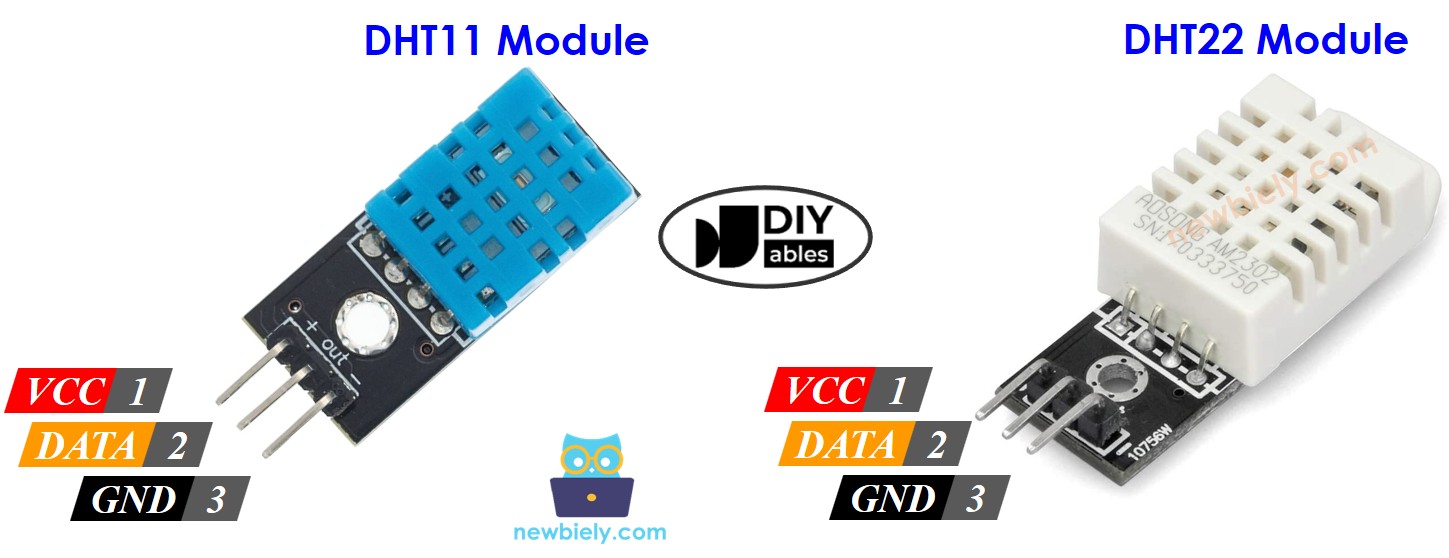
Some manufacturers provide DHT11 and DHT22 sensor in module form with three pins: GND, VCC and DATA pins (or alternatively: -, +, and OUT pins). The module format is often more convenient for breadboard prototyping since it eliminates the need for external pull-up resistors and provides clearly labeled connections.
A common beginner mistake is assuming all modules have the same pin order - always double-check the labels on your specific module before connecting power to avoid damaging your sensor.
※ NOTE THAT:
In module form, the order of the module's pins can vary between manufacturers. ALWAYS use the labels printed on the module. Look closely!
Wiring Diagram
Now let's connect your DHT sensor to your Arduino Mega - this is where your project starts coming to life! The great news is that wiring is identical for both DHT11 and DHT22 sensors, so once you learn one, you've mastered both.
When using the original sensor form (not the module), you'll need to include a pull-up resistor between 5kΩ to 10kΩ from the data line to VCC. This resistor ensures reliable communication by keeping the data line at a defined high voltage level when not actively transmitting data.
Important Safety Note: While these sensors are quite robust, always double-check your wiring before applying power. Connecting VCC to the wrong pin or reversing power connections can damage your sensor permanently.
Arduino Mega - DHT11 Sensor Wiring
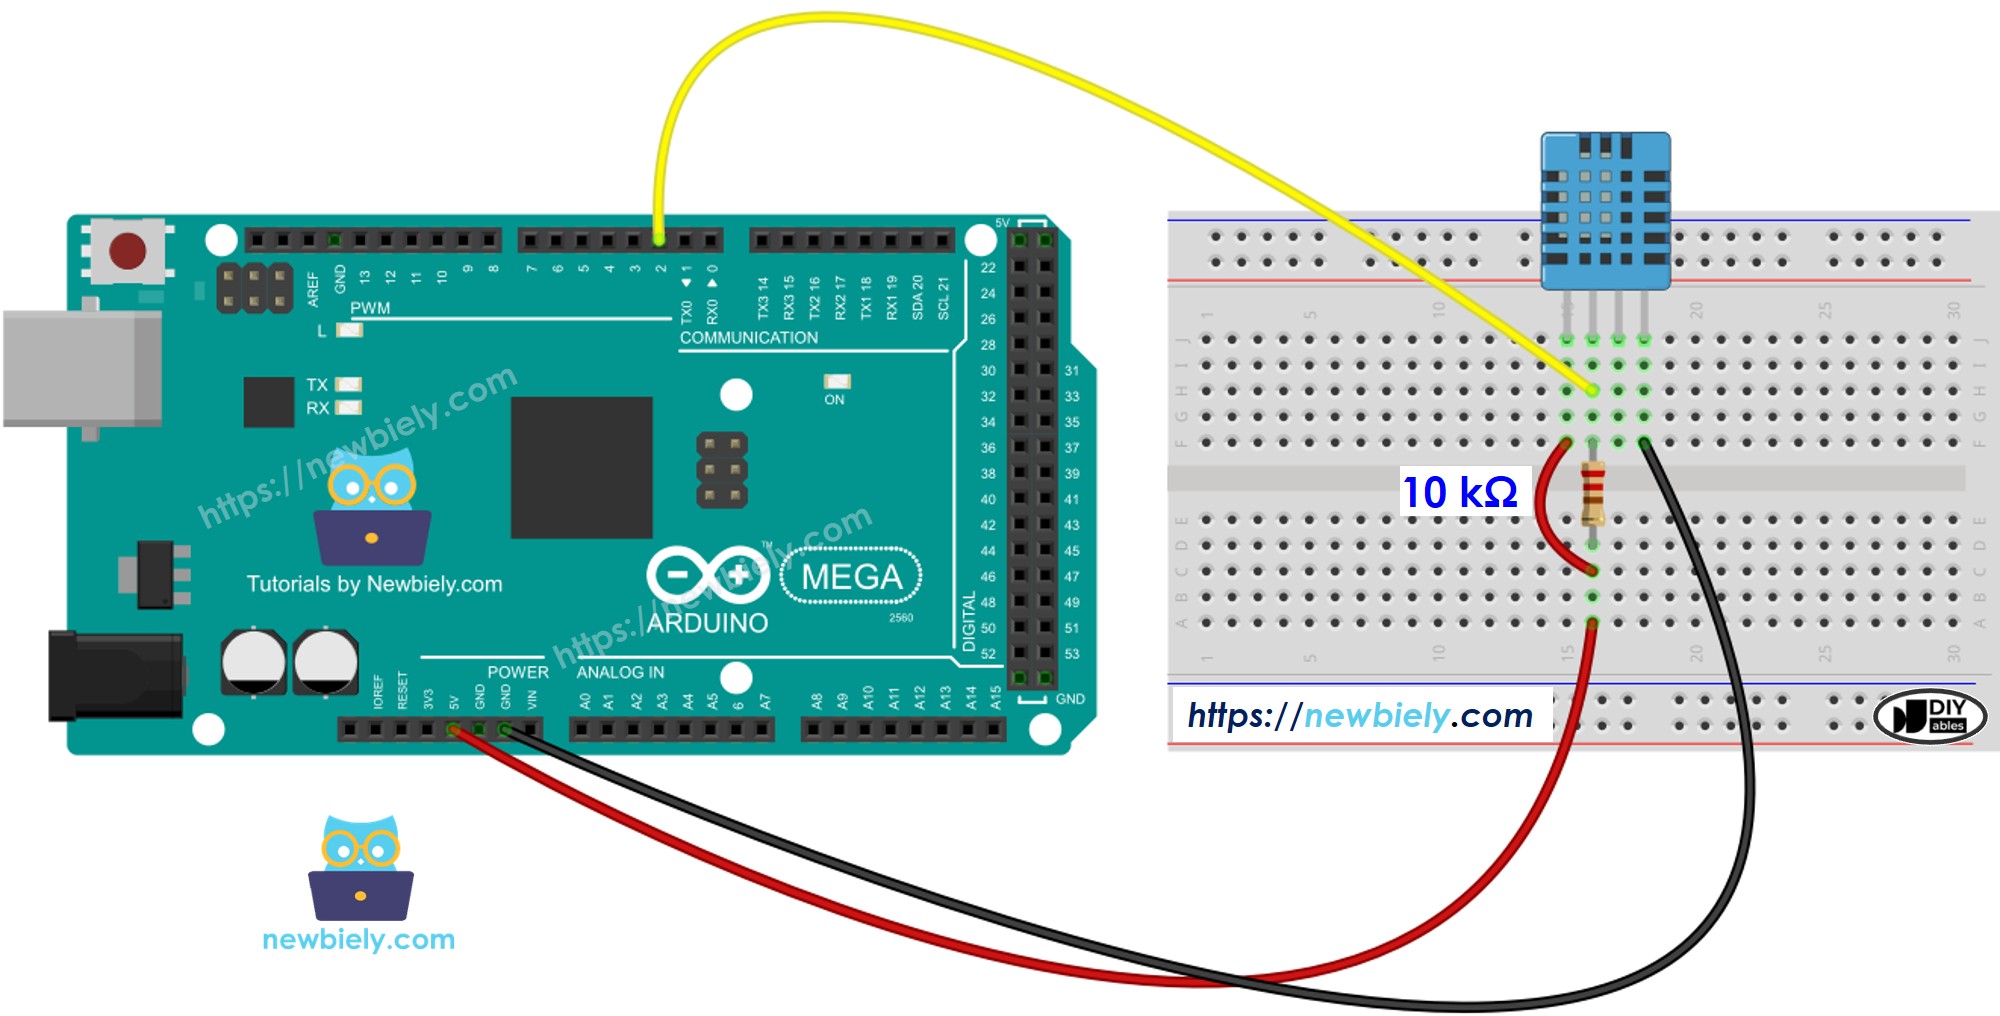
This image is created using Fritzing. Click to enlarge image
| DHT11 Pin | Arduino Mega Pin |
|---|---|
| GND | GND |
| VCC | 5V |
| DATA | Digital Pin 2 |
| NC | Not Connected |
| Pull-up Resistor | Between DATA and VCC (10kΩ) |
Arduino Mega - DHT22 Sensor Wiring

This image is created using Fritzing. Click to enlarge image
| DHT22 Pin | Arduino Mega Pin |
|---|---|
| GND | GND |
| VCC | 5V |
| DATA | Digital Pin 2 |
| NC | Not Connected |
| Pull-up Resistor | Between DATA and VCC (10kΩ) |
Arduino Mega - DHT11 Module Wiring
Most DHT11 sensor modules have a built-in pull-up resistor, so you don't need to add an external one. This saves you some wiring work and reduces the chance of connection errors - perfect for beginners!
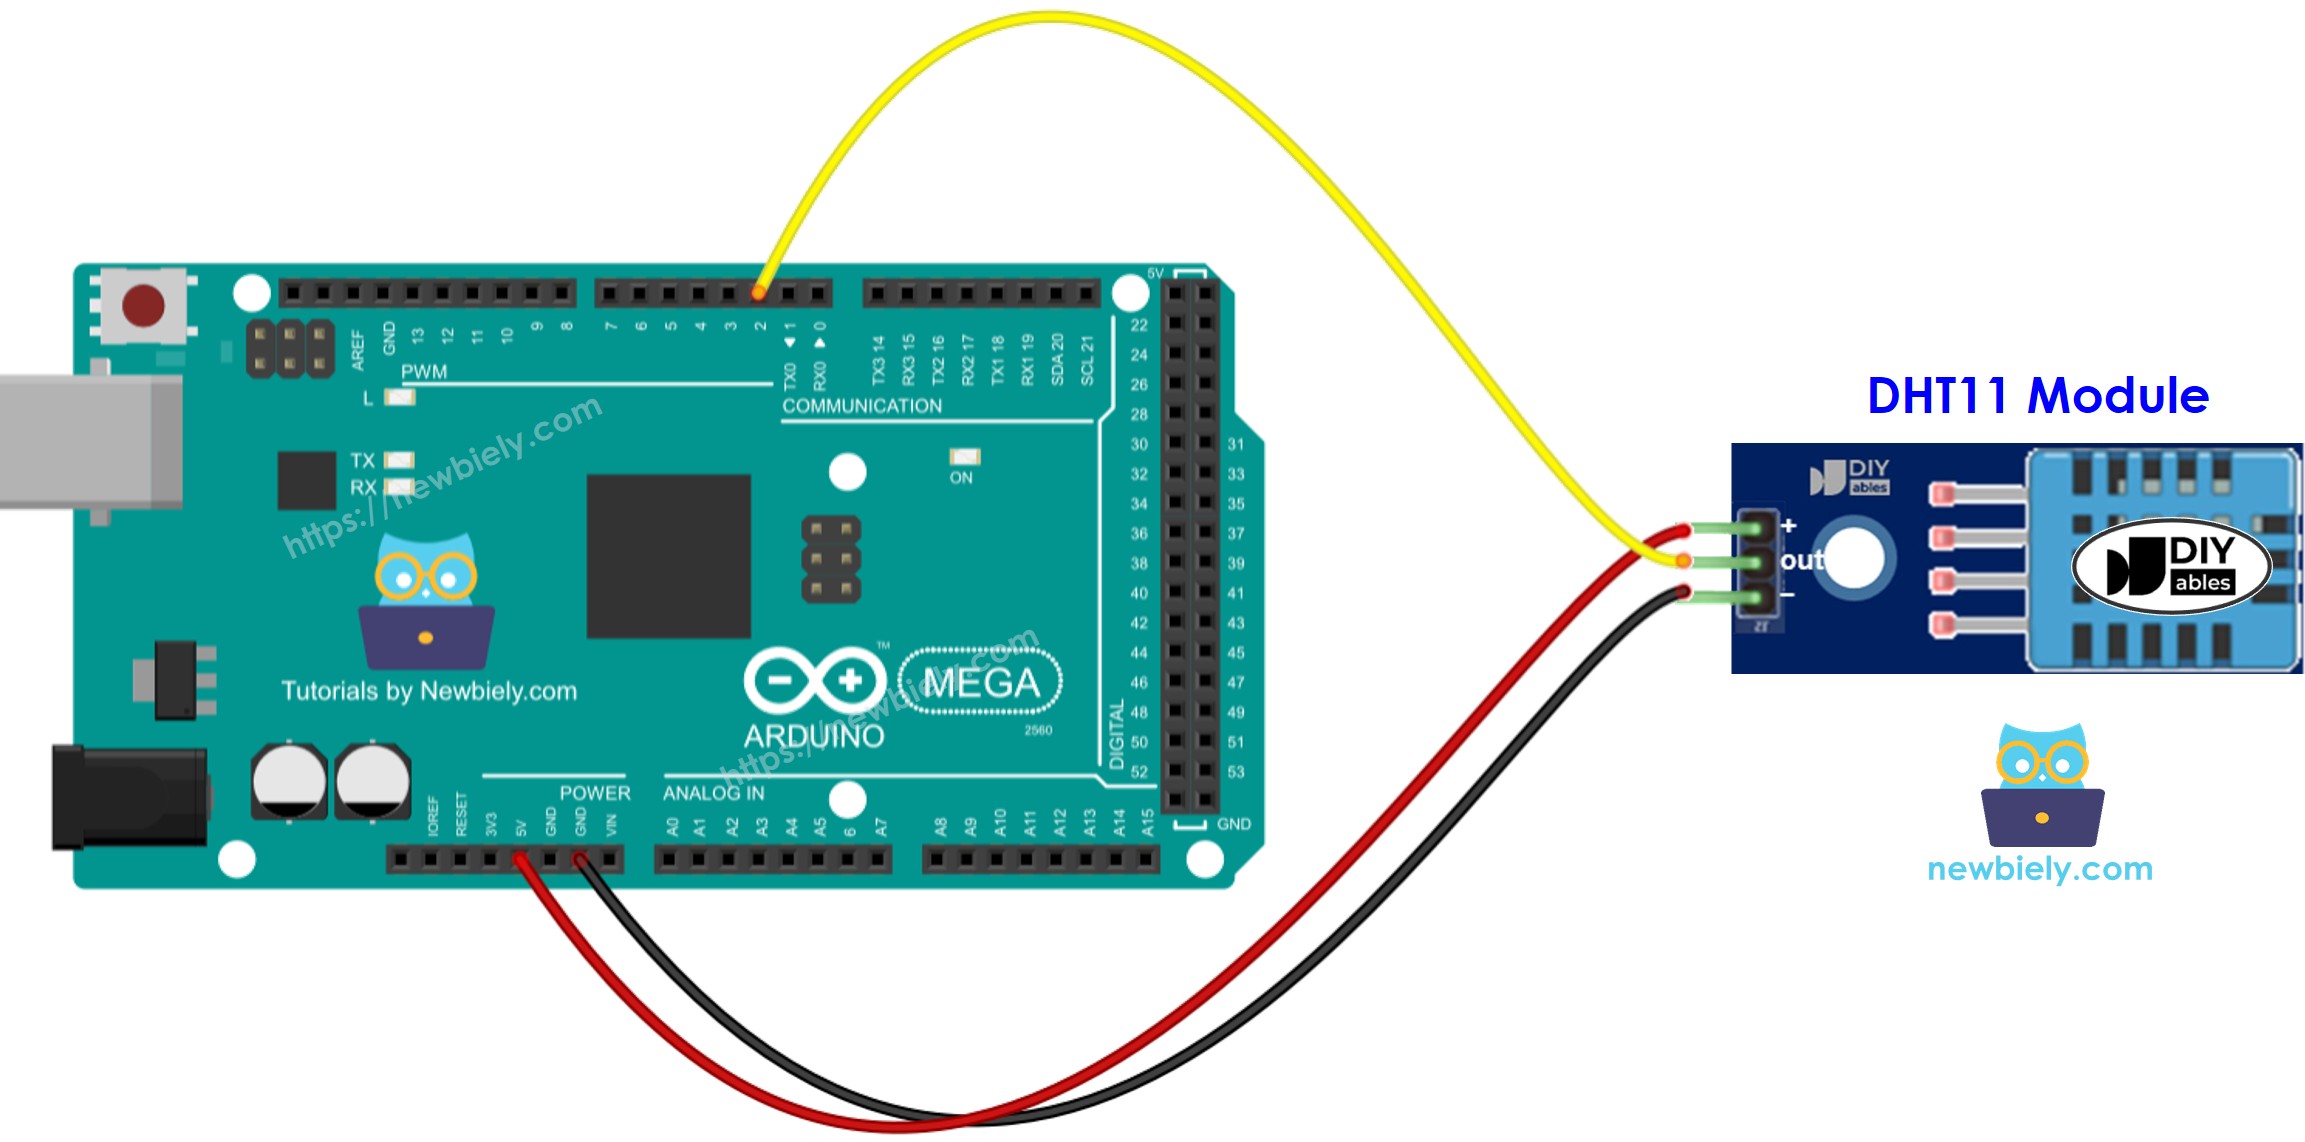
This image is created using Fritzing. Click to enlarge image
| DHT11 Module Pin | Arduino Mega Pin |
|---|---|
| GND (or -) | GND |
| VCC (or +) | 5V |
| DATA (or OUT) | Digital Pin 2 |
Arduino Mega - DHT22 Module Wiring
Most DHT22 sensor modules also have a built-in pull-up resistor, so you don't need to add an external one. This makes the module form especially convenient for quick prototyping and permanent installations.
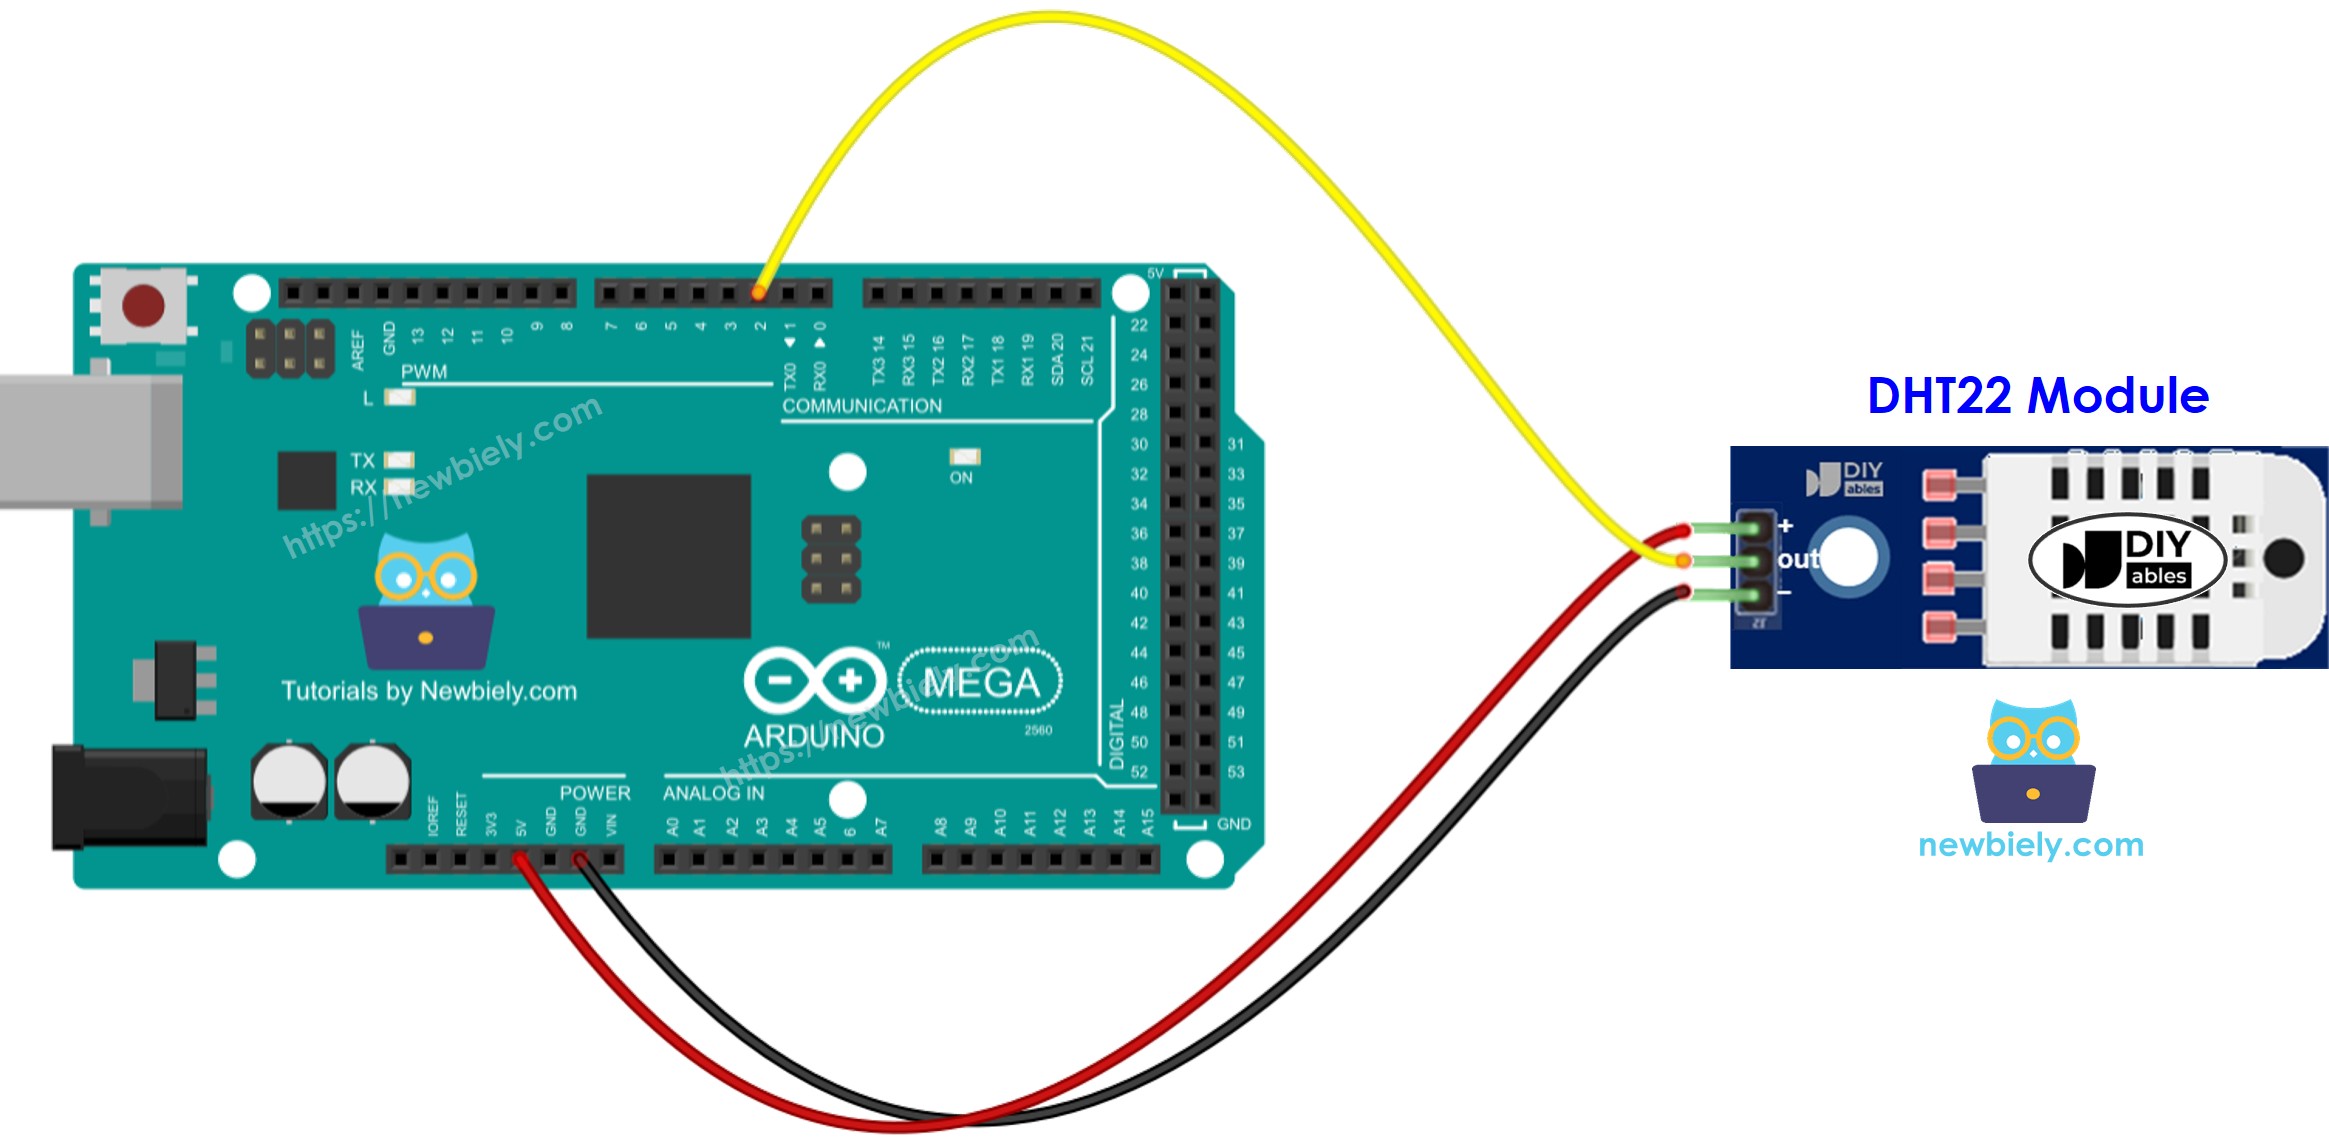
This image is created using Fritzing. Click to enlarge image
| DHT22 Module Pin | Arduino Mega Pin |
|---|---|
| GND (or -) | GND |
| VCC (or +) | 5V |
| DATA (or OUT) | Digital Pin 2 |
How To Program For DHTxx Temperature Sensor
Now for the exciting part - let's bring your temperature and humidity monitoring project to life with code! Don't worry if you're new to Arduino Mega programming; we'll walk through everything step by step, explaining each part so you understand not just what the code does, but how it works. The beauty of the DHT sensor library is that it handles all the complex communication protocols for you.
Programming for both DHT11 and DHT22 sensors is remarkably similar - there's literally just one line of code that differs between them! This means once you master one sensor, you've essentially mastered both. The Arduino Mega community has created excellent libraries that make working with these sensors as simple as calling a few functions.
Here's the basic structure for working with DHT sensors:
- Include the library:
- Define the Arduino Mega pin connected to DHT sensor:
- Define the sensor type: DHT11 or DHT22 (This is the different line of code)
or
- Declare DHT object:
- Initialize the sensor in your setup() function:
- Read humidity (returns percentage as a float):
- Read temperature in Celsius:
- Read temperature in Fahrenheit:
Pro Tip: Always check if your readings are valid using isnan() function to detect sensor errors or connection issues. This prevents your project from displaying confusing error values!
Arduino Mega Code - DHT11
Arduino Mega Code - DHT22
If you compare the two code examples above, you'll notice there's just one line different (line 11) - the sensor type definition! This demonstrates how versatile and consistent the DHT sensor family is for Arduino Mega projects.
Detailed Instructions
First time working with Arduino? We recommend checking out our Arduino Mega Getting Started guide - it'll help everything make sense and give you the confidence to tackle any Arduino Mega project!
- Connect Your Hardware: Wire your DHT sensor to your Arduino Mega following the diagrams above. Take your time with this step - solid connections are crucial for reliable readings, and double-checking now saves troubleshooting time later.
- Set Up Arduino IDE: Connect your Arduino Mega to your PC via USB cable and open Arduino IDE. Select the right board (Arduino Mega) and port from the Tools menu. If you're not sure which port, disconnect and reconnect the Arduino Mega to see which port appears.
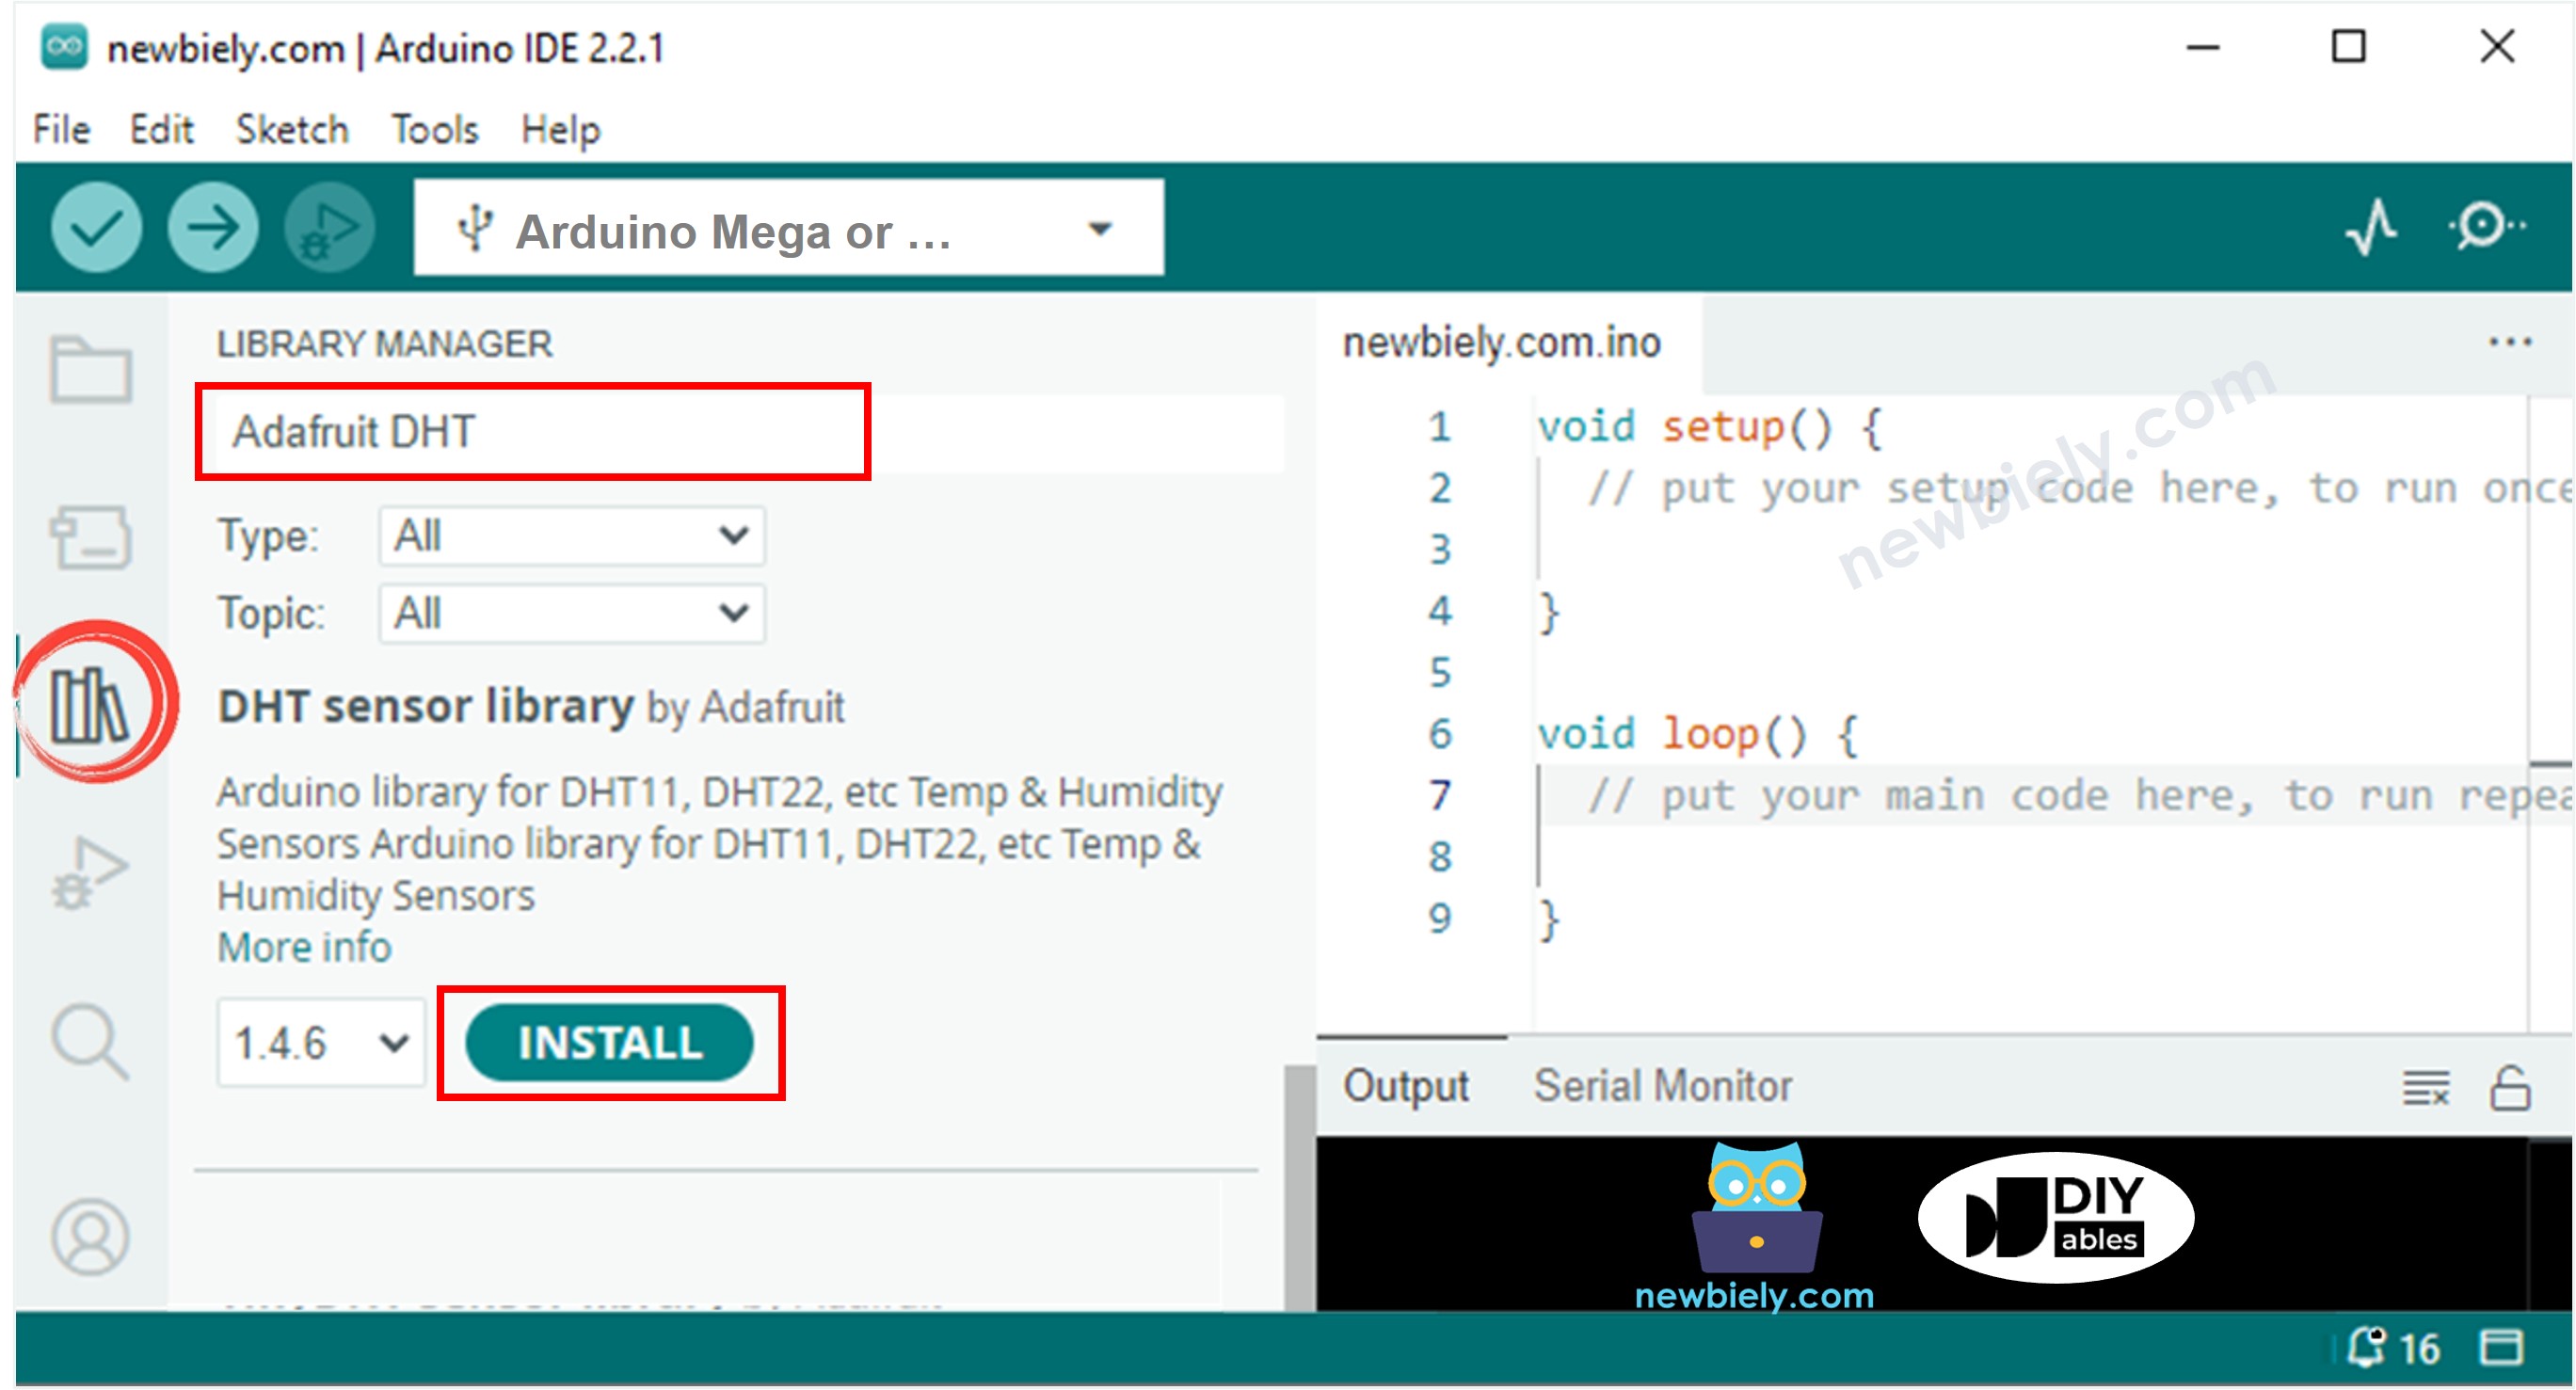
- Install Required Libraries: Navigate to the Libraries icon on the left bar of the Arduino IDE (it looks like a stack of books). This is where we'll add the DHT sensor library that makes programming so much easier.
- Search for DHT Library: Search for "DHT" in the library manager, then find the DHT sensor library by Adafruit. This is the most popular and reliable library for DHT sensors, trusted by makers worldwide.
- Install the Library: Click the Install button to install the DHT library. You're building your Arduino Mega toolkit with each library you add!
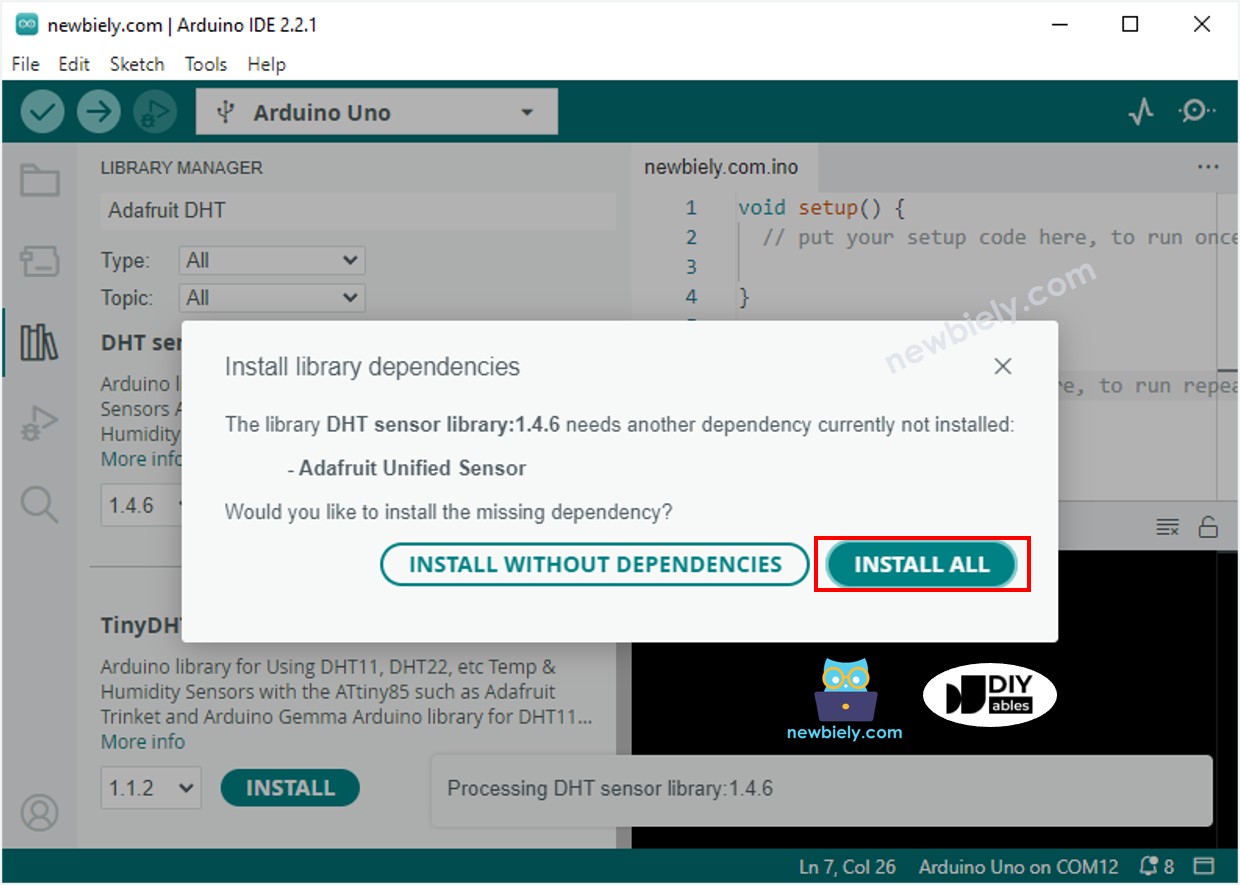
- Install Dependencies: You'll be prompted to install additional library dependencies (like the Adafruit Unified Sensor library). Click Install All to get everything you need - these supporting libraries work behind the scenes to make sensor communication smooth and reliable.
- Load Your Code: Copy the code example corresponding to your sensor type (DHT11 or DHT22) and paste it into a new Arduino IDE sketch. Feel free to modify the code as you learn - experimentation is how you'll become proficient!
- Upload and Test: Click the Upload button on Arduino IDE to transfer your code to the Arduino. Watch for the "Done uploading" message that confirms everything transferred successfully.
- Test Your Sensor: Try changing the environment around your sensor - breathe on it gently to add humidity and warmth, or place it near a cool surface. You should see the readings change, confirming your sensor is working perfectly.
- Monitor the Results: Open the Serial Monitor (Tools > Serial Monitor) to see your temperature and humidity readings updating in real-time. Almost there - you're now successfully monitoring environmental conditions!
Pro Tip: Keep the Serial Monitor open while testing different environmental conditions around your sensor. It's fascinating to see how quickly and accurately these sensors respond to changes in temperature and humidity!
Application Ideas: Now that you've mastered the basics of Arduino Mega temperature and humidity sensing, your creativity is the only limit! Here are some inspiring project ideas to get you started: You could create a smart home climate monitor that alerts you when rooms get too humid, build an automated greenhouse controller that maintains perfect growing conditions, set up a weather station that logs data over time, develop a bathroom ventilation fan controller that turns on automatically when humidity rises, create a wine cellar monitor for optimal storage conditions, or even build a smart terrarium that maintains perfect conditions for your plants. What will you build first?
These sensors are perfect for IoT projects too - imagine sending your environmental data to the cloud for remote monitoring, or integrating with home automation systems to create intelligent climate control. The possibilities are endless when you combine reliable sensor data with creative programming!
Challenge Yourself: Ready to take your Arduino Mega temperature and humidity sensing skills to the next level? Try these fun challenges to expand your knowledge:
Easy Level: Start with simple modifications to build your confidence: Change the reading interval by adjusting the delay time, add LED indicators that light up when temperature or humidity exceeds certain thresholds, or modify the code to display only Fahrenheit temperatures. These small changes help you understand how the code works!
Medium Level: Combine concepts and add new features: Add an LCD display to show readings without needing a computer, create a data logger that stores readings to an SD card over time, build a simple alarm system that buzzes when conditions go outside your set ranges, or add push buttons to manually trigger readings and cycle through different display modes.
Advanced Level: Create something entirely new and impressive: Build a complete weather station with multiple sensors and web connectivity, design an automated ventilation system that responds to humidity levels, create a greenhouse automation system with temperature-controlled heating and humidity-controlled watering, or develop a smart home integration that communicates with other Arduino Mega devices throughout your house.
Start with the easy challenges and work your way up - don't worry if you get stuck, that's exactly how we learn and grow as makers! Each challenge completed makes you more confident and creative with your Arduino Mega projects.