Arduino Mega - WS2812B LED Strip
Ready to create stunning light displays with your Arduino? You're in the perfect place! This WS2812B LED strip tutorial will walk you through everything you need to know to build amazing RGB lighting projects that respond to your every command.
WS2812B RGB LED strips are absolutely incredible for Arduino Mega projects - imagine having complete control over dozens of colorful LEDs with just a single Arduino Mega pin! Whether you're dreaming of creating ambient room lighting, building a mesmerizing art installation, or adding dynamic effects to your next project, this guide will get you there step by step.
In this comprehensive tutorial, we'll explore how your Arduino Mega can control every aspect of a WS2812B LED strip. You'll learn to change the color of each individual LED, adjust brightness levels, and create smooth animations that will impress everyone who sees them. Think of it like having a programmable rainbow at your fingertips - each LED can display any color you want, exactly when you want it.
What makes this tutorial special is how we'll break everything down into easy-to-understand pieces. Don't worry if you're new to working with LED strips or Arduino Mega programming - by the end of this guide, you'll have the confidence and knowledge to create your own custom lighting effects. The possibilities are truly endless: holiday decorations that dance to music, gaming setups with reactive lighting, or even wearable tech projects that light up the night!
Hardware Preparation
Or you can buy the following kits:
| 1 | × | DIYables Sensor Kit (18 sensors/displays) |
Additionally, some of these links are for products from our own brand, DIYables .
Overview of WS2812B RGB LED Strip
The WS2812B RGB LED strip is a fantastic addressable LED strip that gives you incredible control over individual LEDs with minimal wiring complexity. Think of it like having a string of smart bulbs - each LED contains its own tiny controller chip that can receive and process color commands independently. This means you can create rainbow patterns, chasing effects, or even display simple animations all from a single Arduino Mega pin!
What makes WS2812B strips so popular among makers is their "addressable" nature. Unlike traditional LED strips where all LEDs show the same color, each LED (called a "pixel") on a WS2812B strip can display a completely different color and brightness level. The strip uses a clever daisy-chain communication protocol where your Arduino Mega sends data to the first LED, which then passes along information to the next LED, and so on down the line.
These strips are incredibly versatile and come in various densities - from 30 LEDs per meter for subtle accent lighting to 144 LEDs per meter for dense, smooth color gradients. The individual LEDs are capable of displaying over 16 million different colors by combining red, green, and blue light at different intensities. They operate at 5V DC and each LED can draw up to 60mA when displaying bright white, which is why we need that external power supply for longer strips.
The beauty of working with WS2812B strips lies in their simplicity - despite the complex effects they can create, they require just three connections: power, ground, and a single data line to your Arduino. This makes them perfect for beginners who want impressive results without getting overwhelmed by complicated wiring diagrams.
Pinout
Let's take a look at the pinout - don't worry, it's simpler than it looks! Understanding these three connections is key to getting your LED strip working smoothly, and once you see how straightforward it is, you'll wonder why you were ever worried.
The WS2812B RGB LED Strip has three pins:
- GND pin: This is the ground connection pin. Connect this to GND (0V) on your power supply and Arduino Mega to complete the electrical circuit - think of it as the return path for electricity.
- VCC pin: This is the power input pin. Connect this to the positive terminal of your 5V external power supply. This provides the energy needed to light up all those colorful LEDs.
- Din pin: This is the data input pin that receives control signals from your Arduino. This single pin carries all the color and timing information for every LED on your entire strip - pretty amazing when you think about it!
The connection logic is beautifully simple: your Arduino Mega sends digital color data through the Din pin, while the external power supply provides the electrical energy through VCC and GND. Each LED reads the data intended for it, displays that color, and passes the remaining data down to the next LED in the chain.
A common beginner mistake is trying to power the strip directly from the Arduino's 5V pin - this works for very short strips with just a few LEDs, but longer strips need more current than your Arduino Mega can safely provide. That's why we use an external power supply for reliable, bright lighting effects.
※ NOTE THAT:
The order of pins can vary between manufacturers. ALWAYS use the labels printed on the LED Strip.
Wiring Diagram
Now let's connect everything together! The wiring diagram below shows the recommended approach for safely powering and controlling your WS2812B LED strip. Take your time studying the connections - getting the wiring right is crucial for a successful project.
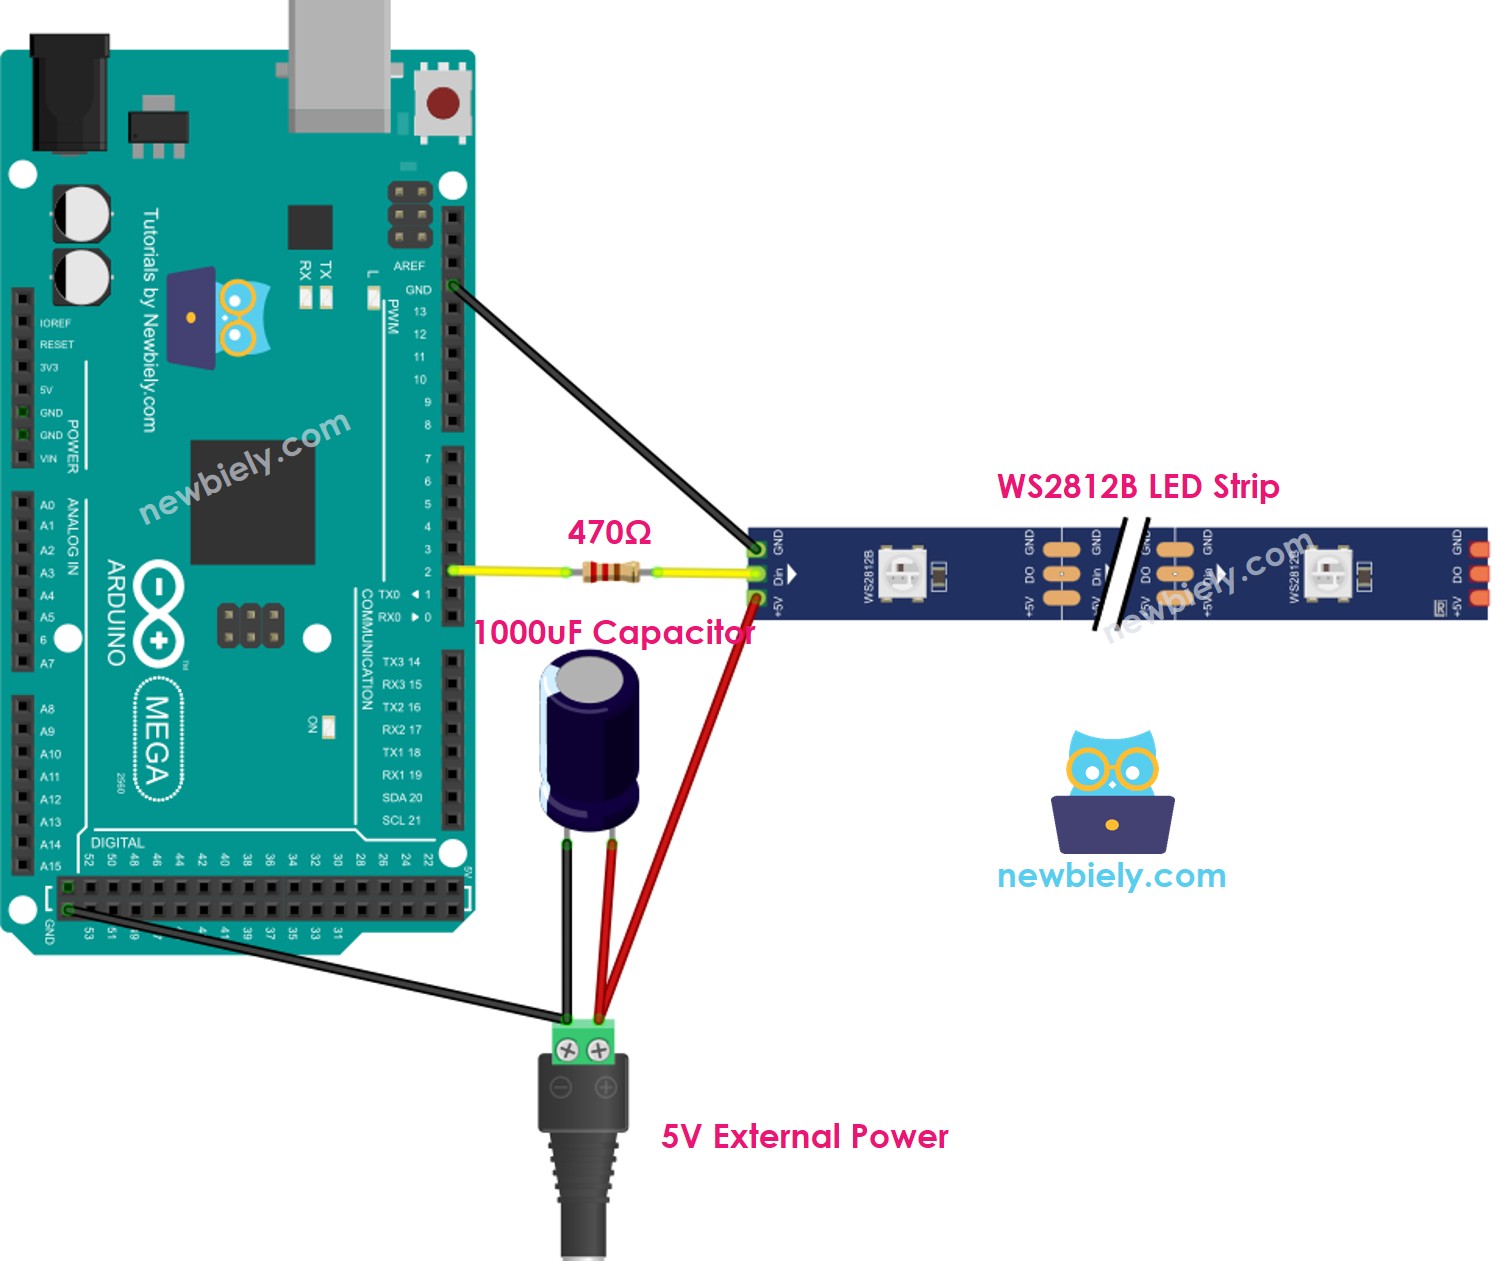
This image is created using Fritzing. Click to enlarge image
Important Safety Note: While simpler wiring approaches might seem tempting, using the external power supply setup shown above is the recommended approach for reliable operation. LED strips can draw significant current, especially when displaying bright colors, and your Arduino's built-in power supply isn't designed to handle this load safely.
The 1000uF capacitor acts as a power buffer, smoothing out voltage fluctuations when the LEDs switch on and off rapidly. The 470Ω resistor protects the first LED's data input from potential voltage spikes and signal reflection issues. These components might seem like extra work, but they'll save you from frustrating intermittent problems down the road!
| Component Pin | Arduino Mega Pin | External Power |
|---|---|---|
| WS2812B GND | GND | Power Supply GND |
| WS2812B VCC | - | Power Supply 5V (+) |
| WS2812B Din | Pin 2 (through 470Ω resistor) | - |
| 1000uF Capacitor - | Between Power Supply + and - | |
| 1000uF Capacitor + | Between Power Supply + and - |
How To Program For WS2812B RGB LED Strip
Now for the exciting part - let's bring your LED strip to life with code! Don't worry if you're new to programming; we'll walk through everything step by step. The code examples below will show you exactly how to create beautiful lighting effects, and I promise it's much easier than you might think.
There are two popular libraries that can control WS2812B LED strips, each with their own strengths:
- Adafruit NeoPixel library: Beginner-friendly with excellent documentation and stable performance
- FastLED library: Advanced features and effects, perfect for complex animations
This tutorial uses the Adafruit NeoPixel library because it's incredibly beginner-friendly while still being powerful enough for most projects. Think of it as your training wheels that you'll actually want to keep using because they work so well!
Setting Up Your WS2812B Object
First, let's tell your Arduino Mega about your LED strip. This is like introducing your Arduino Mega to its new colorful friend:
Initializing Your LED Strip
Before you can control your LEDs, you need to initialize the strip - think of this as turning on the communication channel:
Controlling Individual LEDs
Here's where the magic happens! You can set the color of each individual LED (called a "pixel" in the code):
Adjusting Overall Brightness
Want to dim or brighten your entire strip? Use the setBrightness function:
※ NOTE THAT:
- WS2812B.setBrightness() is used for all pixels on the LED strip. To set the brightness for each individual pixel, we can scale the color value when calling setPixelColor().
- The values set by WS2812B.setBrightness() and WS2812B.setPixelColor() only take effect when WS2812B.show() is called - think of show() as the "go" button that actually updates your LEDs!
Arduino Mega Code
Ready to see your LED strip come alive? The code below creates a beautiful cascading effect that's perfect for getting started. It turns pixels green one by one, then flashes the entire strip red - simple but impressive!
The code demonstrates several key concepts: individual pixel control, timing delays for smooth animations, and how to turn all pixels on or off simultaneously. Don't worry about understanding every line right away - focus on seeing how the basic functions work together to create the effect.
Detailed Instructions
First time working with Arduino? We recommend checking out our Arduino Mega Getting Started guide - it'll help everything make sense and give you the confidence to tackle this project successfully!
- Install the NeoPixel Library: Navigate to the Libraries icon on the left bar of the Arduino IDE. This is where all the magic libraries live that make complex tasks simple!
- Search for the Library: Search for "NeoPixel" and find the NeoPixel library by Adafruit. This library will handle all the complex timing and communication protocols for you.
- Install the Library: Click the Install button to install the NeoPixel library. Take your time with this - having the right library is crucial for everything to work smoothly.
- Upload Your Code: Copy the code above and open it in Arduino IDE. Don't forget to save it with a meaningful name like "LED_Strip_Test" so you can find it later!
- Connect and Upload: Make sure your Arduino Mega is connected via USB, then click the Upload button. You'll see some blinking lights on your Arduino Mega as the code transfers - that's totally normal!
- Power Everything Up: Connect your external power supply and watch the magic happen! Your LED strip should start displaying the cascading green effect followed by the red flash.
- Enjoy the Show: Sit back and admire your work - you've just created your first programmable light display! Almost there - you're doing great!
Pro Tip: Start with a shorter LED strip (10-15 pixels) for your first experiments. It's easier to troubleshoot, uses less power, and the effects happen faster so you can iterate and learn more quickly. You can always upgrade to longer strips once you've mastered the basics!
Serial Monitor Output
Application Ideas
Project Inspiration: Now that you've mastered the basics with your WS2812B LED strip, your creativity is the only limit! Here are some amazing project ideas to get your imagination flowing:
You could create a music-reactive light show that pulses and changes colors with your favorite songs, or build an ambient room lighting system that gradually shifts through calming colors throughout the day. How about setting up a notification display that shows different colors for incoming emails, weather alerts, or social media updates?
For gaming enthusiasts, consider building reactive gaming lights that respond to in-game events, or create a temperature visualization display where the strip shows a color gradient representing your room's temperature. Holiday decorations become magical when you program seasonal light patterns - imagine Halloween orange cascades or Christmas tree effects that dance across your windows!
More adventurous makers might tackle a wearable LED jacket for festivals or parties, construct a smart staircase lighting system that illuminates steps as you walk, or even build a sunrise alarm clock that gradually brightens with natural-looking light to wake you gently. The possibilities truly are endless - what amazing creation will you bring to life first?
Video Section
Watch our video tutorial for a visual walkthrough of this WS2812B LED strip project! The video provides additional insights into the wiring process, shows the LED effects in action, and includes helpful troubleshooting tips that you might find useful if you run into any challenges.
Challenge Yourself
Challenge Yourself: Ready to take your WS2812B LED strip skills to the next level? Try these fun challenges that will help you explore new possibilities and become more confident with programmable LEDs:
Easy Challenges (Perfect for getting started):
- Change the delay time between pixels to create faster or slower cascading effects - experiment with different speeds to see what looks best!
- Modify the colors in the example code - try blue cascading pixels or a purple flash instead of red
- Add a third color sequence after the red flash - maybe a gentle white fade or rainbow cycle
Medium Challenges (Ready to combine concepts):
- Create a "breathing" effect where all LEDs slowly fade in and out like they're breathing - this teaches you about smooth transitions
- Build a temperature indicator using a sensor where the strip shows blue for cold, green for comfortable, and red for hot
- Program a simple clock display where different sections of the strip represent hours, minutes, or seconds
Advanced Challenges (Time to get creative):
- Design a sound-reactive system using a microphone module that changes colors and patterns based on ambient noise levels
- Create a Wi-Fi connected mood light that you can control from your smartphone using an ESP32 instead of Arduino Mega
- Build a motion-activated staircase lighting system that creates a "wave" effect as someone walks up or down
Start with the easy challenges and work your way up - don't worry if you get stuck, that's exactly how we learn and grow! Each challenge will teach you something new and build your confidence for the next one. Remember, every expert was once a beginner who kept experimenting and having fun with their projects!
※ NOTE THAT:
For any complicated LED effect, we offer the paid programming service