Arduino Mega - MP3 Player
Welcome to this comprehensive Arduino Mega MP3 Player tutorial! In this detailed guide, you'll discover how to build a fully functional MP3 player using an Arduino Mega, a serial MP3 player module, a micro SD card, and a speaker. Transform your Arduino into a complete audio playback system capable of playing music, sound effects, voice recordings, and audio notifications!
Building an Arduino Mega MP3 player opens up exciting possibilities beyond simple music playback. This versatile audio system can serve as the foundation for interactive museum exhibits, educational tools with audio feedback, smart home voice announcements, doorbell chimes with custom sounds, alarm systems with spoken warnings, audio books players, ambient sound generators, and automated audio guides. The combination of Arduino's programmability with MP3 playback creates endless creative opportunities!
Throughout this Arduino Mega MP3 player tutorial, we'll explore everything you need to master audio playback:
- Understanding the Serial MP3 player module and how it decodes MP3 files into audio signals
- Preparing your micro SD card with properly formatted and numbered MP3 files
- Wiring connections between Arduino Mega, MP3 module, and speaker
- UART serial communication between Arduino and the MP3 module
- Basic playback control - playing songs automatically on startup
- Interactive control - adding play, pause, next, and previous buttons
- Volume control - adjusting audio levels programmatically
- File management - organizing and accessing multiple audio files
- Advanced features - adding potentiometers, IR remotes, and RFID control
How the System Works:
The MP3 player module acts as a dedicated audio decoder chip. It reads MP3 files from the micro SD card, decodes the compressed audio data, converts it to analog audio signals, and outputs them through its 3.5mm audio jack. The Arduino Mega sends serial commands (via TX/RX pins) to control playback - telling the module which file to play, when to pause, skip tracks, or adjust volume. This division of labor lets the Arduino focus on user interface and control logic while the MP3 module handles the complex audio decoding.
This Arduino Mega MP3 player project is perfect for makers of all skill levels! Whether you're building your first audio project or creating a sophisticated interactive installation, this tutorial provides the foundation you need.
Hardware Preparation
Or you can buy the following kits:
| 1 | × | DIYables Sensor Kit (18 sensors/displays) |
Additionally, some of these links are for products from our own brand, DIYables .
Overview of Serial MP3 Player Module and Speaker
The Serial MP3 Player Module is a compact, all-in-one audio decoder board that simplifies adding MP3 playback to Arduino projects. These modules (commonly based on chips like YX5200, JQ6500, or DFPlayer Mini) combine an MP3 decoder, micro SD card reader, audio amplifier, and serial communication interface in a single package.
Key Features:
- MP3 Decoding: Hardware decoding of MP3 and sometimes WAV audio files
- Micro SD Card Support: Reads audio files from micro SD cards (typically up to 32GB)
- UART Communication: Simple serial commands control all playback functions
- Built-in Amplifier: Can drive small speakers (typically 3W output)
- 3.5mm Audio Jack: Standard aux output for connecting speakers or headphones
- Multiple Audio Formats: Many modules support MP3, WAV, and WMA formats
- Folder Navigation: Organize songs in folders for easier management
- EQ Settings: Some modules offer built-in equalizer presets
How the Module Works:
When the Arduino sends a serial command (e.g., "play track 3"), the MP3 module:
- Reads the specified MP3 file from the micro SD card
- Decodes the compressed MP3 data using its dedicated decoder chip
- Converts the digital audio to an analog signal via its built-in DAC
- Amplifies the signal through the onboard amplifier
- Outputs the audio through the 3.5mm jack to the connected speaker
This hardware-based decoding is crucial because the Arduino Mega doesn't have enough processing power to decode MP3 files in software. The module handles all the complex audio processing while the Arduino simply sends simple serial commands.
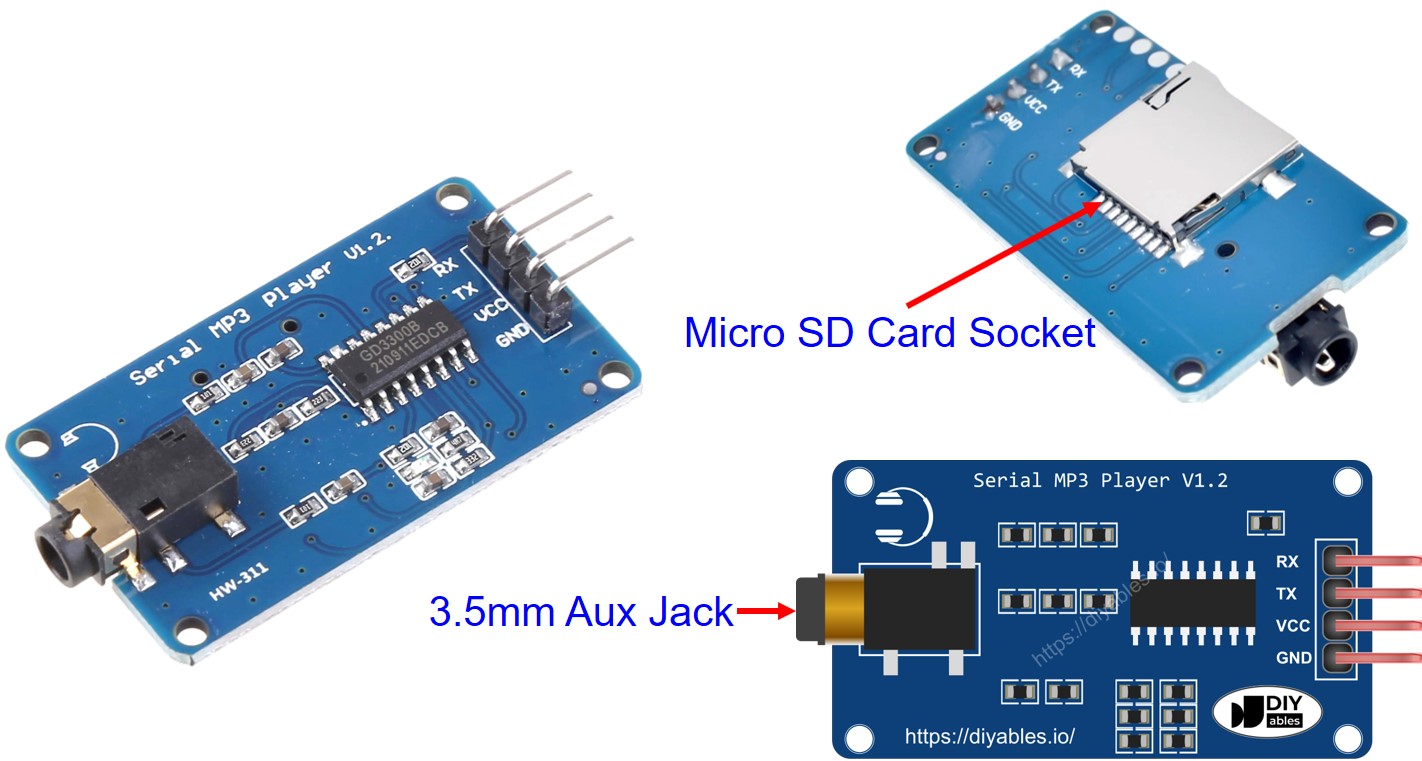
Serial MP3 Player Module Pinout
The Serial MP3 Player Module features three connection interfaces, each serving a specific purpose in the audio playback system:
1. Arduino Connection - UART Serial Interface (4 pins):
- RX pin (Receive): Receives serial data FROM the Arduino. Connect this to the Arduino Mega's TX pin. This pin receives commands like "play", "pause", "next track", etc. You can use Hardware Serial (Serial1, Serial2, Serial3 on Mega) or Software Serial.
- TX pin (Transmit): Sends serial data TO the Arduino. Connect this to the Arduino Mega's RX pin. This pin sends status information back to the Arduino (like current track playing, playback finished, etc.). Optional in simple applications.
- VCC pin: Power supply input. Connect to Arduino Mega's 5V pin. The module typically draws 20-50mA during playback, more during loud passages.
- GND pin: Ground reference. Connect to Arduino Mega's GND pin to complete the circuit and establish common ground.
UART Serial Communication:
The module uses UART (Universal Asynchronous Receiver-Transmitter) communication at 9600 baud rate. Commands are sent as specific byte sequences. For example, to play track 1, the Arduino sends: 0x7E 0xFF 0x06 0x03 0x00 0x00 0x01 0xEF. Fortunately, Arduino libraries (like DFRobotDFPlayerMini) handle these complex command structures for you!
2. Speaker Connection - 3.5mm Audio Jack:
- 3.5mm Female Aux Jack: Standard audio output connector. Connect any speaker or headphones with a 3.5mm male plug. The module outputs line-level or amplified audio depending on the specific model.
3. Micro SD Card Connection - Card Socket:
- Micro SD Card Socket: Located on the back of the module. Insert your micro SD card here (formatted as FAT32 with MP3 files). The card should click into place. Most modules support cards up to 32GB.
Arduino Mega Hardware Serial Options:
The Arduino Mega has 4 hardware UART serial ports:
- Serial (pins 0/1) - Used for USB communication, avoid for MP3 module
- Serial1 (pins 19/18) - TX1=19, RX1=18
- Serial2 (pins 17/16) - TX2=17, RX2=16
- Serial3 (pins 15/14) - TX3=15, RX3=14
Using hardware serial is recommended over software serial for more reliable communication!
Speaker Pinout
Most active (powered) speakers designed for MP3 players have two essential connections:
1. Audio Input Connection:
- 3.5mm AUX Male Plug: This standard audio connector plugs into the MP3 module's 3.5mm female jack. The connection carries the stereo audio signal (left channel, right channel, and ground). This is the same type of connection used for headphones and computer speakers.
2. Power Connection:
Active speakers require their own power source because the MP3 module's output is typically not strong enough to directly drive speaker coils. Common power options:
- USB Power (5V): Many modern portable speakers use USB power. Can be powered from a USB power bank, wall adapter, or even the computer's USB port (if current is sufficient).
- AC Adapter (5V/12V): Some larger speakers use wall adapters that plug into mains power. Check the voltage rating (typically 5V, 9V, or 12V).
- Battery Power: Portable Bluetooth speakers can be repurposed by connecting to the aux input.
- Dedicated Power Supply: For permanent installations, use a regulated 5V power supply.
Speaker Selection Tips:
- Impedance: Look for 4-8 ohm speakers for best compatibility
- Power Rating: 3W-5W speakers work well with most MP3 modules
- Active vs Passive: Active (amplified) speakers are recommended as they have built-in amplifiers
- Size: Larger speakers provide better bass response and volume
- Quality: Better speakers significantly improve audio quality of your MP3 player
Alternative: Passive Speakers
If using passive speakers (without built-in amplifier), you'll need to add an external amplifier module between the MP3 player and speaker, such as a PAM8403 or LM386 amplifier board.
How It Works
Let's break down the complete workflow of the Arduino Mega MP3 player system, from preparing files to playing audio through your speaker.
System Preparation Steps
Step 1: Prepare the Micro SD Card
- Format the Card: Format your micro SD card as FAT32 (required for most MP3 modules). Use your computer's disk formatting tool.
- Organize MP3 Files: Copy your MP3 files to the root directory of the SD card. The MP3 module assigns each file a number based on the order they're stored:
- First file: Track 0001 or Track 1 (depending on module)
- Second file: Track 0002 or Track 2
- Third file: Track 0003 or Track 3
- And so on...
- 001_song_name.mp3
- 002_song_name.mp3
- 003_song_name.mp3
This makes it easier to know which number corresponds to which song.
- Create Folders (Advanced): Some modules support folder organization:
- Folder "01" with songs 001.mp3, 002.mp3, etc.
- Folder "02" with more songs
- Access files by folder and track number
- Insert the prepared micro SD card into the MP3 player module's card socket (back of module)
- Connect the MP3 player module to the Arduino Mega using jumper wires (RX, TX, VCC, GND)
- Connect the speaker to the MP3 module's 3.5mm audio jack
- Connect the speaker to its power source (USB, wall adapter, or battery)
- Play: Start playing the current track or resume from pause
- Stop: Stop playback completely
- Pause: Temporarily pause playback (can be resumed)
- Next: Skip to the next track in sequence
- Previous: Go back to the previous track
- Play Specific Track: Play track number N (e.g., track 5)
- Volume Up/Down: Increase or decrease volume level
- Set Volume: Set volume to specific level (0-30 typically)
- Query Status: Ask module about current state (playing, stopped, etc.)
- Get Track Count: Ask how many files are on the SD card
- Arduino Sends Command: Arduino transmits serial command bytes via TX pin to module's RX pin
- Module Receives Command: MP3 module's microcontroller receives and interprets the command
- File Access: Module accesses the micro SD card and locates the requested MP3 file
- MP3 Decoding: Dedicated decoder chip reads and decompresses the MP3 data
- Digital-to-Analog Conversion: Decoded digital audio is converted to analog voltage signals
- Amplification: Built-in amplifier boosts the signal to drive speakers
- Audio Output: Amplified audio signal is sent through the 3.5mm jack to the speaker
- Sound Production: Speaker's electromagnet vibrates the speaker cone, producing audible sound
- When a track finishes playing
- Current track number
- Current volume level
- If the SD card is inserted properly
- If there are any errors
Step 2: Physical Assembly
Communication Protocol
The Arduino Mega communicates with the MP3 module using UART serial commands. Each command consists of a specific byte sequence that tells the module what to do.
Common Commands Supported:
Audio Playback Process
When you command the module to play a track, here's what happens behind the scenes:
Status Feedback (Optional):
The MP3 module can send status information back to the Arduino via its TX pin (connected to Arduino's RX pin). This allows the Arduino to know:
This bidirectional communication enables creating sophisticated audio interfaces with feedback and status displays!
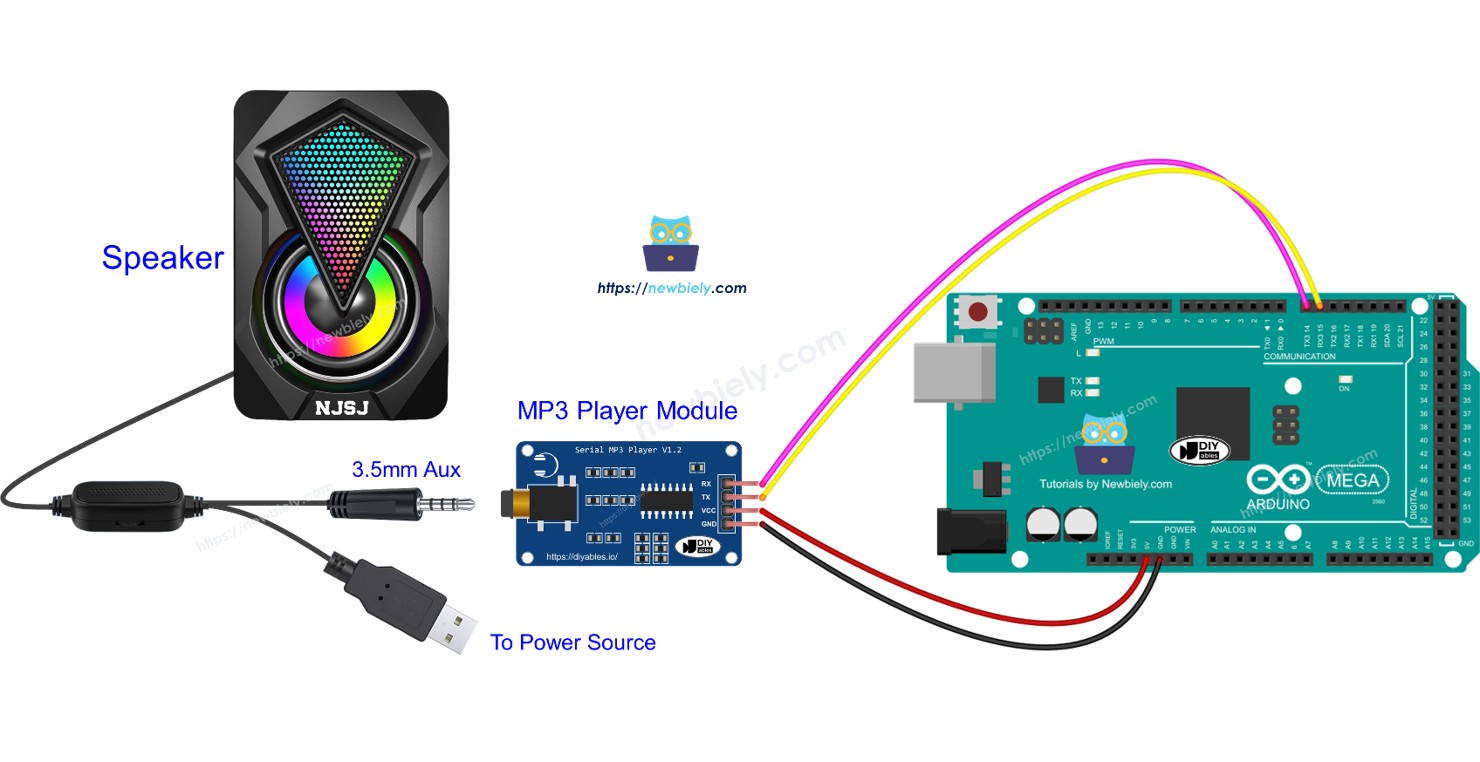
Wiring Diagram
The wiring for the Arduino Mega MP3 player is straightforward, requiring only 4 connections between the Arduino and the MP3 module, plus the audio output to the speaker.
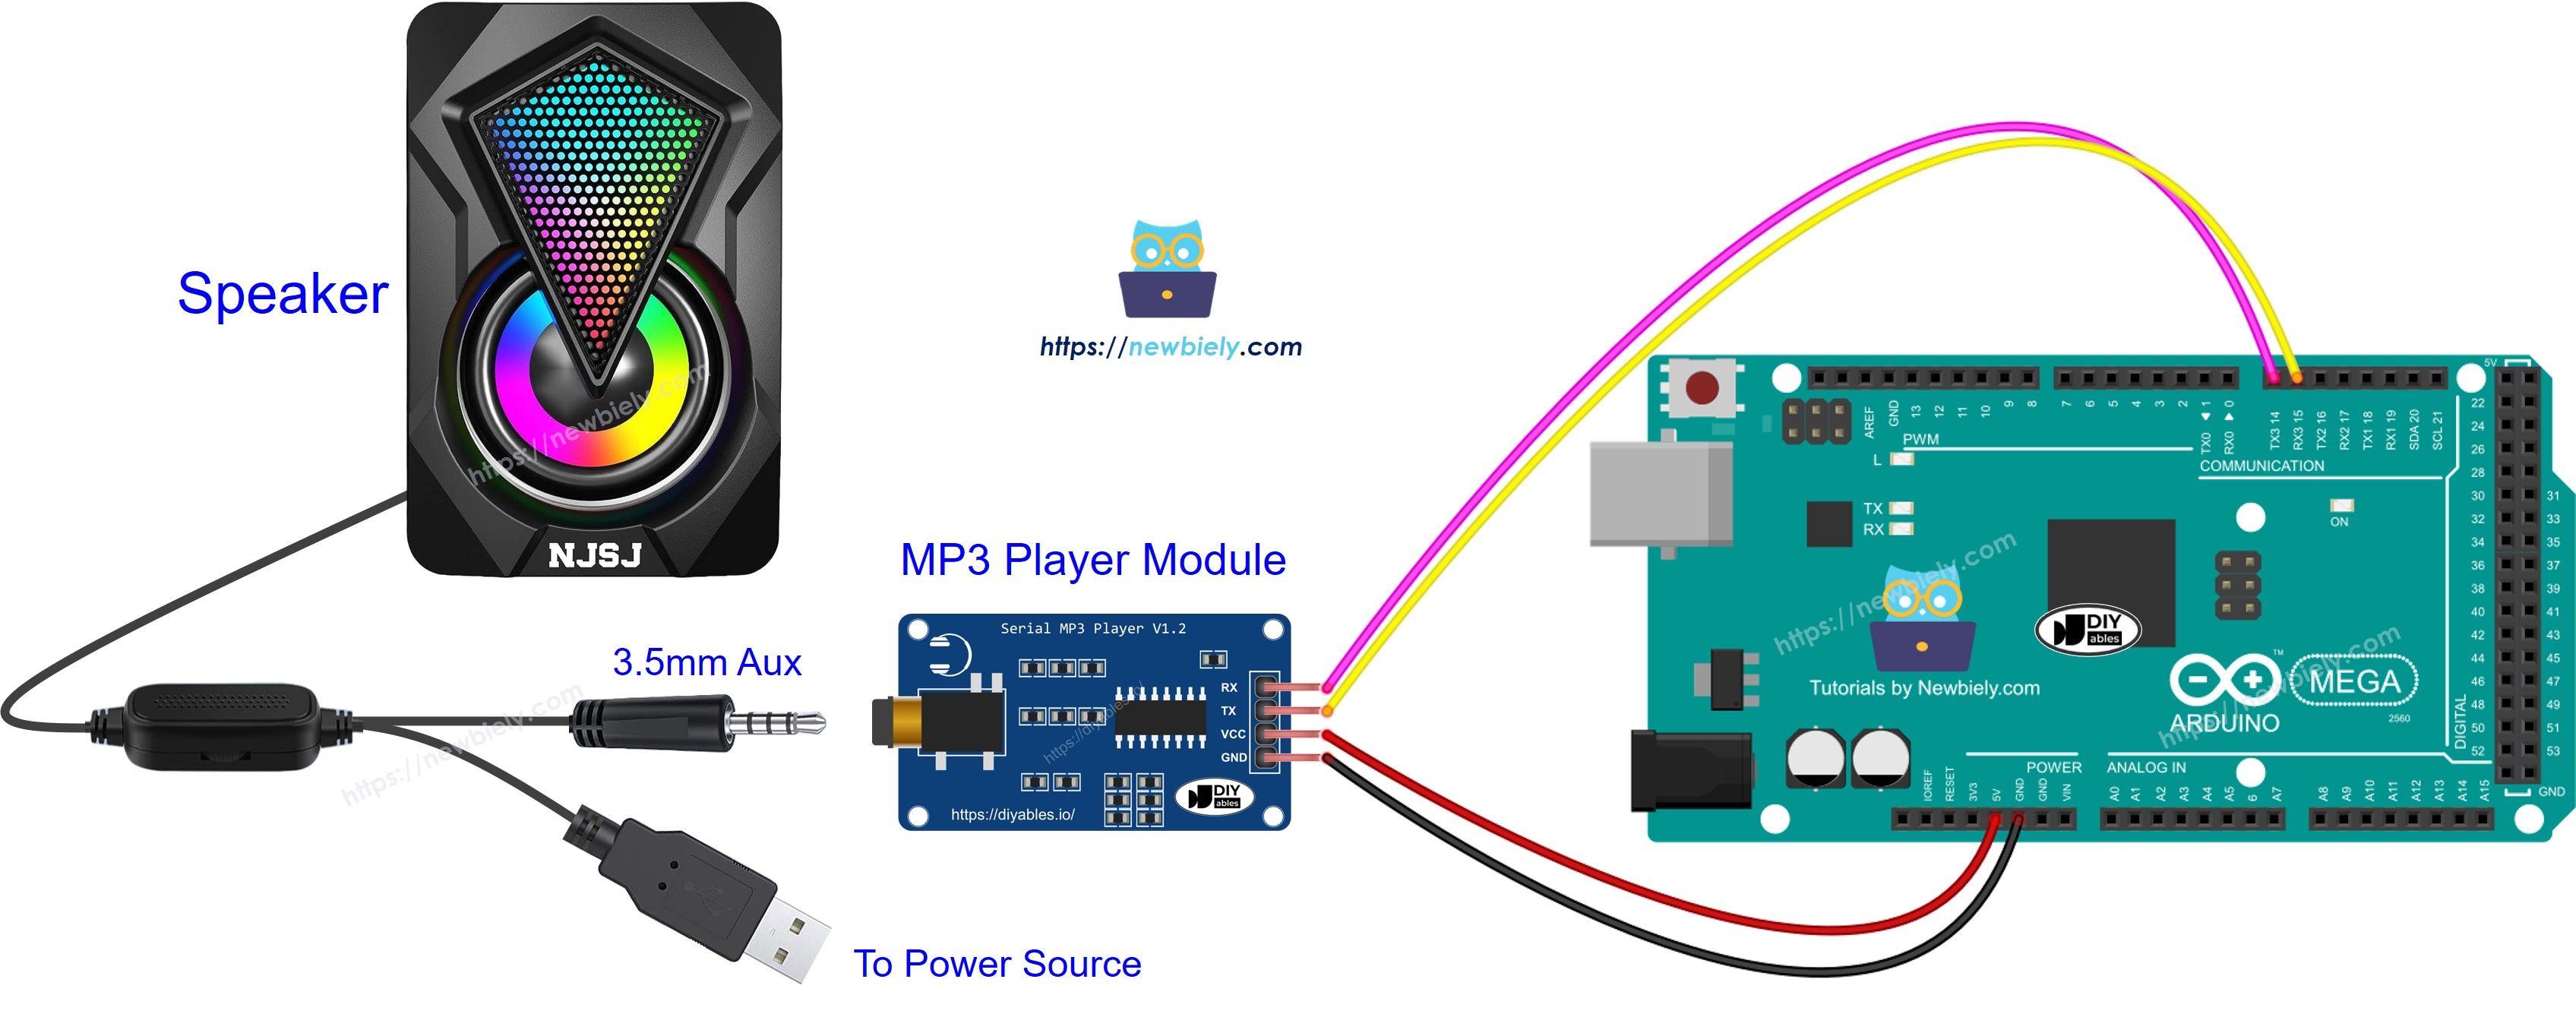
This image is created using Fritzing. Click to enlarge image
Connection Summary:
| MP3 Module Pin | Arduino Mega Pin | Purpose |
|---|---|---|
| VCC | 5V | Power supply |
| GND | GND | Ground reference |
| RX | TX1 (Pin 18) | Arduino sends commands to module |
| TX | RX1 (Pin 19) | Module sends status to Arduino (optional) |
Speaker Connections:
- MP3 Module 3.5mm Jack → Speaker 3.5mm Aux Input
- Speaker Power → USB Power Bank or Wall Adapter
Wiring Notes:
- Serial Port Choice: This diagram uses Serial1 (pins 18/19). You can use Serial2 (16/17) or Serial3 (14/15) if needed for your project.
- TX/RX Crossover: Remember that TX on one device connects to RX on the other device. This allows data to flow: Arduino TX → Module RX (commands) and Module TX → Arduino RX (status).
- Power Considerations: The MP3 module draws about 20-50mA during playback. The Arduino's 5V pin can easily supply this current.
- Optional TX Connection: If you only need to send commands (play, stop, volume) and don't need status feedback, you can skip connecting the module's TX pin. Just connect RX, VCC, and GND.
- Ground Is Critical: Always ensure solid GND connection between Arduino and MP3 module. Poor ground connections cause noise, distortion, or communication failures.
Micro SD Card:
Insert your prepared micro SD card (FAT32 formatted with MP3 files) into the card socket on the back of the MP3 module before powering on.
Arduino Mega Code - Play Music
The code below starts playing the first song saved on the micro SD card.
Detailed Instructions
Follow these steps one by one.
- Connect the parts as shown in the diagram.
- Connect the Arduino Mega to your computer with a USB cable.
- Open the Arduino IDE on your computer.
- Choose the correct board (Arduino Mega) and the correct COM port.
- Follow the steps in the How It Works section.
- Copy the provided code and paste it into the Arduino IDE.
- Click the Upload button in the Arduino IDE to send the code to the Arduino Mega.
- Have fun making music.
Arduino Mega Code - Play Music with control buttons
The code below is a better version of the old code. It has four buttons that let you control the MP3 player.
The wiring for the code that was mentioned:
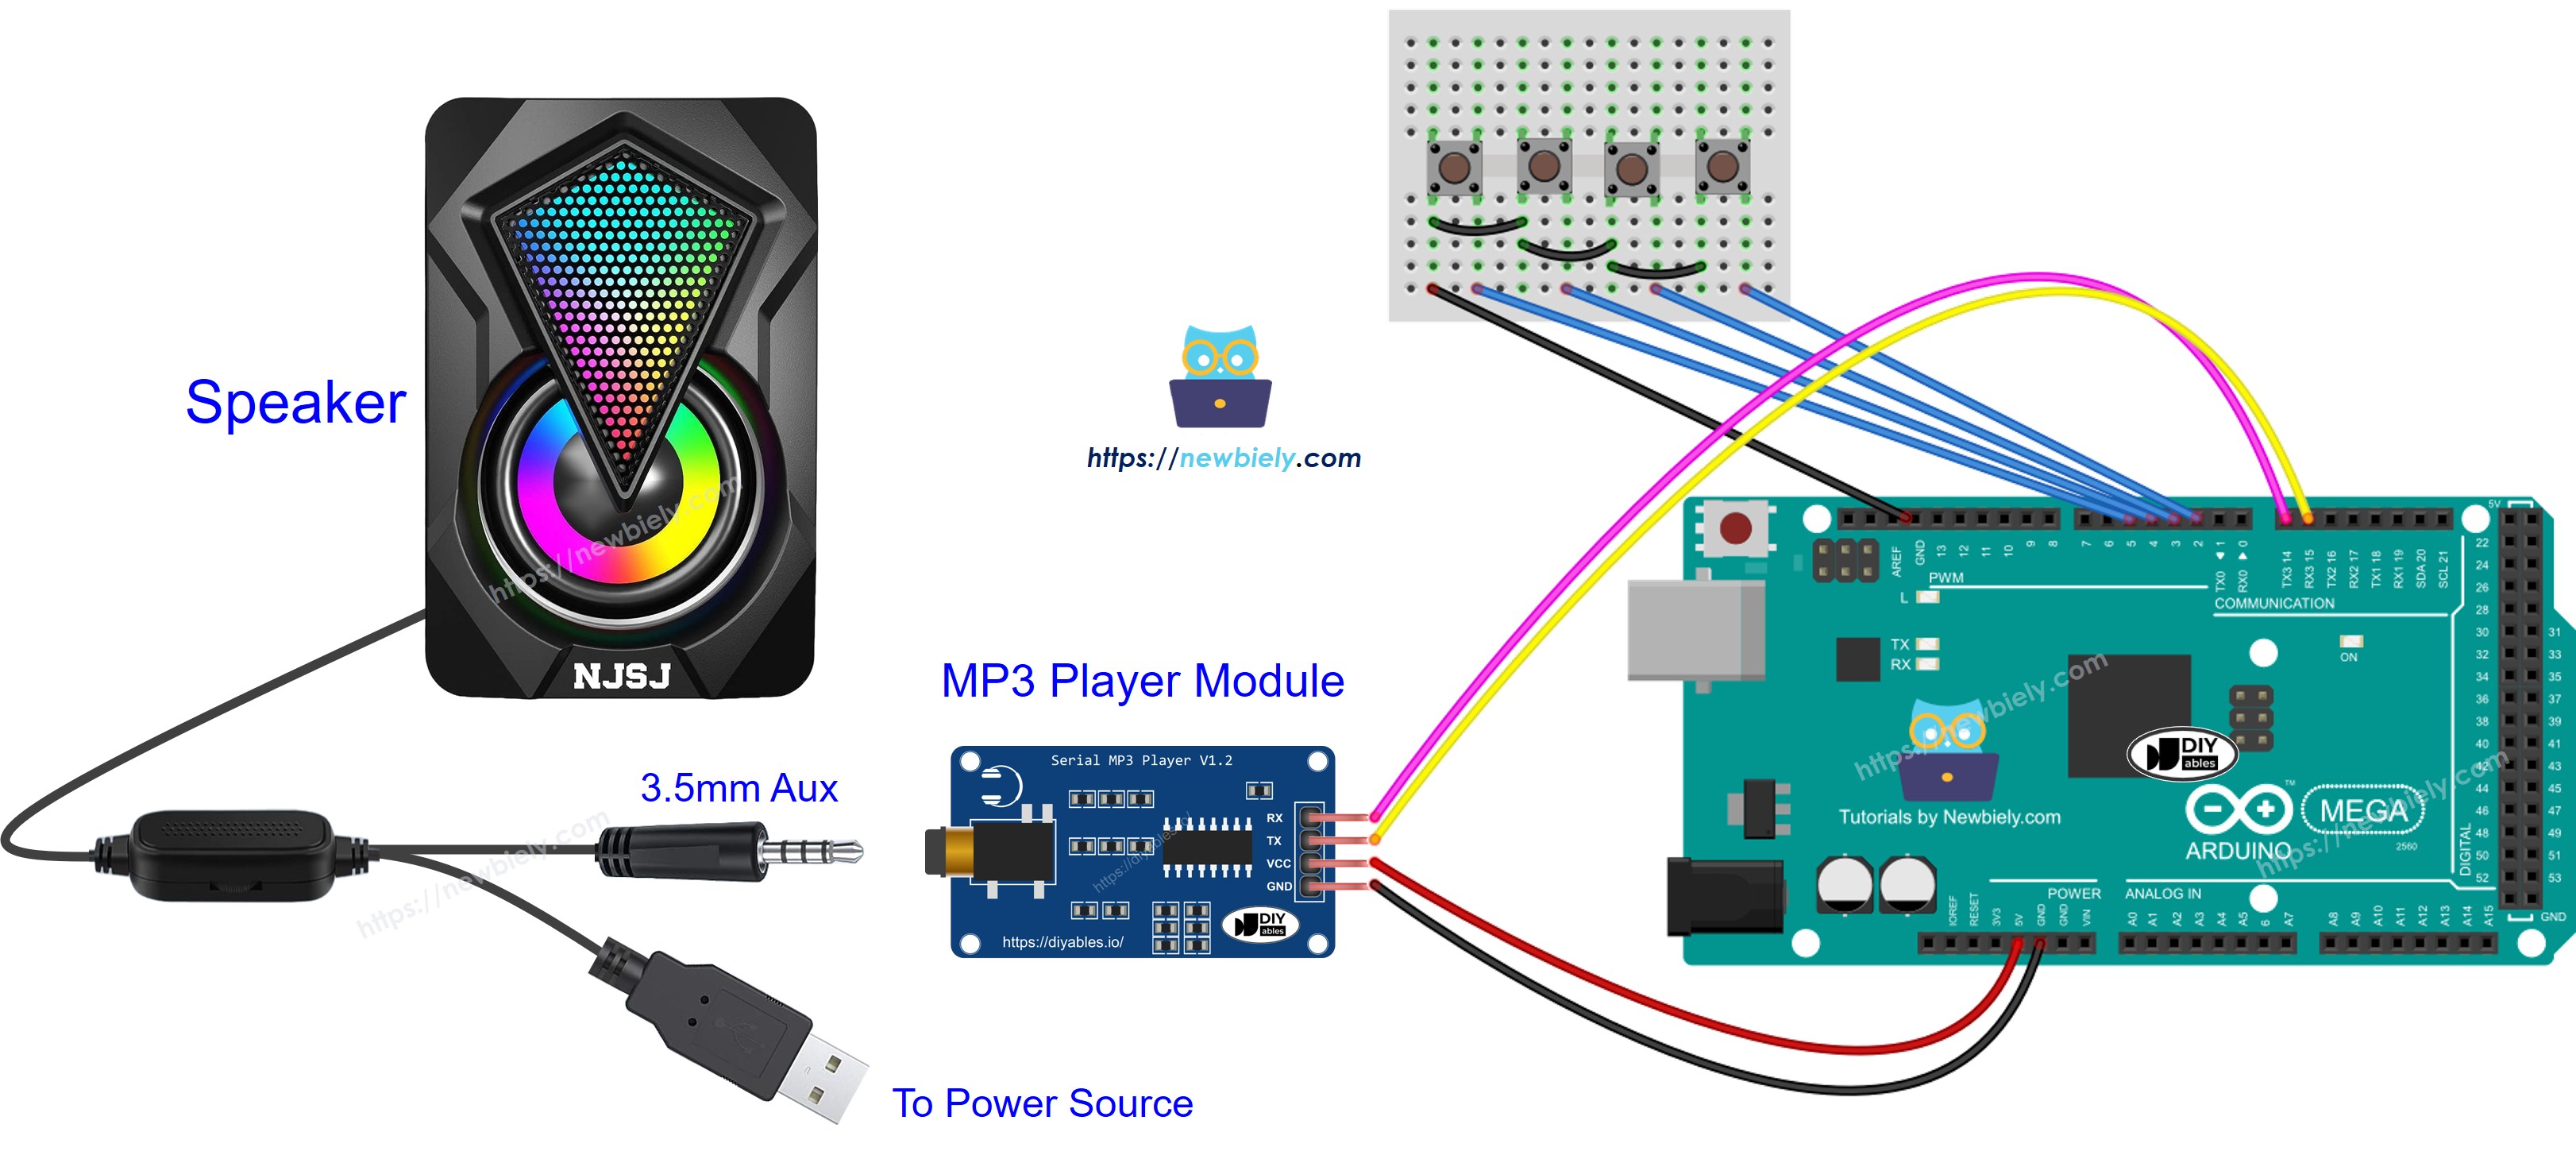
This image is created using Fritzing. Click to enlarge image
Now you can change the projects to add more features, for example:
- Add a volume knob to change the sound level. See the Arduino Mega Potentiometer tutorial.
- Add an IR remote to control it. Follow the Arduino Mega IR Remote Controller tutorial.
- Add an RFID reader and card to make an RFID MP3 player. For more details, check the Arduino Mega RFID tutorial.