Arduino Mega - Micro SD Card
Welcome to this comprehensive Arduino Mega Micro SD Card tutorial! In this detailed guide, you'll discover how to add powerful data storage capabilities to your Arduino Mega projects using micro SD cards. Whether you're building a data logger, sensor recorder, configuration system, or any project requiring persistent storage, this Arduino Mega SD card tutorial has you covered.
Micro SD cards revolutionize Arduino projects by providing massive storage capacity (typically 2GB to 32GB) in a tiny form factor. Unlike Arduino's limited onboard EEPROM (4KB on Arduino Mega), SD cards let you store sensor readings, log files, configuration data, timestamps, and even create simple databases. The data persists even when power is removed, making SD cards perfect for long-term data logging applications.
Throughout this Arduino Mega Micro SD Card tutorial, we'll explore everything you need to master SD card operations:
- Creating and opening files on a micro SD card with automatic file creation
- Writing data to files for sensor logging, timestamps, and measurement recording
- Reading files character-by-character for precise data parsing
- Reading files line-by-line for efficient text processing and CSV data
- Appending data to existing files for continuous data logging without losing previous records
- Overwriting files to update configuration or replace old data
- Understanding the SPI communication protocol used by SD card modules
- File management techniques including checking file existence and proper file closing
This Arduino Mega SD card module project opens up incredible possibilities! Create weather station data loggers, GPS track recorders, event counters with timestamps, sensor networks with local storage, configuration systems that remember settings, CSV data exporters for Excel analysis, scientific experiment recorders, and any application requiring reliable, high-capacity data storage. Micro SD cards transform your Arduino from a real-time controller into a complete data acquisition system!
Hardware Preparation
Or you can buy the following kits:
| 1 | × | DIYables Sensor Kit (18 sensors/displays) |
Additionally, some of these links are for products from our own brand, DIYables .
Overview of Micro SD Card Module
The Micro SD Card Module is a breakout board that provides a convenient interface between your Arduino Mega and standard micro SD cards. This module handles all the complex electrical requirements, voltage level conversion, and physical card socket connections, making it simple to add massive storage capacity to your projects.
Key Features:
- SPI Communication: Uses the SPI (Serial Peripheral Interface) bus for fast data transfer
- Voltage Regulation: Built-in voltage regulator and level shifters protect the 3.3V SD card from the Arduino's 5V signals
- Capacity Support: Works with micro SD cards from 128MB up to 32GB (SDHC)
- File System: Supports FAT16 and FAT32 file systems for easy compatibility with computers
- Hot-Swappable: Cards can be removed and read on computers using standard SD card readers
- Fast Transfer: SPI communication enables data transfer speeds sufficient for most data logging applications
How It Works:
The module acts as an intermediary adapter between the Arduino Mega's 5V logic and the SD card's 3.3V requirements. It includes onboard voltage regulators and level shifters to ensure safe communication. The module communicates using the SPI protocol, which uses 4 main pins (MOSI, MISO, SCK, SS) to transfer data serially at speeds up to 4Mbps on Arduino.
File System Compatibility:
SD cards must be formatted with FAT16 (for cards ≤2GB) or FAT32 (for cards >2GB up to 32GB) file systems. These are standard formats that both Arduino and computers can read, making it easy to transfer data between devices. The Arduino SD library provides high-level functions that hide the complexity of FAT file system operations.
Pinout
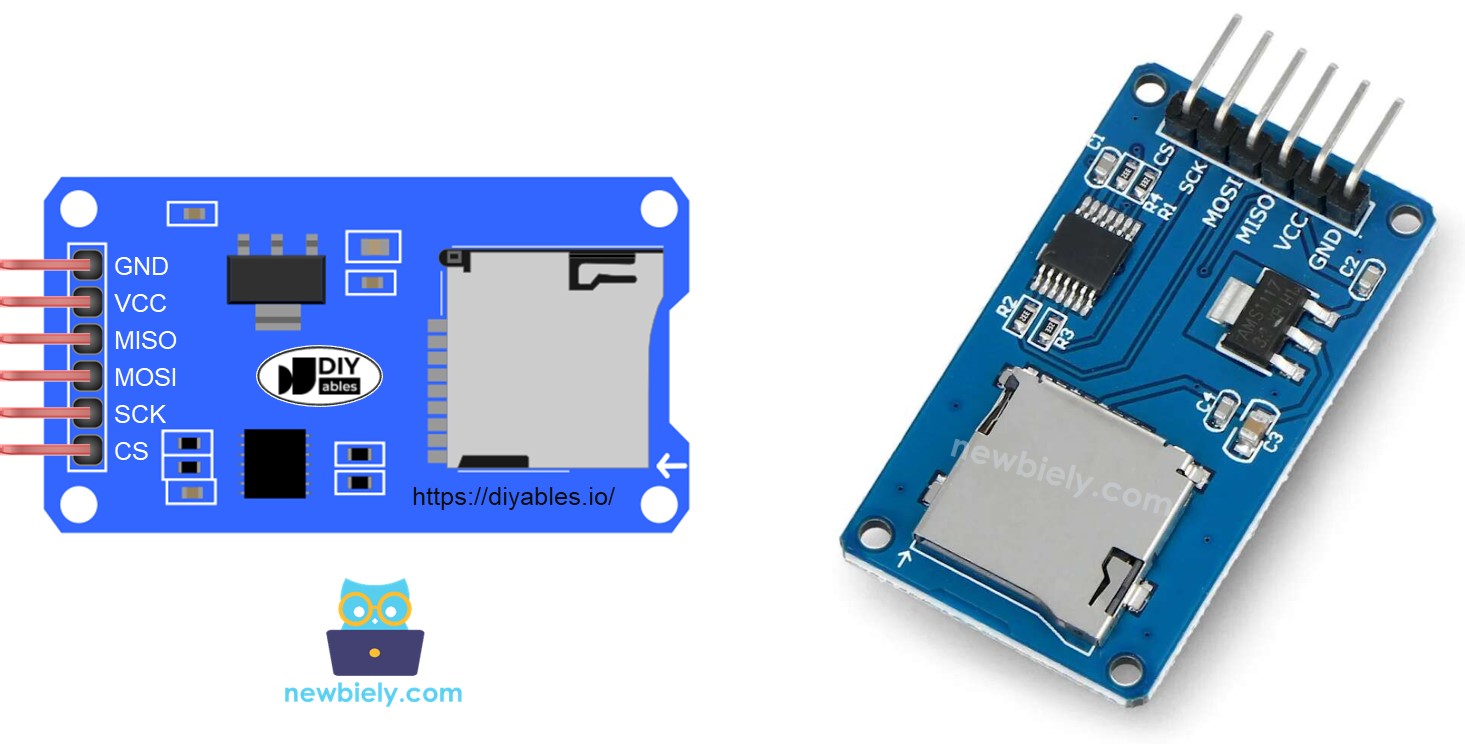
The Micro SD Card Module features six pins that connect to the Arduino Mega's SPI bus. Understanding each pin is essential for proper operation:
Power Pins:
- VCC pin: Power supply input. Connect to Arduino Mega's 5V pin. The onboard regulator converts this to 3.3V for the SD card.
- GND pin: Ground reference. Connect to Arduino Mega's GND pin to complete the circuit.
SPI Communication Pins:
- MISO pin (Master In Slave Out): Data line from SD card to Arduino. Connect to Arduino Mega's MISO pin (Digital Pin 50). This line carries data read from the SD card.
- MOSI pin (Master Out Slave In): Data line from Arduino to SD card. Connect to Arduino Mega's MOSI pin (Digital Pin 51). This line carries data written to the SD card.
- SCK pin (Serial Clock): Clock signal generated by Arduino. Connect to Arduino Mega's SCK pin (Digital Pin 52). This line synchronizes data transfer between devices.
- CS pin (Chip Select) / SS pin (Slave Select): Enables the SD card for communication. Connect to any digital pin on Arduino Mega (commonly pin 53, but configurable in code). When LOW, the SD card listens; when HIGH, it's ignored.
Arduino Mega SPI Pin Locations:
The Arduino Mega has dedicated hardware SPI pins that provide the fastest and most reliable communication:
- Pin 50: MISO (Master In Slave Out)
- Pin 51: MOSI (Master Out Slave In)
- Pin 52: SCK (Serial Clock)
- Pin 53: SS (Slave Select) - Default, but any digital pin can be used
Important Notes:
- Always use the hardware SPI pins (50, 51, 52) for MISO, MOSI, and SCK on Arduino Mega
- The CS/SS pin is configurable - you specify it in the SD.begin() function
- Different Arduino boards use different SPI pin numbers (Uno uses pins 10-13)
- Never connect the SD card directly to Arduino without the module - voltage mismatch will damage the card!
Preparation
Before using your micro SD card with Arduino, you need to properly format it. This ensures compatibility with the Arduino SD library and enables reliable file operations.
Step 1: Insert Card into Computer
Plug the micro SD card into your computer using a USB 3.0 SD card reader (or your computer's built-in SD card slot with a micro SD adapter).
Step 2: Check and Format the Card
The SD card MUST be formatted as FAT16 or FAT32:
- FAT16: For SD cards 2GB or smaller
- FAT32: For SD cards larger than 2GB up to 32GB
- exFAT: NOT supported by Arduino SD library (don't use this format)
Windows Formatting:
- Open File Explorer and locate the SD card drive
- Right-click on the drive and select "Format"
- Choose "FAT32" for File System (or "FAT" for cards ≤2GB)
- Click "Start" to format
Mac Formatting:
- Open Disk Utility (Applications → Utilities → Disk Utility)
- Select the SD card from the left sidebar
- Click "Erase"
- Choose "MS-DOS (FAT)" for Format
- Click "Erase" to format
Verify Format:
After formatting, the card should be empty and ready for Arduino use. The Arduino will create files automatically during operation.
Recommended Card Specifications:
- Capacity: 2GB to 16GB is ideal (32GB maximum)
- Speed Class: Class 4 or higher for reliable data logging
- Brand: Use quality brands (SanDisk, Samsung, Kingston) for reliability
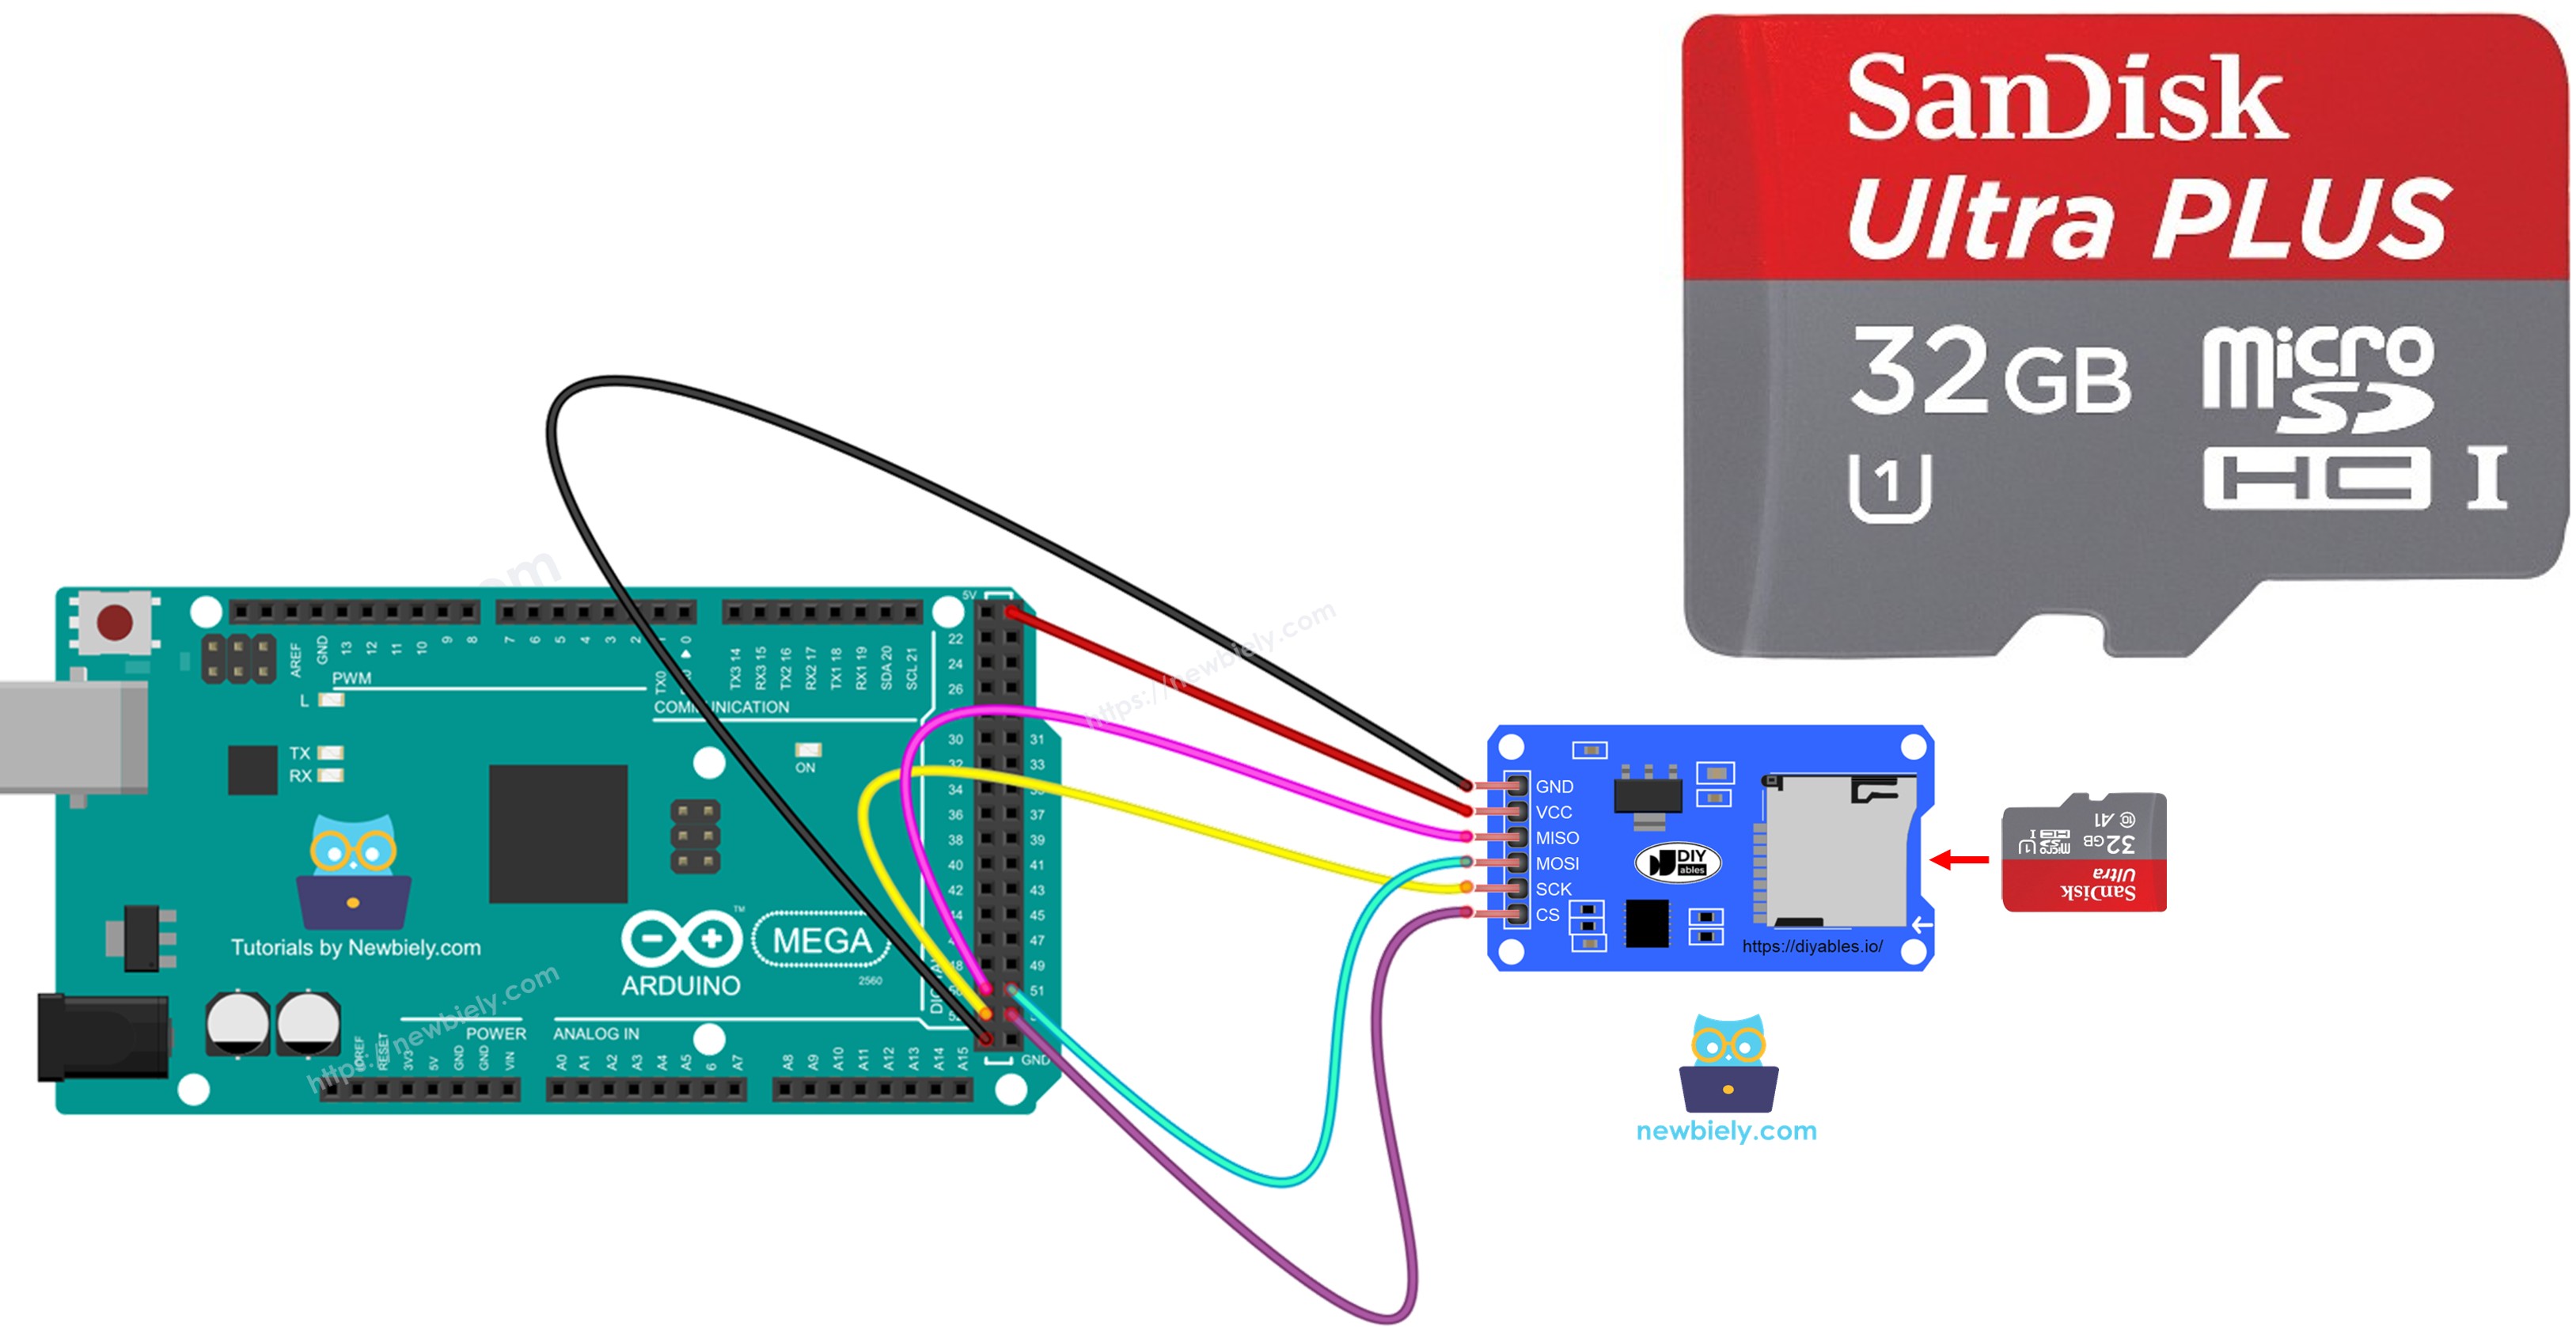
Wiring Diagram
Let's examine the wiring connections between your Arduino Mega and the Micro SD Card Module. The module uses the SPI (Serial Peripheral Interface) bus, which requires 4 data lines plus power connections.
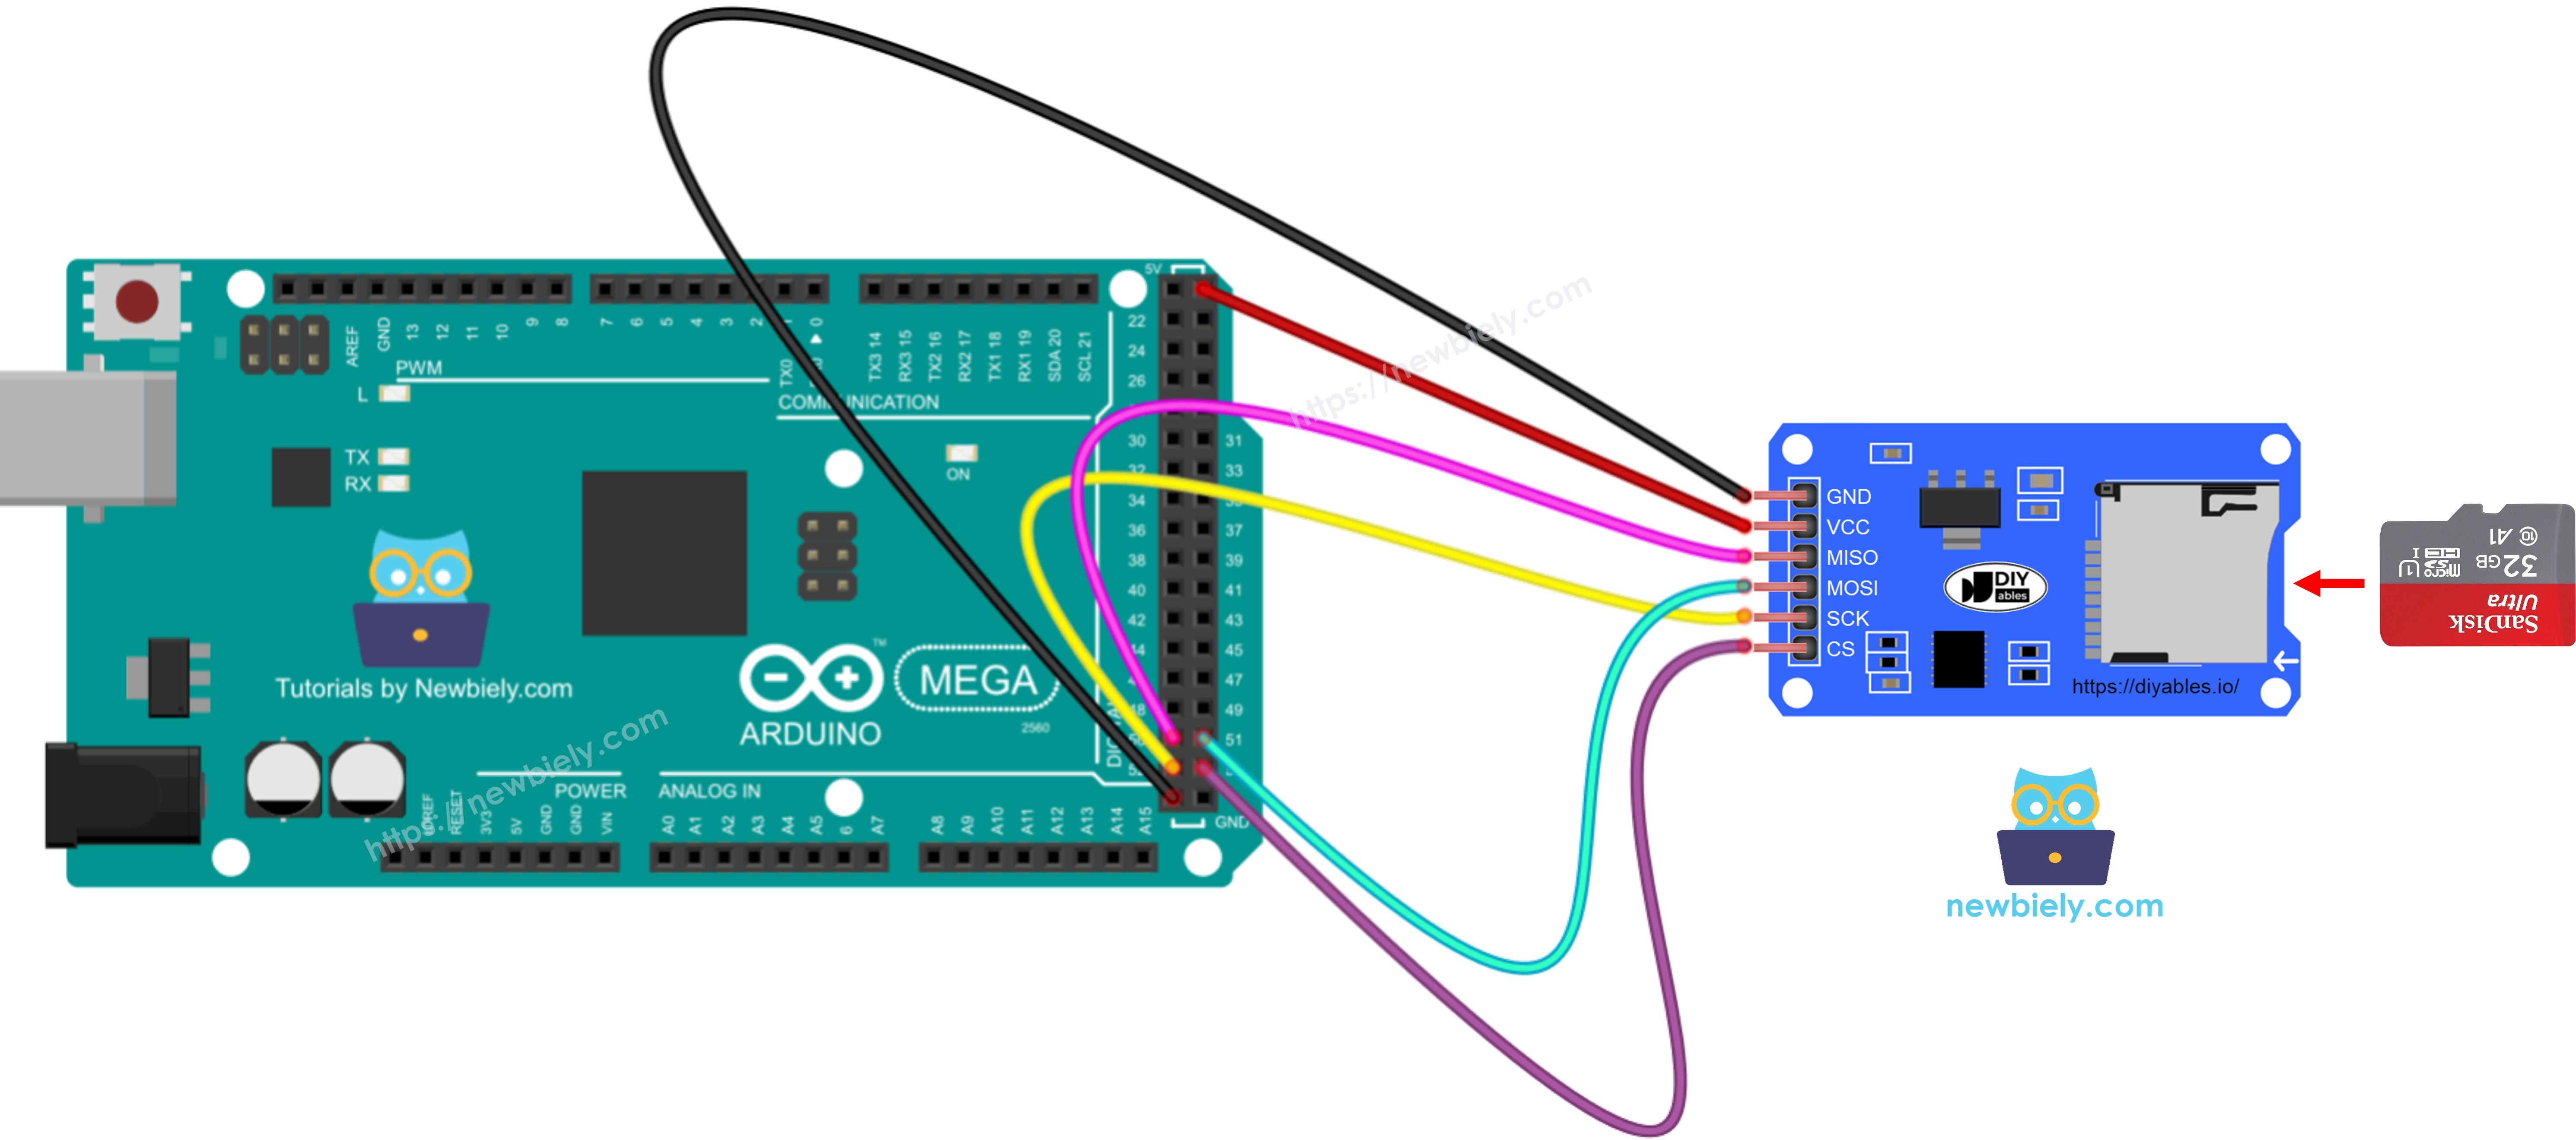
This image is created using Fritzing. Click to enlarge image
Connection Summary:
| SD Card Module | Arduino Mega |
|---|---|
| VCC | 5V |
| GND | GND |
| MISO | Pin 50 |
| MOSI | Pin 51 |
| SCK | Pin 52 |
| CS | Pin 53* |
*Pin 53 is the default SS pin, but you can use any digital pin by specifying it in SD.begin(pin_number)
Wiring Best Practices:
- Short Wires: Use jumper wires shorter than 20cm for reliable SPI communication at high speeds
- Avoid Crosstalk: Keep wires separated and avoid running them parallel to each other
- Secure Connections: Ensure all connections are firmly seated - loose wires cause intermittent failures
- Power Quality: The SD card can draw 100-200mA during write operations, ensure your power supply can handle this
- Card Insertion: Always insert the micro SD card into the module BEFORE powering on the Arduino
SPI Bus Sharing:
Multiple SPI devices (SD cards, displays, sensors) can share the same MISO, MOSI, and SCK lines. Each device needs its own unique CS (Chip Select) pin. Only the device with CS pulled LOW will communicate, while others remain inactive.
※ NOTE THAT:
Shield Users: If you have an Ethernet shield, data logging shield, or any shield with a built-in micro SD card slot, you don't need to use a separate micro SD card module. Simply insert the micro SD card into the card slot on the shield. Most shields use pin 4 for the SD card CS pin (check your shield's documentation).
Arduino Mega - How to Open a File on Micro SD Card and Create if Not Existed
One of the most fundamental SD card operations is opening files. The Arduino SD library makes this simple with the SD.open() function, which can both open existing files and create new ones automatically.
How File Opening Works:
When you call SD.open() with a filename and FILE_WRITE mode, the library:
- Checks if the file exists on the SD card
- If it exists, opens it for appending (adding data to the end)
- If it doesn't exist, creates a new empty file with that name
- Returns a File object that you use for reading/writing operations
File Naming Rules:
- Maximum filename length: 8 characters + 3 character extension (8.3 format)
- Use only letters, numbers, and underscores (avoid spaces and special characters)
- Extensions are optional but recommended (.txt, .csv, .log, .dat)
- Examples: "data.txt", "sensor.log", "config.dat"
Always Close Files:
After opening and using a file, always call file.close(). This ensures:
- Data is properly written to the SD card (flushed from buffers)
- File system integrity is maintained
- File is available for other operations
- Prevents data corruption if power is lost
Arduino Mega Code
Detailed Instructions
Follow these detailed step-by-step instructions to test file creation and opening on your SD card:
- Put the micro SD card into the micro SD card module.
- Use the wiring diagram to connect the micro SD card module to the Arduino Mega.
- Connect the Arduino Mega to your computer with a USB cable.
- Open the Arduino IDE on your computer.
- Choose the Arduino Mega board and the correct COM port.
- Open the Serial Monitor in the Arduino IDE.
- Copy the code shown and paste it into the Arduino IDE.
9. Upload Code: Click the Upload button (right arrow icon) in the Arduino IDE toolbar to compile and upload the code to the Arduino Mega. Wait for the "Done uploading" message.
10. View Results: Look at the Serial Monitor window. After the first upload with a fresh SD card, you should see:
What's Happening:
- Line 1: Confirms SD card initialized successfully
- Line 2: File doesn't exist yet, so it's being created
- Line 3: File now exists and is confirmed on the card
11. Test Again: Press the reset button on your Arduino Mega or re-upload the code. The Serial Monitor should now show:
Notice the file already exists, so the "Creating" message is skipped.
※ NOTE THAT:
Timing Note: You may not see anything in the Serial Monitor if you open it for the first time after uploading. This is because the Arduino has already executed and finished before the Serial Monitor connected. Press the reset button on the Arduino to see the output again.
12. Verify on Computer:
- Remove the micro SD card from the module (power off Arduino first)
- Insert the micro SD card into a USB card reader
- Connect the USB card reader to your computer
- Open the drive in File Explorer (Windows) or Finder (Mac)
- Confirm that "arduino.txt" file exists on the card
- You can open the file to view its contents (should be empty at this point)
Arduino Mega - How to Write/Read Data To/From a File on Micro SD Card
Now let's explore reading and writing actual data to SD card files. This is the core functionality for data logging, configuration storage, and persistent data applications.
Writing Data to Files:
The SD library provides several methods for writing data:
- file.print(): Writes text without a newline (same as Serial.print())
- file.println(): Writes text with a newline at the end (same as Serial.println())
- file.write(): Writes raw bytes for binary data
All data is appended to the end of the file unless you explicitly delete and recreate the file.
Reading Data from Files:
Reading can be done in multiple ways:
- file.read(): Reads one character at a time, returns -1 when end of file is reached
- file.available(): Returns the number of bytes available to read (0 when at end of file)
- Character-by-character: Good for parsing and processing each character
- Line-by-line: More efficient for structured text data (covered in next section)
File Position and EOF:
Each file has an internal position pointer that tracks where you're currently reading or writing. When reading, the pointer advances with each character. When it reaches the end of the file, file.available() returns 0.
Example Use Case:
This example demonstrates a complete write-then-read cycle:
- Opens a file for writing
- Writes two lines of text to the file
- Closes the file (important!)
- Reopens the file for reading
- Reads and displays every character until end of file
- Closes the file again
- The Serial Monitor showed what was in the file.
Important Behavior - Data Appending: The FILE_WRITE mode always appends new data to the end of existing files rather than overwriting them. This is intentional and perfect for data logging! However, if you reset the Arduino Mega or re-upload this code, the same text will be written again to the file, resulting in duplicated content.
After a second reset, the Serial Monitor will show:
To avoid this duplication:
- Delete the file before writing (shown in the "overwrite" section below)
- Only write data when specific conditions are met (e.g., button press, new sensor reading)
- Use a flag in EEPROM to track if initial data has been written
Verify on Computer:
You can also remove the micro SD card from the module and insert it into a USB SD card reader to view the files on your computer. Open "arduino.txt" in any text editor (Notepad, TextEdit) to see the exact content written by the Arduino. This is extremely useful for debugging and verifying data logging operations!
Arduino Mega - How to Read a File on Micro SD Card Line-by-Line
Reading files line-by-line is much more efficient than character-by-character reading when working with structured text data like CSV files, logs with timestamps, or configuration files. This approach makes parsing and processing data significantly easier.
How Line-by-Line Reading Works:
Instead of processing every character individually, line-by-line reading:
- Reads characters until it encounters a newline character ('\n')
- Stores all characters from that line in a String variable
- Returns the complete line for processing
- Repeats until the end of file is reached
Advantages of Line-by-Line Reading:
- Easier Parsing: Each line is a complete unit of data
- CSV Support: Perfect for comma-separated values (CSV) files
- Structured Logs: Great for timestamped log entries
- Less Complex Code: Simpler logic than character-by-character parsing
- Better Performance: Fewer function calls and operations
Use Cases:
- Reading sensor logs with timestamps
- Processing CSV data files (sensor1,sensor2,sensor3)
- Loading configuration settings (key=value format)
- Parsing GPS NMEA sentences
- Reading multi-line text files
Implementation:
The example below uses the readStringUntil() function, which reads characters until it encounters a specified delimiter (in this case, '\n' for newline). This makes it easy to process each line as a complete string.
Expected Output on Serial Monitor:
Understanding the Output:
- Each line from the file is displayed with a line number prefix
- Empty lines (if any) will show as blank between line numbers
- The line count accurately reflects the number of lines in the file
※ NOTE THAT:
Data Accumulation Note: If you haven't deleted the file contents first (using the overwrite method shown below), and you've reset the Arduino multiple times, you may see duplicate lines in the Serial Monitor. Each reset with the write code adds more data to the file. To start fresh, either use the overwrite method or manually delete the file from the SD card using your computer.
Arduino Mega - How to Overwrite a File on Micro SD Card
By default, the FILE_WRITE mode appends data to the end of existing files. While this is perfect for continuous data logging, sometimes you need to completely replace a file's contents with new data. This is called "overwriting" the file.
Why Overwrite Files?
Overwriting is useful for:
- Configuration files: Updating settings without keeping old values
- Status files: Replacing current status with new status
- Daily logs: Starting fresh each day with new data
- Temporary data: Clearing old calculations and storing new ones
- Summary files: Replacing old summaries with updated information
How to Overwrite:
The Arduino SD library doesn't have a "overwrite" mode directly. Instead, you use a two-step process:
- Delete the old file: Use SD.remove(filename) to delete the existing file
- Create new file: Open the file with SD.open(filename, FILE_WRITE) which creates a fresh empty file
This approach ensures you start with a completely clean file, eliminating any old data.
Important Considerations:
- Data Loss: Deleting removes all previous data permanently - make sure this is intentional
- Atomic Operations: There's a brief moment between delete and create where the file doesn't exist
- Error Handling: Always check if delete succeeded before writing new data
- Backup Strategy: For critical data, consider writing to a new filename first, then deleting old file
Example Process:
This example demonstrates file overwriting by:
- Deleting any existing file with the same name
- Creating a fresh new file
- Writing new data to the clean file
- Reading back the data to verify only the new content exists
Expected Serial Monitor Output:
After uploading this code, the Serial Monitor will display:
What's Happening:
- SD card is successfully initialized
- Old file is deleted (if it existed)
- New file is created and two lines of text are written
- File is closed to ensure data is saved
- File is reopened for reading
- Content is read character-by-character and displayed
Testing Overwrite Functionality:
Test 1 - Initial Run: Upload the code and observe the output above.
Test 2 - Verify Overwrite: Press the reset button on your Arduino Mega (or re-upload the code). The Serial Monitor should show EXACTLY the same output - not doubled! This confirms that the file was overwritten, not appended to.
Test 3 - Computer Verification:
- Power off the Arduino
- Remove the micro SD card from the module
- Insert it into a USB SD card reader
- Connect to your computer
- Open "arduino.txt" in a text editor
- Verify it contains only the two lines, regardless of how many times you reset the Arduino
Comparison with Append Mode:
If you had used FILE_WRITE without SD.remove(), each reset would add duplicate lines. With the overwrite method, the file always contains exactly what was written in the most recent run - perfect for configuration files and status updates!
Video Tutorial
Practical Tips for Arduino SD Card Projects
Data Logging Best Practices:
- Buffer Your Data: Instead of writing every single sensor reading immediately, collect several readings in memory and write them in batches. This reduces SD card wear and improves performance.
- Use Timestamps: Always log data with timestamps (using RTC module) so you know when each measurement was taken. Format: "2026-01-20 14:30:45, 25.3, 65" (date, time, temperature, humidity)
- CSV Format: Structure your data as CSV (Comma-Separated Values) for easy import into Excel, Python, or data analysis tools:
- File Naming: Use descriptive filenames with dates: "log2026.txt" or "sensor.csv"
Performance Optimization:
- Minimize file.open() calls: Open file once, write multiple times, then close
- Use file.flush(): Forces data from buffer to SD card without closing file
- Avoid excessive writes: SD cards have limited write cycles (~100,000 per block)
- Monitor file sizes: Large files (>1MB) take longer to open and read
Power Considerations:
- Clean Power Supply: SD cards are sensitive to power fluctuations during write operations
- Add Capacitors: A 100µF capacitor between VCC and GND can stabilize power
- Safe Shutdown: Always close files before removing power to prevent corruption
- Battery Backup: Consider adding backup power for critical data logging applications
Debugging Techniques:
- Test with Serial: First verify your logic with Serial.print() before writing to SD
- Check Return Values: SD.begin() returns false if initialization fails
- File Object Check: if (!myFile) means the file failed to open
- Use Serial Debug: Print confirmation messages at each step to track program flow
Function References
For comprehensive documentation on all available functions and advanced SD card operations, refer to these detailed resources:
Core Libraries:
- Serial Communication - Complete guide to Serial.print(), Serial.println(), and debugging techniques
- Arduino SD Card Library Reference - Full documentation of SD library functions including:
- SD.begin() - Initialize SD card
- SD.open() - Open/create files
- SD.exists() - Check file existence
- SD.remove() - Delete files
- SD.mkdir() - Create directories
- File.print() / file.println() - Write data
- File.read() / file.available() - Read data
- File.close() - Close files properly
- File system management and directory operations
- Binary file reading/writing for efficient data storage
- Handling large files and memory management
- Error handling and troubleshooting SD card issues
- Performance optimization for high-speed data logging
- "Card failed" error: Check wiring, ensure card is formatted FAT32, try a different SD card
- Can't open file: Verify filename uses 8.3 format, check if SD.begin() succeeded
- Data corruption: Always call file.close() after writing, ensure stable power supply
- Slow performance: Use file.flush() periodically during long write operations
- Files not visible on computer: Safely eject card before removing from module
Additional Topics:
Common SD Card Troubleshooting:
If you encounter issues: