Arduino Mega - Stepper Motor and Limit Switch
Ready to learn how to control stepper motors with limit switches? You're in the perfect place! This comprehensive Arduino Mega tutorial will walk you through everything you need to know about combining these two essential components for precise motion control in your projects.
Whether you're building a 3D printer, CNC machine, robotic arm, or automated door system, understanding how to use limit switches with stepper motors is a crucial skill that opens up countless possibilities. Limit switches act as the "eyes" of your mechanical system, telling your Arduino Mega when moving parts have reached specific positions, while stepper motors provide the precise, controlled movement that makes automation possible.
In this hands-on guide, we'll explore three practical scenarios that you'll encounter in real-world projects: stopping a stepper motor instantly when it hits a limit, making it reverse direction automatically, and creating a system that changes direction based on two different limit switches. These techniques are the foundation of many automated systems, from simple linear actuators to complex multi-axis machines.
By the end of this tutorial, you'll have the confidence to integrate Arduino Mega stepper motor limit switch control into your own projects, plus you'll understand the programming logic behind professional automation systems. Let's dive in and bring some intelligent motion control to your Arduino Mega projects - I promise it's more straightforward than you might think!
Hardware Preparation
Or you can buy the following kits:
| 1 | × | DIYables Sensor Kit (18 sensors/displays) |
Additionally, some of these links are for products from our own brand, DIYables .
Overview of Stepper Motor and Limit Switch
Stepper motors and limit switches are a perfect partnership in automation projects, working together to create precise, controlled motion systems that know exactly where they are and when to stop. Think of this combination as the brain and sensory system of mechanical automation - the stepper motor provides accurate movement while the limit switch provides position feedback.
A stepper motor is a brushless DC motor that divides a full rotation into a large number of discrete steps (typically 200 steps per revolution for NEMA 17 motors). This means you can control rotation with incredible precision - down to 1.8 degrees per step! Unlike regular DC motors that spin continuously, stepper motors move in exact increments, making them ideal for applications where you need to know exactly how far something has moved. They're commonly used in 3D printers, CNC machines, camera gimbals, and robotic systems because they can hold their position even when power is removed and don't require feedback sensors for basic positioning.
Limit switches are mechanical switches that detect when a moving object has reached a specific position or boundary. They act as safety devices and position sensors, telling your Arduino Mega "Hey, we've reached the end of travel!" or "The moving part is now at the home position." Most limit switches are normally open (NO), meaning they complete the circuit when pressed, though some are normally closed (NC). They're incredibly reliable, can handle high currents, and work in harsh environments - which is why you'll find them in everything from garage door openers to industrial machinery.
When you combine Arduino Mega stepper motor and limit switch control, you create intelligent motion systems that can move precisely and know their boundaries. This combination is essential for creating linear actuators, automated sliding mechanisms, robotic joints with defined ranges, and any system that needs to move between specific positions safely and accurately.
If you do not know about stepper motor and limit switch (pinout, how it works, how to program ...), learn about them in the following tutorials:
- Arduino Mega - Limit Switch tutorial
Wiring Diagram
Let's take a look at the wiring setup - don't worry, it's more straightforward than it might appear at first glance! Understanding these connections is key to getting your stepper motor limit switch project working smoothly. This tutorial covers two different wiring configurations: one for a single limit switch setup and another for a dual limit switch system.
This tutorial provides the Arduino Mega codes for two cases: One stepper motor + one limit switch, One stepper motor + two limit switches.
- Wiring diagram between the stepper motor and a limit switch
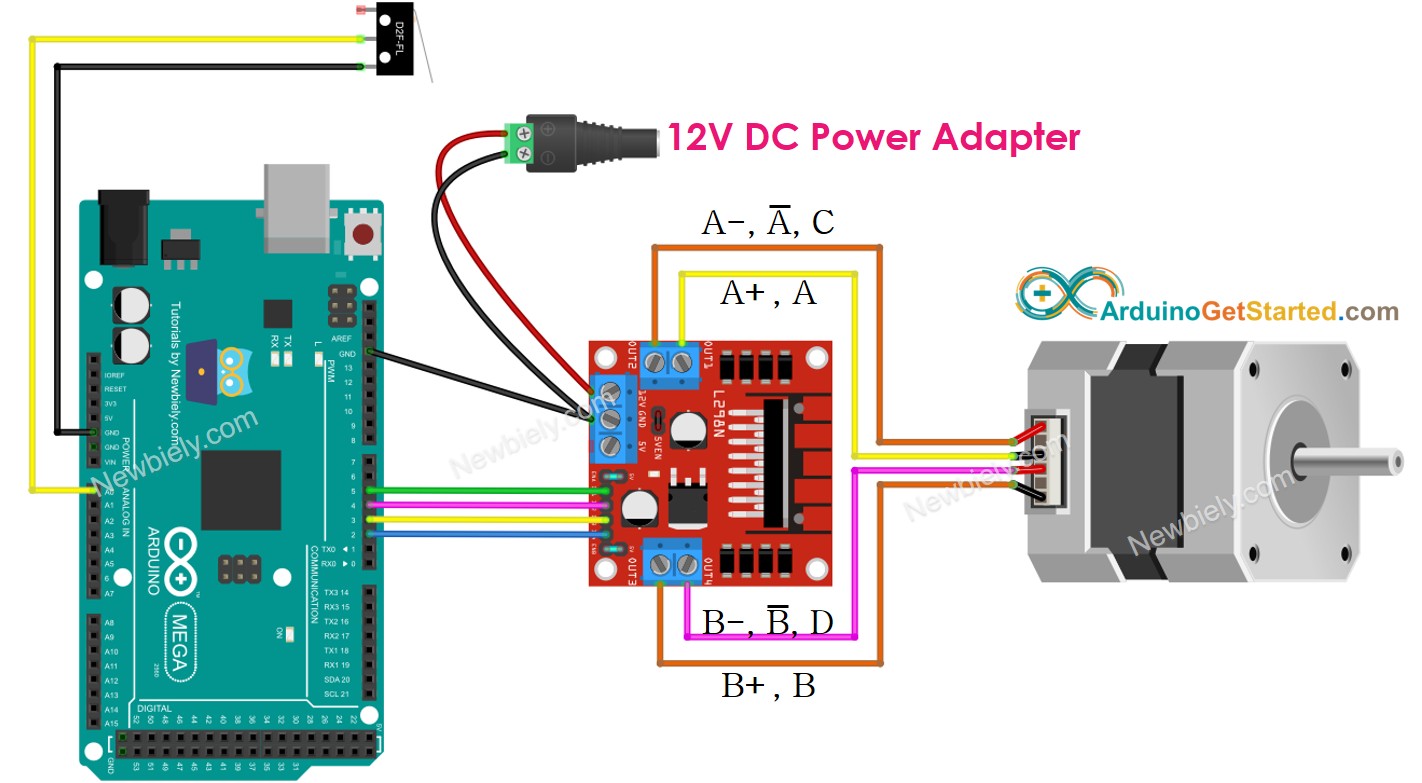
This image is created using Fritzing. Click to enlarge image
| Component Pin | Arduino Mega Pin |
|---|---|
| Stepper Motor (via L298N) IN1 | Pin 5 |
| Stepper Motor (via L298N) IN2 | Pin 4 |
| Stepper Motor (via L298N) IN3 | Pin 3 |
| Stepper Motor (via L298N) IN4 | Pin 2 |
| Limit Switch Signal | Pin A0 |
| Limit Switch GND | GND |
| L298N VCC | 5V |
| L298N GND | GND |
| L298N 12V | External 12V Power Supply |
- Wiring diagram between the stepper motor and two limit switches
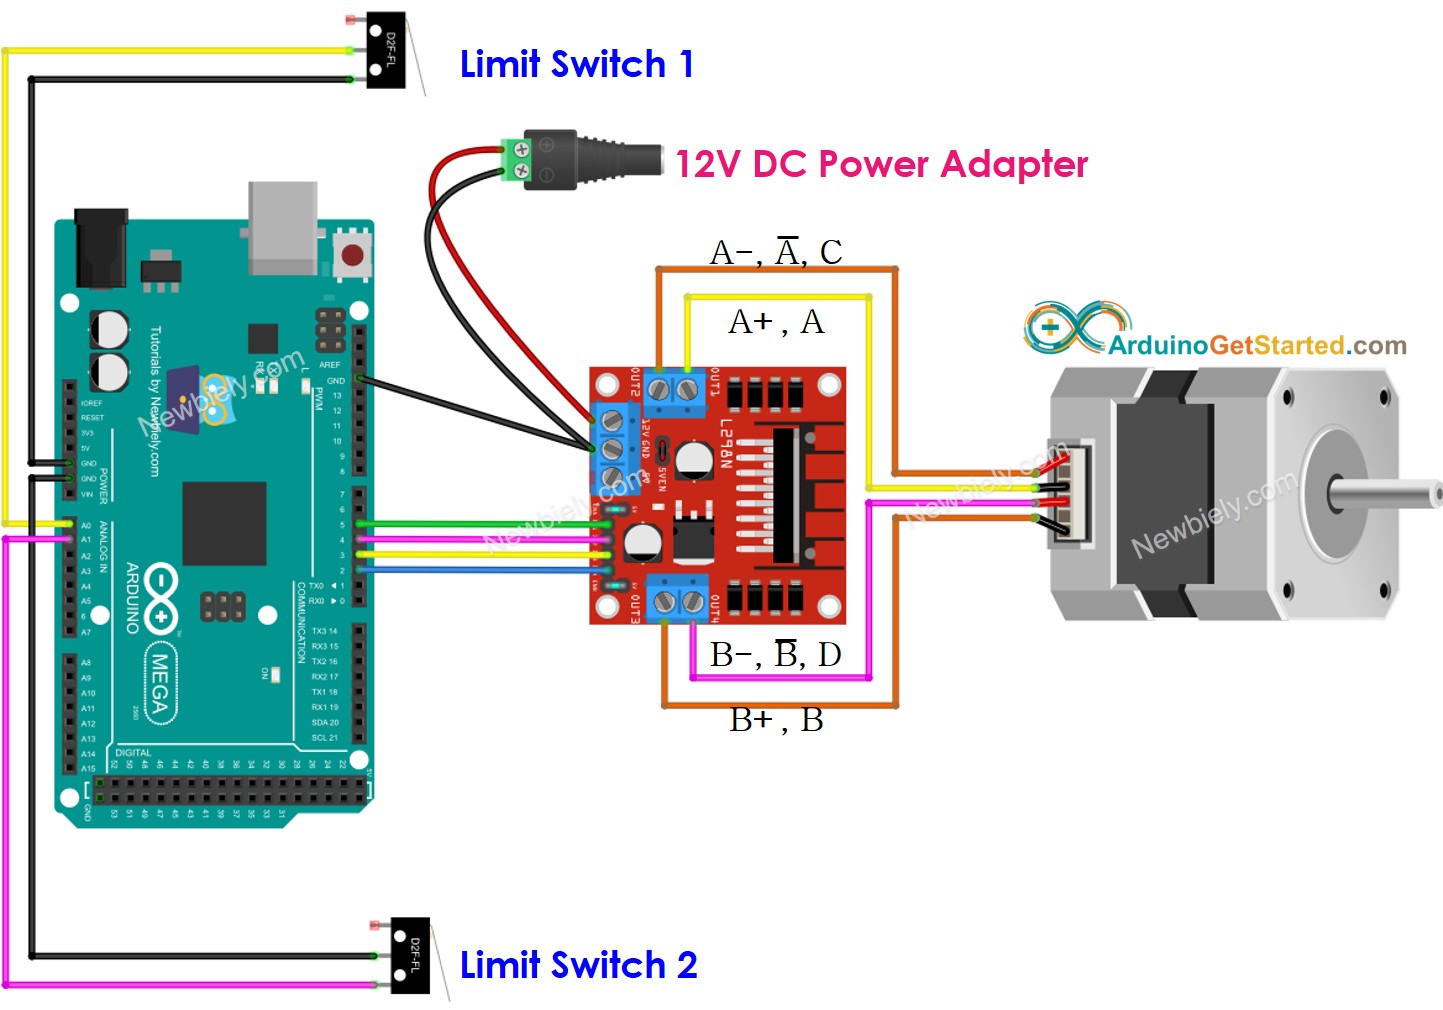
This image is created using Fritzing. Click to enlarge image
| Component Pin | Arduino Mega Pin |
|---|---|
| Stepper Motor (via L298N) IN1 | Pin 5 |
| Stepper Motor (via L298N) IN2 | Pin 4 |
| Stepper Motor (via L298N) IN3 | Pin 3 |
| Stepper Motor (via L298N) IN4 | Pin 2 |
| Limit Switch 1 Signal | Pin A0 |
| Limit Switch 2 Signal | Pin A1 |
| Limit Switch 1 & 2 GND | GND |
| L298N VCC | 5V |
| L298N GND | GND |
| L298N 12V | External 12V Power Supply |
Important Safety Note: Make sure to connect the external 12V power supply to the L298N driver module properly. The stepper motor requires more current than the Arduino Mega can provide directly, which is why we use the L298N driver. Always double-check your power connections before applying power to prevent damage to your components.
※ NOTE THAT:
Depending on the stepper motor, the wiring connection between the stepper motor and L298N may be different. Please take a close look at this Arduino Mega - Stepper Motor tutorial to see how to connect the stepper motor to the L298N motor driver.
Arduino Mega Code - Stop Stepper Motor by a Limit Switch
Now for the exciting part - let's bring this project to life with code! Don't worry if you're new to programming stepper motors or working with limit switches; we'll walk through everything step by step. The beauty of this approach is that once you understand the basic concepts, you can apply them to all sorts of automation projects.
There are several ways to make a stepper motor stop, and understanding the difference is important for your projects:
- Call stepper.stop() function: This method doesn't stop the stepper motor immediately but gradually decelerates it to a stop. This is gentler on the mechanical system and provides smoother operation.
- Do NOT call stepper.run() function: This method stops the stepper motor immediately by simply not sending step pulses. This provides instant stopping but can be more abrupt.
For limit switch applications, immediate stopping is usually preferred because it provides precise positioning and prevents the motor from overrunning the limit switch position. The code below demonstrates how to make a stepper motor spin continuously and stop instantly when a limit switch is triggered.
Detailed Instructions
New to Arduino? No worries! Start with our Arduino Mega Getting Started guide to learn the basics first.
- Connect Your Hardware: Wire up your Arduino Mega, L298N motor driver, stepper motor, and limit switch according to the wiring diagram above. Take your time with this step - double-checking connections now will save you troubleshooting time later!
- Set Up Arduino Mega IDE: Connect your Arduino Mega to your PC via USB cable, then open Arduino Mega IDE and select the correct board (Arduino Mega) and COM port. If you're not sure which port, check the Device Manager on Windows or System Information on Mac.
- Install Required Libraries: Navigate to the Libraries icon on the left bar of the Arduino Mega IDE. We'll need two essential libraries for this project - don't worry, installing them is super easy!
- Install ezButton Library: Search for "ezButton", then find the button library by ArduinoGetStarted.com. Click the Install button to add this helpful library that makes working with buttons and switches much simpler.

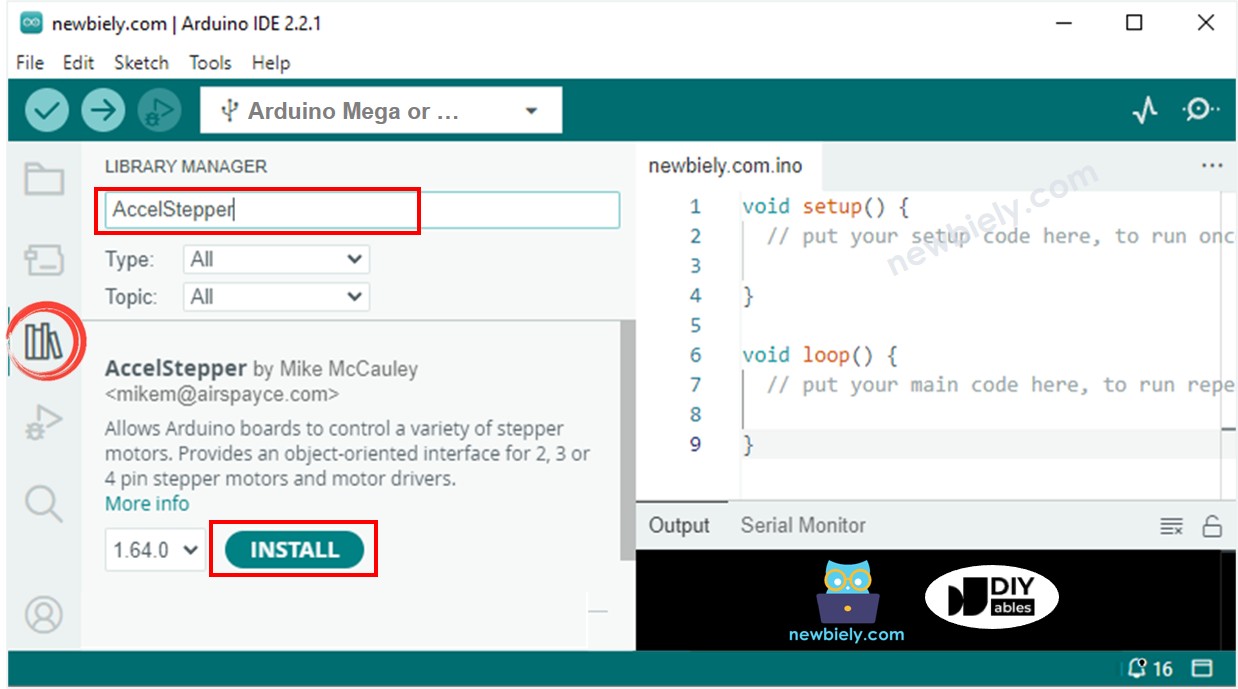
- Install AccelStepper Library: Search for "AccelStepper", then find the AccelStepper library by Mike McCauley. Click Install to add this powerful library that makes stepper motor control much more manageable than using basic digitalWrite commands.
- Upload the Code: Copy the code above and paste it into Arduino Mega IDE. Click the Upload button to transfer the program to your Arduino. You'll see some blinking lights on the Arduino Mega during upload - this is perfectly normal!
- Test the System: If your wiring is correct, you'll see the motor start rotating in a clockwise direction. The stepper motor will continue spinning until you interact with it.
- Trigger the Limit Switch: Gently press or touch the limit switch. You should see the motor stop immediately! This instant response is exactly what you want for precise position control.
- Monitor the Results: Open the Serial Monitor (Tools > Serial Monitor) to see real-time feedback about what's happening. The Arduino Mega will tell you when the limit switch is pressed and confirm that the motor has stopped.
Pro Tip: If your motor doesn't move or moves in the wrong direction, try swapping two of the stepper motor wires on the L298N connections. Stepper motor wiring can vary by manufacturer, so don't worry if you need to experiment a bit to get it right!
Serial Monitor Output
Code Explanation
Read the line-by-line explanation in comment lines of code!
Arduino Mega Code - Change Direction of Stepper Motor by a Limit Switch
This next example shows you how to create a more sophisticated system where the stepper motor automatically reverses direction when it hits a limit switch. This is incredibly useful for creating oscillating systems, automatic back-and-forth motion, or safety systems that reverse when they encounter obstacles.
The beauty of this approach is that it creates a self-contained system that can run indefinitely, changing direction whenever the limit switch is activated. This technique is commonly used in automated curtain systems, sliding door mechanisms, and linear actuators that need to move between two positions.
Detailed Instructions
- Prepare Your System: Make sure you have the same hardware setup from the previous example - Arduino Mega, L298N driver, stepper motor, and limit switch all connected according to our wiring diagram.
- Upload the New Code: Copy the code above and open it with Arduino Mega IDE. Click the Upload button to transfer this new program to your Arduino. The beauty of Arduino Mega is how easy it is to try different programs with the same hardware!
- Observe Initial Motion: If your wiring is correct, you'll see the motor begin spinning in the clockwise direction. This is the default starting direction set in the code.
- Test Direction Change: Touch or press the limit switch and watch what happens. You should see the stepper motor immediately change to anti-clockwise (counter-clockwise) rotation. This direction change should be smooth and immediate.
- Test Continuous Operation: Touch the limit switch again, and you'll see the motor change back to clockwise rotation. The system will continue this back-and-forth pattern every time the limit switch is activated.
- Monitor the System: Keep the Serial Monitor open to see real-time updates about direction changes. This feedback helps you understand exactly when the system detects the limit switch and changes direction.
- Experiment with Positioning: Try placing the limit switch at different positions to see how it affects the motor's travel distance. This will help you understand how to position limit switches in your own projects.
Pro Tip: This type of automatic direction reversal is perfect for creating pendulum-like motions or systems that need to sweep back and forth. You can adjust the motor speed in the code to make the motion faster or slower depending on your application!
Serial Monitor Output
Arduino Mega Code - Change Direction of Stepper Motor by two Limit Switches
Now let's explore the most sophisticated setup - using two limit switches to create a fully automated system with defined boundaries! This configuration is the foundation of many professional automation systems, including 3D printers, CNC machines, and robotic systems that need to operate within specific limits.
With two limit switches, you can create a system that automatically changes direction when it reaches either end of its travel range. This creates a completely autonomous back-and-forth motion that's perfect for applications like automated sliding doors, conveyor systems, or any mechanism that needs to move between two specific positions repeatedly.
Detailed Instructions
- Update Your Wiring: Follow the two-limit-switch wiring diagram shown earlier in this tutorial. You'll be adding a second limit switch to pin 6 while keeping the first one on pin 7. Take your time with the connections - having two switches means double-checking is extra important!
- Position Your Limit Switches: Place the two limit switches at opposite ends of your motor's travel path. Think of them as the "boundaries" of your system - when the moving part hits either switch, it should reverse direction.
- Upload the Two-Switch Code: Copy the code above and open it with Arduino Mega IDE. Click Upload to transfer this enhanced program to your Arduino. This code is designed to handle input from both limit switches intelligently.
- Test Initial Operation: If your wiring is correct, you'll see the motor start spinning in the clockwise direction, just like in our previous examples. The motor will continue in this direction until it encounters the first limit switch.
- Trigger Limit Switch 1: When you touch or activate limit switch 1 (connected to pin 6), you should see the stepper motor immediately change to anti-clockwise rotation. The system now knows it's hit one boundary and needs to reverse.
- Trigger Limit Switch 2: As the motor spins in the opposite direction, activate limit switch 2 (connected to pin 7). The motor should now change back to clockwise rotation, creating a complete cycle.
- Watch Automatic Operation: Once you've tested both switches, you can let the system run automatically. If positioned correctly, the moving mechanism will travel back and forth between the two limit switches, creating smooth, controlled oscillation.
- Fine-tune Positioning: Adjust the physical position of your limit switches to change the travel distance. This allows you to customize the range of motion for your specific application.
Pro Tip: This two-limit-switch setup is incredibly versatile! You can use it to create everything from automated window blinds to camera slider systems. The key is positioning the switches at exactly the right spots for your intended range of motion!
Serial Monitor Output
Application Ideas
Project Applications: Now that you've mastered Arduino Mega stepper motor limit switch control, your creativity is the only limit! Here are some exciting project ideas to get you started:
You could create an automated sliding door system that opens and closes based on sensor input, with limit switches ensuring it never over-travels and damages the mechanism. Build a camera slider for smooth, professional video shots that automatically travels between two positions for time-lapse photography. Set up a linear actuator for opening windows, adjusting solar panels, or controlling ventilation systems in greenhouses.
Consider developing an automated curtain or blind controller that responds to light sensors and time schedules, with limit switches preventing the motor from running when the curtains reach their fully open or closed positions. You could even construct a simple CNC or 3D printer axis using these techniques as the foundation for more complex multi-axis systems.
For more advanced projects, try building a robotic arm joint with defined movement limits, an automated sorting system that moves items back and forth between processing stations, or a precision measuring device that can return to exact positions repeatedly. The combination of stepper motor precision and limit switch feedback makes all of these projects achievable with the skills you've just learned!
Challenge Yourself
Challenge Yourself: Ready to take your stepper motor and limit switch skills to the next level? Try these fun challenges to expand your knowledge and build more sophisticated systems!
Easy Challenges (Perfect for beginners):
- Modify the motor speed by changing the setMaxSpeed() value - try making it move slower for delicate applications or faster for quick positioning
- Add LED indicators that light up when each limit switch is activated, giving you visual feedback about the system state
- Change the delay between direction changes by adding a pause when a limit switch is triggered
Medium Challenges (Ready to combine concepts):
- Add a push button that allows manual control to override the automatic limit switch behavior
- Incorporate an LCD display to show the current direction, switch status, and step count
- Create a system that counts how many times it has traveled between the limit switches and stops after a predetermined number of cycles
- Add acceleration and deceleration to make the motor speed up and slow down gradually instead of starting and stopping abruptly
Advanced Challenges (Time to get creative):
- Build a complete linear positioning system where you can command the motor to move to specific positions between the two limit switches
- Create a "homing" sequence that finds both limit switches at startup and then moves to a center position
- Develop a system that varies its travel distance based on input from a potentiometer or other sensor
- Design a multi-axis system using multiple stepper motors and limit switch pairs working together
Expert Level Challenge:
- Build a complete CNC-style control system with G-code-like commands that can position the motor at precise locations within the limit switch boundaries
Start with the easy challenges and work your way up - don't worry if you get stuck, that's how we learn! Each challenge will teach you new programming concepts and help you understand how professional automation systems work. What will you build first?