Arduino Mega - LED - Blink Without Delay
Ready to unlock one of Arduino's most powerful programming techniques? You're in the perfect place! This tutorial will show you how to blink an LED without using the delay() function - and trust me, once you master this technique, your Arduino projects will never be the same.
Let's imagine that your Arduino Mega has to do two important tasks: blinking an LED and checking a button state, which can be pressed anytime. If we use the delay() function (described in a previous tutorial), your Arduino may miss some of the button pressing events. In other words, your Arduino cannot fully handle the second task while it's busy waiting during the delay period.
This is where the "blink without delay" technique becomes a game-changer! In this comprehensive tutorial, we'll learn how your Arduino Mega can blink an LED and monitor a button's state simultaneously without missing any pressing events. Think of it like being able to walk and chew gum at the same time - your Arduino will become truly multitasking capable.
We'll work through three detailed examples and compare the differences between them, so you can see exactly why this method is so powerful. You'll discover how to use the millis() function effectively, understand timing concepts that apply to countless projects, and gain skills that will make you a more confident Arduino programmer. By the end of this tutorial, you'll have the knowledge to create responsive, non-blocking Arduino projects that can handle multiple tasks smoothly and efficiently.
We will run though three below examples and compare the difference between them.
- Arduino blinks LED by using delay() function
- Arduino blinks LED by using millis() function
- Arduino blinks LED by using ezLED library
※ NOTE THAT:
- This method is not just only for blinking LED and checking the button's state. Generally, this method lets Arduino do several tasks at the same time without blocking each other.
- This tutorial provides in-depth knowledge that helps you understand the working principle. To make it easy, you can use Arduino - LED library.
Hardware Preparation
Or you can buy the following kits:
| 1 | × | DIYables Sensor Kit (18 sensors/displays) |
Additionally, some of these links are for products from our own brand, DIYables .
Buy Note: Use the LED Module for easier wiring. It includes an integrated resistor.
Wiring Diagram
Let's set up the connections for our LED blink without delay project - don't worry, the wiring is straightforward and we'll guide you through each connection! Understanding these connections is crucial for getting your non-blocking Arduino project working smoothly.
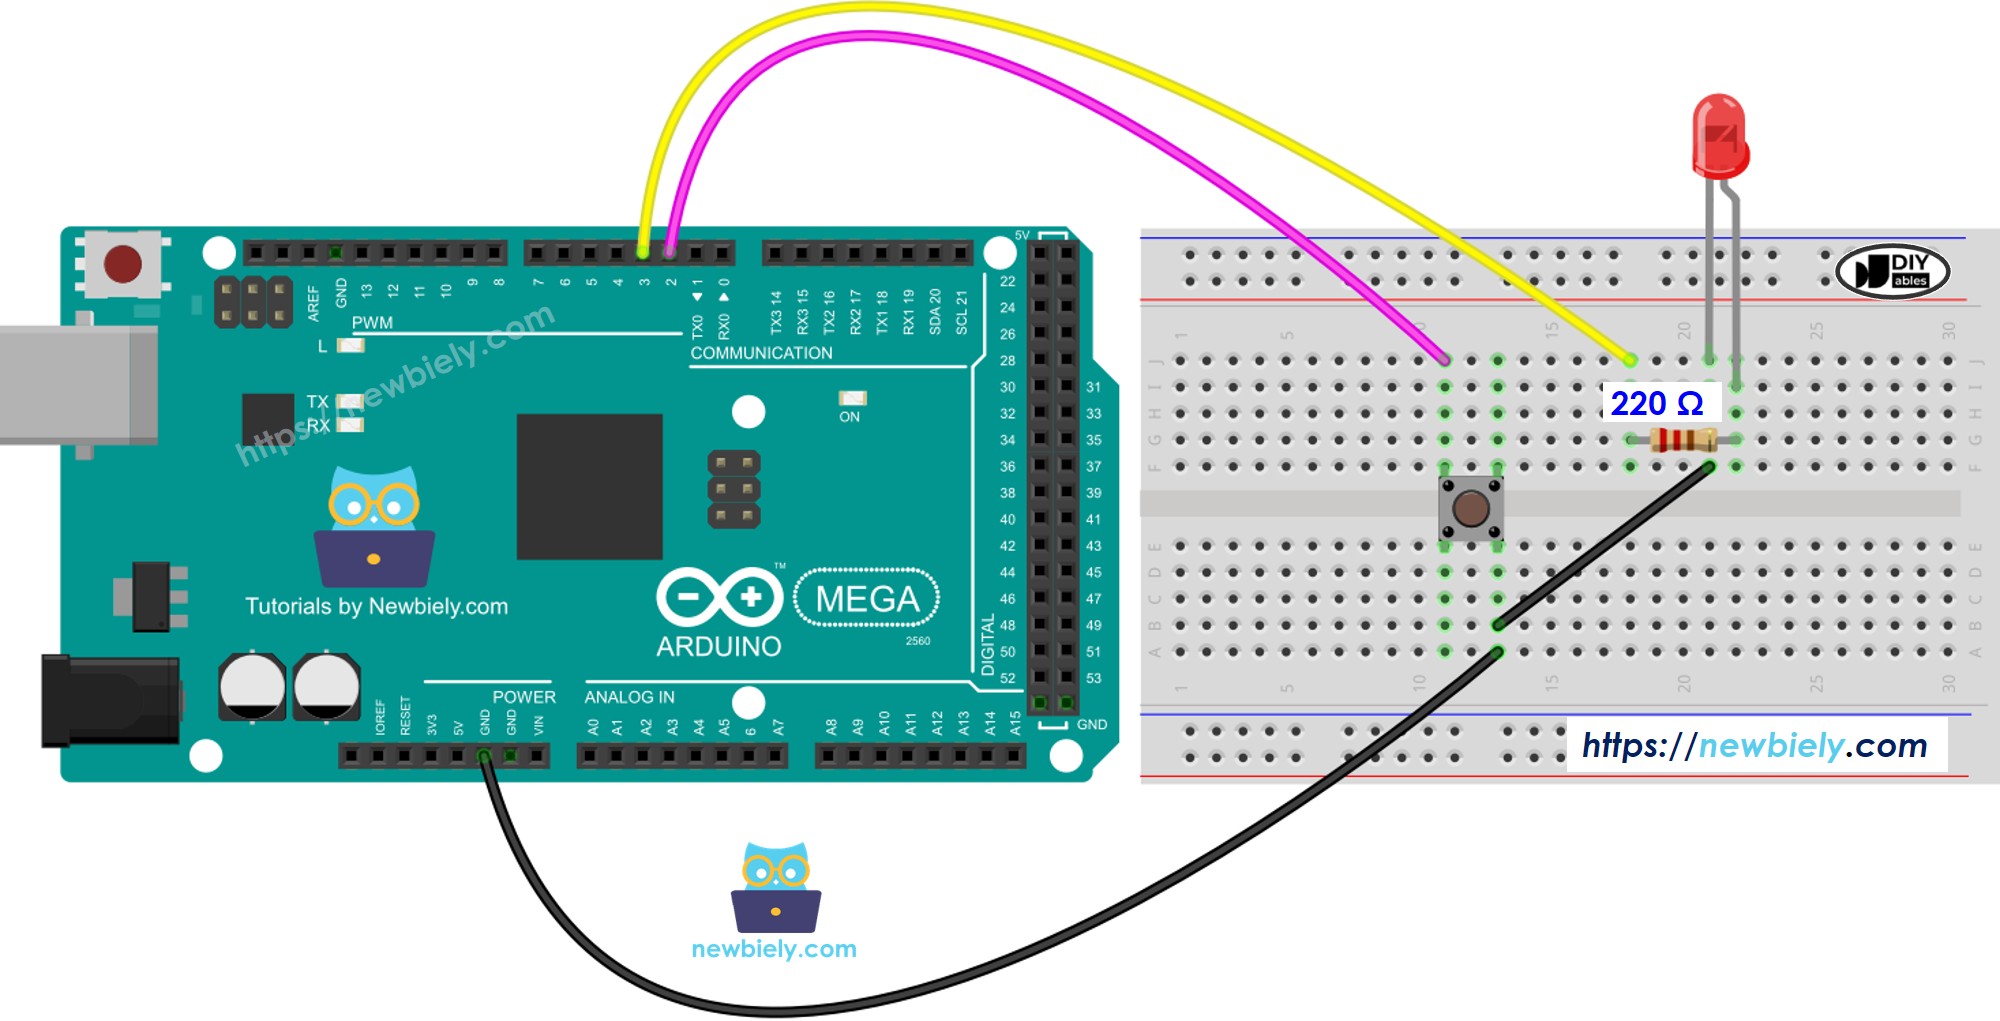
This image is created using Fritzing. Click to enlarge image
The wiring diagram above shows how to connect both the LED and button to your Arduino Mega. Take your time with the connections - getting them right the first time will save you troubleshooting later. The LED connects through a current-limiting resistor to protect both the LED and your Arduino, while the button uses the internal pull-up resistor feature of the Arduino Mega for clean, reliable input readings.
| Component Pin | Arduino Mega Pin | Purpose |
|---|---|---|
| LED Long Leg (Anode) | Pin 13 via 220Ω Resistor | Output signal to control LED |
| LED Short Leg (Cathode) | GND | Ground connection |
| Button Pin 1 | Pin 7 | Digital input with internal pull-up |
| Button Pin 2 | GND | Ground connection for button |
Arduino Code - With Delay
Now for the interesting part - let's first look at the traditional blocking approach so you can understand exactly why the non-blocking method is so much better! This first example uses the delay() function, and you'll see how it creates limitations in your Arduino's responsiveness. Don't worry if the concept seems complex at first; we'll walk through everything step by step.
Detailed Instructions
New to Arduino? No worries! Start with our Arduino Getting Started guide to learn the basics first.
- Connect Your Hardware: Wire up the LED and button according to the diagram above. Take your time with this - good connections are the foundation of a working project.
- Open Arduino IDE: Launch the Arduino IDE on your computer and select your Arduino Mega from the board menu. Don't forget to choose the correct COM port!
- Upload the Code: Copy the code above into a new Arduino sketch and click the Upload button. You should see the "Done uploading" message when it's successful.
- Open Serial Monitor: Click the Serial Monitor button (magnifying glass icon) to see the button press outputs. Set the baud rate to 9600.
- Test the Blocking Behavior: Press the button multiple times rapidly while watching the LED blink. You'll notice something frustrating - some of your button presses get missed!
- Observe the Problem: Watch the Serial Monitor output. You'll see that not all your button presses are detected, especially when you press during the delay periods.
Pro Tip: Try pressing the button at different times during the LED cycle. You'll notice that presses during the delay() periods are completely ignored - this is the exact problem we're going to solve!
- Connect Arduino to PC via USB cable
- Open Arduino IDE, select the right board and port
- Copy the above code and open with Arduino IDE
- Click Upload button on Arduino IDE to upload code to Arduino
- Open Serial Monitor
- Press the button 4 times
- See the LED: The LED toggles between ON/OFF periodically every second
- See the output in Serial Monitor
- On Serial Monitor, some pressing times were missed. That is because, during delay time, Arduino CANNOT do anything. Therefore, it is unable to detect the pressing event.
Arduino Code - Without Delay
Here's where the magic happens! This non-blocking approach using millis() will completely transform how your Arduino handles multiple tasks. The LED will blink at exactly the same rate, but now your Arduino remains fully responsive to button presses. It's like upgrading from a single-tasking computer to a multitasking powerhouse!
Detailed Instructions
- Upload the New Code: Replace the previous code with this millis()-based version and upload it to your Arduino Mega. You're about to see a dramatic improvement in responsiveness!
- Test Multiple Tasks: Press the button multiple times rapidly while the LED is blinking. This time, you'll notice that every single button press gets detected - no more missed events!
- Compare the Difference: Watch how the LED continues its steady blinking rhythm while your Arduino responds instantly to every button press. This is the power of non-blocking programming!
- Check Serial Monitor: Open the Serial Monitor and press the button several times. You'll see that all pressing events are now captured, regardless of when during the LED cycle you press.
- Experiment with Timing: Try holding the button down briefly or pressing it in quick succession. Notice how responsive and reliable the system has become compared to the delay-based version.
- Run the above code and press the button 4 times
- See the LED: The LED toggles between ON/OFF periodically every second
- See the output in Serial Monitor
- All pressing events were detected.
Code Explanation
Read the line-by-line explanation in comment lines of code!
Adding More Tasks
The below code demonstrates the true power of non-blocking programming by controlling two LEDs with different blink intervals while simultaneously monitoring a button. This example shows how you can scale this technique to handle multiple independent tasks - imagine the possibilities for your future projects!
Extendability
This millis()-based method opens up incredible possibilities for your Arduino Mega projects! You can use this non-blocking approach to let your Arduino handle several tasks simultaneously without any interference between them. Think of it as giving your Arduino the ability to multitask like a modern computer.
For example, you could create a project that sends requests to the Internet and waits for responses while simultaneously blinking LED status indicators, checking multiple buttons, reading sensor values, and updating a display - all at the same time! The key is that each task manages its own timing using millis(), allowing them to coexist harmoniously.
Other practical applications include: creating responsive user interfaces that don't freeze during long operations, building data logging systems that continue collecting sensor readings while writing to SD cards, developing IoT devices that maintain network connections while controlling physical outputs, or designing interactive installations that respond to multiple inputs while running complex lighting sequences.
Application Ideas: Now that you've mastered non-blocking programming, your creativity is the only limit! Here are some exciting project ideas to get you started: You could create a smart home controller that manages lights, sensors, and wireless communication simultaneously, build a weather station that logs data while updating a web server and displaying real-time information, set up an interactive art installation with multiple sensors and LED arrays responding independently, develop a security system that monitors multiple zones while sending alerts and updating status displays, or even design a robot that can navigate while processing sensor data and responding to remote commands. What will you build first?
Challenge Yourself: Ready to take your non-blocking programming skills to the next level? Try these fun challenges:
- Easy Challenge: Modify the code to blink three LEDs at different rates (500ms, 1000ms, and 1500ms) while monitoring the button. Start with this one to build your confidence!
- Medium Challenge: Add a second button that changes the blink speed of one LED when pressed. This will teach you how to handle multiple inputs in non-blocking code.
- Advanced Challenge: Create a "Simon Says" style memory game using multiple LEDs and buttons, where patterns play while the system remains responsive to player input. Don't worry if you get stuck - that's how we learn!
- Expert Challenge: Build a data logging system that reads a sensor every 30 seconds, blinks a status LED every second, checks for button presses to start/stop logging, and sends data over serial - all without blocking any task.
- Creative Challenge: Design your own interactive project that combines at least three different timing intervals. Maybe a traffic light simulator, a musical light show, or a plant watering reminder system!
Start with the easy ones and work your way up! Each challenge will strengthen your understanding of non-blocking programming and prepare you for even more complex projects. Remember, the best way to learn is by doing, so don't be afraid to experiment and make mistakes along the way.