Arduino Mega - Stepper Motor
Ready to learn how to control stepper motors with your Arduino? You're in the perfect place! This comprehensive tutorial will walk you through everything you need to know about using an L298N driver to control bipolar stepper motors. Whether you're building a 3D printer, robot, or automated positioning system, mastering stepper motor control opens up a world of precise movement possibilities.
Don't worry if you're new to stepper motors – they might seem complex at first, but with the right guidance, you'll find them incredibly useful and surprisingly straightforward to work with. Unlike regular DC motors that spin continuously, stepper motors move in precise, controlled steps, making them perfect for applications where you need exact positioning and repeatable movements.
In this hands-on tutorial, we'll cover everything from basic wiring to advanced programming techniques. You'll learn how to control position with pinpoint accuracy, adjust speed and acceleration smoothly, and change direction effortlessly. We'll be using the popular NEMA 17 stepper motor as our example, but the principles apply to any 4-wire bipolar stepper motor you might encounter in your projects.
By the end of this tutorial, you'll have the confidence to integrate stepper motors into your own creative projects. From automated camera sliders to precision CNC machines, the skills you learn here will serve as a foundation for countless exciting builds. Let's dive in and bring some precision movement to your Arduino Mega projects!
In this tutorial, we are going to learn:
- How to use L298N driver to control bipolar stepper motor
- How to control the position of stepper motor
- How to control the speed of stepper motor
- How to control the direction of stepper motor
The tutorial can apply to any kind of bipolar stepper motor (4 wires). The tutorial will take NEMA 17 stepper motor as an example.
Hardware Preparation
Or you can buy the following kits:
| 1 | × | DIYables Sensor Kit (18 sensors/displays) |
Additionally, some of these links are for products from our own brand, DIYables .
Overview of Stepper Motor
Stepper motors are fascinating devices that convert electrical pulses into precise mechanical rotation. Think of them as the ultimate precision tools of the motor world – instead of spinning freely like regular DC motors, they move in exact, repeatable steps. This makes them absolutely perfect for applications where you need to know exactly where your motor is positioned at any given moment.
There are two popular types of stepper motors that you'll encounter in your Arduino Mega projects:
- Bipolar stepper motors: These motors have 4 wires and offer excellent torque and precision. They're the type we'll focus on in this tutorial since they're incredibly versatile and widely used in everything from 3D printers to robotic arms.
- Unipolar stepper motors: These come with either 5 or 6 wires and are slightly easier to control but typically provide less torque than their bipolar cousins.
Here's a helpful tip: if you have a 6-wire unipolar stepper motor lying around, you're in luck! You can actually use four of the six wires and control it exactly like a bipolar stepper motor. This gives you more flexibility in your component choices and helps you make the most of what you have in your parts collection.
For 5-wire unipolar stepper motor projects, we have a dedicated tutorial covering Arduino Mega - control 28BYJ-48 stepper motor using ULN2003 driver. But today, we're diving deep into bipolar stepper motors because they offer superior performance and are incredibly popular in serious maker projects.
What makes bipolar stepper motors special is their internal construction with two coils (called phases) that create magnetic fields. By energizing these coils in specific sequences, we can make the motor shaft rotate in precise increments. This level of control is what makes them indispensable for applications requiring accurate positioning, like camera gimbals, automated telescope mounts, or precision measurement equipment.
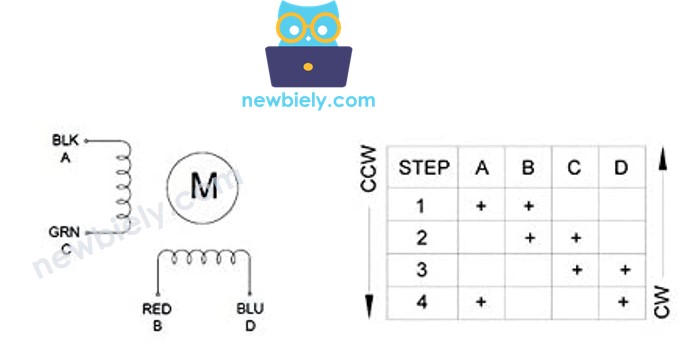
Bipolar Stepper Motor pinout
Understanding the pinout is simpler than it looks! Don't worry – once you see the pattern, connecting your stepper motor will become second nature. The bipolar stepper motor pinout has 4 pins that correspond to the two internal coils. Depending on manufacturers, the motor's pins have several naming conventions, but they all refer to the same basic concept.
The below table shows some widely-used pin-naming conventions you'll encounter:
| PIN NO | Naming 1 | Naming 2 | Naming 3 |
|---|---|---|---|
| 1 | A+ | A | A |
| 2 | A- | A | C |
| 3 | B+ | B | B |
| 4 | B- | B | D |
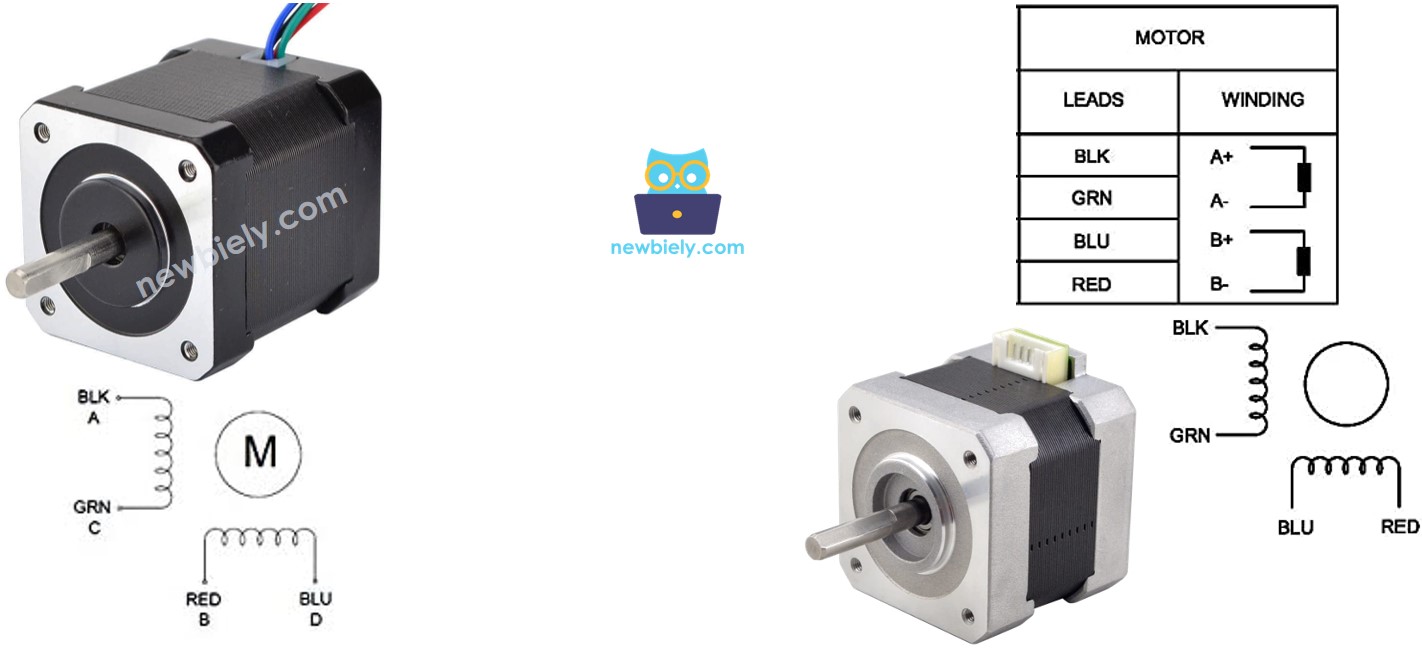
Here's something important to keep in mind: the order of pins, wire naming, and wire coloring can vary significantly between manufacturers. This might seem confusing at first, but don't let it discourage you! The key is to always check the datasheet or manual that comes with your specific motor. Think of it like a color-coding system – once you know which color goes with which coil, you're all set.
The image above shows the specifications of two different motors with different wire naming and wire coloring. Notice how the same electrical connections can have completely different color schemes? This is why reading the documentation is so important – it saves you from guesswork and potential frustration later.
Pro Tip: When you get a new stepper motor, take a moment to identify the coil pairs using a multimeter. Simply check continuity between wires – wires that show continuity belong to the same coil. This simple test can save you lots of troubleshooting time!
Steps per Revolution
Understanding steps per revolution is crucial for precise positioning in your Arduino Mega stepper motor projects. Every stepper motor has a specification that tells you the degree per step (let's call this DEG_PER_STEP), which is like the motor's "resolution" – how finely it can move. The beauty of stepper motors is that you can control them using different methods to achieve varying levels of precision.
The motor's specification specifies the degree per step (let's call DEG_PER_STEP). Depending on the method of control, the steps per revolution (let's call STEP_PER_REVOLUTION) is calculated as the following table:
| Control method | Steps per Revolution | Real degree per step |
|---|---|---|
| Full-step | STEP_PER_REVOLUTION = 360 / DEG_PER_STEP | DEG_PER_STEP |
| Half-step | STEP_PER_REVOLUTION = (360 / DEG_PER_STEP) * 2 | DEG_PER_STEP / 2 |
| Micro-step (1/n) | STEP_PER_REVOLUTION = (360 / DEG_PER_STEP) * n | DEG_PER_STEP / n |
Let me break this down with a practical example that you'll encounter frequently. Most NEMA 17 stepper motors (the ones commonly used in 3D printers) have a specification of 1.8 degrees per step. Here's how the math works out:
| Control method | Steps per Revolution | Real degree per step |
|---|---|---|
| Full-step | 200 steps/revolution | 1.8° |
| Half-step | 400 steps/revolution | 0.9° |
| Micro-step (1/n) | (200 * n) steps/revolution | (1.8 / n)° |
This flexibility is what makes stepper motors so powerful! Want smooth, precise movement for a camera slider? Use micro-stepping. Need maximum torque for lifting heavy objects? Full-step mode gives you the most holding power. The choice is yours based on your project's specific needs.
How to control a stepper motor using Arduino
Here's where things get exciting – your Arduino Mega is perfectly capable of generating the precise timing signals needed to control stepper motors. However, there's one important consideration: the control signals from your Arduino, while perfectly timed, don't have enough voltage and current to actually drive the stepper motor directly. Think of your Arduino Mega as the "brain" that knows exactly when to send signals, but it needs some "muscle" to make the motor actually move.
This is where a hardware driver becomes essential. The driver acts like a smart amplifier that does two critical jobs for your stepper motor Arduino Mega project:
- Signal Amplification: It takes the low-power control signals from your Arduino Mega and amplifies them to the voltage and current levels that your stepper motor needs to operate effectively.
- Protection: It creates a protective barrier between your delicate Arduino Mega and the high current/voltage requirements of the stepper motor, preventing any electrical damage to your microcontroller.
There are many different types of hardware drivers available for controlling stepper motors, each with their own advantages. Some are designed for high-precision applications, others for high-power motors, and some prioritize ease of use for beginners. The L298N driver strikes an excellent balance – it's powerful enough for most projects, affordable, widely available, and beginner-friendly.
The L298N driver is particularly popular in the Arduino Mega community because it can handle voltages up to 35V and currents up to 2A per channel, making it suitable for a wide range of stepper motors. Plus, it's incredibly forgiving and robust, which means you're less likely to accidentally damage it while learning.
Overview of L298N Driver
The L298N driver is your stepper motor's best friend and a fantastic choice for Arduino Mega projects! This versatile module is like having a professional motor controller in a compact, affordable package. What makes it truly special is its dual-purpose design – a single L298N driver can control either two separate DC motors OR one stepper motor, giving you incredible flexibility in your projects.
In this tutorial, we're focusing on using the L298N to control stepper motors, but it's worth knowing that you could easily repurpose the same driver for other motor-based projects later. Think of it as an investment in your component library that will serve you well across multiple builds.
The L298N stands out because it can handle serious power requirements – up to 35V and 2A per channel – which covers most hobbyist and even semi-professional applications. Whether you're building a desktop CNC machine, a camera dolly, or a precision positioning system, this driver has the muscle to get the job done reliably.
L298N Driver Pinout
Let's take a look at the pinout – don't worry, it's simpler than it looks! Understanding these connections is key to getting your stepper motor project working smoothly. Once you understand what each pin does, connecting everything becomes straightforward and logical.
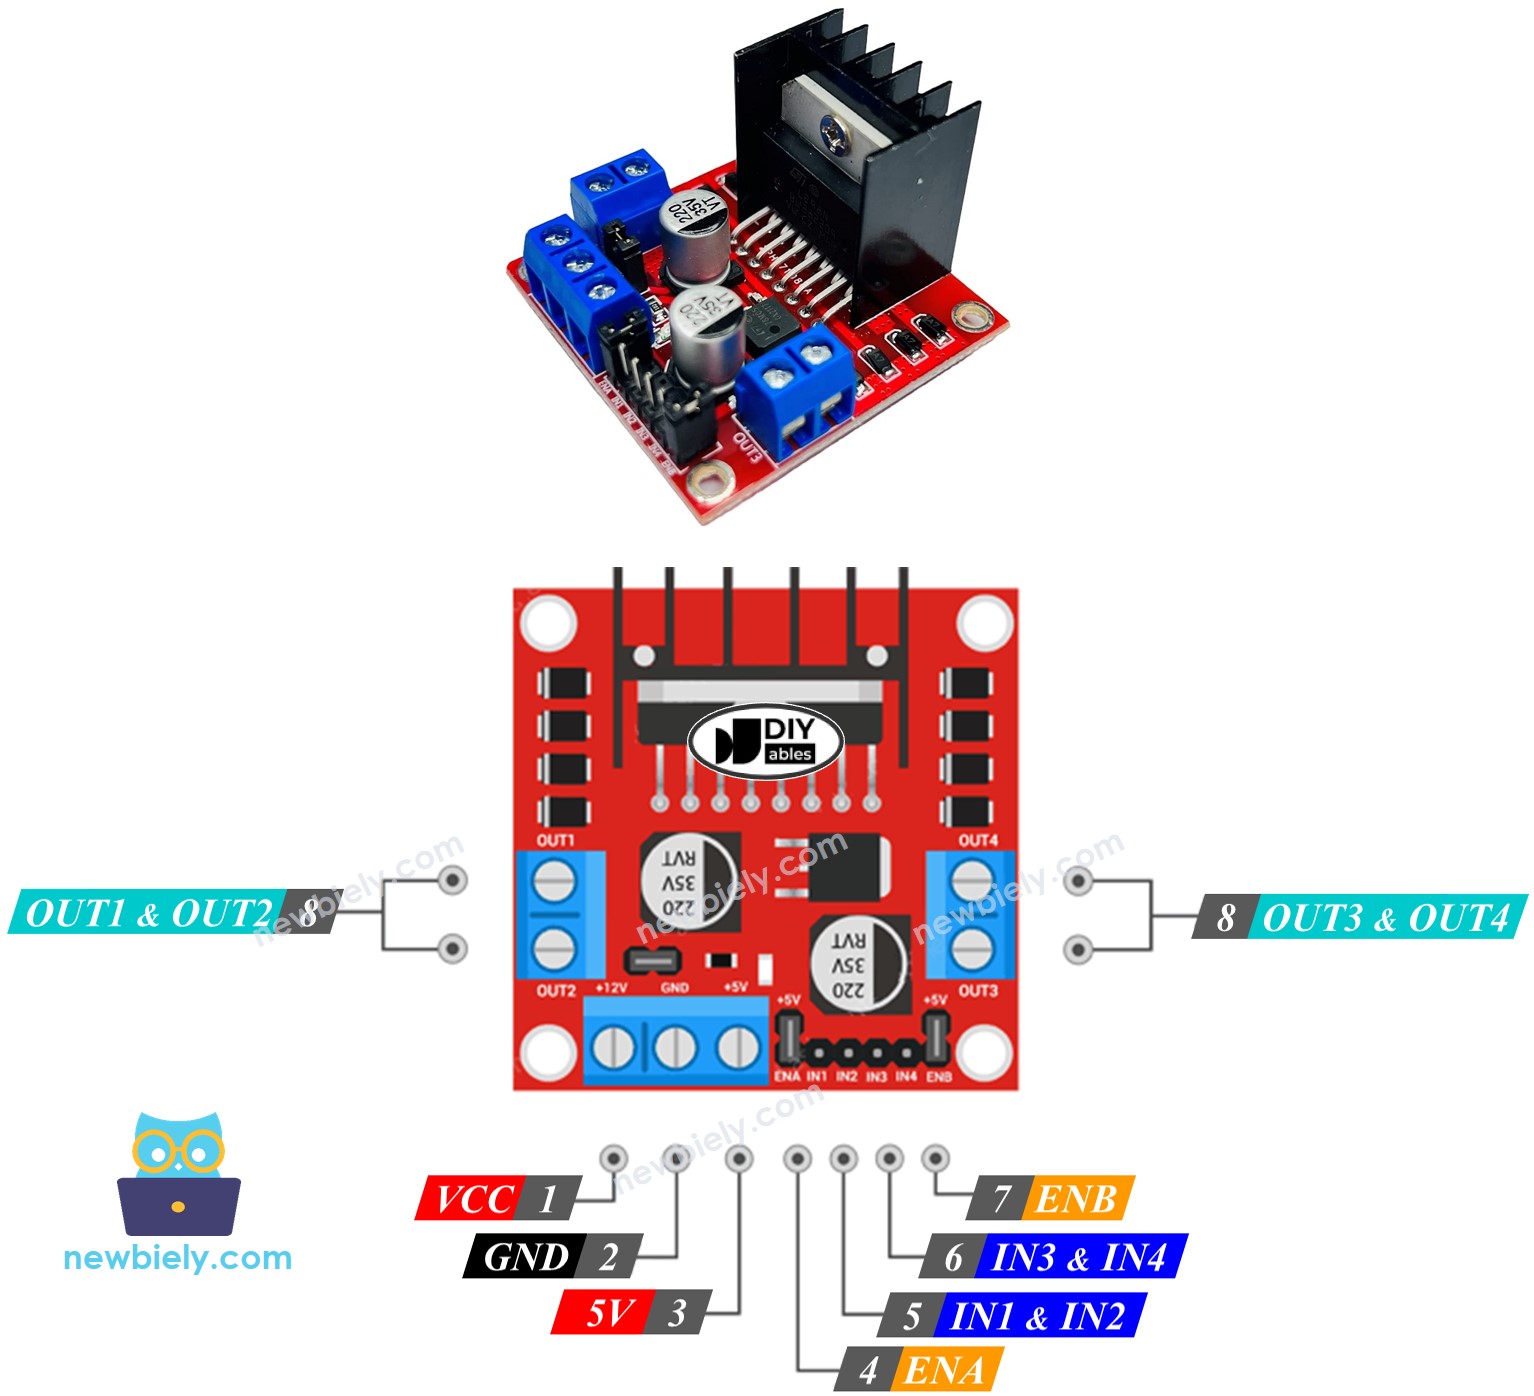
The L298N driver has 11 pins and three jumpers that work together to give you complete control over your stepper motor. Let me walk you through each one so you'll feel confident making these connections:
Power Supply Pins:
- VCC pin: This is the main power supply pin for your stepper motor. Connect this to your external power supply, which can be anywhere between 5V to 35V depending on your motor's requirements. Most NEMA 17 motors work great with 12V.
- GND pin: This is your common ground connection that needs to be connected to GND (0V) of both your Arduino Mega and power supply. Think of this as the electrical "reference point" for your entire circuit.
- 5V pin: This supplies power for the L298N module's internal logic circuits. You can connect this to your Arduino's 5V output, or if you keep the 5V-EN jumper in place, it gets power automatically from the VCC input.
Control Signal Pins:
- IN1, IN2, IN3, IN4 pins: These are your control input pins that connect directly to your Arduino's digital pins. Your Arduino Mega sends timing signals through these pins to tell the driver exactly when to energize each coil of your stepper motor. It's like having a direct communication line between your Arduino's brain and the motor driver's muscle.
Motor Output Pins:
- OUT1, OUT2, OUT3, OUT4 pins: These are the high-power output pins that connect directly to your stepper motor's four wires. The driver uses these to send the amplified signals that actually make your motor move.
Enable and Control Jumpers:
- ENA, ENB jumpers: These little jumpers are like on/off switches for the motor control. Keep both the ENA & ENB jumpers in place to enable your stepper motor. Removing them would disable the motor outputs.
- 5V-EN jumper: This jumper determines how the module gets its logic power. Keep it in place for simple projects (power comes from VCC), or remove it if you want to supply 5V separately for more advanced power management.
Pro Tip: For most Arduino Mega stepper motor projects, you can keep all three jumpers in place and focus on connecting the main power, control, and motor wires. This keeps things simple while you're learning!
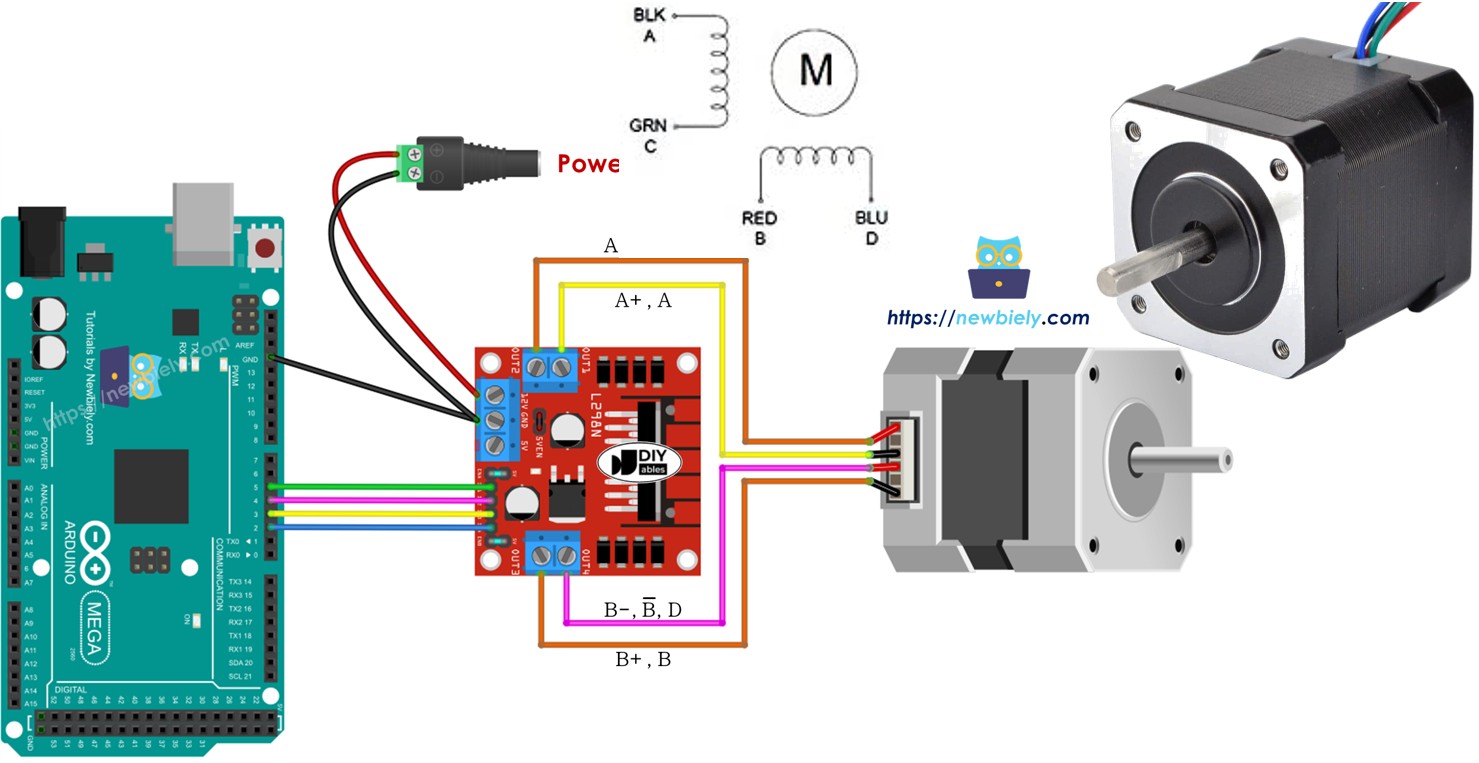
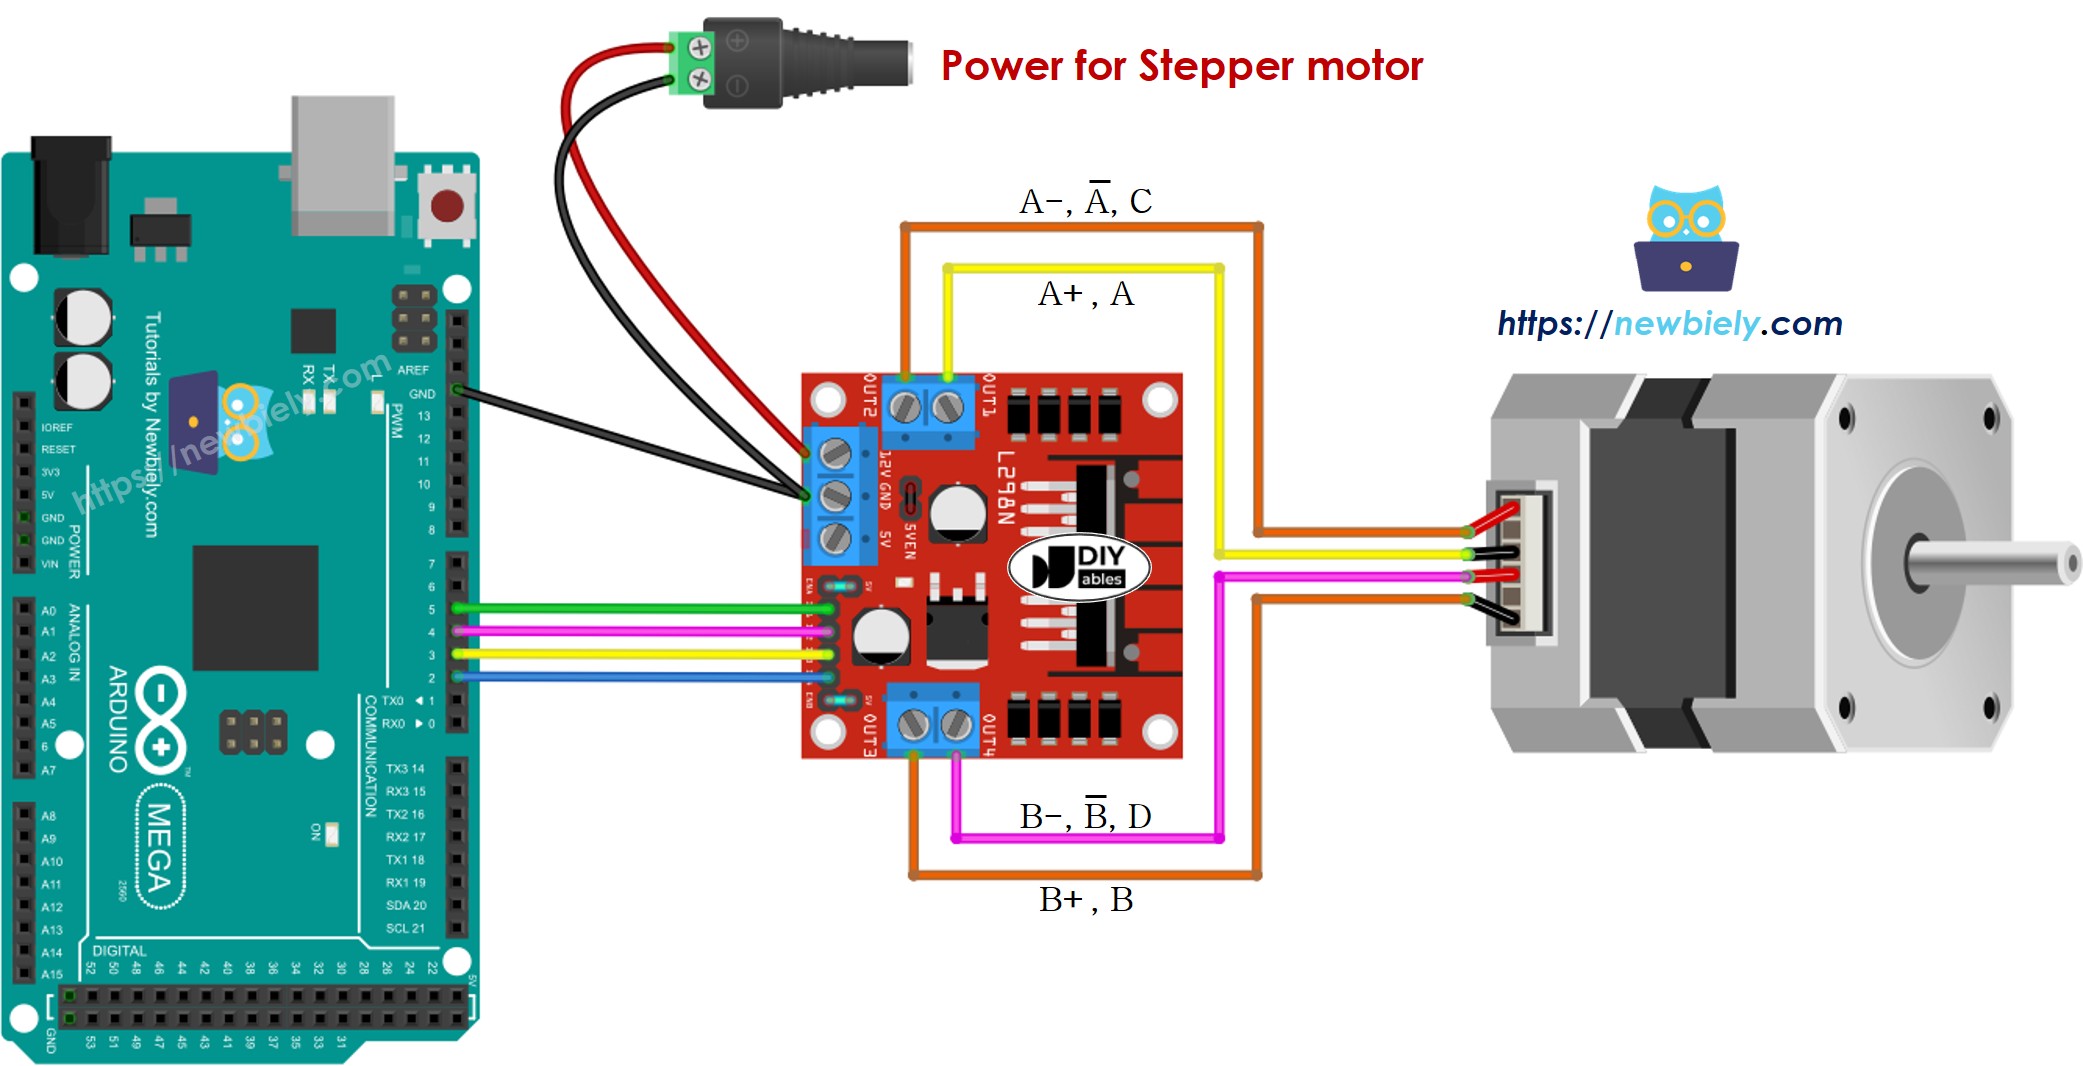
Wiring Diagram
Now for the exciting part – let's connect everything together! The wiring might look complex at first glance, but I promise it's more straightforward than it appears. Take your time with these connections, and double-check each wire before powering up your project.
This image is created using Fritzing. Click to enlarge image
Important Safety Note: Please make sure to double-check all your connections before applying power. While the L298N driver is quite robust, incorrect wiring can damage both your Arduino Mega and the motor driver. It's always better to spend an extra minute verifying connections than dealing with burned components later!
※ NOTE THAT:
- Please keep all three jumpers on the L298N module in place (in case motor's power supply ≤ 12V)
- Order of the pins on stepper motors may vary between manufacturers. Please check the below table for correct wiring.
Wiring table between Arduino Mega and L298N Driver
These connections create the communication pathway between your Arduino's brain and the L298N's control logic:
| Arduino Mega pins | L298N pins |
|---|---|
| 5 | IN1 |
| 4 | IN2 |
| 3 | IN3 |
| 2 | IN4 |
Wiring table between L298N Driver and Stepper motor
Important! Here's where you need to pay special attention: Please do not rely solely on the wire order shown in the wiring diagram image above. It's just a visual example, and the actual pin order on your stepper motor may be completely different depending on your manufacturer. This is the most common source of confusion for beginners, but once you get it right, your motor will work beautifully!
The key is to match the coil pairs correctly. Make sure your wiring follows this logical connection table:
| L298N pins | Stepper motor pins | Or | Or |
|---|---|---|---|
| OUT1 | A+ | A | A |
| OUT2 | A- | A | C |
| OUT3 | B+ | B | B |
| OUT4 | B- | B | D |
Before buying a stepper motor, I'd strongly recommend checking the datasheet, specification, or manual that comes with it. Quality manufacturers always provide the mapping between wire colors and coil names. For example, this stepper motor provides a clear mapping as shown in the image below:
Based on that specific mapping, your wiring table becomes much clearer:
| L298N pins | stepper motor pins | wire color |
|---|---|---|
| OUT1 | A | black wire |
| OUT2 | C | green wire |
| OUT3 | B | red wire |
| OUT4 | D | blue wire |
※ NOTE THAT:
Here's a helpful tip: In all the wiring tables above, you can actually swap OUT1 with OUT2, or OUT3 with OUT4, and your motor will still work perfectly! However, if you make these swaps, the motor's rotation direction might be reversed (clockwise becomes anticlockwise, and vice versa). This can actually be useful if you need to change direction without modifying your code!
How to control a Stepper motor using an L298N driver
Now for the fun part – let's bring your stepper motor project to life with code! Don't worry if you're new to stepper motor programming; we'll walk through everything step by step. The beauty of working with Arduino Mega is that there are excellent libraries available that handle all the complex timing calculations for you.
Controlling a stepper motor manually would be quite challenging – you'd need to manage precise timing sequences, handle acceleration curves, and coordinate multiple pins simultaneously. Fortunately, thanks to the amazing AccelStepper library, controlling stepper motors becomes not just manageable, but actually enjoyable!
A Word About Library Choice: Arduino IDE includes a built-in Stepper library, but we strongly recommend avoiding it for serious projects. Here's why the built-in library falls short:
- Blocking Operation: The library provides only blocking functions, which means your Arduino Mega can't do anything else while controlling the stepper motor. This severely limits your project's capabilities.
- Limited Functionality: It lacks essential features like acceleration control, smooth speed changes, and advanced positioning functions that make your projects feel professional.
Instead, we enthusiastically recommend the AccelStepper library, which is like having a professional motor controller built into your code. This incredible library offers:
- Smooth Acceleration and Deceleration: Your motors will start and stop gracefully, reducing mechanical stress and eliminating jarring movements.
- Non-blocking Operation: Your Arduino Mega can control the stepper motor while simultaneously reading sensors, updating displays, or handling user input.
- Multiple Motor Support: Control several steppers simultaneously with independent speeds and positions.
- Full-step and Half-step Support: Choose the right balance between torque and smoothness for your application.
Note: The AccelStepper library doesn't support microstepping, but for most Arduino Mega projects, the full-step and half-step modes provide excellent performance and precision.
How To Control the Position of Stepper Motor via L298N Driver
Positioning your stepper motor is incredibly straightforward with the AccelStepper library. Think of it like telling your motor "go to this exact spot" – and it will move there smoothly and accurately:
The beauty of this approach is that you think in terms of absolute positions rather than trying to count steps manually. Want to move exactly one full revolution? Just calculate the steps per revolution and use that number. Need to return to your starting position? Simply use moveTo(0).
Important Notes for Success:
The stepper.moveTo() function is non-blocking, which is fantastic for creating responsive, multi-tasking Arduino Mega projects. However, this powerful feature comes with a few important considerations that will ensure your stepper motor works perfectly:
- Call stepper.run() frequently: This function must be called as often as possible, ideally in your main loop() function. Think of it as giving your motor regular "heartbeats" to keep it moving smoothly.
- Avoid delay() when motor is moving: The delay() function stops your entire Arduino Mega program, preventing stepper.run() from being called. This will make your motor movement jerky or cause it to stop entirely.
- Minimize Serial output during movement: Functions like Serial.print() and Serial.println() can slow down your loop significantly, causing irregular motor movement. Use them sparingly when the motor is active.
Following these guidelines ensures smooth, professional-looking motor control that will impress anyone who sees your project in action!
How To Control the Speed of Stepper Motor via L298N Driver
Speed control is where stepper motors really shine, and the AccelStepper library makes it incredibly easy to achieve professional-grade motion control. You're not limited to just setting a speed – you can create smooth acceleration and deceleration profiles that make your projects look and sound professional:
Understanding the Parameters:
- setAcceleration(): This controls how quickly your motor reaches its target speed. A higher value means faster acceleration (more aggressive), while a lower value creates smoother, more gradual speed changes. For most projects, values between 50-200 work wonderfully.
- setSpeed(): This sets your motor's maximum speed in steps per second. Remember, this is the top speed – your motor will accelerate smoothly to this speed rather than jumping to it immediately.
The acceleration feature is particularly valuable because it eliminates the jarring start-stop motion that can cause mechanical stress and make your projects sound unprofessional. Instead, your stepper motor will gracefully speed up and slow down, creating smooth, linear motion that's perfect for camera sliders, positioning systems, and precision machinery.
How To Control the Direction of Stepper Motor via L298N Driver
Direction control with stepper motors is beautifully simple and intuitive. If you've followed our wiring instructions above, your motor will behave predictably and logically:
Clockwise Rotation: Occurs when you move from a lower position to a higher position (position increment). For example, moving from position 100 to position 300 will rotate the motor clockwise.
Counterclockwise Rotation: Happens when you move from a higher position to a lower position (position decrement). Moving from position 300 to position 100 will rotate the motor counterclockwise.
Practical Examples:
- Current position: 100, Target: 200 → Clockwise rotation
- Current position: -200, Target: -100 → Clockwise rotation (still an increment!)
- Current position: 200, Target: 100 → Counterclockwise rotation
- Current position: -100, Target: -200 → Counterclockwise rotation
This position-based direction control is incredibly intuitive because you think about where you want to go rather than which direction to turn. It's like having GPS for your motor – just specify the destination!
Helpful Note: If you discover that your motor rotates in the opposite direction from what you expect, don't worry! As mentioned in the wiring section, you can easily fix this by swapping either the A coil wires (OUT1 with OUT2) or the B coil wires (OUT3 with OUT4). This simple wire swap will reverse the motor's direction without any code changes needed.
How To Stop Stepper Motor
Stopping your stepper motor is just as important as starting it, and the AccelStepper library gives you complete control over when and how your motor stops:
Automatic Stopping: Your stepper motor will automatically stop when it reaches the position you specified with moveTo(). This is the most common way motors stop in positioning applications – they simply arrive at their destination and hold position.
Immediate Emergency Stop: Need to stop the motor right now? No problem! Use the stepper.stop() function to force an immediate stop at any time. This is perfect for emergency stops, user interruptions, or when sensor inputs require immediate motor shutdown.
The great thing about both stopping methods is that your motor will maintain its holding torque after stopping, keeping your mechanism securely in position until you command it to move again.
Arduino Mega Code - Stepper Motor Code
Here comes the exciting part – let's see your stepper motor in action! This example code demonstrates all the concepts we've covered and creates a mesmerizing back-and-forth motion that's perfect for testing and learning.
The code below creates a continuous demonstration that does:
- Rotates the motor one full revolution in the clockwise direction with smooth acceleration
- Stops the motor for 5 seconds (great for observing the holding torque)
- Rotates the motor back one full revolution in the counterclockwise direction
- Stops again for 5 seconds
- Repeats this fascinating cycle indefinitely
This pattern is excellent for testing your wiring, observing motor behavior, and getting familiar with how stepper motors move. You'll hear the distinctive stepper motor sound and see the precise, controlled motion that makes these motors so valuable in precision applications.
Detailed Instructions
First time working with Arduino? We recommend checking out our Arduino Mega Getting Started guide to build your foundation – it'll help everything make sense!
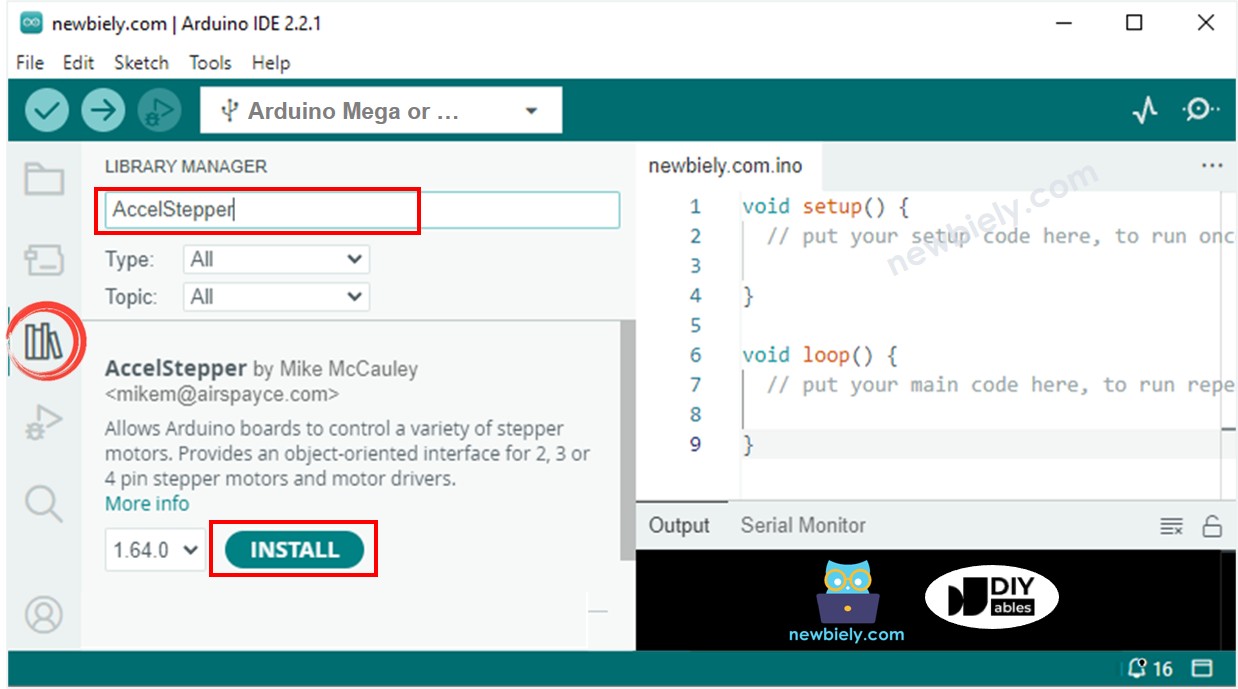
- Install the AccelStepper Library: Navigate to the Libraries icon on the left bar of your Arduino IDE. Don't worry if this is your first time installing a library – it's simpler than it looks!
- Search for AccelStepper: Type "AccelStepper" in the search box, then find the AccelStepper library by Mike McCauley. This is the gold standard library that thousands of makers rely on for their stepper motor projects.
- Install the Library: Click the Install button to add AccelStepper to your Arduino IDE. Once installed, you'll have access to all the powerful functions we've discussed.
- Upload Your Code: Copy the code above and open it in Arduino IDE. Take a moment to read through the comments – they explain exactly what each section does!
- Connect Your Hardware: Double-check all your wiring connections using our tables above. This is the most critical step – take your time and verify each connection.
- Power Up and Test: Click the Upload button in Arduino IDE to transfer the code to your Arduino. Make sure your external power supply is connected before expecting motor movement.
- Observe the Magic: You'll see your stepper motor come to life with:
- Smooth rotation one full revolution in the clockwise direction
- A 5-second pause (perfect for admiring the precision!)
- Smooth rotation back one full revolution in the counterclockwise direction
- Another 5-second pause
- This mesmerizing cycle repeats continuously
- Monitor the Progress: Open the Serial Monitor (Tools → Serial Monitor) to see real-time status updates that help you understand what's happening.
Pro Tip: Start with slow speeds and gentle acceleration while you're learning. Once everything works perfectly, you can experiment with faster speeds and more aggressive acceleration to suit your project's needs!
Code Explanation
Read the line-by-line explanation in comment lines of source code!
Application Ideas
Application Ideas: Now that you've mastered the basics of Arduino Mega stepper motor control, your creativity is the only limit! Here are some exciting project ideas to get your imagination flowing:
You could create a precision camera slider for stunning time-lapse photography, where the stepper motor provides silky-smooth movement at exact speeds. Build an automated solar panel tracker that follows the sun throughout the day for maximum energy efficiency. Set up a CNC drawing machine that can create intricate artwork or PCB prototypes with incredible precision.
Consider designing a robotic telescope mount for astrophotography, where precise positioning is absolutely critical. Create an automated plant watering system with a rotating arm that services multiple plants in sequence. Build a 3D scanner turntable that rotates objects at precise angles for photogrammetry projects.
For more advanced makers, you could develop a pick-and-place machine for electronics assembly, construct a laser engraver with X-Y positioning, or even build a miniature CNC mill for machining small parts. The precision and repeatability of stepper motors make them perfect for any application where exact positioning matters.
What exciting project will you tackle first? The skills you've learned here will serve as the foundation for countless amazing builds!
Video Section
Watch our comprehensive video tutorial for a visual walkthrough of this Arduino Mega stepper motor project! The video provides additional insights into troubleshooting common issues, demonstrates proper wiring techniques, and shows the smooth motor operation you should expect. Seeing the project in action often helps clarify any questions about timing, connections, or expected motor behavior.
Challenge Yourself
Challenge Yourself: Ready to take your Arduino Mega stepper motor skills to the next level? Try these fun challenges that will expand your knowledge and boost your confidence:
Beginner Challenges (Perfect for getting comfortable):
- Modify the code to change the rotation speed – try making it move faster or slower to see how it affects smoothness
- Add a second stepper motor and make them move in synchronized patterns
- Create a simple user interface with buttons to control direction and speed manually
Intermediate Challenges (Time to combine concepts):
- Add an LCD display to show the current position, speed, and direction in real-time
- Integrate a potentiometer to control motor speed dynamically while it's running
- Build a simple positioning system where you input a target position via Serial Monitor
- Create a "homing" sequence that finds a limit switch and establishes a zero position
Advanced Challenges (For the ambitious makers):
- Design a two-axis positioning system using two stepper motors for X-Y control
- Build a stepper motor-controlled camera slider with programmable motion profiles
- Create a mini CNC plotter that can draw simple shapes and text
- Develop a solar tracking system that automatically follows the sun's position throughout the day
Start with the easier challenges and work your way up – don't worry if you get stuck, that's exactly how we learn and grow! Each challenge you complete will make you more confident and skilled with stepper motor control. The key is to experiment, make mistakes, learn from them, and most importantly, have fun with your builds!
Remember, every expert was once a beginner. Take your time, celebrate small victories, and don't hesitate to revisit the basics when needed. You've got this!