Arduino Mega - RFID/NFC
Ready to dive into the fascinating world of RFID and NFC technology with your Arduino Mega? You're in the perfect place! This comprehensive tutorial will walk you through everything you need to know about using RFID/NFC with Arduino, and I promise it's more straightforward than you might think.

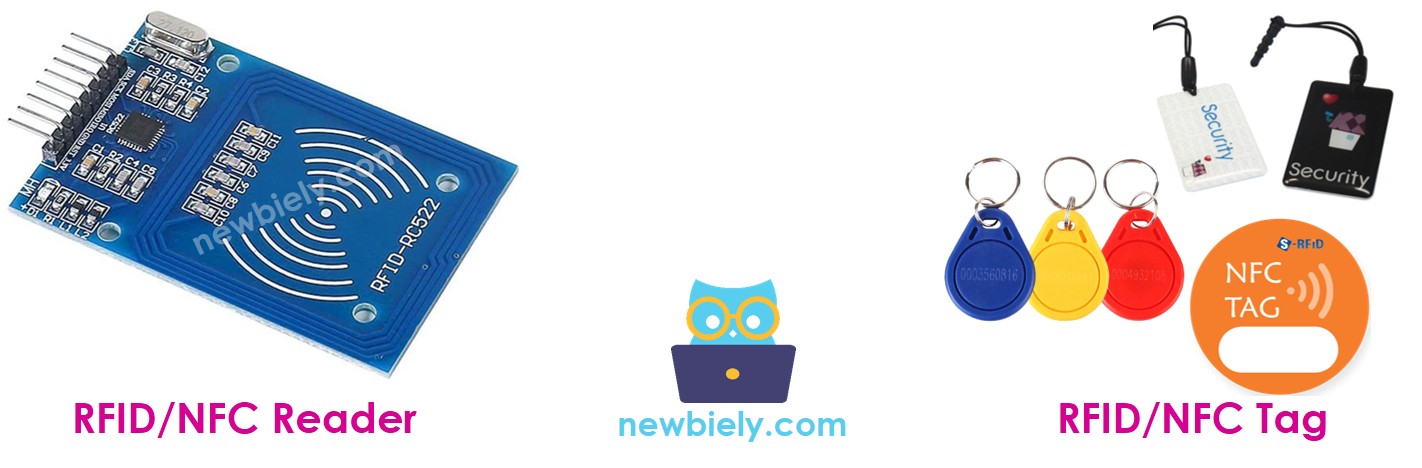
In this guide, we'll explore how to work with RFID/NFC technology using Arduino Mega and the popular RC522 RFID reader module. Whether you're dreaming of building an access control system, inventory tracker, or interactive project, RFID technology opens up amazing possibilities for your Arduino Mega projects. The RFID/NFC system consists of two essential components: a reader and tags. While there are two popular RFID/NFC readers available - RC522 and PN532 - this tutorial focuses specifically on the RC522 RFID reader, which is perfect for beginners due to its simplicity and reliability.
Don't worry if you're new to RFID technology - we'll start with the basics and build your understanding step by step. The RC522 RFID reader module (also called RFID-RC522 Module) is incredibly versatile and can read the UID of RFID/NFC tags, change UIDs on writable tags, write data to tags, and read stored data from tags. For most Arduino Mega projects, reading the unique identifier (UID) is the most common and useful application, so that's exactly what we'll focus on mastering today.
By the end of this tutorial, you'll understand how RFID technology works, know how to wire the RC522 module safely to your Arduino, and have working code that reads RFID tags like a pro. Plus, we'll explore exciting project ideas that will inspire your next creation. Let's get started on this exciting journey into contactless technology!
Hardware Preparation
Or you can buy the following kits:
| 1 | × | DIYables Sensor Kit (18 sensors/displays) |
Additionally, some of these links are for products from our own brand, DIYables .
Overview of RFID-RC522 Module
The RFID-RC522 module is a powerful yet beginner-friendly RFID reader that makes working with contactless technology incredibly accessible for Arduino Mega projects. Think of it as your gateway to building smart, interactive systems that can identify objects, people, or animals without any physical contact required.
This remarkable little module operates at 13.56MHz frequency and supports multiple RFID/NFC protocols, making it compatible with a wide variety of tags and cards. What makes the RC522 particularly appealing for Arduino Mega enthusiasts is its excellent balance of functionality, affordability, and ease of use. The module can read tags from distances up to 50mm (about 2 inches), which is perfect for most practical applications like access control systems or inventory tracking.
The RC522 excels in several key areas that make it ideal for your projects. It offers reliable performance with low power consumption, supports SPI communication (which works beautifully with Arduino), and comes with comprehensive library support that simplifies programming. The module's compact size and straightforward pinout make it easy to integrate into your projects, whether you're building a simple RFID reader or a complex multi-sensor system.
RFID-RC522 Module Pinout
Let's take a look at the pinout - don't worry, it's simpler than it looks! Understanding these pin connections is key to getting your RFID project working smoothly, and once you see how they work together, you'll feel confident connecting everything up.
The RFID-RC522 has 8 pins, and while some are common power and ground connections, others are designed to work with different communication modes like SPI, I2C, and UART. For Arduino Mega projects, we'll focus on SPI mode since it's the most reliable and best supported. Here's what each pin does:
- GND pin: This is your ground connection pin. Connect this to your Arduino's GND (0V) to complete the circuit - think of it as the return path for electrical current.
- VCC pin: This is the power supply pin that needs to be connected to 3.3V. Remember, this module runs on 3.3V, not 5V, so connecting it to 5V could damage your module.
- RST pin: This is the reset and power-down control pin. When this pin goes low, the module enters hard power-down mode. When it rises back up, the module resets and starts fresh - very handy for troubleshooting!
- IRQ pin: This is an interrupt pin that can alert your Arduino Mega microcontroller when an RFID tag comes into its vicinity. It's like having the module tap your Arduino Mega on the shoulder to say "Hey, there's a tag here!"
- MISO/SCL/TX pin: This versatile pin acts as MISO (Master In, Slave Out) when SPI interface is enabled, SCL when I2C interface is enabled, and TX when UART interface is enabled. For our Arduino Mega projects, it'll be sending data back to your Arduino.
- MOSI pin: This pin acts as MOSI (Master Out, Slave In) when SPI interface is enabled. Your Arduino Mega will use this to send commands to the RC522 module.
- SCK pin: This pin acts as SCK (Serial Clock) when SPI interface is enabled - it keeps everything synchronized like a metronome for data transfer.
- SS/SDA/RX pin: Another versatile pin that acts as SS (Slave Select) when SPI interface is enabled, SDA when I2C interface is enabled, and RX when UART interface is enabled. Think of SS as the "attention" signal that tells the module when to listen.
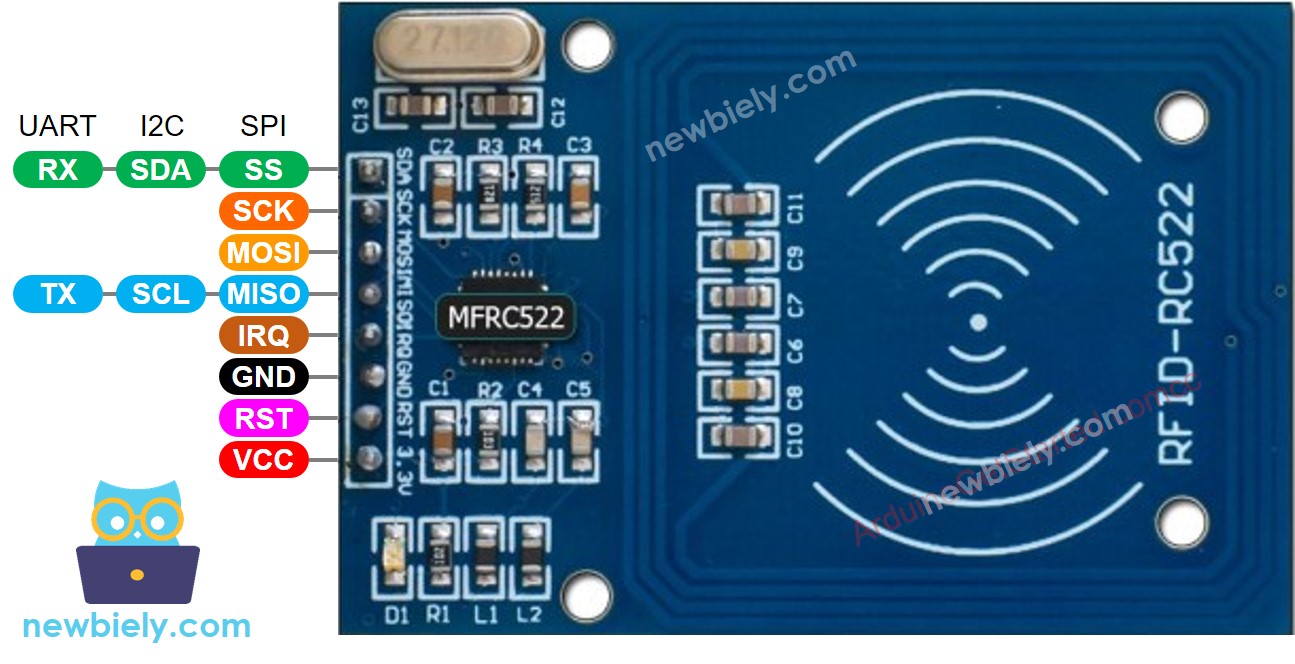
※ NOTE THAT:
- The order of pins can vary according to manufacturers. ALWAYS use the labels printed on the module. The above image shows the pinout of the module from DIYables manufacturer.
- Do not connect VCC pin to 5V pin. This will likely destroy your module.
- MFRC522 library supports only SPI mode. Therefore, this tutorial uses only SPI communication.
How RFID/NFC Works
Understanding how RFID/NFC technology works will help you appreciate the magic happening in your projects and troubleshoot any issues that might arise. The beauty of this technology lies in its simplicity and the fact that it works without any physical contact or even a direct line of sight!
RFID/NFC systems consist of two essential components working together: the reader (your RC522 module) and the tag (the cards or key fobs you'll be scanning). The reader is the active component that contains a radio frequency module and an antenna, which generates a high-frequency electromagnetic field. Think of it as constantly broadcasting a radio signal in a small area around itself.
The tag, on the other hand, is usually a passive device that doesn't need any power source of its own - pretty amazing when you think about it! Each tag contains a tiny microchip that stores and processes information, plus a small antenna to receive and transmit signals. The tag stores important information including its UID (Unique ID) and any additional data you might want to store, like access permissions or user information.
Here's where the magic happens: when you want to read information from a tag, you simply bring it close to the reader (usually within 2 inches). The reading process is fascinating - the reader generates an electromagnetic field that actually powers the tag by causing electrons to move through the tag's antenna. It's like wireless charging, but for data! Once powered, the chip inside the tag responds by sending the requested information back to the reader through another radio signal. The reader detects this response signal, transforms it into digital data that your Arduino Mega can understand, and passes it along to your code. Pretty cool, right?
Wiring Diagram between RFID-RC522 Module and Arduino
Now let's talk about connecting your RC522 module to your Arduino Mega - and here's something important to keep in mind for a successful project. The RFID-RC522 Module is designed to operate at a 3.3V level, while the output pins of an Arduino Mega produce a 5V level. This voltage difference means we need to be thoughtful about our connections.
Important Safety Note: While connecting Arduino Mega pins directly to the RC522 module may work for testing purposes, it's not the recommended approach for reliable, long-term projects. The voltage mismatch can cause erratic behavior or potentially damage your module over time.
For the safest approach, you should regulate the 5V signals from your Arduino Mega down to 3.3V before connecting to certain pins on the RC522 module. The good news is that not all pins need voltage regulation - the MISO pin can handle 5V input just fine. However, the SS, SCK, MOSI, and RST pins should have their voltage regulated to ensure reliable operation and protect your module.
This tutorial provides two different wiring approaches so you can choose what works best for your situation:
Simple Wiring (for testing and learning):
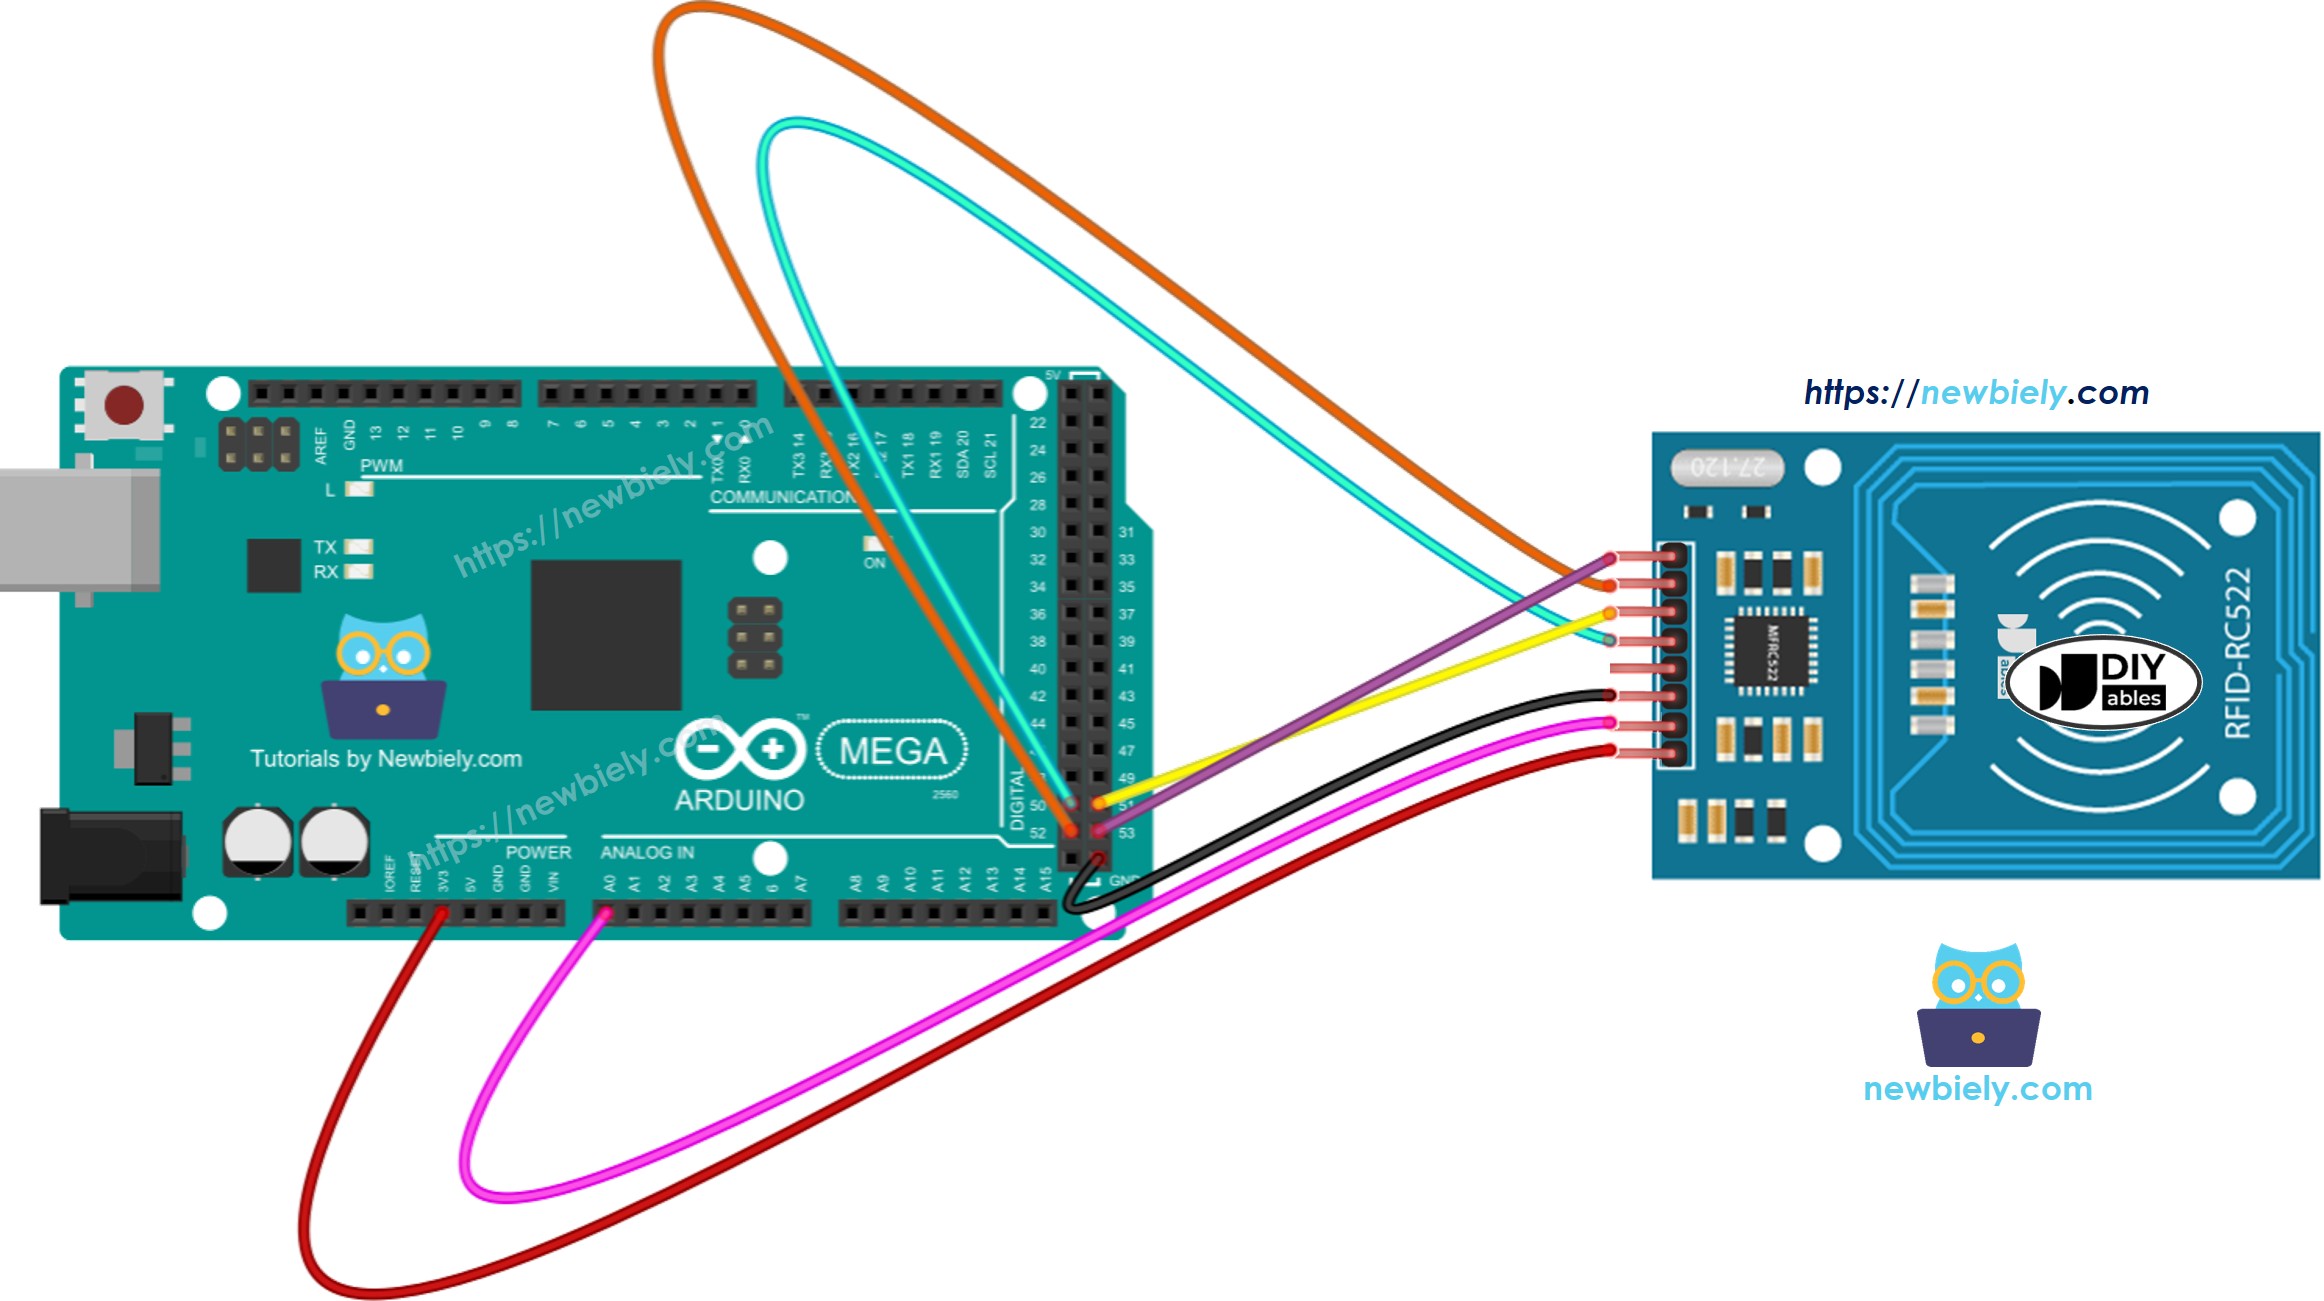
This image is created using Fritzing. Click to enlarge image
Safe Wiring with Voltage Regulation (recommended for projects):
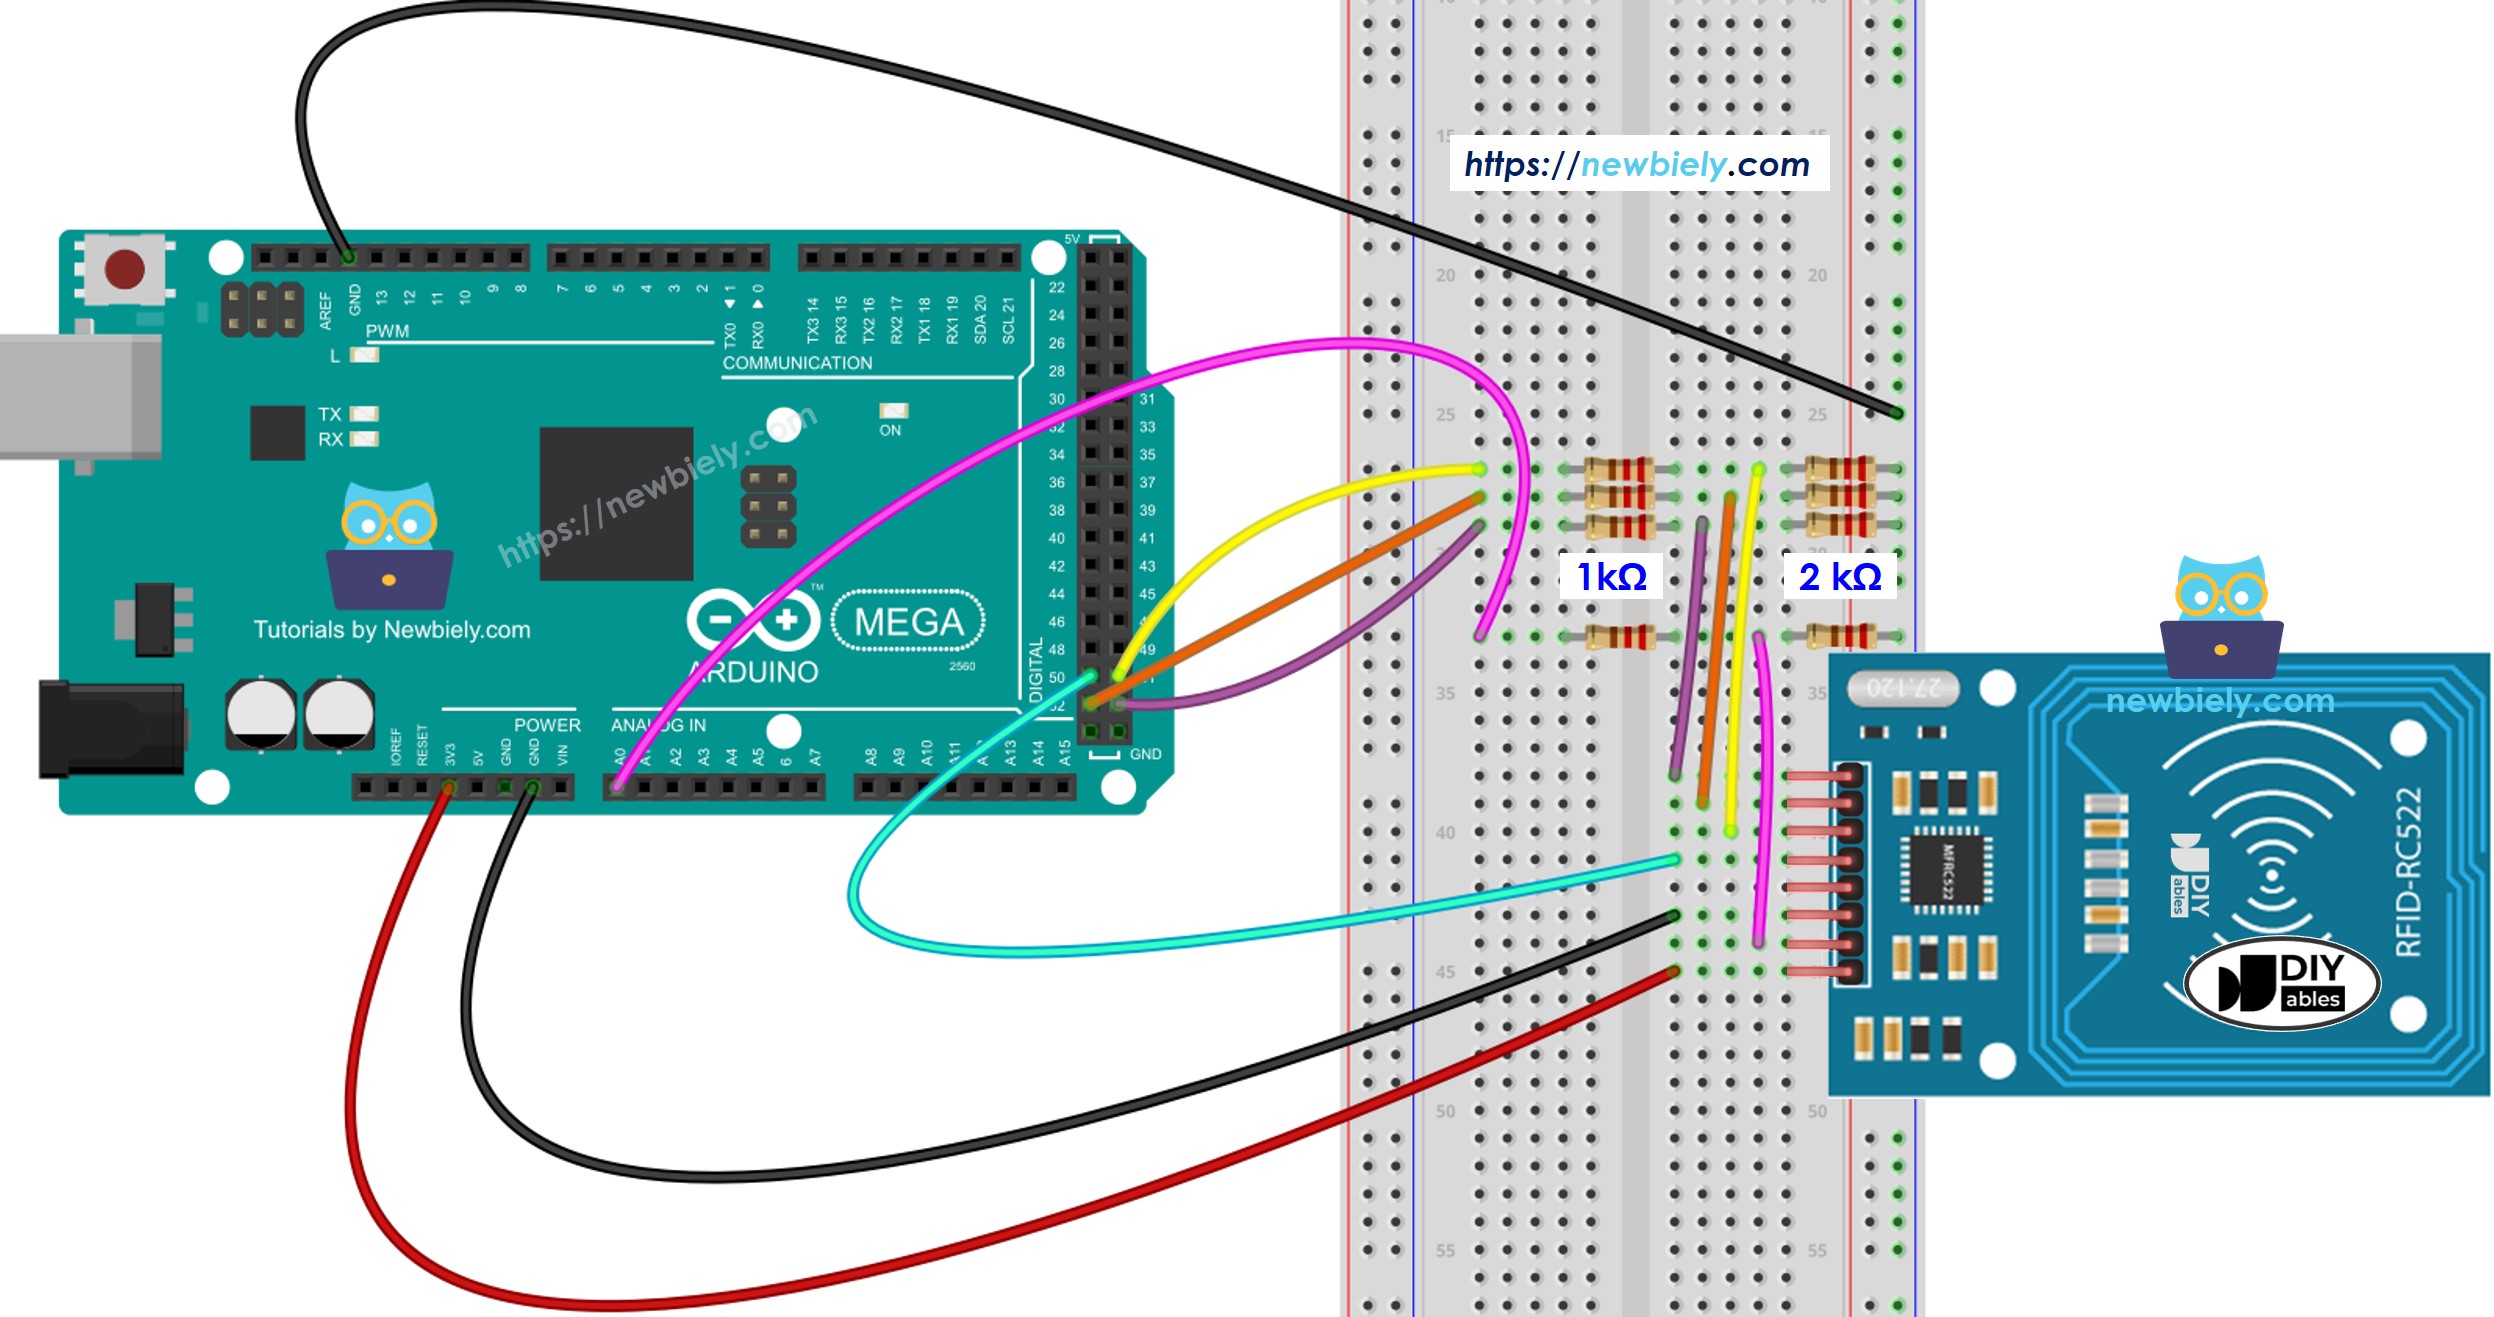
This image is created using Fritzing. Click to enlarge image
In the voltage-regulated version, we use simple voltage divider circuits with 1kΩ and 2kΩ resistors to safely reduce the 5V signals to approximately 3.3V. This simple solution uses basic resistors you probably already have in your kit and provides reliable voltage regulation for your project.
Wiring table of RFID/NFC RC522 Module and Arduino
| RFID/NFC RC522 | Arduino Mega |
|---|---|
| SS | Pin 53 |
| SCK | Pin 52 |
| MOSI | Pin 51 |
| MISO | Pin 50 |
| IRQ | (not connected) |
| GND | GND |
| RST | Pin A0 |
| VCC | 3.3V |
Arduino Mega RFID/NFC Code
Now for the exciting part - let's bring this project to life with code! Don't worry if you're new to programming; we'll walk through everything step by step, and the code examples below will show you exactly how to read RFID tags with your Arduino. Programming your RFID reader is actually more straightforward than you might expect, thanks to the excellent MFRC522 library that handles all the complex communication details for you.
The beauty of working with RFID on Arduino Mega is that once you understand the basic concepts, you can adapt and expand the code for countless creative projects. Whether you're building a simple tag reader or a complex access control system, the fundamental principles remain the same. Let's start with a basic example that reads and displays the UID of any RFID tag you present to the reader.
Detailed Instructions
New to Arduino? No worries! Start with our Arduino Mega Getting Started guide to learn the basics first - it'll help everything make sense when you dive into this RFID project.
- Install the MFRC522 Library: Navigate to the Libraries icon on the left bar of the Arduino Mega . This library is essential for communicating with your RC522 module and makes programming much easier than writing all the communication code from scratch.
- Search for the Library: Search for "MFRC522", then find the library by GithubCommunity. This is the most popular and well-maintained library for RC522 modules, with excellent documentation and community support.
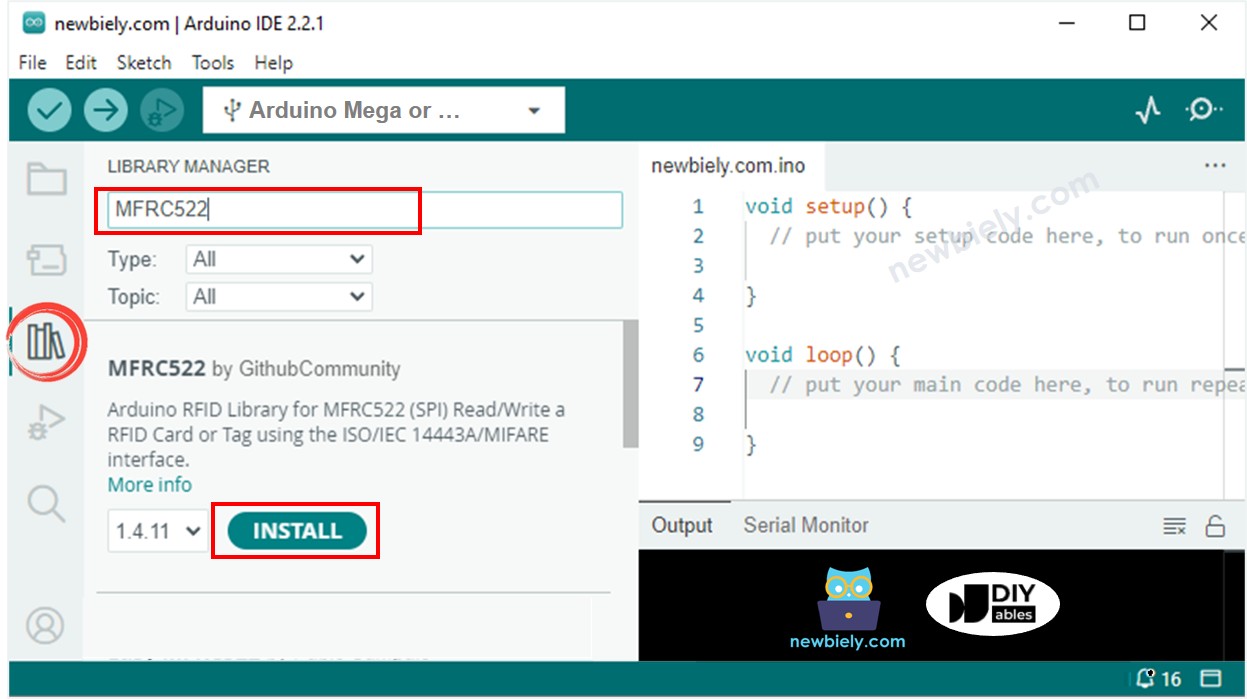
- Install the Library: Click the Install button to install the MFRC522 library. The Arduino Mega will automatically download and install everything you need - pretty convenient!
- Upload Your Code: Copy the code provided above and open it in your Arduino Mega . Take a moment to look through the code and see how it initializes the RFID reader and checks for new tags.
- Upload to Arduino: Click the Upload button on Arduino Mega to transfer your code to the Arduino. You'll see the TX/RX LEDs flash as the code uploads - this means everything is working correctly!
- Open Serial Monitor: Open the Serial Monitor (Tools > Serial Monitor) to see the output from your RFID reader. Make sure the baud rate is set to 9600 to match your code.
- Test Your Tags: Tap several RFID/NFC tags on your RFID-RC522 module one at a time. Hold each tag near the reader for a second or two - you don't need to press hard, just get it close!
- View the Results: Watch as the UID information appears on your Serial Monitor. Each tag has its own unique identifier - pretty cool to see it in action!
Pro Tip: If you're not seeing any output, double-check your wiring connections and make sure your tags are compatible with 13.56MHz frequency. Sometimes it takes a moment for the module to initialize, so be patient on your first run!
How RFID/NFC Technology Works in Practice
Now that you have your RFID system up and running, let's dive deeper into what's actually happening when you scan a tag. Understanding the technical process will help you troubleshoot issues and design more sophisticated projects.
When you bring an RFID tag close to your RC522 reader, several fascinating steps happen in milliseconds. First, the reader's antenna creates a 13.56MHz electromagnetic field that extends roughly 2 inches around the module. When a compatible tag enters this field, the electromagnetic energy is captured by the tag's tiny antenna coil and converted into just enough electrical power to wake up the tag's microchip.
Once powered, the tag's chip responds with its stored information, starting with a collision avoidance protocol to ensure clear communication if multiple tags are present. The tag then transmits its UID and other data back to the reader using a process called load modulation - essentially changing the electromagnetic field in a way the reader can detect and decode.
The RC522 module processes this incoming data, performs error checking to ensure accuracy, and makes the information available to your Arduino Mega through SPI communication. Your Arduino Mega code can then use this UID data for decision-making, logging, access control, or any other creative application you can imagine.
Application and Project Ideas
Application Ideas: Now that you've mastered the basics of Arduino Mega RFID technology, your creativity is the only limit! Here are some exciting project ideas to get your imagination flowing and inspire your next creation:
You could create a smart home access control system that recognizes family members' key fobs and automatically unlocks doors or disarms security systems. Build an inventory management system for your tutorial or office that tracks when tools or supplies are borrowed and returned. Set up an attendance tracking system for events, classes, or meetings that automatically logs when people arrive and leave.
Consider developing a pet feeding system that recognizes your pets' RFID chips and dispenses the right amount of food at scheduled times. You might construct a personal object tracker that helps you find frequently misplaced items like keys, wallet, or tools by logging their last known location. Create an interactive museum or educational exhibit where visitors can scan RFID cards to trigger different displays, sounds, or lighting effects.
For more advanced projects, you could build a garage door opener that recognizes authorized vehicles with RFID tags, develop a medication management system that tracks when prescriptions are accessed, or even create a smart storage cabinet that knows what's inside and can guide you to specific items. The possibilities are truly endless, and each project will teach you something new about both RFID technology and Arduino Mega programming!
Challenge Yourself
Challenge Yourself: Ready to take your RFID skills to the next level? Try these fun challenges to expand your knowledge and build something even more amazing! Start with the easier ones and work your way up - don't worry if you get stuck, that's exactly how we learn and grow as makers.
Easy Challenges (Perfect for building confidence):
- Modify the code to display a custom welcome message for specific RFID tags - imagine having your Arduino Mega greet you by name!
- Add an LED that lights up in different colors based on whether a tag is authorized or not
- Create a simple counter that tracks how many times each tag has been scanned
Medium Challenges (Time to combine concepts):
- Add an LCD display to show tag information without needing the Serial Monitor
- Combine RFID with a servo motor to create a simple locking mechanism that opens for authorized tags
- Build a data logging system that saves tag scan times and dates to an SD card
- Create a multi-user system that stores different access levels for different tags
Advanced Challenges (For the truly ambitious):
- Build a complete access control system with multiple RFID readers at different entry points
- Create an RFID-based inventory system that tracks items in and out of storage
- Develop a pet monitoring system that tracks your pets' activities and feeding schedules
- Design an interactive game or puzzle that uses RFID tags as game pieces or clues
Remember, the best way to learn is by doing, so pick a challenge that excites you and start experimenting. Each project will teach you something new and bring you closer to becoming an RFID expert. What will you build first?