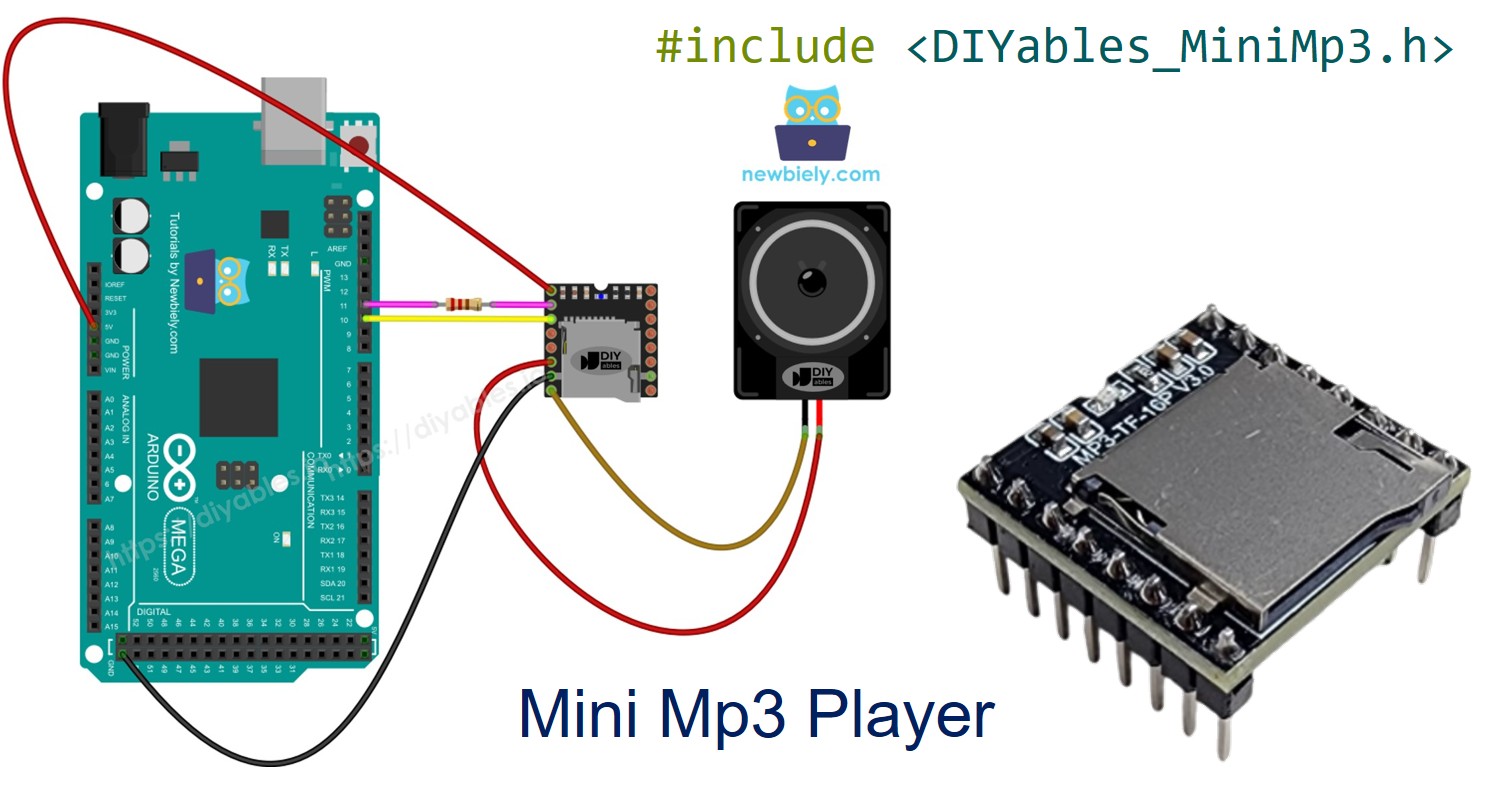
Arduino Mega - Mini Mp3 Player Module
The Arduino Mega 2560 has four hardware serial ports, making it an excellent choice for working with UART peripherals like the DIYables Mini Mp3 Player module. This tutorial demonstrates how to connect and program the Mini Mp3 Player with the Mega, taking advantage of its dedicated Serial1 port so you never have to deal with SoftwareSerial.
What this tutorial covers:
Wiring the Mini Mp3 Player to the Mega's Serial1 port.
Formatting and loading the SD card.
Code for: play, pause, resume, stop, next, previous.
Volume up/down with buttons.
Track looping, shuffle, and folder-based playback.
Serial Monitor control for quick testing.
Status queries to read volume, track number, and more.
Or you can buy the following kits:
Disclosure: Some of the links provided in this section are Amazon affiliate links. We may receive a commission for any purchases made through these links at no additional cost to you.
Additionally, some of these links are for products from our own brand,
DIYables .
The DIYables Mini Mp3 Player uses the YX5200-24SS decoder chip to read and play mp3 files from a micro SD card. It has a built-in amplifier that can drive a small speaker directly (up to 3W), plus DAC output pins if you want to route audio to an external amp.
The Mega communicates with the module via UART at 9600 baud. The available features are:
Full transport controls: play, pause, resume, stop, next, previous
Volume range: 0 (mute) to 30 (max)
EQ presets: Normal, Pop, Rock, Jazz, Classic, Bass
Repeat options: loop one track, loop a folder, loop all, shuffle
Folder playback: organize tracks into numbered directories
Advertisement mode: interrupt then resume the previous track
Status queries: what track is playing, current volume, total track count
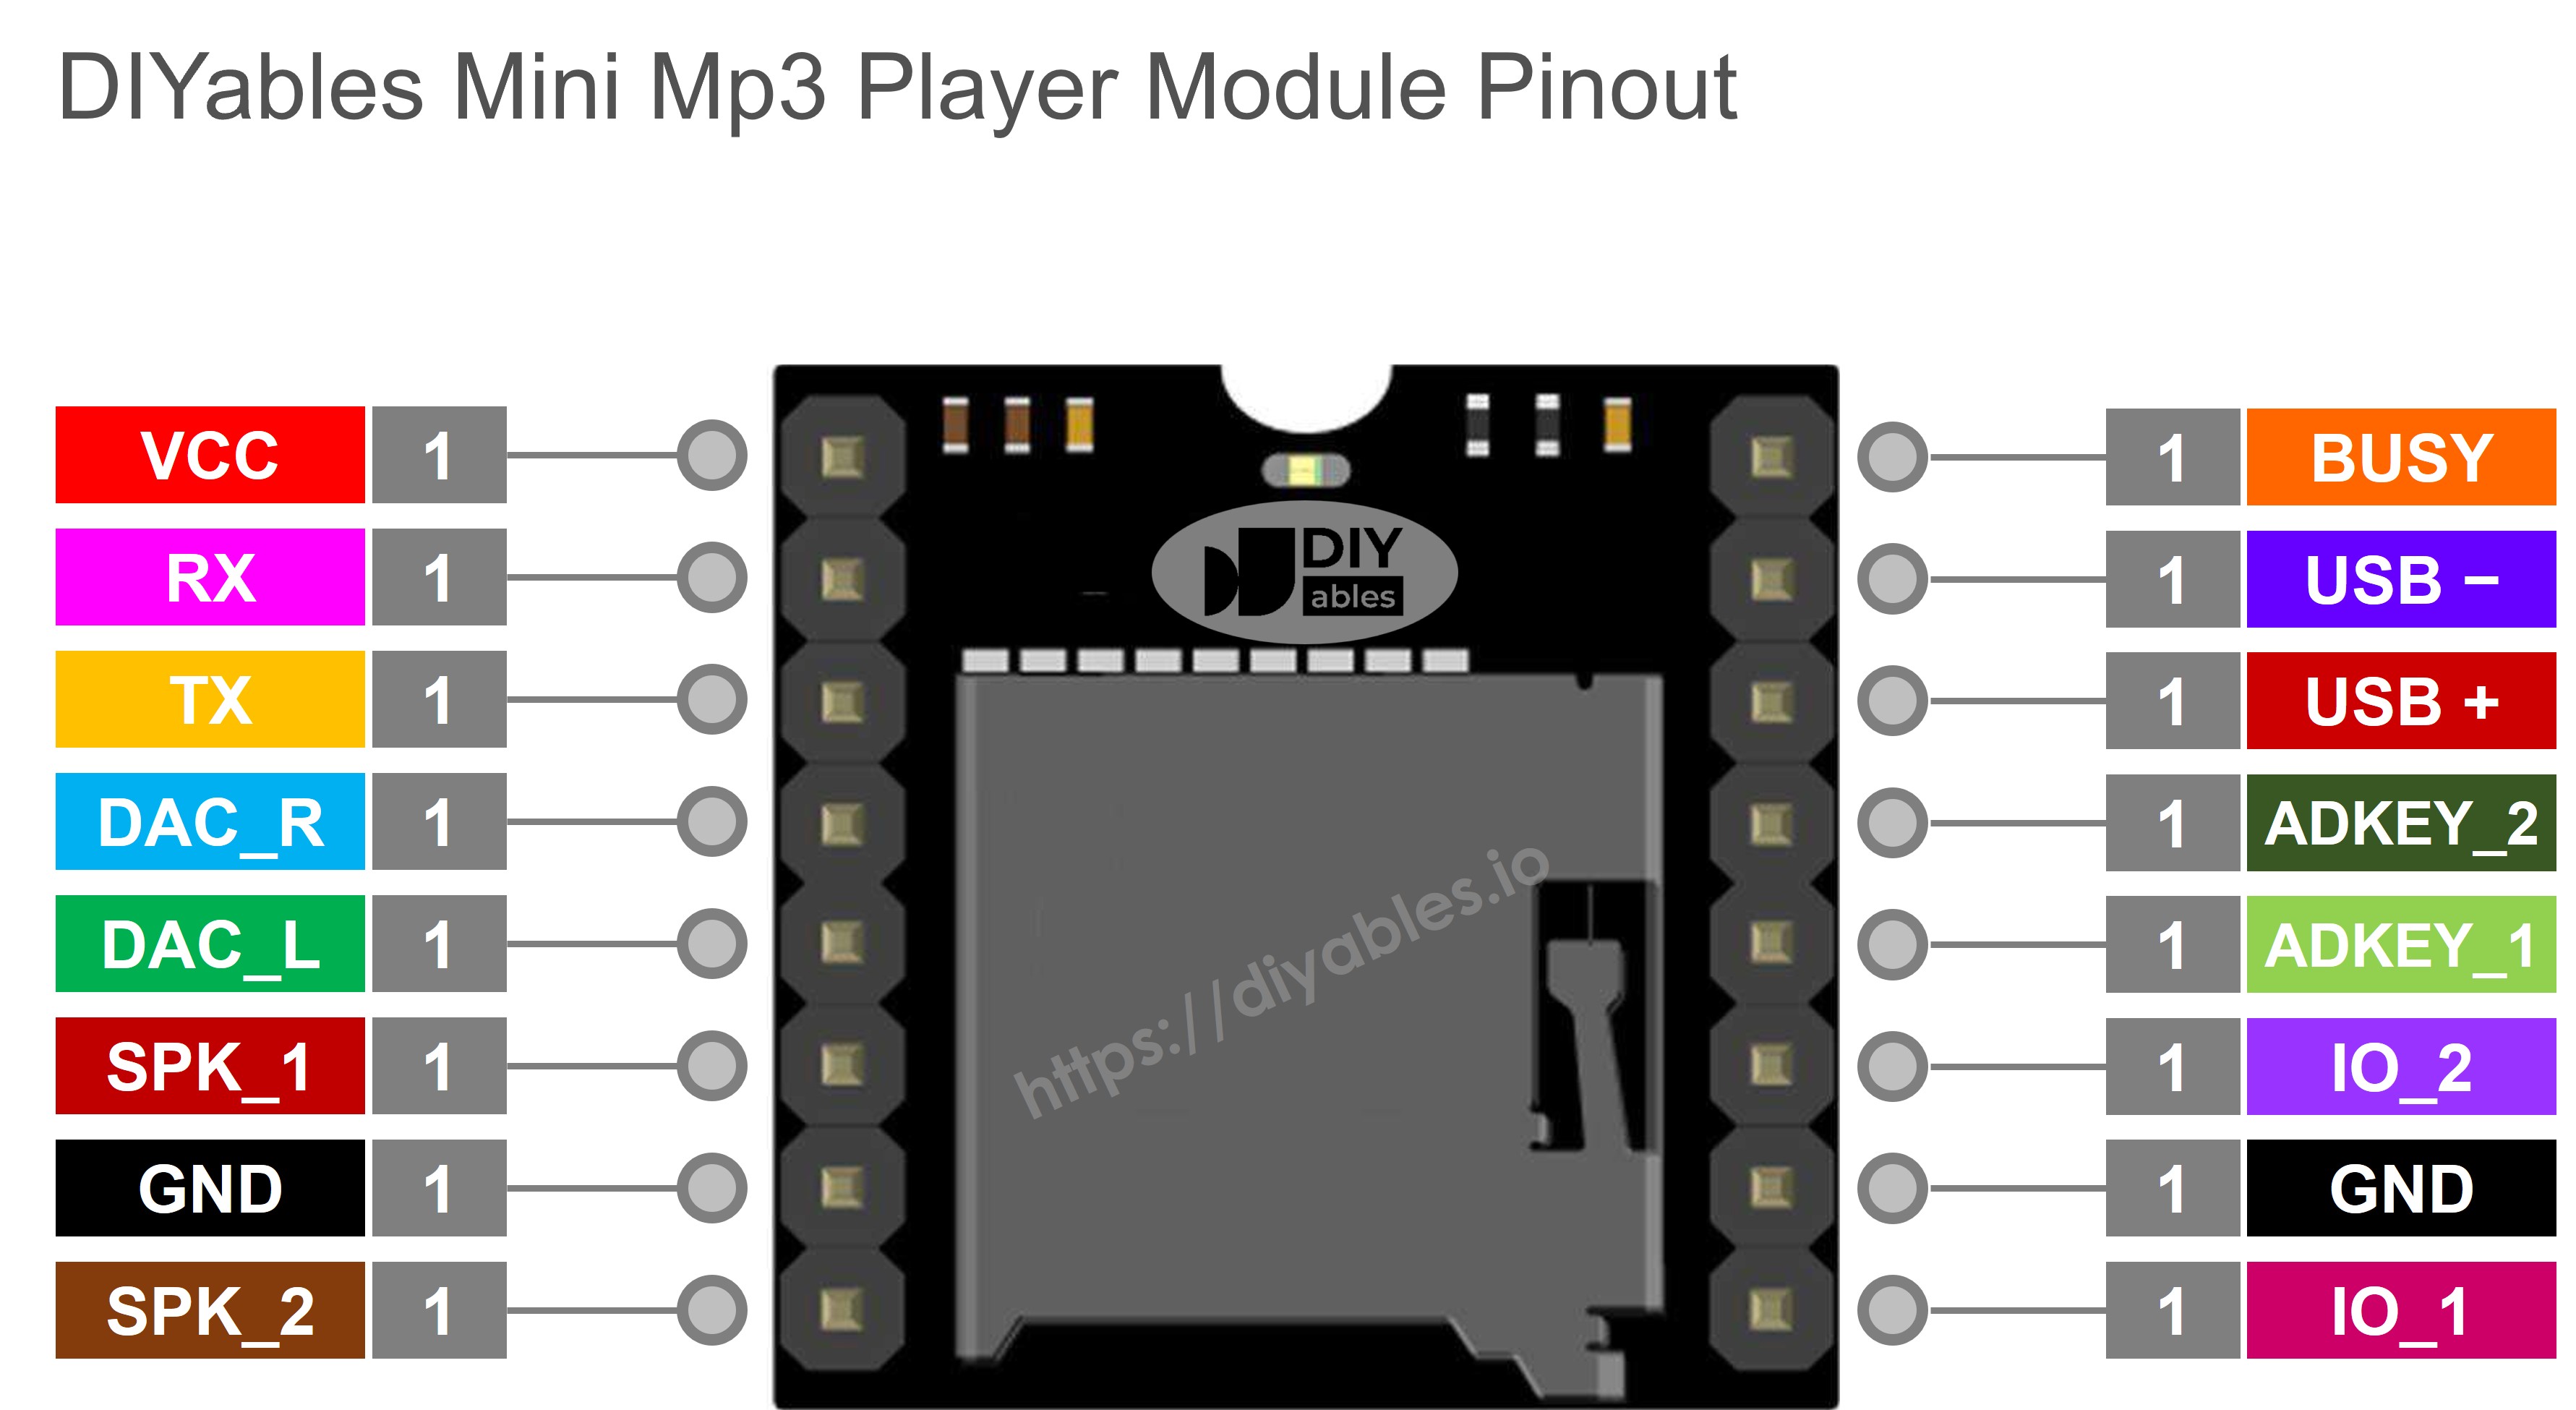
| Pin | Role |
|---|
| VCC | Power supply (3.2V–5.0V) |
| GND | Ground |
| RX | Serial receive — connect to Mega TX1 through 1K resistor |
| TX | Serial transmit — connect to Mega RX1 |
| SPK_1 | Speaker positive (onboard amplifier, 3W max) |
| SPK_2 | Speaker negative |
| DAC_R | Right channel audio output (line level) |
| DAC_L | Left channel audio output (line level) |
| BUSY | LOW while audio plays, HIGH when stopped |
| IO_1 | Physical trigger | short=previous, long=vol down |
| IO_2 | Physical trigger | short=next, long=vol up |
The Mega is a 5V board, so a 1K series resistor on the module's RX line is required to protect its 3.3V input.
We use Serial1 (TX1 = pin 18, RX1 = pin 19) for the mp3 module, leaving the main Serial (pins 0 and 1) free for debugging via the Serial Monitor.
| Mini Mp3 Player | Arduino Mega | Notes |
|---|
| VCC | 5V | |
| GND | GND | |
| RX | Pin 18 (TX1) | Through a 1K resistor |
| TX | Pin 19 (RX1) | Direct connection |
| SPK_1 | Speaker + | |
| SPK_2 | Speaker − | |
You can also use Serial2 (pins 16/17) or Serial3 (pins 14/15) if Serial1 is occupied.
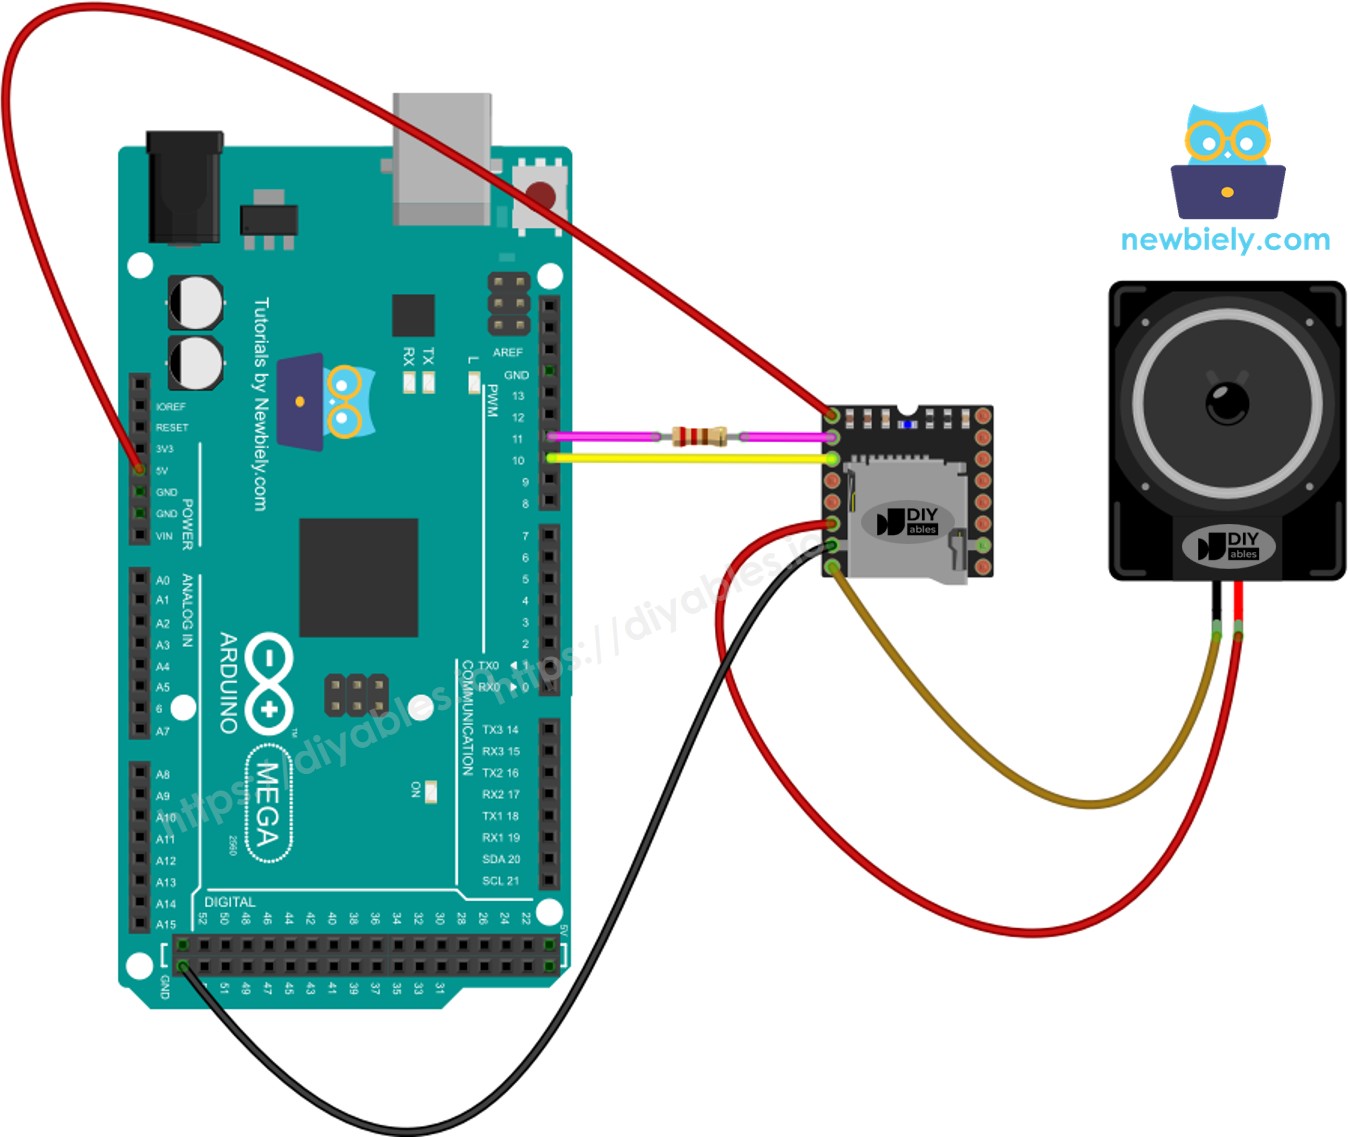
This image is created using Fritzing. Click to enlarge image
Format the card as FAT16 or FAT32, then add mp3 files with zero-padded numbers:
/001.mp3
/002.mp3
/003.mp3
For folder playback, create numbered directories:
/01/001.mp3
/01/002.mp3
/02/001.mp3
Important details:
Numbering starts at 1.
The module uses the copy order to assign track numbers, not the filename. Copy files one at a time after formatting.
Folder names: 2 digits (01–99). File names: 3 digits (001–255).
Connect the Mega to your PC using the USB cable.
In the Arduino IDE, select Arduino Mega or Mega 2560 and the correct port.
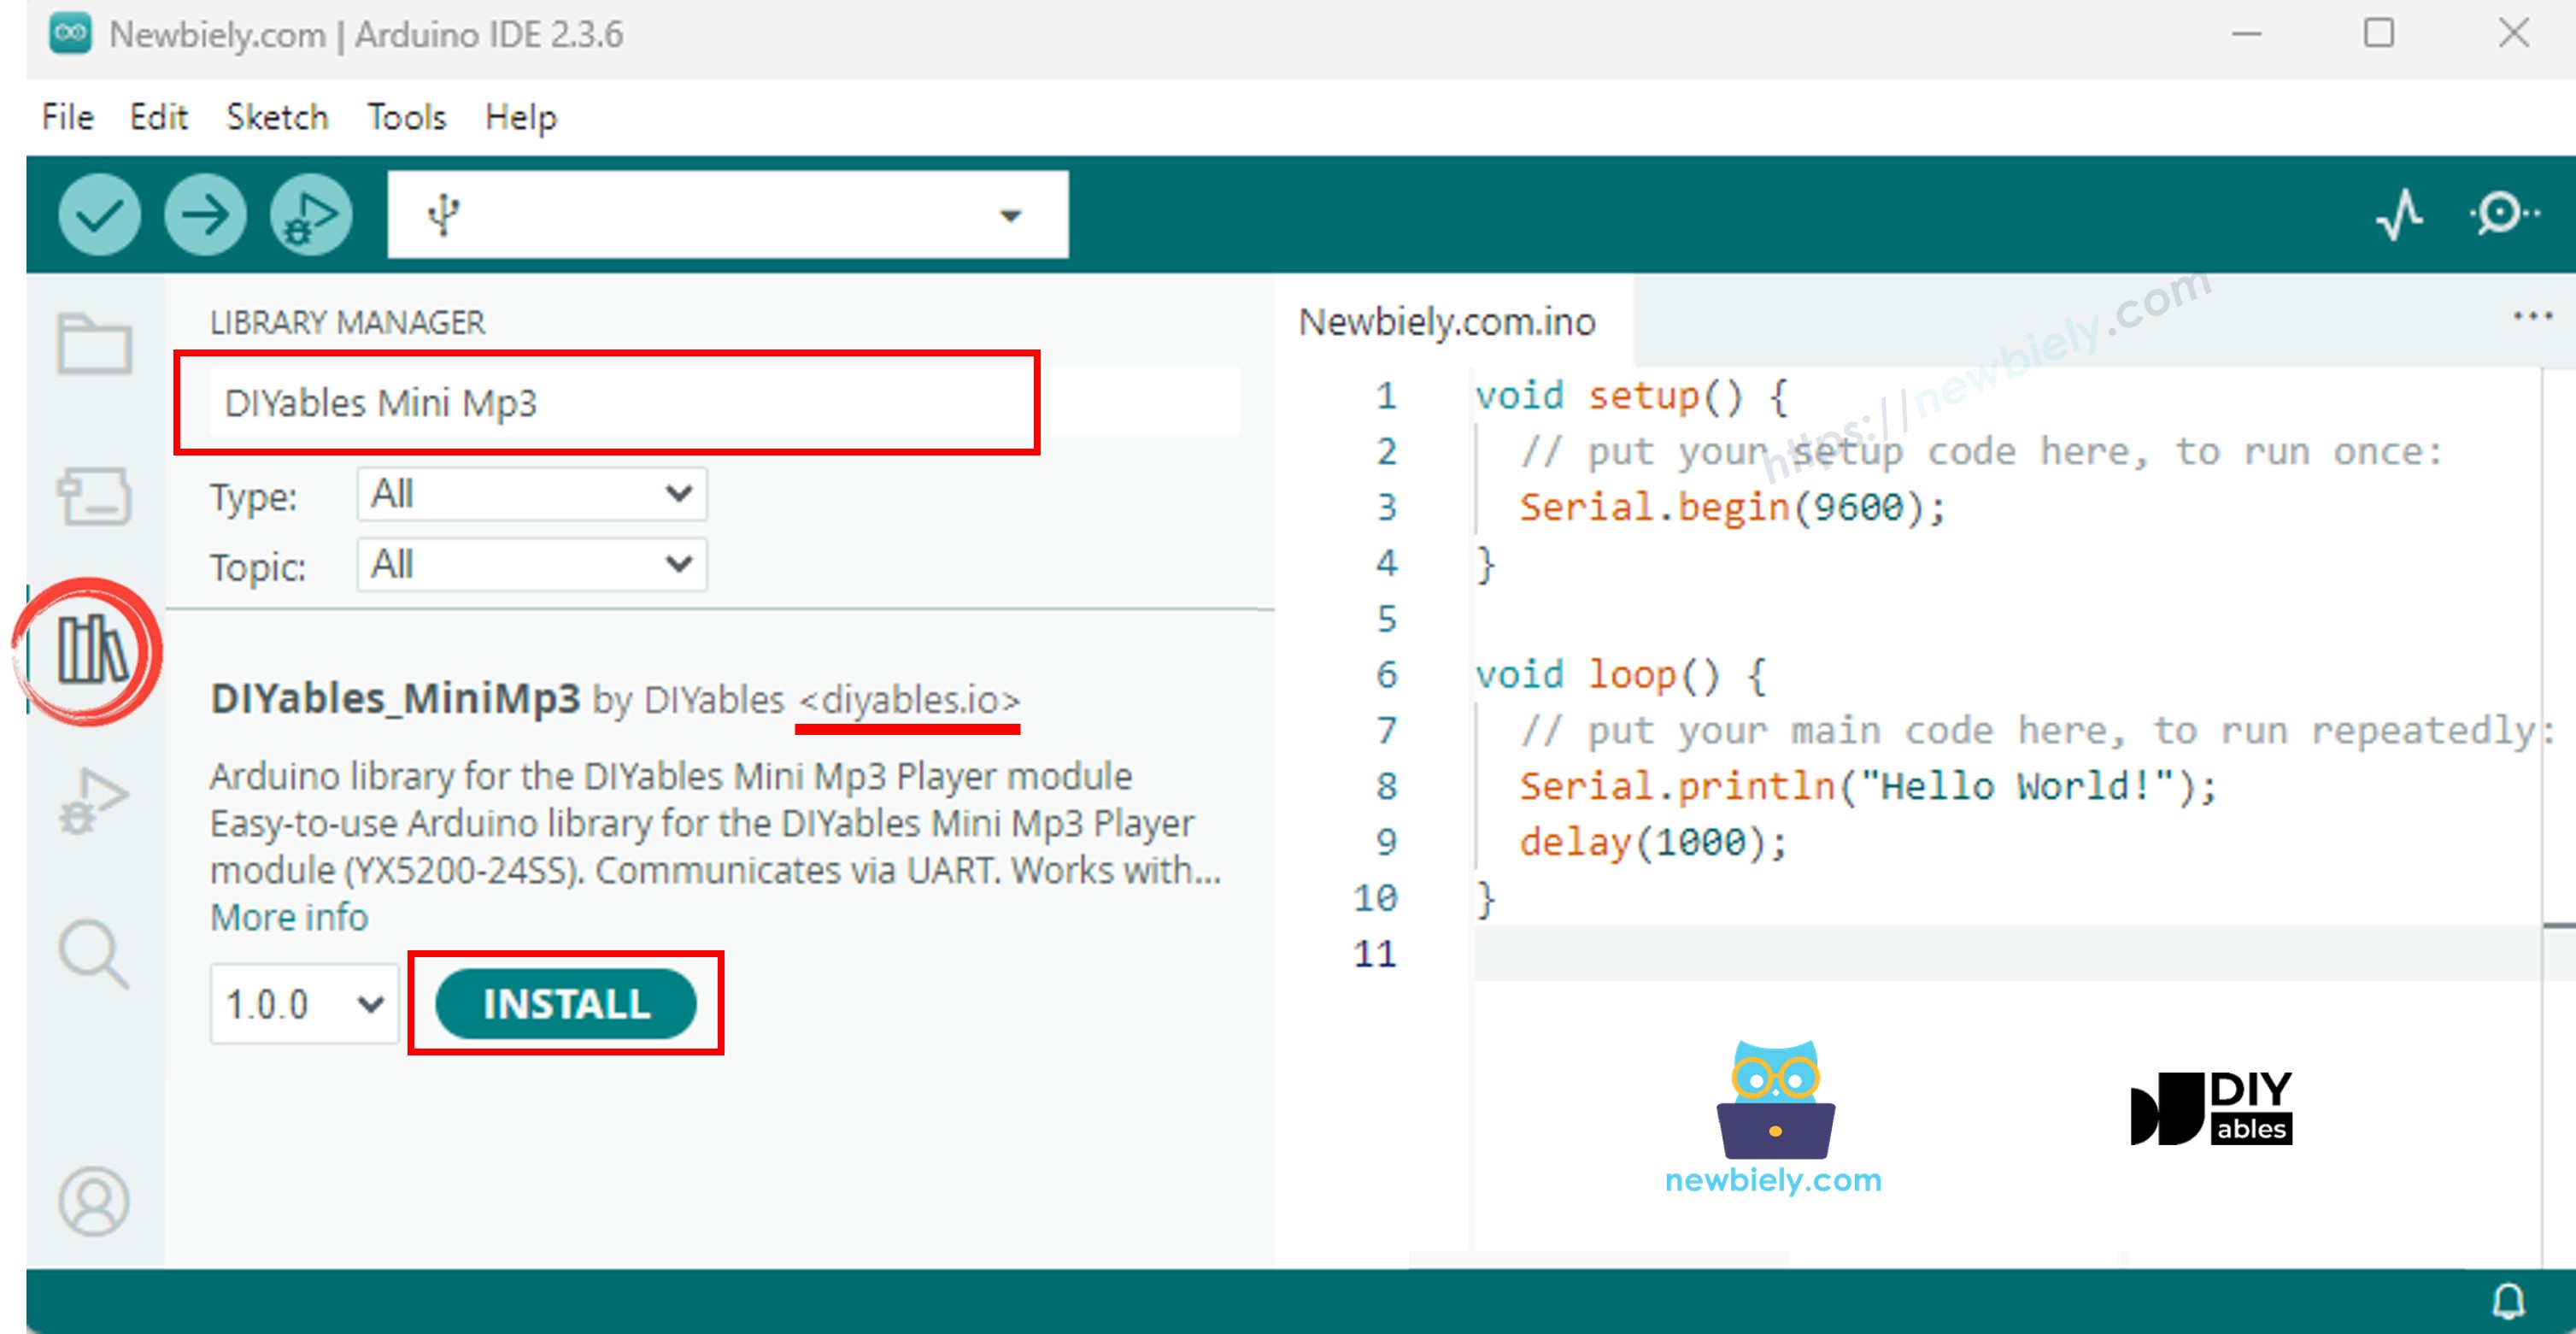
Open the Libraries panel.
Search for "DIYables_MiniMp3" and install it.
No dependencies required.
The Mega has plenty of hardware serial ports, so skip SoftwareSerial entirely:
#include <DIYables_MiniMp3.h>
DIYables_MiniMp3 mp3;
void setup() {
Serial.begin(9600);
Serial1.begin(9600);
mp3.begin(Serial1);
delay(1000);
mp3.setVolume(25);
}
void loop() {
}
#include <DIYables_MiniMp3.h>
#include <SoftwareSerial.h>
SoftwareSerial mp3Serial(10, 11);
DIYables_MiniMp3 mp3;
void setup()
{
Serial.begin(9600);
mp3Serial.begin(9600);
mp3.begin(mp3Serial);
delay(1000);
mp3.setVolume(25);
Serial.println("Playing track 1...");
mp3.play(1);
}
void loop()
{
}
| Function | Action | Code |
|---|
| play(n) | Play track n | mp3.play(1) |
| playNext() | Next track | mp3.playNext() |
| playPrevious() | Previous track | mp3.playPrevious() |
| pause() | Pause | mp3.pause() |
| resume() | Resume | mp3.resume() |
| stop() | Stop | mp3.stop() |
#include <DIYables_MiniMp3.h>
#include <SoftwareSerial.h>
SoftwareSerial mp3Serial(10, 11);
DIYables_MiniMp3 mp3;
int currentTrack = 1;
int totalTracks = 3;
unsigned long lastTrackTime = 0;
unsigned long trackDuration = 5000;
void setup()
{
Serial.begin(9600);
mp3Serial.begin(9600);
mp3.begin(mp3Serial);
delay(1000);
mp3.setVolume(20);
Serial.println("Playing track 1...");
mp3.play(currentTrack);
lastTrackTime = millis();
}
void loop()
{
if (millis() - lastTrackTime >= trackDuration)
{
currentTrack++;
if (currentTrack > totalTracks)
currentTrack = 1;
Serial.print("Playing track ");
Serial.println(currentTrack);
mp3.play(currentTrack);
lastTrackTime = millis();
}
}
#include <DIYables_MiniMp3.h>
#include <SoftwareSerial.h>
SoftwareSerial mp3Serial(10, 11);
DIYables_MiniMp3 mp3;
const int BUTTON_VOL_UP = 2;
const int BUTTON_VOL_DOWN = 3;
int volume = 15;
void setup()
{
Serial.begin(9600);
mp3Serial.begin(9600);
pinMode(BUTTON_VOL_UP, INPUT_PULLUP);
pinMode(BUTTON_VOL_DOWN, INPUT_PULLUP);
mp3.begin(mp3Serial);
delay(1000);
mp3.setVolume(volume);
mp3.loopTrack(1);
Serial.print("Volume: ");
Serial.println(volume);
}
void loop()
{
if (digitalRead(BUTTON_VOL_UP) == LOW)
{
if (volume < 30)
{
volume++;
mp3.setVolume(volume);
Serial.print("Volume: ");
Serial.println(volume);
}
delay(200);
}
if (digitalRead(BUTTON_VOL_DOWN) == LOW)
{
if (volume > 0)
{
volume--;
mp3.setVolume(volume);
Serial.print("Volume: ");
Serial.println(volume);
}
delay(200);
}
}
| Function | Description | Code |
|---|
| setVolume(v) | Set directly (0–30) | mp3.setVolume(20) |
| volumeUp() | +1 | mp3.volumeUp() |
| volumeDown() | −1 | mp3.volumeDown() |
| getVolume() | Read current level | mp3.getVolume() |
#include <DIYables_MiniMp3.h>
#include <SoftwareSerial.h>
SoftwareSerial mp3Serial(10, 11);
DIYables_MiniMp3 mp3;
const int BUTTON_NEXT = 2;
const int BUTTON_PREV = 3;
void setup()
{
Serial.begin(9600);
mp3Serial.begin(9600);
pinMode(BUTTON_NEXT, INPUT_PULLUP);
pinMode(BUTTON_PREV, INPUT_PULLUP);
mp3.begin(mp3Serial);
delay(1000);
mp3.setVolume(20);
mp3.play(1);
Serial.println("Press NEXT or PREV button to change track");
}
void loop()
{
if (digitalRead(BUTTON_NEXT) == LOW)
{
Serial.println("Next track");
mp3.playNext();
delay(300);
}
if (digitalRead(BUTTON_PREV) == LOW)
{
Serial.println("Previous track");
mp3.playPrevious();
delay(300);
}
}
#include <DIYables_MiniMp3.h>
#include <SoftwareSerial.h>
SoftwareSerial mp3Serial(10, 11);
DIYables_MiniMp3 mp3;
const int BUTTON_PIN = 2;
bool paused = false;
void setup()
{
Serial.begin(9600);
mp3Serial.begin(9600);
pinMode(BUTTON_PIN, INPUT_PULLUP);
mp3.begin(mp3Serial);
delay(1000);
mp3.setVolume(20);
mp3.play(1);
Serial.println("Playing. Press button to pause/resume.");
}
void loop()
{
if (digitalRead(BUTTON_PIN) == LOW)
{
if (paused)
{
mp3.resume();
Serial.println("Resumed");
}
else
{
mp3.pause();
Serial.println("Paused");
}
paused = !paused;
delay(300);
}
}
#include <DIYables_MiniMp3.h>
#include <SoftwareSerial.h>
SoftwareSerial mp3Serial(10, 11);
DIYables_MiniMp3 mp3;
void setup()
{
Serial.begin(9600);
mp3Serial.begin(9600);
mp3.begin(mp3Serial);
delay(1000);
mp3.setVolume(25);
mp3.setEQ(DIYables_MiniMp3::EQ_NORMAL);
Serial.println("Playing track 1 on loop...");
mp3.loopTrack(1);
}
void loop()
{
}
| Function | Description | Code |
|---|
| loopTrack(n) | Repeat one track | mp3.loopTrack(1) |
| loopFolder(f) | Repeat all in folder | mp3.loopFolder(1) |
| loopAll() | Repeat everything | mp3.loopAll() |
| stopLoop() | Stop repeating | mp3.stopLoop() |
| shuffle() | Random order | mp3.shuffle() |
#include <DIYables_MiniMp3.h>
#include <SoftwareSerial.h>
SoftwareSerial mp3Serial(10, 11);
DIYables_MiniMp3 mp3;
void setup()
{
Serial.begin(9600);
mp3Serial.begin(9600);
mp3.begin(mp3Serial);
delay(1000);
mp3.setVolume(20);
Serial.println("Playing folder 01, track 001...");
mp3.playFolder(1, 1);
delay(5000);
Serial.println("Playing folder 01, track 002...");
mp3.playFolder(1, 2);
delay(5000);
Serial.println("Playing folder 02, track 001...");
mp3.playFolder(2, 1);
}
void loop()
{
}
| Function | Description | Code |
|---|
| playFolder(f, t) | Folder f, track t (99 folders, 255 tracks) | mp3.playFolder(1, 1) |
| playLargeFolder(f, t) | Large mode (15 folders, 3000 tracks) | mp3.playLargeFolder(1, 500) |
| playFromMP3Folder(t) | From /mp3 folder | mp3.playFromMP3Folder(1) |
#include <DIYables_MiniMp3.h>
#include <SoftwareSerial.h>
SoftwareSerial mp3Serial(10, 11);
DIYables_MiniMp3 mp3;
void setup()
{
Serial.begin(9600);
mp3Serial.begin(9600);
mp3.begin(mp3Serial);
delay(1000);
mp3.setVolume(20);
Serial.println("=== DIYables Mini Mp3 Player ===");
Serial.println("Commands:");
Serial.println(" 1-9 Play track number");
Serial.println(" + Volume up");
Serial.println(" - Volume down");
Serial.println(" p Pause");
Serial.println(" r Resume");
Serial.println(" s Stop");
Serial.println(" n Next track");
Serial.println(" b Previous track");
Serial.println(" ? Show status");
Serial.println("================================");
}
void loop()
{
if (Serial.available())
{
char cmd = Serial.read();
switch (cmd)
{
case '1': case '2': case '3':
case '4': case '5': case '6':
case '7': case '8': case '9':
Serial.print("Playing track ");
Serial.println(cmd - '0');
mp3.play(cmd - '0');
break;
case '+':
Serial.println("Volume up");
mp3.volumeUp();
break;
case '-':
Serial.println("Volume down");
mp3.volumeDown();
break;
case 'p':
Serial.println("Paused");
mp3.pause();
break;
case 'r':
Serial.println("Resumed");
mp3.resume();
break;
case 's':
Serial.println("Stopped");
mp3.stop();
break;
case 'n':
Serial.println("Next track");
mp3.playNext();
break;
case 'b':
Serial.println("Previous track");
mp3.playPrevious();
break;
case '?':
{
Serial.println("--- Status ---");
int16_t vol = mp3.getVolume();
Serial.print("Volume: ");
Serial.println(vol);
int16_t track = mp3.getCurrentTrack();
Serial.print("Current track: ");
Serial.println(track);
bool playing = mp3.isPlaying();
Serial.print("Playing: ");
Serial.println(playing ? "Yes" : "No");
int16_t total = mp3.getTrackCount();
Serial.print("Total tracks: ");
Serial.println(total);
Serial.println("--------------");
break;
}
default:
break;
}
}
}
| Key | Action |
|---|
| 1–9 | Play track by number |
| + / − | Volume up / down |
| p | Pause |
| r | Resume |
| s | Stop |
| n | Next |
| b | Previous |
| ? | Status report |
| Constant | Value | Sound |
|---|
| DIYables_MiniMp3::EQ_NORMAL | 0 | Flat |
| DIYables_MiniMp3::EQ_POP | 1 | Pop |
| DIYables_MiniMp3::EQ_ROCK | 2 | Rock |
| DIYables_MiniMp3::EQ_JAZZ | 3 | Jazz |
| DIYables_MiniMp3::EQ_CLASSIC | 4 | Classical |
| DIYables_MiniMp3::EQ_BASS | 5 | Bass boost |
mp3.setEQ(DIYables_MiniMp3::EQ_CLASSIC);
Blocking calls (up to 100 ms each). Return −1 on error.
| Function | Type | What It Returns |
|---|
| isPlaying() | bool | true during playback |
| getVolume() | int16_t | 0–30 |
| getEQ() | int16_t | 0–5 |
| getTrackCount() | int16_t | Tracks on card |
| getCurrentTrack() | int16_t | Active track number |
| getFolderCount() | int16_t | Folders on card |
| getTrackCountInFolder(f) | int16_t | Tracks in folder f |