Arduino UNO R4 - RTC Real-Time Clock

This tutorial instructs you how to use Arduino UNO R4 with RTC (Real-Time Clock). In detail, we will learn:

Arduino UNO R4 RTC Real-Time Clock

Hardware Preparation

1×Arduino UNO R4 WiFi
1×Arduino UNO R4 Minima (Alternatively)
1×USB Cable Type-C
1×AA Batteries 1.5V
1×2 AA Battery Holder
1×(Optional) Jumper Wires
1×(Recommended) Screw Terminal Block Shield for Arduino UNO R4
1×(Recommended) Breadboard Shield For Arduino UNO R4
1×(Recommended) Enclosure For Arduino UNO R4

Or you can buy the following sensor kits:

1×DIYables Sensor Kit (30 sensors/displays)
1×DIYables Sensor Kit (18 sensors/displays)
Disclosure: Some of the links provided in this section are Amazon affiliate links. We may receive a commission for any purchases made through these links at no additional cost to you.
Additionally, some of these links are for products from our own brand, DIYables.

Overview of Real-Time Clock on Arduino UNO R4

Both the Arduino UNO R4 Minima and WiFi version have a built-in Real-Time Clock (RTC) embedded within its main microcontroller. This RTC allows your Arduino projects to keep track of date and time even when the board is turned off momentarily. You can access and control the RTC using the RTC library included in the Arduino IDE when you install the board package for your Arduino UNO R4. The library allows you to set the current date and time, read the current date and time, and set alarms for specific times.

However, there's a crucial point to consider regarding backup power:

  • Arduino UNO R4 Minima: Arduino UNO R4 Minima doesn't have a dedicated backup battery for RTC. This means if the board completely loses power, the RTC resets, and you'll need to set the time again when you power it back on.
  • Arduino UNO R4 WiFi: Arduino UNO R4 WiFi doesn't includes backup battery for RTC. However, it offers a solution to use an external backup battery for RTC. You can connect an external battery to power RTC on Arduino UNO R3 WiFi via the VRTC (Voltage for Real-Time Clock)** pin. By supplying an external voltage (between 1.6V and 3.6V) to this pin, you can provide backup power to the RTC. This ensures the clock keeps running even when the main power supply is off, allowing you to retain the time settings.

You can provide backup power for the RTC using two AA batteries with a battery holder, as shown in the following wiring diagram

The wiring diagram between Arduino UNO R4 WiFi RTC backup battery

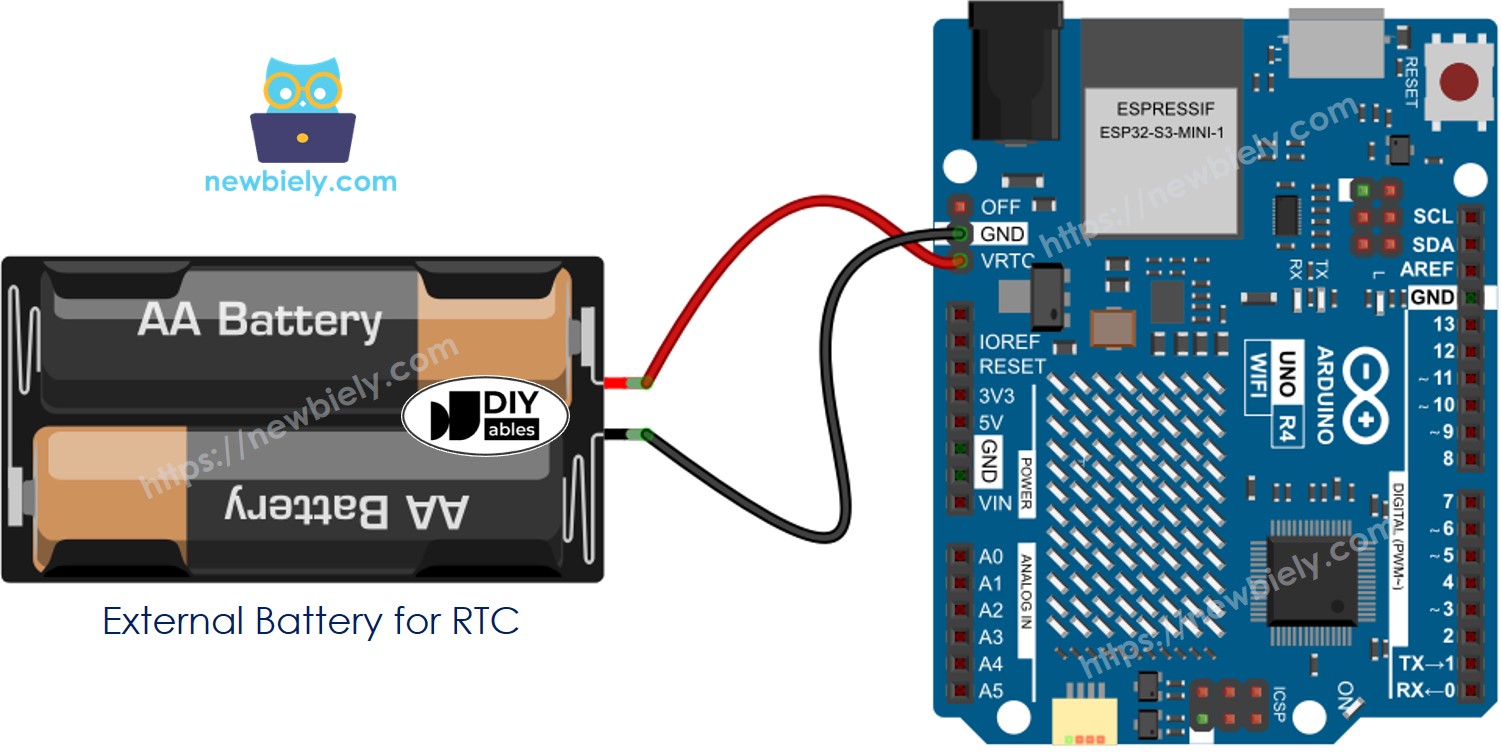
This image is created using Fritzing. Click to enlarge image

※ NOTE THAT:

That battery power source is for RTC only. You need to power Arduino UNO R4 via a separate power supply.

How To Program For RTC On Arduino UNO R4

  • Add the library:
#include "RTC.h"
  • Initialize the RTC:
RTC.begin();
  • Check if the RTC is configured or not, if not, set the date and time.
// Tries to retrieve time RTCTime savedTime; RTC.getTime(savedTime); if (!RTC.isRunning()) { // this means the RTC is waking up "as new" if (savedTime.getYear() == 2000) { Serial.println("RTC is NOT running, let's set the time!"); // Set current time, modify it to match the time you upload the code RTCTime startTime(22, Month::JULY, 2024, 16, 52, 00, DayOfWeek::MONDAY, SaveLight::SAVING_TIME_ACTIVE); RTC.setTime(startTime); } else { RTC.setTime(savedTime); } }
  • Displays date and time from the clock module
RTCTime currentTime; // Get current time from RTC RTC.getTime(currentTime); // Print out date (YYYY/MM/DD) Serial.print("Date & Time: "); Serial.print(currentTime.getYear()); Serial.print("/"); Serial.print(Month2int(currentTime.getMonth())); Serial.print("/"); Serial.print(currentTime.getDayOfMonth()); Serial.print(" - "); // Print time (HH/MM/SS) Serial.print(currentTime.getHour()); Serial.print(":"); Serial.print(currentTime.getMinutes()); Serial.print(":"); Serial.println(currentTime.getSeconds());

Arduino UNO R4 Code – How to get data and time

/* * This Arduino UNO R4 code was developed by newbiely.com * * This Arduino UNO R4 code is made available for public use without any restriction * * For comprehensive instructions and wiring diagrams, please visit: * https://newbiely.com/tutorials/arduino-uno-r4/arduino-uno-r4-rtc-real-time-clock */ #include "RTC.h" void setup() { Serial.begin(9600); //delay(1000); RTC.begin(); // Tries to retrieve time RTCTime savedTime; RTC.getTime(savedTime); if (!RTC.isRunning()) { // this means the RTC is waking up "as new" if (savedTime.getYear() == 2000) { Serial.println("RTC is NOT running, let's set the time!"); // Set current time, modify it to match the time you upload the code RTCTime startTime(22, Month::JULY, 2024, 16, 52, 00, DayOfWeek::MONDAY, SaveLight::SAVING_TIME_ACTIVE); RTC.setTime(startTime); } else { RTC.setTime(savedTime); } } } void loop() { RTCTime currentTime; // Get current time from RTC RTC.getTime(currentTime); // Print out date (YYYY/MM/DD) Serial.print("Date & Time: "); Serial.print(currentTime.getYear()); Serial.print("/"); Serial.print(Month2int(currentTime.getMonth())); Serial.print("/"); Serial.print(currentTime.getDayOfMonth()); Serial.print(" - "); // Print time (HH/MM/SS) Serial.print(currentTime.getHour()); Serial.print(":"); Serial.print(currentTime.getMinutes()); Serial.print(":"); Serial.println(currentTime.getSeconds()); delay(1000); }

Detailed Instructions

Follow these instructions step by step:

  • If this is your first time using the Arduino UNO R4 WiFi/Minima, refer to the tutorial on setting up the environment for Arduino UNO R4 WiFi/Minima in the Arduino IDE.
  • If you use Arduino UNO R4 WiFi, Connect the Arduino UNO R4 WiFi to the backup battery according to the provided diagram.
  • Connect the Arduino UNO R4 board to your computer using a USB cable.
  • Launch the Arduino IDE on your computer.
  • Select the appropriate Arduino UNO R4 board (e.g., Arduino UNO R4 WiFi) and COM port.
  • Copy the code and paste it into Arduino IDE.
  • Modify the time on the code to match your current time
  • Press the Upload button in Arduino IDE to send the code to Arduino UNO R4.
  • Open the Serial Monitor.
  • Check the result on the Serial Monitor.
COM6
Send
Date & Time: 2024/7/22 - 16:52:1 Date & Time: 2024/7/22 - 16:52:2 Date & Time: 2024/7/22 - 16:52:3 Date & Time: 2024/7/22 - 16:52:4 Date & Time: 2024/7/22 - 16:52:5 Date & Time: 2024/7/22 - 16:52:6 Date & Time: 2024/7/22 - 16:52:7 Date & Time: 2024/7/22 - 16:52:8 Date & Time: 2024/7/22 - 16:52:9 Date & Time: 2024/7/22 - 16:52:10 Date & Time: 2024/7/22 - 16:52:11 Date & Time: 2024/7/22 - 16:52:12 Date & Time: 2024/7/22 - 16:52:13
Autoscroll Show timestamp
Clear output
9600 baud  
Newline  

Everything looks fine, but wait! There could be a problem in the following scenarios:

  • You use an Arduino UNO R4 WiFi without a backup battery or an Arduino UNO R4 Minima.
  • The Arduino loses power temporarily and reboots. The Arduino then sets the current time to the time specified in the code, but real-time has passed. This leads to incorrect time information.

Solutions for this:

  • Use a stable power source for the Arduino.
  • Use a stable backup battery (only works for the UNO R4 WiFi).
  • Update the RTC time from the Internet via Network Time Protocol (NTP) each time the Arduino reboots (requires an Internet connection).

Let's see how to use NTP to update the time on the Arduino UNO R4's RTC:

Arduino UNO R4 Code – Update RTC time via NTP

/* * This Arduino UNO R4 code was developed by newbiely.com * * This Arduino UNO R4 code is made available for public use without any restriction * * For comprehensive instructions and wiring diagrams, please visit: * https://newbiely.com/tutorials/arduino-uno-r4/arduino-uno-r4-rtc-real-time-clock */ #include "RTC.h" void setup() { Serial.begin(9600); //delay(1000); RTC.begin(); // Tries to retrieve time RTCTime savedTime; RTC.getTime(savedTime); if (!RTC.isRunning()) { // this means the RTC is waking up "as new" if (savedTime.getYear() == 2000) { Serial.println("RTC is NOT running, let's set the time!"); // Set current time, modify it to match the time you upload the code RTCTime startTime(22, Month::JULY, 2024, 16, 52, 00, DayOfWeek::MONDAY, SaveLight::SAVING_TIME_ACTIVE); RTC.setTime(startTime); } else { RTC.setTime(savedTime); } } } void loop() { RTCTime currentTime; // Get current time from RTC RTC.getTime(currentTime); // Print out date (YYYY/MM/DD) Serial.print("Date & Time: "); Serial.print(currentTime.getYear()); Serial.print("/"); Serial.print(Month2int(currentTime.getMonth())); Serial.print("/"); Serial.print(currentTime.getDayOfMonth()); Serial.print(" - "); // Print time (HH/MM/SS) Serial.print(currentTime.getHour()); Serial.print(":"); Serial.print(currentTime.getMinutes()); Serial.print(":"); Serial.println(currentTime.getSeconds()); delay(1000); }

Detailed Instructions

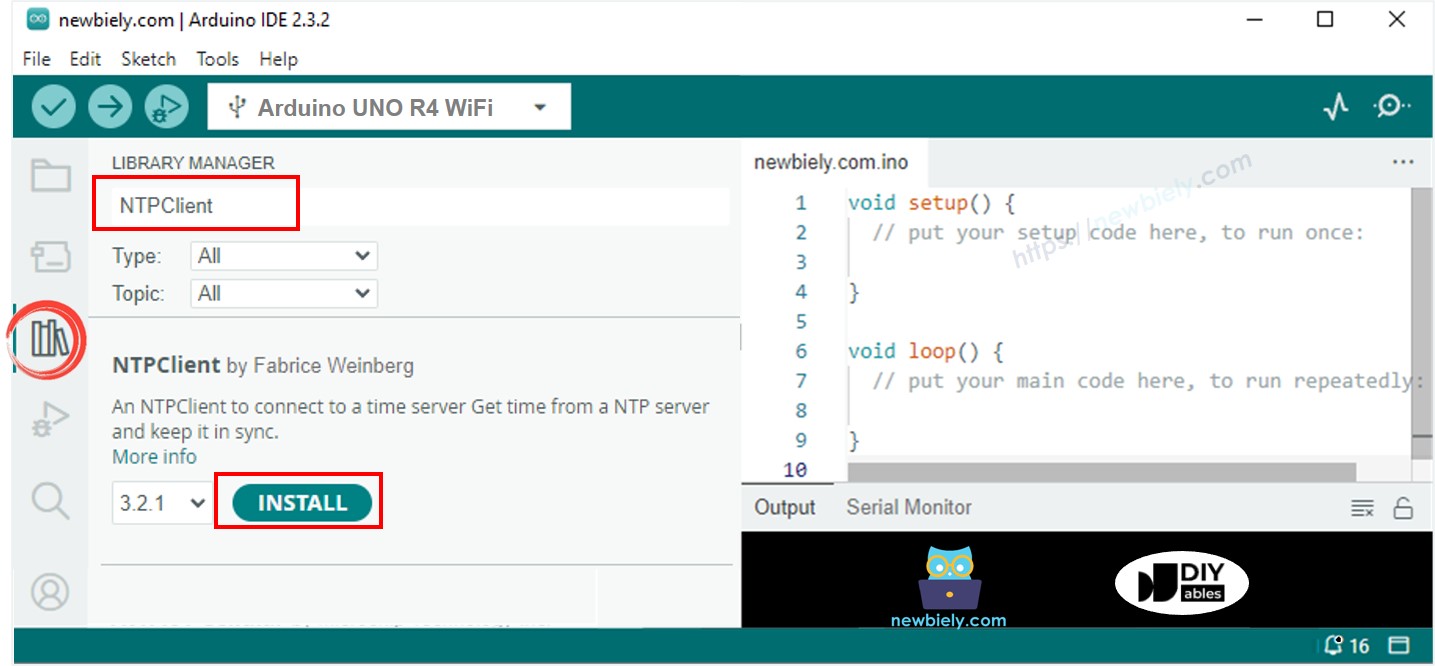
  • Open the Library Manager by clicking on the Library Manager icon on the left side of the Arduino IDE.
  • Search for “NTPClient” and locate the NTPClient by Fabrice Weinberg.
  • Click on the Install button to add the NTPClient library.
Arduino UNO R4 NTPClient library
  • Copy the code and paste it into Arduino IDE.
  • Modify the WiFi SSID and password on the code to match your network credentials
  • Press the Upload button in Arduino IDE to send the code to Arduino UNO R4.
  • Open the Serial Monitor.
  • Check the result on the Serial Monitor.
COM6
Send
Attempting to connect to SSID: YOUR_WIFI_SSID Connected to WiFi IP Address: 192.168.0.8 Starting connection to NTP server... Unix time = 1721671335 The RTC was updated to: 2024-07-22T18:02:15 RTC Date & Time: 2024/7/22 - 18:2:15 RTC Date & Time: 2024/7/22 - 18:2:16 RTC Date & Time: 2024/7/22 - 18:2:17 RTC Date & Time: 2024/7/22 - 18:2:18 RTC Date & Time: 2024/7/22 - 18:2:19 RTC Date & Time: 2024/7/22 - 18:2:20 RTC Date & Time: 2024/7/22 - 18:2:21
Autoscroll Show timestamp
Clear output
9600 baud  
Newline  

Video Tutorial

Learn More

※ OUR MESSAGES

  • As freelancers, We are AVAILABLE for HIRE. See how to outsource your project to us
  • Please feel free to share the link of this tutorial. However, Please do not use our content on any other websites. We invested a lot of effort and time to create the content, please respect our work!