Arduino UNO R4 - Control Car via Web

This tutorial instructs you how to control a 2WD RC robot car via the web using the Arduino Uno R4 WiFi. In this guide, we will walk you through the steps to set up and control your robot car remotely, utilizing the powerful capabilities of the Arduino Uno R4 with built-in WiFi. By the end of this tutorial, you will learn:

Arduino UNO R4 controls robot car via Web

This tutorial is perfect for hobbyists, students, and anyone interested in robotics and web-based control systems. Whether you are a beginner or have some experience with Arduino, our step-by-step instructions will help you achieve your goal of remotely controlling your 2WD RC robot car.

Let's get started on this exciting journey of combining robotics and web technology!

Why needs WebSocket to control the RC car?

  • Without WebSocket, you would have to refresh the page every time you want to change the car's direction. This method is not very efficient.
  • With WebSocket, a dedicated connection is created between the webpage and the Arduino UNO R4. This setup allows you to send commands to the Arduino UNO R4 without needing to refresh the page. As a result, the robot car responds quickly and smoothly. Isn't that amazing?

To sum up, WebSocket allows you to control the robot smoothly and in real-time.

We provide detailed guides on using WebSocket with Arduino UNO R4. Find out more by visiting the links provided: Arduino UNO R4 - WebSocket tutorial

How It Works

The Arduino UNO R4 code creates a web server and a WebSocket server. Here's how it works:

  • When you enter the IP address of the Arduino UNO R4 into a web browser, it requests the User Interface webpage from the Arduino UNO R4. The web server on the Arduino UNO R4 responds by sending back the webpage's content made up of HTML, CSS, and JavaScript. Your web browser then shows this webpage. The JavaScript code on the webpage starts a WebSocket connection with the Arduino UNO R4's WebSocket server. When this WebSocket connection is working, any pressing or releasing of buttons on the webpage sends commands to the Arduino UNO R4 through this connection. The WebSocket server on the Arduino UNO R4 gets these commands and controls the robot car as directed.

Here is a table that displays the commands sent from the webpage to the Arduino UNO R4, based on what the user does:

User's Action Button Command Car Action
PRESS UP 1 MOVE FORWARD
PRESS DOWN 2 MOVE BACKWARD
PRESS LEFT 4 TURN LEFT
PRESS RIGHT 8 TURN RIGHT
PRESS STOP 0 STOP
RELEASE UP 0 STOP
RELEASE DOWN 0 STOP
RELEASE LEFT 0 STOP
RELEASE RIGHT 0 STOP
RELEASE STOP 0 STOP

Wiring Diagram between 2WD RC Car and Arduino UNO R4

The wiring diagram between Arduino UNO R4 2WD RC Car

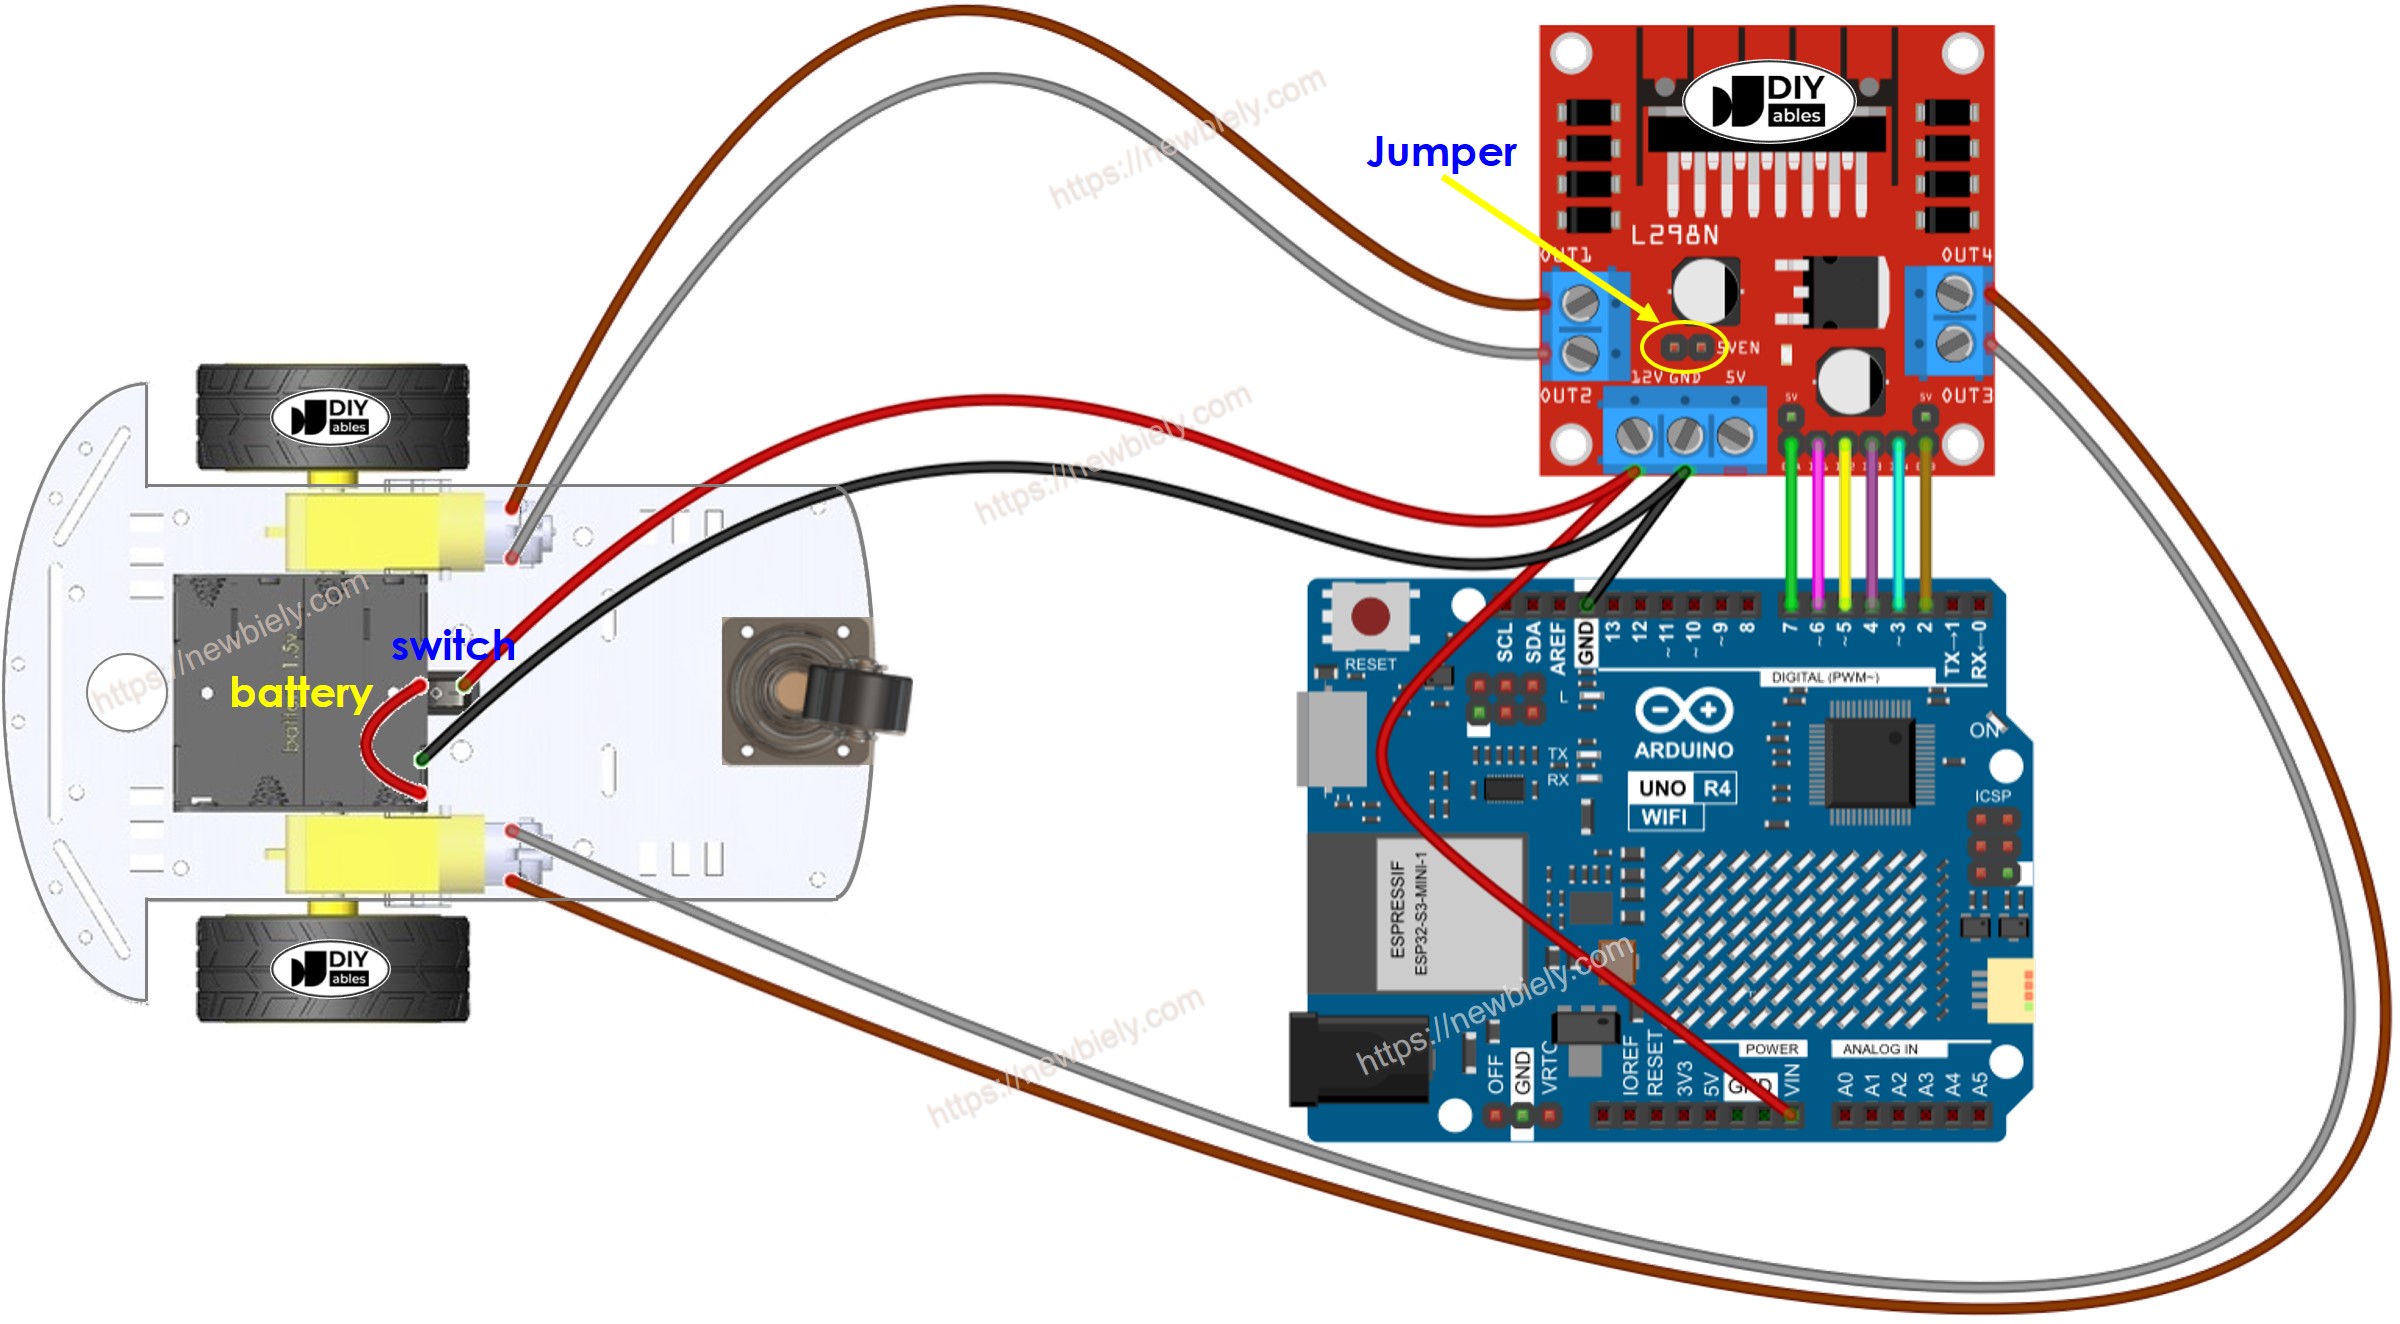
This image is created using Fritzing. Click to enlarge image

See The best way to supply power to the Arduino Uno R4 and other components.

Usually, you would need two different sources of power:

  • One for the motor.
  • Another for the Arduino UNO R4 board and the L298N module, which is used as the motor driver.

You can simplify this setup by using one power source - four 1.5V batteries to make a total of 6V. Here is how to do it:

  • Attach the batteries to the L298N module as shown in the instructions.
  • Take off the two jumpers from the ENA and ENB pins
  • Put on a jumper marked 5VEN (shown with a yellow circle in the diagram).
  • Connect the 12V pin of the L298N module to the Vin pin on the Arduino UNO R4. This will power the Arduino UNO R4 using the batteries.

The 2WD RC car has an on/off switch. This lets you connect or disconnect the battery using the switch, turning the car's power on or off when needed. If you want something simpler, you can skip using the switch.

Arduino UNO R4 Code

The webpage's content (HTML, CSS, JavaScript) is saved in a separate file called index.h. Therefore, we will use two code files in the Arduino IDE.

  • An .ino file is a Arduino UNO R4 code that creates a web server and WebSocket Server to control the car.
  • An .h file stores the content of the webpage.

Detailed Instructions

Follow these instructions step by step:

  • If this is your first time using the Arduino Uno R4 WiFi/Minima, refer to the tutorial on setting up the environment for Arduino Uno R4 WiFi/Minima in the Arduino IDE.
  • Connect the Arduino Uno R4 board to your computer using a USB cable.
  • Launch the Arduino IDE on your computer.
  • Select the appropriate Arduino Uno R4 board (e.g., Arduino Uno R4 WiFi) and COM port.
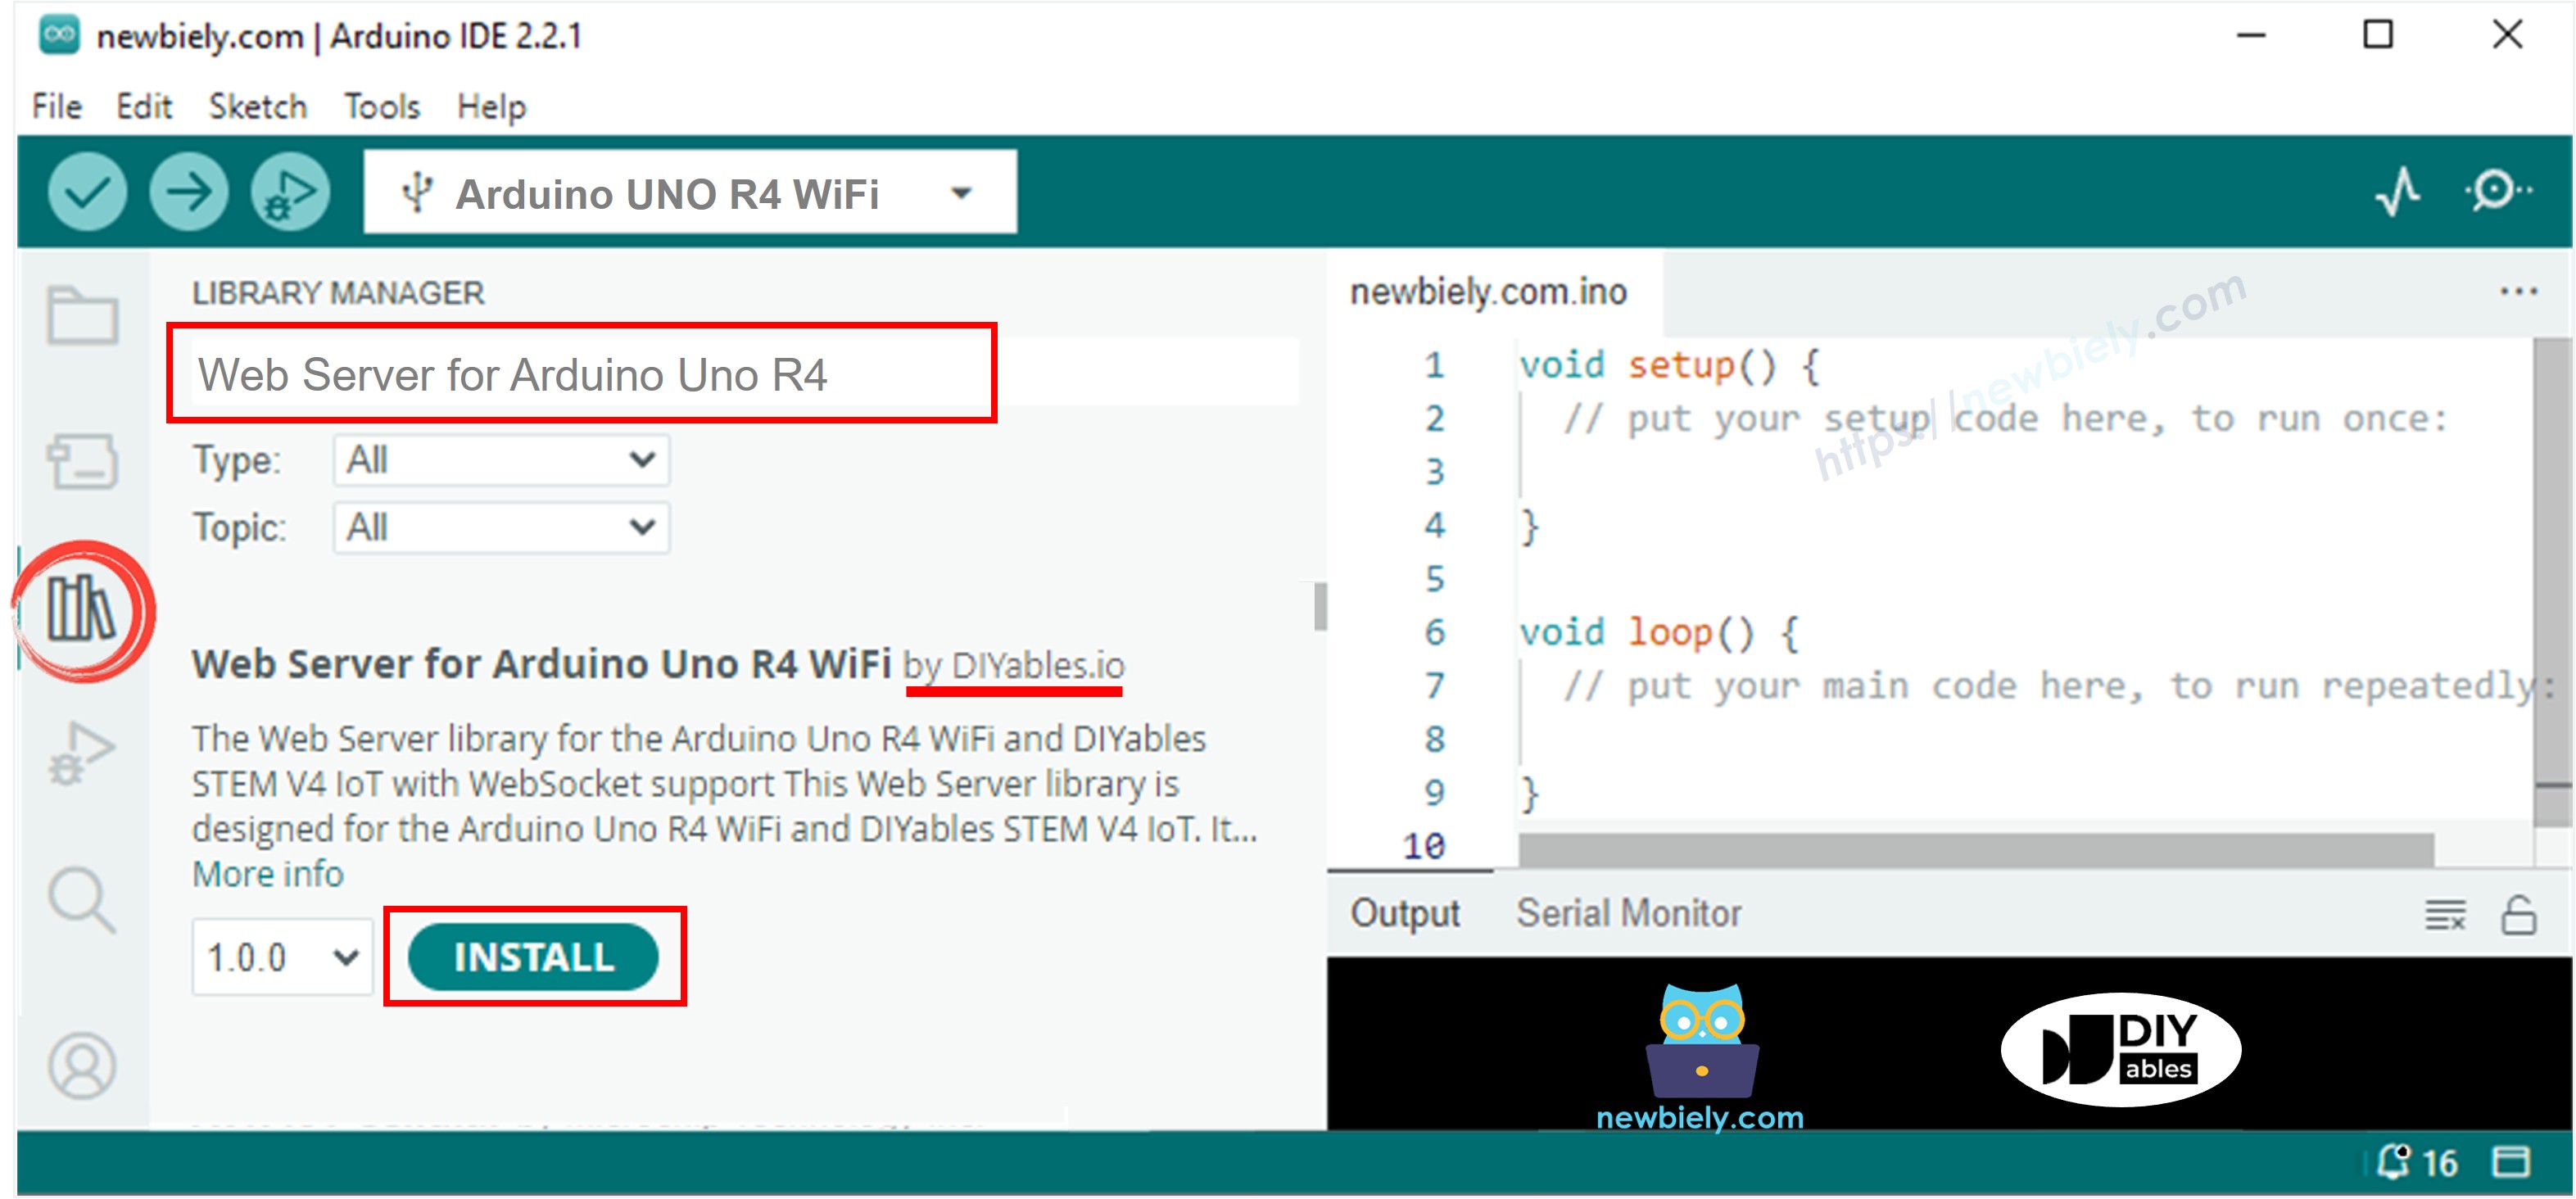
  • Open the Library Manager by clicking on the Library Manager icon on the left side of the Arduino IDE.
  • Search for Web Server for Arduino Uno R4 WiFi and locate the Web Server library created by DIYables.
  • Click Install button to install the Web Server library.
Arduino UNO R4 Web Server library
  • In the Arduino IDE, start a new sketch and name it, for example, newbiely.com.ino
  • Copy the following code and open it using the Arduino IDE
/* * This Arduino UNO R4 code was developed by newbiely.com * * This Arduino UNO R4 code is made available for public use without any restriction * * For comprehensive instructions and wiring diagrams, please visit: * https://newbiely.com/tutorials/arduino-uno-r4/arduino-uno-r4-controls-car-via-web */ #include <UnoR4WiFi_WebServer.h> #include "index.h" #define CMD_STOP 0 #define CMD_FORWARD 1 #define CMD_BACKWARD 2 #define CMD_LEFT 4 #define CMD_RIGHT 8 #define ENA_PIN 7 // The Arduino pin connected to the ENA pin L298N #define IN1_PIN 6 // The Arduino pin connected to the IN1 pin L298N #define IN2_PIN 5 // The Arduino pin connected to the IN2 pin L298N #define IN3_PIN 4 // The Arduino pin connected to the IN3 pin L298N #define IN4_PIN 3 // The Arduino pin connected to the IN4 pin L298N #define ENB_PIN 2 // The Arduino pin connected to the ENB pin L298N // WiFi credentials const char WIFI_SSID[] = "YOUR_WIFI_SSID"; const char WIFI_PASSWORD[] = "YOUR_WIFI_PASSWORD"; // Create web server instance UnoR4WiFi_WebServer server(80); UnoR4WiFi_WebSocket *webSocket; // Page handlers void handleHome(WiFiClient& client, const String& method, const String& request, const QueryParams& params, const String& jsonData) { server.sendResponse(client, HTML_CONTENT); } // WebSocket event handlers void onWebSocketOpen(net::WebSocket& ws) { Serial.println("New WebSocket connection"); } void onWebSocketMessage(net::WebSocket& ws, const net::WebSocket::DataType dataType, const char* message, uint16_t length) { String cmd_str = String((char*)message); int command = cmd_str.toInt(); Serial.print("command: "); Serial.println(command); switch (command) { case CMD_STOP: Serial.println("Stop"); CAR_stop(); break; case CMD_FORWARD: Serial.println("Move Forward"); CAR_moveForward(); break; case CMD_BACKWARD: Serial.println("Move Backward"); CAR_moveBackward(); break; case CMD_LEFT: Serial.println("Turn Left"); CAR_turnLeft(); break; case CMD_RIGHT: Serial.println("Turn Right"); CAR_turnRight(); break; default: Serial.println("Unknown command"); } } void onWebSocketClose(net::WebSocket& ws, const net::WebSocket::CloseCode code, const char* reason, uint16_t length) { Serial.println("WebSocket client disconnected"); } void setup() { Serial.begin(9600); delay(1000); pinMode(ENA_PIN, OUTPUT); pinMode(IN1_PIN, OUTPUT); pinMode(IN2_PIN, OUTPUT); pinMode(IN3_PIN, OUTPUT); pinMode(IN4_PIN, OUTPUT); pinMode(ENB_PIN, OUTPUT); digitalWrite(ENA_PIN, HIGH); // set full speed digitalWrite(ENB_PIN, HIGH); // set full speed Serial.println("Arduino Uno R4 WiFi - WebSocket Server"); // Configure web server routes server.addRoute("/", handleHome); // Start web server with WiFi connection server.begin(WIFI_SSID, WIFI_PASSWORD); // Enable WebSocket functionality webSocket = server.enableWebSocket(81); if (webSocket != nullptr) { // Set up WebSocket event handlers webSocket->onOpen(onWebSocketOpen); webSocket->onMessage(onWebSocketMessage); webSocket->onClose(onWebSocketClose); } else { Serial.println("Failed to start WebSocket server"); } } void loop() { // Handle HTTP requests and WebSocket connections using the library server.handleClient(); server.handleWebSocket(); delay(10); } void CAR_moveForward() { digitalWrite(IN1_PIN, HIGH); digitalWrite(IN2_PIN, LOW); digitalWrite(IN3_PIN, HIGH); digitalWrite(IN4_PIN, LOW); } void CAR_moveBackward() { digitalWrite(IN1_PIN, LOW); digitalWrite(IN2_PIN, HIGH); digitalWrite(IN3_PIN, LOW); digitalWrite(IN4_PIN, HIGH); } void CAR_turnLeft() { digitalWrite(IN1_PIN, HIGH); digitalWrite(IN2_PIN, LOW); digitalWrite(IN3_PIN, LOW); digitalWrite(IN4_PIN, LOW); } void CAR_turnRight() { digitalWrite(IN1_PIN, LOW); digitalWrite(IN2_PIN, LOW); digitalWrite(IN3_PIN, HIGH); digitalWrite(IN4_PIN, LOW); } void CAR_stop() { digitalWrite(IN1_PIN, LOW); digitalWrite(IN2_PIN, LOW); digitalWrite(IN3_PIN, LOW); digitalWrite(IN4_PIN, LOW); }
  • Change the WiFi details (SSID and password) in the program to use your network information.
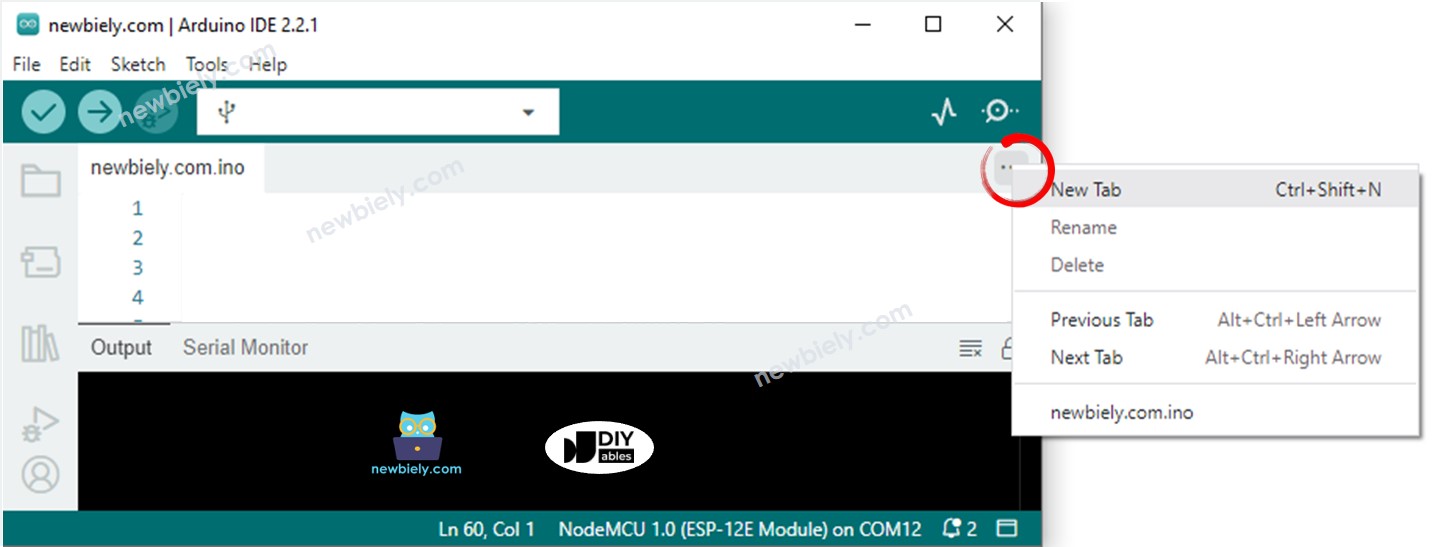
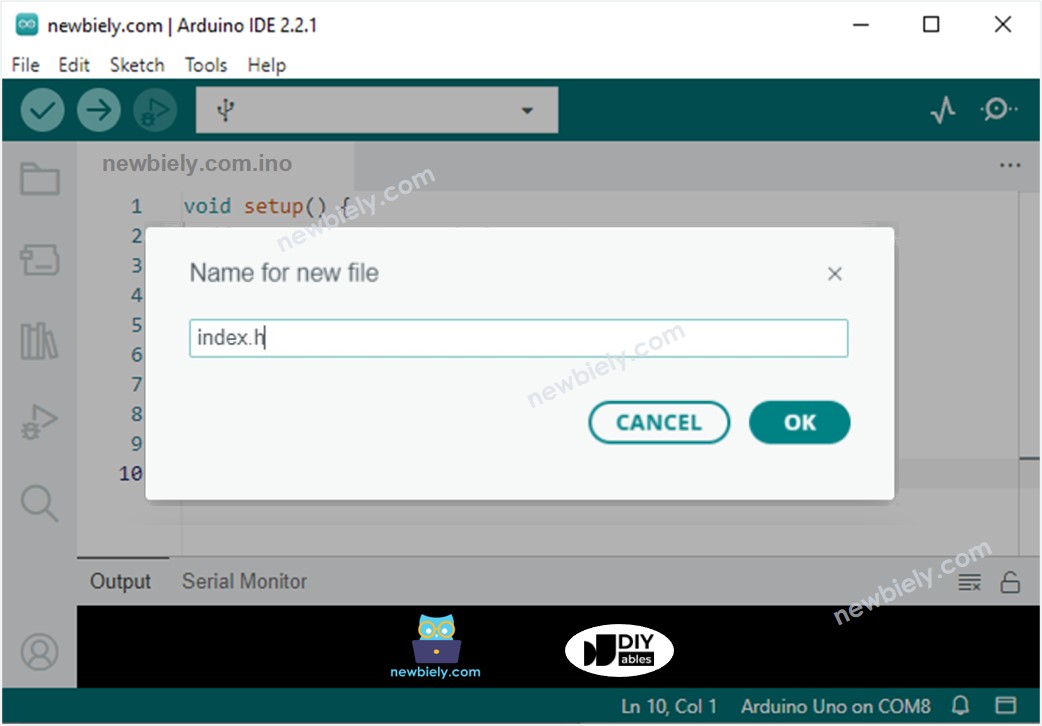
  • Create the file named index.h in Arduino IDE by doing one of the following:
    • Click the button located below the serial monitor icon and select New Tab, or press Ctrl+Shift+N on your keyboard.
    Arduino IDE 2 adds file
    • Name the file index.h and press the OK button.
    Arduino IDE 2 adds file index.h
    • Copy the following code and paste it into the index.h file.
    /* * This Arduino UNO R4 code was developed by newbiely.com * * This Arduino UNO R4 code is made available for public use without any restriction * * For comprehensive instructions and wiring diagrams, please visit: * https://newbiely.com/tutorials/arduino-uno-r4/arduino-uno-r4-controls-car-via-web */ const char *HTML_CONTENT = R"=====( <!DOCTYPE html> <html> <head> <title>Arduino Uno R4 Control Car via Web</title> <meta name="viewport" content="width=device-width, initial-scale=0.7, maximum-scale=1, user-scalable=no"> <style type="text/css"> body { text-align: center; font-size: 24px;} button { text-align: center; font-size: 24px;} #container { margin-right: auto; margin-left: auto; width: 400px; height: 400px; position: relative; margin-bottom: 10px; } div[class^='button'] { position: absolute; } .button_up, .button_down { width:214px; height:104px;} .button_left, .button_right { width:104px; height:214px;} .button_stop { width:178px; height:178px;} .button_up { background: url('https://esp32io.com/images/tutorial/up_inactive.png') no-repeat; background-size: contain; left: 200px; top: 0px; transform: translateX(-50%); } .button_down { background: url('https://esp32io.com/images/tutorial/down_inactive.png') no-repeat; background-size: contain; left:200px; bottom: 0px; transform: translateX(-50%); } .button_right { background: url('https://esp32io.com/images/tutorial/right_inactive.png') no-repeat; background-size: contain; right: 0px; top: 200px; transform: translateY(-50%); } .button_left { background: url('https://esp32io.com/images/tutorial/left_inactive.png') no-repeat; background-size: contain; left:0px; top: 200px; transform: translateY(-50%); } .button_stop { background: url('https://esp32io.com/images/tutorial/stop_inactive.png') no-repeat; background-size: contain; left:200px; top: 200px; transform: translate(-50%, -50%); } </style> <script> var CMD_STOP = 0; var CMD_FORWARD = 1; var CMD_BACKWARD = 2; var CMD_LEFT = 4; var CMD_RIGHT = 8; var img_name_lookup = { [CMD_STOP]: "stop", [CMD_FORWARD]: "up", [CMD_BACKWARD]: "down", [CMD_LEFT]: "left", [CMD_RIGHT]: "right" } var ws = null; function init() { var container = document.querySelector("#container"); container.addEventListener("touchstart", mouse_down); container.addEventListener("touchend", mouse_up); container.addEventListener("touchcancel", mouse_up); container.addEventListener("mousedown", mouse_down); container.addEventListener("mouseup", mouse_up); container.addEventListener("mouseout", mouse_up); } function ws_onmessage(e_msg) { e_msg = e_msg || window.event; // MessageEvent //alert("msg : " + e_msg.data); } function ws_onopen() { document.getElementById("ws_state").innerHTML = "OPEN"; document.getElementById("wc_conn").innerHTML = "Disconnect"; } function ws_onclose() { document.getElementById("ws_state").innerHTML = "CLOSED"; document.getElementById("wc_conn").innerHTML = "Connect"; console.log("socket was closed"); ws.onopen = null; ws.onclose = null; ws.onmessage = null; ws = null; } function wc_onclick() { if(ws == null) { ws = new WebSocket("ws://" + window.location.host + ":81"); document.getElementById("ws_state").innerHTML = "CONNECTING"; ws.onopen = ws_onopen; ws.onclose = ws_onclose; ws.onmessage = ws_onmessage; } else ws.close(); } function mouse_down(event) { if (event.target !== event.currentTarget) { var id = event.target.id; send_command(id); event.target.style.backgroundImage = "url('https://esp32io.com/images/tutorial/" + img_name_lookup[id] + "_active.png')"; } event.stopPropagation(); event.preventDefault(); } function mouse_up(event) { if (event.target !== event.currentTarget) { var id = event.target.id; send_command(CMD_STOP); event.target.style.backgroundImage = "url('https://esp32io.com/images/tutorial/" + img_name_lookup[id] + "_inactive.png')"; } event.stopPropagation(); event.preventDefault(); } function send_command(cmd) { if(ws != null) if(ws.readyState == 1) ws.send(cmd + "\r\n"); } window.onload = init; </script> </head> <body> <h2>Arduino Uno R4 - RC Car via Web</h2> <div id="container"> <div id="0" class="button_stop"></div> <div id="1" class="button_up"></div> <div id="2" class="button_down"></div> <div id="8" class="button_right"></div> <div id="4" class="button_left"></div> </div> <p> WebSocket : <span id="ws_state" style="color:blue">closed</span><br> </p> <button id="wc_conn" type="button" onclick="wc_onclick();">Connect</button> <br> <br> <div class="sponsor">Sponsored by <a href="https://amazon.com/diyables">DIYables</a></div> </body> </html> )=====";
    • You now have the code in two files named newbiely.com.ino and index.h.
    • Click the Upload button in the Arduino IDE to load your code onto the Arduino UNO R4.
    • Open the Serial Monitor.
    • Look at the results displayed on the Serial Monitor.
    COM6
    Send
    Arduino Uno R4 WiFi - WebSocket Server Connected! IP Address: 192.168.0.254 SSID: YOUR_WIFI_SSID IP Address: 192.168.0.254 Signal strength (RSSI): -44 dBm WebSocket server started on port 81 WebSocket URL: ws://192.168.0.254:81 WebSocket server enabled successfully
    Autoscroll Show timestamp
    Clear output
    9600 baud  
    Newline  
    • Write down the IP address shown and type it into the address bar in a web browser on your smartphone or computer.
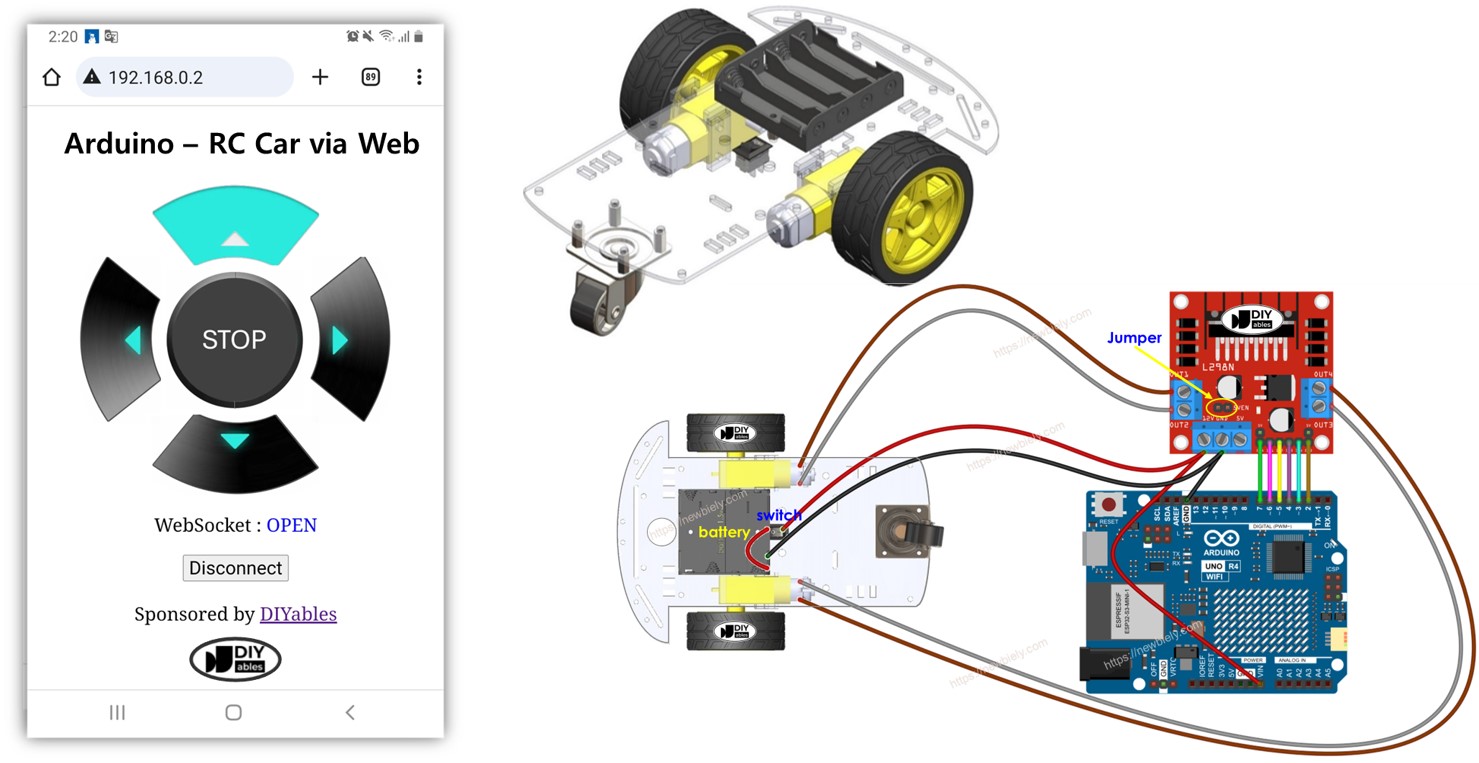
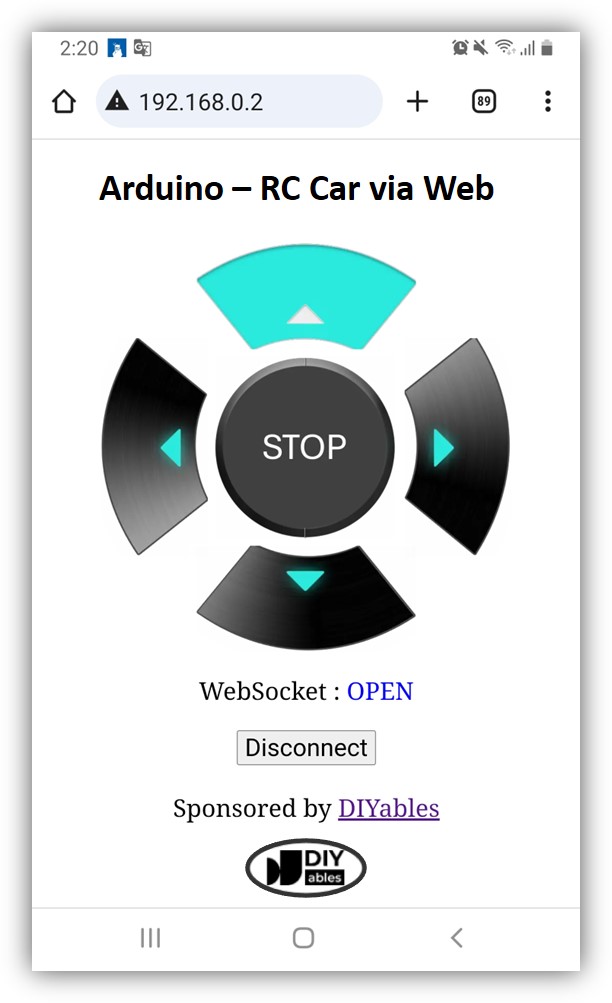
    • The webpage will appear as follows:
    Arduino UNO R4 controls car via web browser
    • Press the CONNECT button to link the webpage with Arduino UNO R4 through WebSocket.
    • You can now direct the car to turn left or right, and move forward or backward using the web interface.

    The control button images are not saved on the Arduino UNO R4 to save its memory. Instead, they are stored online. Therefore, your phone or computer must be connected to the internet to load these images on the web control page.

    ※ NOTE THAT:

    If you change the HTML in the file named index.h but do not change anything in the file named newbiely.com.ino, then when you compile and upload the code to the Arduino UNO R4, the Arduino IDE will not update the HTML content. To make the Arduino IDE to update the HTML content, you must make a small change in the newbiely.com.ino file, like adding an empty line or a comment.

    Line-by-line Code Explanation

    The Arduino UNO R4 code provided includes explanations for each line. Be sure to read the comments within the code!

Troubleshooting For Arduino Uno R4

If the above code does work, please update the latest version for the WiFi module of Arduino UNO R4

  • Connect your Arduino Uno R4 WiFi to your PC
  • Open Arduino IDE 2
  • Go to Tools Firmware Updater
Arduino Uno R4 WiFi Update Firmware
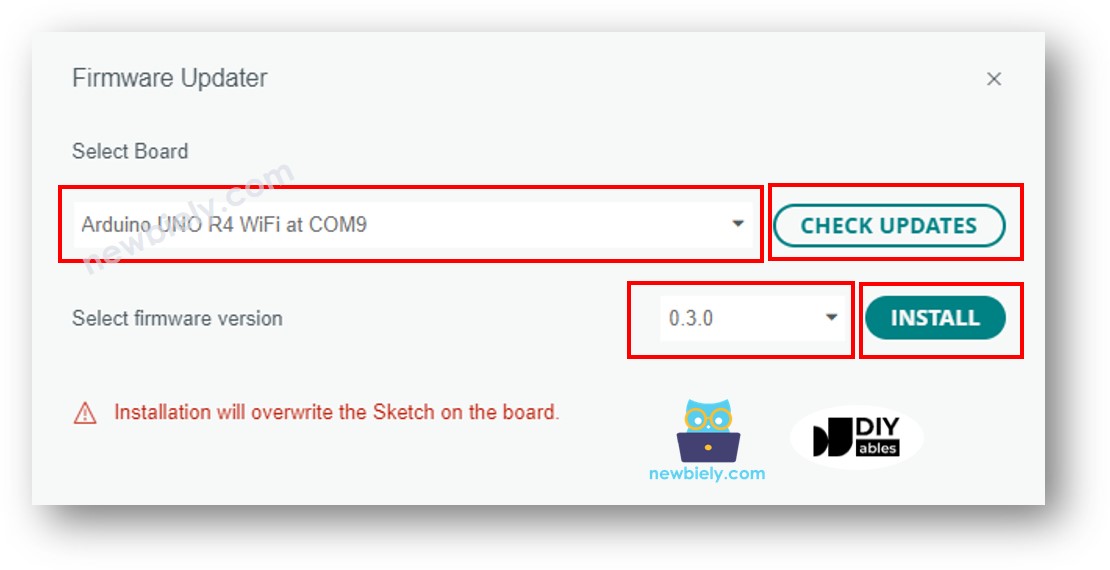
  • Select the Arduino Uno R4 WiFi board and port
  • Click CHECK UPDATES button
  • A list of available firmware versions will appear
  • Select the latest version of firmware
  • Click INSTALL button
  • Wait until it done
  • Reboot your Arduino Uno R4 WiFi
  • Re-compile and upload your code to Arduino Uno R4 WiFi
  • Check the result

※ OUR MESSAGES

  • As freelancers, We are AVAILABLE for HIRE. See how to outsource your project to us
  • Please feel free to share the link of this tutorial. However, Please do not use our content on any other websites. We invested a lot of effort and time to create the content, please respect our work!