Arduino UNO R4 - Blink LED Without Delay
Imagine that the Arduino UNO R4 needs to do two tasks: blink an LED and detect when a button is pressed. If we use the delay() function, the Arduino UNO R4 might miss some button presses. In this tutorial, we'll learn how to make the Arduino UNO R4 blink an LED and monitor a button to ensure it detects every button press.
We will go through three examples below and compare their differences.
- Arduino UNO R4 makes an LED blink using the delay() function.
- Arduino UNO R4 makes an LED blink using the millis() function.
- Arduino UNS R4 makes an LED blink using the ezLED library.

※ NOTE THAT:
- This method does more than just make LED blink and check button status. It allows Arduino UNO R4 to perform multiple tasks simultaneously without interruption.
- This tutorial gives detailed information to help you learn how it works. For simplicity, you can use Arduino UNO R4 - LED library.
Hardware Preparation
Or you can buy the following kits:
| 1 | × | DIYables STEM V4 IoT Starter Kit (Arduino included) | |
| 1 | × | DIYables Sensor Kit (30 sensors/displays) | |
| 1 | × | DIYables Sensor Kit (18 sensors/displays) |
Additionally, some of these links are for products from our own brand, DIYables .
Buy Note: Use the LED Module for easier wiring. It includes an integrated resistor.
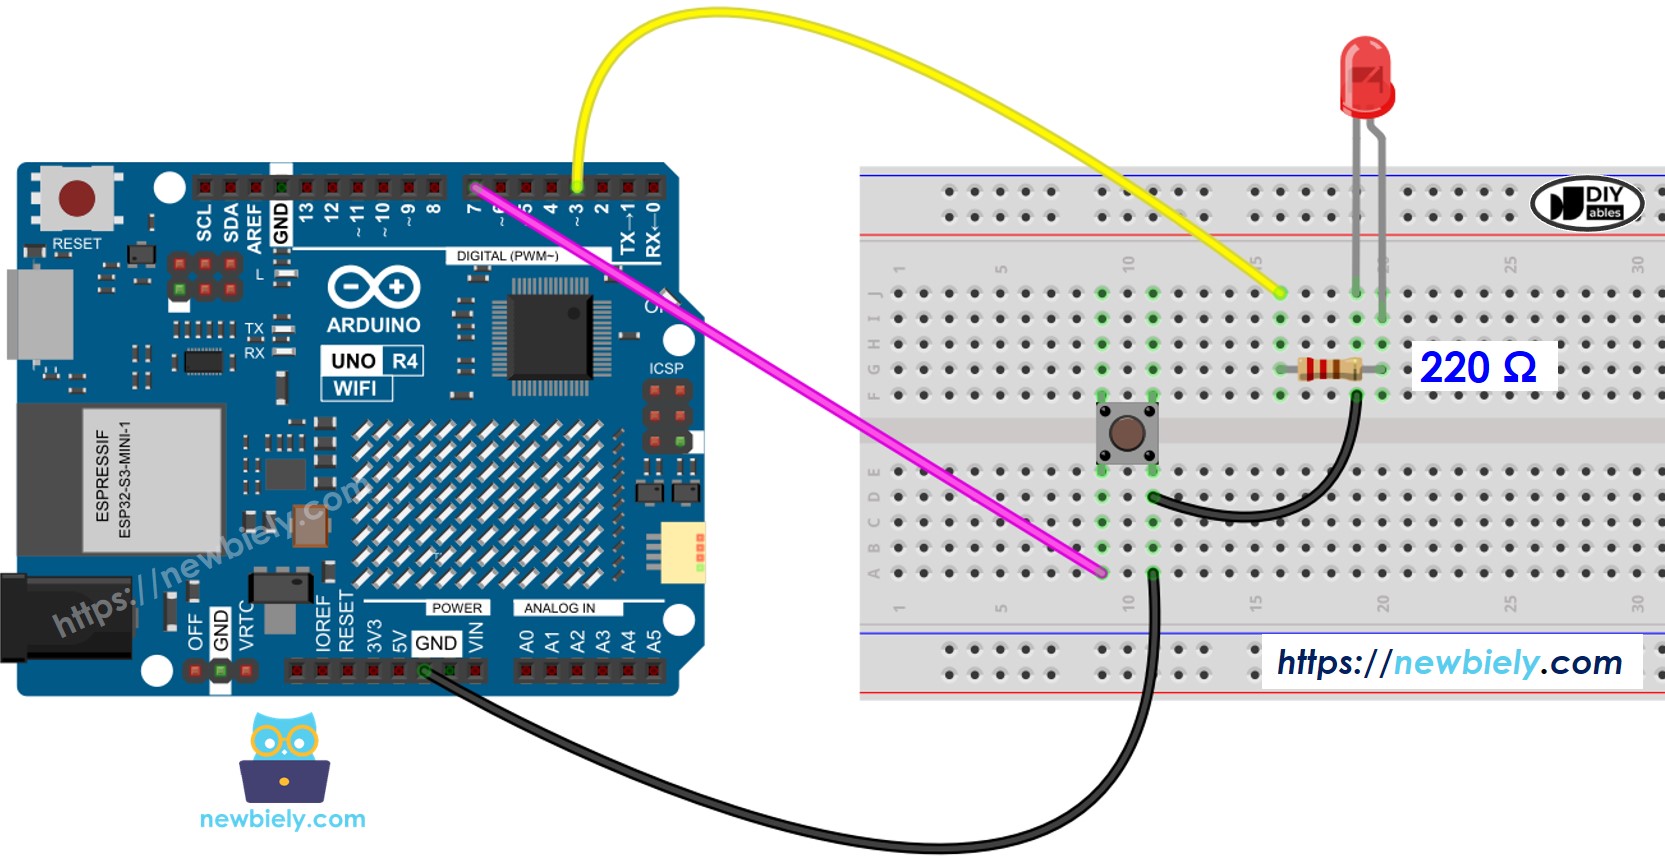
Wiring Diagram

This image is created using Fritzing. Click to enlarge image
See The best way to supply power to the Arduino Uno R4 and other components.
Arduino UNO R4 Code - With Delay
Detailed Instructions
Follow these instructions step by step:
- If this is your first time using the Arduino Uno R4 WiFi/Minima, refer to the tutorial on setting up the environment for Arduino Uno R4 WiFi/Minima in the Arduino IDE.
- Wire the components according to the provided diagram.
- Connect the Arduino Uno R4 board to your computer using a USB cable.
- Launch the Arduino IDE on your computer.
- Select the appropriate Arduino Uno R4 board (e.g., Arduino Uno R4 WiFi) and COM port.
- Copy the provided code and paste it into the Arduino IDE.
- Click the Upload button in the Arduino IDE to transfer the code to the Arduino UNR R4.

- Open the Serial Monitor.
- Push the button four times.
- Observe the LED: It switches on and off every second.
- Check the display on the Serial Monitor.
- Some button presses were not shown on the Serial Monitor because the Arduino UNO R4 cannot do any tasks during a delay. As a result, it misses detecting those presses.
Arduino UNO R4 Code - Without Delay
Detailed Instructions
Follow these instructions step by step:
- Upload the provided code to Arduino Uno R4
- Press the button four times.
- Observe the LED: It switches between ON and OFF every second.
- Check the output on the Serial Monitor.
- All button presses were detected.
Code Explanation
The explanation is in the comments section of the Arduino code above.
Adding More Tasks
This code makes two LEDs blink at different times and also checks if a button is pressed.
