Arduino UNO R4 - Potentiometer fade LED
This tutorial instructs you how to program the Arduino UNO R4 to control the brightness of an LED based on the output value of a potentiometer.
Hardware Preparation
Or you can buy the following kits:
| 1 | × | DIYables STEM V4 IoT Starter Kit (Arduino included) | |
| 1 | × | DIYables Sensor Kit (18 sensors/displays) |
Disclosure: Some of the links provided in this section are Amazon affiliate links. We may receive a commission for any purchases made through these links at no additional cost to you.
Additionally, some of these links are for products from our own brand, DIYables .
Additionally, some of these links are for products from our own brand, DIYables .
Buy Note: Use the LED Module for easier wiring. It includes an integrated resistor.

Overview of LED and Potentiometer
Learn about LED and potentiometer (pinout, functionality, programming) in the tutorials provided:
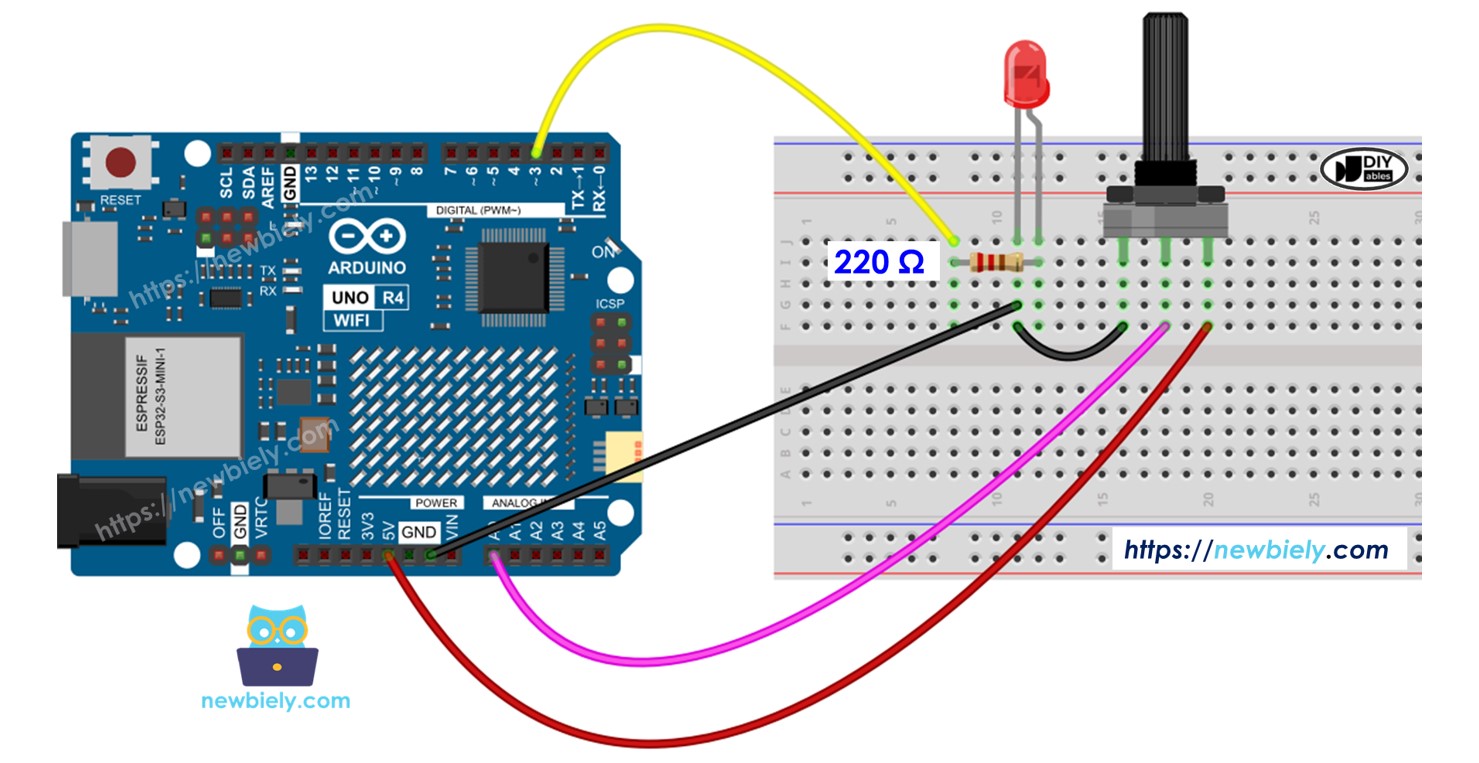
Wiring Diagram
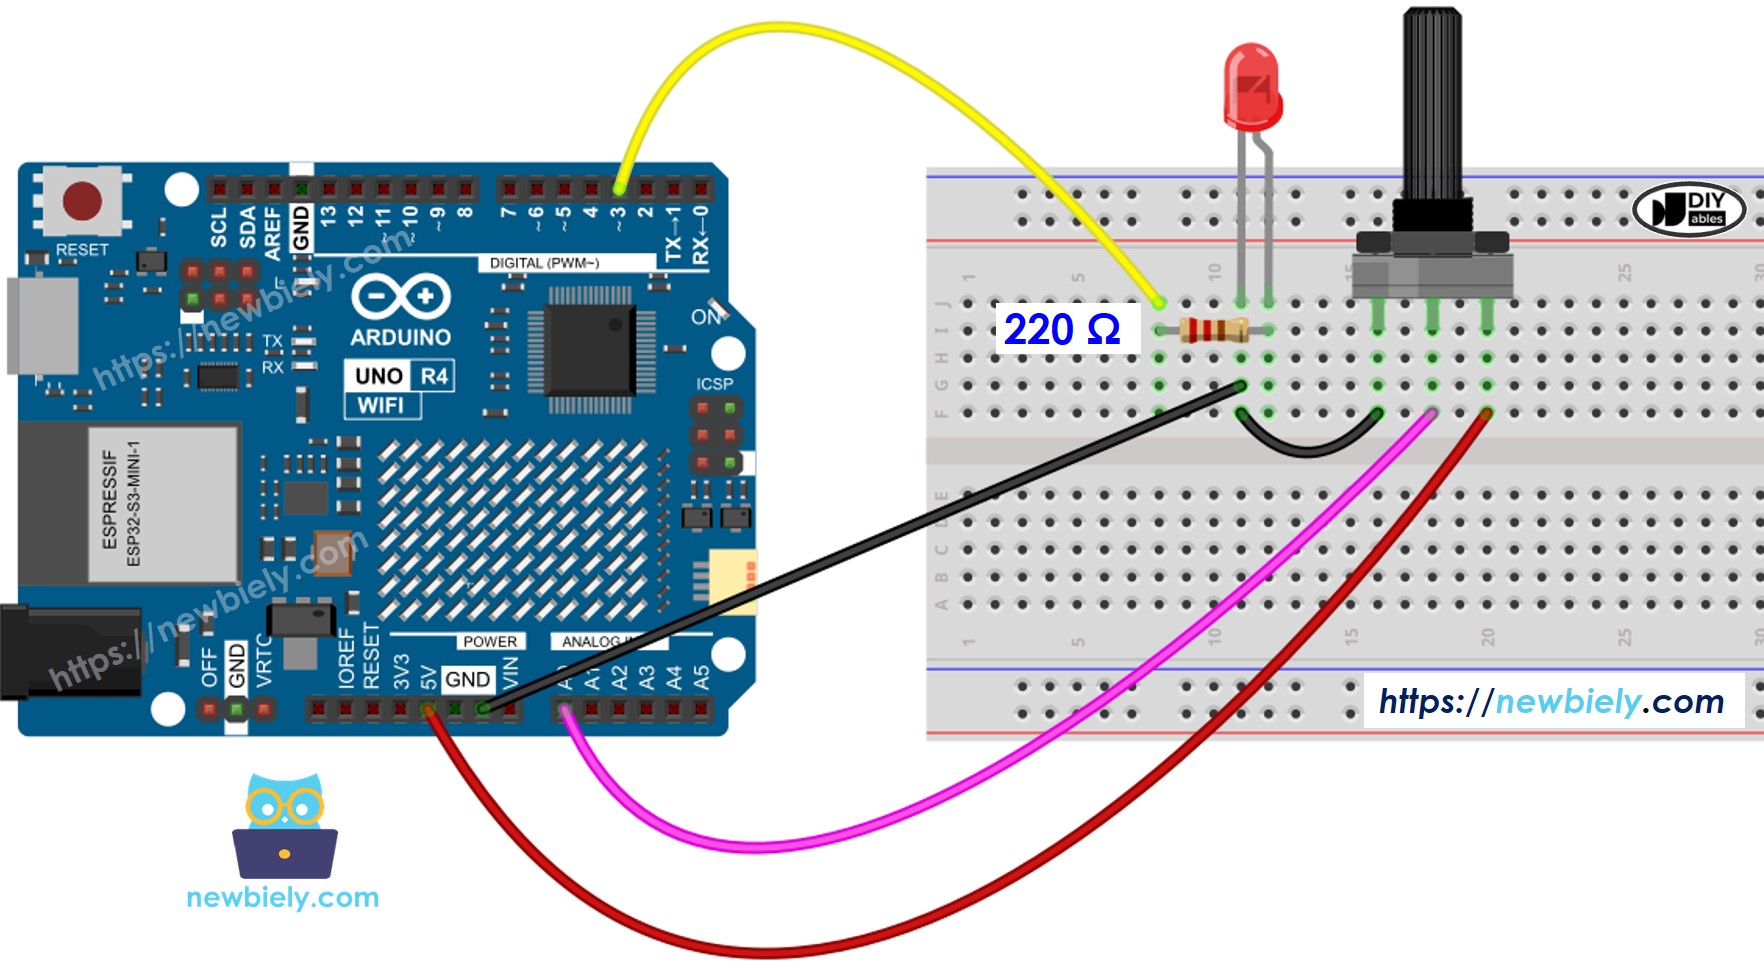
This image is created using Fritzing. Click to enlarge image
See The best way to supply power to the Arduino Uno R4 and other components.
How To Program
- Reads the input on the analog pin A0 (value ranges from 0 to 1023)
int adc_value = analogRead(A0);
- Convert it to a brightness level (a number from 0 to 255)
int brightness = map(adc_value, 0, 1023, 0, 255);
- Sets the brightness of the LED connected to pin 3.
analogWrite(LED_PIN, brightness);
Arduino UNO R4 Code
/*
* This Arduino UNO R4 code was developed by newbiely.com
*
* This Arduino UNO R4 code is made available for public use without any restriction
*
* For comprehensive instructions and wiring diagrams, please visit:
* https://newbiely.com/tutorials/arduino-uno-r4/arduino-uno-r4-potentiometer-fade-led
*/
#define LED_PIN 3 // The Arduino UNO R4 pin connected LED
#define POTENTIOMETER_PIN A0 // The Arduino UNO R4 pin connected potentiometer
void setup() {
// initialize serial communication at 9600 bits per second:
Serial.begin(9600);
// declare LED pin to be an output:
pinMode(LED_PIN, OUTPUT);
}
void loop() {
// reads the input on analog pin A0 (value between 0 and 1023)
int adc_value = analogRead(POTENTIOMETER_PIN);
// scales it to brightness (value between 0 and 255)
int brightness = map(adc_value, 0, 1023, 0, 255);
// sets the brightness LED that connects to pin 3
analogWrite(LED_PIN, brightness);
// print out the value
Serial.print("Analog: ");
Serial.print(adc_value);
Serial.print(", Brightness: ");
Serial.println(brightness);
delay(100);
}
Detailed Instructions
Follow these instructions step by step:
- If this is your first time using the Arduino Uno R4 WiFi/Minima, refer to the tutorial on setting up the environment for Arduino Uno R4 WiFi/Minima in the Arduino IDE.
- Wire the components according to the provided diagram.
- Connect the Arduino Uno R4 board to your computer using a USB cable.
- Launch the Arduino IDE on your computer.
- Select the appropriate Arduino Uno R4 board (e.g., Arduino Uno R4 WiFi) and COM port.
- Copy the code and open it in Arduino IDE
- Click the Upload button in Arduino IDE to upload the code to Arduino UNO R4
- Open the Serial Monitor
- Turn the potentiometer
- Observe the LED
- Check the result on the Serial Monitor
8
Serial.println("Hello World!");
Message (Enter to send message to 'Arduino Uno R4 WiFi' on 'COM15')
New Line
9600 baud
Analog: 6, Brightness: 1
Analog: 34, Brightness: 8
Analog: 89, Brightness: 22
Analog: 149, Brightness: 37
Analog: 214, Brightness: 53
Analog: 297, Brightness: 74
Analog: 365, Brightness: 90
Analog: 431, Brightness: 107
Analog: 510, Brightness: 127
Analog: 589, Brightness: 146
Analog: 695, Brightness: 173
Analog: 790, Brightness: 196
Analog: 970, Brightness: 241
Analog: 996, Brightness: 248
Analog: 1018, Brightness: 253
Analog: 1023, Brightness: 255