Arduino UNO R4 - Keypad 3x4
This tutorial instructs you how to use Arduino UNO R4 with keypad 3x4. In detail, we will learn:
- How to connect a 3x4 keypad to Arduino UNO R4.
- How to program Arduino UNO R4 to read the pressed key from a keypad 3x4
- How to check the password entered on a keypad.
Hardware Preparation
Or you can buy the following kits:
| 1 | × | DIYables STEM V4 IoT Starter Kit (Arduino included) | |
| 1 | × | DIYables Sensor Kit (18 sensors/displays) |
Disclosure: Some of the links provided in this section are Amazon affiliate links. We may receive a commission for any purchases made through these links at no additional cost to you.
Additionally, some of these links are for products from our own brand, DIYables .
Additionally, some of these links are for products from our own brand, DIYables .

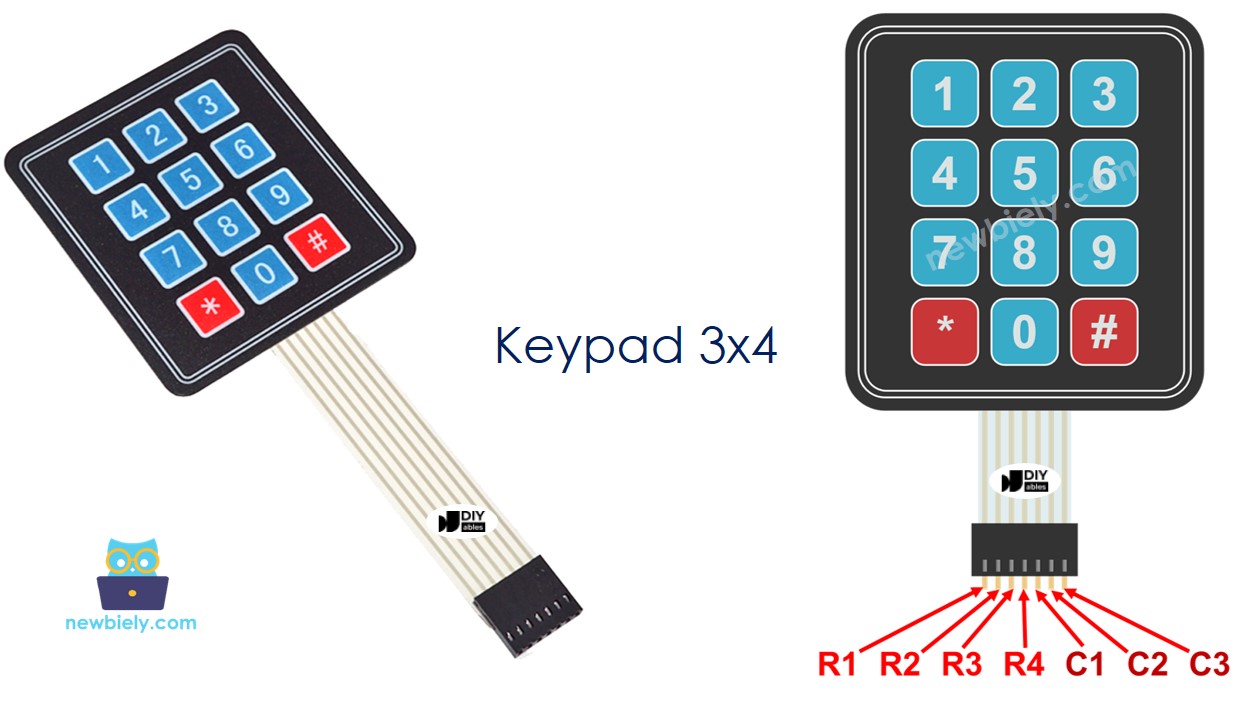
Overview of 3x4 Keypad
The keypad has 12 membrane buttons arranged in rows and columns, known as a matrix. Each button is called a key.
Pinout
A 3x4 keypad has 7 pins, divided into two categories: rows and columns.
- 4 pins are for the rows (R1, R2, R3, R4).
- 3 pins are for the columns (C1, C2, C3).
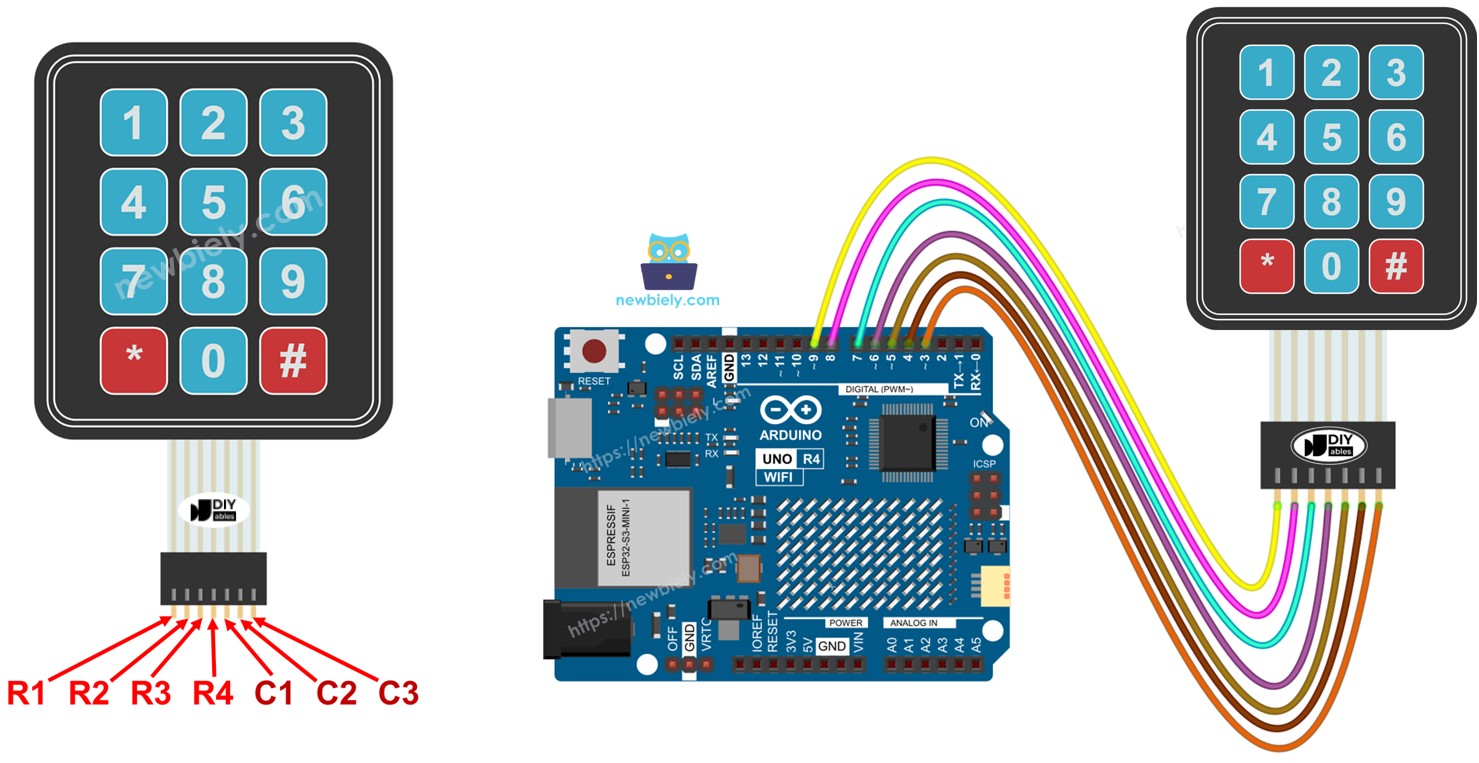
Wiring Diagram
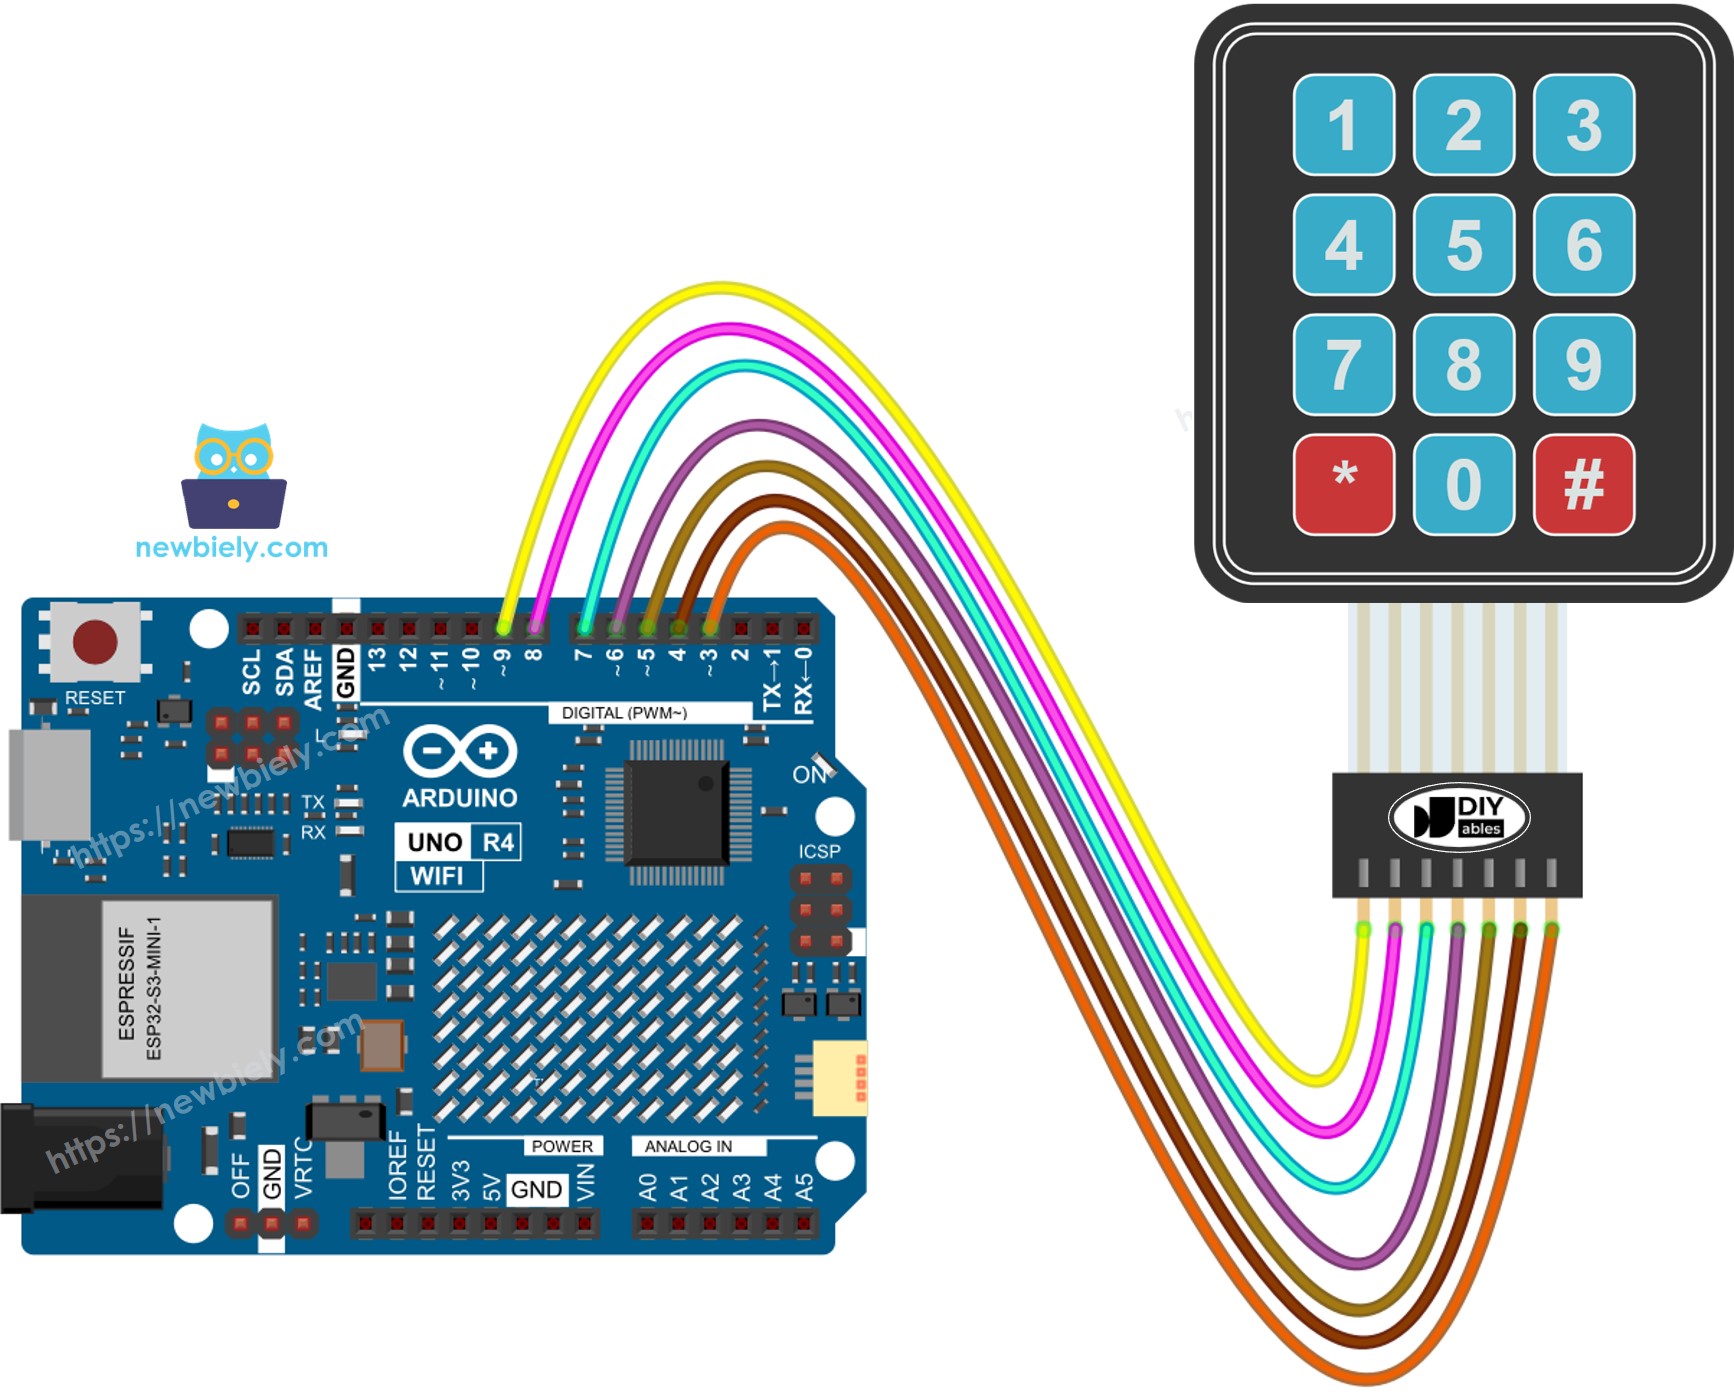
This image is created using Fritzing. Click to enlarge image
See The best way to supply power to the Arduino Uno R4 and other components.
Arduino UNO R4 Code
#include <DIYables_Keypad.h> // DIYables_Keypad library
const int ROW_NUM = 4; // four rows
const int COLUMN_NUM = 3; // three columns
char keys[ROW_NUM][COLUMN_NUM] = {
{ '1', '2', '3' },
{ '4', '5', '6' },
{ '7', '8', '9' },
{ '*', '0', '#' }
};
byte pin_rows[ROW_NUM] = { 9, 8, 7, 6 }; //connect to the row pinouts of the keypad
byte pin_column[COLUMN_NUM] = { 5, 4, 3 }; //connect to the column pinouts of the keypad
DIYables_Keypad keypad = DIYables_Keypad(makeKeymap(keys), pin_rows, pin_column, ROW_NUM, COLUMN_NUM);
void setup() {
Serial.begin(9600);
delay(1000);
Serial.println("Keypad 3x4 example");
}
void loop() {
char key = keypad.getKey();
if (key) {
Serial.println(key);
}
}
Detailed Instructions
Follow these instructions step by step:
- If this is your first time using the Arduino Uno R4 WiFi/Minima, refer to the tutorial on setting up the environment for Arduino Uno R4 WiFi/Minima in the Arduino IDE.
- Connect the Arduino Uno R4 to the 3x4 keypad according to the provided diagram.
- Connect the Arduino Uno R4 to your computer using a USB cable.
- Launch the Arduino IDE on your computer.
- Select the appropriate Arduino Uno R4 board (e.g., Arduino Uno R4 WiFi) and COM port.
- Go to the Libraries icon on the left side of the Arduino IDE.
- Type DIYables_Keypad in the search box, and look for the keypad library by DIYables.io.
- Press the Install button to install the keypad library.

- Copy the code above and open it with the Arduino IDE.
- Click the Upload button in the Arduino IDE to upload the code to the Arduino UNO R4.
- Open the Serial Monitor.
- Press some keys on the keypad.
- Check the results in the Serial Monitor.
8
Serial.println("Hello World!");
Message (Enter to send message to 'Arduino Uno R4 WiFi' on 'COM15')
New Line
9600 baud
3
6
9
4
*
#
Keypad and Password
A common use of a keypad is entering a password. In this use, we highlight two special keys:
- A key to begin or begin again entering the password. For example, key "*"
- A key to end entering the password. For like, key "#"
The password will be made up of the remaining keys, excluding two chosen special keys.
When a key is pressed.
- If the key is not "*" or "#", add the key to the password the user is entering.
- If the key is "#", check if the password entered by the user matches the set password, then erase the entered password.
- If the key is "*", erase the entered password.
Keypad - Password Code
/*
* This Arduino UNO R4 code was developed by newbiely.com
*
* This Arduino UNO R4 code is made available for public use without any restriction
*
* For comprehensive instructions and wiring diagrams, please visit:
* https://newbiely.com/tutorials/arduino-uno-r4/arduino-uno-r4-keypad-3x4
*/
#include <DIYables_Keypad.h> // DIYables_Keypad library
const int ROW_NUM = 4; //four rows
const int COLUMN_NUM = 3; //three columns
char keys[ROW_NUM][COLUMN_NUM] = {
{'1','2','3'},
{'4','5','6'},
{'7','8','9'},
{'*','0','#'}
};
byte pin_rows[ROW_NUM] = {9, 8, 7, 6}; //connect to the row pinouts of the keypad
byte pin_column[COLUMN_NUM] = {5, 4, 3}; //connect to the column pinouts of the keypad
DIYables_Keypad keypad = DIYables_Keypad( makeKeymap(keys), pin_rows, pin_column, ROW_NUM, COLUMN_NUM );
const String password = "1234"; // change your password here
String input_password;
void setup(){
Serial.begin(9600);
Serial.println("Keypad 3x4 password");
input_password.reserve(32); // maximum input characters is 33, change if needed
}
void loop(){
char key = keypad.getKey();
if (key){
Serial.println(key);
if(key == '*') {
input_password = ""; // clear input password
} else if(key == '#') {
if(password == input_password) {
Serial.println("password is correct");
// DO YOUR WORK HERE
} else {
Serial.println("password is incorrect, try again");
}
input_password = ""; // clear input password
} else {
input_password += key; // append new character to input password string
}
}
}
- Run the code provided above.
- Open the Serial Monitor.
- Enter the keys "123456" and then press "#".
- Enter the keys "1234" and then press "#".
- Check the results on the Serial Monitor.
8
Serial.println("Hello World!");
Message (Enter to send message to 'Arduino Uno R4 WiFi' on 'COM15')
New Line
9600 baud
password is incorrect, try again
password is correct