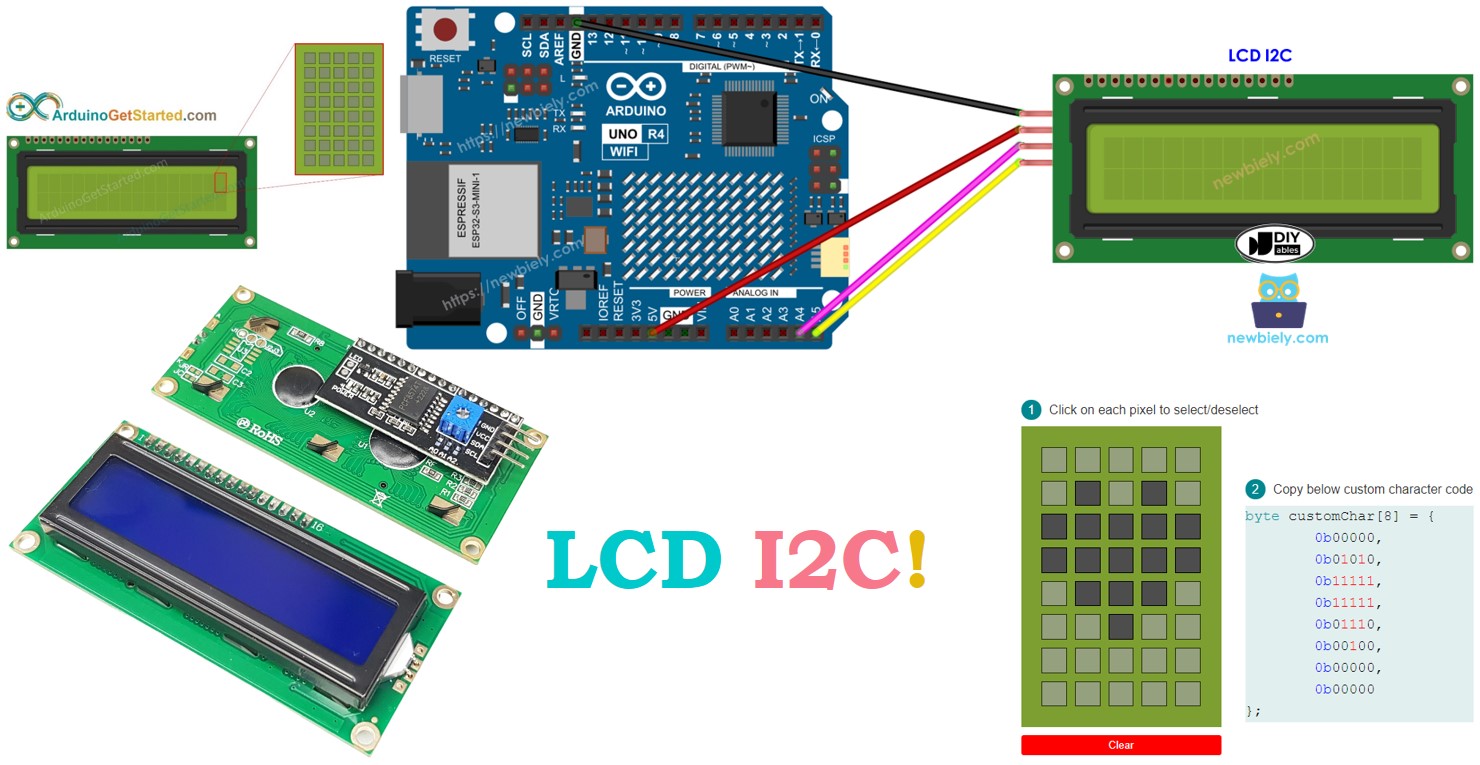
Arduino UNO R4 - LCD I2C

This tutorial instructs you how to use a 16x2 LCD I2C interface with an Arduino UNO R4. In detail, We will learn:

Arduino UNO R4 and 16x2 LCD I2C

Hardware Preparation

1×Arduino UNO R4 WiFi
1×Arduino UNO R4 Minima (Alternatively)
1×USB Cable Type-C
1×LCD I2C
1×Jumper Wires
1×(Optional) 9V Power Adapter for Arduino UNO R4
1×(Recommended) Screw Terminal Block Shield for Arduino Uno
1×(Optional) Transparent Acrylic Enclosure For Arduino Uno

Or you can buy the following sensor kits:

1×DIYables Sensor Kit (30 sensors/displays)
1×DIYables Sensor Kit (18 sensors/displays)
Disclosure: Some of the links provided in this section are Amazon affiliate links. We may receive a commission for any purchases made through these links at no additional cost to you. We appreciate your support.

Overview of LCD I2C 16x2

The 16x2 LCD I2C is a display featuring 16 columns and 2 rows. It is equipped with an I2C interface and includes a potentiometer for contrast adjustment.
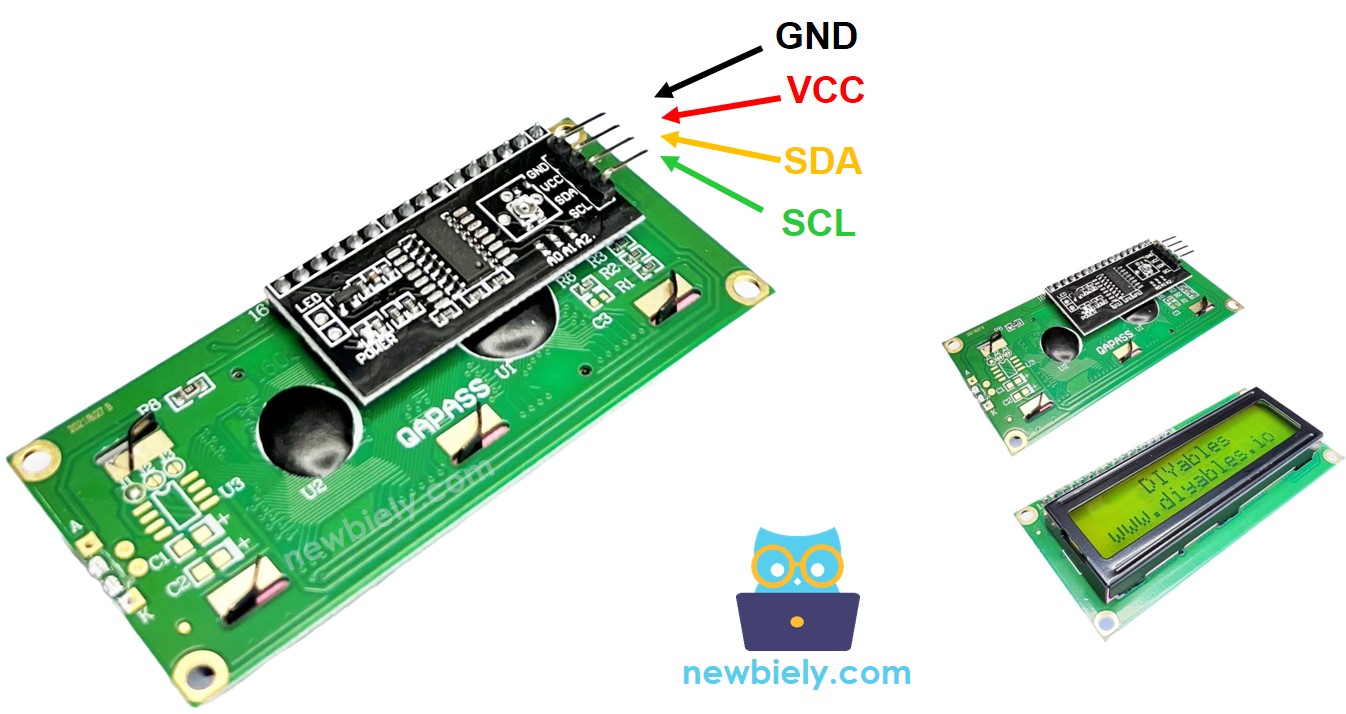
Pinout

The LCD I2C connects through an I2C interface and has 4 pins.

  • GND pin: connect to GND (0 volts).
  • VCC pin: connect to VCC for power (5 volts).
  • SDA pin: carries I2C data signal.
  • SCL pin: carries I2C clock signal.
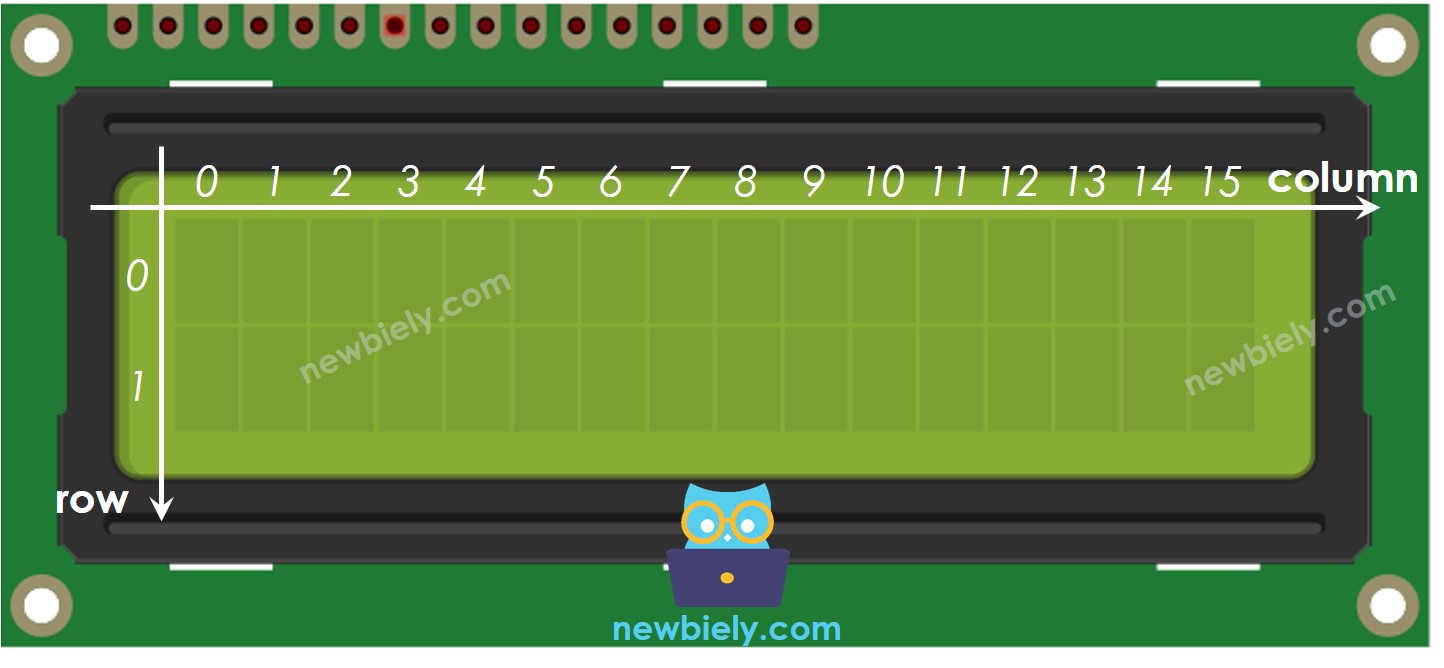
LCD I2C Pinout

LCD Coordinate

The LCD I2C 16x2 has 16 columns and 2 rows. Both columns and rows start numbering from 0.

Arduino UNO R4 LCD I2C Coordinate

Wiring Diagram

The wiring diagram between Arduino UNO R4 LCD I2C

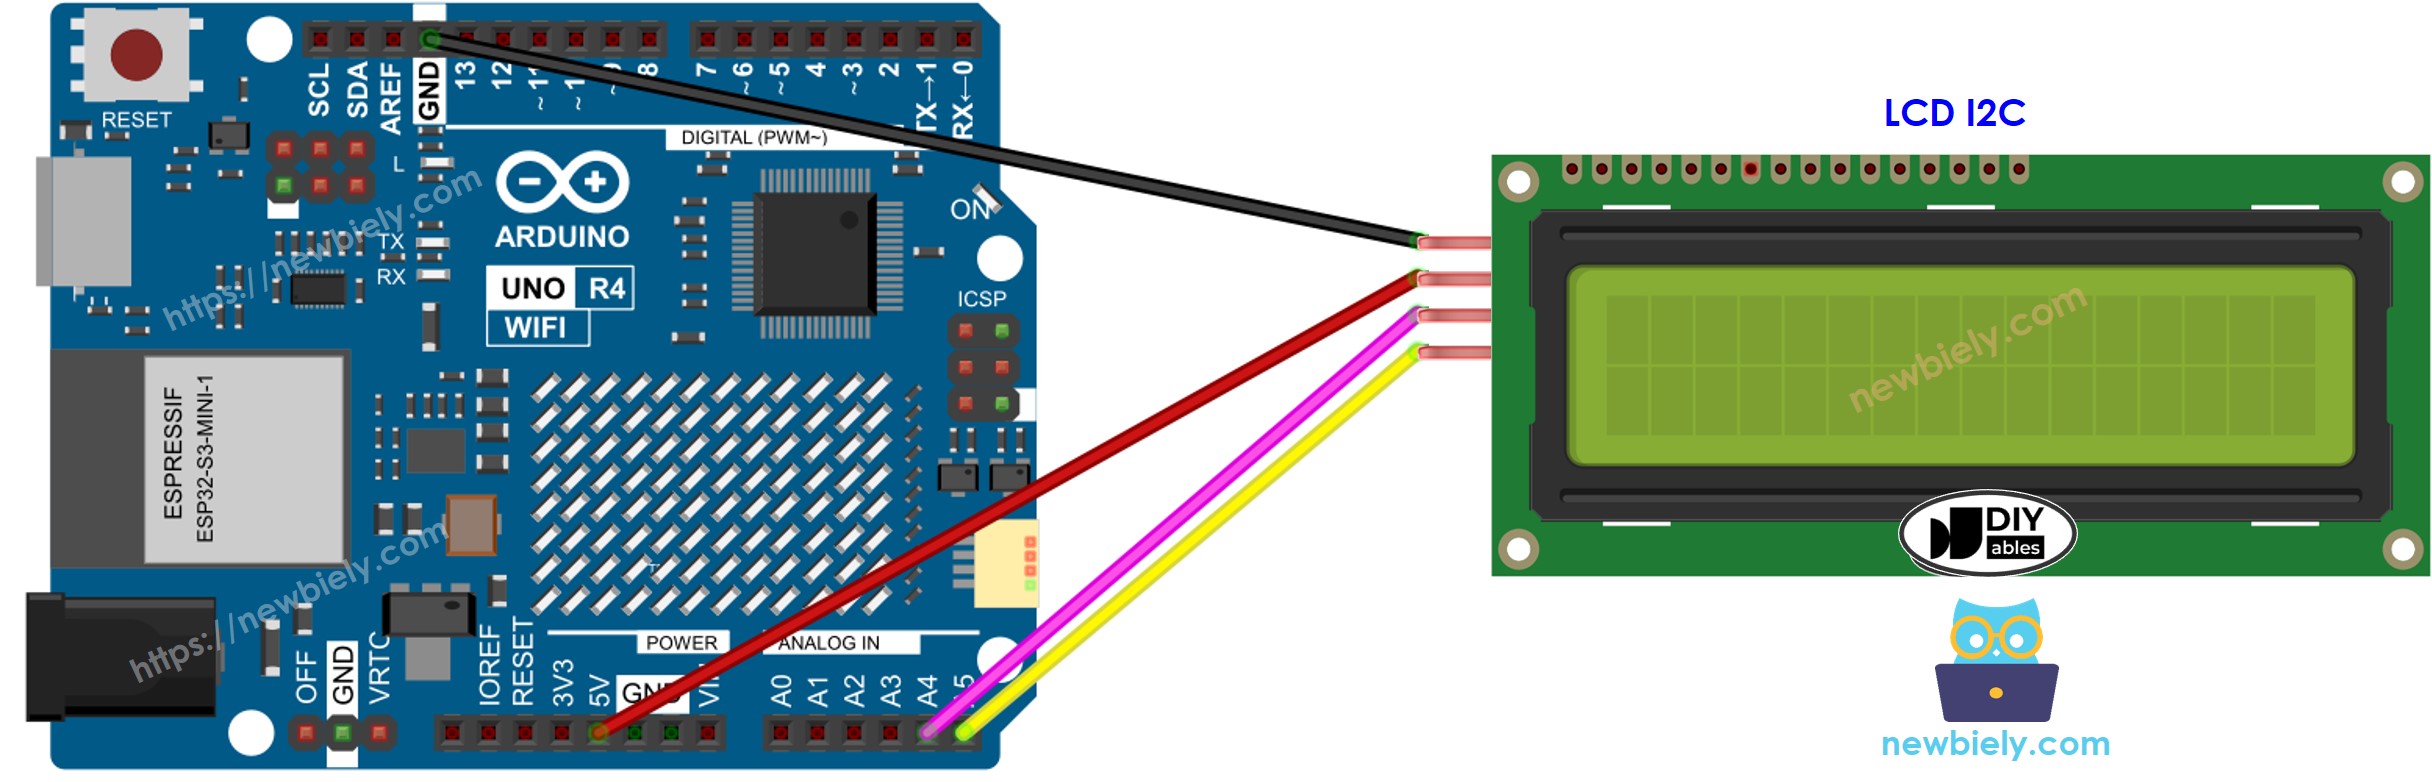
This image is created using Fritzing. Click to enlarge image

LCD I2C Arduino UNO R4, Nano Arduino Mega
Vin 5V 5V
GND GND GND
SDA A4 20
SCL A5 21

How To Program For LCD I2C

Using the LiquidCrystal_I2C library makes handling the LCD very easy.

  • Include the library:
#include <LiquidCrystal_I2C.h>
  • Create a LiquidCrystal_I2C object by specifying its I2C address, the number of columns, and the number of rows.
LiquidCrystal_I2C lcd(0x27, 16, 2); // Initialize the LCD with I2C address 0x27 for a 16x2 display
  • Set up the LCD screen.
lcd.init(); // Initialize the LCD display lcd.backlight(); // Turn on the backlight of the LCD
  • Place the cursor at the chosen spot (column_index, row_index).
lcd.setCursor(column_index, row_index);
  • Display a message on the LCD screen.
lcd.print("Hello World!");

We can do many more things with an LCD (see the 'Do More with LCD' section).

※ NOTE THAT:

The I2C address for the LCD might be different depending on the manufacturer. In our code, we used the address 0x27 as specified by the manufacturer DIYables.

Arduino UNO R4 Code

#include <LiquidCrystal_I2C.h> // Initialize an LCD object for a 16x2 character LCD using I2C LiquidCrystal_I2C lcd(0x27, 16, 2); void setup() { lcd.init(); // Initialize the LCD lcd.backlight(); // Enable the LCD backlight } void loop() { lcd.clear(); // Clear any previously written content lcd.setCursor(0, 0); // Position cursor at top left corner lcd.print("Arduino UNO R4"); // Display text in the first line lcd.setCursor(2, 1); // Position cursor in the second line at third character lcd.print("GetStarted.com"); // Display text in the second line delay(2000); // Pause for 2 seconds lcd.clear(); // Clear the LCD screen for next message lcd.setCursor(3, 0); // Position cursor in the first line, fourth character lcd.print("DIYables"); // Display text in the first line lcd.setCursor(0, 1); // Position cursor at the start of the second line lcd.print("www.diyables.io"); // Display website URL in the second line delay(2000); // Hold the displayed text for 2 seconds

Detailed Instructions

Follow these instructions step by step:

  • If this is your first time using the Arduino Uno R4 WiFi/Minima, refer to the tutorial on setting up the environment for Arduino Uno R4 WiFi/Minima in the Arduino IDE.
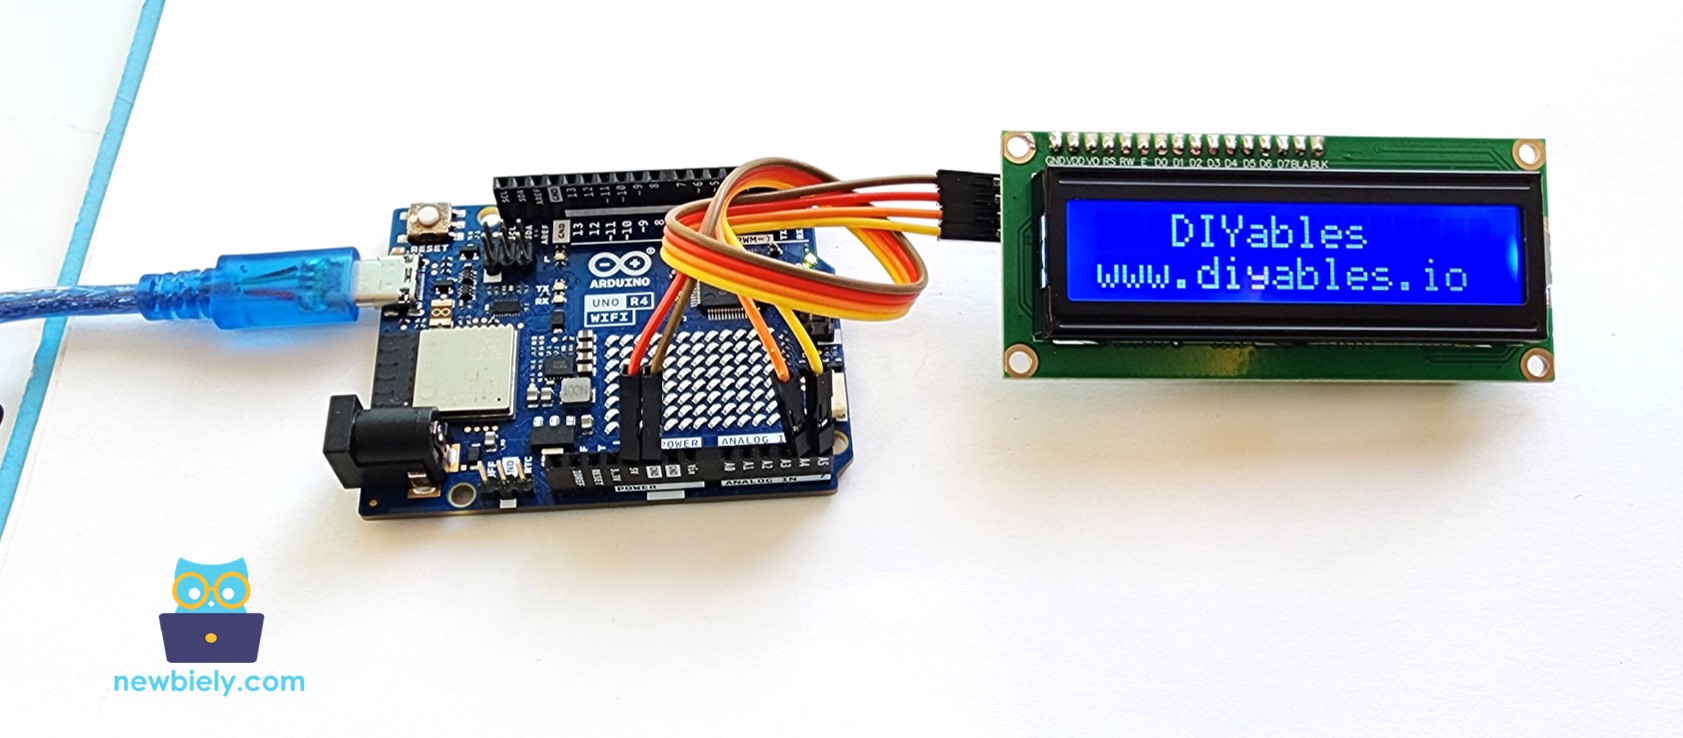
  • Connect LCD I2C display to Arduino UNO R4 according to the provided diagram.
  • Connect the Arduino Uno R4 board to your computer using a USB cable.
  • Launch the Arduino IDE on your computer.
  • Select the appropriate Arduino Uno R4 board (e.g., Arduino Uno R4 WiFi) and COM port.
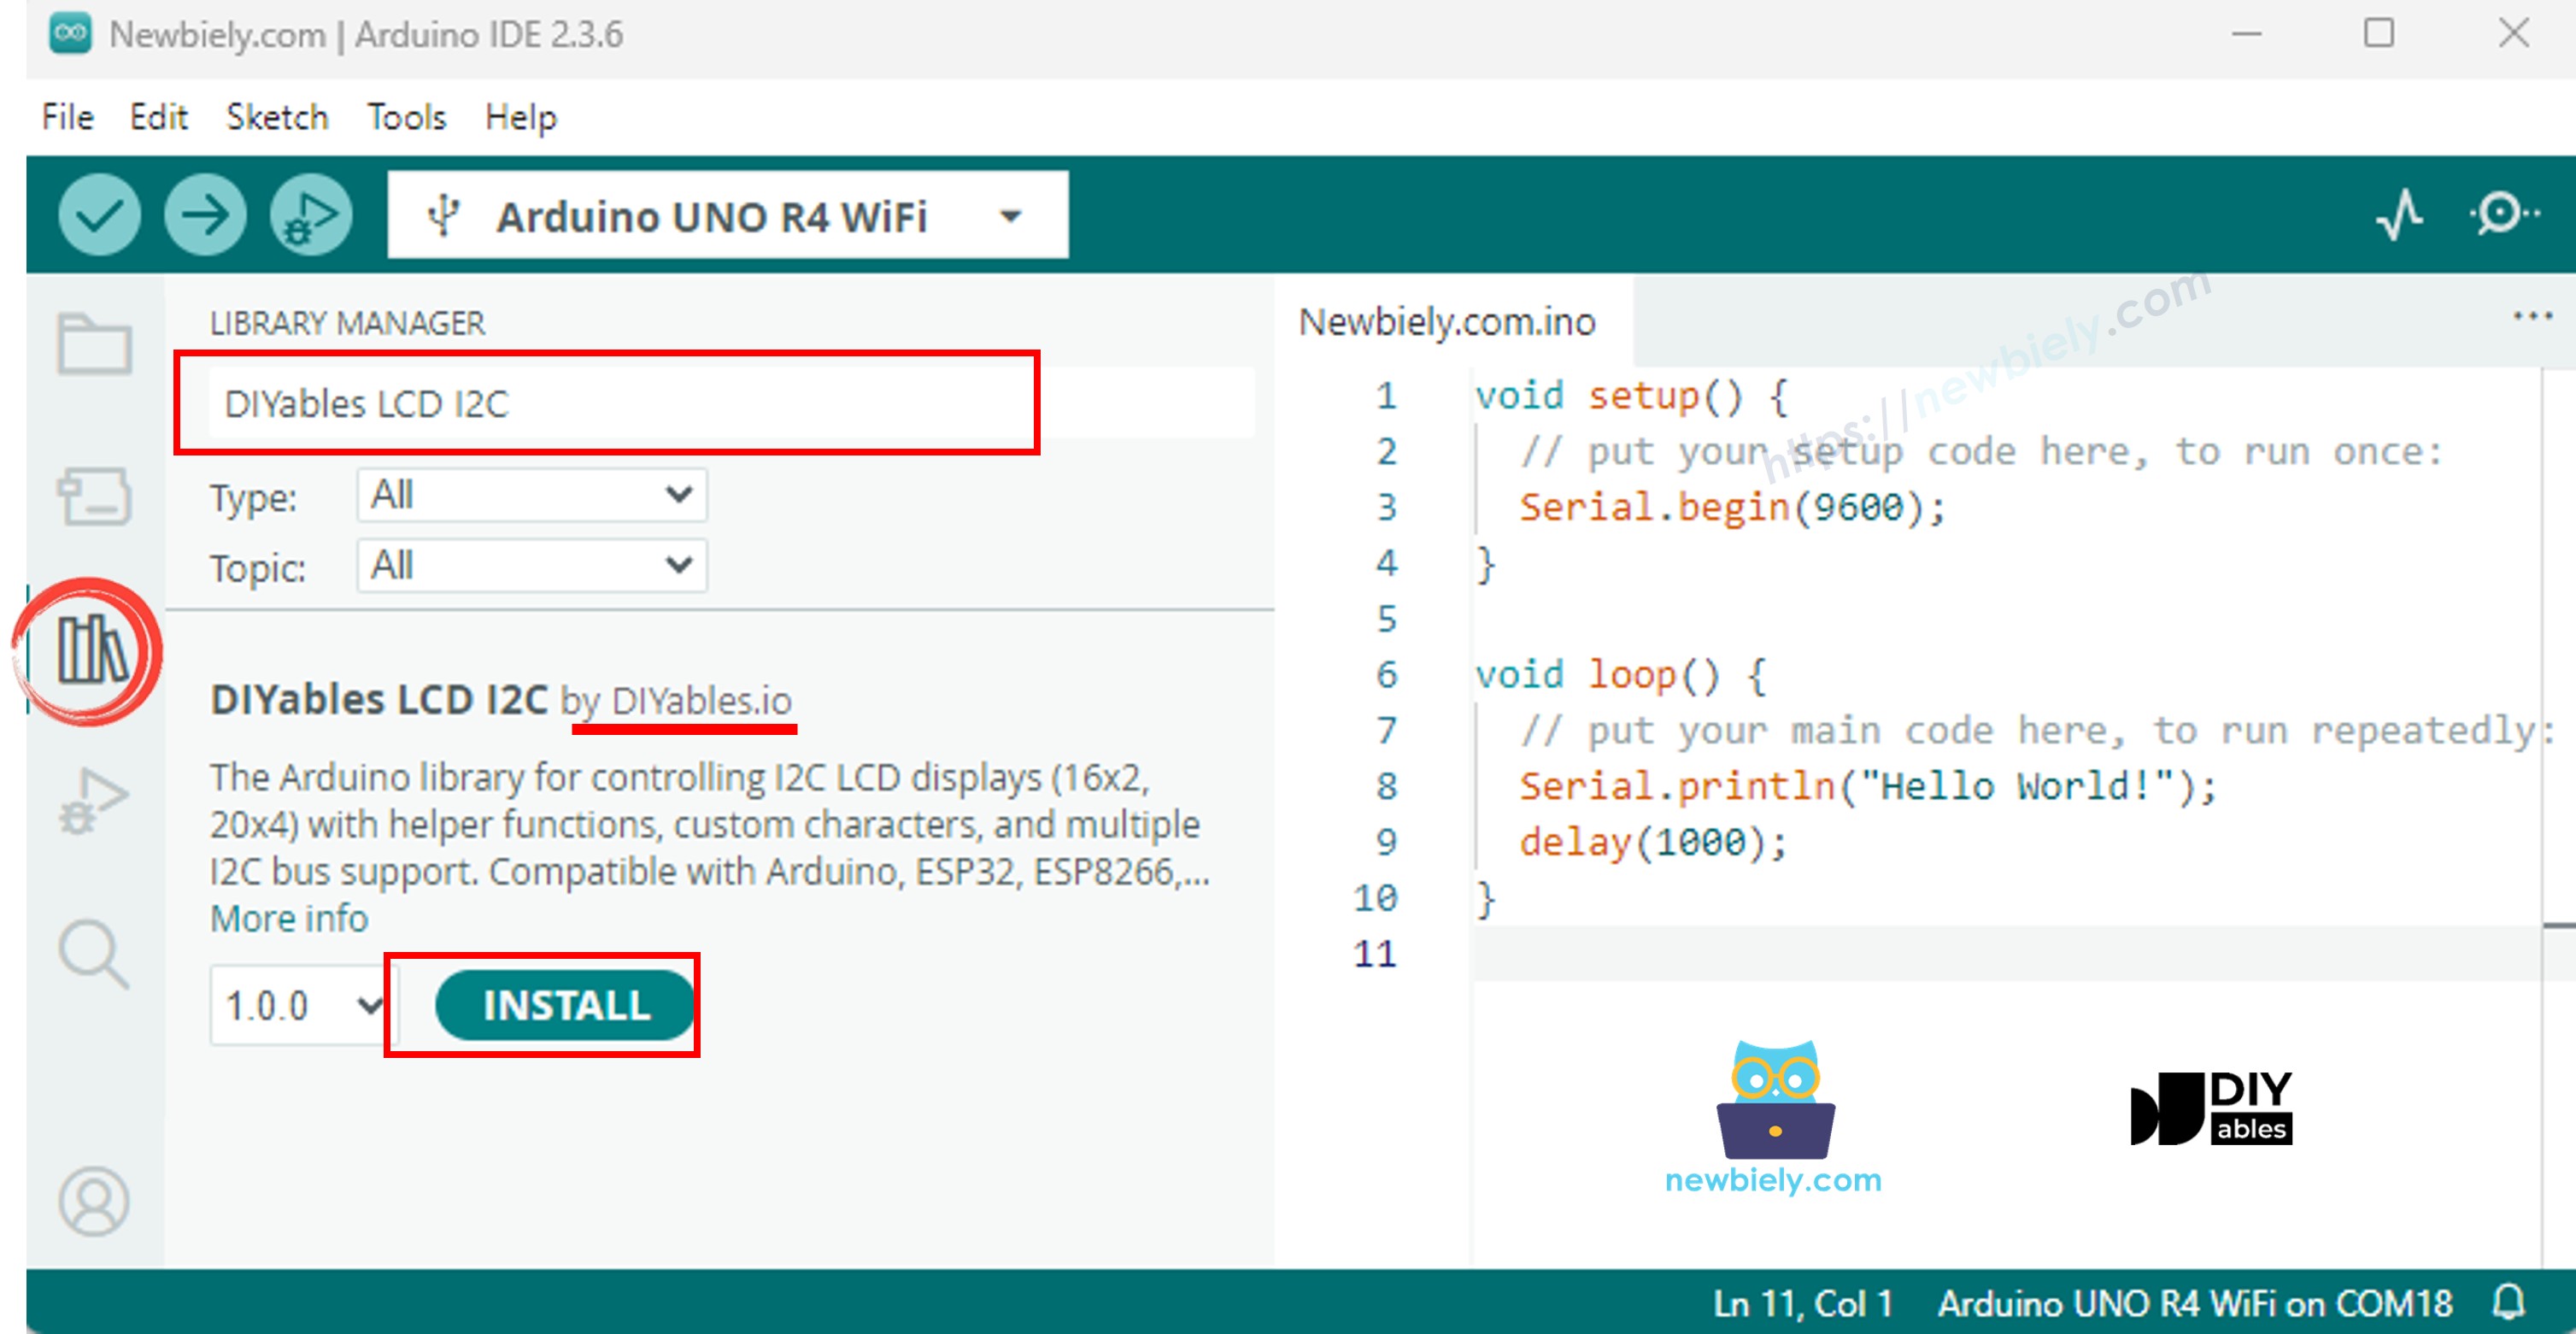
  • Go to the Libraries icon on the left side of the Arduino IDE.
  • Type "LiquidCrystal I2C" in the search box and look for the LiquidCrystal_I2C library by Frank de Brabander.
  • Press the Install button to install the LiquidCrystal_I2C library.
Arduino UNO R4 LiquidCrystal I2C library
  • Copy the code and open it in Arduino IDE
  • Click the Upload button in Arduino IDE to upload the code to Arduino UNO R4
  • Check out the result on the LCD screen
  • Try changing the text and its location

Video Tutorial

Do More with LCD

Custom Character

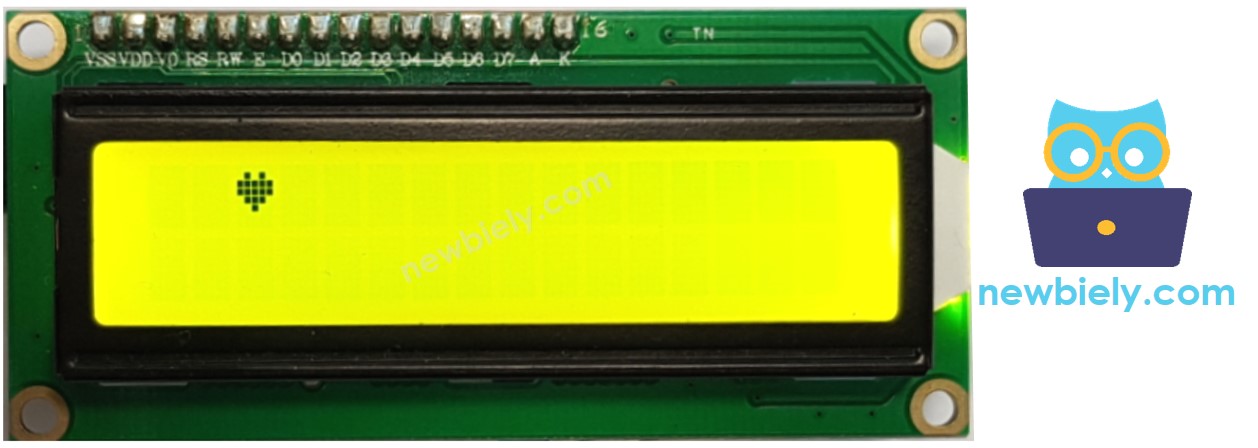
To show special characters or symbols like a heart or an angry bird on an LCD, you must use the character generator because the lcd.print() function can only display ASCII characters.

The LCD 16x2 can show 32 characters across 2 lines, with 16 spots on each line. Every character uses 40 tiny squares, arranged in 8 lines and 5 columns.

Arduino UNO R4 LCD 16x2 Pixel

The character generator creates a character (40 pixels). You only need to follow these steps:

Click on each pixel to select/deselect


Copy below custom character code
Replace the customChar[8] in the below code
#include <LiquidCrystal_I2C.h> // Initialize the LCD connected via I2C at address 0x27 with 16 columns and 2 rows LiquidCrystal_I2C lcd(0x27, 16, 2); // Define byte array for creating custom character shape byte customChar[8] = { 0b00000, 0b01010, 0b11111, 0b11111, 0b01110, 0b00100, 0b00000, 0b00000 }; void setup() { lcd.init(); // Initialize LCD screen lcd.backlight(); // Turn on the backlight lcd.createChar(0, customChar); // Register the custom character on LCD with ID 0 lcd.setCursor(2, 0); // Set cursor to start at column 2, row 0 lcd.write((byte)0); // Display the custom character at the current cursor position } void loop(){ }

Result displayed on the screen:

LCD custom character

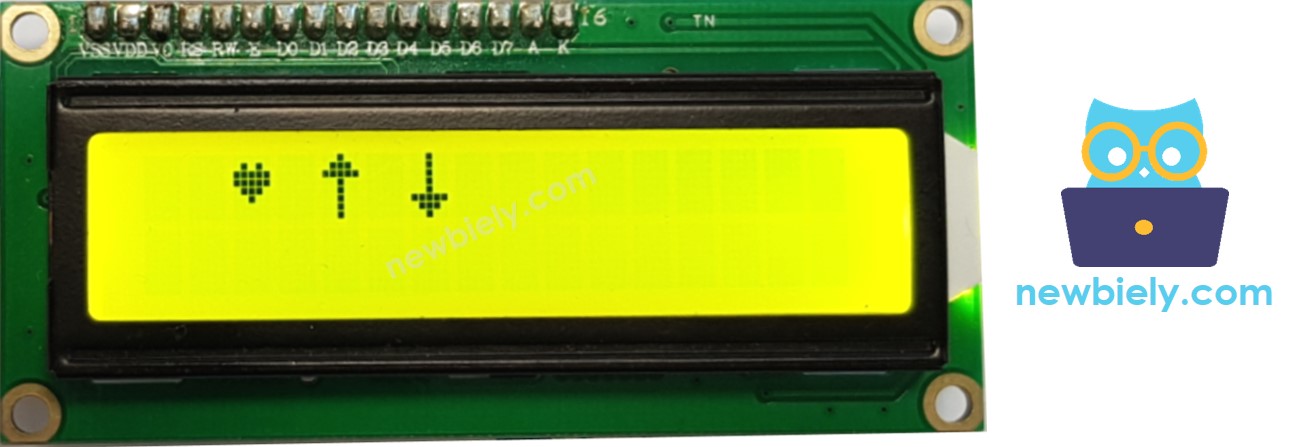
Multiple custom characters

We can make up to 8 special characters (numbered from 0 to 7). The example below shows how to create and display three characters.

#include <LiquidCrystal_I2C.h> // Create an LCD object, using I2C address 0x27 with 16 columns and 2 rows LiquidCrystal_I2C lcd(0x27, 16, 2); // Define custom character 0 (heart shape) byte customChar0[8] = { 0b00000, 0b01010, 0b11111, 0b11111, 0b01110, 0b00100, 0b00000, 0b00000 }; // Define custom character 1 (arrow pointing upwards) byte customChar1[8] = { 0b00100, 0b01110, 0b11111, 0b00100, 0b00100, 0b00100, 0b00100, 0b00100 }; // Define custom character 2 (arrow pointing downwards) byte customChar2[8] = { 0b00100, 0b00100, 0b00100, 0b00100, 0b00100, 0b11111, 0b01110, 0b00100 }; void setup() { lcd.init(); // Initialize the LCD display lcd.backlight(); // Turn on the LCD backlight // Register custom character 0 with index 0 on the LCD lcd.createChar(0, customChar0); // Register custom character 1 with index 1 on the LCD lcd.createChar(1, customChar1); // Register custom character 2 with index 2 on the LCD lcd.createChar(2, customChar2); // Set the cursor to column 2, row 0 lcd.setCursor(2, 0); // Display the custom character 0 at the current cursor position lcd.write((byte)0); // Set the cursor to column 4, row 0 lcd.setCursor(4, 0); // Display the custom character 1 at the current cursor position lcd.write((byte)1); // Set the cursor to column 6, row 0 lcd.setCursor(6, 0); // Display the custom character 2 at the current cursor position lcd.write((byte)2); } void loop() { }

Result displayed on liquid-crystal display (LCD):

LCD multiple custom characters

Summary: how to use custom character on LCD

  • Use the character generator above to make binary code for your special character.
  • Write down the binary code for your character (copy from the previous step).
byte customChar[8] = { 0b00000, 0b01010, 0b11111, 0b11111, 0b01110, 0b00100, 0b00000, 0b00000 };
  • Make a personalized character and place it at a number between 0 and 7 in the setup() function.
lcd.createChar(index, customChar);
  • Display a special character on the LCD whenever you want, either in the setup() or loop() function.
lcd.setCursor(column, row); // Set the cursor to the specified column and row lcd.write((byte)index); // Display the custom character stored at 'index' position

Other functions

Insert the following functions into the loop() function one by one, adding a delay(5000) after each function.

  • Easy-to-read LCD display
lcd.clear();
  • Place the cursor in the top-left corner of the screen.
lcd.home();
  • Position the cursor at a specific place (column, row).
lcd.setCursor(column, row);
  • Show the LCD screen cursor.
lcd.cursor();
  • Turns off the LCD screen cursor.
lcd.noCursor();
  • Show the flashing LCD cursor.
lcd.blink()
  • Stops the flashing LCD cursor.
lcd.noBlink()

Troubleshooting on LCD I2C

If the text does not appear on the LCD I2C, please check these issues:

  • Change the LCD screen brightness by turning the potentiometer on its back.
  • The I2_SELF CONT presence of the LCD might vary with different makers. It usually is 0x27 or 0x3F. Test these addresses individually. If neither works, use the following code to discover the correct I2C address.
// I2C address scanner program #include <Wire.h> void setup() { Wire.begin(); Serial.begin(9600); Serial.println("I2C Scanner"); } void loop() { byte error, address; int nDevices; Serial.println("Scanning..."); nDevices = 0; for(address = 1; address < 127; address++ ) { Wire.beginTransmission(address); error = Wire.endTransmission(); if (error == 0) { Serial.print("I2C device found at address 0x"); if (address < 16) Serial.print("0"); Serial.print(address,HEX); Serial.println(" !"); nDevices++; } else if (error==4) { Serial.print("Unknown error at address 0x"); if (address < 16) Serial.print("0"); Serial.println(address,HEX); } } if (nDevices == 0) Serial.println("No I2C devices found"); else Serial.println("done"); delay(5000); // wait 5 seconds for next scan }

The outcome displayed on the Serial Monitor:

COM6
Send
Scanning... I2C device found at address 0x3F ! done Scanning... I2C device found at address 0x3F ! done
Autoscroll Show timestamp
Clear output
9600 baud  
Newline  

※ OUR MESSAGES

  • As freelancers, We are AVAILABLE for HIRE. See how to outsource your project to us
  • Please feel free to share the link of this tutorial. However, Please do not use our content on any other websites. We invested a lot of effort and time to create the content, please respect our work!