Arduino UNO R4 - TM1637 4-Digit 7-Segment Display

You need a standard 4-digit 7-segment display for projects like clocks, timers, and counters. Typically, this requires 12 connections. However, the TM1637 module simplifies this by needing only 4 connections: 2 for power and 2 to control the segments.

This guide won't go into detailed hardware explanations. We'll focus on how to connect a 4-digit 7-segment display to the Arduino UNO R4 and how to program it to show what we want.
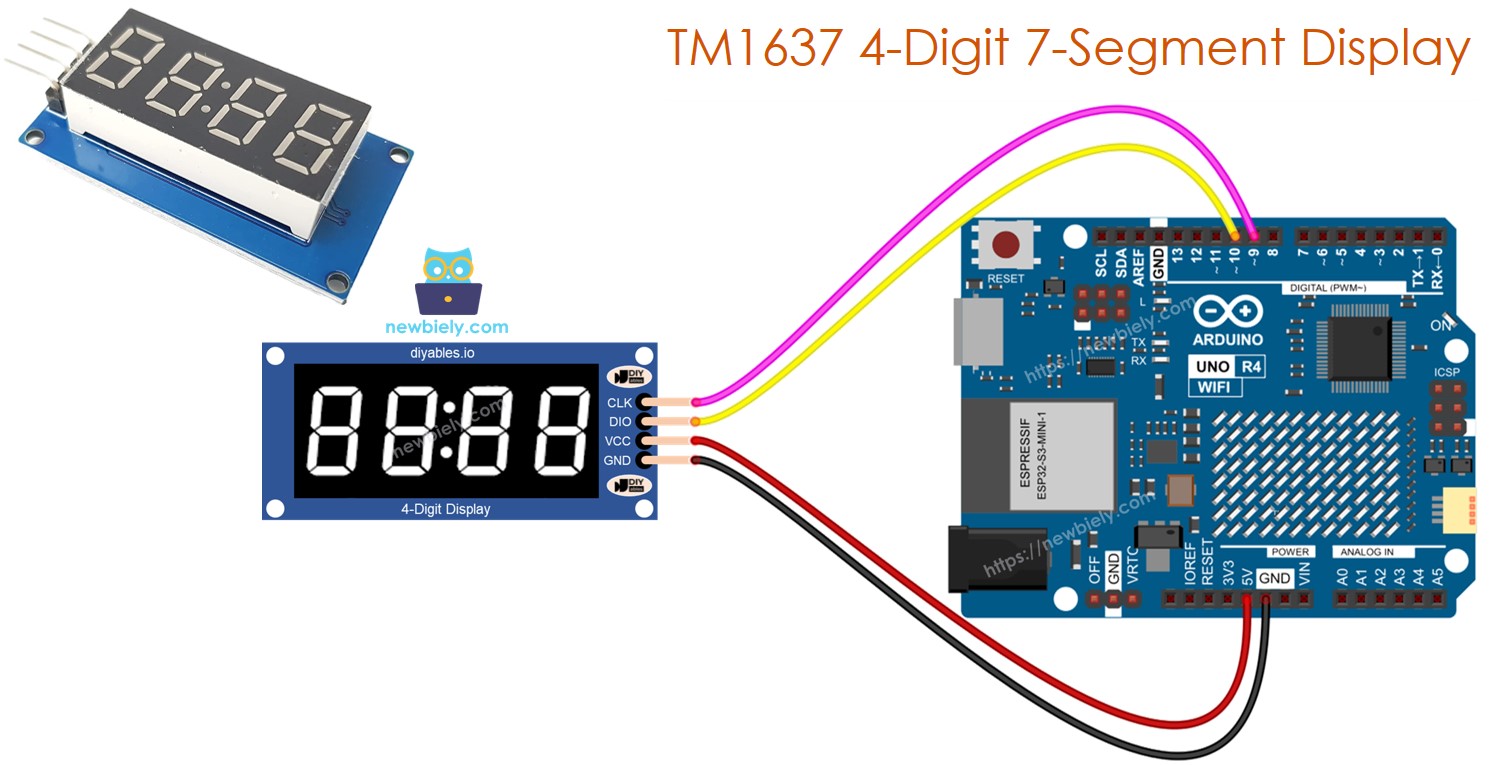
Arduino UNO R4 TM1637 4-digit 7-segment display

This guide will use a colon-separated 4-digit 7-segment display module. If you need to show decimal numbers, please use the 74HC30 4-digit 7-segment Display Module.

Hardware Preparation

1×Arduino UNO R4 WiFi
1×Arduino UNO R4 Minima (Alternatively)
1×USB Cable Type-C
1×TM1637 4-digit 7-segment Display (colon-separated)
1×Jumper Wires
1×(Recommended) Screw Terminal Block Shield for Arduino UNO R4
1×(Recommended) Breadboard Shield For Arduino UNO R4
1×(Recommended) Enclosure For Arduino UNO R4

Or you can buy the following sensor kits:

1×DIYables Sensor Kit (30 sensors/displays)
1×DIYables Sensor Kit (18 sensors/displays)
Disclosure: Some of the links provided in this section are Amazon affiliate links. We may receive a commission for any purchases made through these links at no additional cost to you.
Additionally, some of these links are for products from our own brand, DIYables.

Overview of TM1637 4-digit 7-segment Display

A TM1637 module usually has four 7-segment LEDs and a colon-shaped LED between them. It is great for showing time in hours and minutes, minutes and seconds, or the scores of two teams.

Pinout

The TM1636 4-digit 7-segment display module has four pins:

  • CLK pin: This is a clock input pin. You can connect it to any digital pin on the Arduino UNO R4.
  • DIO pin: This is a Data Input/Output pin. Connect it to any digital pin on the Arduino UNO R4.
  • VCC pin: This pin provides power to the module. Connect it between the 3.3V and 5V power supply.
  • GND pin: This is a ground pin. Connect it to the ground.
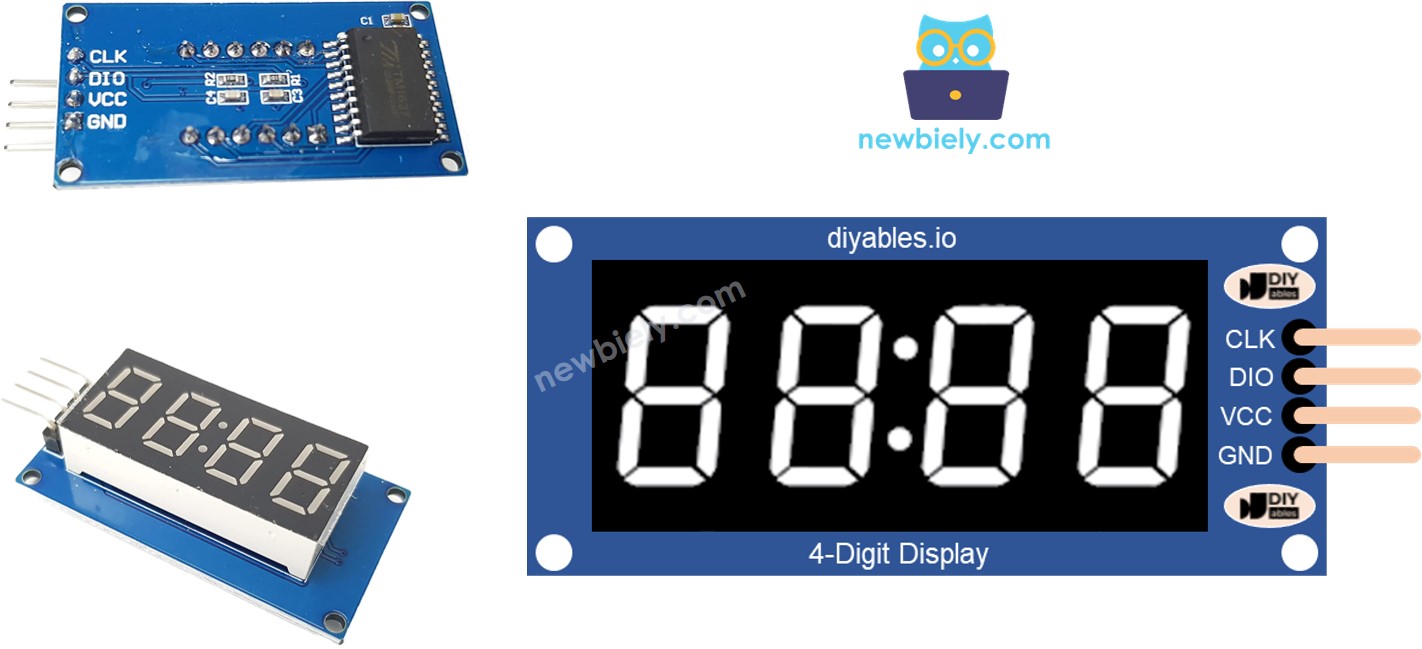
TM1637 module pinout

Wiring Diagram

To connect a TM1637 to an Arduino UNO R4, use four wires: two for power and two to control the display. Power the module using the 5-volt output from the Arduino UNO R4. Connect the CLK and DIO pins to any digital pins on the Arduino UNO R4, like pins 2 and 3. If you use different pins, remember to update the pin numbers in the code.
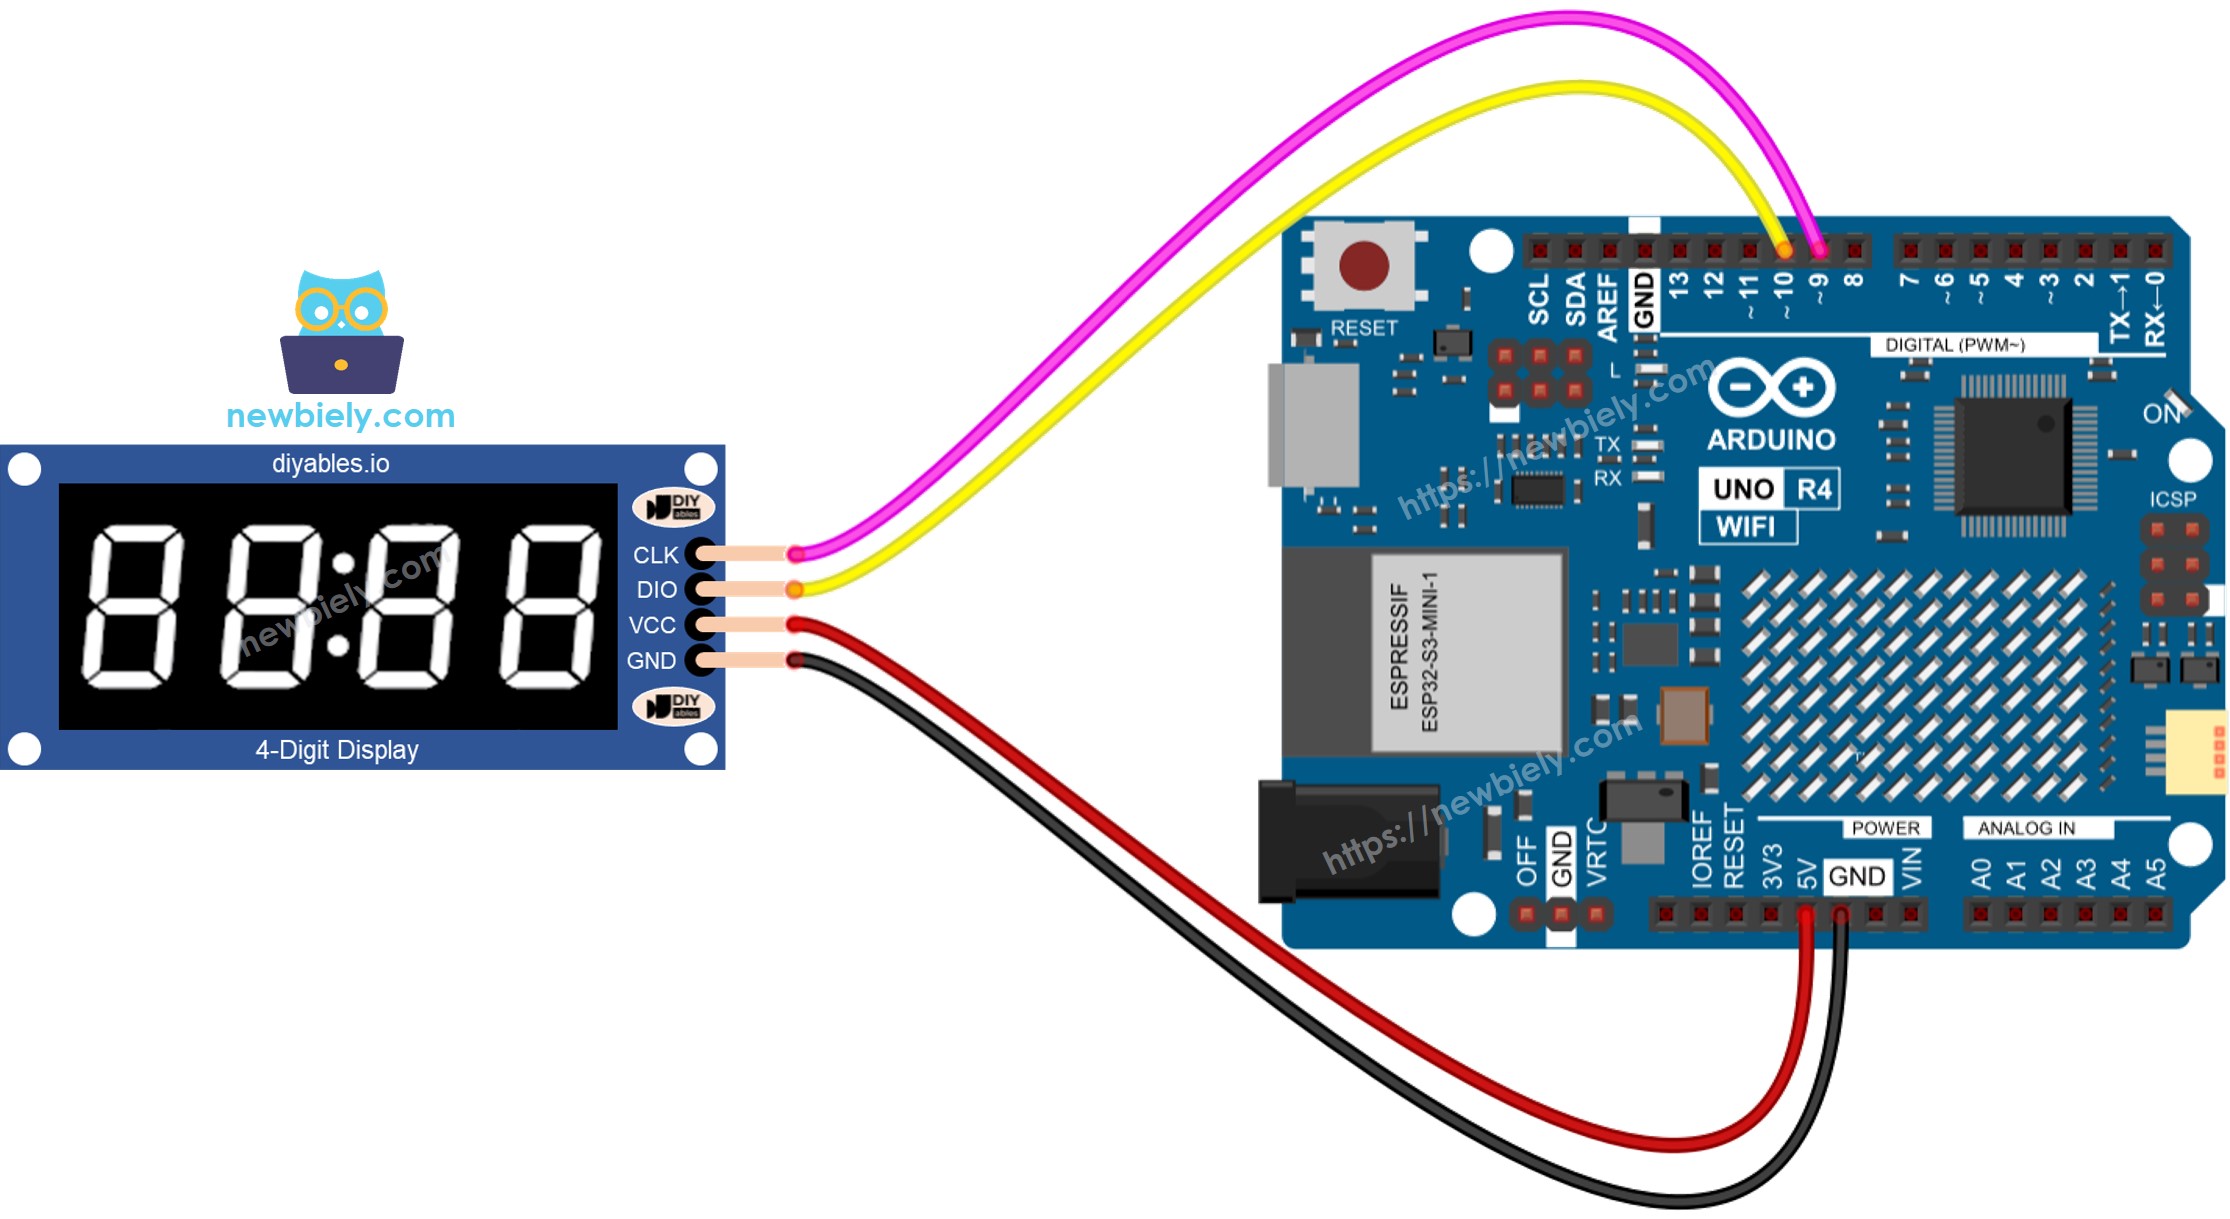
The wiring diagram between Arduino UNO R4 TM1637 Module

This image is created using Fritzing. Click to enlarge image

Library Installation

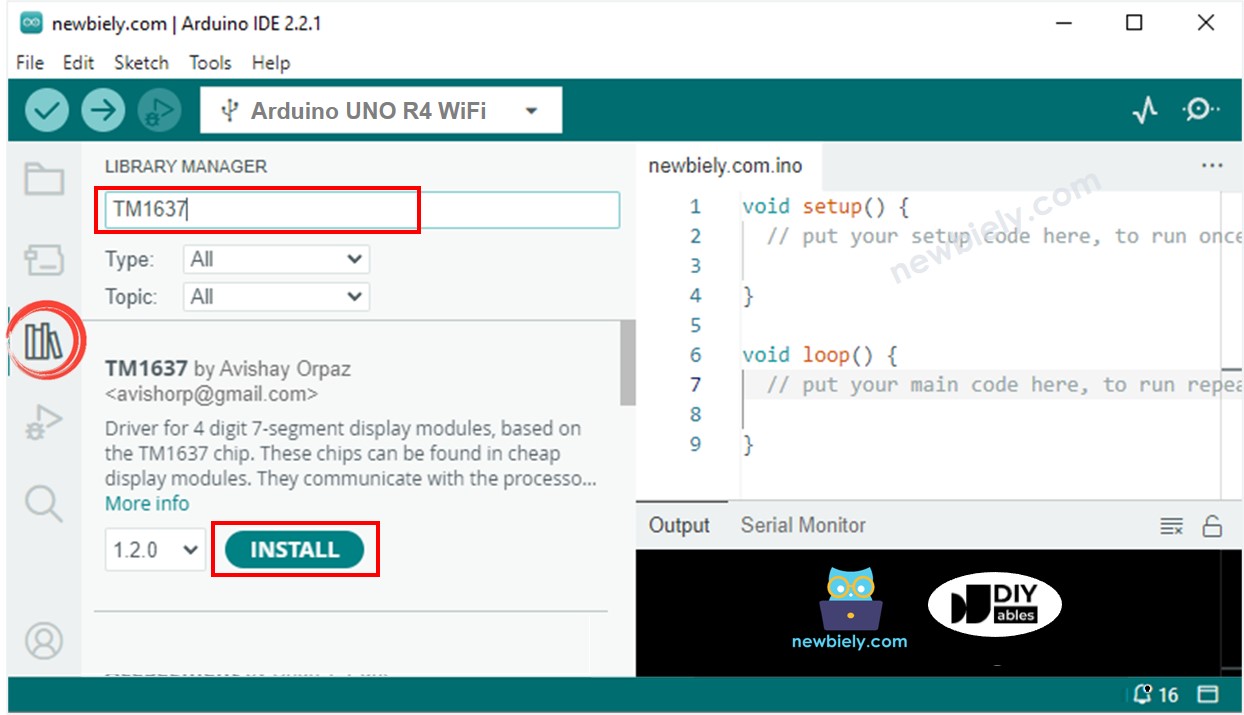
To easily use the TM1637 4-digit 7-segment Display, you must install the TM1637Display library by Avishay Orpaz. Here are the steps to install the library:

  • Go to the Libraries icon on the left side of the Arduino IDE.
  • Type “TM1637” in the search box and look for the TM1637Display library by Avishay Orpaz.
  • Press the Install button.
Arduino UNO R4 TM1637 4-digit 7-segment display library

How To Program For TM1637 4-digit 7-segment using Arduino UNO R4

  • Include the library
#include <TM1637Display.h>
  • Set the Arduino UNO R4 to connect to the display module through pins D9 for CLK and D10 for DIO.
#define CLK 9 #define DIO 10
  • Make a display item called TM1637Display.
TM1637Display display = TM1637Display(CLK, DIO);
  • You can show a number, a number with a decimal point, a negative number, or a letter. If using a letter, specify its shape. Here are examples for each case:
  • To display a number, refer to the following examples. The symbol '_' stands for a digit that is not shown.
display.showNumberDec(-12); // Displays negative twelve with leading space display.showNumberDec(-999); // Displays negative nine hundred ninety-nine display.showNumberDec(42); // Displays forty-two with leading spaces display.showNumberDec(42, false); // Displays forty-two with leading spaces (leading zeros disabled) display.showNumberDec(42, false, 2, 0); // Displays forty-two right aligned in a field width of 2 at start display.showNumberDec(42, true); // Displays forty-two with leading zeros, total 4 digits display.showNumberDec(14, false, 2, 1); // Displays fourteen centered in a field width of 4 display.showNumberDec(-5, false, 3, 0); // Displays negative five in a field width of 3 with leading space display.showNumberDec(1234); // Displays one thousand two hundred thirty-four
  • Show the number with a colon or a dot.
// Displays the number 1530 as '15.30' on a 7-segment display with decimal points display.showNumberDecEx(1530, 0b11100000, false, 4, 0);

Arduino UNO R4 Code

/* * This Arduino UNO R4 code was developed by newbiely.com * * This Arduino UNO R4 code is made available for public use without any restriction * * For comprehensive instructions and wiring diagrams, please visit: * https://newbiely.com/tutorials/arduino-uno-r4/arduino-uno-r4-tm1637-4-digit-7-segment-display */ #include <TM1637Display.h> #define CLK 9 // The Arduino UNO R4 pin connected CLK pin of 7-segment module #define DIO 10 // The Arduino UNO R4 pin connected DIO pin of 7-segment module // create a display object of type TM1637Display TM1637Display display = TM1637Display(CLK, DIO); // an array that sets individual segments per digit to display the word "dOnE" const uint8_t done[] = { SEG_B | SEG_C | SEG_D | SEG_E | SEG_G, // d SEG_A | SEG_B | SEG_C | SEG_D | SEG_E | SEG_F, // O SEG_C | SEG_E | SEG_G, // n SEG_A | SEG_D | SEG_E | SEG_F | SEG_G // E }; // degree celsius symbol const uint8_t celsius[] = { SEG_A | SEG_B | SEG_F | SEG_G, // Degree symbol SEG_A | SEG_D | SEG_E | SEG_F // C }; void setup() { display.clear(); display.setBrightness(7); // set the brightness to 7 (0:dimmest, 7:brightest) } void loop() { // show counter 0-9 int i; for (i = 0; i < 10; i++) { display.showNumberDec(i); delay(500); display.clear(); } display.showNumberDec(-91); // displayed _-91 delay(2000); display.clear(); display.showNumberDec(-109); // displayed -109 delay(2000); display.clear(); display.showNumberDec(21, false); // displayed __21 delay(2000); display.clear(); display.showNumberDec(21, true); // displayed 0021 delay(2000); display.clear(); display.showNumberDec(28, false, 2, 1); // displayed _28_ delay(2000); display.clear(); display.showNumberDec(-9, false, 3, 0); // displayed _-9_ delay(2000); display.clear(); // displayed 15:30 display.showNumberDecEx(1530, 0b11100000, false, 4, 0); delay(2000); display.clear(); // displayed 23°C int temperature = 23; // or read from temperature sensor display.showNumberDec(temperature, false, 2, 0); display.setSegments(celsius, 2, 2); delay(2000); display.clear(); // displayed letters: dOnE display.setSegments(done); delay(2000); display.clear(); }

Detailed Instructions

Follow these instructions step by step:

  • If this is your first time using the Arduino Uno R4 WiFi/Minima, refer to the tutorial on setting up the environment for Arduino Uno R4 WiFi/Minima in the Arduino IDE.
  • Connect TM1637 4-digit 7-segment Display to Arduino UNO R4 according to the provided diagram.
  • Connect the Arduino Uno R4 board to your computer using a USB cable.
  • Launch the Arduino IDE on your computer.
  • Select the appropriate Arduino Uno R4 board (e.g., Arduino Uno R4 WiFi) and COM port.
  • Copy the code above and open it in Arduino IDE
  • Click the Upload button in Arduino IDE to upload the code to Arduino UNO R4
  • Observe the states of the 7-segment display

Video Tutorial

※ OUR MESSAGES

  • As freelancers, We are AVAILABLE for HIRE. See how to outsource your project to us
  • Please feel free to share the link of this tutorial. However, Please do not use our content on any other websites. We invested a lot of effort and time to create the content, please respect our work!