Arduino UNO R4 Built-in LED Matrix
The Arduino Uno R4 WiFi comes with a built-in 12x8 LED Matrix. In this tutorial, we will explore how to use the built-in LED matrix to display numbers and characters. Specifically, we will cover the following:
- Programming the Arduino Uno R4 WiFi to display single digits (0-9) or characters (A-Z) at a adjustable position.
- Programming the Arduino Uno R4 WiFi to display two digits or characters simultaneously.
For information on using the Arduino R4 with external LED Matrix modules, please refer to the tutorial Arduino UNO R4 - LED Matrix.
Hardware Preparation
Or you can buy the following kits:
| 1 | × | DIYables STEM V4 IoT Starter Kit (Arduino included) | |
| 1 | × | DIYables Sensor Kit (18 sensors/displays) |
Disclosure: Some of the links provided in this section are Amazon affiliate links. We may receive a commission for any purchases made through these links at no additional cost to you.
Additionally, some of these links are for products from our own brand, DIYables .
Additionally, some of these links are for products from our own brand, DIYables .

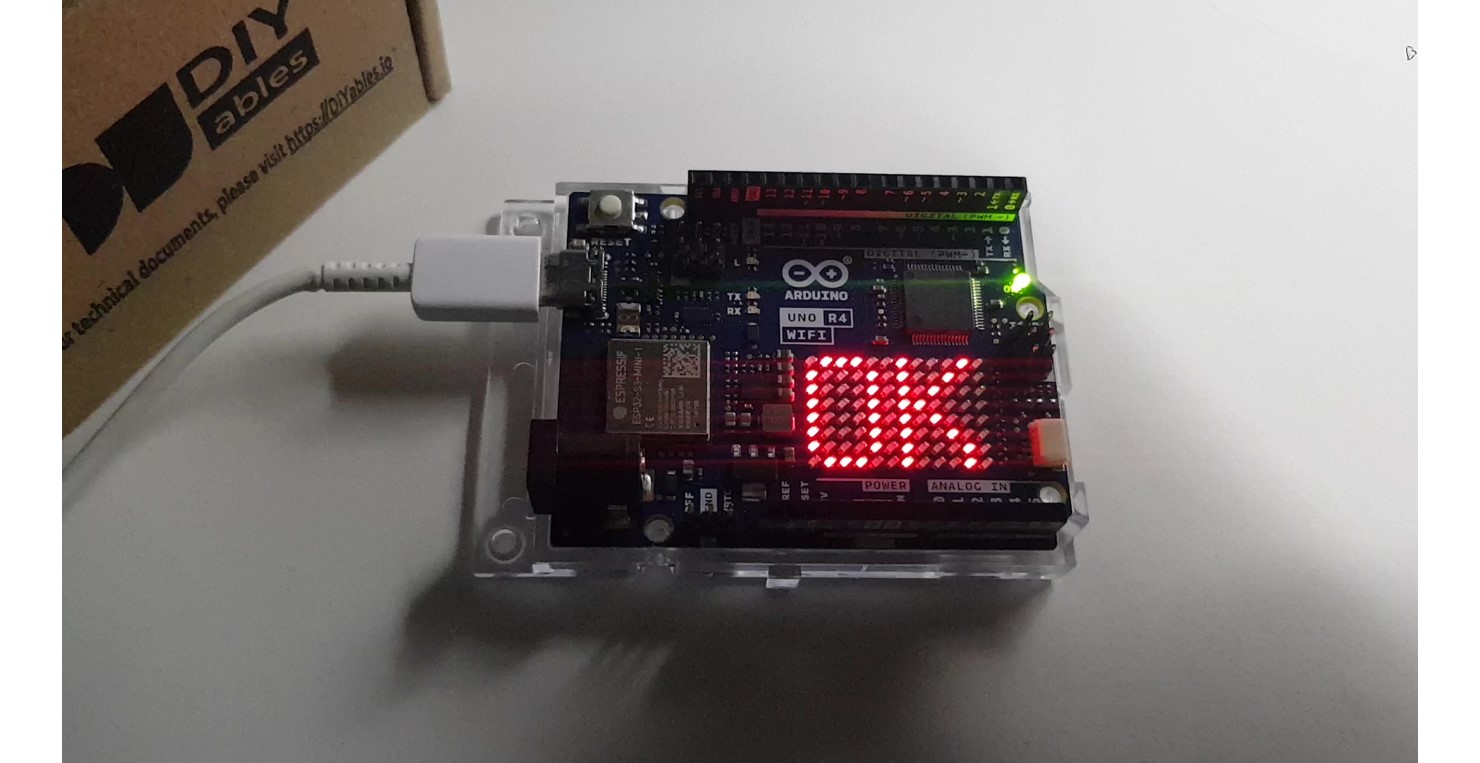
Demonstration
Arduino Code - Displays digits (0-9) or characters (A-Z)
The code below sequentially displays digits from 0 to 9 and characters from A to Z, one by one, in the center of the LED matrix.
/*
* This Arduino UNO R4 code was developed by newbiely.com
*
* This Arduino UNO R4 code is made available for public use without any restriction
*
* For comprehensive instructions and wiring diagrams, please visit:
* https://newbiely.com/tutorials/arduino-uno-r4/arduino-uno-r4-built-in-led-matrix
*/
#include "Arduino_LED_Matrix.h"
#include "fonts.h"
ArduinoLEDMatrix matrix;
uint8_t frame[8][12] = {
{ 0, 0, 0, 0, 0, 0, 0, 0, 0, 0, 0, 0 },
{ 0, 0, 0, 0, 0, 0, 0, 0, 0, 0, 0, 0 },
{ 0, 0, 0, 0, 0, 0, 0, 0, 0, 0, 0, 0 },
{ 0, 0, 0, 0, 0, 0, 0, 0, 0, 0, 0, 0 },
{ 0, 0, 0, 0, 0, 0, 0, 0, 0, 0, 0, 0 },
{ 0, 0, 0, 0, 0, 0, 0, 0, 0, 0, 0, 0 },
{ 0, 0, 0, 0, 0, 0, 0, 0, 0, 0, 0, 0 },
{ 0, 0, 0, 0, 0, 0, 0, 0, 0, 0, 0, 0 }
};
void setup() {
// put your setup code here, to run once:
Serial.begin(115200);
delay(1500);
matrix.begin();
}
void loop() {
for (char c = '0'; c <= '9'; c++) {
clear_frame();
add_to_frame(c, 4);
display_frame();
delay(1000);
}
for (char c = 'A'; c <= 'Z'; c++) {
clear_frame();
add_to_frame(c, 4);
display_frame();
delay(1000);
}
}
void clear_frame() {
for (int row = 0; row < 8; row++) {
for (int col = 0; col < 12; col++) {
frame[row][col] = 0;
}
}
}
void display_frame() {
matrix.renderBitmap(frame, 8, 12);
}
void add_to_frame(char c, int pos) {
int index = -1;
if (c >= '0' && c <= '9')
index = c - '0';
else if (c >= 'A' && c <= 'Z')
index = c - 'A' + 10;
else {
Serial.println("WARNING: unsupported character");
return;
}
for (int row = 0; row < 8; row++) {
uint32_t temp = fonts[index][row] << (7 - pos);
for (int col = 0; col < 12; col++) {
frame[row][col] |= (temp >> (11 - col)) & 1;
}
}
}
Detailed Instructions
- If this is the first time you use Arduino Uno R4, see how to setup environment for Arduino Uno R4 on Arduino IDE.
- Copy the above code and open with Arduino IDE
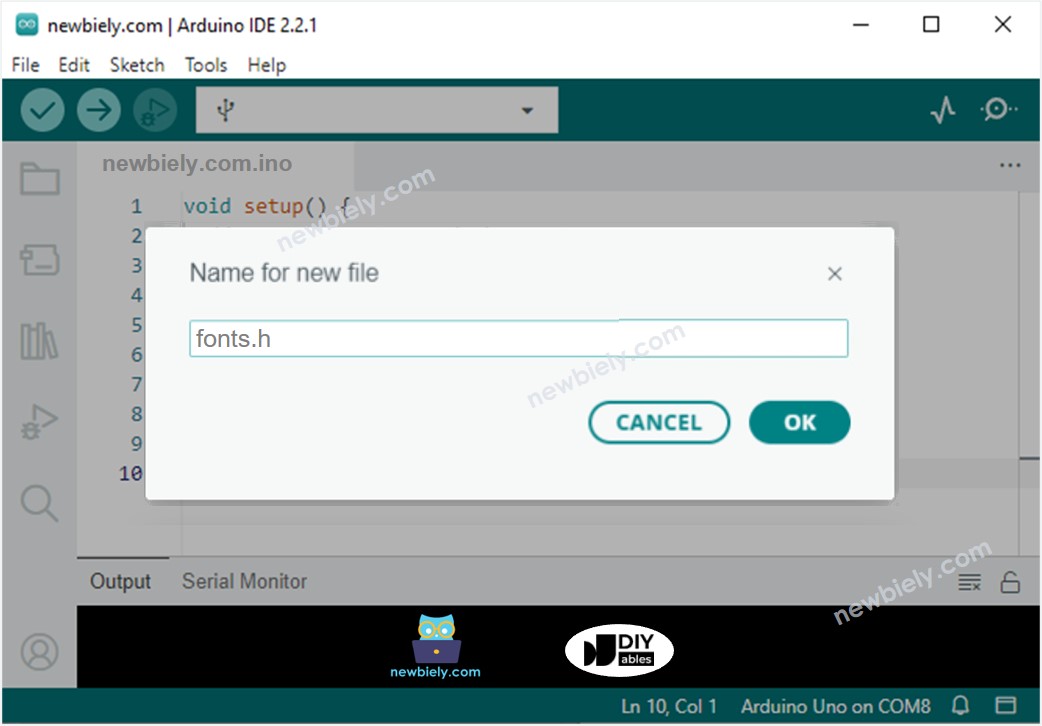
- Create the fonts.h file On Arduino IDE by:
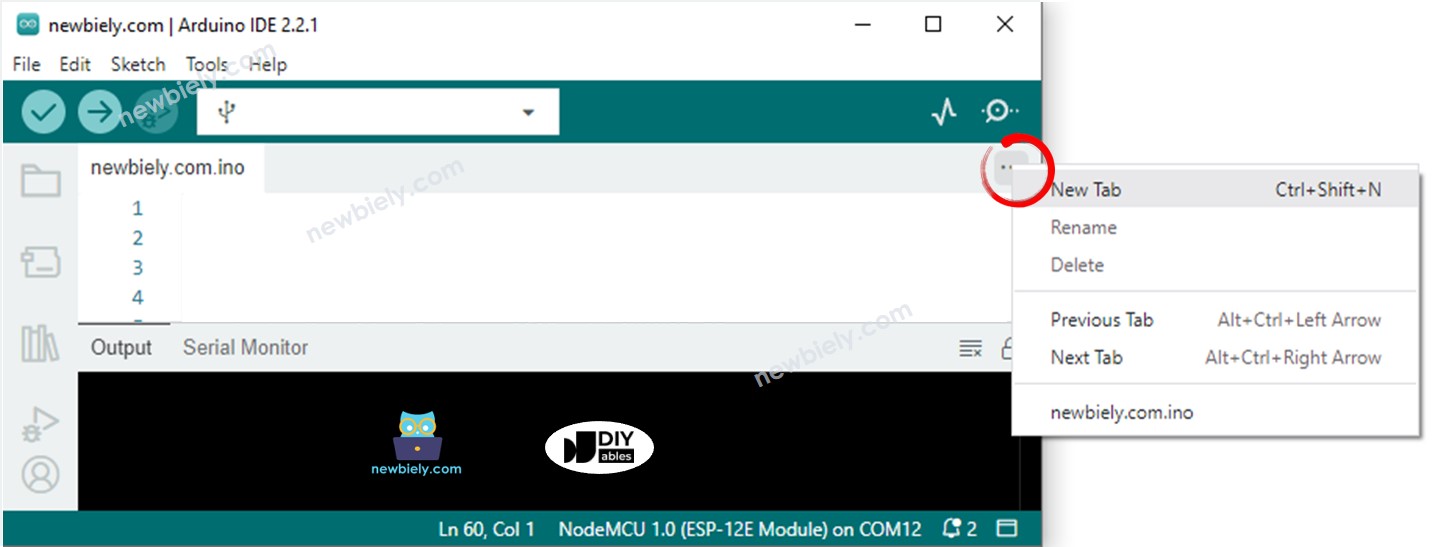
- Either click on the button just below the serial monitor icon and choose "New Tab", or use Ctrl+Shift+N.
- Give file's name fonts.h and click OK button
- Copy the below code and paste it to that file.
/*
* This Arduino UNO R4 code was developed by newbiely.com
*
* This Arduino UNO R4 code is made available for public use without any restriction
*
* For comprehensive instructions and wiring diagrams, please visit:
* https://newbiely.com/tutorials/arduino-uno-r4/arduino-uno-r4-built-in-led-matrix
*/
uint8_t fonts[36][8] = {
{
// 0
0b01110,
0b10001,
0b10001,
0b10001,
0b10001,
0b10001,
0b10001,
0b01110,
},
{
// 1
0b00110,
0b01110,
0b10110,
0b00110,
0b00110,
0b00110,
0b00110,
0b11111,
},
{
// 2
0b11110,
0b00001,
0b00010,
0b00100,
0b01000,
0b10000,
0b10000,
0b11111,
},
{
// 3
0b11110,
0b00001,
0b00010,
0b00100,
0b00110,
0b00001,
0b00001,
0b11110,
},
{
// 4
0b00010,
0b00110,
0b01010,
0b10010,
0b11111,
0b00010,
0b00010,
0b00010,
},
{
// 5
0b11111,
0b10000,
0b10000,
0b11110,
0b00001,
0b00001,
0b10001,
0b01110,
},
{
// 6
0b01110,
0b10000,
0b10000,
0b11110,
0b10001,
0b10001,
0b10001,
0b01110,
},
{
// 7
0b11111,
0b00001,
0b00010,
0b00100,
0b01000,
0b01000,
0b10000,
0b10000,
},
{
// 8
0b01110,
0b10001,
0b10001,
0b01110,
0b10001,
0b10001,
0b10001,
0b01110,
},
{
// 9
0b01110,
0b10001,
0b10001,
0b10001,
0b11110,
0b00001,
0b00001,
0b11110,
},
{
// A
0b00100,
0b01010,
0b10001,
0b11111,
0b10001,
0b10001,
0b10001,
0b10001,
},
{
// B
0b11110,
0b10001,
0b10001,
0b11110,
0b10001,
0b10001,
0b10001,
0b11110,
},
{
// C
0b01110,
0b10001,
0b10000,
0b10000,
0b10000,
0b10000,
0b10001,
0b01110,
},
{
// D
0b11110,
0b10001,
0b10001,
0b10001,
0b10001,
0b10001,
0b10001,
0b11110,
},
{
// E
0b11111,
0b10000,
0b10000,
0b11110,
0b10000,
0b10000,
0b10000,
0b11111,
},
{
// F
0b11111,
0b10000,
0b10000,
0b11110,
0b10000,
0b10000,
0b10000,
0b10000,
},
{
// G
0b01110,
0b10001,
0b10000,
0b10000,
0b10111,
0b10001,
0b10001,
0b01110,
},
{
// H
0b10001,
0b10001,
0b10001,
0b11111,
0b10001,
0b10001,
0b10001,
0b10001,
},
{
// I
0b11111,
0b00100,
0b00100,
0b00100,
0b00100,
0b00100,
0b00100,
0b11111,
},
{
// J
0b11111,
0b00010,
0b00010,
0b00010,
0b00010,
0b00010,
0b10010,
0b01100,
},
{
// K
0b10001,
0b10010,
0b10100,
0b11000,
0b10100,
0b10010,
0b10001,
0b10001,
},
{
// L
0b10000,
0b10000,
0b10000,
0b10000,
0b10000,
0b10000,
0b10000,
0b11111,
},
{
// M
0b10001,
0b11011,
0b10101,
0b10101,
0b10001,
0b10001,
0b10001,
0b10001,
},
{
// N
0b10001,
0b10001,
0b11001,
0b10101,
0b10011,
0b10001,
0b10001,
0b10001,
},
{
// O
0b01110,
0b10001,
0b10001,
0b10001,
0b10001,
0b10001,
0b10001,
0b01110,
},
{
// P
0b11110,
0b10001,
0b10001,
0b11110,
0b10000,
0b10000,
0b10000,
0b10000,
},
{
// Q
0b01110,
0b10001,
0b10001,
0b10001,
0b10001,
0b10101,
0b10010,
0b01101,
},
{
// R
0b11110,
0b10001,
0b10001,
0b11110,
0b10010,
0b10001,
0b10001,
0b10001,
},
{
// S
0b01110,
0b10001,
0b10000,
0b01110,
0b00001,
0b00001,
0b10001,
0b01110,
},
{
// T
0b11111,
0b00100,
0b00100,
0b00100,
0b00100,
0b00100,
0b00100,
0b00100,
},
{
// U
0b10001,
0b10001,
0b10001,
0b10001,
0b10001,
0b10001,
0b10001,
0b01110,
},
{
// V
0b10001,
0b10001,
0b10001,
0b10001,
0b01010,
0b01010,
0b00100,
0b00100,
},
{
// W
0b10001,
0b10001,
0b10001,
0b10101,
0b10101,
0b11011,
0b11011,
0b10001,
},
{
// X
0b10001,
0b10001,
0b01010,
0b00100,
0b00100,
0b01010,
0b10001,
0b10001,
},
{
// Y
0b10001,
0b10001,
0b01010,
0b00100,
0b00100,
0b00100,
0b00100,
0b00100,
},
{
// Z
0b11111,
0b00001,
0b00010,
0b00100,
0b01000,
0b10000,
0b10000,
0b11111,
}
};
- Click Upload button on Arduino IDE to upload code to Arduino
- Check the state of the LED Matrix
Code Explanation
In the provided code, it is crucial to focus on the add_to_frame(char c, int pos) function. This function accepts two arguments:
- char c: The character to be displayed. Valid values range from 0 to 9 and A to Z.
- int pos: The column position where the character should be displayed. Valid values range from 0 to 11.
Arduino Code - Displays two characters simultaneously
The following Arduino code simultaneously displays two characters on the LED matrix.
/*
* This Arduino UNO R4 code was developed by newbiely.com
*
* This Arduino UNO R4 code is made available for public use without any restriction
*
* For comprehensive instructions and wiring diagrams, please visit:
* https://newbiely.com/tutorials/arduino-uno-r4/arduino-uno-r4-built-in-led-matrix
*/
#include "Arduino_LED_Matrix.h"
#include "fonts.h"
ArduinoLEDMatrix matrix;
uint8_t frame[8][12] = {
{ 0, 0, 0, 0, 0, 0, 0, 0, 0, 0, 0, 0 },
{ 0, 0, 0, 0, 0, 0, 0, 0, 0, 0, 0, 0 },
{ 0, 0, 0, 0, 0, 0, 0, 0, 0, 0, 0, 0 },
{ 0, 0, 0, 0, 0, 0, 0, 0, 0, 0, 0, 0 },
{ 0, 0, 0, 0, 0, 0, 0, 0, 0, 0, 0, 0 },
{ 0, 0, 0, 0, 0, 0, 0, 0, 0, 0, 0, 0 },
{ 0, 0, 0, 0, 0, 0, 0, 0, 0, 0, 0, 0 },
{ 0, 0, 0, 0, 0, 0, 0, 0, 0, 0, 0, 0 }
};
void setup() {
// put your setup code here, to run once:
Serial.begin(115200);
delay(1500);
matrix.begin();
}
void loop() {
clear_frame();
add_to_frame('A', 0);
add_to_frame('5', 6);
display_frame();
delay(1000);
clear_frame();
add_to_frame('7', 0);
add_to_frame('F', 6);
display_frame();
delay(1000);
}
void clear_frame() {
for (int row = 0; row < 8; row++) {
for (int col = 0; col < 12; col++) {
frame[row][col] = 0;
}
}
}
void display_frame() {
matrix.renderBitmap(frame, 8, 12);
}
void add_to_frame(char c, int pos) {
int index = -1;
if (c >= '0' && c <= '9')
index = c - '0';
else if (c >= 'A' && c <= 'Z')
index = c - 'A' + 10;
else {
Serial.println("WARNING: unsupported character");
return;
}
for (int row = 0; row < 8; row++) {
uint32_t temp = fonts[index][row] << (7 - pos);
for (int col = 0; col < 12; col++) {
frame[row][col] |= (temp >> (11 - col)) & 1;
}
}
}