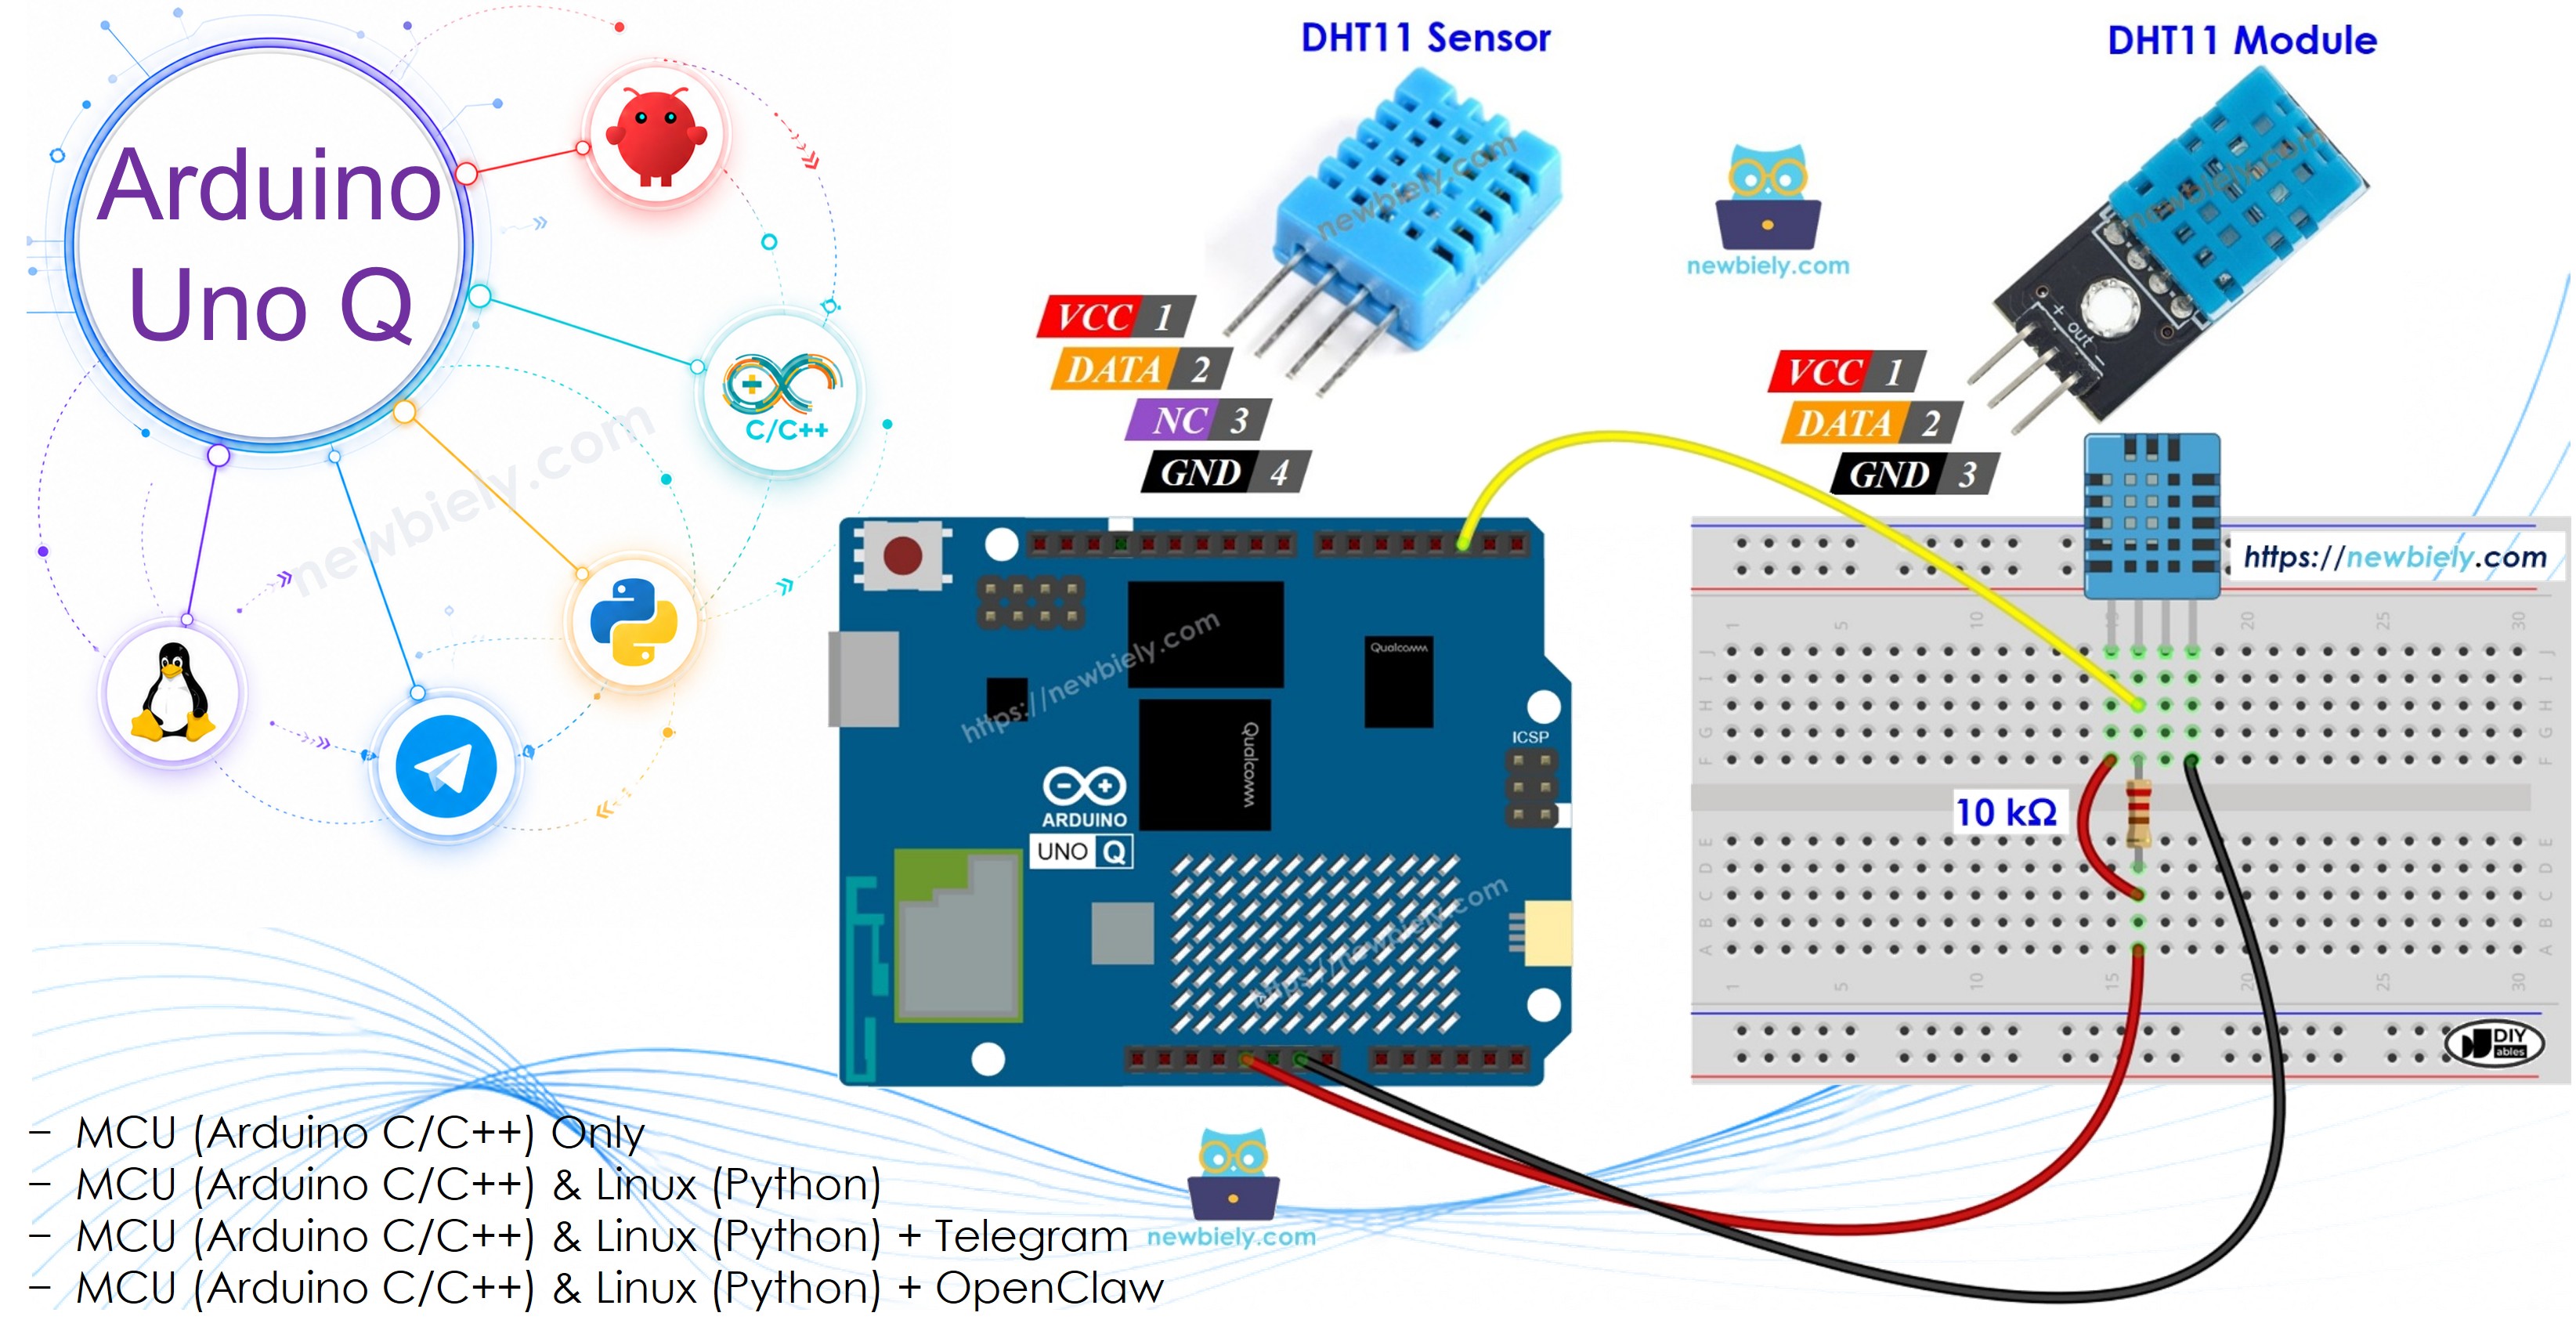
Arduino UNO Q - DHT11
Want to measure temperature AND humidity with your Arduino UNO Q — and get Telegram alerts when it gets too hot or too humid? This tutorial shows you how to use the DHT11 sensor module for complete environment monitoring.
In this tutorial, you will learn:
- What the DHT11 temperature and humidity sensor is and how it works
- How to wire the DHT11 sensor and module to the Arduino UNO Q MCU
- How to program the MCU (C/C++ Arduino code) to read temperature and humidity from the DHT11
- How to program both the Linux side (Python) and MCU side (C/C++) to read DHT11 data via Bridge
- How to receive Telegram alerts when temperature or humidity exceeds a threshold on Arduino UNO Q
- How to use OpenClaw on Arduino UNO Q with the DHT11 sensor
Hardware Preparation
Or you can buy the following kits:
| 1 | × | DIYables Sensor Kit (18 sensors/displays) |
Additionally, some of these links are for products from our own brand, DIYables .
Overview of the DHT11 Sensor
| DHT11 | |
|---|---|
| Operating Voltage | 3 to 5V |
| Temperature Range | 0°C to 50°C |
| Temperature Accuracy | ± 2°C |
| Humidity Range | 20% to 80% |
| Humidity Accuracy | 5% |
| Reading Rate | 1Hz (once every second) |
Pinout
The DHT11 is available in two forms: sensor and module.
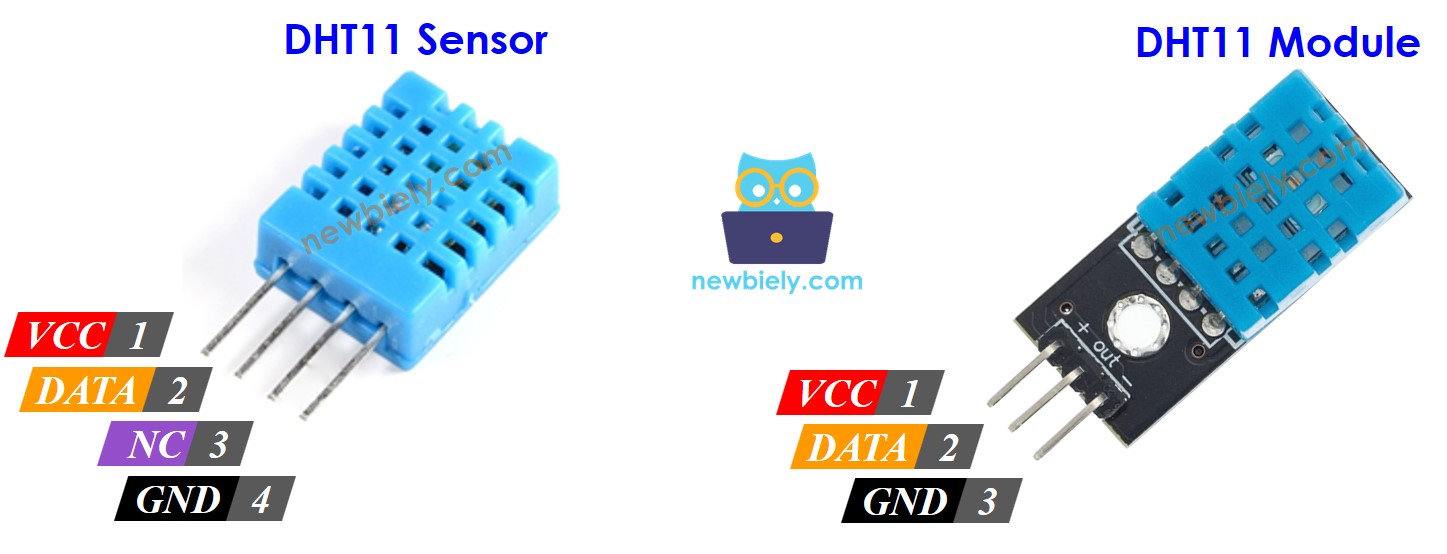
DHT11 Sensor (4-pin):
- GND: Connect to GND (0V)
- VCC: Connect to 3.3V or 5V
- DATA: Communication pin — connect to a digital pin on the MCU
- NC: Not connected
DHT11 Module (3-pin):
- GND: Connect to GND (0V)
- VCC: Connect to 3.3V or 5V
- DATA: Communication pin (also labeled OUT or S on some modules)
Most DHT11 modules include a built-in pull-up resistor — no external resistor needed.
Wiring Diagram
Arduino UNO Q - DHT11 Sensor Wiring
Requires a 10kΩ pull-up resistor between DATA and VCC.
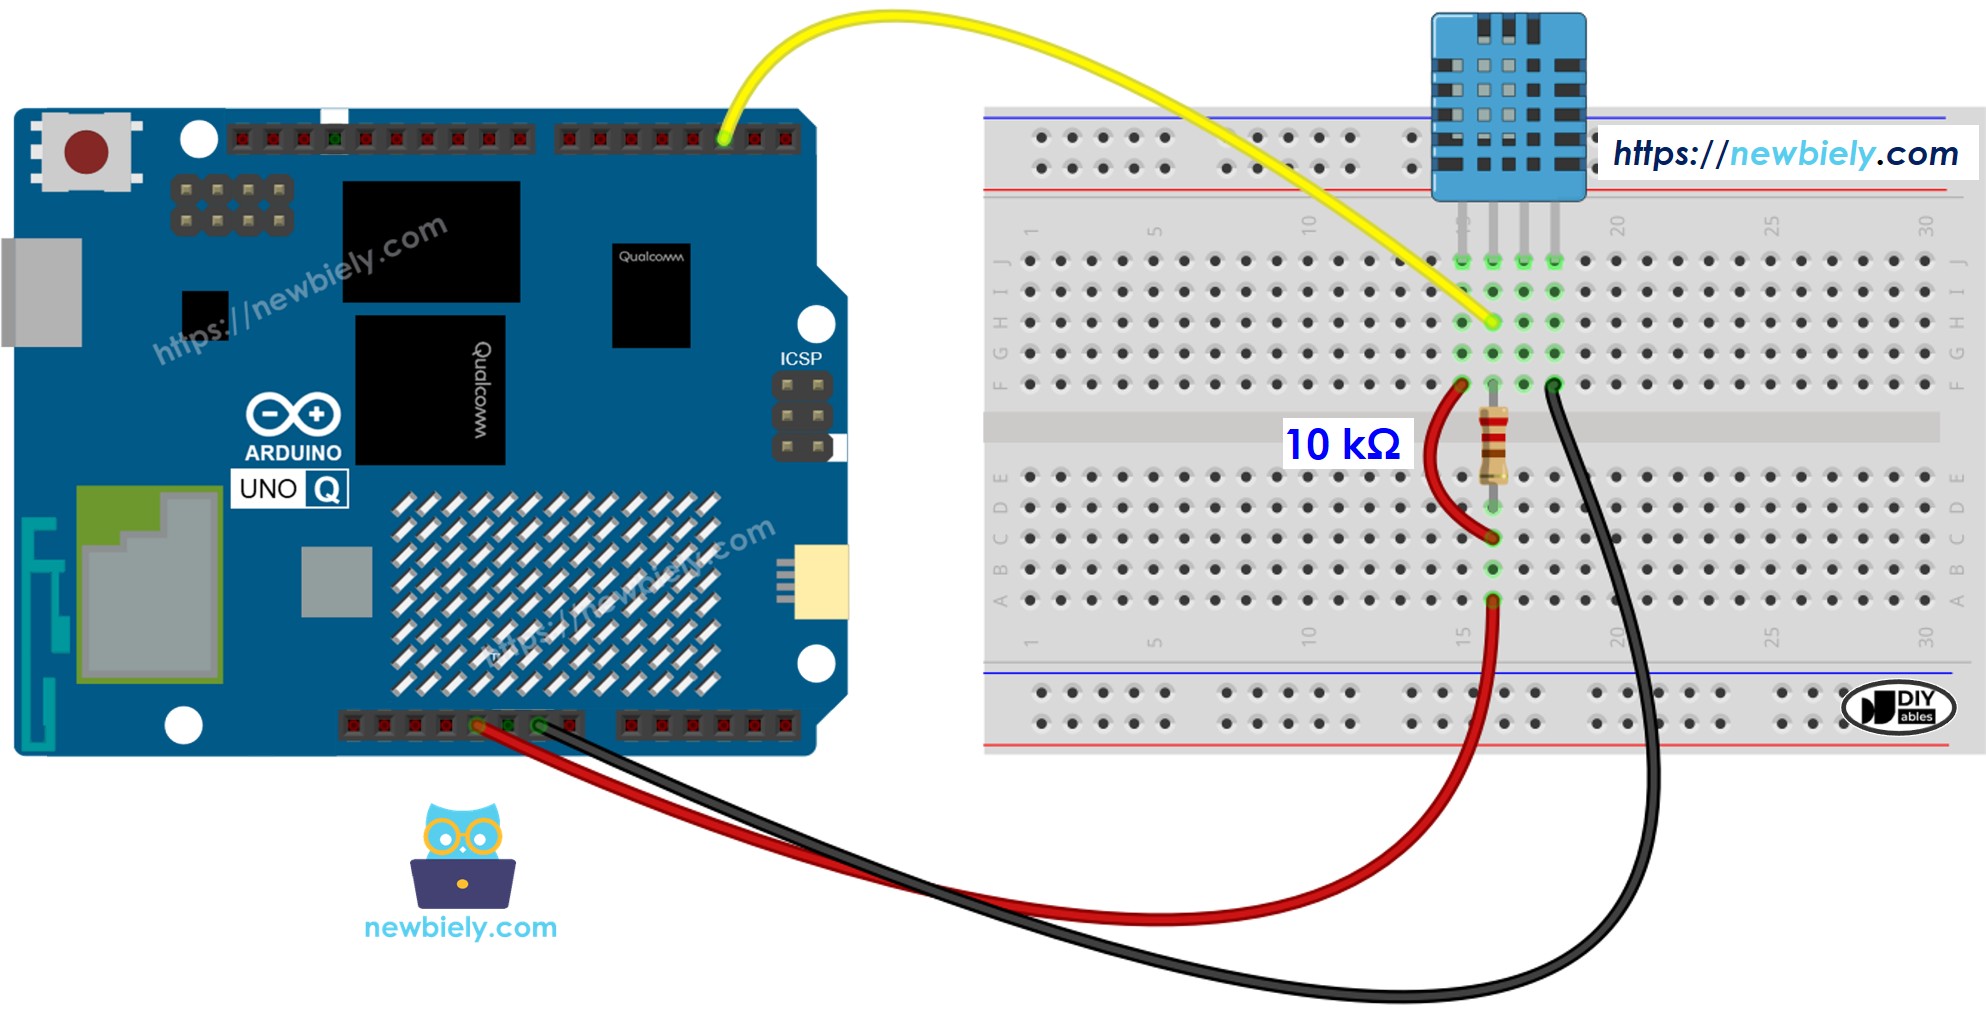
This image is created using Fritzing. Click to enlarge image
Arduino UNO Q - DHT11 Module Wiring
No external resistor needed — the module includes one.
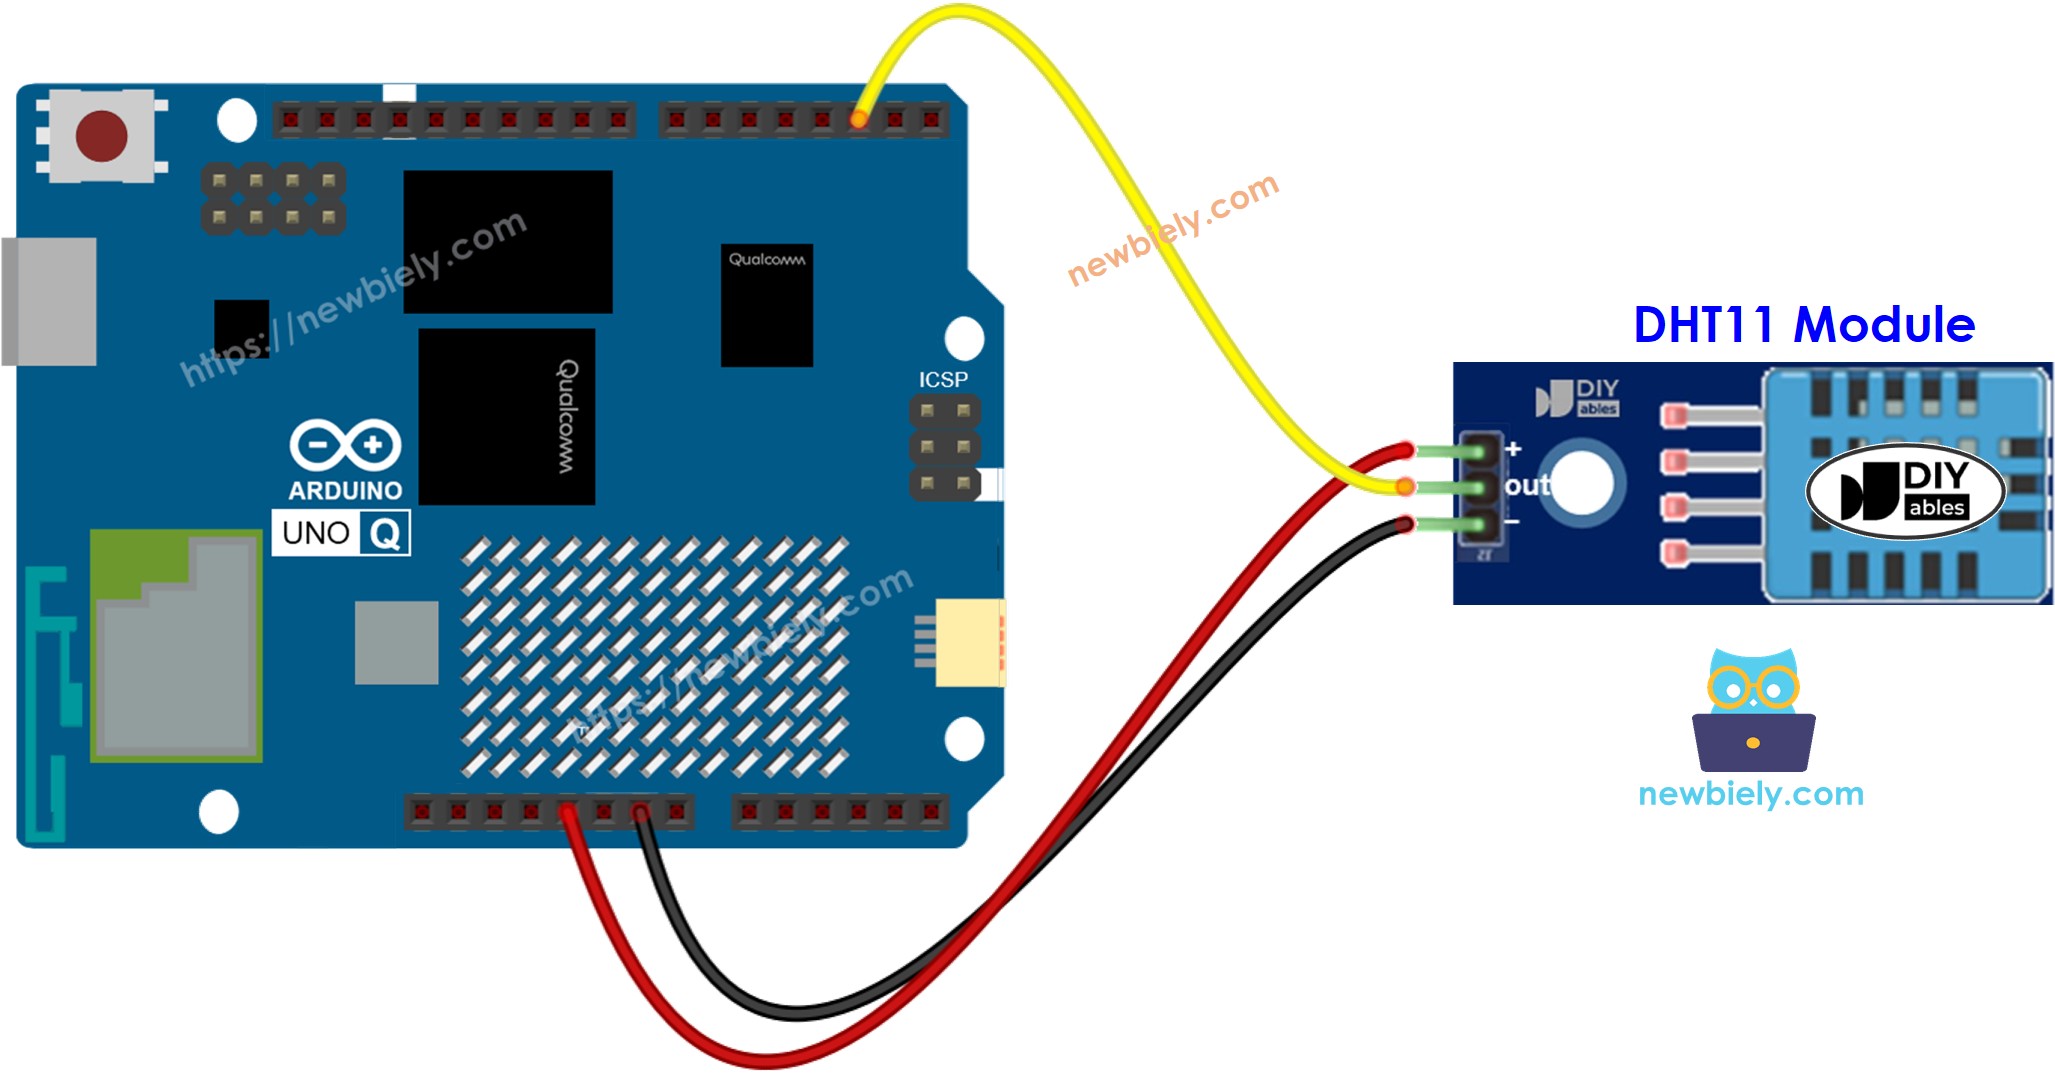
This image is created using Fritzing. Click to enlarge image
| DHT11 Pin | Arduino UNO Q MCU |
|---|---|
| GND | GND |
| VCC | 3.3V or 5V |
| DATA | D2 |
How To Program For DHT11
- Include the library:
- Define the pin and create a sensor object:
- Initialize the sensor:
- Read humidity and temperature:
- Always check for failed reads:
Arduino UNO Q Code
The Arduino UNO Q has two processors working together:
- The STM32 MCU reads the DHT11 sensor directly — all sensor communication runs on the MCU
- The Qualcomm MPU runs Debian Linux and handles Wi-Fi, Python, and cloud connectivity
- In this section, only the MCU is programmed — the Linux side stays idle. A later section shows how both processors work together via Bridge.
The MCU reads temperature and humidity every 3 seconds and prints to the Serial Monitor.
Detailed Instructions
First time with Arduino UNO Q? Follow the Getting Started with Arduino UNO Q tutorial before proceeding.
- Connect: Wire the DHT11 sensor or module to the Arduino UNO Q MCU as shown in the wiring diagram.
- Open Arduino App Lab: Launch Arduino App Lab and wait until it detects your Arduino UNO Q.
- Create a new App: Click the Create New App button.

- Give the App a name, for example: Dht11
- Click Create to confirm.

- Paste the sketch: Copy the MCU code above and paste it into sketch/sketch.ino. Keep other files as default.
- Install the library: Click the Add sketch library button (the open book icon with a + sign) in the left sidebar.

- Search for DHT sensor library created by Adafruit and click the Install button.
- Upload: Click the Run button in Arduino App Lab.

- Breathe on the sensor or hold it — watch humidity and temperature readings update.
App Lab Console Output
Bridge: Linux + MCU
This section shows how to program both processors of the Arduino UNO Q so the Linux side can read temperature and humidity via Bridge:
- The DHT11 sensor is connected to the MCU (STM32) — the MCU reads data every 3 seconds and caches the latest values
- The MPU cannot access the DHT11 directly — it must call Bridge functions to retrieve readings
- The MPU has Wi-Fi — running full Debian Linux, it can log data, publish to dashboards, or send alerts over the Internet
- Arduino_RouterBridge enables RPC communication between the two processors
- ⚠️ /dev/ttyHS1 (Linux) and Serial1 (MCU) are RESERVED by the router — never open them in user code
In short: MCU reads DHT11 every 3 seconds and caches the result → MPU polls Bridge to retrieve readings → MPU publishes or alerts over Wi-Fi.
Note: In the Bridge sketch, the loop() function reads the DHT11 every 3 seconds to keep the cached values fresh. All Bridge callbacks are read-only and return cached data without blocking.
MCU Code (Bridge)
Python Code (Bridge)
Detailed Instructions
- Connect: Wire the DHT11 sensor to the Arduino UNO Q as shown in the wiring diagram.
- Open Arduino App Lab: Launch Arduino App Lab and wait for the board to be detected.
- Create a new App: Click Create New App, name it Dht11Bridge, then click Create.
- Paste the MCU sketch: Copy the MCU Bridge code above and paste it into sketch/sketch.ino.
- Paste the Python code: Copy the Python Bridge code above and paste it into the Python file in the App.
- Upload: Click the Run button in Arduino App Lab.
- Watch temperature and humidity readings appear in the Python console every 3 seconds.
App Lab Console Output
Telegram
Monitor temperature and humidity remotely. Receive automatic alerts when temperature exceeds 35°C or humidity exceeds 80%.
MCU sketch: Keep the same MCU sketch from the previous Bridge section.
Python Code (Telegram)
Detailed Instructions
- Replace YOUR_TELEGRAM_BOT_TOKEN with your actual bot token from BotFather.
- Replace YOUR_CHAT_ID with your Telegram chat ID.
- Paste this Python code into your App's Python file (keep the same MCU sketch).
- Click the Run button. Send /temp or /humidity from Telegram, or breathe on the sensor to trigger alerts.
App Lab Console Output

ArduinoBot
OpenClaw
You can adapt the OpenClaw to this tutorial by refering the instruction on Arduino Uno Q - OpenClaw Tutorial
Project Ideas
You can build many useful projects with the DHT11 sensor and Arduino UNO Q:
- Smart Weather Station: Measure temperature and humidity continuously — the Linux MPU logs data every minute and uploads a daily summary to a cloud dashboard
- Greenhouse Automation: Use the humidity and temperature readings to control a relay fan and a misting system — the MPU sends Telegram alerts when conditions go out of range
- Baby Room Monitor: Monitor temperature and humidity in a baby room — Telegram sends an alert when it gets too warm or too dry, helping maintain comfort
- Fermentation Monitor: Track temperature and humidity during fermentation — the MPU logs data and Telegram alerts if conditions deviate from target range
- Remote Environment Logger: Deploy on battery power with Wi-Fi — the MPU reads DHT11 via Bridge every 10 minutes and uploads readings to a remote server
Challenge Yourself
Ready to go further with the DHT11 on Arduino UNO Q? Try these challenges:
- Easy: Modify the MCU sketch to blink the built-in LED when humidity exceeds 70%, providing a visual warning directly on the board.
- Medium: Add a set_temp_threshold(String) and set_humi_threshold(String) Bridge function that let Python dynamically update the alert thresholds at runtime without recompiling the MCU sketch.
- Advanced: Build a comfort index display: calculate the heat index from temperature and humidity, display it on the Python console, and send a Telegram report every hour with average temperature, humidity, and heat index. Include a trend indicator (rising/falling/stable) based on the last 3 readings.