Arduino UNO Q - LM35 Temperature Sensor

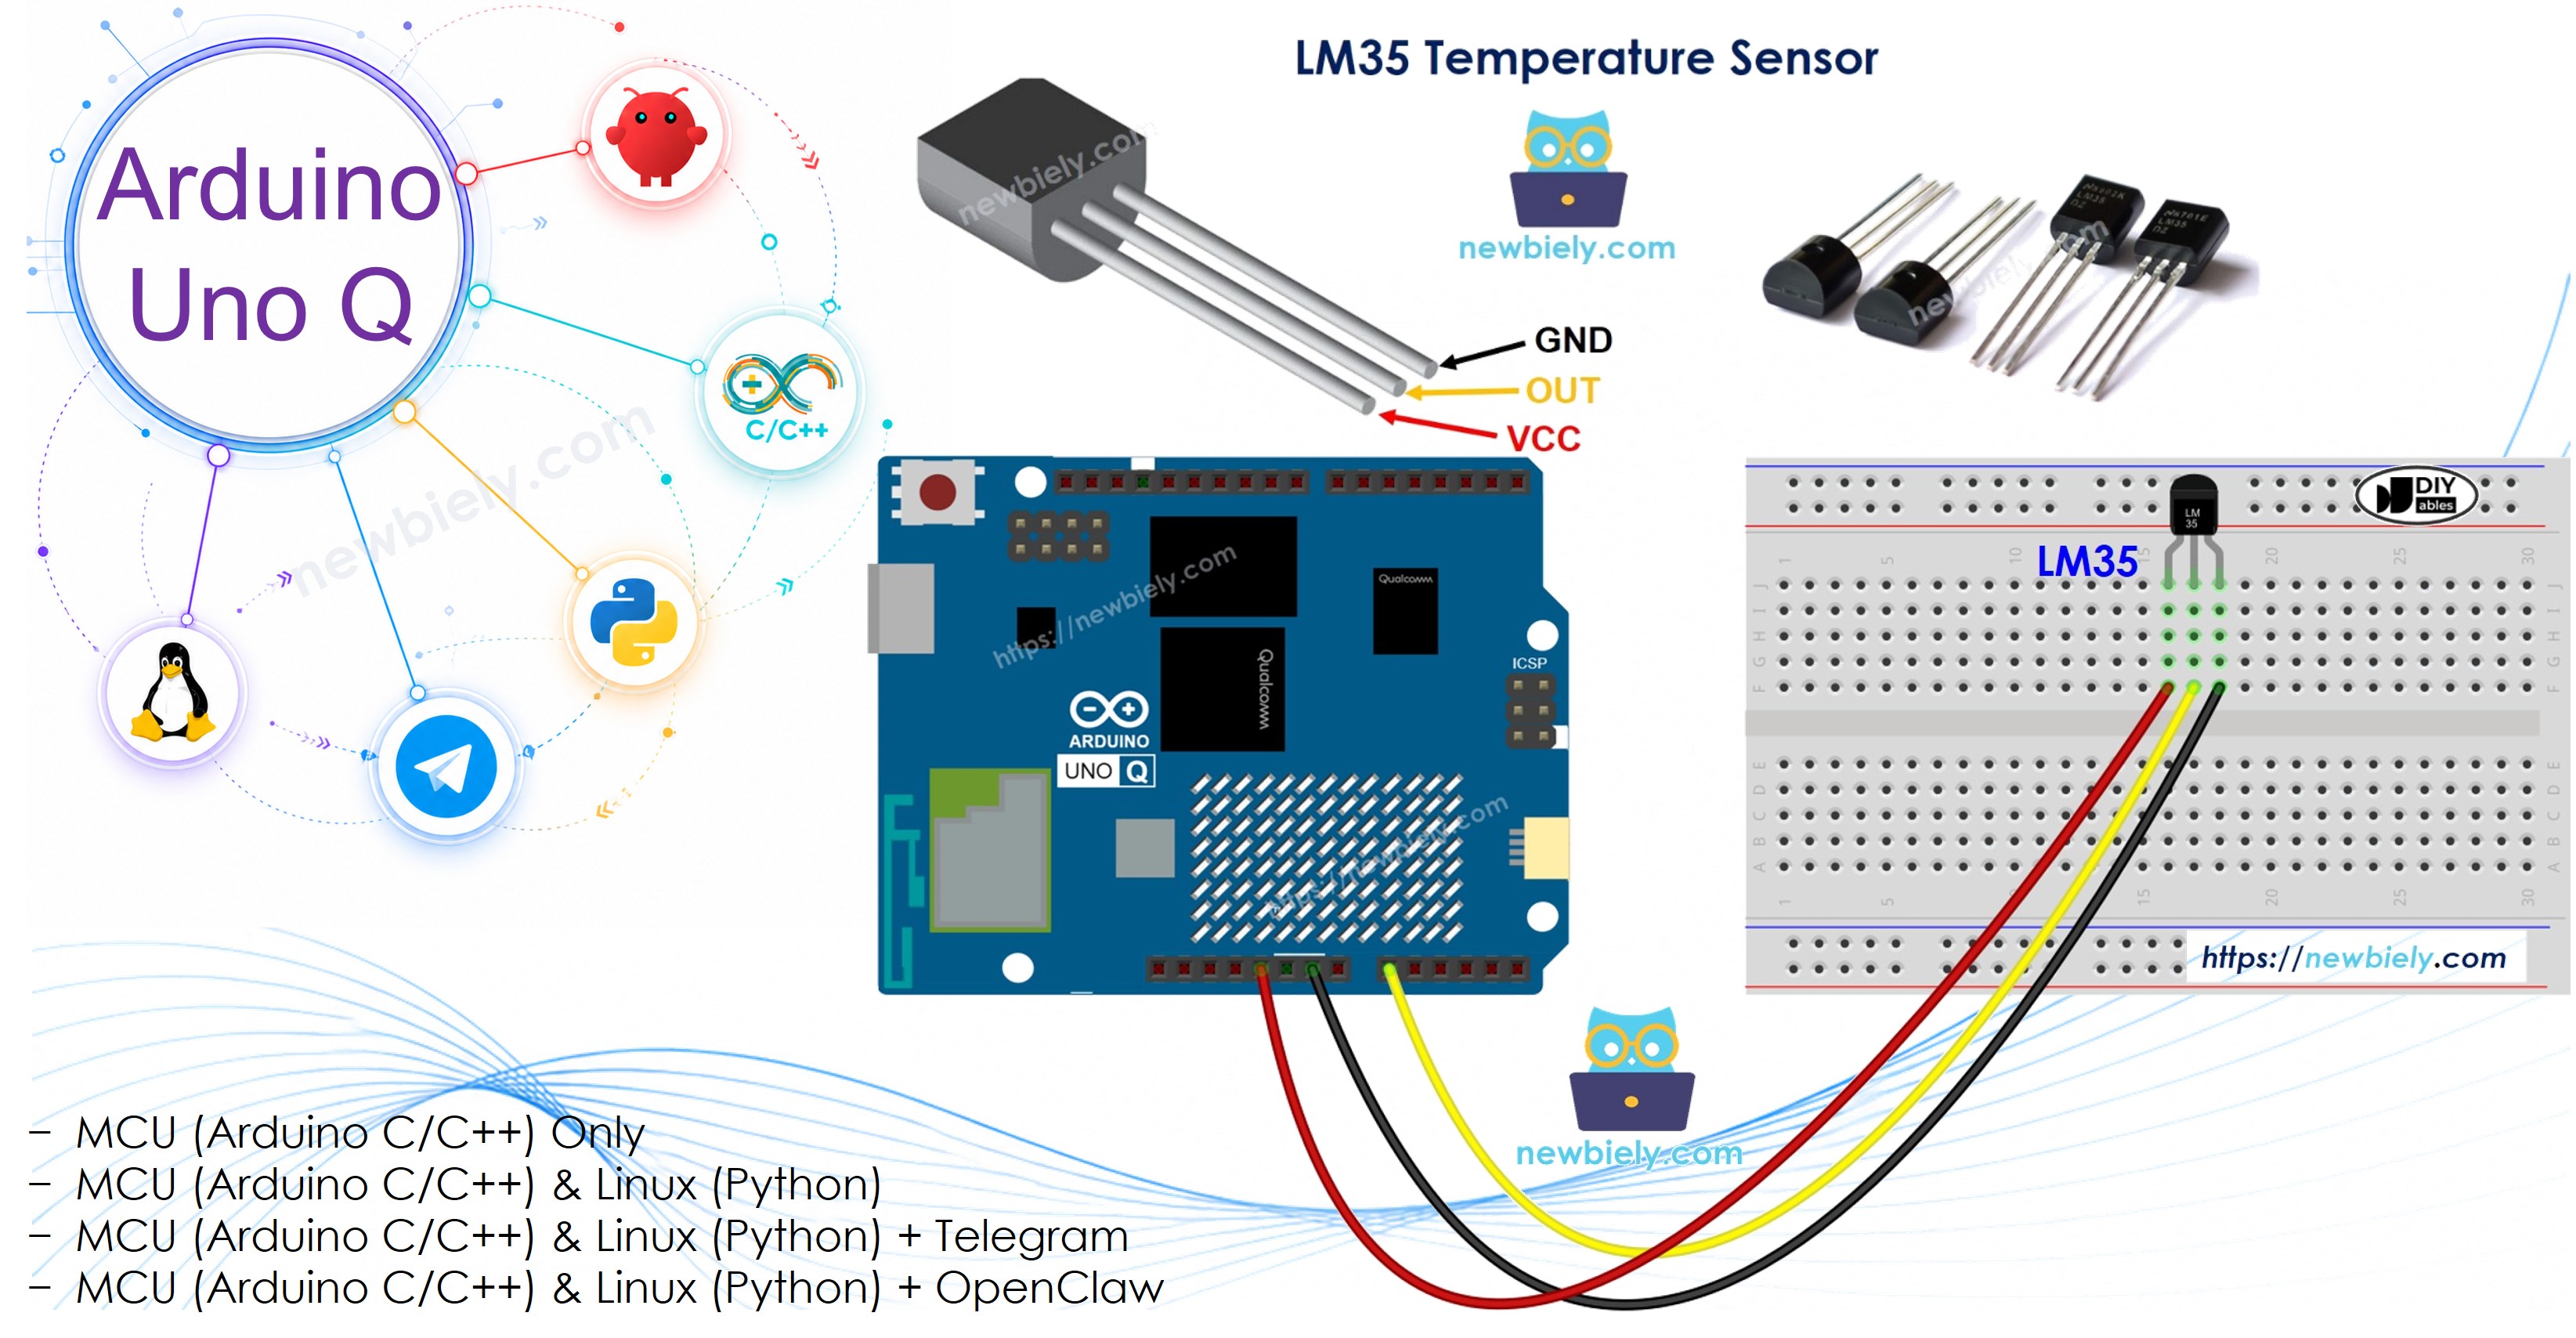
The LM35 is a simple analog temperature sensor that outputs a voltage proportional to temperature. On Arduino UNO Q, the MCU's 12-bit ADC delivers higher precision than standard 10-bit boards. This tutorial shows you how to wire and program the LM35 — and monitor it remotely via Telegram.

In this tutorial, you will learn:

Arduino UNO Q LM35 Temperature Sensor

Hardware Preparation

1×Arduino UNO Q
1×USB Cable for Arduino Uno Q
1×LM35 Temperature Sensor
1×Breadboard
1×Jumper Wires
1×Recommended: Screw Terminal Block Shield for Arduino Uno
1×Recommended: Sensors/Servo Expansion Shield for Arduino Uno
1×Recommended: Breadboard Shield for Arduino Uno
1×Recommended: Enclosure for Arduino Uno
1×Recommended: Prototyping Base Plate & Breadboard Kit for Arduino UNO

Or you can buy the following kits:

1×DIYables Sensor Kit (18 sensors/displays)
Disclosure: Some of the links provided in this section are Amazon affiliate links. We may receive a commission for any purchases made through these links at no additional cost to you.
Additionally, some of these links are for products from our own brand, DIYables .

Overview of the LM35 Temperature Sensor
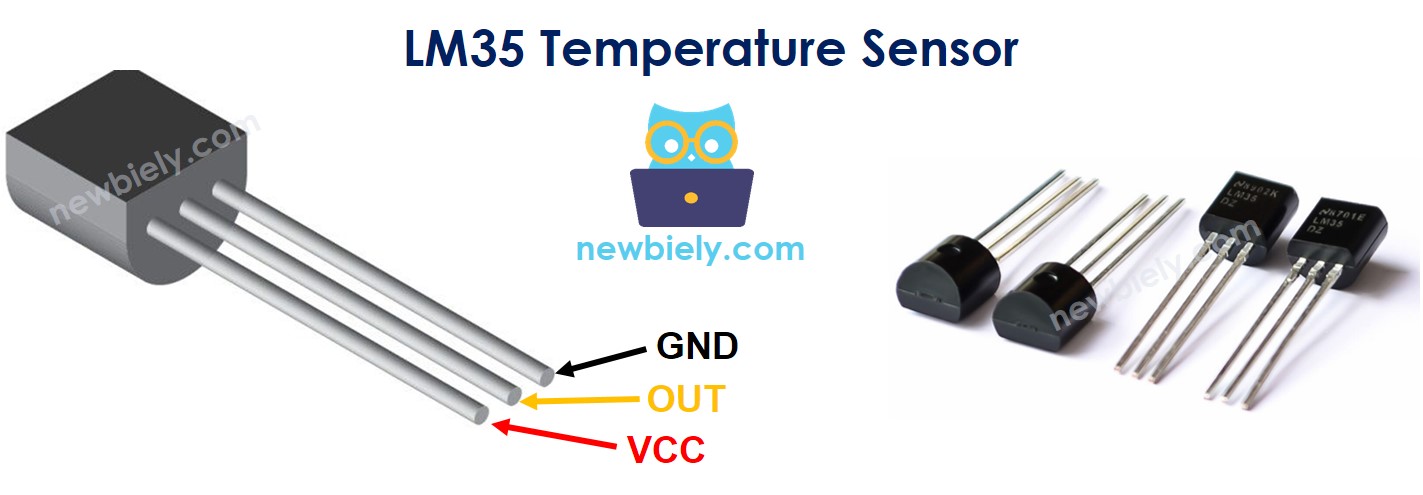
Pinout

The LM35 has three pins:

  • GND: Connect to GND (0V)
  • VCC: Connect to 5V (the LM35 requires at least 4V supply)
  • OUT: Analog output — connect to an analog pin on the Arduino UNO Q MCU
LM35 temperature sensor Pinout

How It Works

The LM35 outputs a voltage that increases linearly with temperature: each 1°C rise increases the output by 10mV. To read temperature, measure the output voltage and divide by 10.

On Arduino UNO Q, the MCU (STM32U585) uses a 12-bit ADC (values 0–4095) with a 3.3V reference. This gives better resolution than standard 10-bit Arduino boards.

Wiring Diagram

The wiring diagram between Arduino UNO Q LM35 Temperature Sensor

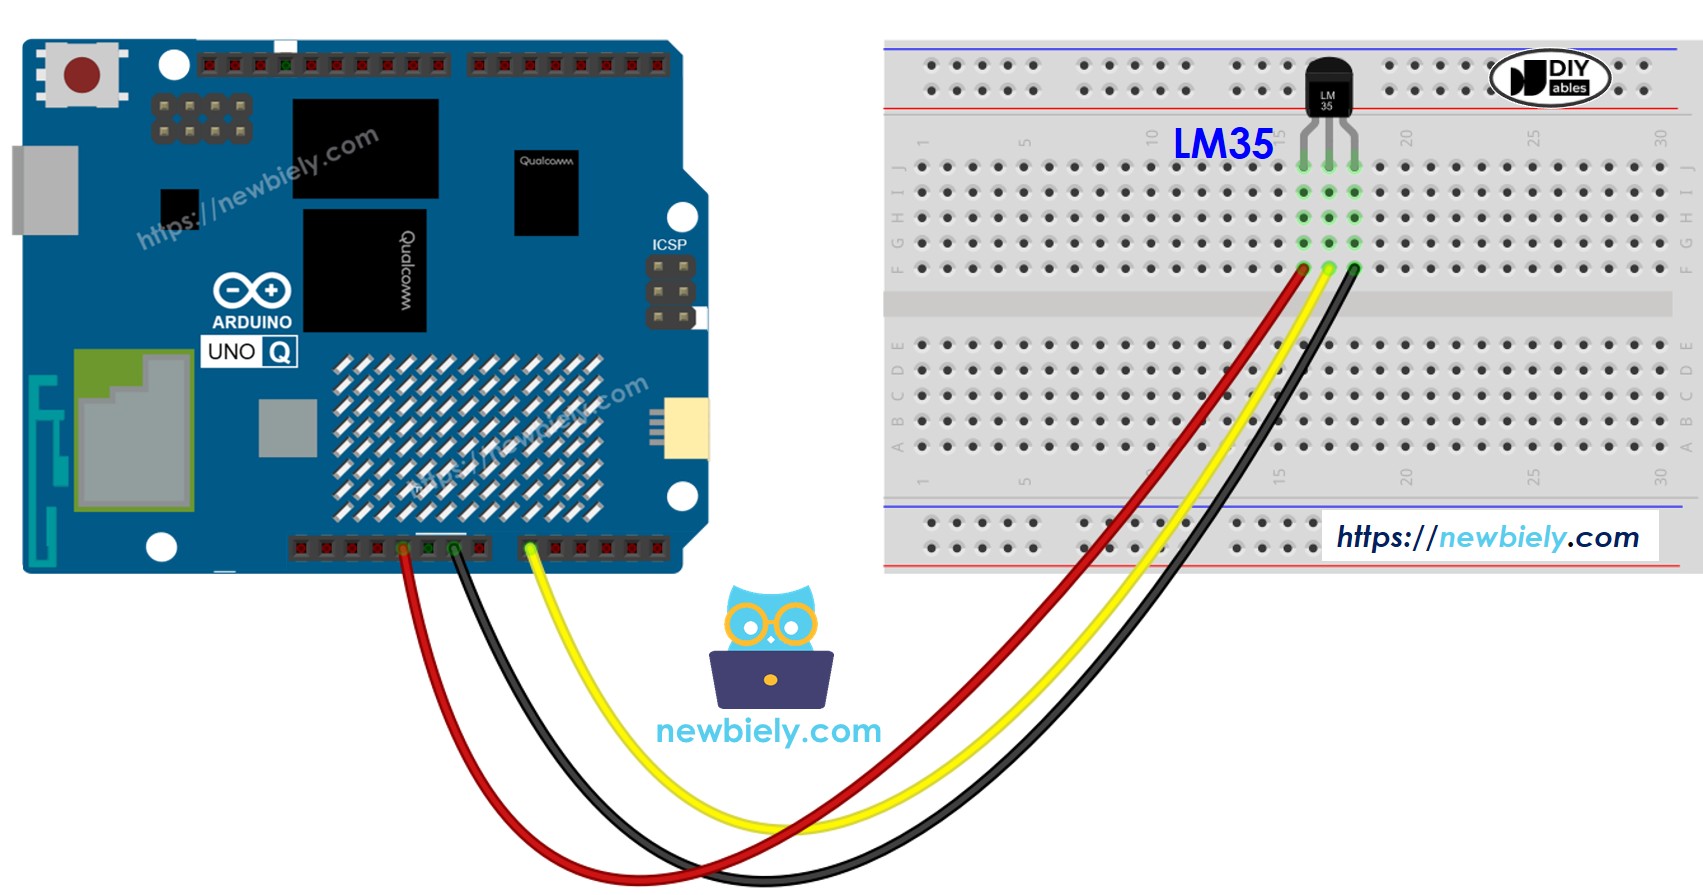
This image is created using Fritzing. Click to enlarge image

LM35 Pin Arduino UNO Q MCU
GND GND
VCC 5V
OUT A0

※ NOTE THAT:

Connect LM35 VCC to the 5V pin, not 3.3V — the LM35 requires at least 4V to operate. The analog output will still be within the 3.3V ADC range of the MCU.

How To Program For LM35

  • Read the ADC value from the analog pin:
int adcVal = analogRead(PIN_LM35);
  • Convert ADC value to voltage in millivolts (using 3.3V reference and 12-bit resolution):
float milliVolt = adcVal * (ADC_VREF_mV / ADC_RESOLUTION); // ADC_VREF_mV = 3300.0 (3.3V reference on UNO Q MCU) // ADC_RESOLUTION = 4096.0 (12-bit ADC on UNO Q MCU)
  • Convert millivolts to Celsius:
float tempC = milliVolt / 10;
  • Convert Celsius to Fahrenheit:
float tempF = tempC * 9.0 / 5.0 + 32.0;

Arduino UNO Q Code

The Arduino UNO Q has two processors working together:

  • The STM32 MCU reads the LM35 analog output directly via its 12-bit ADC — all sensor reading and conversion runs on the MCU
  • The Qualcomm MPU runs Debian Linux and handles Wi-Fi, Python, and cloud connectivity
  • In this section, only the MCU is programmed — the Linux side stays idle. A later section shows how both processors work together via Bridge.

The MCU reads the LM35 every second and prints temperature to the Serial Monitor.

/* * This Arduino UNO Q code was developed by newbiely.com * * This Arduino UNO Q code is made available for public use without any restriction * * For comprehensive instructions and wiring diagrams, please visit: * https://newbiely.com/tutorials/arduino-uno-q/arduino-uno-q-lm35-temperature-sensor */ // COPYRIGHT newbiely.com // AUTHOR: newbiely // This code is made available for public use without restriction. // For complete instructions, tutorials, and further information, visit: // https://newbiely.com/tutorials/arduino-uno-q/arduino-uno-q-lm35-temperature-sensor // Arduino UNO Q MCU (STM32U585) uses a 12-bit ADC (0–4095) with a 3.3V reference #define ADC_VREF_mV 3300.0 // MCU reference voltage in millivolts #define ADC_RESOLUTION 4096.0 // 12-bit ADC resolution #define PIN_LM35 A0 // Analog pin connected to LM35 OUT pin void setup() { Serial.begin(115200); delay(1500); Serial.println("Arduino UNO Q LM35 Temperature Sensor ready"); } void loop() { int adcVal = analogRead(PIN_LM35); float milliVolt = adcVal * (ADC_VREF_mV / ADC_RESOLUTION); float tempC = milliVolt / 10; float tempF = tempC * 9.0 / 5.0 + 32.0; Serial.print("Temperature: "); Serial.print(tempC); Serial.print("°C = "); Serial.print(tempF); Serial.println("°F"); delay(1000); }

Detailed Instructions

First time with Arduino UNO Q? Follow the Getting Started with Arduino UNO Q tutorial before proceeding.

  • Connect: Wire the LM35 sensor to the Arduino UNO Q MCU as shown in the wiring diagram.
  • Open Arduino App Lab: Launch Arduino App Lab and wait until it detects your Arduino UNO Q.
  • Create a new App: Click the Create New App button.
Create New App in Arduino App Lab on Arduino UNO Q
  • Give the App a name, for example: Lm35TemperatureSensor
  • Click Create to confirm.
Arduino App Lab App folders and files on Arduino UNO Q
  • Paste the sketch: Copy the MCU code above and paste it into sketch/sketch.ino. Keep other files as default.
  • No library required — the LM35 uses only the built-in analogRead() function.
  • Upload: Click the Run button in Arduino App Lab.
Click Run button in Arduino App Lab on Arduino UNO Q
  • Hold the sensor in your hand — watch the temperature rise in the console.

App Lab Console Output

DIYables_Apps
Stop
sketch.ino
1#include "Arduino_RouterBridge.h"
Serial Monitor
Python
Message (Enter to send a message to "Newbiely" on usb(2820070321))
New Line
9600 baud
[2026-04-29 09:00:01] Arduino UNO Q LM35 Temperature Sensor ready [2026-04-29 09:00:02] Temperature: 26.31°C = 79.36°F [2026-04-29 09:00:03] Temperature: 26.44°C = 79.59°F [2026-04-29 09:00:04] Temperature: 26.87°C = 80.37°F [2026-04-29 09:00:05] Temperature: 27.25°C = 81.05°F

Bridge: Linux + MCU

This section shows how to program both processors of the Arduino UNO Q so the Linux side can read LM35 temperature via Bridge:

  • The LM35 sensor is connected to the MCU (STM32) analog pin — the MCU reads and converts the ADC value every second
  • The MPU cannot access the analog pin directly — it must call Bridge functions to retrieve readings
  • The MPU has Wi-Fi — running full Debian Linux, it can log data, publish to dashboards, or send alerts over the Internet
  • Arduino_RouterBridge enables RPC communication between the two processors
  • ⚠️ /dev/ttyHS1 (Linux) and Serial1 (MCU) are RESERVED by the router — never open them in user code

In short: MCU reads LM35 every second via 12-bit ADC → MPU reads temperature via Bridge → MPU publishes or alerts over Wi-Fi.

MCU Code (Bridge)

/* * This Arduino UNO Q code was developed by newbiely.com * * This Arduino UNO Q code is made available for public use without any restriction * * For comprehensive instructions and wiring diagrams, please visit: * https://newbiely.com/tutorials/arduino-uno-q/arduino-uno-q-lm35-temperature-sensor */ // COPYRIGHT newbiely.com // AUTHOR: newbiely // This code is made available for public use without restriction. // For complete instructions, tutorials, and further information, visit: // https://newbiely.com/tutorials/arduino-uno-q/arduino-uno-q-lm35-temperature-sensor // Arduino UNO Q MCU (STM32U585) uses a 12-bit ADC (0–4095) with a 3.3V reference #include "Arduino_RouterBridge.h" #define ADC_VREF_mV 3300.0 #define ADC_RESOLUTION 4096.0 #define PIN_LM35 A0 float last_temp_c = 0.0; float last_temp_f = 0.0; unsigned long last_read_ms = 0; void read_lm35() { int adcVal = analogRead(PIN_LM35); float milliVolt = adcVal * (ADC_VREF_mV / ADC_RESOLUTION); last_temp_c = milliVolt / 10.0; last_temp_f = last_temp_c * 9.0 / 5.0 + 32.0; } String get_temp_c(String arg) { return String(last_temp_c, 2); } String get_temp_f(String arg) { return String(last_temp_f, 2); } String get_status(String arg) { return "Temp: " + String(last_temp_c, 2) + "°C / " + String(last_temp_f, 2) + "°F"; } void setup() { Bridge.begin(); Monitor.begin(); read_lm35(); Bridge.provide("get_temp_c", get_temp_c); Bridge.provide("get_temp_f", get_temp_f); Bridge.provide("get_status", get_status); Monitor.println("Arduino UNO Q LM35 Temperature Sensor Bridge ready"); } void loop() { unsigned long now = millis(); if (now - last_read_ms >= 1000) { last_read_ms = now; read_lm35(); Monitor.println("Temp: " + String(last_temp_c, 2) + "°C / " + String(last_temp_f, 2) + "°F"); } }

Python Code (Bridge)

/* * This Arduino UNO Q code was developed by newbiely.com * * This Arduino UNO Q code is made available for public use without any restriction * * For comprehensive instructions and wiring diagrams, please visit: * https://newbiely.com/tutorials/arduino-uno-q/arduino-uno-q-lm35-temperature-sensor */ # COPYRIGHT newbiely.com # AUTHOR: newbiely # This code is made available for public use without restriction. # For complete instructions, tutorials, and further information, visit: # https://newbiely.com/tutorials/arduino-uno-q/arduino-uno-q-lm35-temperature-sensor from arduino.app_utils import * import time def loop(): temp_c = Bridge.call("get_temp_c") temp_f = Bridge.call("get_temp_f") print(f"Temperature: {temp_c}°C = {temp_f}°F") time.sleep(1) App.run(user_loop=loop)

Detailed Instructions

  • Connect: Wire the LM35 sensor to the Arduino UNO Q as shown in the wiring diagram.
  • Open Arduino App Lab: Launch Arduino App Lab and wait for the board to be detected.
  • Create a new App: Click Create New App, name it Lm35TemperatureSensorBridge, then click Create.
  • Paste the MCU sketch: Copy the MCU Bridge code above and paste it into sketch/sketch.ino.
  • Paste the Python code: Copy the Python Bridge code above and paste it into the Python file in the App.
  • Install the library: Click the Add sketch library button (the open book icon with a + sign) in the left sidebar.
Add sketch library in Arduino App Lab on Arduino UNO Q
  • Search for Arduino_RouterBridge created by Arduino and click the Install button.
My Apps / DIYables Apps
Run
Bricks
No bricks added...
Sketch Libraries
No sketch libra...
Files
python
sketch
.gitignore
README.md
app.yaml
sketch.ino
Add sketch library
Arduino_RouterBridge Arduino

This library provides a simple RPC bridge for Arduino UNO Q boards, allowing communication between the board and other devices using MsgPack serialization.

0.4.1
Install
More Info
  • Upload: Click the Run button in Arduino App Lab.
Click Run button in Arduino App Lab on Arduino UNO Q
  • Watch temperature readings appear in the Python console every second.

App Lab Console Output

DIYables_Apps
Stop
sketch.ino
1#include "Arduino_RouterBridge.h"
Serial Monitor
Python
Message (Enter to send a message to "Newbiely" on usb(2820070321))
New Line
9600 baud
[2026-04-29 09:00:01] Arduino UNO Q LM35 Temperature Sensor Bridge ready [2026-04-29 09:00:02] Temp: 26.31°C / 79.36°F [2026-04-29 09:00:03] Temp: 26.44°C / 79.59°F [2026-04-29 09:00:04] Temp: 26.87°C / 80.37°F
DIYables_Apps
Stop
sketch.ino
1#include "Arduino_RouterBridge.h"
Serial Monitor
Python
[2026-04-29 09:00:02] Temperature: 26.31°C = 79.36°F [2026-04-29 09:00:03] Temperature: 26.44°C = 79.59°F [2026-04-29 09:00:04] Temperature: 26.87°C = 80.37°F [2026-04-29 09:00:05] Temperature: 27.25°C = 81.05°F

Telegram

Monitor LM35 temperature remotely and receive automatic Telegram alerts when temperature rises above 35°C.

MCU sketch: Keep the same MCU sketch from the previous Bridge section.

Python Code (Telegram)

/* * This Arduino UNO Q code was developed by newbiely.com * * This Arduino UNO Q code is made available for public use without any restriction * * For comprehensive instructions and wiring diagrams, please visit: * https://newbiely.com/tutorials/arduino-uno-q/arduino-uno-q-lm35-temperature-sensor */ # COPYRIGHT newbiely.com # AUTHOR: newbiely # This code is made available for public use without restriction. # For complete instructions, tutorials, and further information, visit: # https://newbiely.com/tutorials/arduino-uno-q/arduino-uno-q-lm35-temperature-sensor from arduino.app_utils import * import requests import time TELEGRAM_BOT_TOKEN = "YOUR_TELEGRAM_BOT_TOKEN" CHAT_ID = "YOUR_CHAT_ID" last_update_id = 0 ALERT_THRESHOLD_C = 35.0 alert_sent = False def get_updates(): global last_update_id url = f"https://api.telegram.org/bot{TELEGRAM_BOT_TOKEN}/getUpdates" params = {"offset": last_update_id + 1, "timeout": 5} try: response = requests.get(url, params=params, timeout=10) data = response.json() if data["ok"]: return data["result"] except Exception as e: print(f"Error getting updates: {e}") return [] def send_message(chat_id, text): url = f"https://api.telegram.org/bot{TELEGRAM_BOT_TOKEN}/sendMessage" payload = {"chat_id": chat_id, "text": text} try: requests.post(url, data=payload, timeout=10) except Exception as e: print(f"Error sending message: {e}") def loop(): global alert_sent # Auto-alert on high temperature temp_c_str = Bridge.call("get_temp_c") try: temp_c = float(temp_c_str) if temp_c > ALERT_THRESHOLD_C and not alert_sent: alert_sent = True temp_f = Bridge.call("get_temp_f") msg = f"⚠️ High temperature alert: {temp_c_str}°C / {temp_f}°F" print(msg) send_message(CHAT_ID, msg) elif temp_c <= ALERT_THRESHOLD_C: alert_sent = False except ValueError: pass # Handle Telegram commands updates = get_updates() for update in updates: last_update_id = update["update_id"] if "message" not in update: continue message = update["message"] chat_id = message["chat"]["id"] text = message.get("text", "").strip() print(f"Received: {text}") if text == "/start": send_message(chat_id, "Arduino UNO Q LM35 Temperature Sensor Bot\n" "/temp - Read temperature (°C and °F)\n" "/tempC - Read temperature in Celsius\n" "/tempF - Read temperature in Fahrenheit\n" "/status - Get sensor status") elif text == "/temp": temp_c = Bridge.call("get_temp_c") temp_f = Bridge.call("get_temp_f") send_message(chat_id, f"Temperature: {temp_c}°C = {temp_f}°F") elif text == "/tempC": result = Bridge.call("get_temp_c") send_message(chat_id, f"Temperature: {result}°C") elif text == "/tempF": result = Bridge.call("get_temp_f") send_message(chat_id, f"Temperature: {result}°F") elif text == "/status": result = Bridge.call("get_status") send_message(chat_id, result) else: send_message(chat_id, "Unknown command. Send /start for help.") time.sleep(1) App.run(user_loop=loop)

Detailed Instructions

  • Replace YOUR_TELEGRAM_BOT_TOKEN with your actual bot token from BotFather.
  • Replace YOUR_CHAT_ID with your Telegram chat ID.
  • Paste this Python code into your App's Python file (keep the same MCU sketch).
  • Click the Run button. Send /temp from Telegram or hold the sensor to trigger the high-temperature alert.

App Lab Console Output

DIYables_Apps
Stop
sketch.ino
1#include "Arduino_RouterBridge.h"
Serial Monitor
Python
[2026-04-29 09:10:00] Waiting for Telegram messages... [2026-04-29 09:10:15] ⚠️ High temperature alert: 36.25°C / 97.25°F [2026-04-29 09:10:30] Received: /temp [2026-04-29 09:10:45] Received: /tempC
Telegram
Telegram 12:45
Welcome to Telegram!
ArduinoBot 10:19
Chatting with Arduino...
telegram-botfather
BotFather Yesterday
Your bot has been created.

ArduinoBot

bot
Today
/temp
10:15 AM ✓✓
Temperature: 26.31°C = 79.36°F
10:16 AM
/tempC
10:17 AM ✓✓
Temperature: 26.31°C
10:18 AM
/tempF
10:19 AM ✓✓
Temperature: 79.36°F
10:20 AM
/status
10:21 AM ✓✓
Temp: 26.31°C / 79.36°F
10:22 AM
⚠️ High temperature alert: 36.25°C / 97.25°F
10:23 AM

OpenClaw

...OPENCLAW

OpenClaw support for Arduino UNO Q LM35 Temperature Sensor is coming soon.

...OPENCLAW

Project Ideas

You can build many useful projects with the LM35 and Arduino UNO Q:

  • Analog Temperature Monitor: The LM35's continuous analog output and the MCU's 12-bit ADC give smooth, high-resolution readings — log every second and identify micro-temperature trends
  • Overheating Protector: Use the LM35 to monitor a device (motor, circuit) — the MCU triggers a relay via Bridge when temperature exceeds a safe limit, and Telegram notifies you
  • Multi-Zone Temperature Survey: Connect multiple LM35 sensors to different analog pins — the Python side queries each via Bridge and displays a side-by-side temperature comparison
  • Calibrated Thermometer: Use the LM35's factory accuracy (±0.5°C) to build a precise digital thermometer with Telegram commands for on-demand readings
  • Temperature-Based Fan Speed Controller: Map the LM35 ADC reading directly to a PWM output value on the MCU to control fan speed — the Python side can monitor the fan duty cycle via Bridge

Challenge Yourself

Ready to go further with the LM35 on Arduino UNO Q? Try these challenges:

  • Easy: Add a moving average filter in the MCU sketch that averages the last 10 ADC readings before computing temperature — this reduces noise in the output.
  • Medium: Compare LM35 and DS18B20 readings side by side: connect both sensors and add a compare_sensors(String) Bridge function that returns both readings in a single response for easy comparison.
  • Advanced: Build a calibration tool: take 100 LM35 readings over 10 seconds, compute mean and standard deviation, and return them as a JSON string via a get_stats(String) Bridge function — Python displays and logs the calibration results.

※ OUR MESSAGES

  • As freelancers, We are AVAILABLE for HIRE. See how to outsource your project to us
  • Please feel free to share the link of this tutorial. However, Please do not use our content on any other websites. We invested a lot of effort and time to create the content, please respect our work!