Arduino UNO Q - RFID

RFID (Radio Frequency Identification) lets you read a unique ID from a tag or card wirelessly — no contact required. On Arduino UNO Q, the MFRC522 (RC522) module connects over SPI to the MCU. With Bridge and Telegram, you can receive instant notifications on your phone when a tag is scanned.

In this tutorial, you will learn:

Arduino UNO Q RFID RC522

Hardware Preparation

1×Arduino UNO Q
1×USB Cable for Arduino Uno Q
1×RFID/NFC RC522 Kit (reader + tags)
1×Jumper Wires
1×Recommended: Screw Terminal Block Shield for Arduino Uno
1×Recommended: Sensors/Servo Expansion Shield for Arduino Uno
1×Recommended: Breadboard Shield for Arduino Uno
1×Recommended: Enclosure for Arduino Uno
1×Recommended: Prototyping Base Plate & Breadboard Kit for Arduino UNO

Or you can buy the following kits:

1×DIYables Sensor Kit (18 sensors/displays)
Disclosure: Some of the links provided in this section are Amazon affiliate links. We may receive a commission for any purchases made through these links at no additional cost to you.
Additionally, some of these links are for products from our own brand, DIYables .

Overview of the RFID-RC522 Module

Pinout

The RC522 has 8 pins. In this tutorial, we use SPI communication:

  • GND: Connect to GND
  • VCC: Connect to 3.3V (⚠️ NOT 5V — may damage the module)
  • RST: Reset pin — connect to MCU digital pin
  • IRQ: Interrupt pin — not connected in this tutorial
  • MISO/SCL/TX: MISO line (SPI)
  • MOSI: MOSI line (SPI)
  • SCK: Clock line (SPI)
  • SS/SDA/RX: Slave Select (SPI)
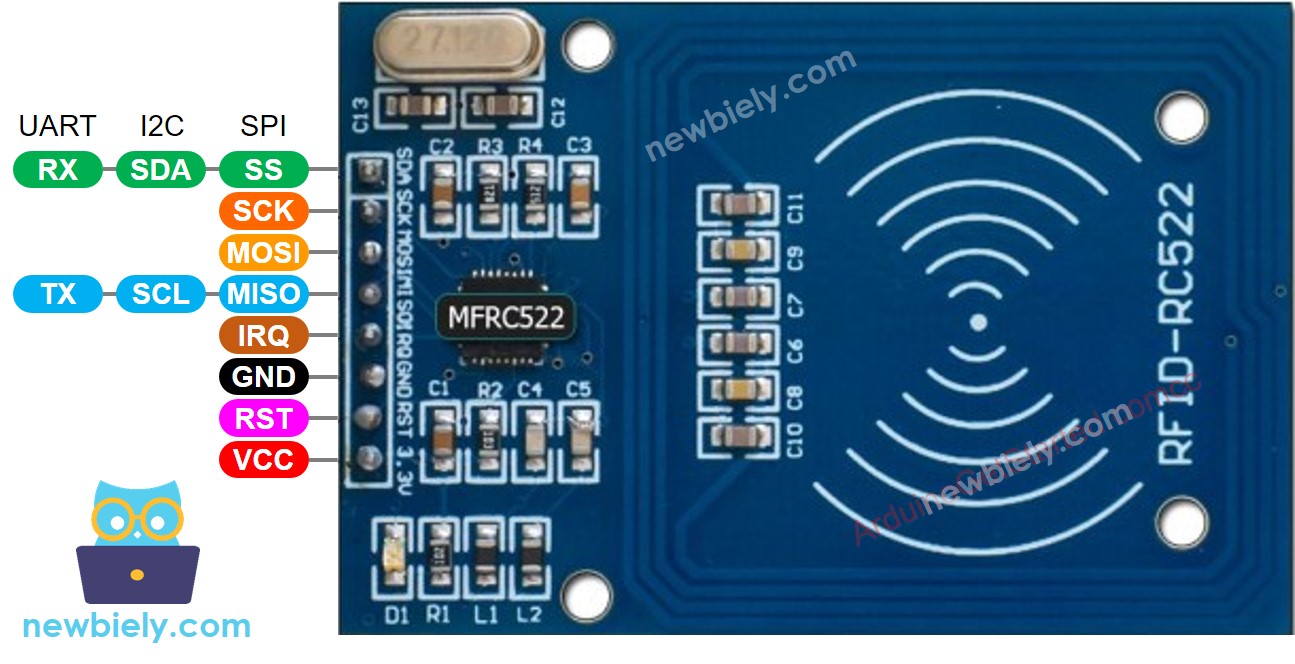
RFID-RC522 Pinout

※ NOTE THAT:

  • Pin arrangement may vary by manufacturer — always follow the labels on the module itself.
  • Do NOT connect VCC to 5V — this may permanently damage the RC522 module.
  • The MFRC522 library uses SPI mode only.

How RFID/NFC Works

RFID has two parts: a reader and a tag:

  • The reader generates an electromagnetic field via its antenna
  • The tag is passive (no battery) — it draws power from the field and transmits its stored UID back to the reader
RFID reader and tag

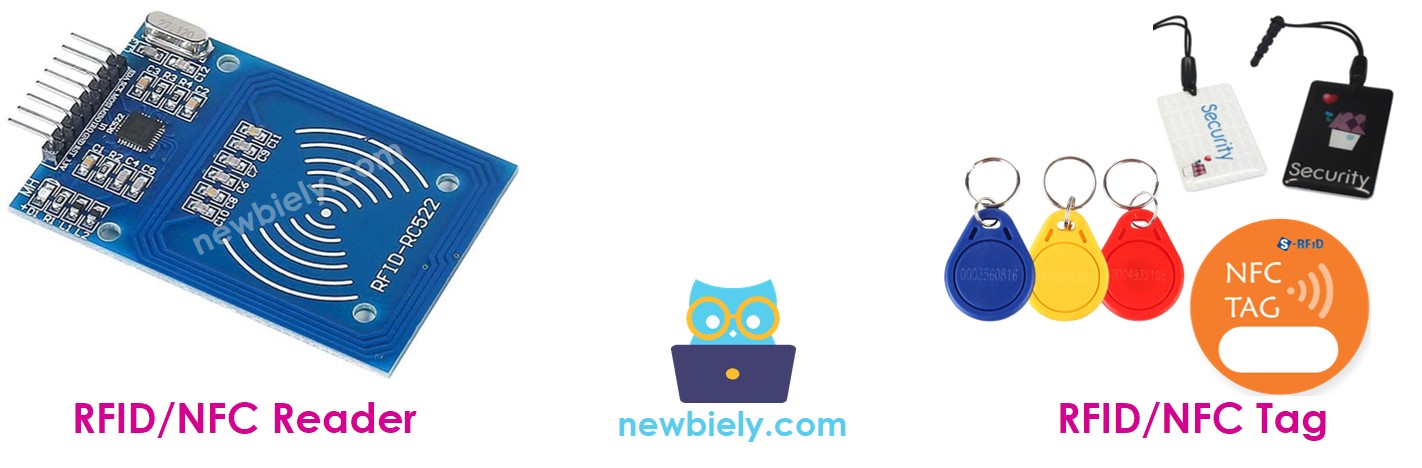
The MCU receives the UID bytes from the reader and can act on them — e.g., grant access if the UID matches an authorized list.

Wiring Diagram

The wiring diagram between Arduino UNO Q RFID RC522

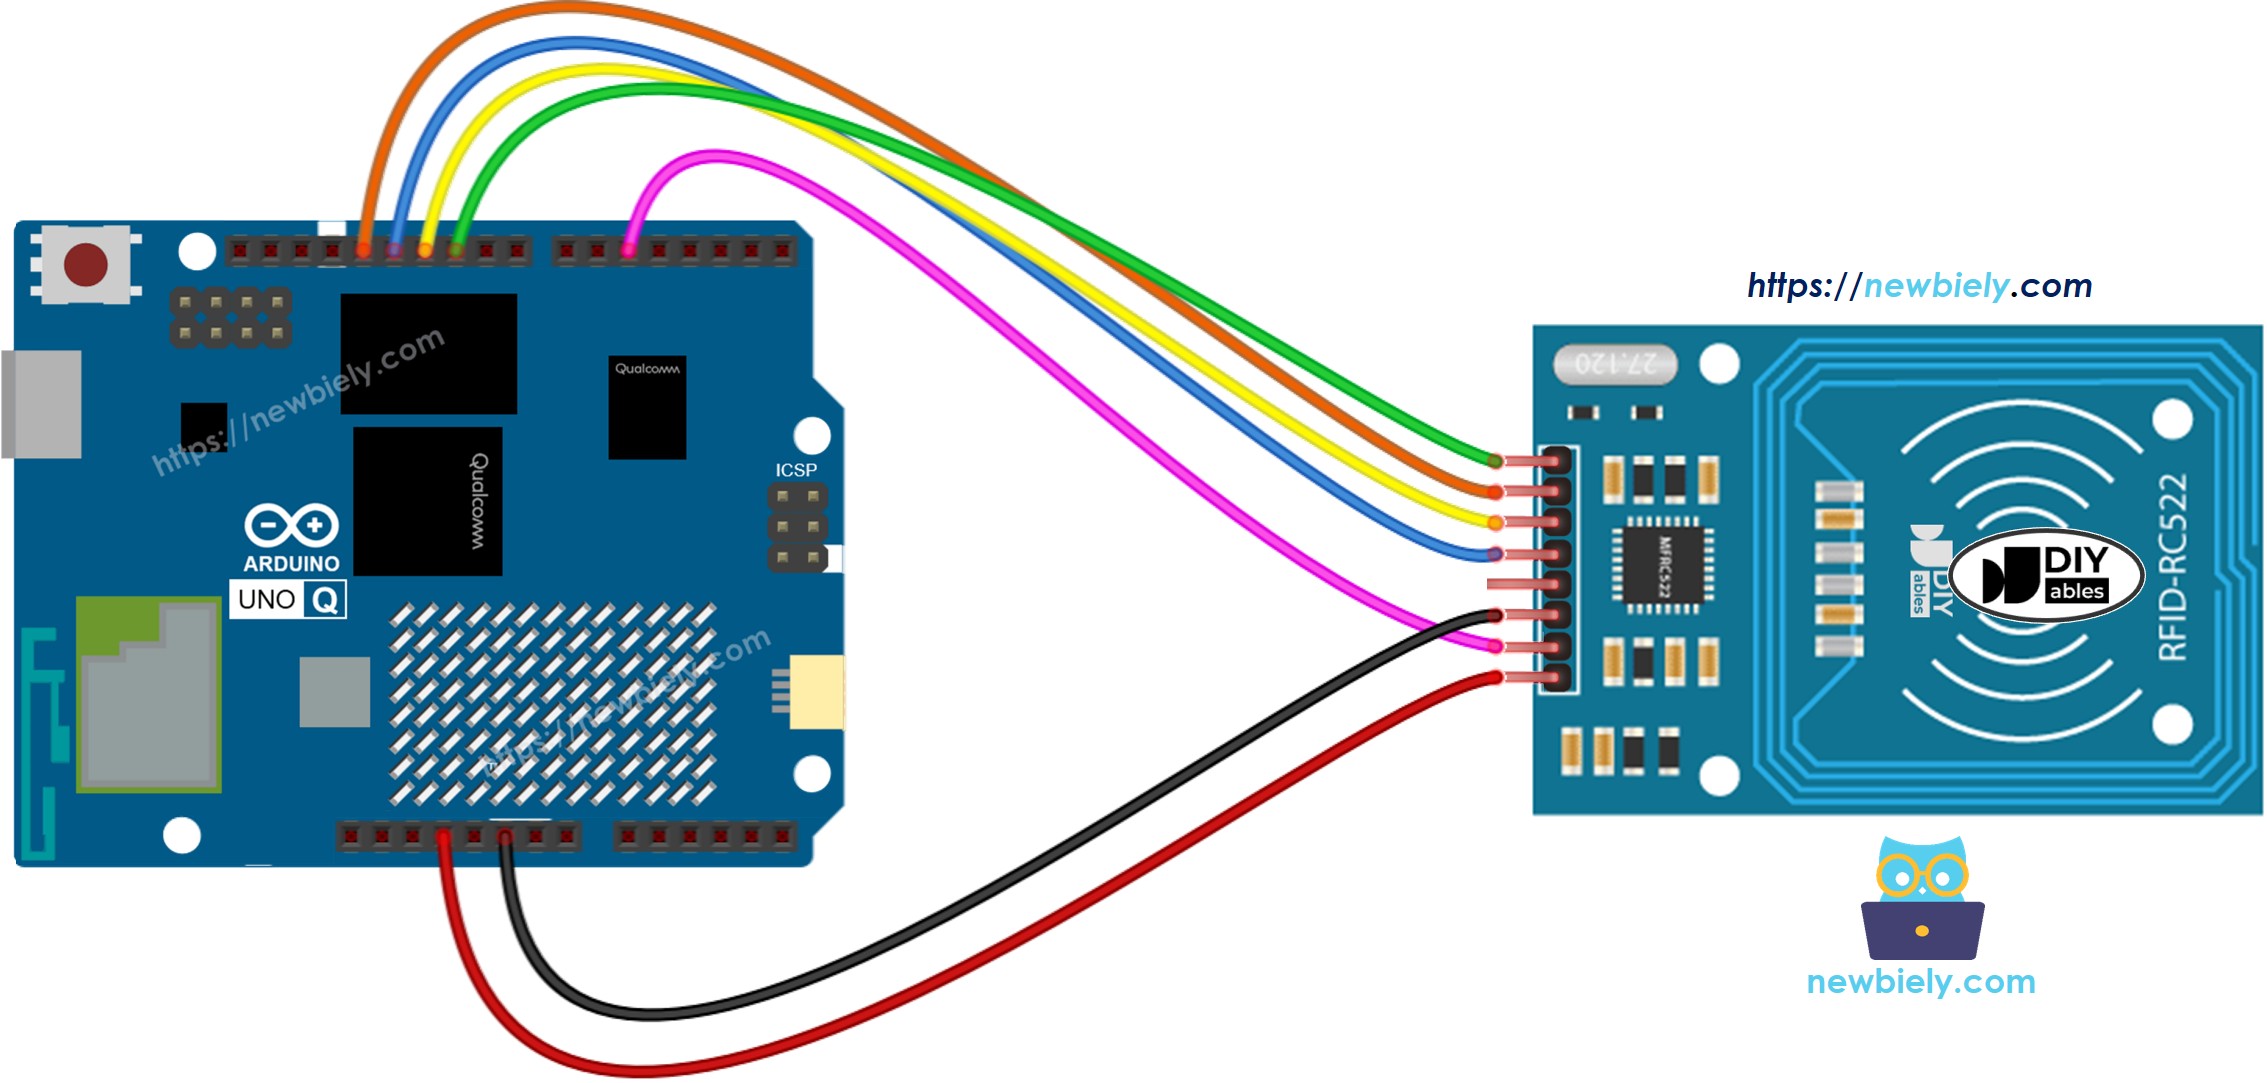
This image is created using Fritzing. Click to enlarge image

RC522 Pin Arduino UNO Q MCU
GND GND
VCC 3.3V
RST D5
IRQ (not connected)
MISO D12 (MISO)
MOSI D11 (MOSI)
SCK D13 (SCK)
SS D10 (SS)

How To Program For RFID

  • Initialize SPI and MFRC522:
SPI.begin(); rfid.PCD_Init();
  • Detect and read a tag in loop():
if (rfid.PICC_IsNewCardPresent() && rfid.PICC_ReadCardSerial()) { // rfid.uid.uidByte[] contains the UID bytes // rfid.uid.size is the number of bytes rfid.PICC_HaltA(); rfid.PCD_StopCrypto1(); }

Arduino UNO Q Code

The Arduino UNO Q has two processors working together:

  • The STM32 MCU communicates with the RC522 over SPI and reads tag UIDs in loop()
  • The Qualcomm MPU runs Debian Linux and handles Wi-Fi, Python, and cloud connectivity
  • In this section, only the MCU is programmed — the Linux side stays idle. A later section shows how both processors work together via Bridge.
/* * This Arduino UNO Q code was developed by newbiely.com * * This Arduino UNO Q code is made available for public use without any restriction * * For comprehensive instructions and wiring diagrams, please visit: * https://newbiely.com/tutorials/arduino-uno-q/arduino-uno-q-rfid */ // COPYRIGHT newbiely.com // AUTHOR: newbiely // This code is made available for public use without restriction. // For complete instructions, tutorials, and further information, visit: // https://newbiely.com/tutorials/arduino-uno-q/arduino-uno-q-rfid #include <SPI.h> #include <MFRC522.h> #define SS_PIN 10 // The Arduino UNO Q MCU pin connected to SS of RC522 #define RST_PIN 5 // The Arduino UNO Q MCU pin connected to RST of RC522 MFRC522 rfid(SS_PIN, RST_PIN); void setup() { Serial.begin(9600); SPI.begin(); rfid.PCD_Init(); Serial.println("Arduino UNO Q RFID ready"); Serial.println("Tap RFID/NFC tag on reader"); } void loop() { if (rfid.PICC_IsNewCardPresent()) { if (rfid.PICC_ReadCardSerial()) { Serial.print("UID:"); for (int i = 0; i < rfid.uid.size; i++) { Serial.print(rfid.uid.uidByte[i] < 0x10 ? " 0" : " "); Serial.print(rfid.uid.uidByte[i], HEX); } Serial.println(); rfid.PICC_HaltA(); rfid.PCD_StopCrypto1(); } } }

Detailed Instructions

First time with Arduino UNO Q? Follow the Getting Started with Arduino UNO Q tutorial before proceeding.

  • Connect: Wire the RC522 to the Arduino UNO Q MCU as shown in the wiring diagram.
  • Open Arduino App Lab: Launch Arduino App Lab and wait until it detects your Arduino UNO Q.
  • Create a new App: Click the Create New App button.
Create New App in Arduino App Lab on Arduino UNO Q
  • Give the App a name, for example: RC522RFID
  • Click Create to confirm.
Arduino App Lab App folders and files on Arduino UNO Q
  • Paste the sketch: Copy the MCU code above and paste it into sketch/sketch.ino. Keep other files as default.
  • Install the library: Click the Add sketch library button (the open book icon with a + sign) in the left sidebar.
Add sketch library in Arduino App Lab on Arduino UNO Q
  • Search for MFRC522 created by GithubCommunity and click the Install button.
My Apps / DIYables Apps
Run
Bricks
No bricks added...
Sketch Libraries
No sketch libra...
Files
python
sketch
.gitignore
README.md
app.yaml
sketch.ino
Add sketch library
MFRC522 GithubCommunity

Read/Write a RFID Card or Tag using the ISO/IEC 14443A/MIFARE interface.

1.4.11
Install
More Info
  • Upload: Click the Run button in Arduino App Lab.
Click Run button in Arduino App Lab on Arduino UNO Q
  • Tap an RFID/NFC tag on the reader and observe the UID printed in the Serial Monitor.

App Lab Console Output

DIYables_Apps
Stop
sketch.ino
1#include "Arduino_RouterBridge.h"
Serial Monitor
Python
Message (Enter to send a message to "Newbiely" on usb(2820070321))
New Line
9600 baud
[2026-04-29 09:00:01] Arduino UNO Q RFID ready [2026-04-29 09:00:01] Tap RFID/NFC tag on reader [2026-04-29 09:00:05] UID: 3A C9 6A CB [2026-04-29 09:00:08] UID: 04 64 34 5A 1E 4E 80

Bridge: Linux + MCU

This section shows how to program both processors of the Arduino UNO Q so the Linux side can receive tag scan events and read UIDs via Bridge:

  • The RC522 RFID reader is connected to the MCU via SPI — the MCU scans for tags in loop() and sets an event flag when a tag is detected
  • The MPU cannot read the RC522 directly — it calls Bridge functions to poll for tag events and read the last UID
  • The MPU has Wi-Fi — running full Debian Linux, it can send Telegram notifications when a tag is scanned
  • Arduino_RouterBridge enables RPC communication between the two processors
  • ⚠️ /dev/ttyHS1 (Linux) and Serial1 (MCU) are RESERVED by the router — never open them in user code

In short: MCU detects tag in loop() → sets event flag → MPU polls Bridge → MPU sends Telegram alert.

MCU Code (Bridge)

/* * This Arduino UNO Q code was developed by newbiely.com * * This Arduino UNO Q code is made available for public use without any restriction * * For comprehensive instructions and wiring diagrams, please visit: * https://newbiely.com/tutorials/arduino-uno-q/arduino-uno-q-rfid */ // COPYRIGHT newbiely.com // AUTHOR: newbiely // This code is made available for public use without restriction. // For complete instructions, tutorials, and further information, visit: // https://newbiely.com/tutorials/arduino-uno-q/arduino-uno-q-rfid #include "Arduino_RouterBridge.h" #include <SPI.h> #include <MFRC522.h> #define SS_PIN 10 // The Arduino UNO Q MCU pin connected to SS of RC522 #define RST_PIN 5 // The Arduino UNO Q MCU pin connected to RST of RC522 MFRC522 rfid(SS_PIN, RST_PIN); String last_uid = "none"; bool tag_event = false; String get_uid(String arg) { return last_uid; } String get_event(String arg) { if (tag_event) { tag_event = false; return last_uid; } return "none"; } void setup() { Bridge.begin(); Monitor.begin(); SPI.begin(); rfid.PCD_Init(); Bridge.provide("get_uid", get_uid); Bridge.provide("get_event", get_event); Monitor.println("Arduino UNO Q RFID Bridge ready"); Monitor.println("Tap RFID/NFC tag on reader"); } void loop() { if (rfid.PICC_IsNewCardPresent()) { if (rfid.PICC_ReadCardSerial()) { last_uid = ""; for (int i = 0; i < rfid.uid.size; i++) { if (i > 0) last_uid += ":"; if (rfid.uid.uidByte[i] < 0x10) last_uid += "0"; last_uid += String(rfid.uid.uidByte[i], HEX); } last_uid.toUpperCase(); tag_event = true; Monitor.print("Tag scanned: "); Monitor.println(last_uid); rfid.PICC_HaltA(); rfid.PCD_StopCrypto1(); } } }

Python Code (Bridge)

/* * This Arduino UNO Q code was developed by newbiely.com * * This Arduino UNO Q code is made available for public use without any restriction * * For comprehensive instructions and wiring diagrams, please visit: * https://newbiely.com/tutorials/arduino-uno-q/arduino-uno-q-rfid */ # COPYRIGHT newbiely.com # AUTHOR: newbiely # This code is made available for public use without restriction. # For complete instructions, tutorials, and further information, visit: # https://newbiely.com/tutorials/arduino-uno-q/arduino-uno-q-rfid from arduino.app_utils import * import time def loop(): event = Bridge.call("get_event") if event != "none": print(f"Tag scanned: {event}") time.sleep(0.2) App.run(user_loop=loop)

Detailed Instructions

  • Connect: Wire the RC522 to the Arduino UNO Q as shown in the wiring diagram.
  • Open Arduino App Lab: Launch Arduino App Lab and wait for the board to be detected.
  • Create a new App: Click Create New App, name it RC522RFIDBridge, then click Create.
  • Paste the MCU sketch: Copy the MCU Bridge code above and paste it into sketch/sketch.ino.
  • Paste the Python code: Copy the Python Bridge code above and paste it into the Python file in the App.
  • Upload: Click the Run button in Arduino App Lab.
Click Run button in Arduino App Lab on Arduino UNO Q
  • Tap an RFID/NFC tag — observe the UID in the MCU console and the Python console.

App Lab Console Output

DIYables_Apps
Stop
sketch.ino
1#include "Arduino_RouterBridge.h"
Serial Monitor
Python
Message (Enter to send a message to "Newbiely" on usb(2820070321))
New Line
9600 baud
[2026-04-29 09:00:01] Arduino UNO Q RFID Bridge ready [2026-04-29 09:00:01] Tap RFID/NFC tag on reader [2026-04-29 09:00:05] Tag scanned: 3A:C9:6A:CB [2026-04-29 09:00:10] Tag scanned: 04:64:34:5A:1E:4E:80
DIYables_Apps
Stop
sketch.ino
1#include "Arduino_RouterBridge.h"
Serial Monitor
Python
[2026-04-29 09:00:05] Tag scanned: 3A:C9:6A:CB [2026-04-29 09:00:10] Tag scanned: 04:64:34:5A:1E:4E:80

Telegram

Receive instant Telegram notifications when an RFID/NFC tag is scanned on the Arduino UNO Q.

MCU sketch: Keep the same MCU sketch from the previous Bridge section.

Python Code (Telegram)

/* * This Arduino UNO Q code was developed by newbiely.com * * This Arduino UNO Q code is made available for public use without any restriction * * For comprehensive instructions and wiring diagrams, please visit: * https://newbiely.com/tutorials/arduino-uno-q/arduino-uno-q-rfid */ # COPYRIGHT newbiely.com # AUTHOR: newbiely # This code is made available for public use without restriction. # For complete instructions, tutorials, and further information, visit: # https://newbiely.com/tutorials/arduino-uno-q/arduino-uno-q-rfid from arduino.app_utils import * import requests import time TELEGRAM_BOT_TOKEN = "YOUR_TELEGRAM_BOT_TOKEN" CHAT_ID = "YOUR_CHAT_ID" last_update_id = 0 def get_updates(): global last_update_id url = f"https://api.telegram.org/bot{TELEGRAM_BOT_TOKEN}/getUpdates" params = {"offset": last_update_id + 1, "timeout": 5} try: response = requests.get(url, params=params, timeout=10) data = response.json() if data["ok"]: return data["result"] except Exception as e: print(f"Error getting updates: {e}") return [] def send_message(chat_id, text): url = f"https://api.telegram.org/bot{TELEGRAM_BOT_TOKEN}/sendMessage" payload = {"chat_id": chat_id, "text": text} try: requests.post(url, data=payload, timeout=10) except Exception as e: print(f"Error sending message: {e}") def loop(): # Check for new RFID tag scan event event = Bridge.call("get_event") if event != "none": print(f"Tag scanned: {event}") send_message(CHAT_ID, f"🏷️ RFID tag scanned!\nUID: {event}") # Check for Telegram commands updates = get_updates() for update in updates: last_update_id = update["update_id"] if "message" not in update: continue message = update["message"] chat_id = message["chat"]["id"] text = message.get("text", "").strip() print(f"Received: {text}") if text == "/start": send_message(chat_id, "Arduino UNO Q RFID Bot\n" "/uid - Read the last scanned tag UID\n" "Tap a tag on the reader to receive an automatic notification") elif text == "/uid": result = Bridge.call("get_uid") send_message(chat_id, f"Last UID: {result}") else: send_message(chat_id, "Unknown command. Send /start for help.") time.sleep(0.2) App.run(user_loop=loop)

Detailed Instructions

  • Replace YOUR_TELEGRAM_BOT_TOKEN with your actual bot token from BotFather.
  • Replace YOUR_CHAT_ID with your Telegram chat ID.
  • Paste this Python code into your App's Python file (keep the same MCU sketch).
  • Click the Run button. Tap a tag — receive the Telegram notification instantly.

App Lab Console Output

DIYables_Apps
Stop
sketch.ino
1#include "Arduino_RouterBridge.h"
Serial Monitor
Python
[2026-04-29 09:10:00] Waiting for Telegram messages... [2026-04-29 09:10:05] Tag scanned: 3A:C9:6A:CB [2026-04-29 09:10:12] Received: /uid
Telegram
Telegram 12:45
Welcome to Telegram!
ArduinoBot 10:19
Chatting with Arduino...
telegram-botfather
BotFather Yesterday
Your bot has been created.

ArduinoBot

bot
Today
/uid
10:15 AM ✓✓
Last UID: 3A:C9:6A:CB
10:16 AM
🏷️ RFID tag scanned!
10:17 AM
UID: 04:64:34:5A:1E:4E:80
10:18 AM

OpenClaw

...OPENCLAW

OpenClaw support for Arduino UNO Q RFID is coming soon.

...OPENCLAW

Project Ideas

You can build many useful projects with the RFID reader and Arduino UNO Q:

  • Access Control System: Maintain an authorized UID list on the Linux side — when a tag is scanned, compare the UID to the list and use Bridge to unlock an electromagnetic lock if authorized, or send a Telegram alert for unauthorized scans
  • Attendance Tracker: Every time a student or employee scans their RFID card, the MPU logs the UID and timestamp to a CSV file on Linux — send a daily attendance report to Telegram automatically at end of day
  • Telegram Tag Register: Use /register via Telegram to add the last scanned UID to an authorized list — and /list to see all registered UIDs stored in a Python JSON file
  • Smart Locker: Combine RFID with a solenoid lock — each registered tag unlocks a personal locker for 10 seconds, with every access logged and sent to Telegram
  • Library Book Tracking: Attach RFID tags to books — scan on borrow and return, log each event with timestamp and UID to a file on Linux, and query via Telegram to check who has which book

Challenge Yourself

Ready to go further with RFID on Arduino UNO Q? Try these challenges:

  • Easy: Modify the Python code to print "Authorized" if the scanned UID matches a hardcoded string in Python, or "Unauthorized" if it does not — no MCU changes needed.
  • Medium: Build a tag register via Telegram: send /register to add the last scanned UID from Bridge.call("get_uid") to a Python JSON file, and /list to see all registered UIDs — make the access control decision in Python.
  • Advanced: Implement a time-limited access system: each registered UID has an allowed time window (e.g., 08:00–18:00) stored in a JSON file — scans outside the allowed window send a Telegram alert and do not unlock the door, while scans inside unlock the door for 10 seconds.

Learn More

※ OUR MESSAGES

  • As freelancers, We are AVAILABLE for HIRE. See how to outsource your project to us
  • Please feel free to share the link of this tutorial. However, Please do not use our content on any other websites. We invested a lot of effort and time to create the content, please respect our work!