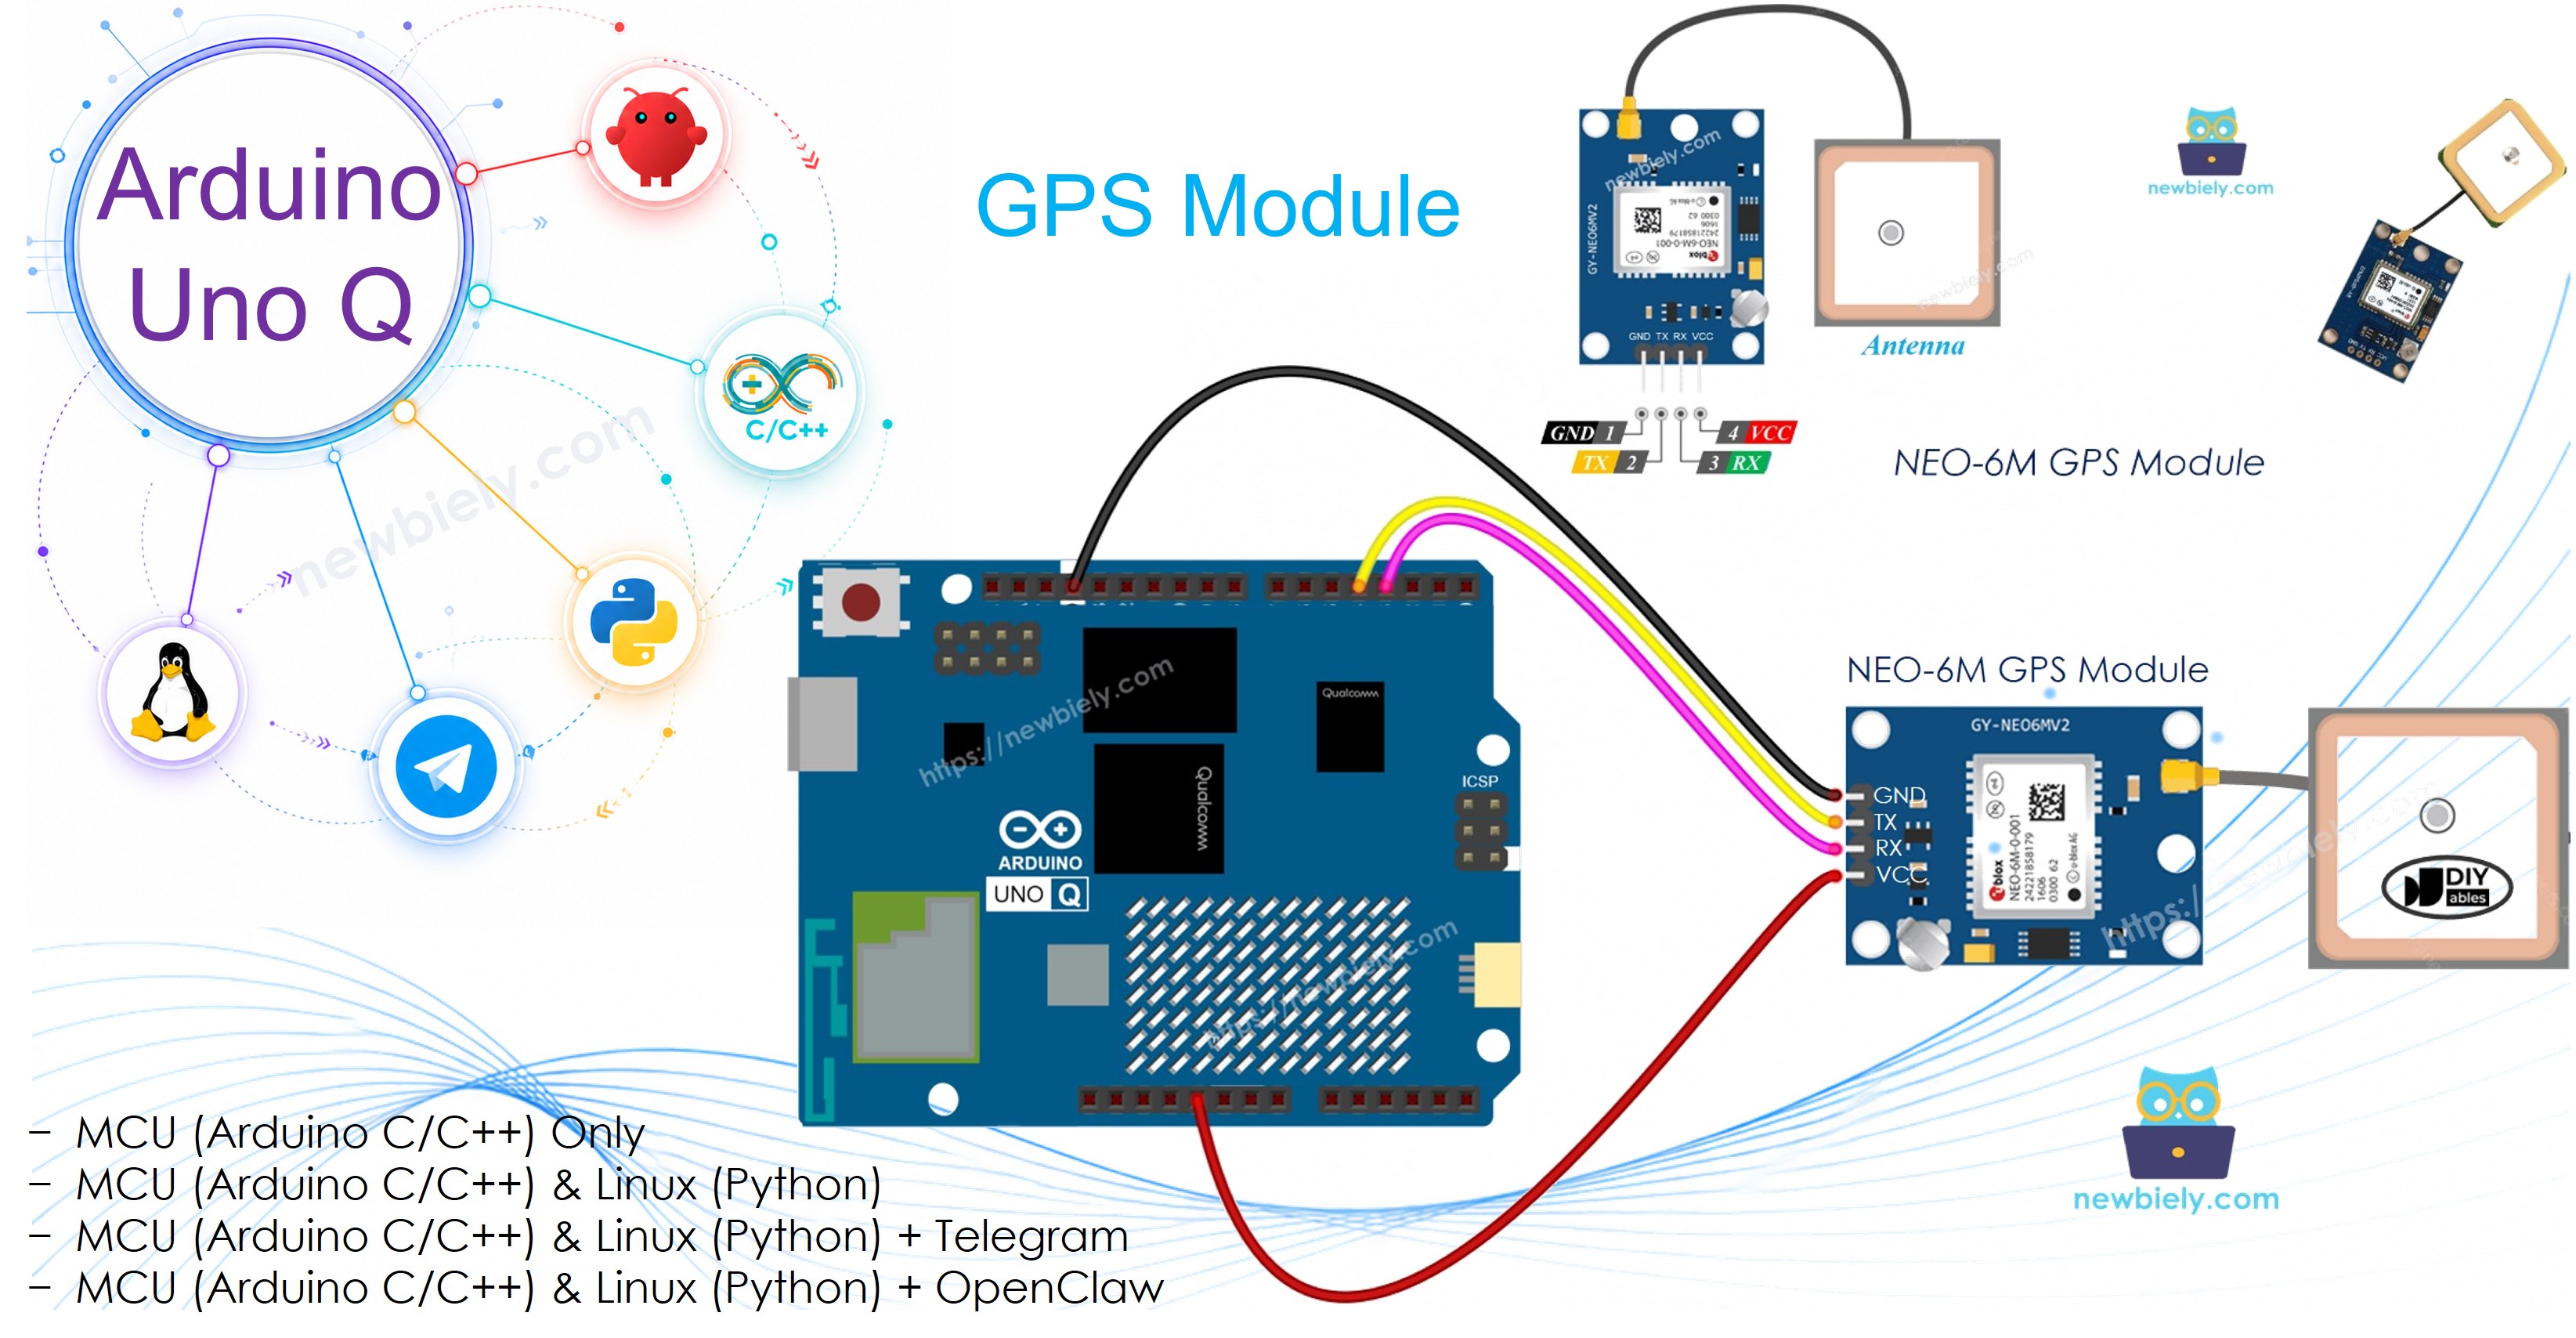
The NEO-6M GPS module provides accurate location, speed, altitude, and time data via NMEA serial output. The Arduino UNO Q MCU parses the GPS data using TinyGPS++, caches the results, and exposes them to the Linux side via Bridge — enabling Google Maps location sharing through Telegram.
In this tutorial, you will learn:
How the NEO-6M GPS module works
How to wire the GPS module to the Arduino UNO Q MCU
How to parse GPS NMEA data with TinyGPS++ on Arduino UNO Q
How to read latitude, longitude, altitude, speed, and date/time
How to use Bridge to expose GPS data to the Linux side (Python)
How to build a GPS tracker that shares your location via Telegram on Arduino UNO Q
How to use OpenClaw on Arduino UNO Q with GPS
※ NOTE THAT:
The GPS module requires an unobstructed view of the sky to acquire a satellite fix. Outdoors is best; near a window may work. First fix may take several minutes.
Disclosure: Some of the links provided in this section are Amazon affiliate links. We may receive a commission for any purchases made through these links at no additional cost to you. Additionally, some of these links are for products from our own brand, DIYables .
Overview of the NEO-6M GPS Module
The NEO-6M is a widely used GPS receiver module that provides NMEA-format data over UART at 9600 baud. It can track up to 22 satellites across 50 channels and delivers position accuracy of around 2.5 meters.
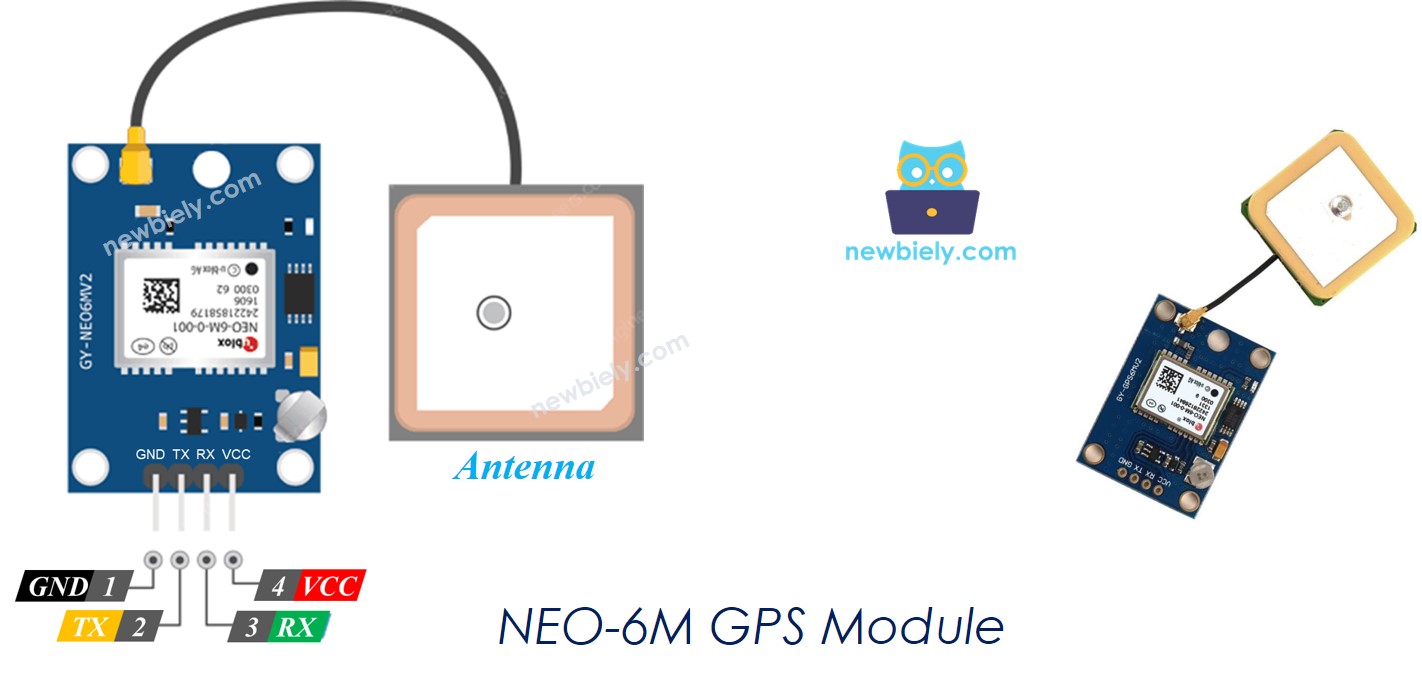
Pinout
VCC pin: Connect to VCC (5V or 3.3V — most modules support both)
GND pin: Connect to GND (0V)
TX pin: Serial output — send GPS NMEA data to the MCU RX pin
RX pin: Serial input — receives optional configuration commands from MCU TX pin
How It Works
The NEO-6M continuously outputs NMEA sentences (e.g., $GPGGA, $GPRMC) at 9600 baud. The Arduino UNO Q MCU reads these sentences, feeds them to the TinyGPS++ library, which parses them into latitude, longitude, altitude, speed, and date/time values.
Blue LED on module: Blinks once per second when a satellite fix is acquired
Wiring Diagram
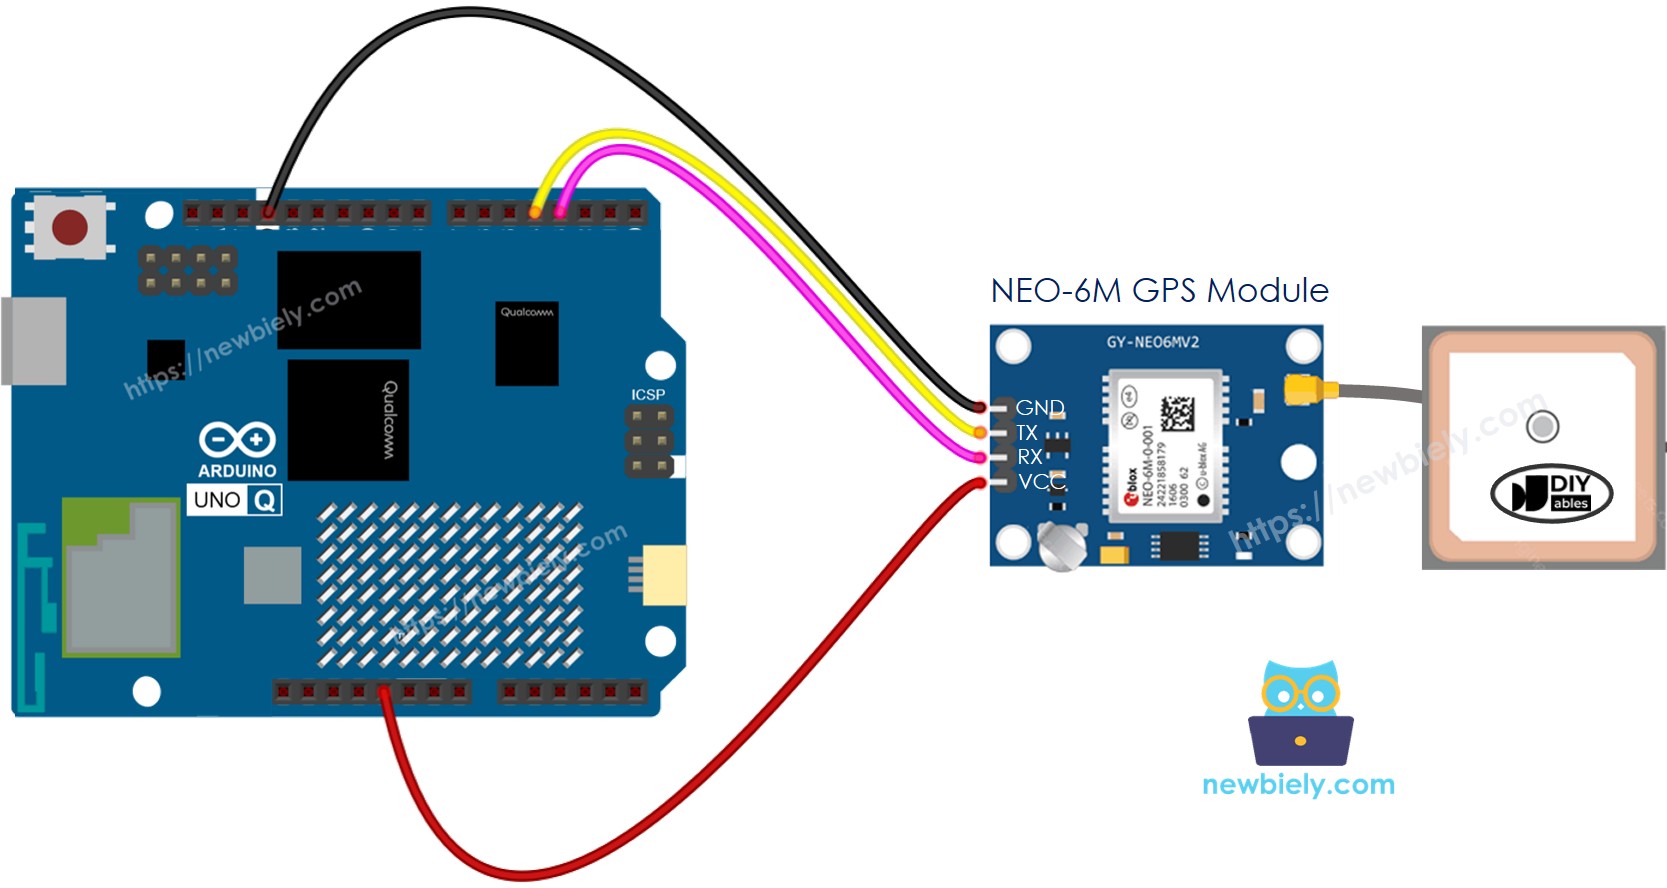
This image is created using Fritzing. Click to enlarge image
NEO-6M GPS Module Pin
Arduino UNO Q MCU
VCC
3.3V
GND
GND
TX
D4 (MCU RX)
RX
D3 (MCU TX)
※ NOTE THAT:
The MCU TX pin (D3) outputs 3.3V signals. This is compatible with the NEO-6M RX pin which accepts 3.3V logic, so no level shifter is needed.
How To Program For GPS
Include the TinyGPS++ library and set up SoftwareSerial:
while (gpsSerial.available() > 0) { gps.encode(gpsSerial.read());}
Read coordinates when a fix is valid:
if (gps.location.isValid()) {double lat = gps.location.lat();double lng = gps.location.lng();}
Arduino UNO Q Code
The Arduino UNO Q has two processors working together:
The STM32 MCU reads GPS NMEA sentences continuously, parses them with TinyGPS++, and prints coordinates, speed, altitude, and date/time to the Serial Monitor
The Qualcomm MPU runs Debian Linux with Wi-Fi — in this section, only the MCU is programmed. A later section shows how both processors work together via Bridge.
/* * This Arduino UNO Q code was developed by newbiely.com * * This Arduino UNO Q code is made available for public use without any restriction * * For comprehensive instructions and wiring diagrams, please visit: * https://newbiely.com/tutorials/arduino-uno-q/arduino-uno-q-gps */// COPYRIGHT newbiely.com// AUTHOR: newbiely// This code is made available for public use without restriction.// For complete instructions, tutorials, and further information, visit:// https://newbiely.com/tutorials/arduino-uno-q/arduino-uno-q-gps#include <TinyGPS++.h>#include <SoftwareSerial.h>#define RX_PIN 4 // The Arduino UNO Q MCU pin connected to TX of the GPS module#define TX_PIN 3 // The Arduino UNO Q MCU pin connected to RX of the GPS moduleTinyGPSPlus gps;SoftwareSerial gpsSerial(RX_PIN, TX_PIN);voidsetup() {Serial.begin(9600); gpsSerial.begin(9600); // NEO-6M default baud rateSerial.println("Arduino UNO Q - NEO-6M GPS Module");}voidloop() {while (gpsSerial.available() > 0) {if (gps.encode(gpsSerial.read())) {if (gps.location.isValid()) {Serial.print("- Latitude : ");Serial.println(gps.location.lat(), 6);Serial.print("- Longitude: ");Serial.println(gps.location.lng(), 6);Serial.print("- Altitude : ");if (gps.altitude.isValid())Serial.println(gps.altitude.meters());elseSerial.println("INVALID"); } else {Serial.println("- Location: INVALID (waiting for fix...)"); }Serial.print("- Speed : ");if (gps.speed.isValid()) {Serial.print(gps.speed.kmph());Serial.println(" km/h"); } else {Serial.println("INVALID"); }Serial.print("- Date/Time: ");if (gps.date.isValid() && gps.time.isValid()) {Serial.print(gps.date.year());Serial.print("-");Serial.print(gps.date.month());Serial.print("-");Serial.print(gps.date.day());Serial.print(" ");Serial.print(gps.time.hour());Serial.print(":");Serial.print(gps.time.minute());Serial.print(":");Serial.println(gps.time.second()); } else {Serial.println("INVALID"); }Serial.println(); } }if (millis() > 5000 && gps.charsProcessed() < 10)Serial.println("No GPS data received: check wiring");}
Connect: Wire the NEO-6M GPS module to the Arduino UNO Q MCU as shown in the wiring diagram.
Take the sensor outside or place it near a window with a clear sky view.
Open Arduino App Lab: Launch Arduino App Lab and wait until it detects your Arduino UNO Q.
Create a new App: Click the Create New App button.
Give the App a name, for example: GPSModule
Click Create to confirm.
Paste the sketch: Copy the MCU code above and paste it into sketch/sketch.ino.
Install the library: Click the Add sketch library button (the open book icon with a + sign) in the left sidebar.
Search for TinyGPSPlus created by Mikal Hart and click the Install button.
My Apps/DIYables Apps
Run
Bricks
No bricks added...
Sketch Libraries
No sketch libra...
Files
python
sketch
.gitignore
README.md
app.yaml
sketch.ino
Add sketch library
TinyGPSPlus
TinyGPSPlusMikal Hart
NMEA is the standard format GPS devices use to report location, time, altitude, etc. TinyGPSPlus is a compact, resilient library that parses the most common NMEA 'sentences' used: GGA and RMC. It can also be customized to extract data from *any* compliant sentence.
1.0.3
Install
More Info
Upload: Click the Run button in Arduino App Lab.
Wait for the GPS module's blue LED to start blinking — this signals a satellite fix has been acquired.
Observe the GPS data in the Serial Monitor.
App Lab Console Output
DIYables_Apps
Stop
sketch.ino
1#include"Arduino_RouterBridge.h"
Serial Monitor
Python
Message (Enter to send a message to "Newbiely" on usb(2820070321))
This section shows how to program both processors of the Arduino UNO Q to expose GPS data to the Linux side via Bridge:
The GPS module is connected to the MCU — the MCU continuously parses NMEA sentences and caches latitude, longitude, altitude, speed, and date/time
The MPU cannot read the GPS UART directly — it calls Bridge functions to get cached GPS values
The MPU has Wi-Fi — running full Debian Linux, it can share your GPS location with a Google Maps link via Telegram
Arduino_RouterBridge enables RPC communication between the two processors
⚠️ /dev/ttyHS1 (Linux) and Serial1 (MCU) are RESERVED by the router — never open them in user code
MCU Code (Bridge)
/* * This Arduino UNO Q code was developed by newbiely.com * * This Arduino UNO Q code is made available for public use without any restriction * * For comprehensive instructions and wiring diagrams, please visit: * https://newbiely.com/tutorials/arduino-uno-q/arduino-uno-q-gps */// COPYRIGHT newbiely.com// AUTHOR: newbiely// This code is made available for public use without restriction.// For complete instructions, tutorials, and further information, visit:// https://newbiely.com/tutorials/arduino-uno-q/arduino-uno-q-gps#include"Arduino_RouterBridge.h"#include <TinyGPS++.h>#include <SoftwareSerial.h>#define RX_PIN 4 // The Arduino UNO Q MCU pin connected to TX of the GPS module#define TX_PIN 3 // The Arduino UNO Q MCU pin connected to RX of the GPS moduleTinyGPSPlus gps;SoftwareSerial gpsSerial(RX_PIN, TX_PIN);// Cached GPS databool cached_valid = false;double cached_lat = 0.0;double cached_lng = 0.0;double cached_alt = 0.0;double cached_speed = 0.0;char cached_datetime[32] = "INVALID";String get_location(String arg) {if (!cached_valid) return"INVALID";char buf[48]; dtostrf(cached_lat, 10, 6, buf);String result = "lat:"; result += buf; dtostrf(cached_lng, 11, 6, buf); result += " lng:"; result += buf;return result;}String get_latitude(String arg) {if (!cached_valid) return"INVALID";char buf[16]; dtostrf(cached_lat, 10, 6, buf);returnString(buf);}String get_longitude(String arg) {if (!cached_valid) return"INVALID";char buf[16]; dtostrf(cached_lng, 11, 6, buf);returnString(buf);}String get_altitude(String arg) {if (!cached_valid || cached_alt == 0.0) return"INVALID";char buf[10]; dtostrf(cached_alt, 6, 1, buf);returnString(buf);}String get_speed(String arg) {if (!cached_valid) return"INVALID";char buf[10]; dtostrf(cached_speed, 6, 2, buf);returnString(buf);}String get_datetime(String arg) {returnString(cached_datetime);}voidsetup() {Bridge.begin(); Monitor.begin(); gpsSerial.begin(9600);Bridge.provide("get_location", get_location);Bridge.provide("get_latitude", get_latitude);Bridge.provide("get_longitude", get_longitude);Bridge.provide("get_altitude", get_altitude);Bridge.provide("get_speed", get_speed);Bridge.provide("get_datetime", get_datetime); Monitor.println("Arduino UNO Q GPS Bridge ready. Waiting for fix...");}voidloop() {while (gpsSerial.available() > 0) {if (gps.encode(gpsSerial.read())) {if (gps.location.isValid()) { cached_valid = true; cached_lat = gps.location.lat(); cached_lng = gps.location.lng();if (gps.altitude.isValid()) cached_alt = gps.altitude.meters();if (gps.speed.isValid()) cached_speed = gps.speed.kmph();if (gps.date.isValid() && gps.time.isValid()) { snprintf(cached_datetime, sizeof(cached_datetime),"%04d-%02d-%02d %02d:%02d:%02d", gps.date.year(), gps.date.month(), gps.date.day(), gps.time.hour(), gps.time.minute(), gps.time.second()); } } } }if (millis() > 5000 && gps.charsProcessed() < 10) Monitor.println("No GPS data received: check wiring");}
Python Code (Bridge)
/* * This Arduino UNO Q code was developed by newbiely.com * * This Arduino UNO Q code is made available for public use without any restriction * * For comprehensive instructions and wiring diagrams, please visit: * https://newbiely.com/tutorials/arduino-uno-q/arduino-uno-q-gps */# COPYRIGHT newbiely.com# AUTHOR: newbiely# This code is made available for public use without restriction.# For complete instructions, tutorials, and further information, visit:# https://newbiely.com/tutorials/arduino-uno-q/arduino-uno-q-gpsfrom arduino.app_utils import *import timedef loop(): location = Bridge.call("get_location") speed = Bridge.call("get_speed") datetime = Bridge.call("get_datetime") altitude = Bridge.call("get_altitude")print(f"Location : {location}")print(f"Speed : {speed} km/h")print(f"Altitude : {altitude} m")print(f"Date/Time: {datetime}")print() time.sleep(2)App.run(user_loop=loop)
Detailed Instructions
Connect: Wire the NEO-6M GPS module to the Arduino UNO Q as shown in the wiring diagram. Place the device near a window with a clear sky view.
Open Arduino App Lab and create a new App named GPSBridge.
Paste the MCU sketch into sketch/sketch.ino.
Paste the Python code into the Python file.
Upload: Click the Run button. Wait for the blue LED on the GPS module to blink.
Observe GPS data appearing in the Python console once a fix is acquired.
App Lab Console Output
DIYables_Apps
Stop
sketch.ino
1#include"Arduino_RouterBridge.h"
Serial Monitor
Python
Message (Enter to send a message to "Newbiely" on usb(2820070321))
New Line
9600 baud
[2026-04-29 09:00:01] Arduino UNO Q GPS Bridge ready. Waiting for fix...
Build a GPS tracker on Arduino UNO Q — send your location with a Google Maps link, speed, altitude, and time via Telegram commands.
MCU sketch: Keep the same MCU sketch from the previous Bridge section.
Python Code (Telegram)
/* * This Arduino UNO Q code was developed by newbiely.com * * This Arduino UNO Q code is made available for public use without any restriction * * For comprehensive instructions and wiring diagrams, please visit: * https://newbiely.com/tutorials/arduino-uno-q/arduino-uno-q-gps */# COPYRIGHT newbiely.com# AUTHOR: newbiely# This code is made available for public use without restriction.# For complete instructions, tutorials, and further information, visit:# https://newbiely.com/tutorials/arduino-uno-q/arduino-uno-q-gpsfrom arduino.app_utils import *import requestsimport timeTELEGRAM_BOT_TOKEN = "YOUR_TELEGRAM_BOT_TOKEN"CHAT_ID = "YOUR_CHAT_ID"last_update_id = 0def get_updates():global last_update_id url = f"https://api.telegram.org/bot{TELEGRAM_BOT_TOKEN}/getUpdates" params = {"offset": last_update_id + 1, "timeout": 5}try: response = requests.get(url, params=params, timeout=10) data = response.json()if data["ok"]:return data["result"]exceptExceptionas e:print(f"Error getting updates: {e}")return []def send_message(chat_id, text): url = f"https://api.telegram.org/bot{TELEGRAM_BOT_TOKEN}/sendMessage" payload = {"chat_id": chat_id, "text": text}try: requests.post(url, data=payload, timeout=10)exceptExceptionas e:print(f"Error sending message: {e}")def loop(): updates = get_updates()for update in updates: last_update_id = update["update_id"]if"message"notin update:continue message = update["message"] chat_id = message["chat"]["id"] text = message.get("text", "").strip()print(f"Received: {text}")if text == "/start": send_message(chat_id,"Arduino UNO Q GPS Bot\n""/location - Current GPS coordinates + Google Maps link\n""/speed - Current speed (km/h)\n""/altitude - Current altitude (meters)\n""/time - Current GPS date and time")elif text == "/location": lat = Bridge.call("get_latitude") lng = Bridge.call("get_longitude")if lat == "INVALID"or lng == "INVALID": send_message(chat_id, "GPS location not yet available. Waiting for fix...")else: maps_url = f"https://maps.google.com/?q={lat.strip()},{lng.strip()}" send_message(chat_id, f"📍 Location:\nLatitude : {lat.strip()}\nLongitude: {lng.strip()}\n{maps_url}")elif text == "/speed": result = Bridge.call("get_speed")if result == "INVALID": send_message(chat_id, "Speed not yet available.")else: send_message(chat_id, f"🚀 Speed: {result.strip()} km/h")elif text == "/altitude": result = Bridge.call("get_altitude")if result == "INVALID": send_message(chat_id, "Altitude not yet available.")else: send_message(chat_id, f"⛰️ Altitude: {result.strip()} m")elif text == "/time": result = Bridge.call("get_datetime") send_message(chat_id, f"🕐 GPS Date/Time: {result}")else: send_message(chat_id, "Unknown command. Send /start for help.") time.sleep(0.3)App.run(user_loop=loop)
Detailed Instructions
Replace YOUR_TELEGRAM_BOT_TOKEN with your actual bot token from BotFather.
Replace YOUR_CHAT_ID with your Telegram chat ID.
Paste this Python code into your App's Python file (keep the same MCU sketch).
Click the Run button — wait for a GPS fix (blue LED blinking), then send /location in Telegram.
📍 Location:
Latitude : 37.774900
Longitude: -122.419400
https://maps.google.com/?q=37.774900,-122.419400
10:16 AM
/speed
10:17 AM✓✓
🚀 Speed: 0.12 km/h
10:18 AM
/altitude
10:19 AM✓✓
⛰️ Altitude: 16.2 m
10:20 AM
/time
10:21 AM✓✓
🕐 GPS Date/Time: 2026-04-29 09:10:15
10:22 AM
OpenClaw
...OPENCLAW
OpenClaw support for Arduino UNO Q GPS is coming soon.
...OPENCLAW
Project Ideas
You can build many useful projects with the GPS module and Arduino UNO Q:
Personal GPS Tracker: Send /location via Telegram at any time to instantly receive your current GPS coordinates and a clickable Google Maps link — perfect for tracking a vehicle or pet
Geo-fence Alert System: Define a home location (latitude/longitude) in Python; if the GPS moves more than a set distance away, automatically send a Telegram alert with the current location and Google Maps link
Speed Monitor: Continuously check the GPS speed value in Python — if it exceeds a set threshold (e.g., 120 km/h), send a Telegram warning with the current speed and location
Trip Logger: Log GPS coordinates, speed, and altitude to a CSV file on the Linux side every 10 seconds; send a /summary Telegram command to get total trip distance, max speed, and duration
Automatic Location Broadcast: Send your GPS location to Telegram every 5 minutes automatically using a Python timer — useful for monitoring a moving asset or vehicle in real time
Challenge Yourself
Ready to go further with GPS on Arduino UNO Q? Try these challenges:
Easy: Add a /satellites Telegram command that returns the number of satellites currently visible to the GPS module using gps.satellites.value() in the MCU and exposing it via a get_satellites Bridge function.
Medium: Implement a geo-fence in Python: when the GPS moves more than 500 meters from a saved home location, automatically send a Telegram alert. Use TinyGPSPlus::distanceBetween() on the MCU or calculate the Haversine distance in Python.
Advanced: Build a live trip tracker: log GPS coordinates with timestamps to a JSON file on Linux every 30 seconds during movement (speed > 2 km/h). Implement a /track Telegram command that returns the last 5 logged points as a formatted route summary with total estimated distance.
Please feel free to share the link of this tutorial. However, Please do not use our content on any other websites. We invested a lot of effort and time to create the content, please respect our work!