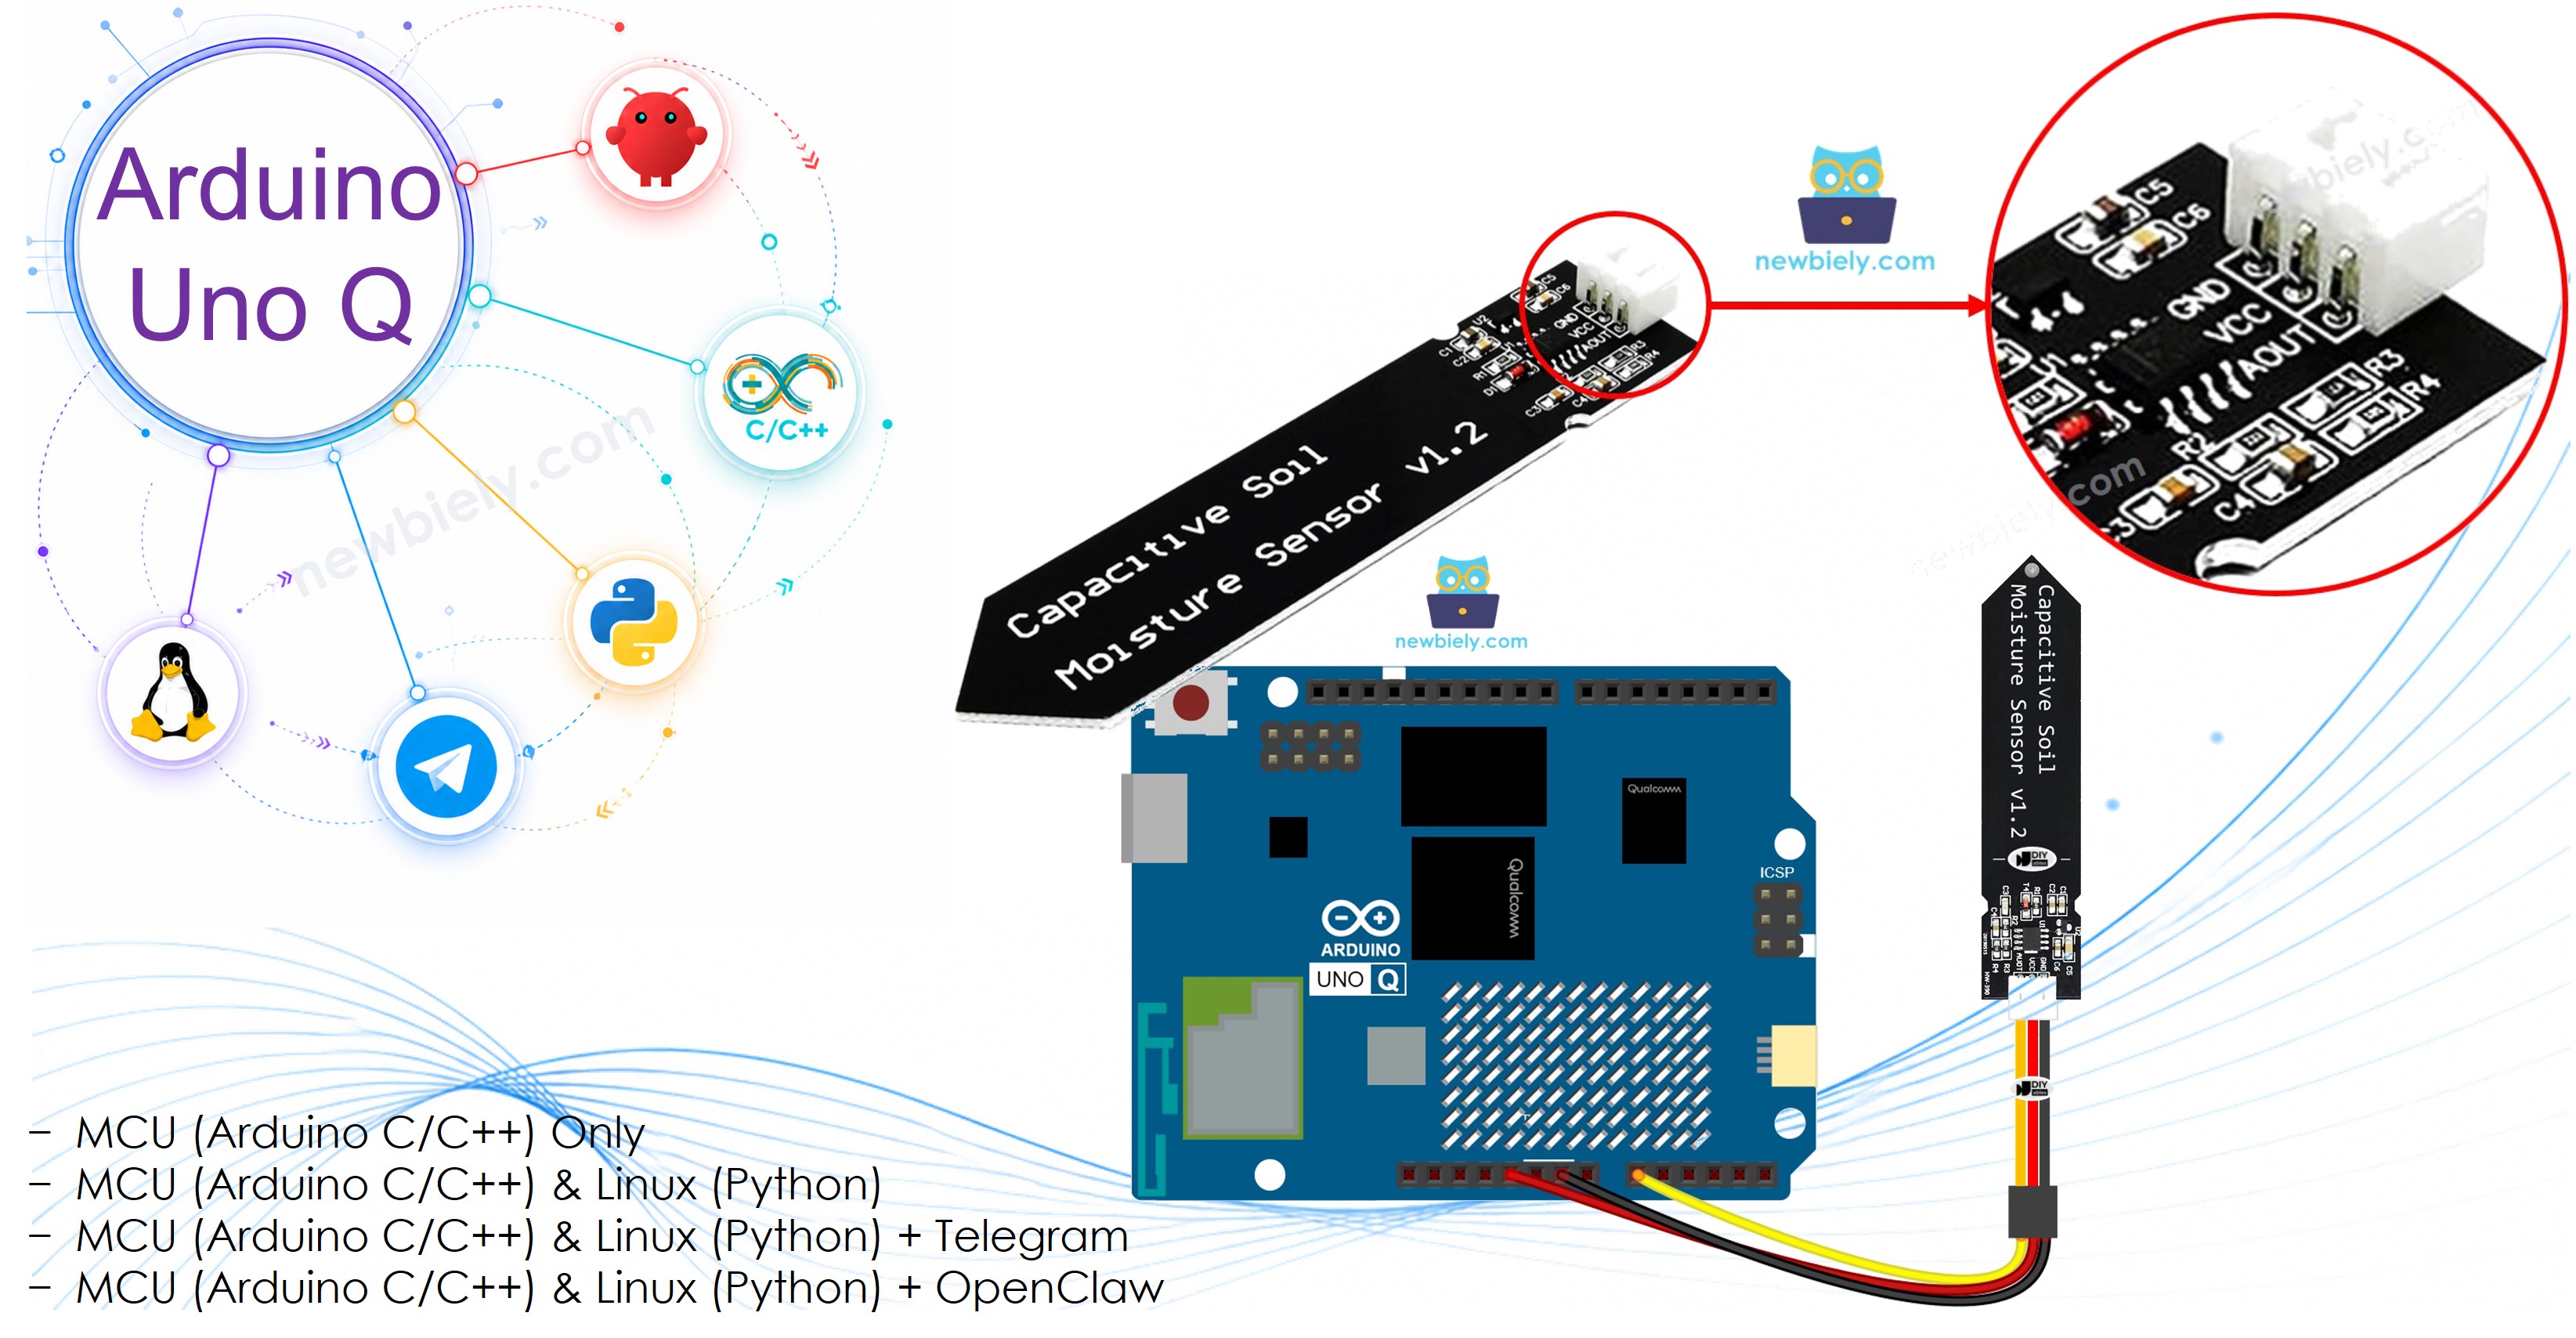
Arduino UNO Q - Soil Moisture Sensor
A soil moisture sensor measures how much water is in the soil — useful for automatic plant watering systems, greenhouse monitoring, and agricultural automation. In this tutorial, you will learn how to connect a capacitive soil moisture sensor to Arduino UNO Q, read moisture values, calibrate wet/dry thresholds, and monitor soil remotely via Telegram.
※ NOTE THAT:
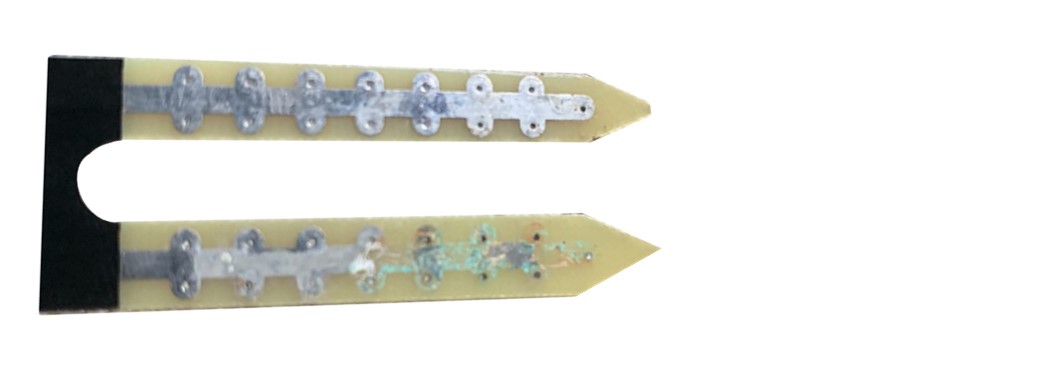
Always use the capacitive soil moisture sensor rather than the resistive type. Resistive sensors have exposed electrodes that corrode quickly due to electrolysis. Capacitive sensors are sealed and corrosion-resistant, giving much longer service life.
Hardware Preparation
Or you can buy the following kits:
| 1 | × | DIYables Sensor Kit (18 sensors/displays) |
Additionally, some of these links are for products from our own brand, DIYables .
Buy Note: Many soil moisture sensors available in the market are unreliable, regardless of their version. We strongly recommend buying the sensor with TLC555I Chip from the DIYables brand using the link provided above. We tested it, and it worked reliably.
Overview of Soil Moisture Sensor
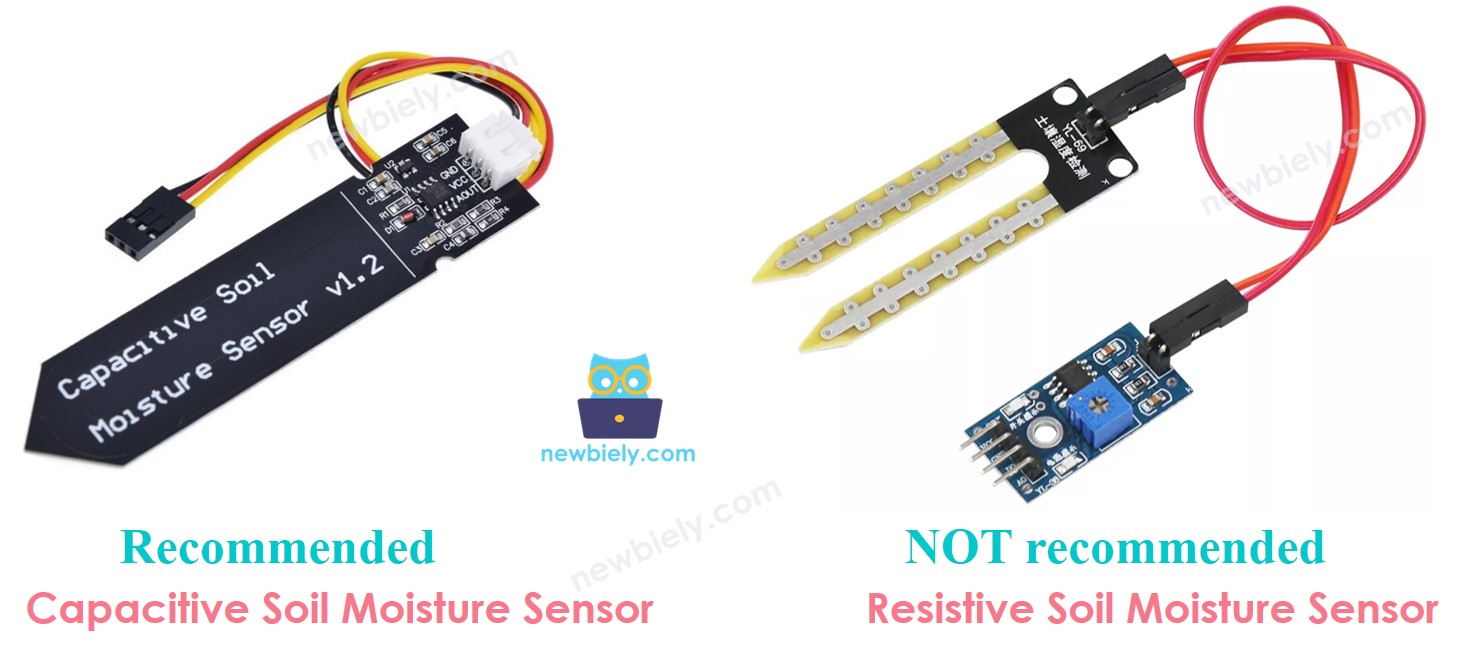
There are two types of soil moisture sensors — resistive and capacitive. This tutorial uses only the capacitive type:
- Resistive sensor: Passes current between exposed electrodes → causes corrosion over time
- Capacitive sensor: No exposed conductors → corrosion-resistant, longer lifespan
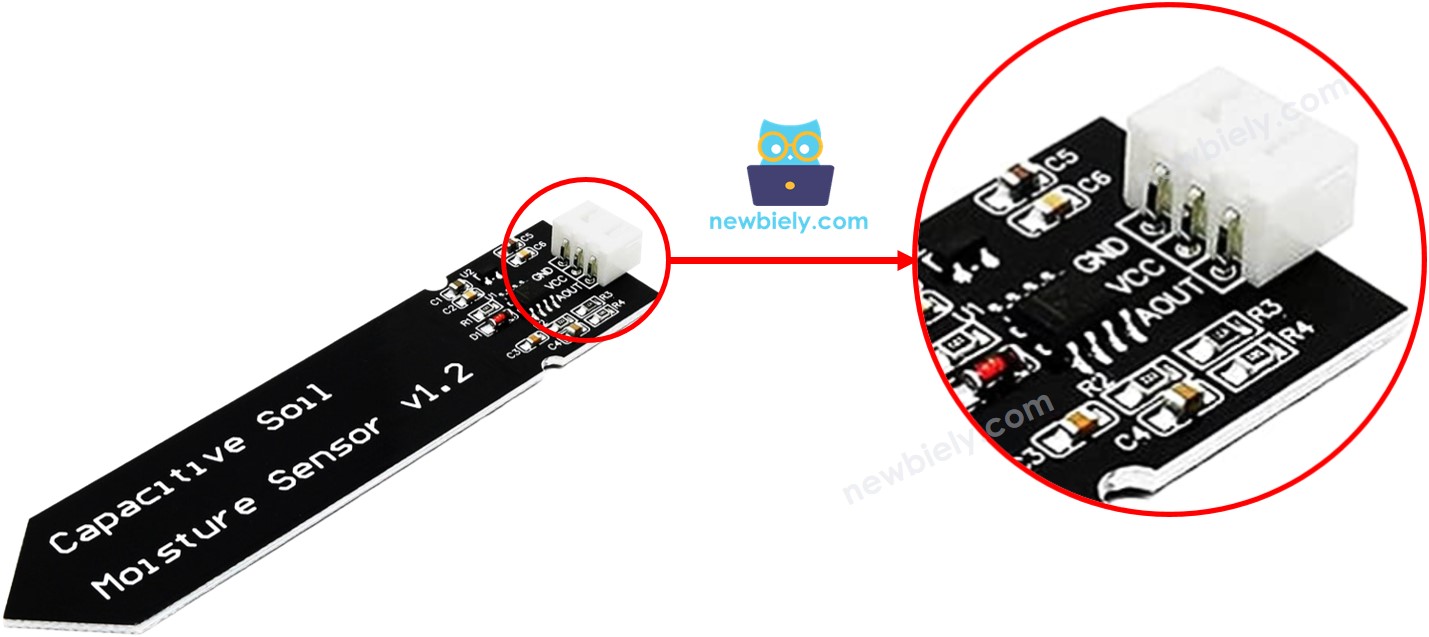
Pinout
The capacitive soil moisture sensor has three pins:
- GND pin: Connect to GND (0V)
- VCC pin: Connect to 3.3V (Arduino UNO Q MCU operates at 3.3V)
- AOUT pin: Analog output — voltage proportional to soil moisture; connect to an analog input pin
How It Works
The AOUT pin outputs a higher voltage when the soil is dry and a lower voltage when the soil is wet:
- Dry soil → high voltage → high ADC value (closer to 4095 on Arduino UNO Q)
- Wet soil → low voltage → low ADC value (closer to 0)
※ NOTE THAT:
Arduino UNO Q ADC difference: The STM32 MCU uses a 12-bit ADC (0–4095), compared to 10-bit (0–1023) on many other Arduino boards. Calibration threshold values will be higher — typically in the 1500–3000 range depending on your sensor.
Wiring Diagram

This image is created using Fritzing. Click to enlarge image
| Sensor Pin | Arduino UNO Q Pin |
|---|---|
| GND | GND |
| VCC | 3.3V |
| AOUT | A0 |
※ NOTE THAT:
Do NOT bury the circuit board (top section) of the sensor in soil or water — only insert the probe (bottom section) into the soil.
MCU Code
The Arduino UNO Q has two processors: the STM32 MCU (handles real-time hardware control) and the Qualcomm MPU (runs Debian Linux). In this section, only the STM32 MCU is programmed — the Linux side stays idle. A later section will show how both processors work together.
Example 1: Read Raw Moisture Value
Detailed Instructions
- First time with Arduino UNO Q? Follow the Getting Started with Arduino UNO Q tutorial to get your development environment ready before proceeding.
- Wire the sensor: Connect GND to GND, VCC to 3.3V, and AOUT to A0.
- Connect: Plug the Arduino UNO Q into your computer with a USB-C cable.
- Open Arduino App Lab: Launch Arduino App Lab and wait until it detects your Arduino UNO Q.
- Create a new App: Click the Create New App button.

- Give the App a name, for example: DIYables_SoilMoisture
- Click Create to confirm.
- You will see a set of folders and files generated inside your new App.

- Find the sketch/sketch.ino file — this is where you will paste the MCU sketch.
- Install the library: Click the Add sketch library button (the open book icon with a + sign) in the left sidebar.

- Search for Arduino_RouterBridge created by Arduino and click the Install button.
- Upload: Click the Run button in Arduino App Lab to compile and upload to the STM32.

- Insert the sensor probe into soil and add water gradually. Watch the ADC value decrease in the Bridge Monitor (available in the next section).
- Pro Tip: The reading will not reach 0 even when fully wet. Record the minimum value (wet) and maximum value (dry) during testing — these become your calibration bounds.
Calibration
The moisture value is not absolute — it depends on the specific sensor, soil composition, and water type. To accurately detect wet vs. dry soil, you must calibrate the threshold:
- Upload the code and insert the sensor into dry soil → note the ADC reading (e.g. 2800 → DRY_VALUE)
- Water the soil thoroughly and wait a few minutes → note the ADC reading (e.g. 1200 → WET_VALUE)
- Set THRESHOLD to the midpoint: (DRY_VALUE + WET_VALUE) / 2 ≈ 2000
- Update THRESHOLD in Example 2 below
※ NOTE THAT:
- Avoid testing with pure distilled water — it has very low conductivity and may not change the reading significantly.
- Do not submerge the circuit board section in water or soil.
Example 2: Detect Wet or Dry Soil
After calibration, update THRESHOLD and use this code to classify soil as WET or DRY:
Detailed Instructions
- Use the same App, replace the sketch with the code above.
- Update THRESHOLD with your calibrated value.
- Upload and insert the sensor into soil — add water slowly and observe the status change.
- Pro Tip: Add a few points of hysteresis (e.g. two separate thresholds for WET and DRY) to avoid rapid switching near the boundary.
Linux + MCU Bridge Programming
The Arduino UNO Q has two processors that work together: the MPU (Qualcomm, runs Debian Linux) and the MCU (STM32, runs Zephyr OS with your Arduino sketch). They communicate using RPC via the Arduino_RouterBridge library — never via raw serial ports.
- The sensor is connected to the MCU (STM32) — wired to analog pin A0. The MCU reads the ADC value and classifies soil moisture.
- The MPU cannot read the sensor directly — it must request the reading from the MCU via Bridge.call(). The MCU responds with the current moisture value and status.
- The MPU has Wi-Fi — because the MPU runs full Debian Linux with Wi-Fi, it can report soil moisture status via Telegram on demand.
- Communication: Bridge.call() on the Linux side invokes Bridge.provide() functions on the MCU side
- ⚠️ Reserved: /dev/ttyHS1 (Linux) and Serial1 (MCU) are used by the Arduino Router — never open them directly
In short: MPU requests moisture reading → MCU reads ADC, classifies WET/DRY → MCU reports result → MPU logs or forwards it.
MCU sketch — soil moisture with Bridge and Monitor output:
Python script (Arduino App Lab) — poll moisture from Linux:
- Note: Make sure Bridge.begin() is called in the MCU sketch and the sketch is uploaded before running the Python script on the Linux side.
- ⚠️ Warning: Never directly open /dev/ttyHS1 (on Linux) or use Serial1 (on MCU) in your code — these are reserved by the Arduino Router and accessing them will break the Bridge.
Detailed Instructions
- Upload the MCU sketch: Open Arduino App Lab, create a new App, paste the Bridge MCU sketch above into sketch/sketch.ino, install the Arduino_RouterBridge library, and click Run.
- Add the Python script: Paste the Python code above into the Python tab of the same App.
- Run the App: Click Run — the Python side reads moisture every 2 seconds.
- Add water to soil and watch the status switch between DRY and WET in the console.
- Check the console: Open the Console tab → MCU Monitor subtab.
App Lab Console Output
Telegram Integration
Monitor your soil moisture remotely from anywhere via Telegram.
If you do not have a Telegram bot yet, see How to Create a Telegram Bot to get your bot token before continuing.
MCU sketch: Keep the same MCU sketch from the previous Bridge section — no changes needed. Make sure it is already uploaded and running on the STM32 before proceeding.
Python script (Arduino App Lab) — Telegram bot for soil moisture monitoring:
- Note: Replace YOUR_BOT_TOKEN with the token obtained from @BotFather on Telegram.
- Send /read to get the current moisture ADC value and wet/dry status.
Detailed Instructions
- Upload the MCU sketch: Use the Bridge MCU sketch from the previous section (upload it first if not already done).
- Paste the Telegram script: Copy the Python code above into the Python tab of your App in Arduino App Lab.
- Set your token: Replace YOUR_BOT_TOKEN in the script with your actual bot token.
- Run the App: Click Run — the bot starts listening for Telegram messages.
- Test it: Insert the sensor into dry then wet soil, send /read each time — the bot replies with the moisture value and status.
App Lab Console Output

ArduinoBot
OpenClaw Integration
You can adapt the OpenClaw to this tutorial by refering the instruction on Arduino Uno Q - OpenClaw Tutorial
Application/Project Ideas
- Automatic plant watering: Trigger a pump relay when /read returns DRY — combine with the relay tutorial
- Greenhouse monitor: Schedule Telegram /read alerts every hour via a cron job on the Linux side
- Smart irrigation system: Combine multiple soil moisture sensors with the automatic irrigation system tutorial
- Soil health tracker: Log moisture readings to a file on the Linux MPU and visualize trends over time
- Weather-aware watering: Combine soil moisture data with online weather API on the MPU to skip watering when rain is forecast
Challenge Yourself
- Easy: Add a /status Telegram command that replies "Soil is DRY — consider watering!" or "Soil is WET — no watering needed."
- Medium: Log moisture readings with timestamps to a CSV file on the MPU's Linux filesystem every 10 minutes
- Advanced: Build an automatic irrigation system that reads soil moisture every 30 minutes and sends a Telegram alert when the soil becomes dry