Arduino UNO Q RS485
Use RS485 serial communication with the Arduino UNO Q and a TTL-to-RS485 module. RS485 supports long-distance communication (up to 1200m), high noise immunity, and multi-device bus topologies — making it ideal for industrial and automation projects. With Bridge and Telegram, you can send and receive RS485 data remotely from Python or your phone.
In this tutorial, you will learn:
- How RS485 communication works and why a TTL-to-RS485 module is needed
- How to wire the TTL-to-RS485 module to the Arduino UNO Q
- How to send and receive data over RS485 on Arduino UNO Q
- How to use Bridge to control RS485 communication from Python on Arduino UNO Q
- How to send and receive RS485 data via Telegram on Arduino UNO Q
- How to use OpenClaw on Arduino UNO Q with RS485
Hardware Preparation
Or you can buy the following kits:
| 1 | × | DIYables Sensor Kit (18 sensors/displays) |
Additionally, some of these links are for products from our own brand, DIYables .
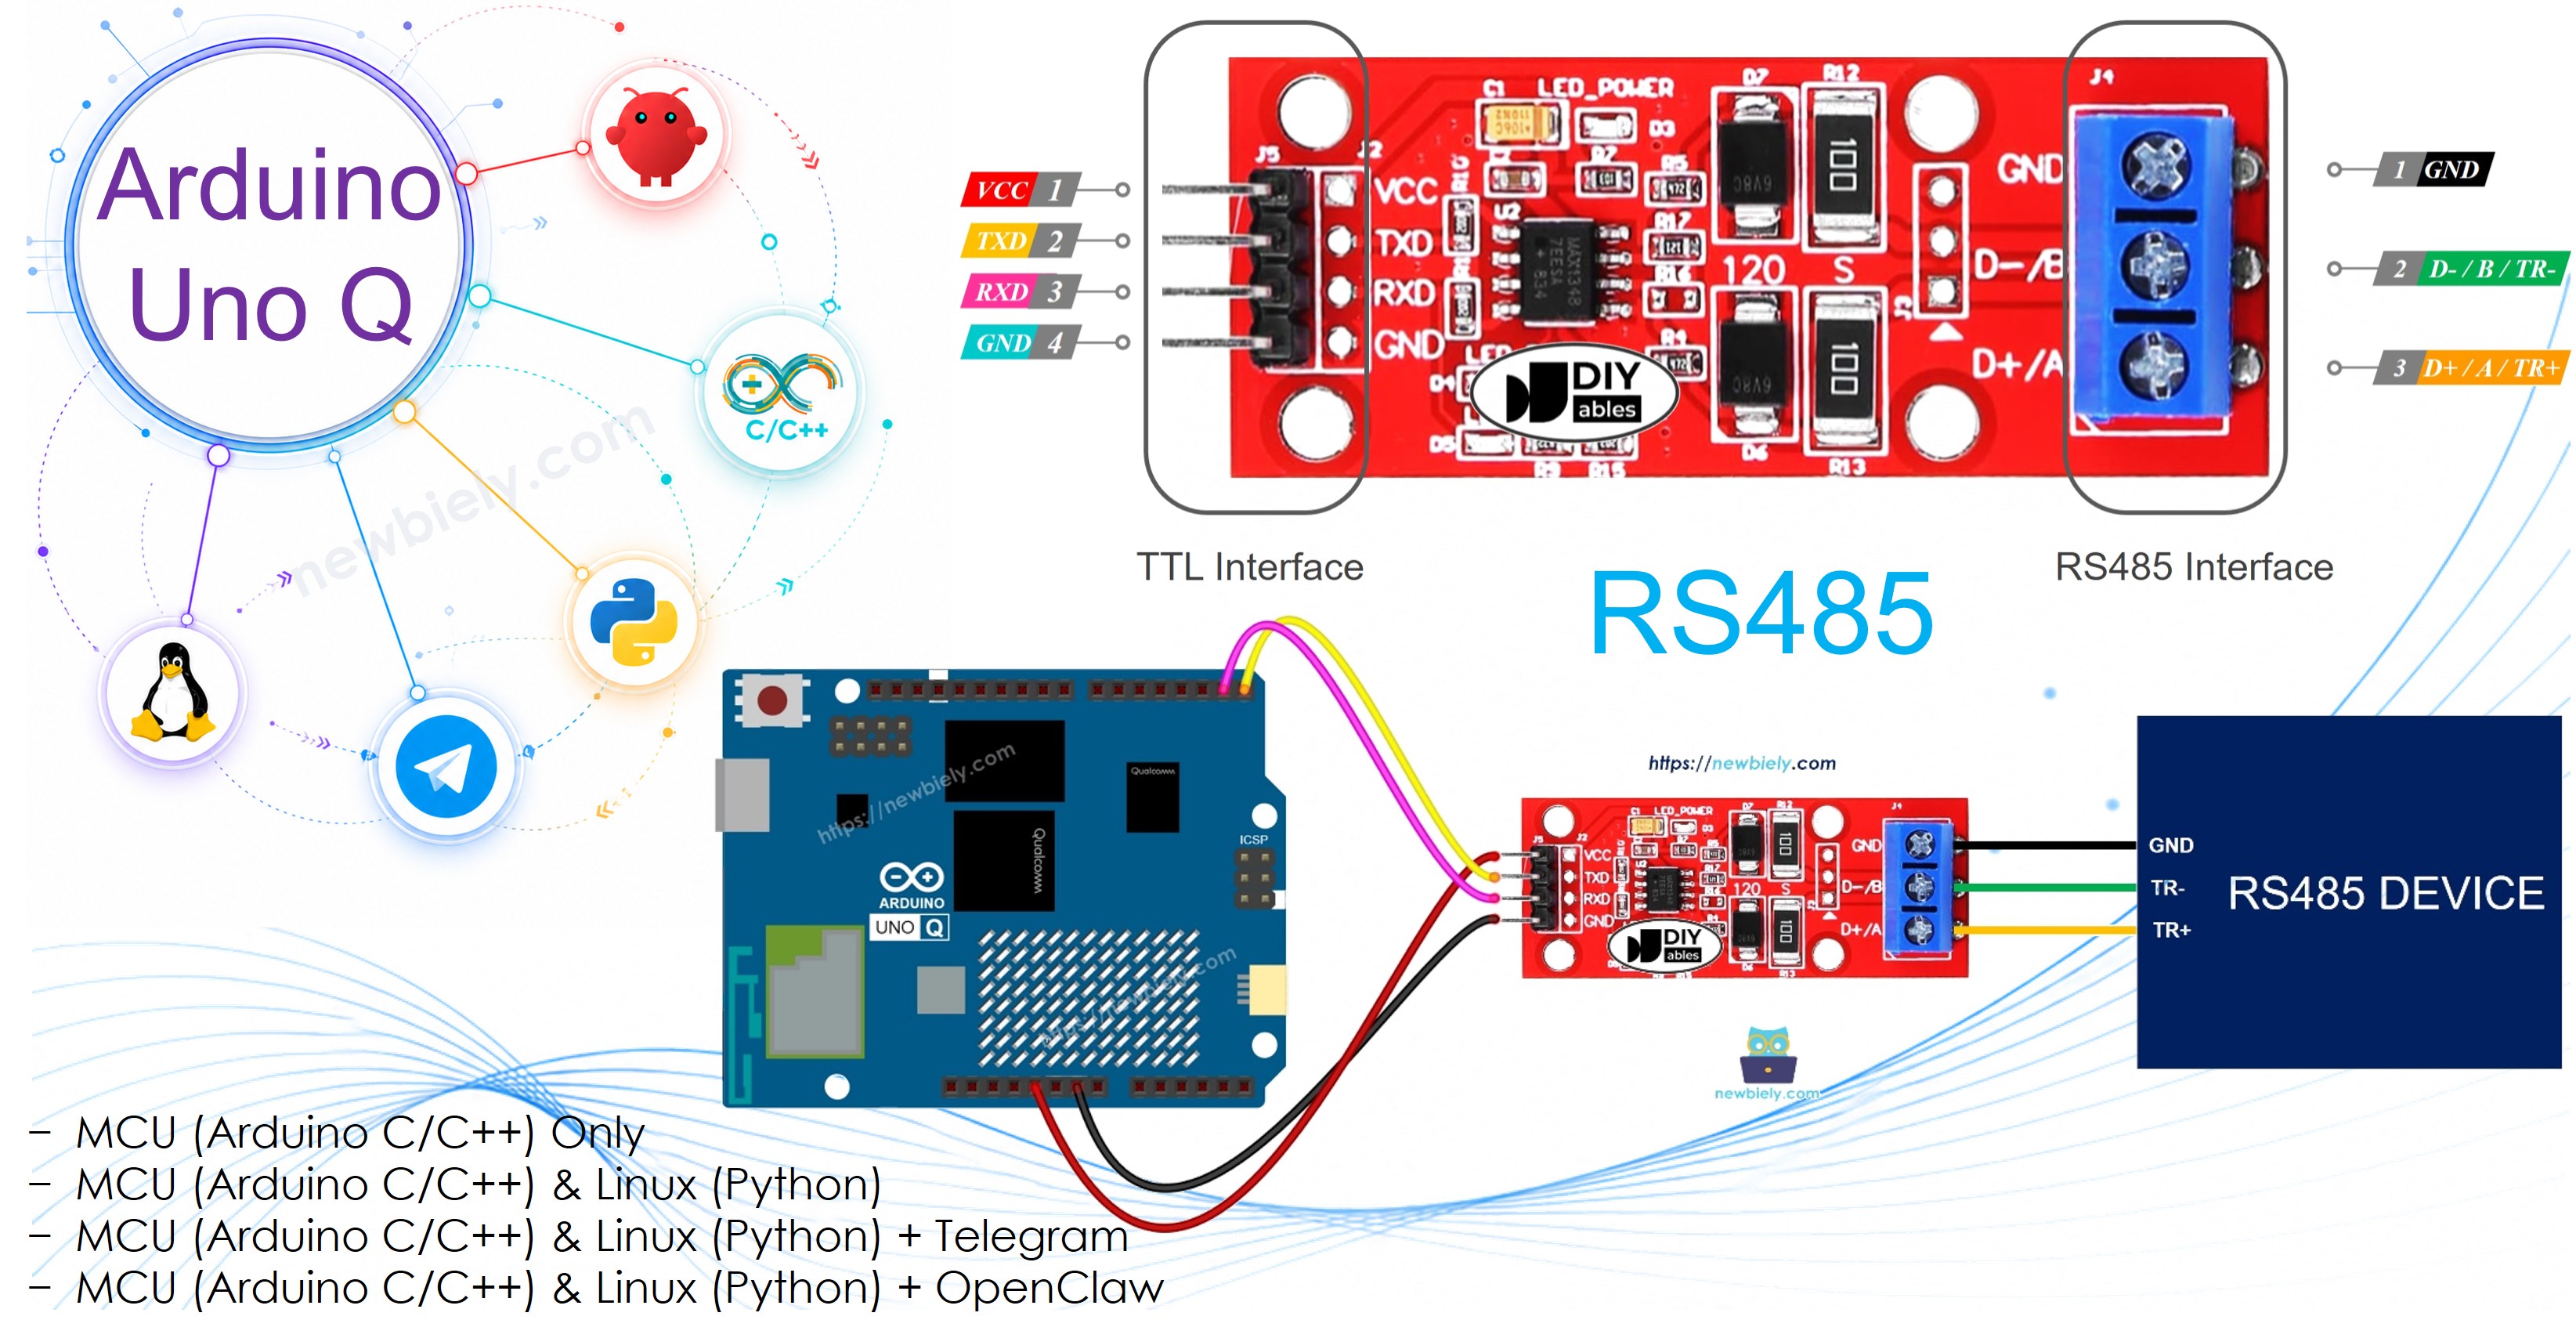
Overview of the TTL to RS485 Module
The Arduino UNO Q MCU communicates over UART using TTL logic levels (3.3V). TTL signals are limited in range. To communicate over long distances with RS485-compatible devices (sensors, drives, meters, industrial controllers), you need to convert TTL signals to the differential RS485 standard. The TTL-to-RS485 module performs this conversion in both directions.
RS485 key advantages:
- Long distance: up to 1200 meters
- High noise immunity
- Multi-drop bus: up to 32 devices on a single bus
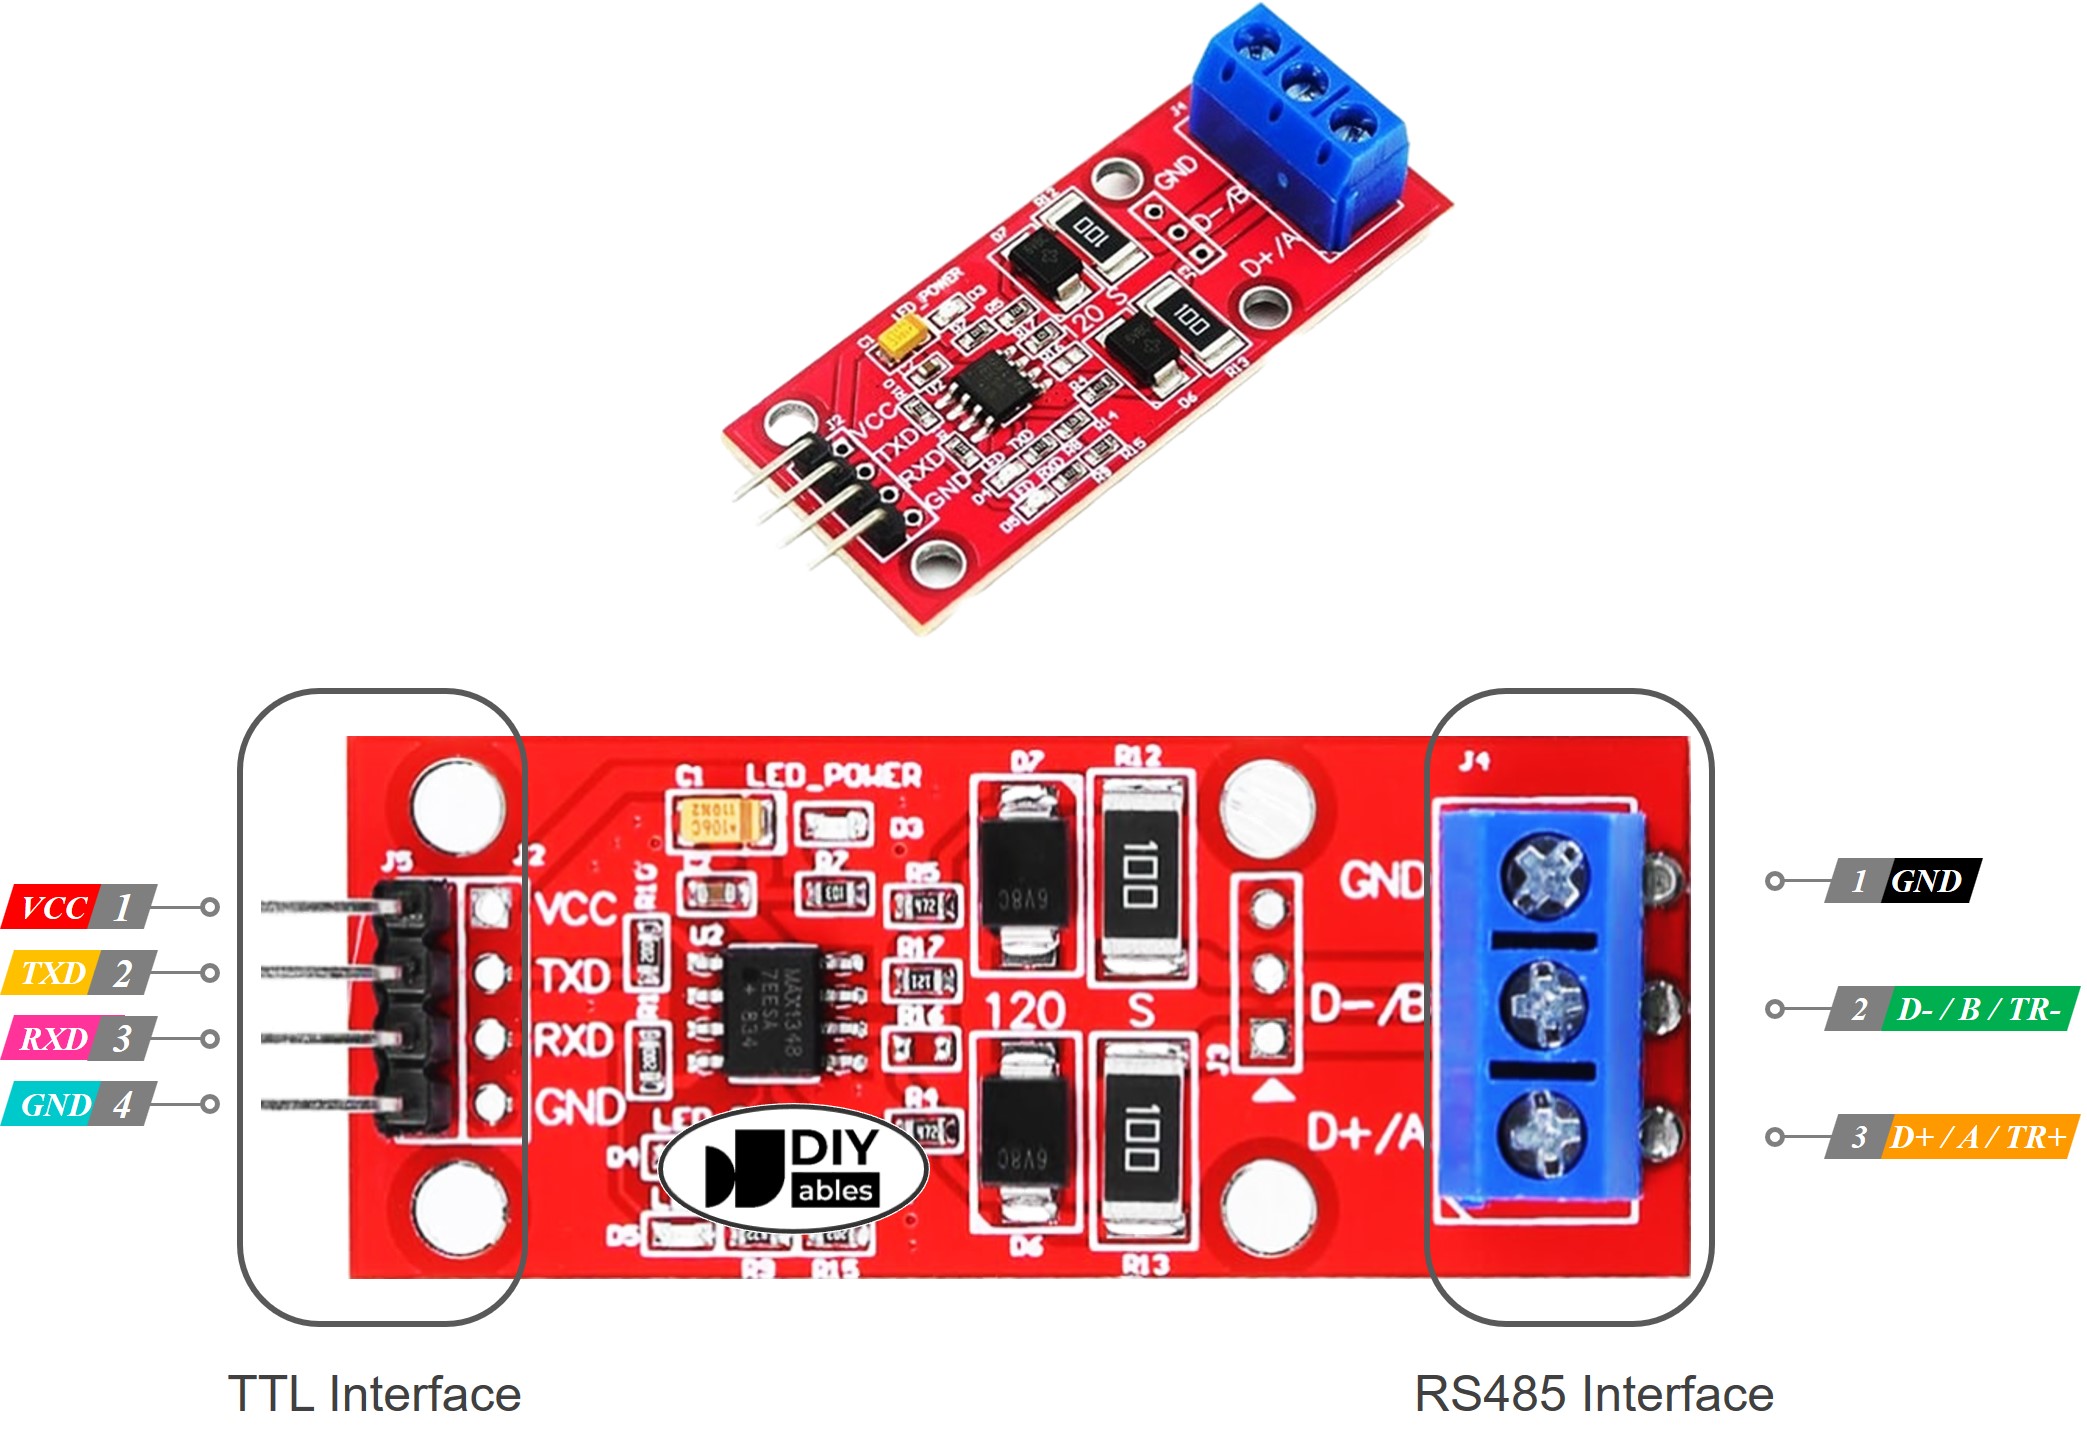
Pinout
- TTL interface (connects to Arduino UNO Q MCU):
- VCC: Power — connect to 3.3V
- GND: Ground
- RXD: Data input — connect to MCU TX pin (D6)
- TXD: Data output — connect to MCU RX pin (D7)
- RS485 interface:
- D+ (A or TR+): Differential data line A
- D- (B or TR-): Differential data line B
- GND: Optional — connect for noise reduction
Wiring Diagram
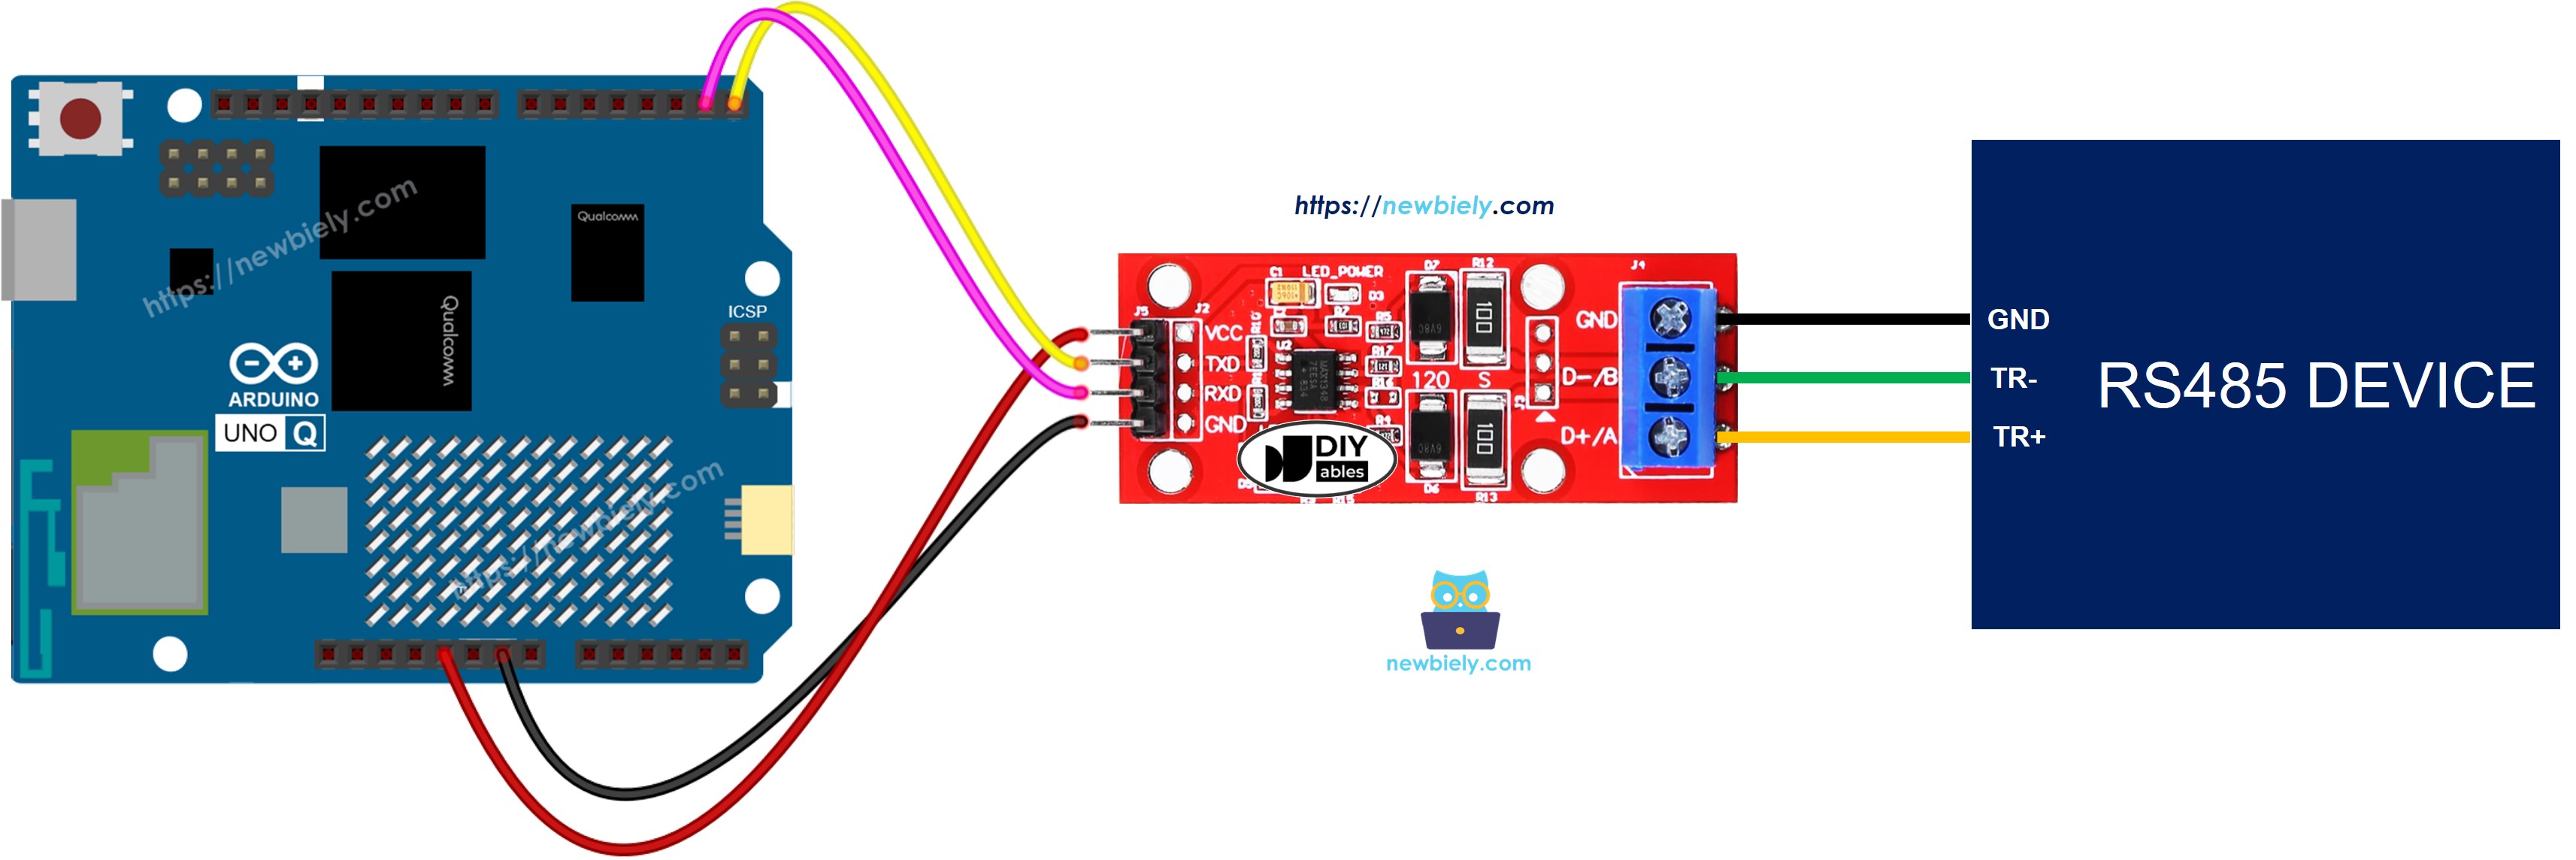
This image is created using Fritzing. Click to enlarge image
| TTL-to-RS485 Module Pin | Arduino UNO Q MCU Pin | Note |
|---|---|---|
| VCC | 3.3V | |
| GND | GND | |
| RXD | D6 (MCU TX) | |
| TXD | D7 (MCU RX) |
Connect D+ and D- to the RS485 bus. When testing with a PC, connect them to a USB-to-RS485 adapter.
How To Program For RS485
- Include SoftwareSerial and create an RS485 serial object:
- Read incoming RS485 data:
- Send data over RS485:
Arduino UNO Q Code
Detailed Instructions
First time with Arduino UNO Q? Follow the Getting Started with Arduino UNO Q tutorial before proceeding.
- Connect: Wire the TTL-to-RS485 module to the Arduino UNO Q MCU as shown in the wiring diagram.
- Open Arduino App Lab: Launch Arduino App Lab and wait until it detects your Arduino UNO Q.
- Create a new App: Click the Create New App button.

- Give the App a name, for example: RS485
- Click Create to confirm.

- Paste the sketch: Copy the MCU code above and paste it into sketch/sketch.ino.
- Upload: Click the Run button in Arduino App Lab.

Testing
To test RS485 communication:
- Connect the D+ and D- pins to a USB-to-RS485 adapter:
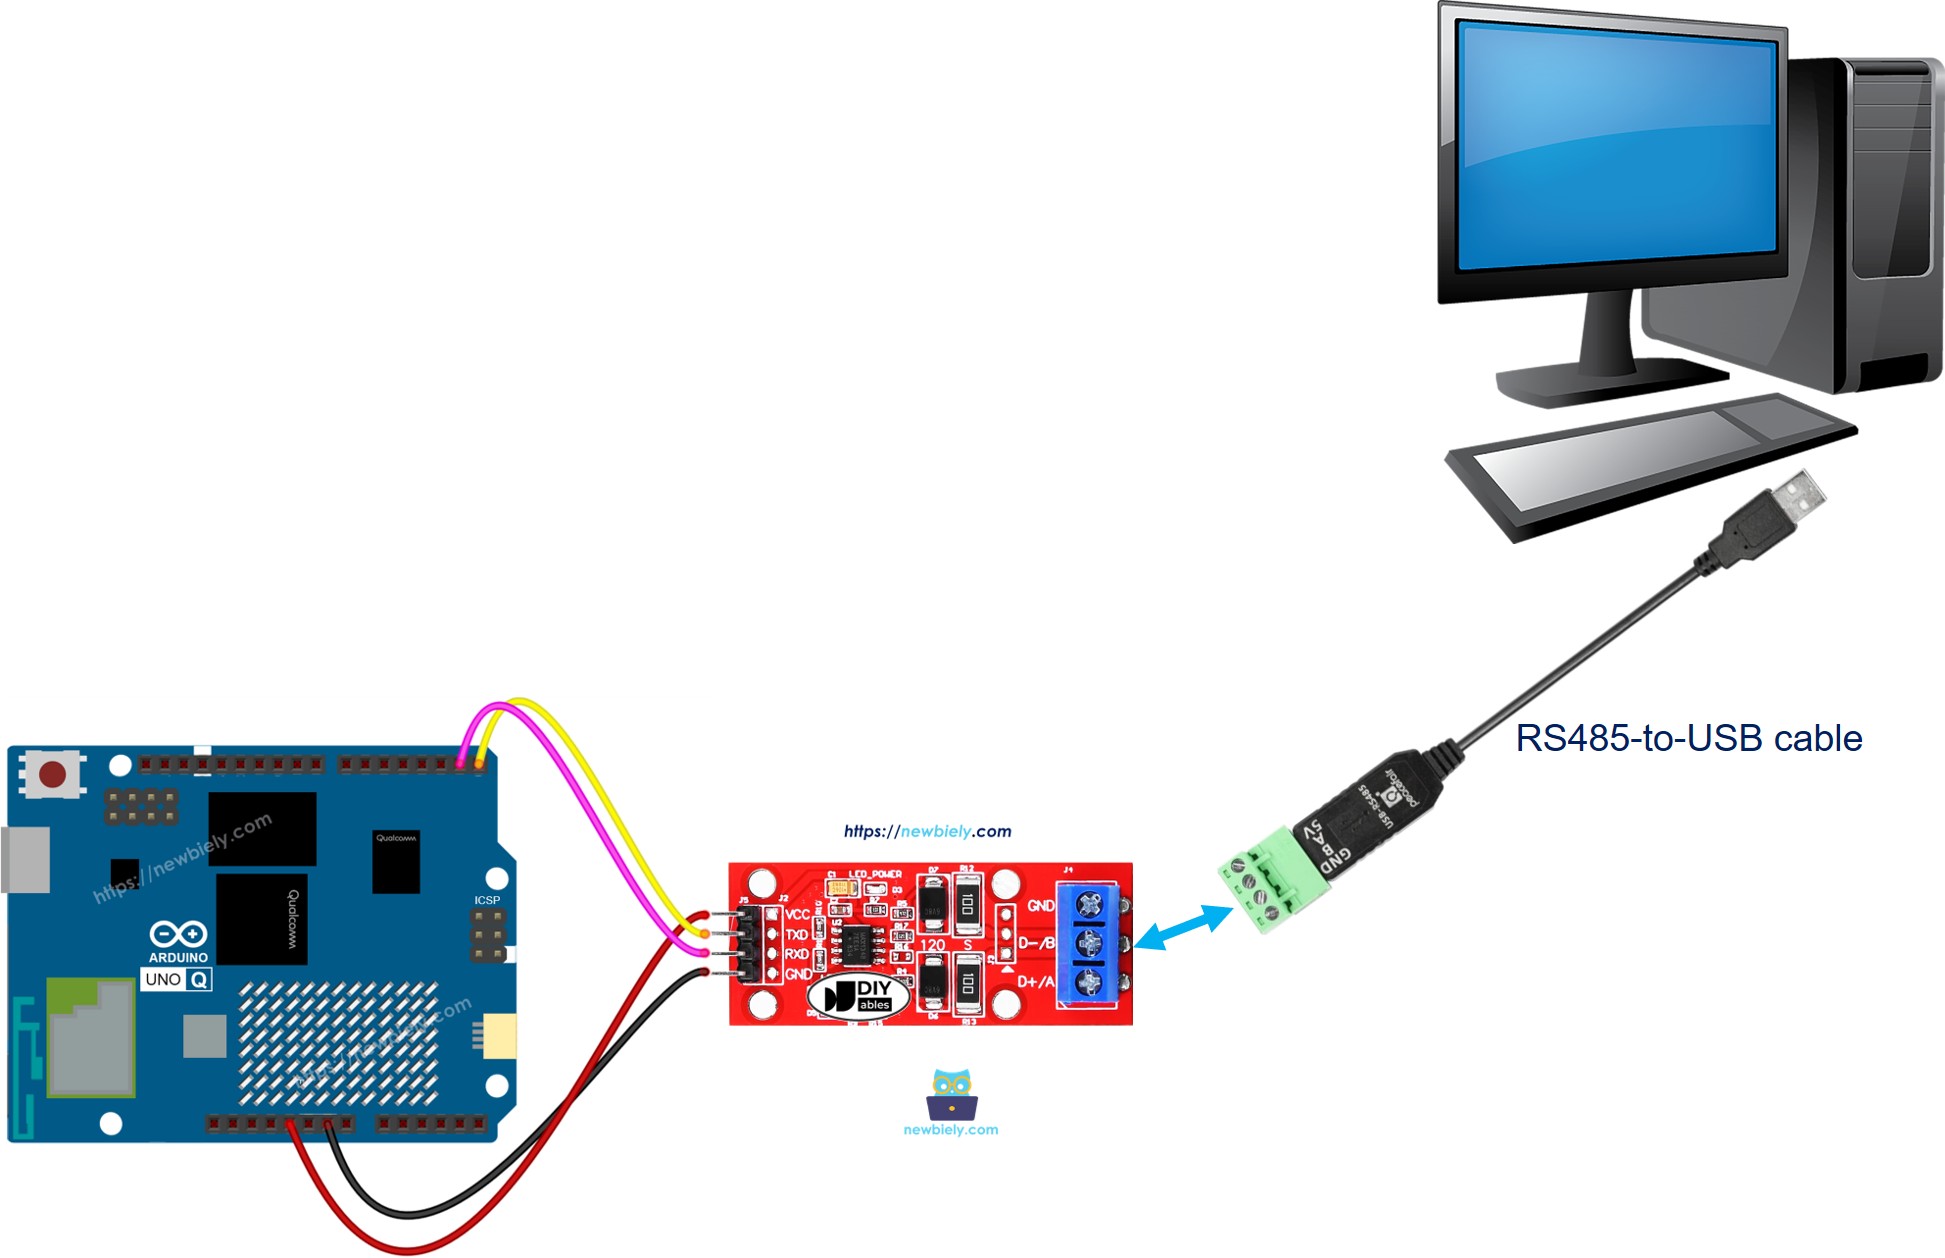
- Set the baud rate to 9600, select the correct COM port.
- Type any text and send it. The Arduino UNO Q will echo it back — you should see the echoed data in the terminal.
Bridge: Linux + MCU
This section shows how to send and receive RS485 data from the Linux side (Python) via Bridge:
- The TTL-to-RS485 module is connected to the MCU via SoftwareSerial — the MCU handles all serial I/O
- The MPU cannot use SoftwareSerial directly — it calls Bridge functions to send/receive RS485 data
- The MPU has Wi-Fi — running full Debian Linux, it can relay RS485 data to Telegram or web services
- Arduino_RouterBridge enables RPC communication between the two processors
- ⚠️ /dev/ttyHS1 (Linux) and Serial1 (MCU) are RESERVED by the router — never open them in user code
MCU Code (Bridge)
Python Code (Bridge)
Detailed Instructions
- Connect: Wire the TTL-to-RS485 module to the Arduino UNO Q as shown above.
- Open Arduino App Lab and create a new App named RS485Bridge.
- Paste the MCU sketch into sketch/sketch.ino.
- Paste the Python code into the Python file.
- Install the library: Click the Add sketch library button (the open book icon with a + sign) in the left sidebar.

- Search for Arduino_RouterBridge created by Arduino and click the Install button.
- Upload: Click the Run button. Python will send a message via RS485 and read back any echoed data.
App Lab Console Output
Telegram
Send and receive RS485 data through Telegram — forward messages from industrial sensors to your phone or send commands from Telegram to an RS485 device.
MCU sketch: Keep the same MCU sketch from the previous Bridge section.
Python Code (Telegram)
Detailed Instructions
- Replace YOUR_TELEGRAM_BOT_TOKEN with your actual bot token from BotFather.
- Replace YOUR_CHAT_ID with your Telegram chat ID.
- Paste the Python code into your App's Python file (keep the same MCU sketch).
- Click the Run button — send /send Hello in Telegram to transmit data over RS485.
App Lab Console Output

ArduinoBot
OpenClaw
You can adapt the OpenClaw to this tutorial by refering the instruction on Arduino Uno Q - OpenClaw Tutorial
Project Ideas
You can build many useful projects with RS485 communication and Arduino UNO Q:
- Industrial Sensor Network: Connect multiple RS485 sensors (temperature, humidity, flow) on a single bus; the MCU polls each device by address, collects readings, and Python sends periodic summaries to Telegram
- Modbus RTU Data Logger: Use the RS485 bus to read Modbus RTU registers from an energy meter or VFD; Python logs the data to a file and sends alerts when values exceed thresholds
- Long-Distance Relay Control: Run RS485 wire over 100m to a remote relay board; send /send RELAY_ON from Telegram and the Arduino UNO Q forwards the command over RS485 to trigger the relay
- Access Control Panel: Connect an RS485 access controller to the module; the MCU reads door events, and Python forwards them as Telegram notifications — showing which door opened and when
- Building Automation Gateway: Bridge RS485 HVAC or lighting controllers to the internet; Python translates Telegram commands into RS485 command strings and sends them via the send_rs485 Bridge function
Challenge Yourself
Ready to go further with RS485 on Arduino UNO Q? Try these challenges:
- Easy: Extend the Bridge sketch to accumulate received bytes into lines (using \n as delimiter) and expose the most recent complete line via get_last_line — preventing partial reads when RS485 data arrives in chunks.
- Medium: Implement a Modbus-style address filter: modify the MCU receive loop to only accept messages that start with a specific device address byte (e.g., 0x01), buffering only valid frames — and expose the filtered payload via get_received.
- Advanced: Build a multi-device polling system: store a list of RS485 device addresses in a Python JSON config; Python sequentially sends a query command to each address via send_rs485, waits for a reply via get_received, and logs each response to a timestamped CSV file — creating a lightweight RS485 data logger running entirely on the Arduino UNO Q Linux side.