Arduino UNO Q - Temperature Sensor
Reading temperature accurately in real time is one of the most common Arduino tasks, and the DS18B20 sensor makes it easy on Arduino UNO Q. With its simple 1-Wire interface, it delivers digital temperature readings directly to your code — no analog conversion needed.
In this tutorial, you will learn:
- What the DS18B20 1-Wire temperature sensor is and how it works
- How to connect the DS18B20 temperature sensor to Arduino UNO Q
- How to connect the DS18B20 temperature sensor to Arduino UNO Q using a wiring adapter
- How to program the MCU (C/C++ Arduino code) on Arduino UNO Q to read temperature from the DS18B20 sensor
- How to program both the Linux side (Python) and MCU side (C/C++ Arduino code) to make the Linux side read and process temperature data from the DS18B20 sensor
- How to use Telegram to message Arduino UNO Q to get temperature readings remotely
- How to use OpenClaw on Arduino UNO Q to read temperature from the DS18B20 sensor
Hardware Preparation
Or you can buy the following kits:
| 1 | × | DIYables Sensor Kit (18 sensors/displays) |
Additionally, some of these links are for products from our own brand, DIYables .
Buy Note: Many DS18B20 sensors available in the market are unreliable. We strongly recommend buying the sensor from the DIYables brand using the link provided above. We tested it, and it worked reliably.
Overview of the DS18B20 Temperature Sensor
The DS18B20 is a digital temperature sensor that communicates over a single data wire using the 1-Wire protocol.
- Protocol: 1-Wire digital — one data pin handles both power and communication
- Range: -55°C to +125°C (-67°F to +257°F) with ±0.5°C accuracy between -10°C and +85°C
- Output: Digital — no analog-to-digital conversion needed
- Power: Powered by 3.3V or 5V; supports parasitic power mode (powered from data line)
- Multiple sensors: Up to 127 DS18B20 sensors can share a single data pin, each with a unique 64-bit address
- Package types: TO-92 transistor-style package and waterproof stainless steel probe
Pinout

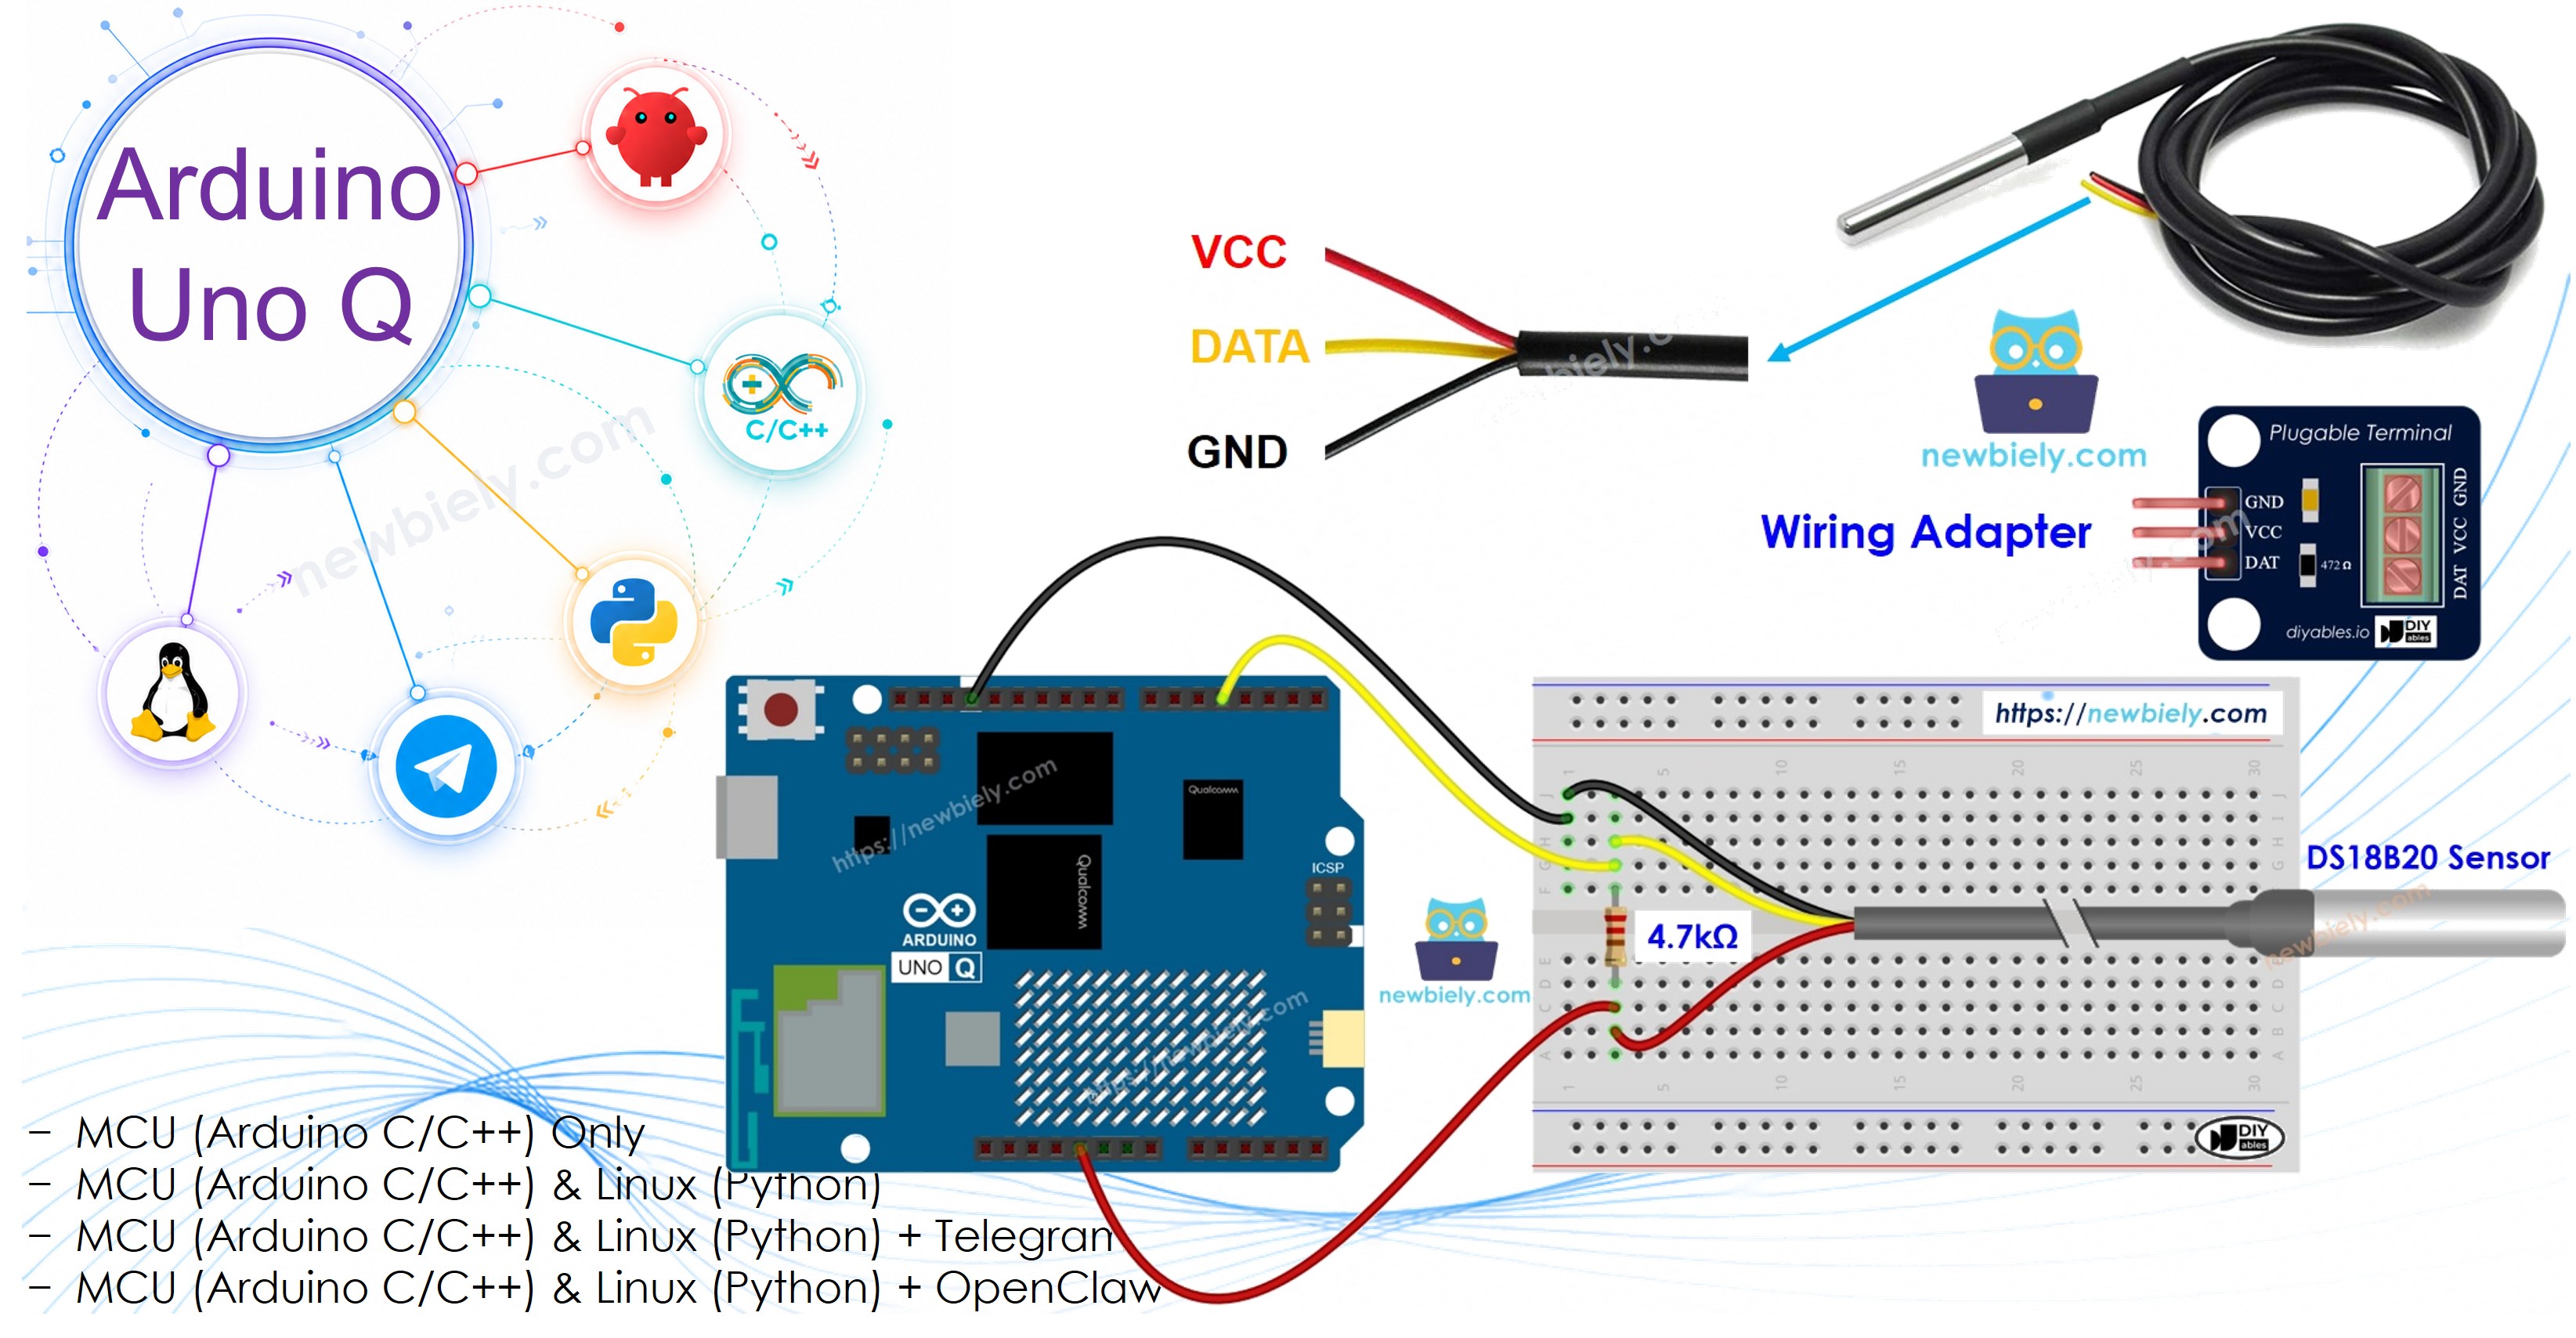
The DS18B20 temperature sensor has three pins:
| DS18B20 Pin | Function | Arduino UNO Q Pin |
|---|---|---|
| GND | Ground | GND |
| VCC | Power (3.3V or 5V) | 5V |
| DATA | 1-Wire Data Bus | 4 |
- Pull-up resistor: A 4.7kΩ resistor between the DATA pin and VCC is required for reliable 1-Wire communication
- Adapter: We recommend buying a DS18B20 sensor with a wiring adapter — it includes the pull-up resistor and a screw terminal block, so no extra components are needed
How to Program for DS18B20 Temperature Sensor
- Include the libraries:
- Create a OneWire object and a DallasTemperature object for the pin connected to the sensor's DATA pin:
- Initialize the sensor in setup():
- Request a temperature reading:
- Read temperature in Celsius:
- (Optional) Convert Celsius to Fahrenheit:
Wiring Diagram
- Breadboard wiring (with pull-up resistor):
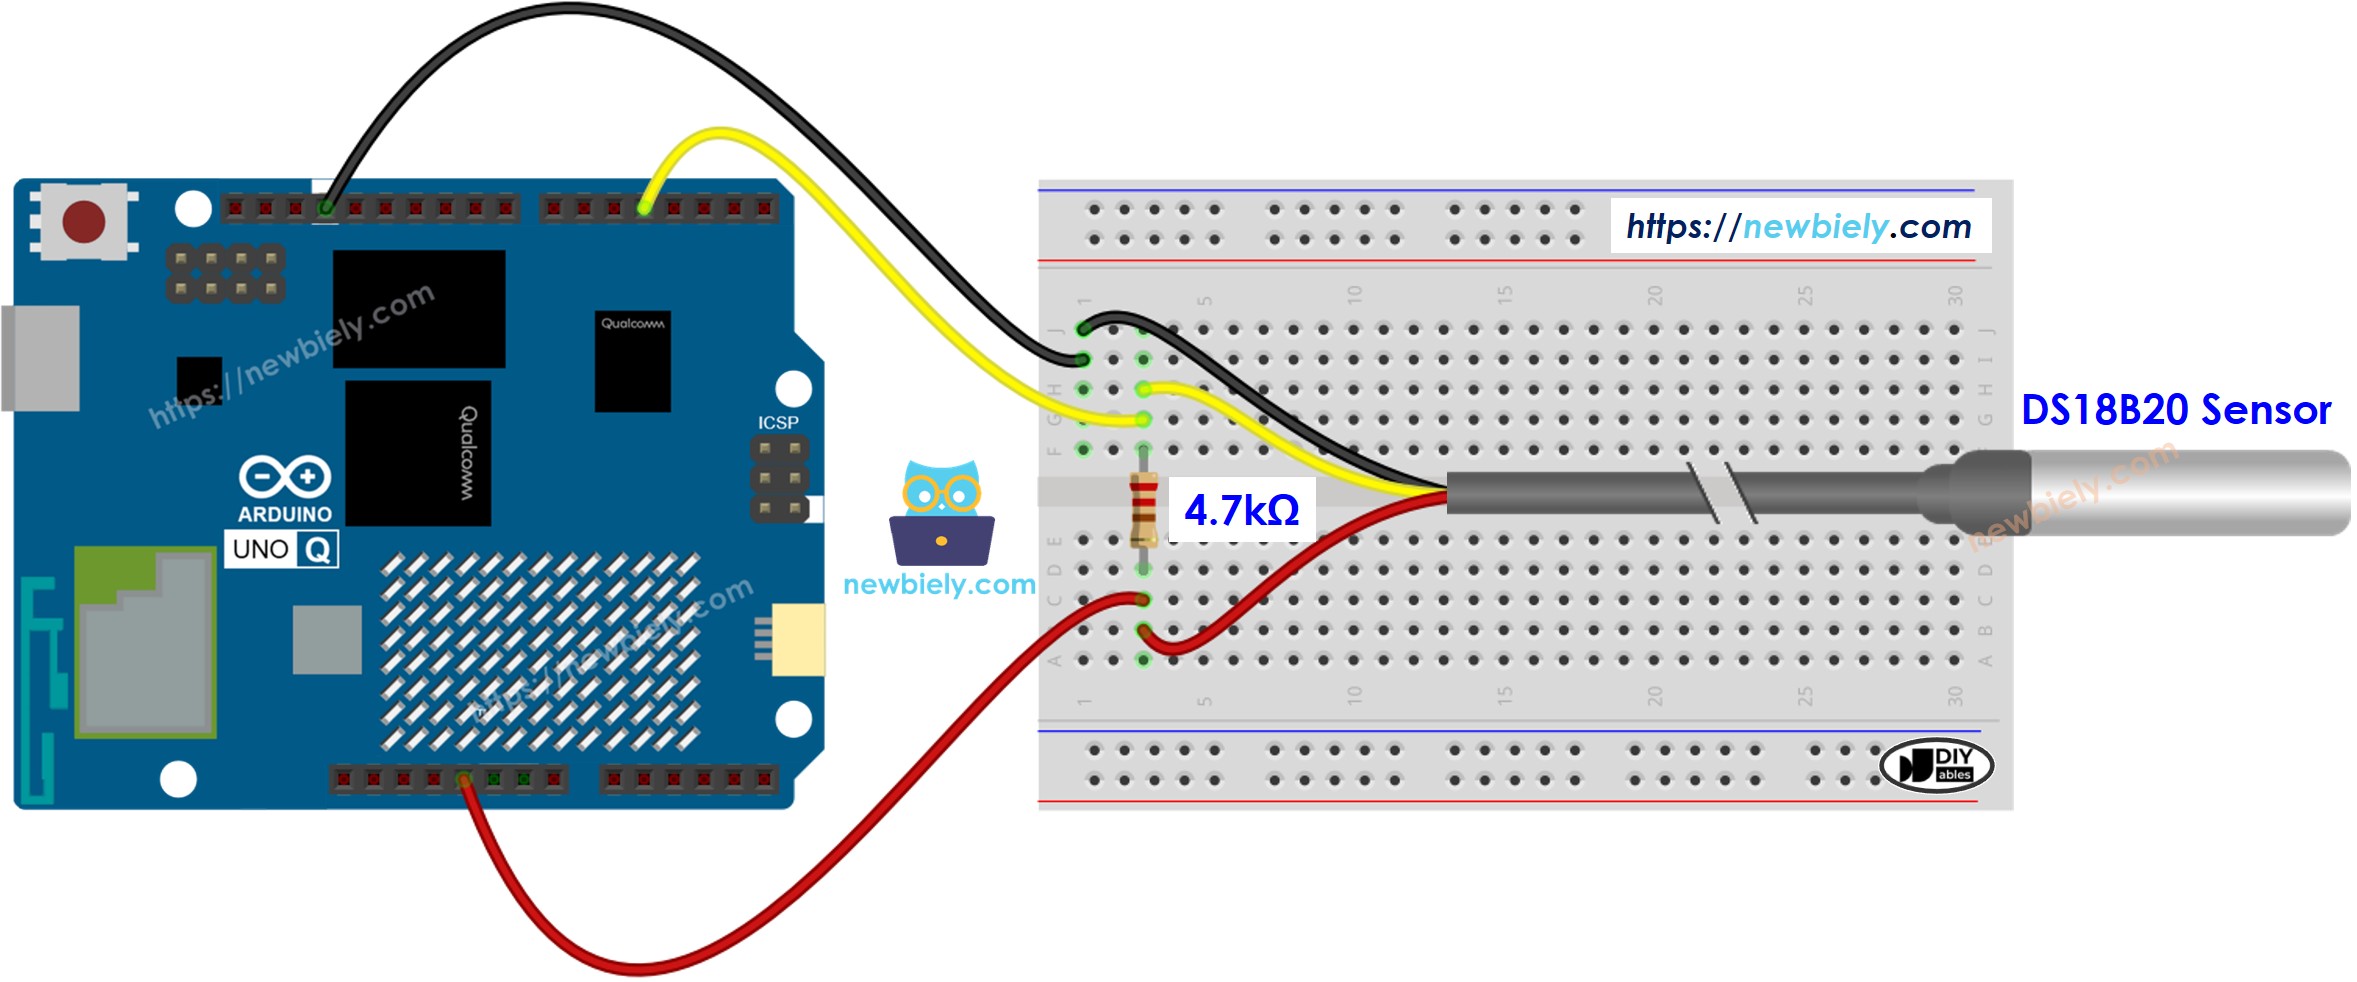
This image is created using Fritzing. Click to enlarge image
- Wiring diagram with adapter (no extra resistor needed):
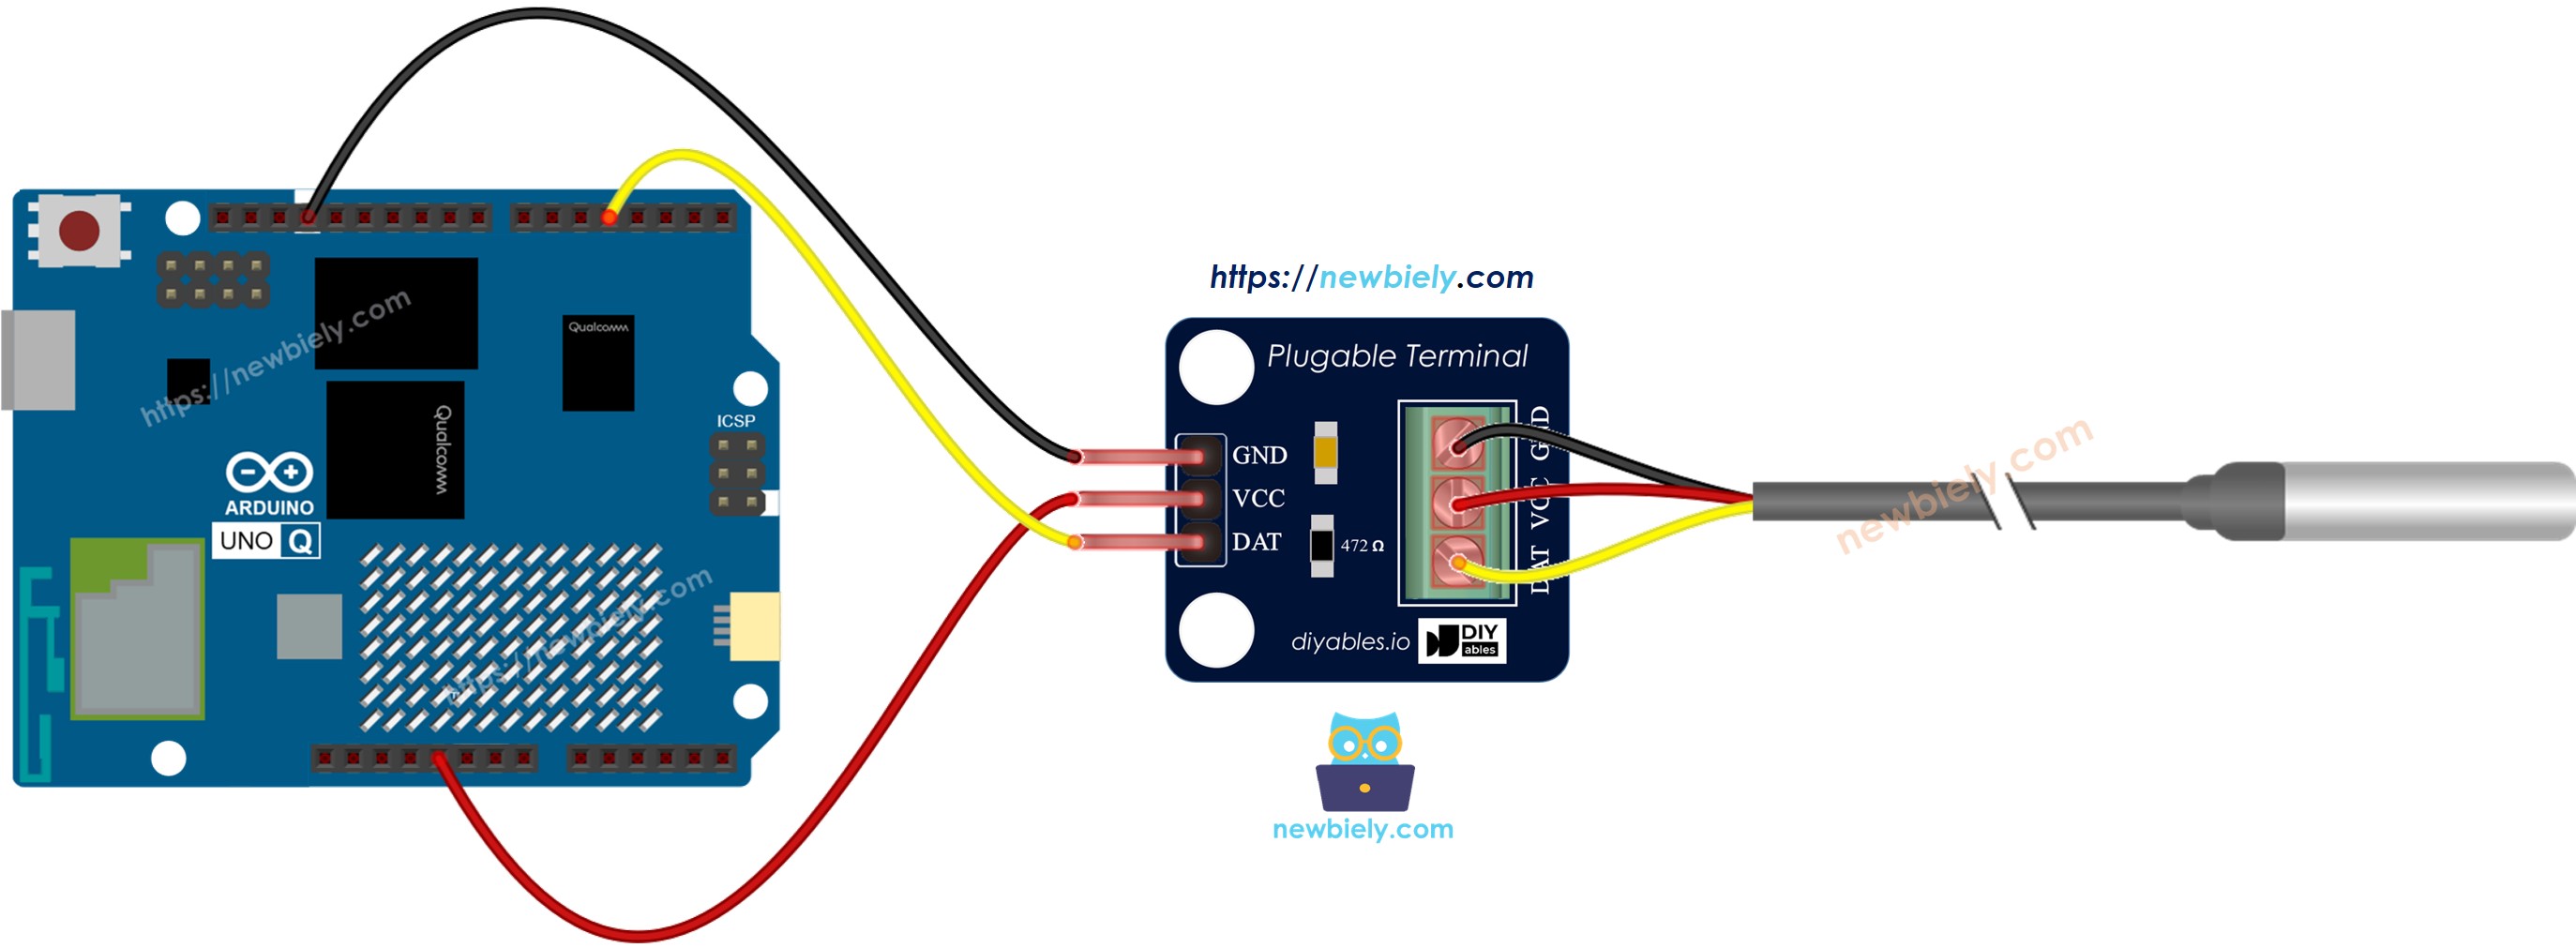
This image is created using Fritzing. Click to enlarge image
We recommend buying a DS18B20 sensor with a wiring adapter. This adapter makes it simple to connect because it includes a resistor, so you do not need an extra one.
MCU Code (Direct Arduino Sketch)
Here is the Arduino sketch that runs directly on the STM32 MCU to read temperature from the DS18B20 sensor and output readings to the App Lab console.
- Initializes the DS18B20 sensor using the DallasTemperature library
- Requests a temperature reading every 500ms
- Reads temperature in Celsius and converts to Fahrenheit
- Outputs both values to the App Lab console
Detailed Instructions
- First time with Arduino UNO Q? Follow the Getting Started with Arduino UNO Q tutorial to get your development environment ready before proceeding.
- Wire the sensor: Connect the DS18B20 to Arduino UNO Q pin 4 according to the wiring diagram above. If using the adapter, follow the adapter wiring diagram.
- Connect: Plug the Arduino UNO Q into your computer with a USB-C cable.
- Open Arduino App Lab: Launch Arduino App Lab and wait until it detects your Arduino UNO Q — this can take several minutes on first launch.
- Create a new App: Click the Create New App button.

- Give the App a name, for example: DIYables_DS18B20
- Click Create to confirm.
- You will see a set of folders and files generated inside your new App.

- Find the sketch/sketch.ino file — this is where you will paste the MCU sketch.
- Install the library: Click the Add sketch library button (the open book icon with a + sign) in the left sidebar.

- Search for DallasTemperature created by Miles Burton
- Search for OneWire created by Jim Studt, Tom Pollard, Robin James, Glenn Trewitt, Jason Dangel, Guillermo Lovato, Paul Stoffregen, Scott Roberts, Bertrik Sikken, Mark Tillotson, Ken Butcher, Roger Clark, Love Nystrom and click the Install button.
- Search for Arduino_RouterBridge created by Arduino and click the Install button.
- Upload: Click the Run button in Arduino App Lab to compile and upload to the STM32.

- Check readings: Open the Console tab → Serial Monitor subtab to see live temperature output.
- Test: Hold the sensor in your hand or place it in warm water and watch the temperature rise.
- Pro Tip: The DS18B20 takes about 750ms to complete a conversion — if readings seem frozen, increase the delay() value to at least 800ms.
App Lab Console Output
Linux + MCU Bridge Programming
The Arduino UNO Q has two processors that work together: the MPU (Qualcomm, runs Debian Linux) and the MCU (STM32, runs Zephyr OS with your Arduino sketch). They communicate using RPC via the Arduino_RouterBridge library — never via raw serial ports.
- DS18B20 is connected to the MCU (STM32) — the sensor is wired to a digital pin on the STM32, not to the MPU. The MCU reads raw 1-Wire data from the sensor directly.
- MPU cannot read the sensor directly — to get the temperature, the MPU must send a request to the MCU via Bridge.call(). The MCU executes the corresponding Bridge.provide() function and returns the result.
- MPU has Wi-Fi — because the MPU runs full Debian Linux with Wi-Fi support, it can connect to the Internet and do things the MCU cannot: send Telegram messages, call REST APIs, upload data to cloud services, and more.
- Communication: Bridge.call() on the Linux side invokes Bridge.provide() functions on the MCU side
- ⚠️ Reserved: /dev/ttyHS1 (Linux) and Serial1 (MCU) are used by the Arduino Router — never open them directly
In short: MCU reads the sensor → MPU requests the value → MPU uses it over the Internet.
MCU sketch — exposes temperature reading to the Linux side:
Python script (Arduino App Lab) — read temperature from Linux:
- Note: Make sure Bridge.begin() is called in the MCU sketch and the sketch is uploaded before running the Python script on the Linux side.
- ⚠️ Warning: Never directly open /dev/ttyHS1 (on Linux) or use Serial1 (on MCU) in your code — these are reserved by the Arduino Router and accessing them will break the Bridge.
Detailed Instructions
- Upload the MCU sketch: Open Arduino App Lab, create a new App, paste the Bridge MCU sketch above into sketch/sketch.ino, install the DallasTemperature and OneWire libraries, and click Run.
- Add the Python script: Paste the Python code above into the Python tab of the same App.
- Run the App: Click Run — the Linux side will start requesting temperature readings every second.
- Check the console: Open the Console tab → Python Console subtab to see live temperature output from the Linux side.
- Pro Tip: Adjust the time.sleep(1) value to control how often temperature is polled — increase it to reduce CPU usage on the Linux side.
App Lab Console Output
Telegram Integration
You can read the temperature from your DS18B20 sensor remotely over Telegram — send a command from anywhere and get the current temperature reading back instantly.
If you do not have a Telegram bot yet, see How to Create a Telegram Bot to get your bot token before continuing.
This section covers:
- Running a Python script on the Linux side of Arduino UNO Q to listen for Telegram messages
- Forwarding the temperature request to the MCU side via Bridge.call()
- Sending the temperature reading back as a Telegram reply
MCU sketch: Keep the same MCU sketch from the previous Bridge section — no changes needed. Make sure it is already uploaded and running on the STM32 before proceeding.
Python script (Arduino App Lab) — Telegram bot for DS18B20 temperature sensor:
- Note: Replace YOUR_BOT_TOKEN with the token obtained from @BotFather on Telegram.
- Send /temperature to your bot to get the current temperature reading from the DS18B20 sensor.
Detailed Instructions
- Upload the MCU sketch: Use the Bridge MCU sketch from the previous section (upload it first if not already done).
- Paste the Telegram script: Copy the Python code above into the Python tab of your App in Arduino App Lab.
- Set your token: Replace YOUR_BOT_TOKEN in the script with your actual bot token.
- Run the App: Click Run — the bot starts listening for Telegram messages immediately.
- Test it: Send /temperature to your bot and get the current reading back.
- Pro Tip: Schedule /temperature polls from your phone's Telegram to monitor temperature trends throughout the day.
App Lab Console Output

ArduinoBot
OpenClaw Integration
You can adapt the OpenClaw to this tutorial by refering the instruction on Arduino Uno Q - OpenClaw Tutorial
Application/Project Ideas
Here are some project ideas you can build with the DS18B20 temperature sensor and Arduino UNO Q:
- Room temperature monitor: Log temperature readings every minute and display trends on the Linux side
- Temperature alert system: Send a Telegram alert when temperature exceeds a set threshold
- Smart thermostat: Read DS18B20 temperature from the Linux side and control a relay or fan via Bridge.call() based on the reading
- Data logger: Have the Python side save temperature readings to a CSV file on the Linux filesystem every few seconds
- Multi-sensor network: Connect multiple DS18B20 sensors to a single pin (each has a unique ID) and read all of them from the Linux side
- Plant protection system: Monitor outdoor temperature and send a Telegram warning when frost conditions are detected
Need more DS18B20 details? Check out the Arduino DS18B20 tutorial for more ideas.
Challenge Yourself
Try these challenges with the DS18B20 temperature sensor and Arduino UNO Q to level up your skills:
- Easy: Modify the MCU sketch to also read and display the sensor's unique 64-bit address alongside the temperature reading
- Medium: Add a second DS18B20 sensor on the same data pin and have the Python side read both sensors independently using their unique addresses
- Advanced: Build a Telegram-controlled temperature logger that saves readings to a file on the Linux side and sends a summary report (min/max/average) when requested via Telegram