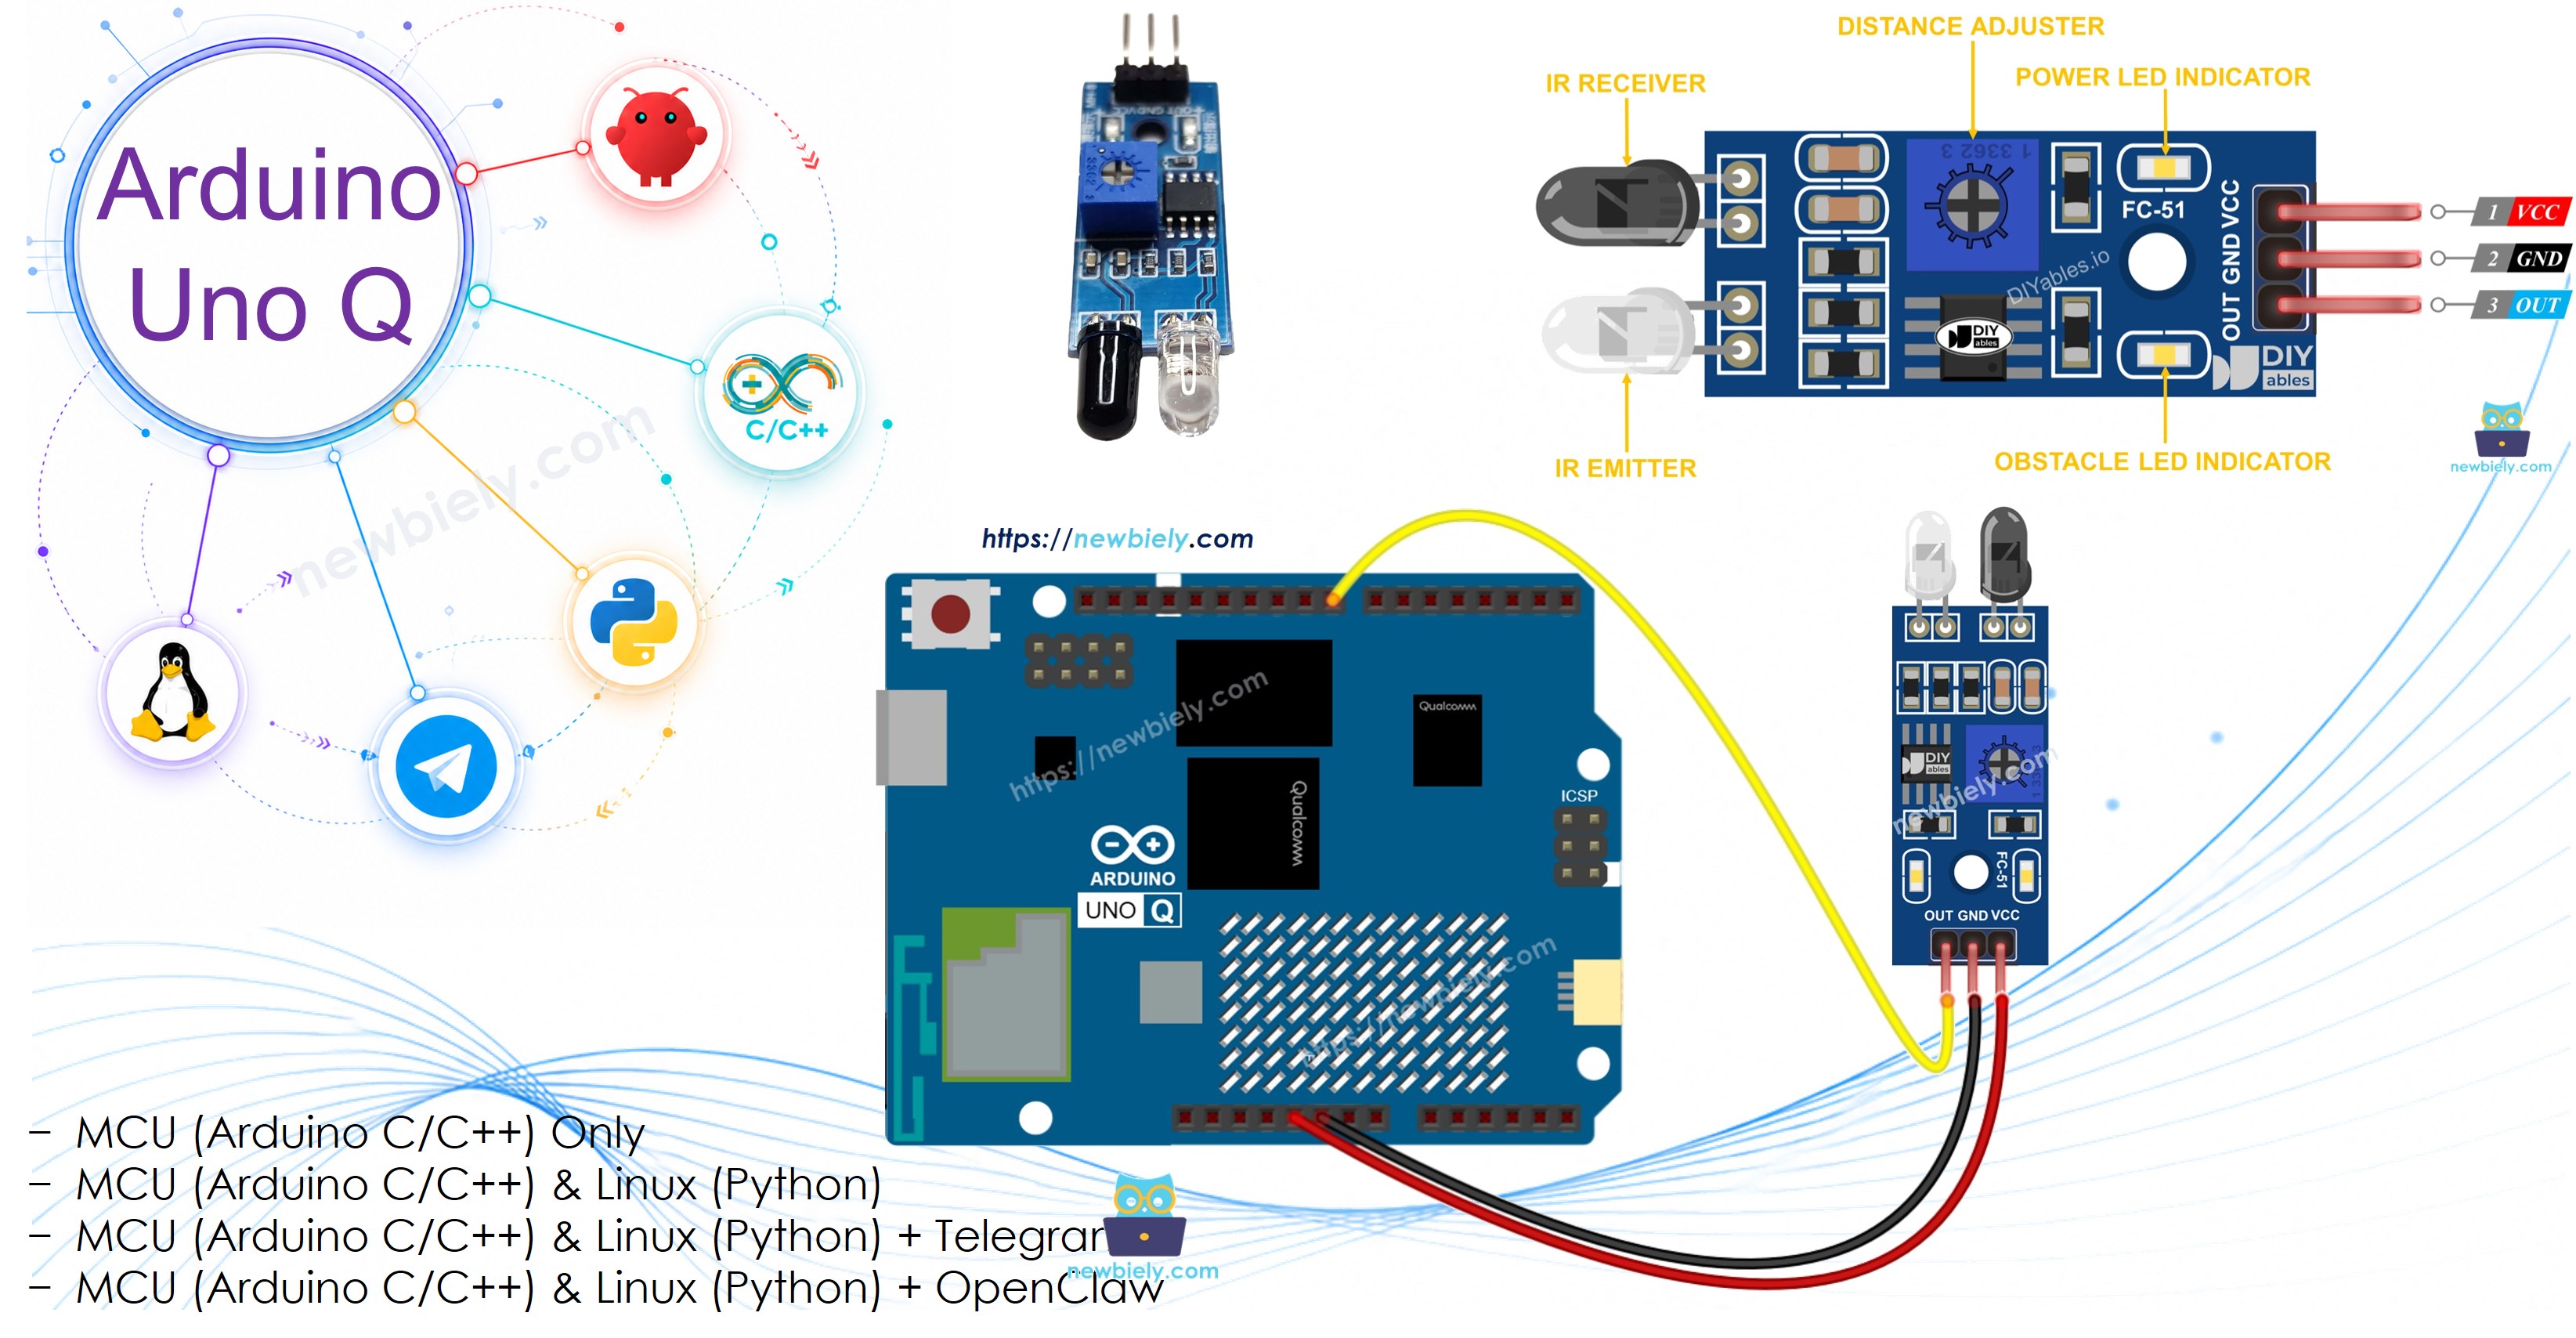
Arduino UNO Q - Obstacle Avoidance Sensor

The IR obstacle avoidance sensor uses infrared light to detect objects in front of it. It reports a digital LOW signal when an obstacle is present and HIGH when the path is clear. With Bridge and Telegram, your Arduino UNO Q can send instant alerts when an object enters the detection zone.

In this tutorial, you will learn:

Arduino UNO Q Obstacle Avoidance Sensor

Hardware Preparation

1×Arduino UNO Q
1×USB Cable for Arduino Uno Q
1×IR Obstacle Avoidance Sensor
1×Alternatively, TCRT5000 Obstacle Avoidance Sensor
1×Jumper Wires
1×Recommended: Screw Terminal Block Shield for Arduino Uno
1×Recommended: Sensors/Servo Expansion Shield for Arduino Uno
1×Recommended: Breadboard Shield for Arduino Uno
1×Recommended: Enclosure for Arduino Uno
1×Recommended: Prototyping Base Plate & Breadboard Kit for Arduino UNO

Or you can buy the following kits:

1×DIYables Sensor Kit (18 sensors/displays)
Disclosure: Some of the links provided in this section are Amazon affiliate links. We may receive a commission for any purchases made through these links at no additional cost to you.
Additionally, some of these links are for products from our own brand, DIYables .

Overview of the IR Obstacle Avoidance Sensor

The infrared obstacle avoidance sensor detects objects using an IR transmitter and receiver. The transmitter emits an IR beam; when an object reflects the beam back, the receiver detects it and the OUT pin goes LOW.
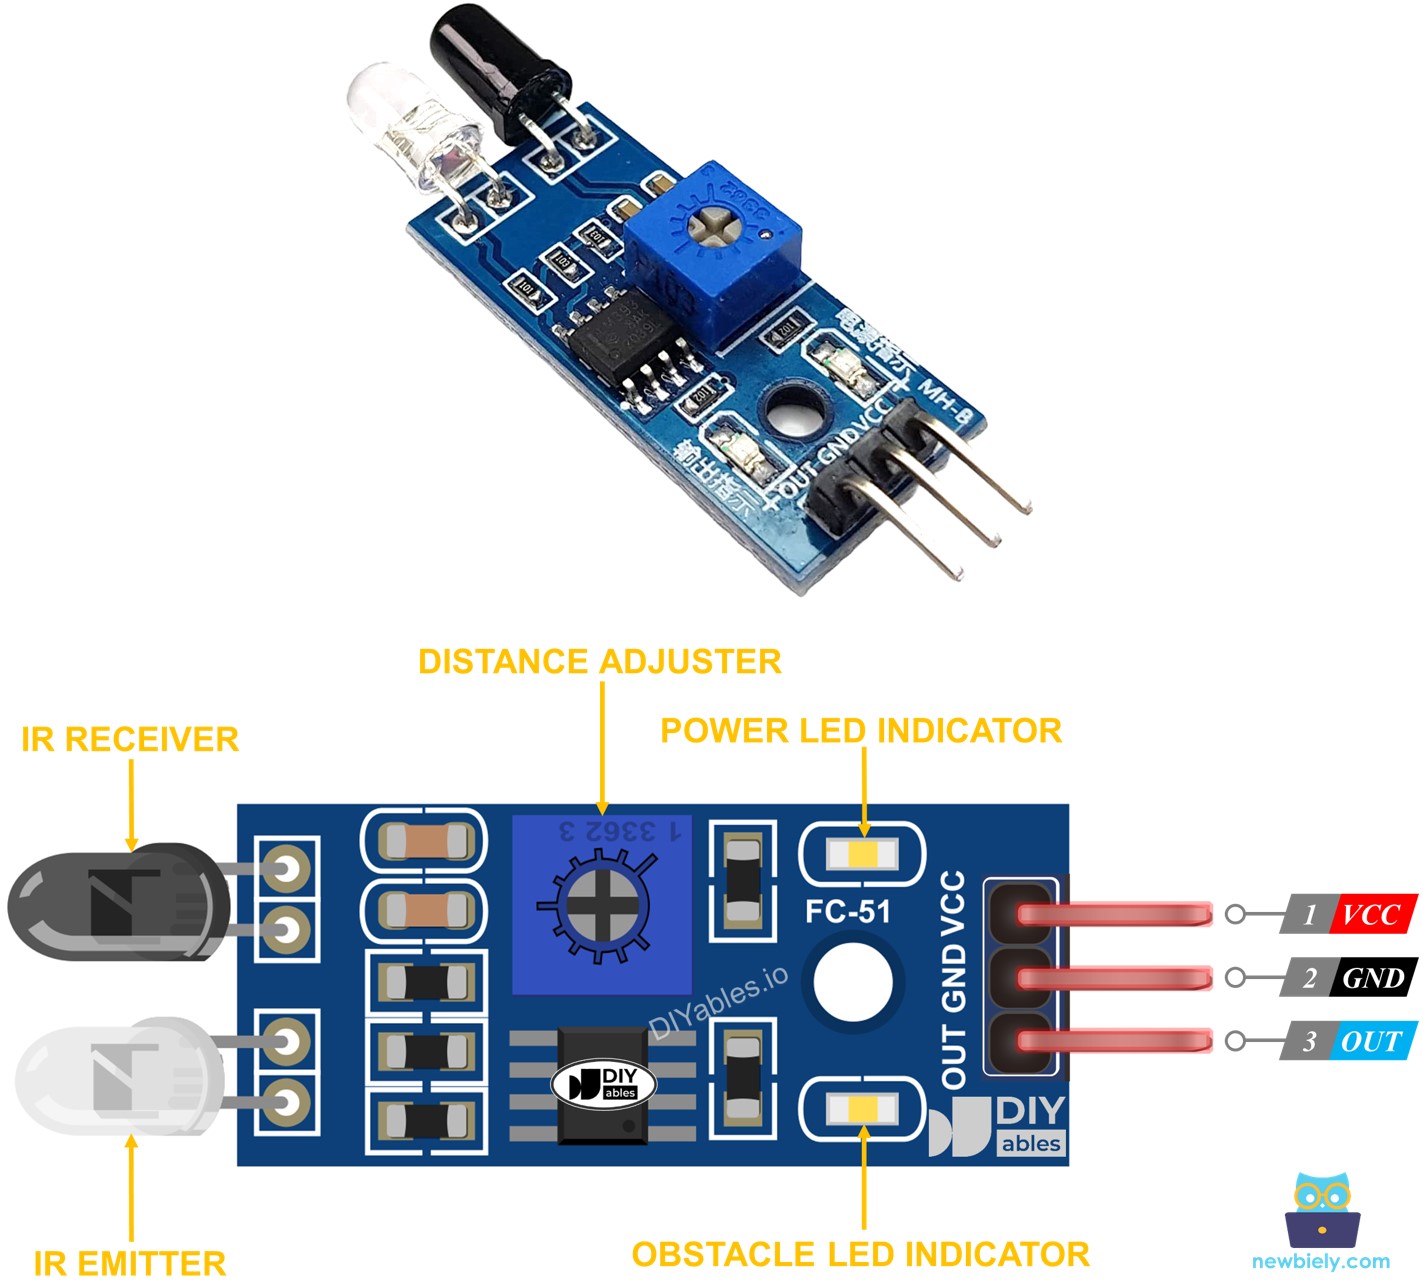
IR Obstacle Avoidance Sensor Pinout

Pinout

  • VCC pin: Connect to VCC (3.3V or 5V)
  • GND pin: Connect to GND (0V)
  • OUT pin: Digital output — LOW = obstacle detected, HIGH = no obstacle

How It Works

  • When an obstacle is in front of the sensor: OUT pin = LOW
  • When the path is clear: OUT pin = HIGH
  • Detection range: 2 cm to 30 cm — adjustable via the onboard potentiometer
  • Detection angle: approximately 35°

※ NOTE THAT:

During shipping, the IR transmitter and receiver may get misaligned. If the sensor does not respond correctly, gently bend them to be parallel to each other.

Wiring Diagram

The wiring diagram between Arduino UNO Q IR Obstacle Avoidance Sensor

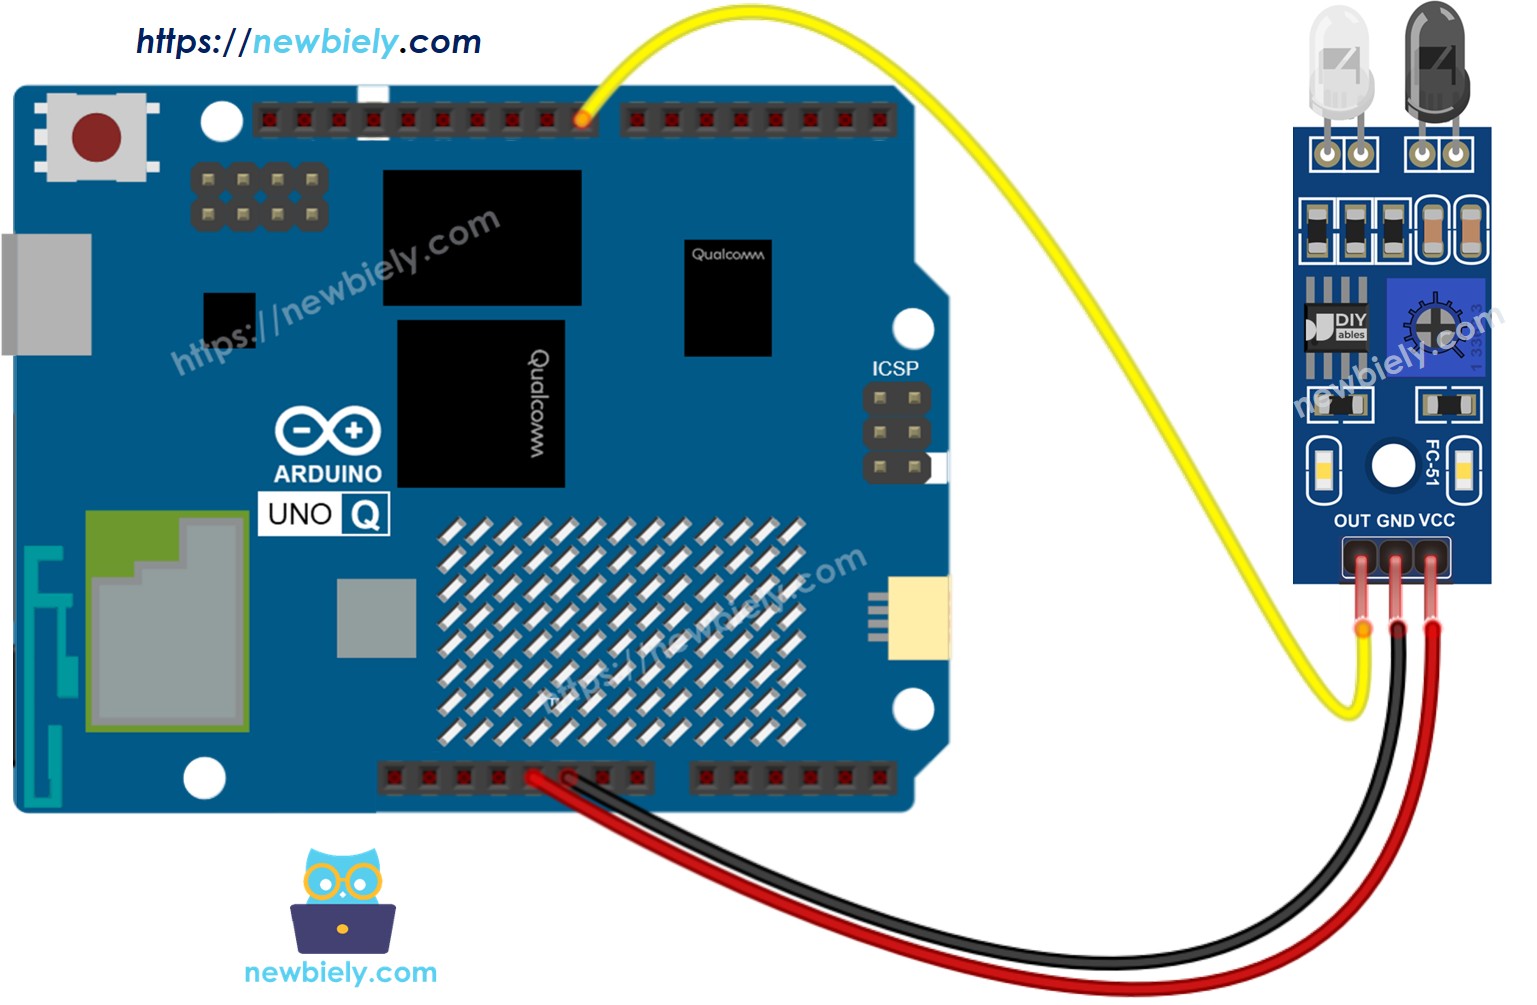
This image is created using Fritzing. Click to enlarge image

IR Obstacle Sensor Pin Arduino UNO Q MCU
VCC 3.3V
GND GND
OUT D8

How To Program For IR Obstacle Avoidance Sensor

  • Configure the sensor pin as a digital input:
pinMode(SENSOR_PIN, INPUT);
  • Read the output — LOW means obstacle detected, HIGH means clear:
int state = digitalRead(SENSOR_PIN); if (state == LOW) Serial.println("Obstacle detected!"); else Serial.println("No obstacle.");

Arduino UNO Q Code

The Arduino UNO Q has two processors working together:

  • The STM32 MCU reads the sensor every 100 ms and reports the result via Serial
  • The Qualcomm MPU runs Debian Linux with Wi-Fi — in this section, only the MCU is programmed. A later section shows how both processors work together via Bridge.
/* * This Arduino UNO Q code was developed by newbiely.com * * This Arduino UNO Q code is made available for public use without any restriction * * For comprehensive instructions and wiring diagrams, please visit: * https://newbiely.com/tutorials/arduino-uno-q/arduino-uno-q-obstacle-avoidance-sensor */ // COPYRIGHT newbiely.com // AUTHOR: newbiely // This code is made available for public use without restriction. // For complete instructions, tutorials, and further information, visit: // https://newbiely.com/tutorials/arduino-uno-q/arduino-uno-q-obstacle-avoidance-sensor // IR Obstacle Avoidance Sensor: // OUT pin: LOW = obstacle detected, HIGH = no obstacle #define SENSOR_PIN 8 // The Arduino UNO Q MCU pin connected to OUT of the IR obstacle sensor void setup() { Serial.begin(9600); pinMode(SENSOR_PIN, INPUT); Serial.println("Arduino UNO Q IR Obstacle Avoidance Sensor ready"); } void loop() { int state = digitalRead(SENSOR_PIN); // LOW = obstacle, HIGH = clear if (state == LOW) Serial.println("Obstacle detected!"); else Serial.println("No obstacle."); delay(100); }

Detailed Instructions

First time with Arduino UNO Q? Follow the Getting Started with Arduino UNO Q tutorial before proceeding.

  • Connect: Wire the IR obstacle sensor to the Arduino UNO Q MCU as shown in the wiring diagram.
  • Open Arduino App Lab: Launch Arduino App Lab and wait until it detects your Arduino UNO Q.
  • Create a new App: Click the Create New App button.
Create New App in Arduino App Lab on Arduino UNO Q
  • Give the App a name, for example: ObstacleSensor
  • Click Create to confirm.
Arduino App Lab App folders and files on Arduino UNO Q
  • Paste the sketch: Copy the MCU code above and paste it into sketch/sketch.ino.
  • Upload: Click the Run button in Arduino App Lab.
Click Run button in Arduino App Lab on Arduino UNO Q
  • Place your hand in front of the sensor and observe the Serial Monitor.
  • Adjust the potentiometer to change the detection range.

App Lab Console Output

DIYables_Apps
Stop
sketch.ino
1#include "Arduino_RouterBridge.h"
Serial Monitor
Python
Message (Enter to send a message to "Newbiely" on usb(2820070321))
New Line
9600 baud
[2026-04-29 09:00:01] Arduino UNO Q IR Obstacle Avoidance Sensor ready [2026-04-29 09:00:02] No obstacle. [2026-04-29 09:00:03] No obstacle. [2026-04-29 09:00:04] Obstacle detected! [2026-04-29 09:00:05] Obstacle detected! [2026-04-29 09:00:06] No obstacle.

Bridge: Linux + MCU

This section shows how to program both processors of the Arduino UNO Q so the Linux side can read obstacle state and receive events via Bridge:

  • The obstacle sensor is connected to the MCU — the MCU reads the sensor every 100 ms
  • The MPU cannot read the sensor pin directly — it calls Bridge functions to get the current state or receive events
  • The MPU has Wi-Fi — running full Debian Linux, it can send instant Telegram alerts when an obstacle is detected
  • Arduino_RouterBridge enables RPC communication between the two processors
  • ⚠️ /dev/ttyHS1 (Linux) and Serial1 (MCU) are RESERVED by the router — never open them in user code

MCU Code (Bridge)

/* * This Arduino UNO Q code was developed by newbiely.com * * This Arduino UNO Q code is made available for public use without any restriction * * For comprehensive instructions and wiring diagrams, please visit: * https://newbiely.com/tutorials/arduino-uno-q/arduino-uno-q-obstacle-avoidance-sensor */ // COPYRIGHT newbiely.com // AUTHOR: newbiely // This code is made available for public use without restriction. // For complete instructions, tutorials, and further information, visit: // https://newbiely.com/tutorials/arduino-uno-q/arduino-uno-q-obstacle-avoidance-sensor #include "Arduino_RouterBridge.h" #define SENSOR_PIN 8 // The Arduino UNO Q MCU pin connected to OUT of the IR obstacle sensor bool cached_obstacle = false; bool obstacle_event = false; bool prev_obstacle = false; unsigned long last_read_ms = 0; const unsigned long READ_INTERVAL = 100; String get_state(String arg) { return cached_obstacle ? "obstacle" : "clear"; } String get_event(String arg) { if (obstacle_event) { obstacle_event = false; return "obstacle_detected"; } return "none"; } void setup() { Bridge.begin(); Monitor.begin(); pinMode(SENSOR_PIN, INPUT); Bridge.provide("get_state", get_state); Bridge.provide("get_event", get_event); Monitor.println("Arduino UNO Q IR Obstacle Avoidance Sensor Bridge ready"); } void loop() { unsigned long now = millis(); if (now - last_read_ms >= READ_INTERVAL) { last_read_ms = now; int state = digitalRead(SENSOR_PIN); // LOW = obstacle cached_obstacle = (state == LOW); if (cached_obstacle && !prev_obstacle) { obstacle_event = true; Monitor.println("Obstacle detected!"); } else if (!cached_obstacle && prev_obstacle) { Monitor.println("Obstacle cleared."); } prev_obstacle = cached_obstacle; } }

Python Code (Bridge)

/* * This Arduino UNO Q code was developed by newbiely.com * * This Arduino UNO Q code is made available for public use without any restriction * * For comprehensive instructions and wiring diagrams, please visit: * https://newbiely.com/tutorials/arduino-uno-q/arduino-uno-q-obstacle-avoidance-sensor */ # COPYRIGHT newbiely.com # AUTHOR: newbiely # This code is made available for public use without restriction. # For complete instructions, tutorials, and further information, visit: # https://newbiely.com/tutorials/arduino-uno-q/arduino-uno-q-obstacle-avoidance-sensor from arduino.app_utils import * import time def loop(): state = Bridge.call("get_state") print(f"Obstacle state: {state}") time.sleep(0.2) App.run(user_loop=loop)

Detailed Instructions

  • Connect: Wire the IR obstacle sensor to the Arduino UNO Q as shown in the wiring diagram.
  • Open Arduino App Lab and create a new App named ObstacleSensorBridge.
  • Paste the MCU sketch into sketch/sketch.ino.
  • Paste the Python code into the Python file.
  • Install the library: Click the Add sketch library button (the open book icon with a + sign) in the left sidebar.
Add sketch library in Arduino App Lab on Arduino UNO Q
  • Search for Arduino_RouterBridge created by Arduino and click the Install button.
My Apps / DIYables Apps
Run
Bricks
No bricks added...
Sketch Libraries
No sketch libra...
Files
python
sketch
.gitignore
README.md
app.yaml
sketch.ino
Add sketch library
Arduino_RouterBridge Arduino

This library provides a simple RPC bridge for Arduino UNO Q boards, allowing communication between the board and other devices using MsgPack serialization.

0.4.1
Install
More Info
  • Upload: Click the Run button.
Click Run button in Arduino App Lab on Arduino UNO Q
  • Place an object in front of the sensor and observe both consoles.

App Lab Console Output

DIYables_Apps
Stop
sketch.ino
1#include "Arduino_RouterBridge.h"
Serial Monitor
Python
Message (Enter to send a message to "Newbiely" on usb(2820070321))
New Line
9600 baud
[2026-04-29 09:00:01] Arduino UNO Q IR Obstacle Avoidance Sensor Bridge ready [2026-04-29 09:00:04] Obstacle detected! [2026-04-29 09:00:06] Obstacle cleared.
DIYables_Apps
Stop
sketch.ino
1#include "Arduino_RouterBridge.h"
Serial Monitor
Python
[2026-04-29 09:00:02] Obstacle state: clear [2026-04-29 09:00:03] Obstacle state: clear [2026-04-29 09:00:04] Obstacle state: obstacle [2026-04-29 09:00:05] Obstacle state: obstacle [2026-04-29 09:00:06] Obstacle state: clear

Telegram

Receive instant Telegram alerts when an obstacle is detected in front of the sensor, and query its state remotely.

MCU sketch: Keep the same MCU sketch from the previous Bridge section.

Python Code (Telegram)

/* * This Arduino UNO Q code was developed by newbiely.com * * This Arduino UNO Q code is made available for public use without any restriction * * For comprehensive instructions and wiring diagrams, please visit: * https://newbiely.com/tutorials/arduino-uno-q/arduino-uno-q-obstacle-avoidance-sensor */ # COPYRIGHT newbiely.com # AUTHOR: newbiely # This code is made available for public use without restriction. # For complete instructions, tutorials, and further information, visit: # https://newbiely.com/tutorials/arduino-uno-q/arduino-uno-q-obstacle-avoidance-sensor from arduino.app_utils import * import requests import time TELEGRAM_BOT_TOKEN = "YOUR_TELEGRAM_BOT_TOKEN" CHAT_ID = "YOUR_CHAT_ID" last_update_id = 0 def get_updates(): global last_update_id url = f"https://api.telegram.org/bot{TELEGRAM_BOT_TOKEN}/getUpdates" params = {"offset": last_update_id + 1, "timeout": 5} try: response = requests.get(url, params=params, timeout=10) data = response.json() if data["ok"]: return data["result"] except Exception as e: print(f"Error getting updates: {e}") return [] def send_message(chat_id, text): url = f"https://api.telegram.org/bot{TELEGRAM_BOT_TOKEN}/sendMessage" payload = {"chat_id": chat_id, "text": text} try: requests.post(url, data=payload, timeout=10) except Exception as e: print(f"Error sending message: {e}") def loop(): # Auto-alert on obstacle detected event = Bridge.call("get_event") if event == "obstacle_detected": print("Obstacle detected!") send_message(CHAT_ID, "🚧 Obstacle detected in front of the sensor!") # Handle Telegram commands updates = get_updates() for update in updates: last_update_id = update["update_id"] if "message" not in update: continue message = update["message"] chat_id = message["chat"]["id"] text = message.get("text", "").strip() print(f"Received: {text}") if text == "/start": send_message(chat_id, "Arduino UNO Q Obstacle Sensor Bot\n" "/state - Current obstacle state (obstacle / clear)\n" "Automatic alert when an obstacle is detected!") elif text == "/state": result = Bridge.call("get_state") send_message(chat_id, f"Obstacle state: {result}") else: send_message(chat_id, "Unknown command. Send /start for help.") time.sleep(0.1) App.run(user_loop=loop)

Detailed Instructions

  • Replace YOUR_TELEGRAM_BOT_TOKEN with your actual bot token from BotFather.
  • Replace YOUR_CHAT_ID with your Telegram chat ID.
  • Paste this Python code into your App's Python file (keep the same MCU sketch).
  • Click the Run button — place an object in front of the sensor to trigger the Telegram alert.

App Lab Console Output

DIYables_Apps
Stop
sketch.ino
1#include "Arduino_RouterBridge.h"
Serial Monitor
Python
[2026-04-29 09:10:01] Waiting for Telegram messages... [2026-04-29 09:10:04] Obstacle detected! [2026-04-29 09:10:10] Received: /state
Telegram
Telegram 12:45
Welcome to Telegram!
ArduinoBot 10:19
Chatting with Arduino...
telegram-botfather
BotFather Yesterday
Your bot has been created.

ArduinoBot

bot
Today
🚧 Obstacle detected in front of the sensor!
10:15 AM
/state
10:16 AM ✓✓
Obstacle state: clear
10:17 AM

OpenClaw

...OPENCLAW

OpenClaw support for Arduino UNO Q Obstacle Avoidance Sensor is coming soon.

...OPENCLAW

Project Ideas

You can build many useful projects with the IR obstacle avoidance sensor and Arduino UNO Q:

  • Doorway Visitor Counter: Mount the sensor at a doorway — each time an obstacle (person) crosses, the event counter increments; the MPU sends a Telegram summary with the daily count when you send /count
  • Package Delivery Notifier: Place the sensor facing a mailbox or delivery area — when a package is dropped and detected, Python sends a Telegram alert "Package delivered!" to your phone
  • Robot Obstacle Stop: Connect the sensor to a motor-driven robot — when the MCU detects an obstacle, it stops the motors immediately; the MPU sends a Telegram notification with the obstacle event time
  • Automated Gate Trigger: Use the sensor to detect a vehicle approaching — when an obstacle is detected for more than 200 ms, the MCU triggers a relay to open a gate, and Python sends a Telegram log entry
  • Industrial Parts Counter: Mount the sensor on an assembly line conveyor — count how many parts pass per minute and send the count to Telegram every 5 minutes using a Python timer

Challenge Yourself

Ready to go further with the IR obstacle avoidance sensor on Arduino UNO Q? Try these challenges:

  • Easy: Add a /count Telegram command that returns how many obstacle detection events have occurred since the program started, tracked as a counter in the Python code.
  • Medium: Implement a debounce filter: an obstacle must be continuously detected for at least 300 ms before the event is registered and the Telegram alert is sent — this eliminates false triggers from vibrations or flickering reflections.
  • Advanced: Build a bidirectional people counter: use two IR obstacle sensors spaced a few centimeters apart on a doorway — determine entry vs. exit direction based on which sensor triggers first, and send a Telegram update with current occupancy count.

Learn More

※ OUR MESSAGES

  • As freelancers, We are AVAILABLE for HIRE. See how to outsource your project to us
  • Please feel free to share the link of this tutorial. However, Please do not use our content on any other websites. We invested a lot of effort and time to create the content, please respect our work!