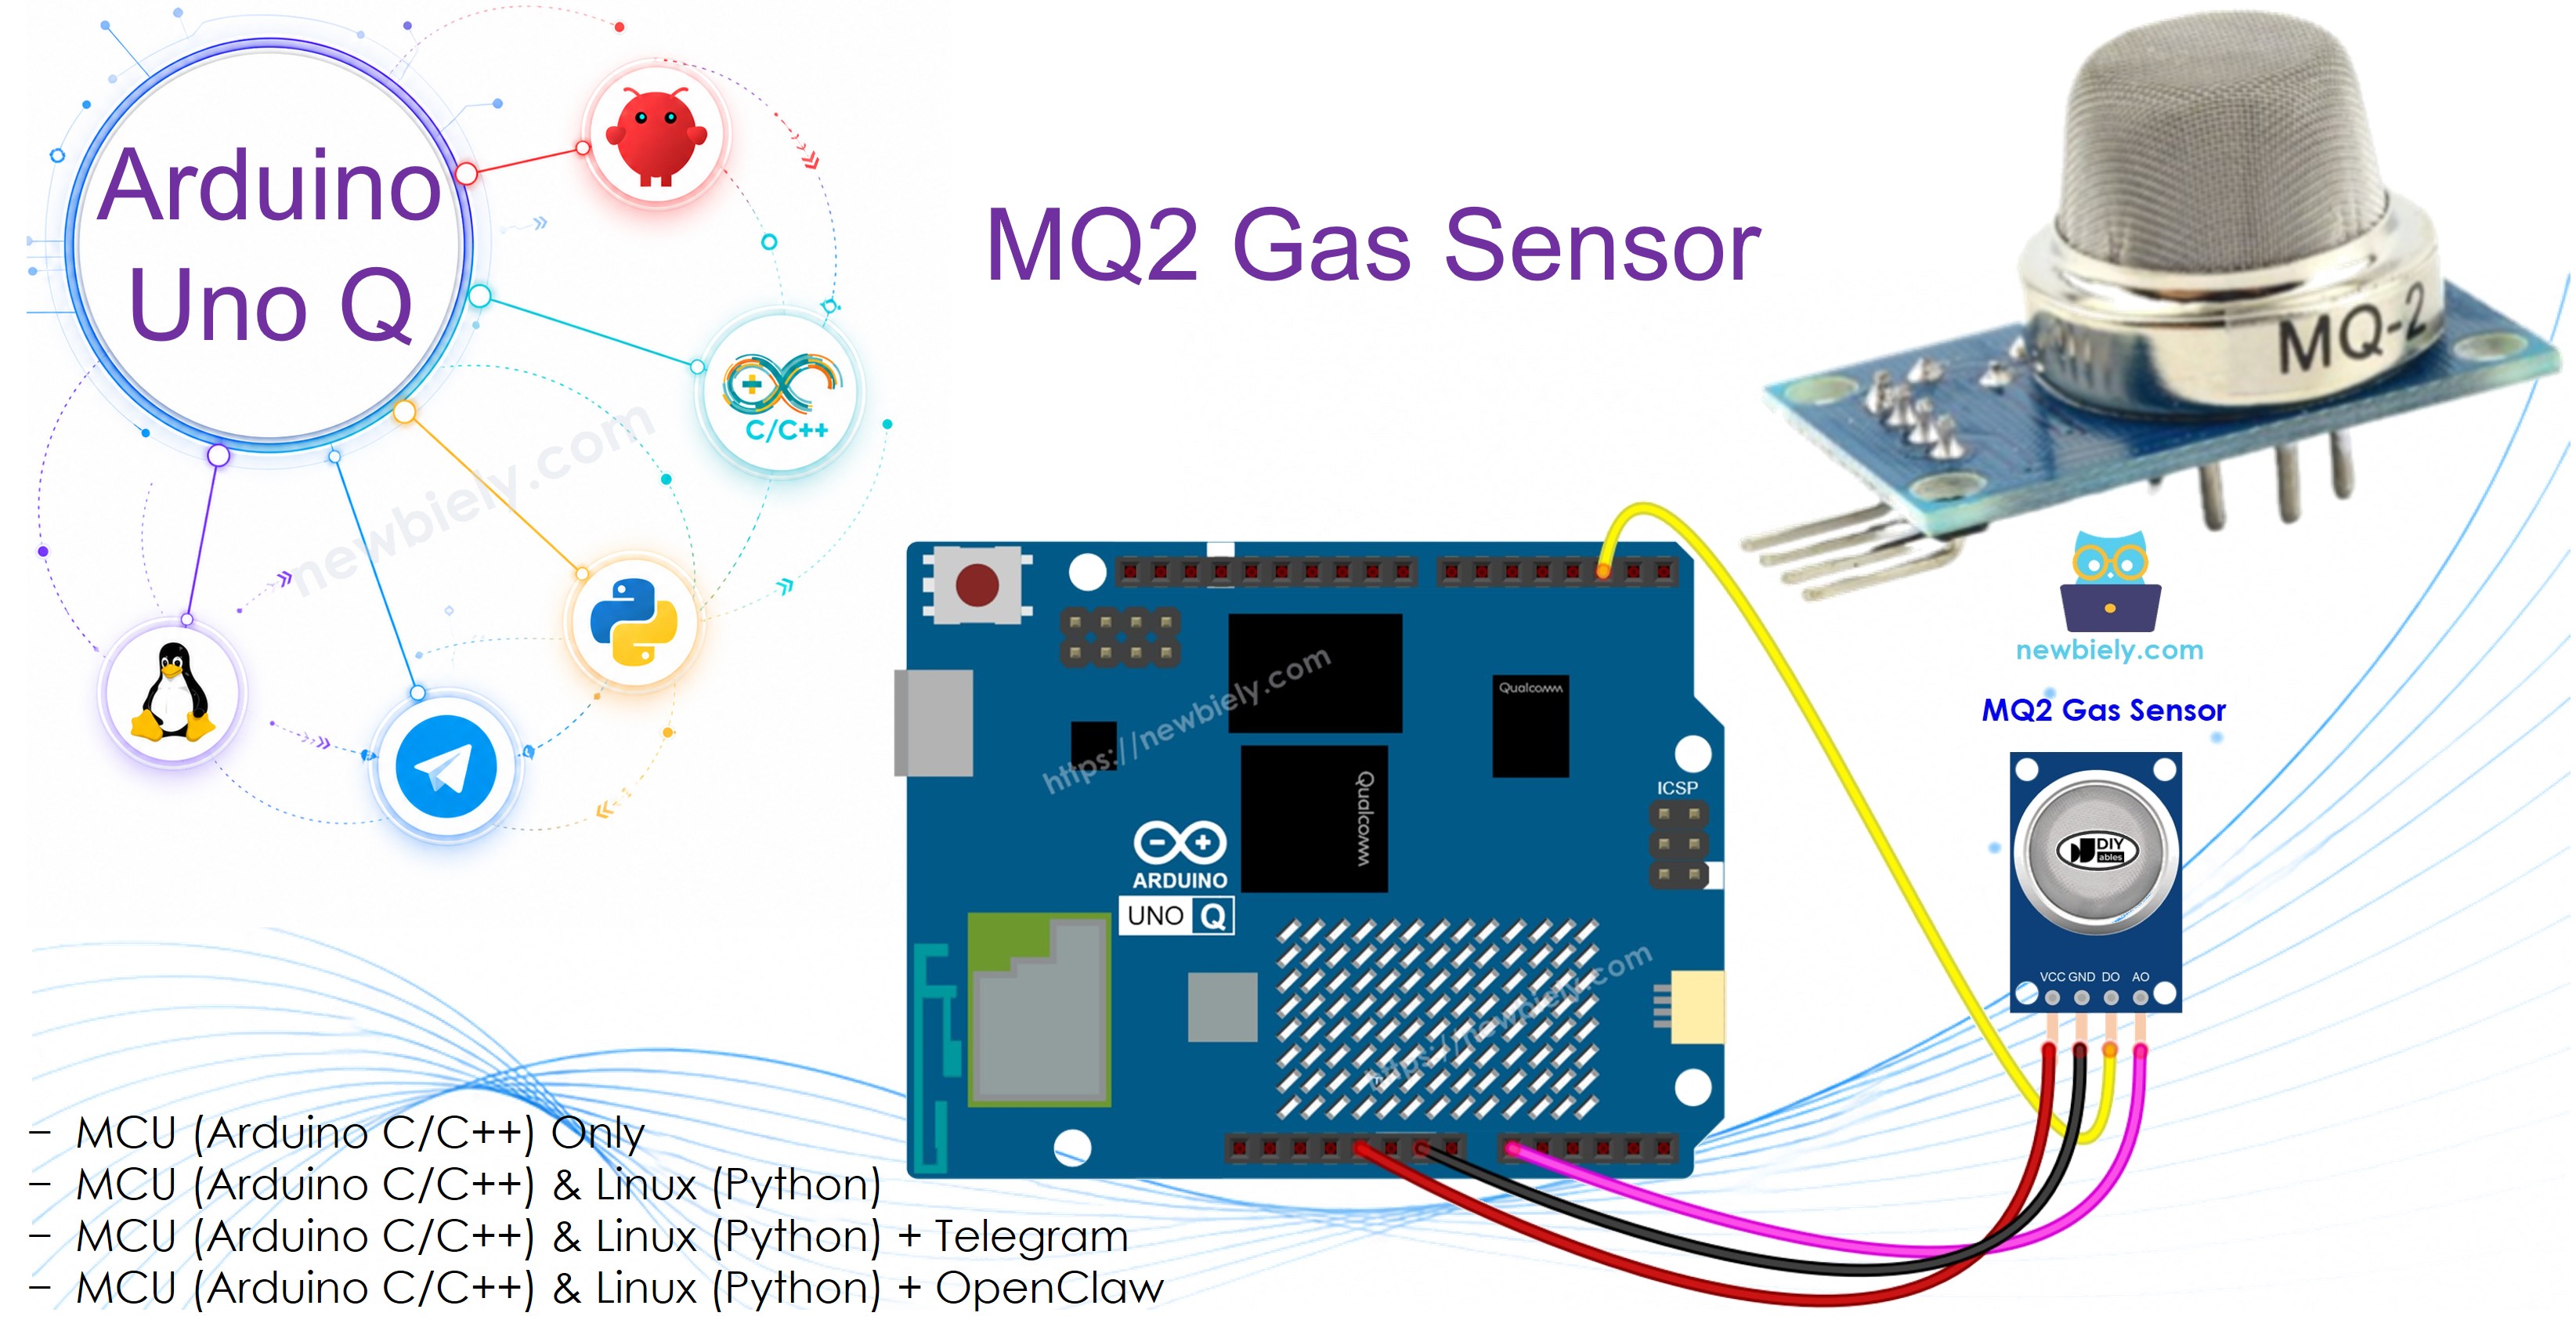
Arduino UNO Q - Gas Sensor

The MQ2 gas sensor detects LPG, smoke, alcohol, propane, hydrogen, methane, and carbon monoxide. It outputs a digital signal (gas/no gas) and an analog signal (gas concentration level). With Bridge and Telegram, your Arduino UNO Q can send instant gas leak alerts to your phone.

In this tutorial, you will learn:

Arduino UNO Q Gas Sensor

※ NOTE THAT:

Use the gas sensor for early warning only. Always pair it with proper gas detectors, ventilation, and safety equipment. Never rely on this sensor alone for life-safety applications.

Hardware Preparation

1×Arduino UNO Q
1×USB Cable for Arduino Uno Q
1×MQ2 Gas Sensor
1×Jumper Wires
1×Recommended: Screw Terminal Block Shield for Arduino Uno
1×Recommended: Sensors/Servo Expansion Shield for Arduino Uno
1×Recommended: Breadboard Shield for Arduino Uno
1×Recommended: Enclosure for Arduino Uno
1×Recommended: Prototyping Base Plate & Breadboard Kit for Arduino UNO

Or you can buy the following kits:

1×DIYables Sensor Kit (18 sensors/displays)
Disclosure: Some of the links provided in this section are Amazon affiliate links. We may receive a commission for any purchases made through these links at no additional cost to you.
Additionally, some of these links are for products from our own brand, DIYables .

Overview of the MQ2 Gas Sensor

The MQ2 can detect: LPG, smoke, alcohol, propane, hydrogen, methane, and carbon monoxide. It does not distinguish individual gases — it measures overall flammable/harmful gas levels.
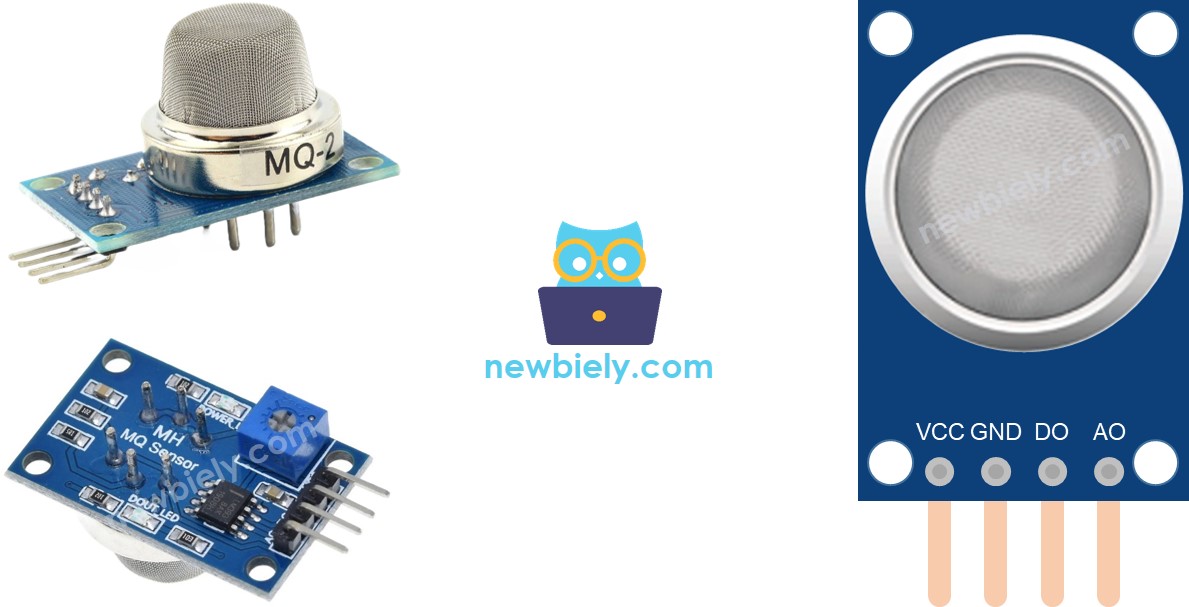
MQ2 Gas Sensor Pinout

Pinout

  • VCC pin: 5V power supply (the internal heating element requires 5V)
  • GND pin: Ground
  • DO pin: Digital output — HIGH = no gas, LOW = gas detected. Sensitivity is adjusted by the onboard potentiometer.
  • AO pin: Analog output — higher value = more gas concentration

LED Indicators

  • PWR-LED: Power indicator
  • DO-LED: Lights up when gas is detected (DO pin LOW)

Warm-Up Requirement

The MQ2 has an internal heater that must reach operating temperature before accurate readings:

  • First use after a long pause (>1 month): Warm up for 24–48 hours
  • Normal use: 5–10 minutes warm-up; initial readings may be high but will stabilize

The code includes a 20-second warm-up delay in setup() as a minimum. Power the sensor and wait before trusting the readings.

※ NOTE THAT:

The MQ2 AO pin can output up to ~5V when powered from 5V. The Arduino UNO Q MCU's ADC reference is 3.3V — voltages above 3.3V will saturate the ADC at 4095. Use the DO pin as the primary gas detection method and AO for relative intensity only.

Wiring Diagram

The wiring diagram between Arduino UNO Q MQ2 Gas Sensor

This image is created using Fritzing. Click to enlarge image

MQ2 Gas Sensor Pin Arduino UNO Q MCU
VCC 5V
GND GND
DO D2
AO A0

How To Program For Gas Sensor

  • Configure the DO pin as a digital input:
pinMode(DO_PIN, INPUT);
  • Read both outputs:
int do_state = digitalRead(DO_PIN); // HIGH = no gas, LOW = gas int ao_value = analogRead(AO_PIN); // 0-4095, higher = more gas
  • Check for gas from digital output:
if (do_state == LOW) { Serial.print("Gas DETECTED! Intensity (AO): "); Serial.println(ao_value); }

Arduino UNO Q Code

The Arduino UNO Q has two processors working together:

  • The STM32 MCU warms up the sensor for 20 seconds, then reads both DO and AO every 500 ms
  • The Qualcomm MPU runs Debian Linux with Wi-Fi — in this section, only the MCU is programmed. A later section shows how both processors work together via Bridge.
/* * This Arduino UNO Q code was developed by newbiely.com * * This Arduino UNO Q code is made available for public use without any restriction * * For comprehensive instructions and wiring diagrams, please visit: * https://newbiely.com/tutorials/arduino-uno-q/arduino-uno-q-gas-sensor */ // COPYRIGHT newbiely.com // AUTHOR: newbiely // This code is made available for public use without restriction. // For complete instructions, tutorials, and further information, visit: // https://newbiely.com/tutorials/arduino-uno-q/arduino-uno-q-gas-sensor // MQ2 Gas Sensor: // DO pin: HIGH = no gas, LOW = gas detected // AO pin: analog — higher value = more gas (12-bit ADC: 0-4095) // VCC = 5V (heating element requires 5V) // The MCU ADC reference is 3.3V. AO readings above 3.3V will saturate at 4095. // Use DO pin as the primary detection method for reliable gas alerts. #define DO_PIN 2 // The Arduino UNO Q MCU pin connected to DO of the MQ2 sensor #define AO_PIN A0 // The Arduino UNO Q MCU pin connected to AO of the MQ2 sensor void setup() { Serial.begin(9600); pinMode(DO_PIN, INPUT); Serial.println("Warming up the MQ2 sensor..."); delay(20000); // allow sensor to warm up Serial.println("Arduino UNO Q MQ2 Gas Sensor ready"); } void loop() { int do_state = digitalRead(DO_PIN); // HIGH = no gas, LOW = gas int ao_value = analogRead(AO_PIN); // 0-4095, higher = more gas if (do_state == LOW) { Serial.print("Gas DETECTED! Intensity (AO): "); Serial.println(ao_value); } else { Serial.print("No gas. AO value: "); Serial.println(ao_value); } delay(500); }

Detailed Instructions

First time with Arduino UNO Q? Follow the Getting Started with Arduino UNO Q tutorial before proceeding.

  • Connect: Wire the MQ2 gas sensor to the Arduino UNO Q MCU as shown in the wiring diagram.
  • Open Arduino App Lab: Launch Arduino App Lab and wait until it detects your Arduino UNO Q.
  • Create a new App: Click the Create New App button.
Create New App in Arduino App Lab on Arduino UNO Q
  • Give the App a name, for example: GasSensor
  • Click Create to confirm.
Arduino App Lab App folders and files on Arduino UNO Q
  • Paste the sketch: Copy the MCU code above and paste it into sketch/sketch.ino.
  • Upload: Click the Run button in Arduino App Lab.
Click Run button in Arduino App Lab on Arduino UNO Q
  • Wait for the 20-second warm-up message to finish in the Serial Monitor.
  • Carefully expose the sensor to a small amount of gas (e.g., hold a lighter near it without igniting it) — observe the Serial Monitor output.
  • Adjust the potentiometer if the DO LED does not respond.

App Lab Console Output

DIYables_Apps
Stop
sketch.ino
1#include "Arduino_RouterBridge.h"
Serial Monitor
Python
Message (Enter to send a message to "Newbiely" on usb(2820070321))
New Line
9600 baud
[2026-04-29 09:00:01] Warming up the MQ2 sensor... [2026-04-29 09:00:21] Arduino UNO Q MQ2 Gas Sensor ready [2026-04-29 09:00:22] No gas. AO value: 312 [2026-04-29 09:00:23] No gas. AO value: 310 [2026-04-29 09:00:24] Gas DETECTED! Intensity (AO): 2187 [2026-04-29 09:00:25] Gas DETECTED! Intensity (AO): 3042 [2026-04-29 09:00:26] No gas. AO value: 315

Bridge: Linux + MCU

This section shows how to program both processors of the Arduino UNO Q so the Linux side can read gas state and receive gas events via Bridge:

  • The gas sensor is connected to the MCU — the MCU warms up for 20 seconds, then reads DO and AO every 500 ms
  • The MPU cannot read the sensor pins directly — it calls Bridge functions to get state, intensity value, or events
  • The MPU has Wi-Fi — running full Debian Linux, it can send urgent Telegram gas alerts the moment gas is detected
  • Arduino_RouterBridge enables RPC communication between the two processors
  • ⚠️ /dev/ttyHS1 (Linux) and Serial1 (MCU) are RESERVED by the router — never open them in user code

MCU Code (Bridge)

/* * This Arduino UNO Q code was developed by newbiely.com * * This Arduino UNO Q code is made available for public use without any restriction * * For comprehensive instructions and wiring diagrams, please visit: * https://newbiely.com/tutorials/arduino-uno-q/arduino-uno-q-gas-sensor */ // COPYRIGHT newbiely.com // AUTHOR: newbiely // This code is made available for public use without restriction. // For complete instructions, tutorials, and further information, visit: // https://newbiely.com/tutorials/arduino-uno-q/arduino-uno-q-gas-sensor #include "Arduino_RouterBridge.h" #define DO_PIN 2 // The Arduino UNO Q MCU pin connected to DO of the MQ2 sensor #define AO_PIN A0 // The Arduino UNO Q MCU pin connected to AO of the MQ2 sensor bool cached_gas = false; int cached_ao = 0; bool gas_event = false; bool prev_gas = false; unsigned long last_read_ms = 0; const unsigned long READ_INTERVAL = 500; String get_state(String arg) { return cached_gas ? "gas" : "no_gas"; } String get_value(String arg) { return String(cached_ao); } String get_event(String arg) { if (gas_event) { gas_event = false; return "gas_detected"; } return "none"; } void setup() { Bridge.begin(); Monitor.begin(); pinMode(DO_PIN, INPUT); Monitor.println("Warming up the MQ2 sensor..."); delay(20000); // warm-up before Bridge callbacks start serving data Bridge.provide("get_state", get_state); Bridge.provide("get_value", get_value); Bridge.provide("get_event", get_event); Monitor.println("Arduino UNO Q MQ2 Gas Sensor Bridge ready"); } void loop() { unsigned long now = millis(); if (now - last_read_ms >= READ_INTERVAL) { last_read_ms = now; int do_state = digitalRead(DO_PIN); // LOW = gas detected cached_ao = analogRead(AO_PIN); cached_gas = (do_state == LOW); if (cached_gas && !prev_gas) { gas_event = true; Monitor.print("GAS DETECTED! AO value: "); Monitor.println(cached_ao); } else if (!cached_gas && prev_gas) { Monitor.println("Gas cleared. Air quality normal."); } prev_gas = cached_gas; } }

Python Code (Bridge)

/* * This Arduino UNO Q code was developed by newbiely.com * * This Arduino UNO Q code is made available for public use without any restriction * * For comprehensive instructions and wiring diagrams, please visit: * https://newbiely.com/tutorials/arduino-uno-q/arduino-uno-q-gas-sensor */ # COPYRIGHT newbiely.com # AUTHOR: newbiely # This code is made available for public use without restriction. # For complete instructions, tutorials, and further information, visit: # https://newbiely.com/tutorials/arduino-uno-q/arduino-uno-q-gas-sensor from arduino.app_utils import * import time def loop(): state = Bridge.call("get_state") value = Bridge.call("get_value") print(f"Gas state: {state} AO value: {value}") time.sleep(0.5) App.run(user_loop=loop)

Detailed Instructions

  • Connect: Wire the MQ2 gas sensor to the Arduino UNO Q as shown in the wiring diagram.
  • Open Arduino App Lab and create a new App named GasSensorBridge.
  • Paste the MCU sketch into sketch/sketch.ino.
  • Paste the Python code into the Python file.
  • Install the library: Click the Add sketch library button (the open book icon with a + sign) in the left sidebar.
Add sketch library in Arduino App Lab on Arduino UNO Q
  • Search for Arduino_RouterBridge created by Arduino and click the Install button.
My Apps / DIYables Apps
Run
Bricks
No bricks added...
Sketch Libraries
No sketch libra...
Files
python
sketch
.gitignore
README.md
app.yaml
sketch.ino
Add sketch library
Arduino_RouterBridge Arduino

This library provides a simple RPC bridge for Arduino UNO Q boards, allowing communication between the board and other devices using MsgPack serialization.

0.4.1
Install
More Info
  • Upload: Click the Run button. Wait for the warm-up period to finish.
Click Run button in Arduino App Lab on Arduino UNO Q
  • Expose the sensor to gas — observe the event appear in both consoles.

App Lab Console Output

DIYables_Apps
Stop
sketch.ino
1#include "Arduino_RouterBridge.h"
Serial Monitor
Python
Message (Enter to send a message to "Newbiely" on usb(2820070321))
New Line
9600 baud
[2026-04-29 09:00:01] Warming up the MQ2 sensor... [2026-04-29 09:00:21] Arduino UNO Q MQ2 Gas Sensor Bridge ready [2026-04-29 09:00:26] GAS DETECTED! AO value: 2187 [2026-04-29 09:00:30] Gas cleared. Air quality normal.
DIYables_Apps
Stop
sketch.ino
1#include "Arduino_RouterBridge.h"
Serial Monitor
Python
[2026-04-29 09:00:22] Gas state: no_gas AO value: 310 [2026-04-29 09:00:24] Gas state: no_gas AO value: 312 [2026-04-29 09:00:26] Gas state: gas AO value: 2187 [2026-04-29 09:00:28] Gas state: gas AO value: 3042 [2026-04-29 09:00:30] Gas state: no_gas AO value: 315

Telegram

Receive instant Telegram gas leak alerts from the Arduino UNO Q gas sensor, and query air quality remotely.

MCU sketch: Keep the same MCU sketch from the previous Bridge section.

Python Code (Telegram)

/* * This Arduino UNO Q code was developed by newbiely.com * * This Arduino UNO Q code is made available for public use without any restriction * * For comprehensive instructions and wiring diagrams, please visit: * https://newbiely.com/tutorials/arduino-uno-q/arduino-uno-q-gas-sensor */ # COPYRIGHT newbiely.com # AUTHOR: newbiely # This code is made available for public use without restriction. # For complete instructions, tutorials, and further information, visit: # https://newbiely.com/tutorials/arduino-uno-q/arduino-uno-q-gas-sensor from arduino.app_utils import * import requests import time TELEGRAM_BOT_TOKEN = "YOUR_TELEGRAM_BOT_TOKEN" CHAT_ID = "YOUR_CHAT_ID" last_update_id = 0 def get_updates(): global last_update_id url = f"https://api.telegram.org/bot{TELEGRAM_BOT_TOKEN}/getUpdates" params = {"offset": last_update_id + 1, "timeout": 5} try: response = requests.get(url, params=params, timeout=10) data = response.json() if data["ok"]: return data["result"] except Exception as e: print(f"Error getting updates: {e}") return [] def send_message(chat_id, text): url = f"https://api.telegram.org/bot{TELEGRAM_BOT_TOKEN}/sendMessage" payload = {"chat_id": chat_id, "text": text} try: requests.post(url, data=payload, timeout=10) except Exception as e: print(f"Error sending message: {e}") def loop(): # Auto-alert on gas detection event = Bridge.call("get_event") if event == "gas_detected": value = Bridge.call("get_value") print(f"GAS DETECTED! AO value: {value}") send_message(CHAT_ID, f"⚠️ GAS DETECTED! Intensity (AO): {value}. Ventilate immediately!") # Handle Telegram commands updates = get_updates() for update in updates: last_update_id = update["update_id"] if "message" not in update: continue message = update["message"] chat_id = message["chat"]["id"] text = message.get("text", "").strip() print(f"Received: {text}") if text == "/start": send_message(chat_id, "Arduino UNO Q Gas Sensor Bot\n" "/state - Current gas state (gas / no_gas)\n" "/value - Read analog intensity (0-4095)\n" "Automatic alert when gas is detected!") elif text == "/state": result = Bridge.call("get_state") send_message(chat_id, f"Gas state: {result}") elif text == "/value": result = Bridge.call("get_value") send_message(chat_id, f"AO intensity value: {result}") else: send_message(chat_id, "Unknown command. Send /start for help.") time.sleep(0.3) App.run(user_loop=loop)

Detailed Instructions

  • Replace YOUR_TELEGRAM_BOT_TOKEN with your actual bot token from BotFather.
  • Replace YOUR_CHAT_ID with your Telegram chat ID.
  • Paste this Python code into your App's Python file (keep the same MCU sketch).
  • Click the Run button — wait for warm-up, then expose the sensor to gas to trigger the Telegram alert.

App Lab Console Output

DIYables_Apps
Stop
sketch.ino
1#include "Arduino_RouterBridge.h"
Serial Monitor
Python
[2026-04-29 09:10:21] Waiting for Telegram messages... [2026-04-29 09:10:26] GAS DETECTED! AO value: 2187 [2026-04-29 09:10:32] Received: /state [2026-04-29 09:10:35] Received: /value
Telegram
Telegram 12:45
Welcome to Telegram!
ArduinoBot 10:19
Chatting with Arduino...
telegram-botfather
BotFather Yesterday
Your bot has been created.

ArduinoBot

bot
Today
⚠️ GAS DETECTED! Intensity (AO): 2187. Ventilate immediately!
10:15 AM
/state
10:16 AM ✓✓
Gas state: no_gas
10:17 AM
/value
10:18 AM ✓✓
AO intensity value: 312
10:19 AM

OpenClaw

...OPENCLAW

OpenClaw support for Arduino UNO Q Gas Sensor is coming soon.

...OPENCLAW

Project Ideas

You can build many useful projects with the MQ2 gas sensor and Arduino UNO Q:

  • Home Gas Leak Alarm: Install in your kitchen near the stove — when gas is detected, the MPU sends an urgent Telegram alert with intensity value and also triggers an audible alarm via relay
  • Ventilation Controller: Combine the gas sensor with a relay-controlled fan — when gas AO exceeds a threshold, the MCU automatically turns the fan on, and Python sends a Telegram notification
  • Air Quality Logger: Log gas state and AO values every minute to a CSV file on Linux — send a daily Telegram summary of air quality events and peak readings
  • Garage Carbon Monoxide Monitor: Place the sensor in a garage — receive a Telegram alert when the car engine leaves CO in the air, with automatic alert cleared when AO drops back to baseline
  • Multi-Gas Safety System: Combine the gas sensor with the flame sensor tutorial — if both detect danger simultaneously, send a "GAS + FIRE" Telegram alert for maximum urgency

Challenge Yourself

Ready to go further with the MQ2 gas sensor on Arduino UNO Q? Try these challenges:

  • Easy: Add a /history Telegram command that returns the last 5 gas detection events with timestamps and AO intensity values stored in a Python list.
  • Medium: Implement a false-alarm filter: gas must be detected for at least 3 consecutive readings (1.5 seconds) before the MPU sends a Telegram alert — this prevents single-reading spikes from triggering false alarms.
  • Advanced: Build a gas intensity trend monitor: track the last 20 AO readings in Python — if the average of the most recent 10 readings is 50% higher than the average of the previous 10, send a "Gas concentration rising" Telegram alert even before the DO pin triggers.

※ OUR MESSAGES

  • As freelancers, We are AVAILABLE for HIRE. See how to outsource your project to us
  • Please feel free to share the link of this tutorial. However, Please do not use our content on any other websites. We invested a lot of effort and time to create the content, please respect our work!