Arduino Nano 33 IoT - HTTP Request

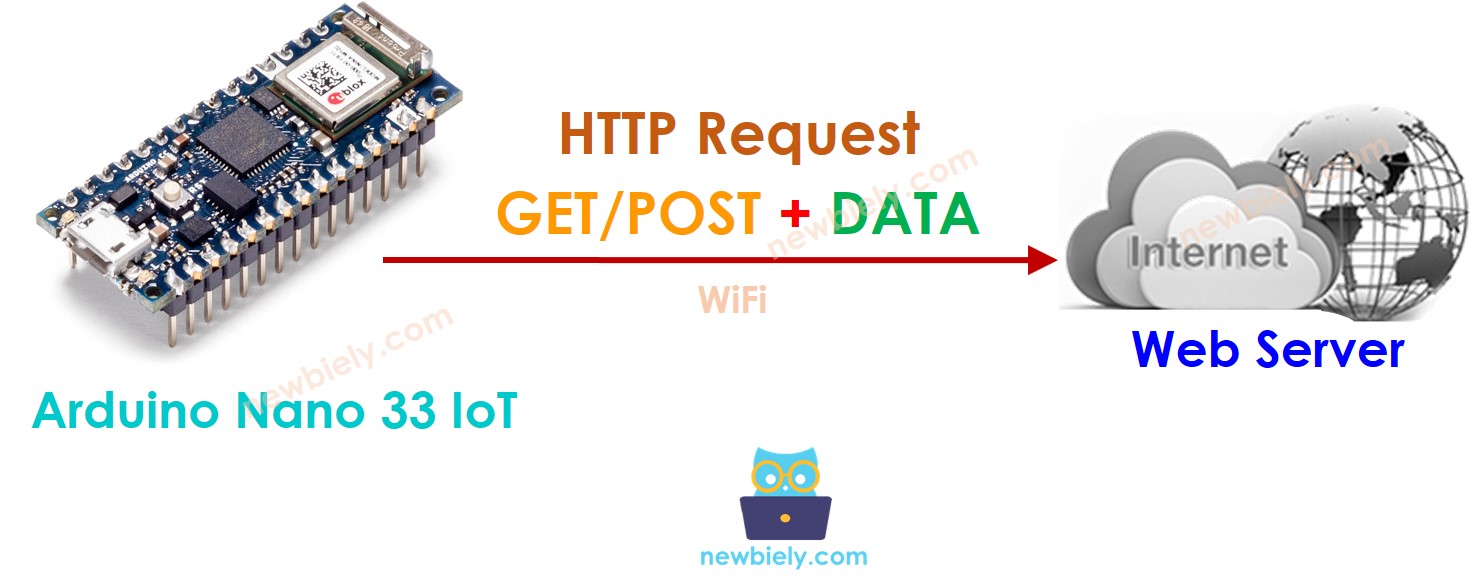
In this tutorial, you'll learn how to make HTTP and HTTPS requests with the Arduino Nano 33 IoT board. We cover:

Arduino Nano 33 IoT web client

Hardware Preparation

1×Arduino Nano 33 IoT
1×Micro USB Cable
1×Breadboard
1×Jumper Wires
1×Optionally, DC Power Jack
1×Recommended: Screw Terminal Expansion Board for Arduino Nano
1×Recommended: Breakout Expansion Board for Arduino Nano
1×Recommended: Power Splitter for Arduino Nano

Or you can buy the following sensor kits:

1×DIYables Sensor Kit (30 sensors/displays)
1×DIYables Sensor Kit (18 sensors/displays)
Disclosure: Some of the links provided in this section are Amazon affiliate links. We may receive a commission for any purchases made through these links at no additional cost to you.
Additionally, some of these links are for products from our own brand, DIYables .

Basic Concepts of Web Client and Web Server

The web has some basic concepts such as a website address (URL), a hostname, a pathname, a query string, and HTTP requests. You can learn more about these in the HTTP tutorial.

How to Program Arduino Nano 33 IoT to Make an HTTP Request

  • Add libraries
#include <WiFiNINA.h> #include <ArduinoHttpClient.h>
  • Enter your WiFi network name and password.
const char WIFI_SSID[] = "YOUR_WIFI_SSID"; // Replace with your network's SSID const char WIFI_PASSWORD[] = "YOUR_WIFI_PASSWORD"; // Replace with your network's password
  • Define the website name, the page path, and the query string details.
String HOST_NAME = "http://YOUR_DOMAIN.com"; // Specify your domain URL here String PATH_NAME = "/products/arduino"; // Specify the endpoint path here //String PATH_NAME = "/products/arduino.php"; // Alternate endpoint path, update if needed String queryString = "temperature=26&humidity=70"; // Include query parameters if required int HTTP_PORT = 80; // HTTP uses port 80
  • Create an HTTP client object.
WiFiClient wifiClient; HttpClient client(wifiClient, HOST_NAME, HTTP_PORT);
  • Connect Arduino Nano 33 IoT to the WiFi network.
while (WiFi.status() != WL_CONNECTED) { Serial.print("Connecting to WiFi: "); Serial.println(WIFI_SSID); WiFi.begin(WIFI_SSID, WIFI_PASSWORD); delay(10000); }
  • Make HTTP GET request
client.get(PATH_NAME);
  • Get the data that comes back from the web server.
int statusCode = client.responseStatusCode(); String response = client.responseBody(); Serial.print("Status Code: "); Serial.println(statusCode); Serial.print("Response: "); Serial.println(response); client.stop();

How to include data into HTTP request

We can send information to a web server by adding it to an HTTP request. The way the information is set up depends on the HTTP request method used.

  • For a GET request:
  • Data can only be sent in the query string of the URL.
  • For a POST request:
  • Data can be sent not only in the query string but also in other formats like JSON, XML, or image.
  • Data is placed in the body of the HTTP request.

Let's learn how to send data as a query string using both HTTP GET and POST methods.

  • Make a query string
int temp = // read temperature value from sensor int humi = // read humidity value from sensor String queryString = String("temperature=") + String(temp) + String("&humidity=") + String(humi);
  • HTTP GET: Attach the part that contains extra information (query string) to the main URL (pathname).
// Make an HTTP GET request with query parameters client.get(PATH_NAME + "?" + queryString);
  • HTTP POST: Place the query string inside the body of the HTTP message.
// Begin HTTP POST request client.beginRequest(); client.post(PATH_NAME); client.sendHeader("Content-Type", "application/x-www-form-urlencoded"); client.sendHeader("Content-Length", queryString.length()); client.beginBody(); client.print(queryString); // Send POST data client.endRequest();
  • For both GET and POST, get the data sent back from the web server.
int statusCode = client.responseStatusCode(); String response = client.responseBody(); client.stop();

Arduino Nano 33 IoT Code for Making HTTP Request

Below is the full Arduino Nano 33 IoT code that shows how to send HTTP GET and POST requests.

/* * This Arduino Nano 33 IoT code was developed by newbiely.com * * This Arduino Nano 33 IoT code is made available for public use without any restriction * * For comprehensive instructions and wiring diagrams, please visit: * https://newbiely.com/tutorials/arduino-nano-iot/arduino-nano-33-iot-http-request */ #include <WiFiNINA.h> #include <ArduinoHttpClient.h> const char WIFI_SSID[] = "YOUR_WIFI_SSID"; // Replace with your network's SSID const char WIFI_PASSWORD[] = "YOUR_WIFI_PASSWORD"; // Replace with your network's password char HOST_NAME[] = "example.com"; String PATH_NAME = "/"; // CHANGE IT //String PATH_NAME = "/products/arduino"; // CHANGE IT //String PATH_NAME = "/products/arduino.php"; // CHANGE IT int HTTP_PORT = 80; // HTTP uses port 80 WiFiClient wifiClient; HttpClient client(wifiClient, HOST_NAME, HTTP_PORT); void setup() { Serial.begin(9600); while (!Serial); Serial.println("Arduino Nano 33 IoT - Making HTTP request"); // Connect to WiFi while (WiFi.status() != WL_CONNECTED) { Serial.print("Connecting to WiFi: "); Serial.println(WIFI_SSID); WiFi.begin(WIFI_SSID, WIFI_PASSWORD); delay(10000); } Serial.print("Connected! IP Address: "); Serial.println(WiFi.localIP()); // Make an HTTP GET request client.get(PATH_NAME); int statusCode = client.responseStatusCode(); String response = client.responseBody(); Serial.print("Status Code: "); Serial.println(statusCode); Serial.print("Response: "); Serial.println(response); client.stop(); } void loop() { }

Detailed Instructions

If you are new to the Arduino Nano 33 IoT, be sure to check out our Getting Started with Arduino Nano 33 IoT tutorial. Then, follow these steps:

  • Use a USB cable to connect the Arduino Nano 33 IoT board to your computer.
  • Launch the Arduino IDE on your computer.
  • Select the Arduino Nano 33 IoT board and choose its corresponding COM port.
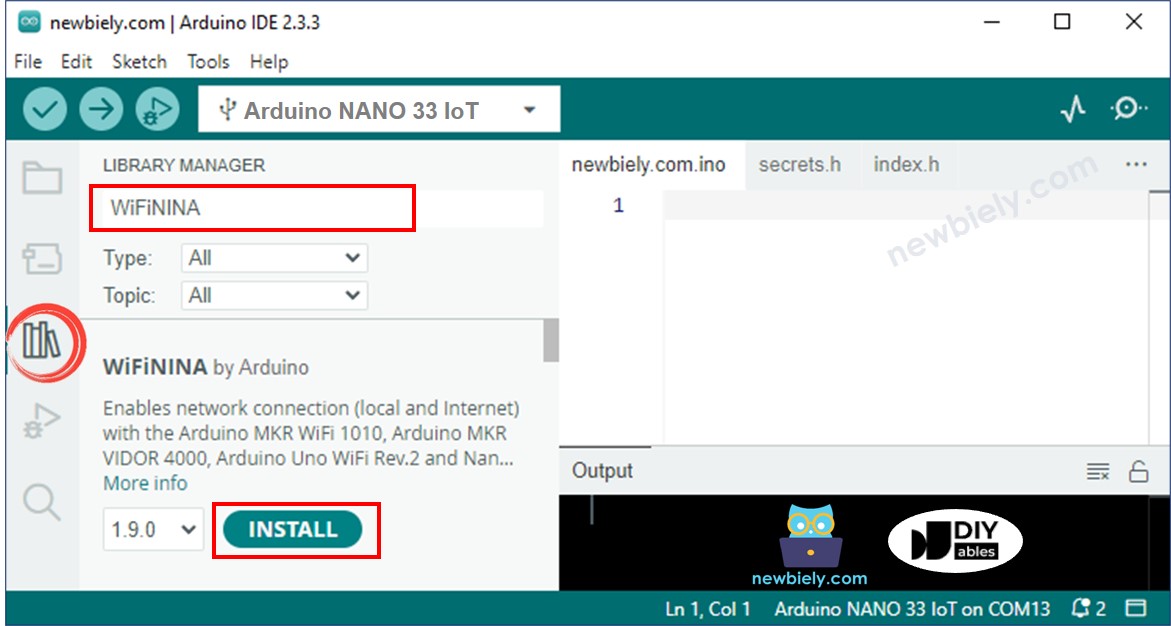
  • Open the Library Manager by clicking on the Library Manager icon on the left side of the Arduino software.
  • Type WiFiNINA in the search box and find the WiFiNINA sensor library made by Arduino.
  • Click on the Install button to add the library.
Arduino Nano 33 IoT WiFiNINA library
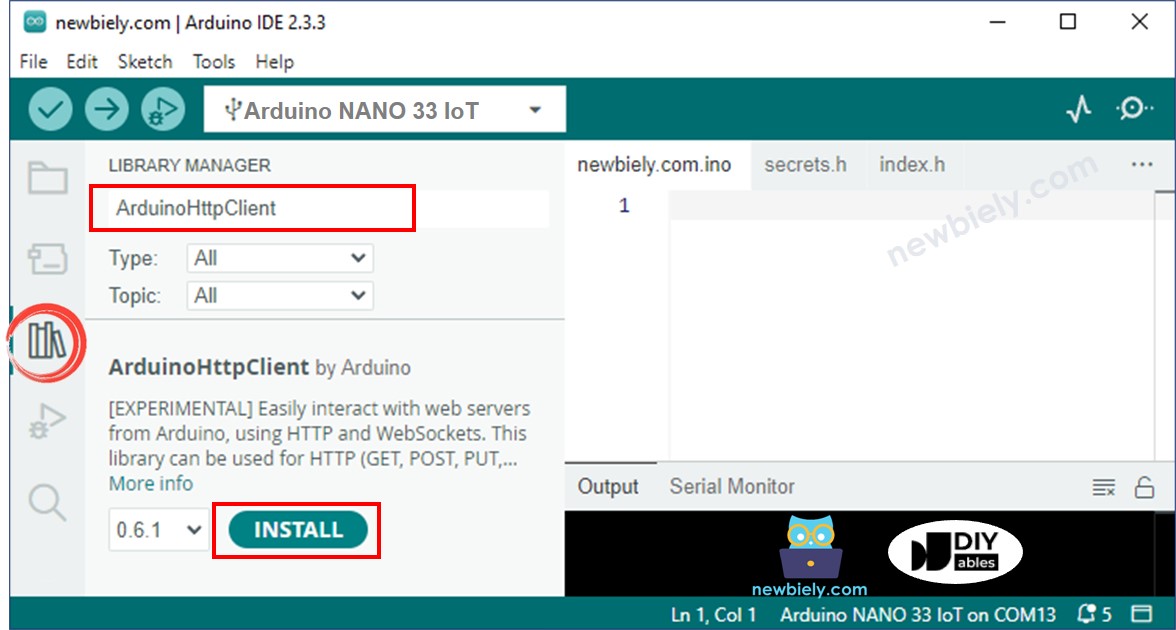
  • Type ArduinoHttpClient in the search box and find the ArduinoHttpClient sensor library made by Arduino.
  • Click on the Install button to add the library.
Arduino Nano 33 IoT ArduinoHttpClient library
  • Copy the above code and open with Arduino IDE
  • Change the WiFi details (WIFI_SSID and WIFI_PASSWORD) in the code to yours.
  • Optionally, change the HOST_NAME and PATH_NAME
  • Click Upload button on Arduino IDE to upload code to Arduino Nano
  • Open the Serial Monitor
  • Check out the result on Serial Monitor. If everything goes right, you will see the text looks like the below:
COM6
Send
Connecting to WiFi: YOUR_WIFI_SSID Connected! IP Address: 192.168.0.3 Status Code: 200 Response: <!doctype html> <html> <head> <title>Example Domain</title> <meta charset="utf-8" /> <meta http-equiv="Content-type" content="text/html; charset=utf-8" /> <meta name="viewport" content="width=device-width, initial-scale=1" /> <style type="text/css"> body { background-color: #f0f0f2; margin: 0; padding: 0; font-family: -apple-system, system-ui, BlinkMacSystemFont, "Segoe UI", "Open Sans", "Helvetica Neue", Helvetica, Arial, sans-serif; } div { width: 600px; margin: 5em auto; padding: 2em; background-color: #fdfdff; border-radius: 0.5em; box-shadow: 2px 3px 7px 2px rgba(0,0,0,0.02); } a:link, a:visited { color: #38488f; text-decoration: none; } @media (max-width: 700px) { div { margin: 0 auto; width: auto; } } </style> </head> <body> <div> <h1>Example Domain</h1> <p>This domain is for use in illustrative examples in documents. You may use this domain in literature without prior coordination or asking for permission.</p> <p><a href="https://www.iana.org/domains/example">More information...</a></p> </div> </body> </html>
Autoscroll Show timestamp
Clear output
9600 baud  
Newline  

Please note that the above code demonstrates how to make an HTTP request. You need to replace the URL and queryString with your own values to make it work.

Arduino Nano 33 IoT Code for Making HTTPS Request

/* * This Arduino Nano 33 IoT code was developed by newbiely.com * * This Arduino Nano 33 IoT code is made available for public use without any restriction * * For comprehensive instructions and wiring diagrams, please visit: * https://newbiely.com/tutorials/arduino-nano-iot/arduino-nano-33-iot-http-request */ #include <WiFiNINA.h> #include <ArduinoHttpClient.h> const char WIFI_SSID[] = "YOUR_WIFI_SSID"; // Replace with your network's SSID const char WIFI_PASSWORD[] = "YOUR_WIFI_PASSWORD"; // Replace with your network's password char HOST_NAME[] = "example.com"; String PATH_NAME = "/"; // CHANGE IT //String PATH_NAME = "/products/arduino"; // CHANGE IT //String PATH_NAME = "/products/arduino.php"; // CHANGE IT int HTTP_PORT = 443; // HTTPS uses port 443 WiFiSSLClient wifiSSLClient; // Use SSL client for HTTPS HttpClient client(wifiSSLClient, HOST_NAME, HTTP_PORT); void setup() { Serial.begin(9600); while (!Serial); Serial.println("Arduino Nano 33 IoT - Making HTTPS request"); // Connect to WiFi while (WiFi.status() != WL_CONNECTED) { Serial.print("Connecting to WiFi: "); Serial.println(WIFI_SSID); WiFi.begin(WIFI_SSID, WIFI_PASSWORD); delay(10000); } Serial.print("Connected! IP Address: "); Serial.println(WiFi.localIP()); // Make an HTTPS GET request client.get(PATH_NAME); int statusCode = client.responseStatusCode(); String response = client.responseBody(); Serial.print("Status Code: "); Serial.println(statusCode); Serial.print("Response: "); Serial.println(response); client.stop(); } void loop() { }

Instructions for Using HTTPS on Arduino Nano 33 IoT

To use HTTPS with the Arduino Nano 33 IoT, follow the same steps as in the previous instructions for HTTP. If you've completed the previous steps, you should already have the necessary libraries installed and your Arduino IDE set up.

Additional Steps:

  • Copy and paste the provided HTTPS code into your Arduino IDE.
  • Make sure to update the WiFi credentials (WIFI_SSID and WIFI_PASSWORD) in the code.
  • Optionally, adjust the HOST_NAME and PATH_NAME to match your server.
  • Upload the code to your Arduino Nano 33 IoT.
  • Open the Serial Monitor to see the output.

Since the target website supports both HTTP and HTTPS, the output on the Serial Monitor should look similar to what you saw in the HTTP example.

Arduino Nano 33 IoT HTTP vs HTTPS Code Differences

If you compare the HTTP code and HTTPS code, you will see just three lines of difference (excluding the printing statements).

Aspect HTTP Code HTTPS Code
Port Number int HTTP_PORT = 80; int HTTP_PORT = 443;
WiFi Client Type WiFiClient wifiClient; WiFiSSLClient wifiSSLClient;
HttpClient Initialization HttpClient client(wifiClient, HOST_NAME, HTTP_PORT); HttpClient client(wifiSSLClient, HOST_NAME, HTTP_PORT);

Summary:

  • Port Number: HTTP uses 80, while HTTPS uses 443 for secure communication.
  • WiFi Client Type: HTTPS requires WiFiSSLClient for SSL/TLS encryption.
  • HttpClient Initialization: The SSL client replaces the standard client in HTTPS.

These small changes enable secure, encrypted communication when switching from HTTP to HTTPS.

The rest of this tutorial provides HTTP code, but you can easily modify it for HTTPS by changing the port to 443, using WiFiSSLClient, and updating HttpClient accordingly.

Arduino Nano 33 IoT Code for Making HTTP GET Request with data

In the previous code, the HTTP GET request was made without including any data. However, in practice, you may want to send data, such as sensor readings or peripheral values, as part of the request.

To do this, you can append the data as a query string to the request URL. The code below demonstrates how to modify the existing HTTP GET request to include data:

/* * This Arduino Nano 33 IoT code was developed by newbiely.com * * This Arduino Nano 33 IoT code is made available for public use without any restriction * * For comprehensive instructions and wiring diagrams, please visit: * https://newbiely.com/tutorials/arduino-nano-iot/arduino-nano-33-iot-http-request */ #include <WiFiNINA.h> #include <ArduinoHttpClient.h> const char WIFI_SSID[] = "YOUR_WIFI_SSID"; // Replace with your network's SSID const char WIFI_PASSWORD[] = "YOUR_WIFI_PASSWORD"; // Replace with your network's password char HOST_NAME[] = "example.com"; String PATH_NAME = "/"; // CHANGE IT //String PATH_NAME = "/products/arduino"; // CHANGE IT //String PATH_NAME = "/products/arduino.php"; // CHANGE IT String queryString = "temperature=26&humidity=70"; // Query string int HTTP_PORT = 80; // HTTP uses port 80 WiFiClient wifiClient; HttpClient client(wifiClient, HOST_NAME, HTTP_PORT); void setup() { Serial.begin(9600); while (!Serial); Serial.println("Arduino Nano 33 IoT - Making HTTP GET request with data"); // Connect to WiFi while (WiFi.status() != WL_CONNECTED) { Serial.print("Connecting to WiFi: "); Serial.println(WIFI_SSID); WiFi.begin(WIFI_SSID, WIFI_PASSWORD); delay(10000); } Serial.print("Connected! IP Address: "); Serial.println(WiFi.localIP()); // Make an HTTP GET request with query parameters client.get(PATH_NAME + "?" + queryString); int statusCode = client.responseStatusCode(); String response = client.responseBody(); Serial.print("Status Code: "); Serial.println(statusCode); Serial.print("Response: "); Serial.println(response); client.stop(); } void loop() { }

Arduino Nano 33 IoT Code for Making HTTP POST Request with data

In the previous code, data was included in the URL as a query string for a GET request. However, in many cases, such as sending larger data or sensitive information, it's better to use a POST request, which sends data in the request body instead of the URL.

The code below demonstrates how to modify the GET request to a POST request, ensuring data is properly sent in the request body. 🚀

This example shows how to include data in the URL-encoded format, but you can easily modify the code to send other formats such as JSON, CSV, or any custom format depending on the requirements of your server.

/* * This Arduino Nano 33 IoT code was developed by newbiely.com * * This Arduino Nano 33 IoT code is made available for public use without any restriction * * For comprehensive instructions and wiring diagrams, please visit: * https://newbiely.com/tutorials/arduino-nano-iot/arduino-nano-33-iot-http-request */ #include <WiFiNINA.h> #include <ArduinoHttpClient.h> const char WIFI_SSID[] = "YOUR_WIFI_SSID"; // Replace with your network's SSID const char WIFI_PASSWORD[] = "YOUR_WIFI_PASSWORD"; // Replace with your network's password char HOST_NAME[] = "example.com"; String PATH_NAME = "/"; // CHANGE IT //String PATH_NAME = "/products/arduino"; // CHANGE IT //String PATH_NAME = "/products/arduino.php"; // CHANGE IT String queryString = "temperature=26&humidity=70"; // Data to send in POST int HTTP_PORT = 80; // HTTP uses port 80 WiFiClient wifiClient; HttpClient client(wifiClient, HOST_NAME, HTTP_PORT); void setup() { Serial.begin(9600); while (!Serial); Serial.println("Arduino Nano 33 IoT - Making HTTP POST request with data"); // Connect to WiFi while (WiFi.status() != WL_CONNECTED) { Serial.print("Connecting to WiFi: "); Serial.println(WIFI_SSID); WiFi.begin(WIFI_SSID, WIFI_PASSWORD); delay(10000); } Serial.print("Connected! IP Address: "); Serial.println(WiFi.localIP()); // Begin HTTP POST request client.beginRequest(); client.post(PATH_NAME); client.sendHeader("Content-Type", "application/x-www-form-urlencoded"); client.sendHeader("Content-Length", queryString.length()); client.beginBody(); client.print(queryString); // Send POST data client.endRequest(); // Read response int statusCode = client.responseStatusCode(); String response = client.responseBody(); Serial.print("Status Code: "); Serial.println(statusCode); Serial.print("Response: "); Serial.println(response); client.stop(); } void loop() { }

Learn More

※ OUR MESSAGES

  • As freelancers, We are AVAILABLE for HIRE. See how to outsource your project to us
  • Please feel free to share the link of this tutorial. However, Please do not use our content on any other websites. We invested a lot of effort and time to create the content, please respect our work!