Arduino Nano 33 IoT - MP3 Player
In this guide, we will learn how to build an MP3 player using an Arduino Nano 33 IoT, an MP3 player module, a Micro SD Card, and a speaker. The MP3 files, which can be songs or spoken audio, are stored on the Micro SD Card. The Arduino Nano 33 IoT will be programmed to tell the MP3 player module which song to play from the SD Card, change it into sound, and then send that sound to the speaker. We will cover these topics:
- How an MP3 player works
- Connecting the speaker and MP3 player parts to the Arduino Nano 33 IoT
- Programming the Arduino Nano 33 IoT to play a song from the micro SD card
- Adding simple play, pause, next, and previous buttons
After that, you can improve the code further by adding a potentiometer or rotary encoder to change the volume.
Hardware Preparation
Or you can buy the following kits:
| 1 | × | DIYables Sensor Kit (18 sensors/displays) |
Additionally, some of these links are for products from our own brand, DIYables .
Overview of Serial MP3 Player Module and Speaker
Serial MP3 Player Module Pinout
A serial MP3 player module includes three connection points:
- The Arduino Nano 33 IoT has 4 connections:
- RX pin: This is a data pin that should be connected to the TX pin of the Arduino.
- TX pin: This is a data pin that should be connected to the RX pin of the Arduino.
- VCC pin: This is the power pin that should be connected to 5V.
- GND pin: This is the ground pin that should be connected to 0V.
- The speaker connects with a 3.5mm aux output female jack.
- The Micro SD Card connects through a Micro SD Card socket located at the back of the module.
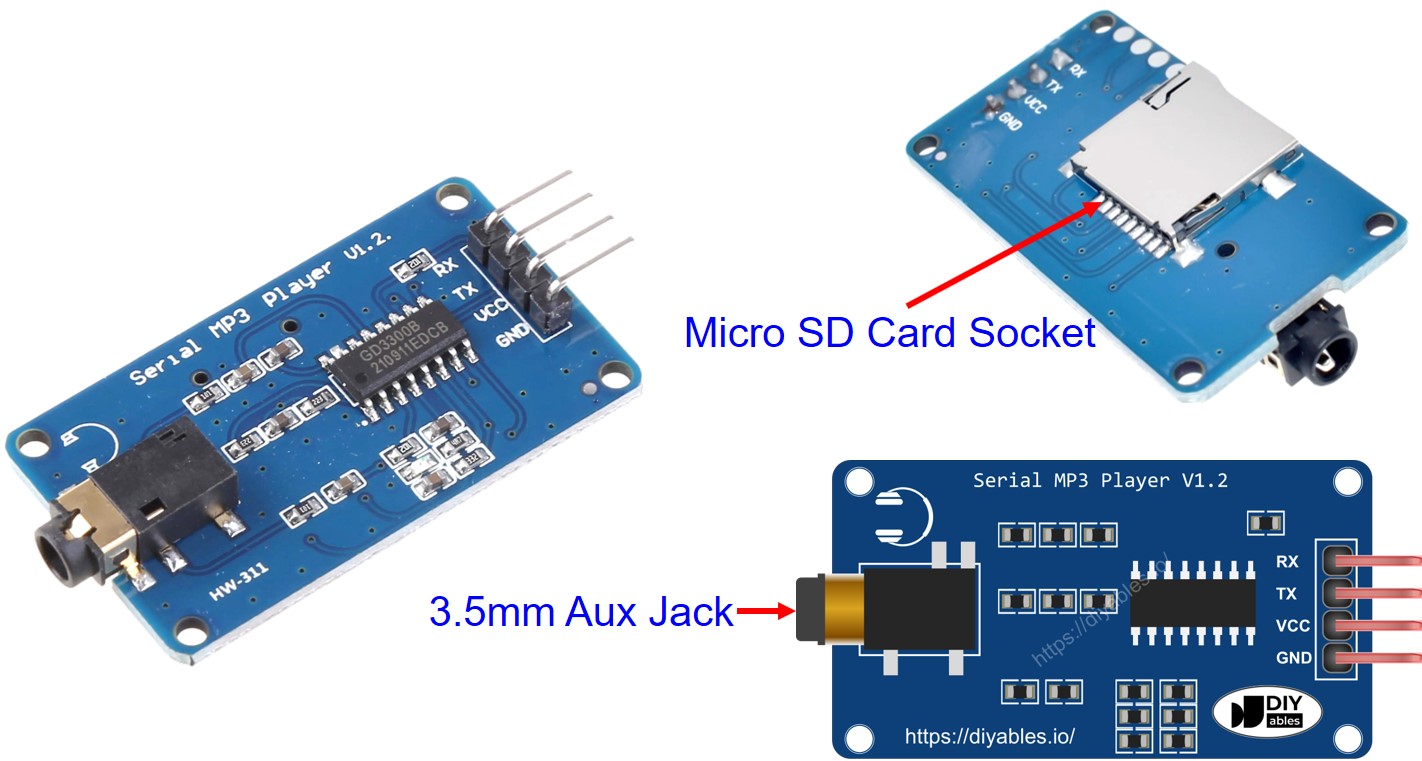
Speaker Pinout
A speaker normally has two types of connections:
- Audio signal interface: This uses a 3.5mm aux plug (male) that connects directly to the MP3 player module.
- Power interface: It can use a USB cable, a 5V power adapter, or any other suitable power connector.
How It Works
To start, please make sure you have these things:
- Collect a set of songs or audio recordings you want to play and save them on a micro SD Card.
- Insert the micro SD Card into the MP3 player module.
- Connect the MP3 player module to the Arduino Nano 33 IoT and attach the speaker to the MP3 player module. Also, make sure the speaker has a power connection.
Every MP3 file on the micro SD card is given an ID number that starts at 0. Then you can instruct the Arduino Nano 33 IoT to control the MP3 player module to do different tasks, such as:
- Play: Begin the selected song.
- Pause: Stop the song for now.
- Play Next: Skip to the next song.
- Play Previous: Return to the last song.
- Change Volume: Adjust the sound level.
When the MP3 player module receives a command, it opens the MP3 file from the micro SD card, changes it into sound, and sends that sound to the speaker using a 3.5mm Aux cable.
Wiring Diagram
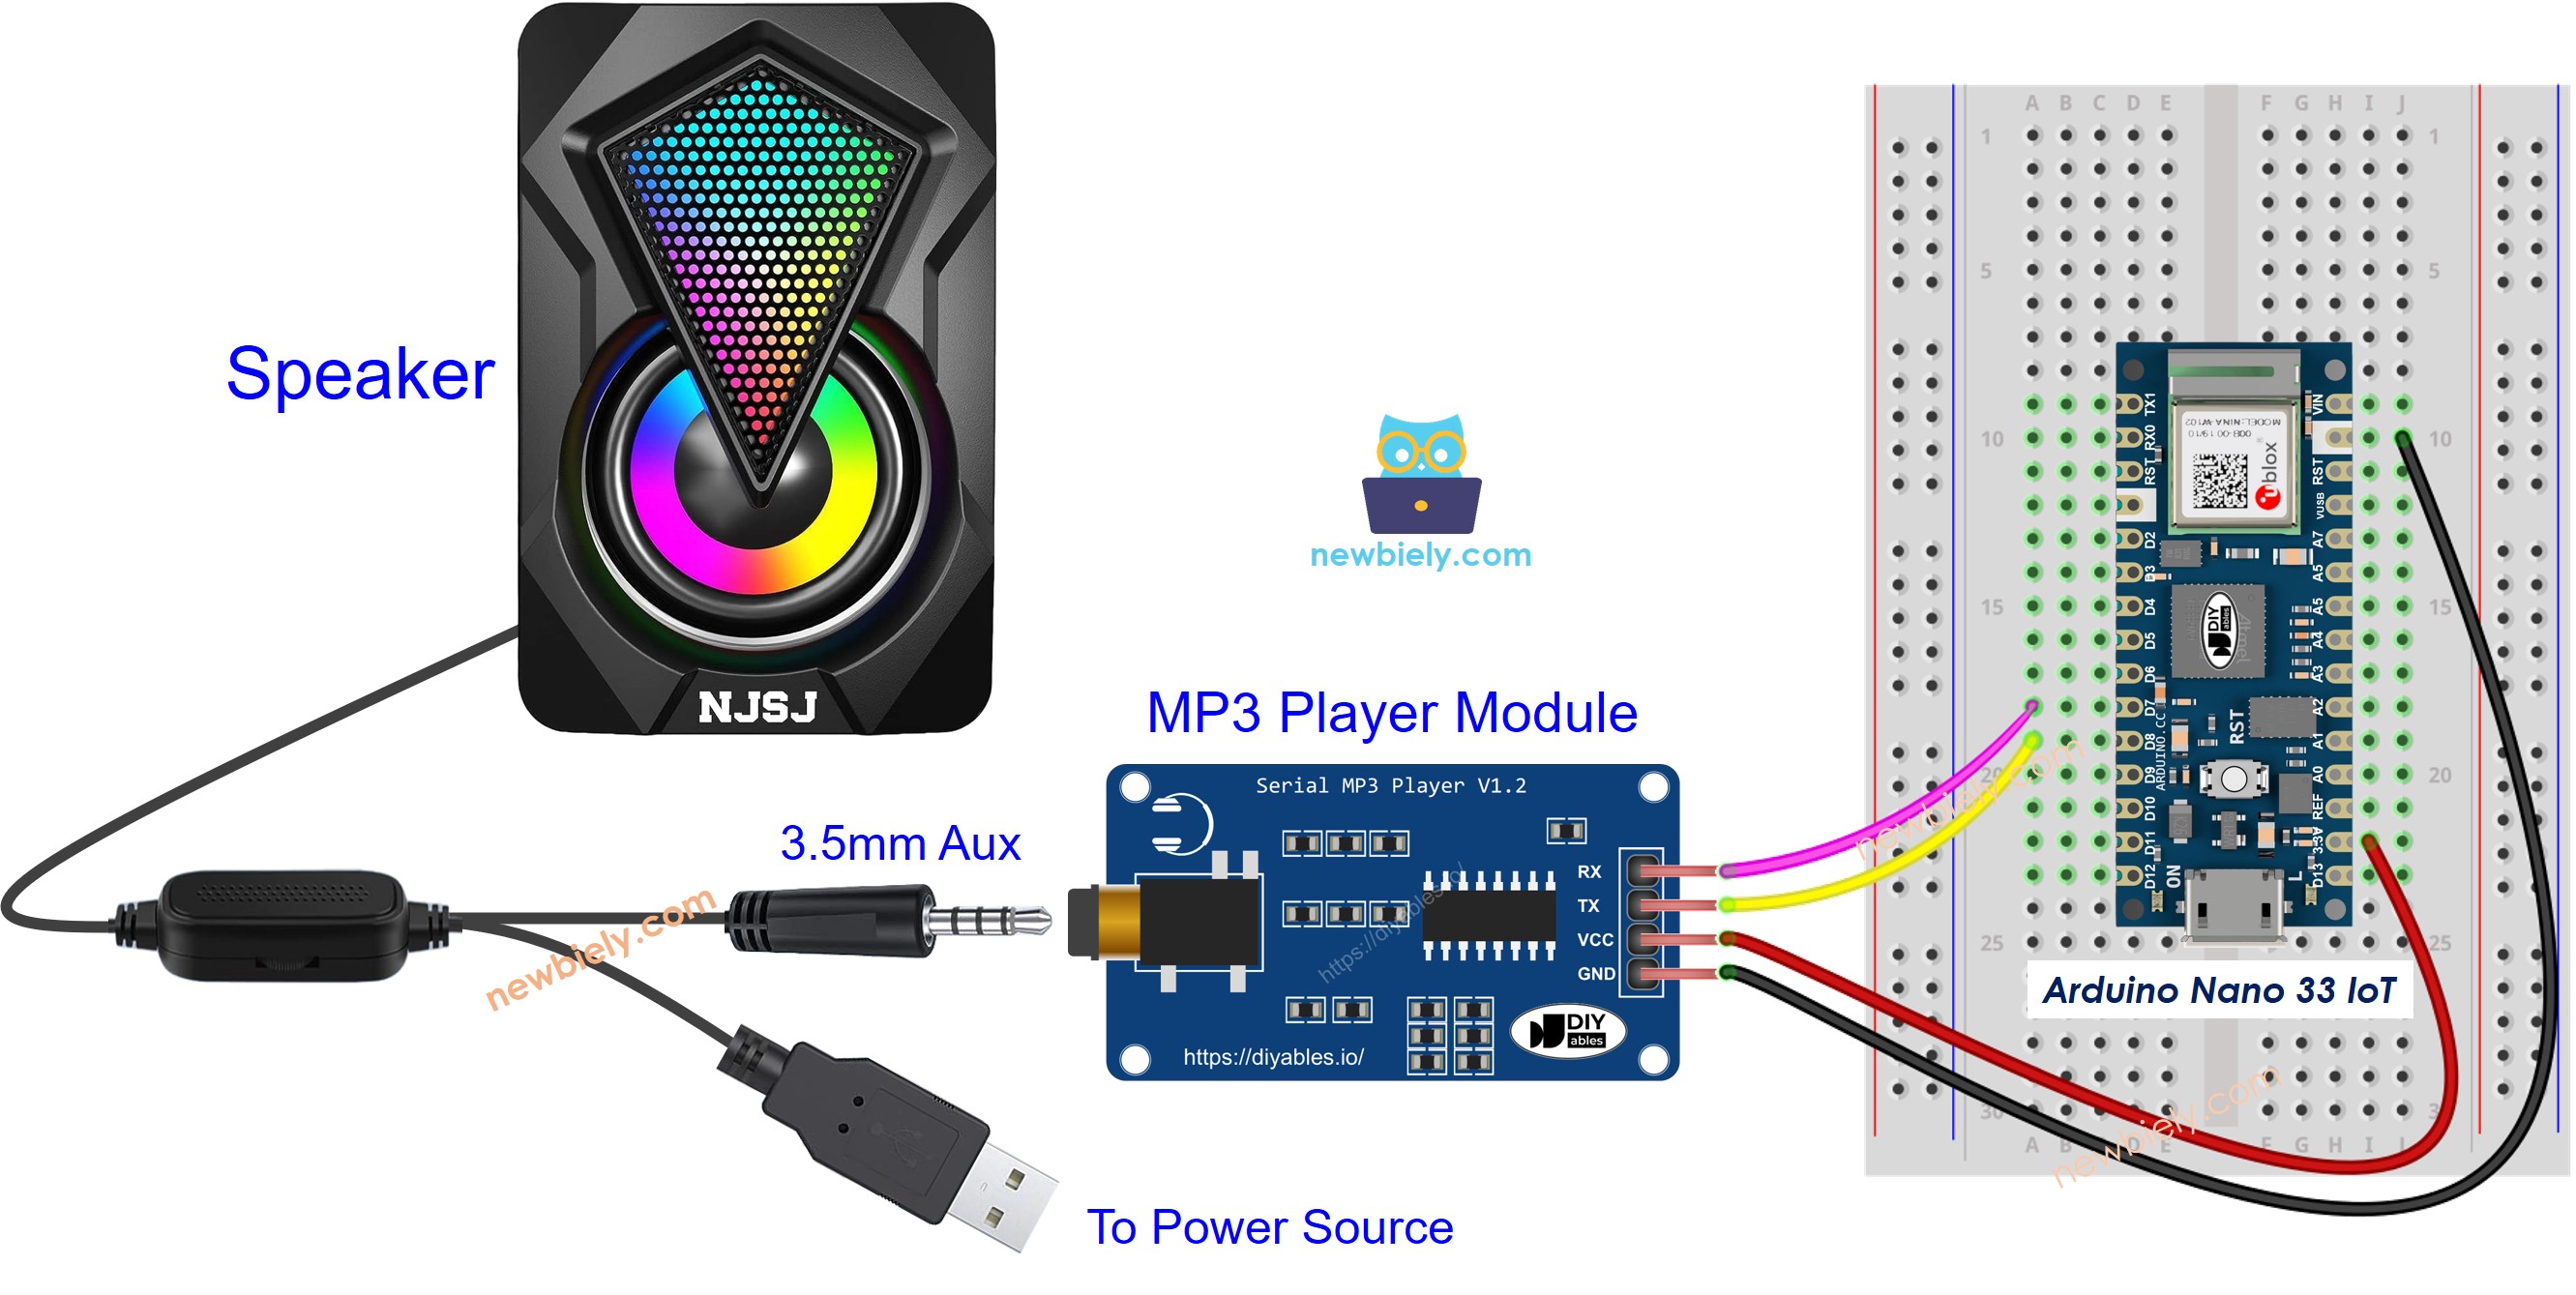
This image is created using Fritzing. Click to enlarge image
Arduino Nano 33 IoT Code - Play Music
This code plays the first song on the Micro SD card.
Detailed Instructions
If you are new to the Arduino Nano 33 IoT, be sure to check out our Getting Started with Arduino Nano 33 IoT tutorial. Then, follow these steps:
- Connect the components to the Arduino Nano 33 IoT board as depicted in the diagram.
- Use a USB cable to connect the Arduino Nano 33 IoT board to your computer.
- Launch the Arduino IDE on your computer.
- Select the Arduino Nano 33 IoT board and choose its corresponding COM port.
- Read the guide in the "How It Works" section.
- Copy the code above and open it in the Arduino IDE.
- Click the Upload button in the Arduino IDE to send the code to your Arduino Nano 33 IoT.
- Enjoy the music!
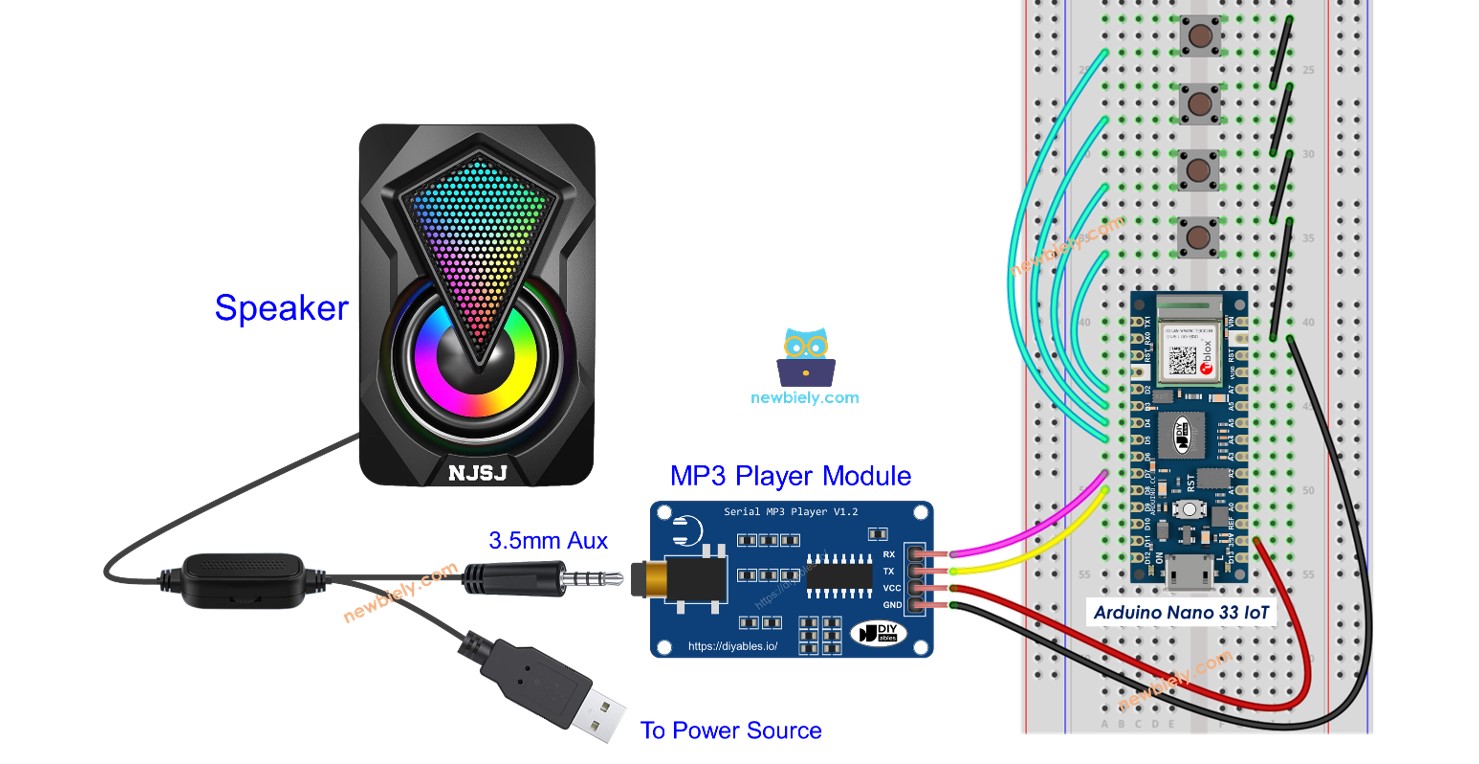
Arduino Nano 33 IoT Code - Play Music with control buttons
The code below is an improved version of the previous code. It adds four buttons that let you control the MP3 player.
Wiring diagram for the code above:

This image is created using Fritzing. Click to enlarge image
You can now change the projects to add more features, such as:
- Add a knob to adjust the volume. See the Arduino Nano 33 IoT Potentiometer tutotial.
- Add an infrared remote control. Check the Arduino Nano 33 IoT IR Remote Controller tutotial.
- Add an RFID reader and card to create an RFID MP3 player. Visit the Arduino Nano 33 IoT RFID tutotial.
※ NOTE THAT:
Please note that the Arduino Nano 33 IoT pins A4 and A5 have built-in pull-up resistors for I2C communication. Although these pins can be used as digital input pins, it is recommended to avoid using them for digital input. If you must use them, do NOT use internal or external pull-down resistors for these pins