Arduino Nano 33 IoT - WS2812B LED Strip

In this guide, we will learn how to use the Arduino Nano 33 IoT to control a WS2812B RGB LED strip. We will use just one pin on the Arduino Nano 33 IoT:

Arduino Nano 33 IoT WS2812B RGB LED strip

Hardware Preparation

1×Arduino Nano 33 IoT
1×Micro USB Cable
1×WS2812B RGB LED Strip
1×1000uF Capacitor
1×470Ω Resistor
1×5V Power Adapter
1×Optionally, DC Power Jack
1×Jumper Wires
1×Breadboard
1×Recommended: Screw Terminal Expansion Board for Arduino Nano
1×Recommended: Breakout Expansion Board for Arduino Nano
1×Recommended: Power Splitter for Arduino Nano

Or you can buy the following sensor kits:

1×DIYables Sensor Kit (30 sensors/displays)
1×DIYables Sensor Kit (18 sensors/displays)
Disclosure: Some of the links provided in this section are Amazon affiliate links. We may receive a commission for any purchases made through these links at no additional cost to you.
Additionally, some of these links are for products from our own brand, DIYables .

Overview of WS2812B RGB LED Strip

Pinout

The WS2812B LED strip has three connection points:

  • GND pin: Connect this pin to ground (0V).
  • VCC pin: Connect this pin to the 5V power supply.
  • Din pin: This pin gets the control signal. Connect it to a pin on the Arduino Nano 33 IoT.
WS2812B Pinout

※ NOTE THAT:

Different manufacturers may arrange the pins in different orders. Always follow the labels printed on the LED strip.
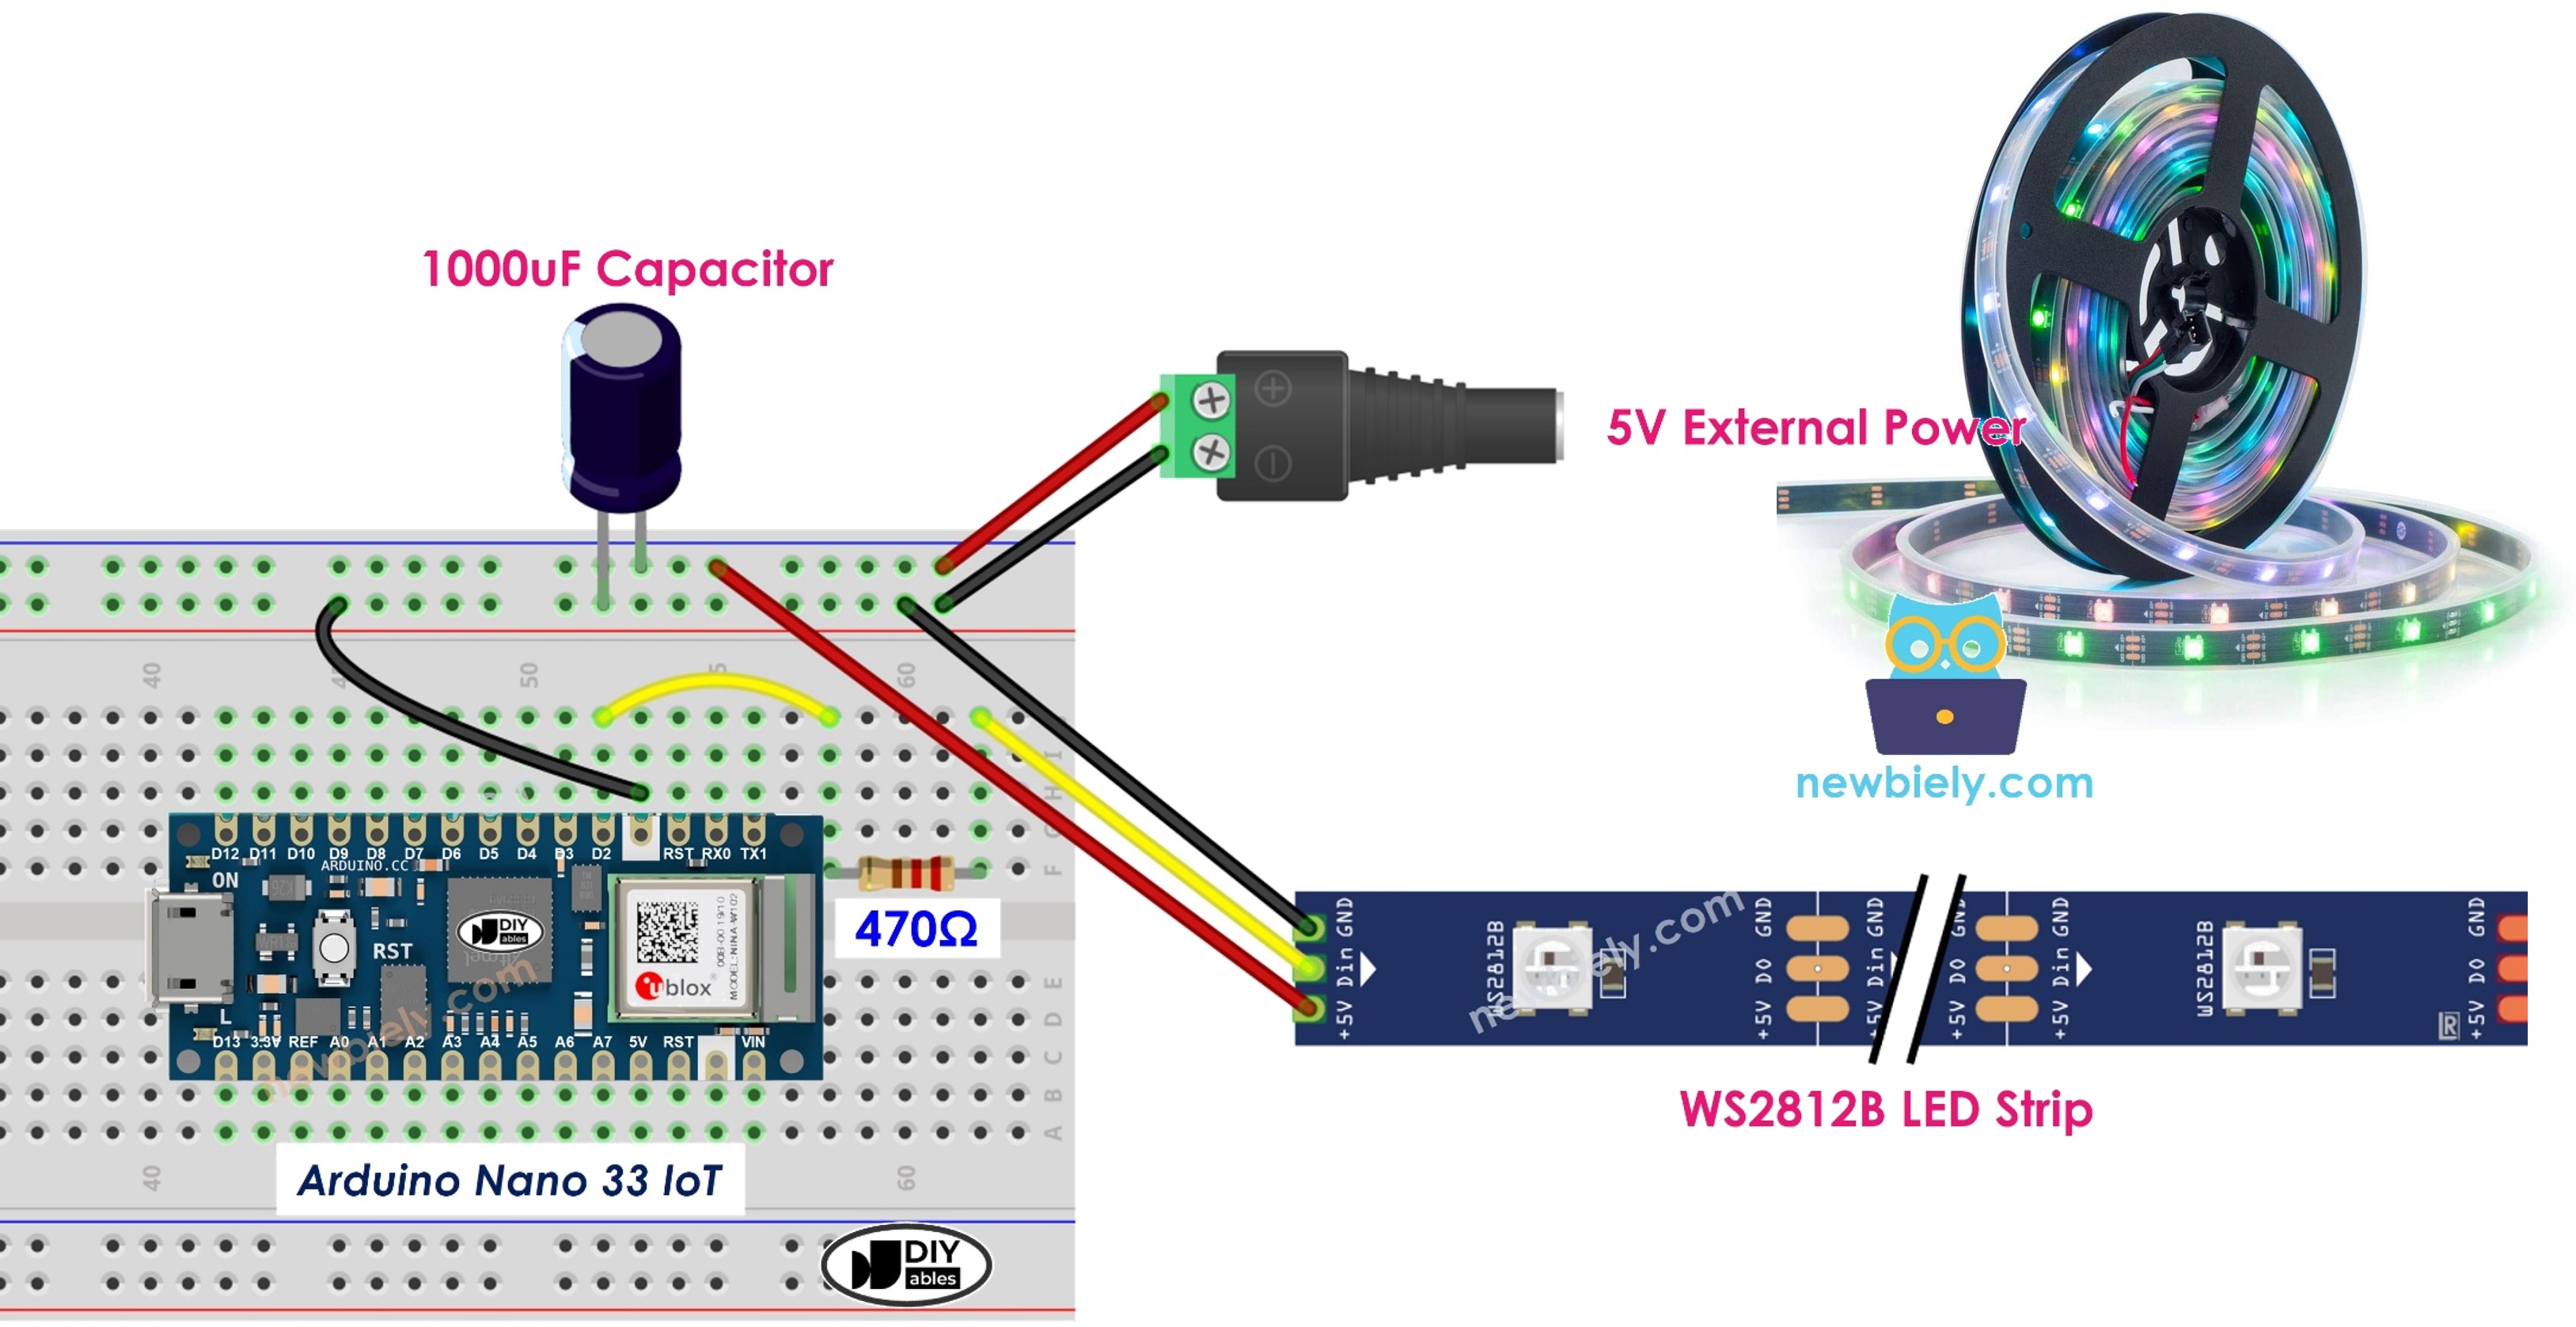
Wiring Diagram

The wiring diagram between Arduino Nano and 33 IoT WS2812B RGB LED strip

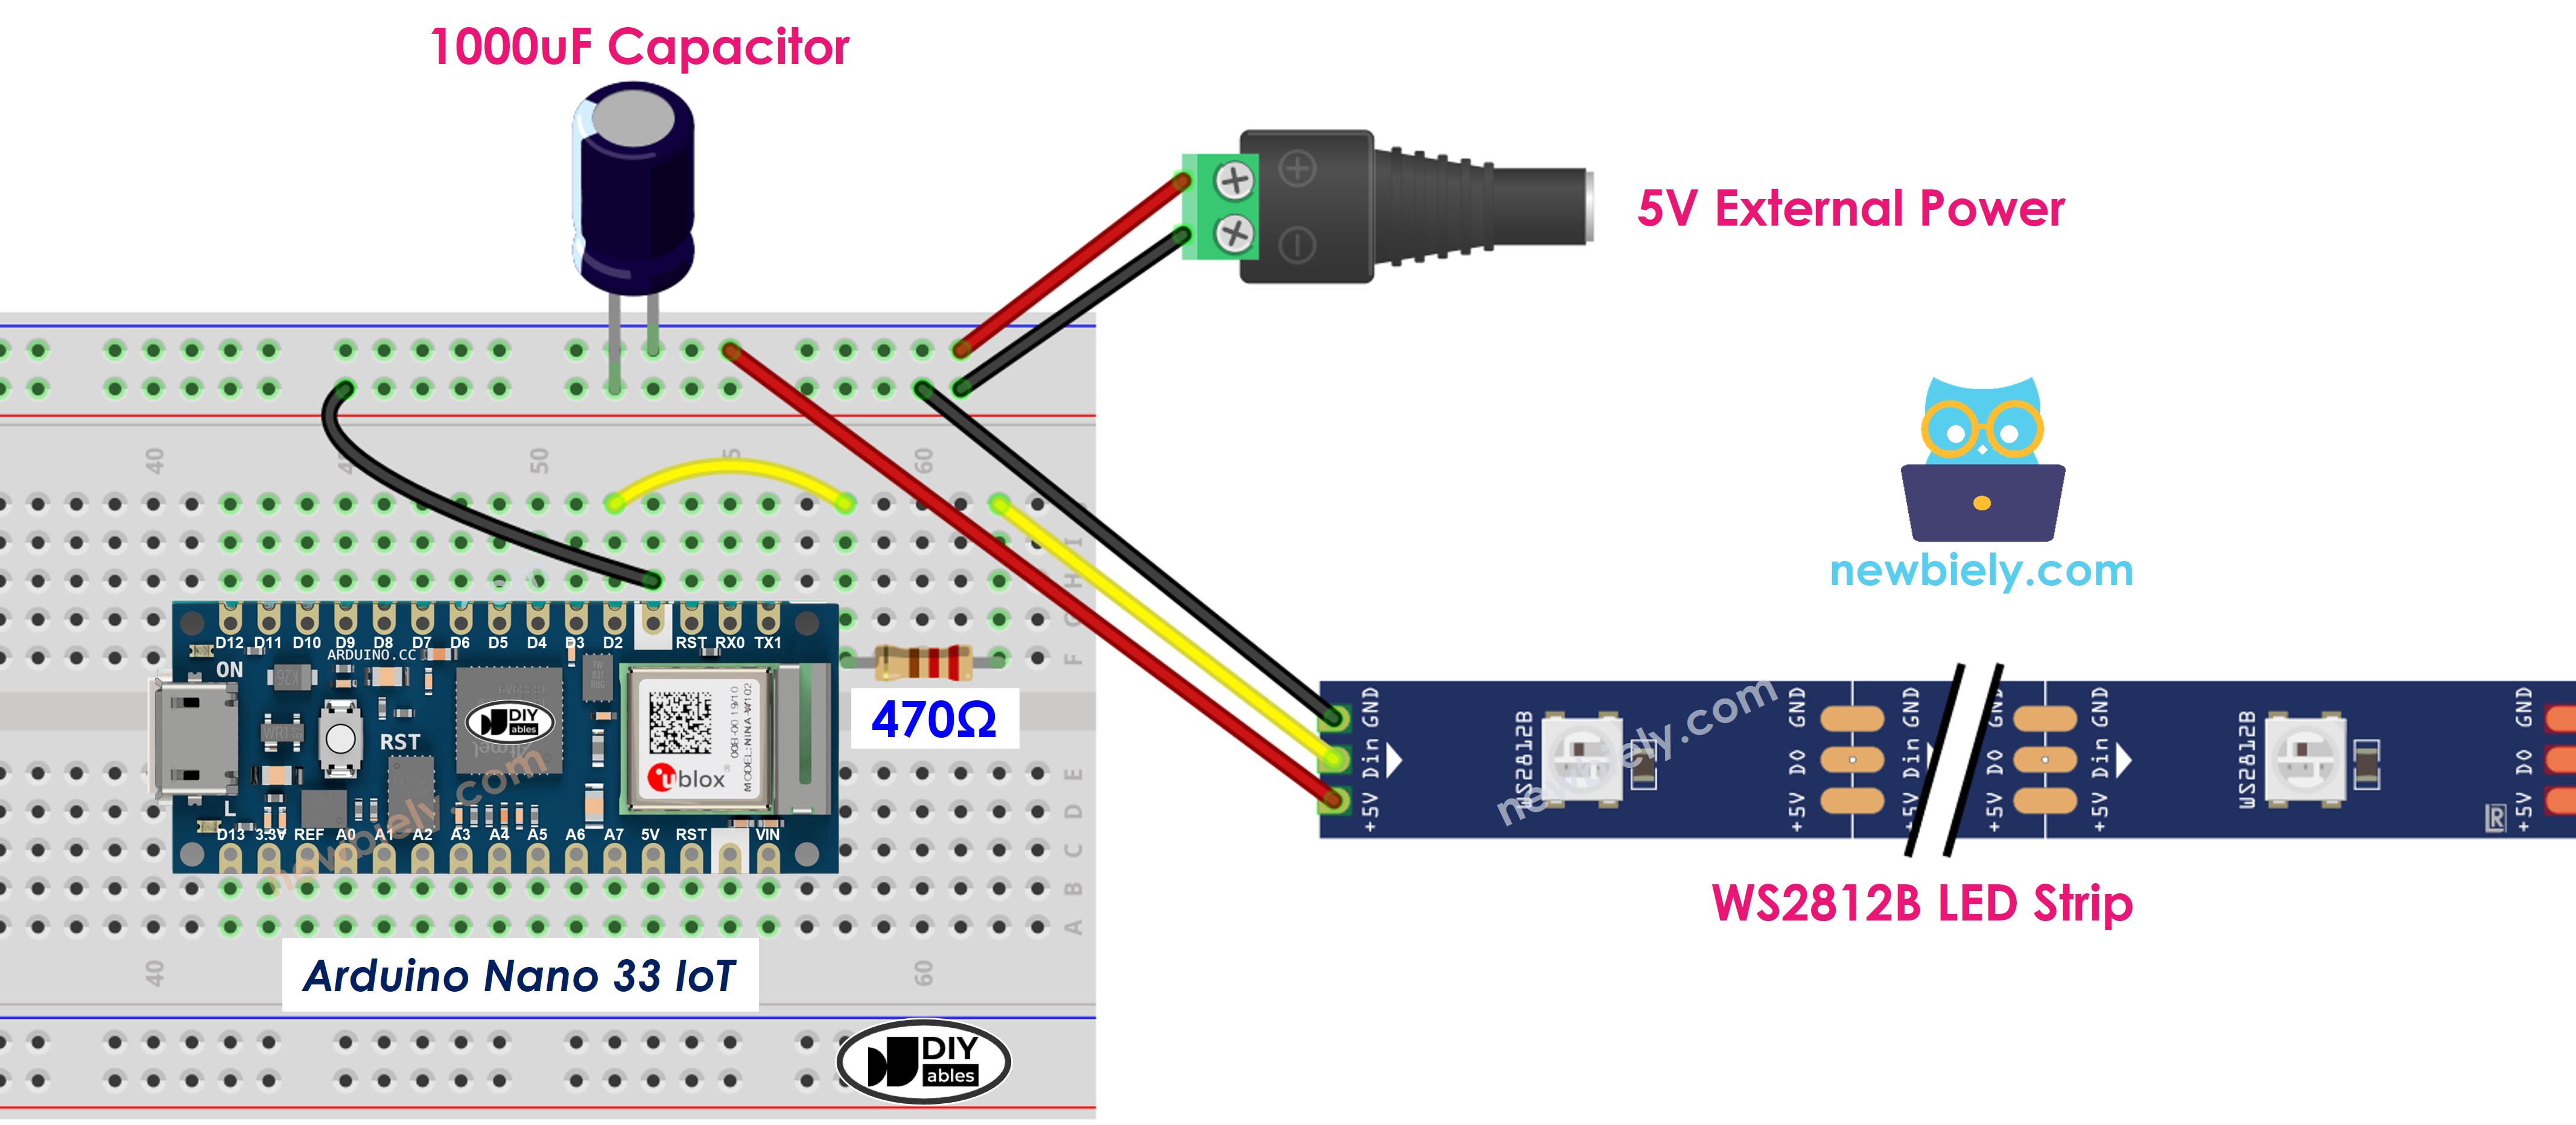
This image is created using Fritzing. Click to enlarge image

How To Program For WS2812B RGB LED Strip

You can use two different libraries to control a WS2812B LED strip:

  • Adafruit NeoPixel toolkit for controlling colorful LED lights.
  • FastLED toolkit for managing LED strips.

This lesson will use the Adafruit NeoPixel library.

  • Create a WS2812B object.
#define PIN_WS2812B D2 // Pin on the Arduino Nano 33 IoT attached to the WS2812B LED strip #define NUM_PIXELS 30 // Total count of LEDs (pixels) present on the WS2812B strip Adafruit_NeoPixel WS2812B(NUM_PIXELS, PIN_WS2812B, NEO_GRB + NEO_KHZ800);
  • Starts the WS2812B
WS2812B.begin(); // Set up the WS2812B LED strip (essential initialization)
  • Change the color of each LED light (they are called pixels).
WS2812B.setPixelColor(pixel, WS2812B.Color(255, 0, 0));
  • Change the brightness for the whole strip.
WS2812B.setBrightness(100); // Set the LED brightness level between 0 (minimum) and 255 (maximum)

※ NOTE THAT:

  • WS2812B.setBrightness() controls the brightness for every light on the LED strip. If you want to change the brightness for each light one by one, you need to adjust its color value.
  • The changes made with WS2812B.setBrightness() and WS2812B.setPixelColor() will only be visible after calling WS2812B.show().

Arduino Nano 33 IoT Code

Here's what the code does:

  • Change each pixel to green, one at a time, waiting a little bit between each change.
  • Switch off all pixels for two seconds.
  • Change all pixels to red at the same time for two seconds.
  • Keep doing these steps forever.
/* * This Arduino Nano 33 IoT code was developed by newbiely.com * * This Arduino Nano 33 IoT code is made available for public use without any restriction * * For comprehensive instructions and wiring diagrams, please visit: * https://newbiely.com/tutorials/arduino-nano-iot/arduino-nano-33-iot-ws2812b-led-strip */ #include <Adafruit_NeoPixel.h> #define PIN_WS2812B 2 // The Arduino Nano 33 IoT pin connected to WS2812B #define NUM_PIXELS 30 // The number of LEDs (pixels) on WS2812B LED strip Adafruit_NeoPixel ws2812b(NUM_PIXELS, PIN_WS2812B, NEO_GRB + NEO_KHZ800); void setup() { ws2812b.begin(); // initialize WS2812B strip object (REQUIRED) } void loop() { ws2812b.clear(); // set all pixel colors to 'off'. It only takes effect if pixels.show() is called // turn pixels to green one-by-one with delay between each pixel for (int pixel = 0; pixel < NUM_PIXELS; pixel++) { // for each pixel ws2812b.setPixelColor(pixel, ws2812b.Color(0, 255, 0)); // it only takes effect if pixels.show() is called ws2812b.show(); // update to the WS2812B Led Strip delay(500); // 500ms pause between each pixel } // turn off all pixels for two seconds ws2812b.clear(); ws2812b.show(); // update to the WS2812B Led Strip delay(2000); // 2 seconds off time // turn on all pixels to red at the same time for two seconds for (int pixel = 0; pixel < NUM_PIXELS; pixel++) { // for each pixel ws2812b.setPixelColor(pixel, ws2812b.Color(255, 0, 0)); // it only takes effect if pixels.show() is called } ws2812b.show(); // update to the WS2812B Led Strip delay(1000); // 1 second on time // turn off all pixels for one seconds ws2812b.clear(); ws2812b.show(); // update to the WS2812B Led Strip delay(1000); // 1 second off time }

Detailed Instructions

If you are new to the Arduino Nano 33 IoT, be sure to check out our Getting Started with Arduino Nano 33 IoT tutorial. Then, follow these steps:

  • Connect the components to the Arduino Nano 33 IoT board as depicted in the diagram.
  • Use a USB cable to connect the Arduino Nano 33 IoT board to your computer.
  • Launch the Arduino IDE on your computer.
  • Select the Arduino Nano 33 IoT board and choose its corresponding COM port.
  • Click the Library Manager icon on the left side of the Arduino IDE.
  • In the search box, type Adafruit NeoPixel and look for the WS2812B library by Adafruit.
  • Press the Install button to add the NeoPixel library.
Arduino Nano 33 IoT neopixel library
  • Copy the code above and open it in the Arduino IDE.
  • Click the Upload button in the Arduino IDE to send the code to your Arduino Nano 33 IoT board.
  • Watch the LED light show.

※ NOTE THAT:

If you want a complex LED light effect, try our paid programming service.

Video Tutorial

※ OUR MESSAGES

  • As freelancers, We are AVAILABLE for HIRE. See how to outsource your project to us
  • Please feel free to share the link of this tutorial. However, Please do not use our content on any other websites. We invested a lot of effort and time to create the content, please respect our work!