Arduino Nano 33 IoT - Rain Sensor
The rain sensor can detect and measure the amount of rain or snow. It gives two outputs: one digital (LOW/HIGH) and one analog.
In this guide, we will show you how to use an Arduino Nano 33 IoT and a rain sensor to detect and measure rain. We will cover the following points:
- How to hook up the rain sensor with the Arduino Nano 33 IoT.
- How to write code for the Arduino Nano 33 IoT so it can notice rain by checking the digital signal from the rain sensor.
- How to write code for the Arduino Nano 33 IoT so it can tell how much it is raining by checking the analog signal from the rain sensor.
After that, you can change the code to turn on a motor or send an alert when it finds rain or snow.
Hardware Preparation
Or you can buy the following kits:
| 1 | × | DIYables Sensor Kit (18 sensors/displays) |
Additionally, some of these links are for products from our own brand, DIYables .
Overview of Rain Sensor
The rain sensor is used to tell if it is raining or to check how much rain is falling. It works in two ways: a digital output and an analog output.
The rain sensor has two parts.
- The sensor pad
- The electronic unit
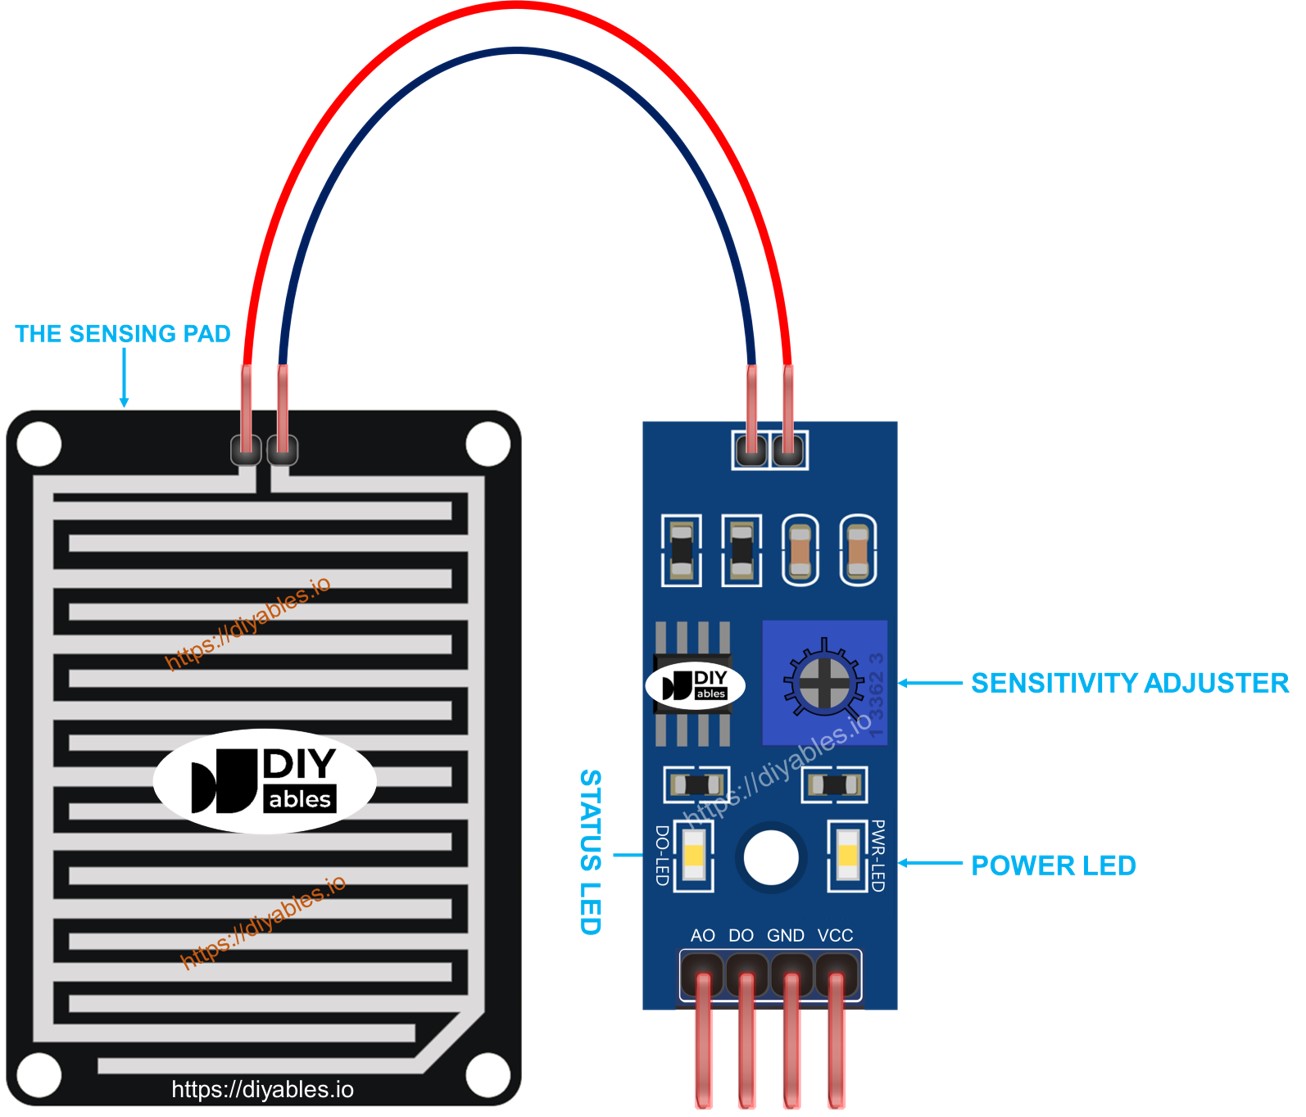
The sensing pad
The sensing pad is placed outside, like on a roof where it can get wet from rain or snow. It has several copper lines divided into two groups: one for power and one for sensing. These lines do not touch each other unless water or snow makes a bridge between them. There is no difference between the two types of lines; you can choose one group to use for power and the other for sensing.
The electronic module
The electronic module in the rain sensor changes the signal from the sensing pad into an analog or digital value that an Arduino Nano 33 IoT can read. It has four pins:
- VCC pin: Connect it to a power supply (between 3.3V and 5V).
- GND pin: Connect it to ground (0V).
- DO pin: This is a digital output. It shows a HIGH signal if no rain is detected and a LOW signal if rain is detected. You can adjust the sensitivity with the built-in dial.
- AO pin: This is an analog output. Its value goes down when there is more water on the sensor pad and goes up when there is less water.
Also, it has two LED lights:
- One LED labeled "PWR" shows when there is power. One LED labeled "DO" shows the rain status on the DO pin; it lights up when it is raining.
How It Works
For the digital output (DO) pin:
- The module comes with its own knob to adjust how sensitive it is.
- When the rain is strong enough (above the set level), the sensor detects it, the sensor’s output goes low, and the LED lights up.
- When the rain is too light (below the set level), the sensor does not detect it, the sensor’s output stays high, and the LED remains off.
About the AO pin:
- When there is more water in the pad, the AO pin shows a lower number. When there is less water, it shows a higher number.
Keep in mind that the potentiometer does not change the number on the AO pin.
Wiring Diagram
The sensor's VCC pin should be connected to a 3.3V or 5V power source. However, if you connect it directly to the Arduino Nano 33 IoT’s power pin, the sensor might not last as long because of damage from chemical reactions. A better method is to attach the sensor's VCC pin to one of the Arduino Nano 33 IoT’s output pins. You can then program that pin to power the sensor only when taking readings. This approach helps reduce the risk of damage.
The rain sensor has two outputs, so you can use one or both, depending on what you need.
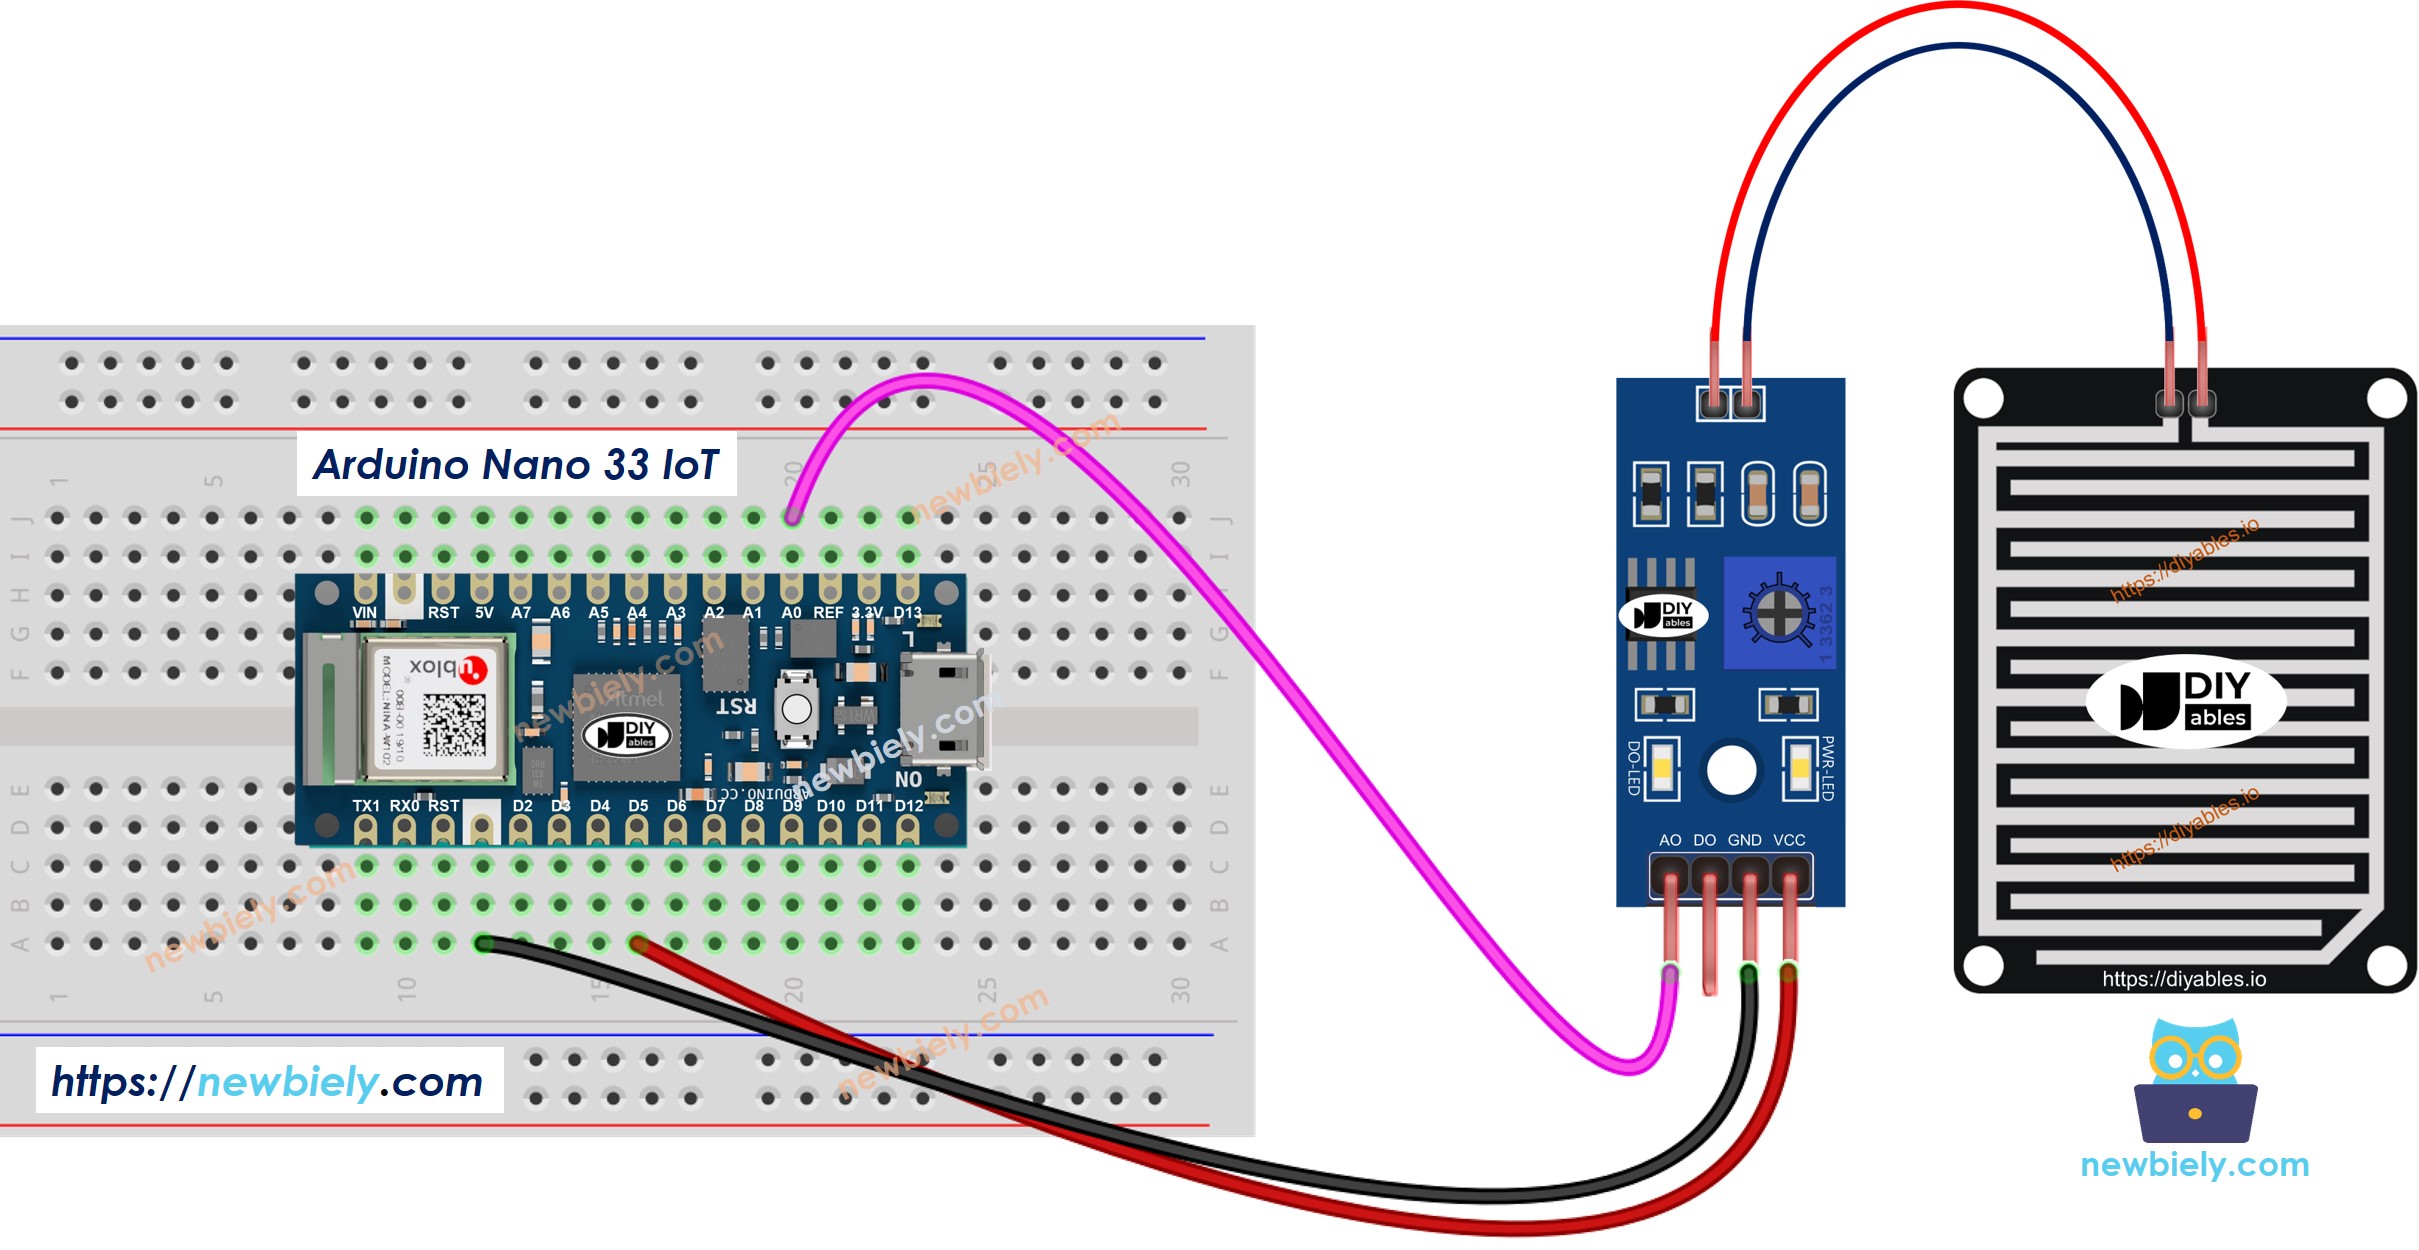
- The wiring diagram for connecting an Arduino Nano 33 IoT to a rain sensor using only the digital output.

This image is created using Fritzing. Click to enlarge image
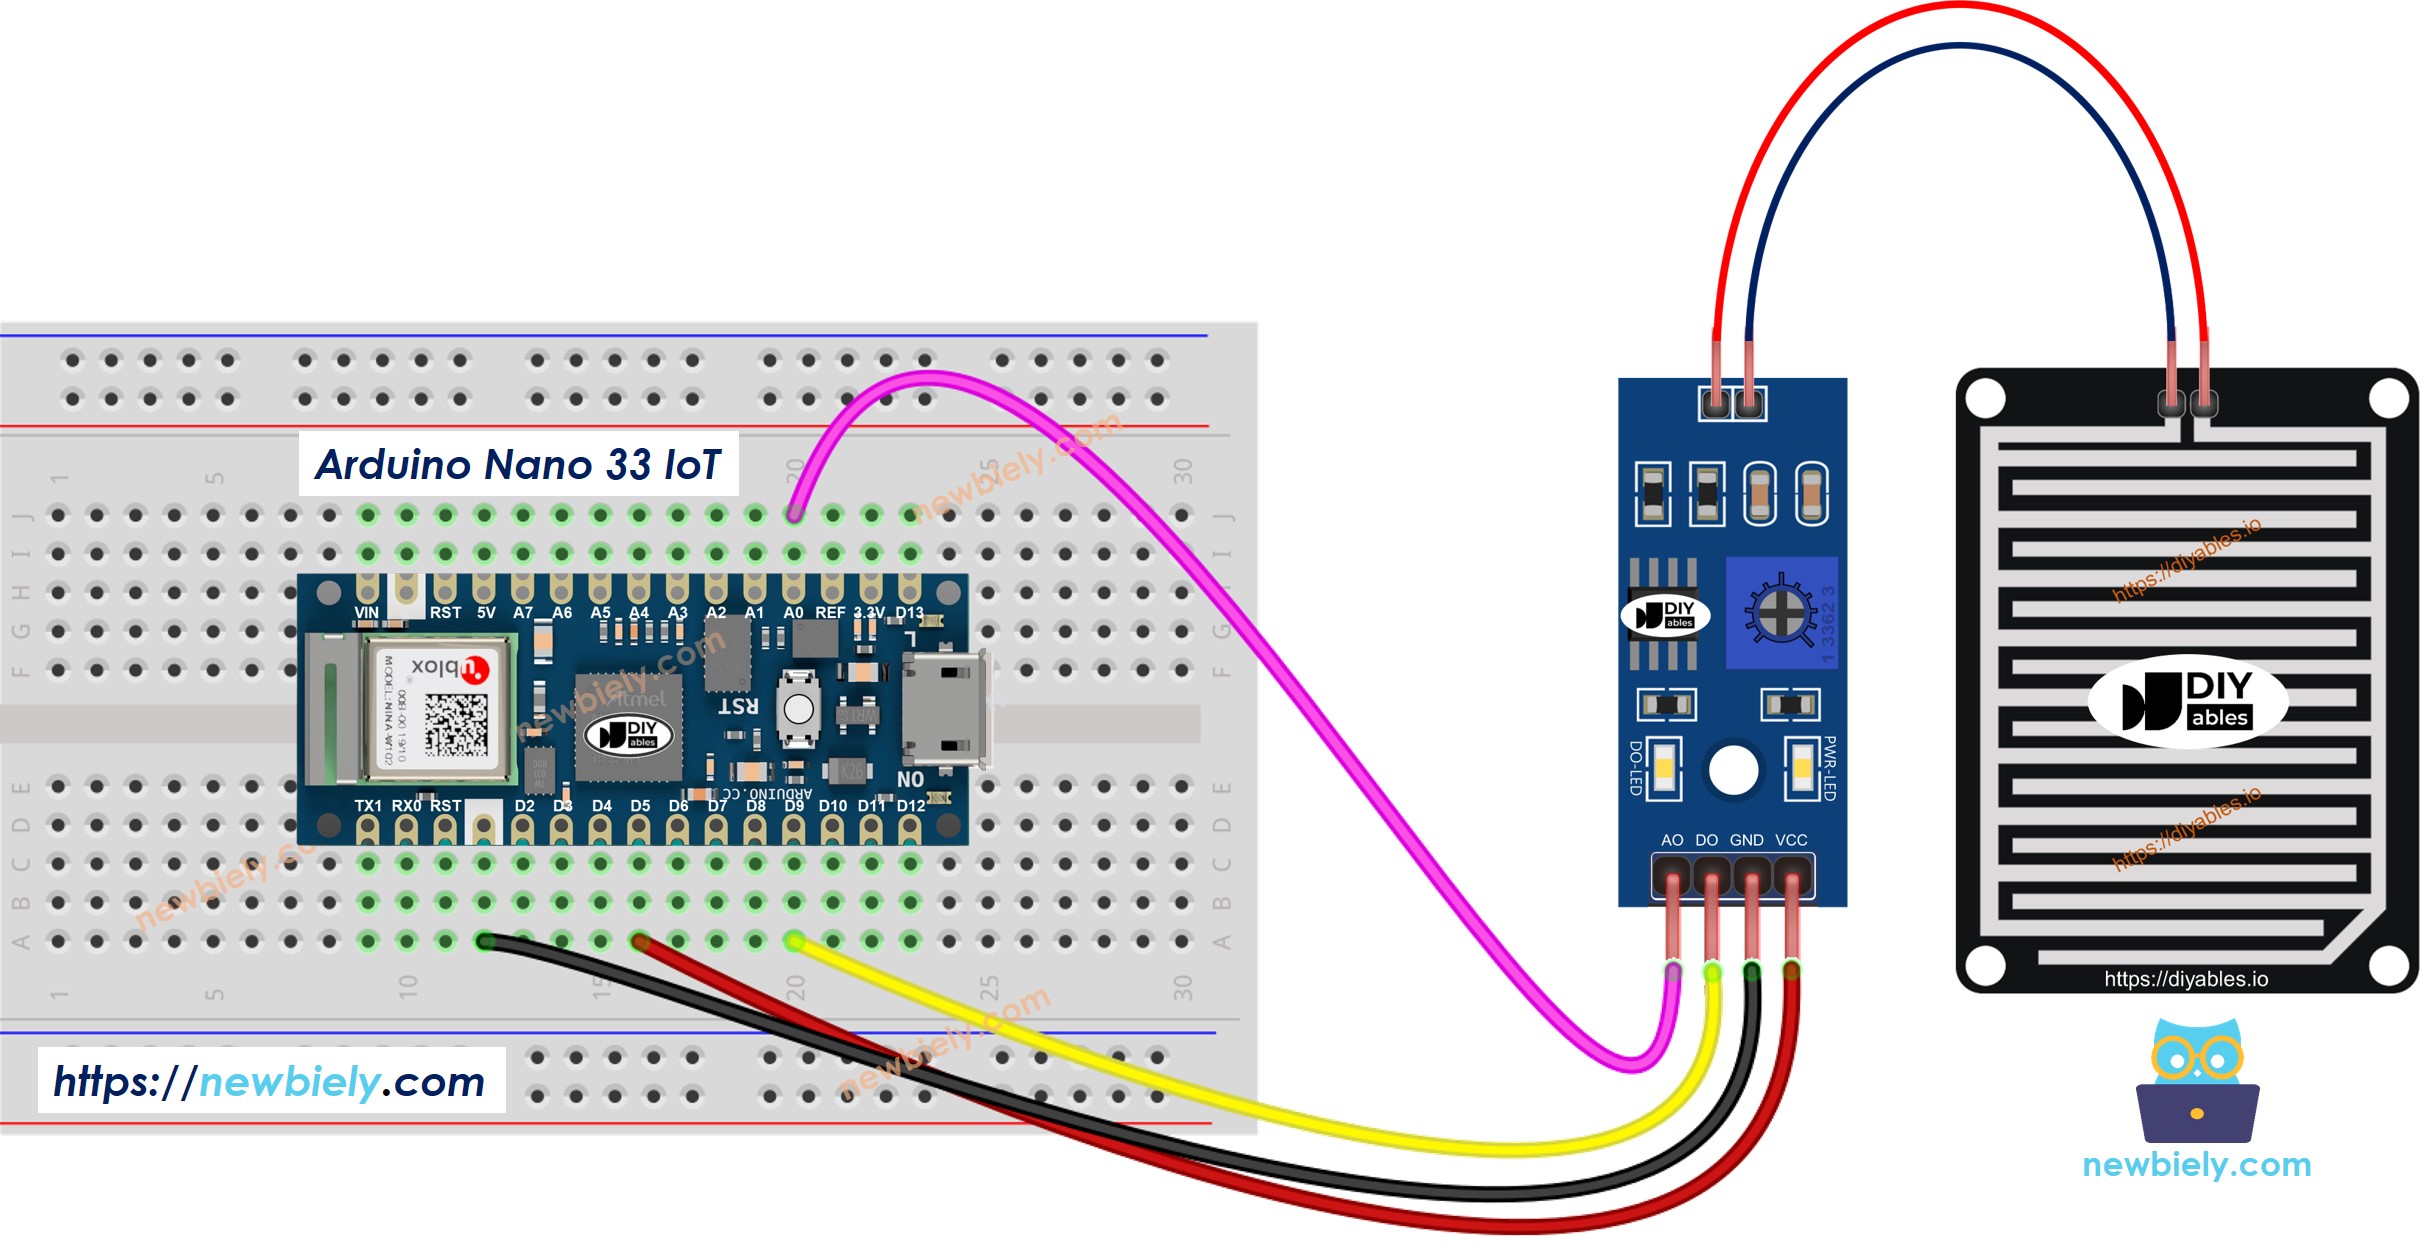
- Connection diagram showing how the Arduino Nano 33 IoT and the rain sensor are wired using only the AO connection.
This image is created using Fritzing. Click to enlarge image
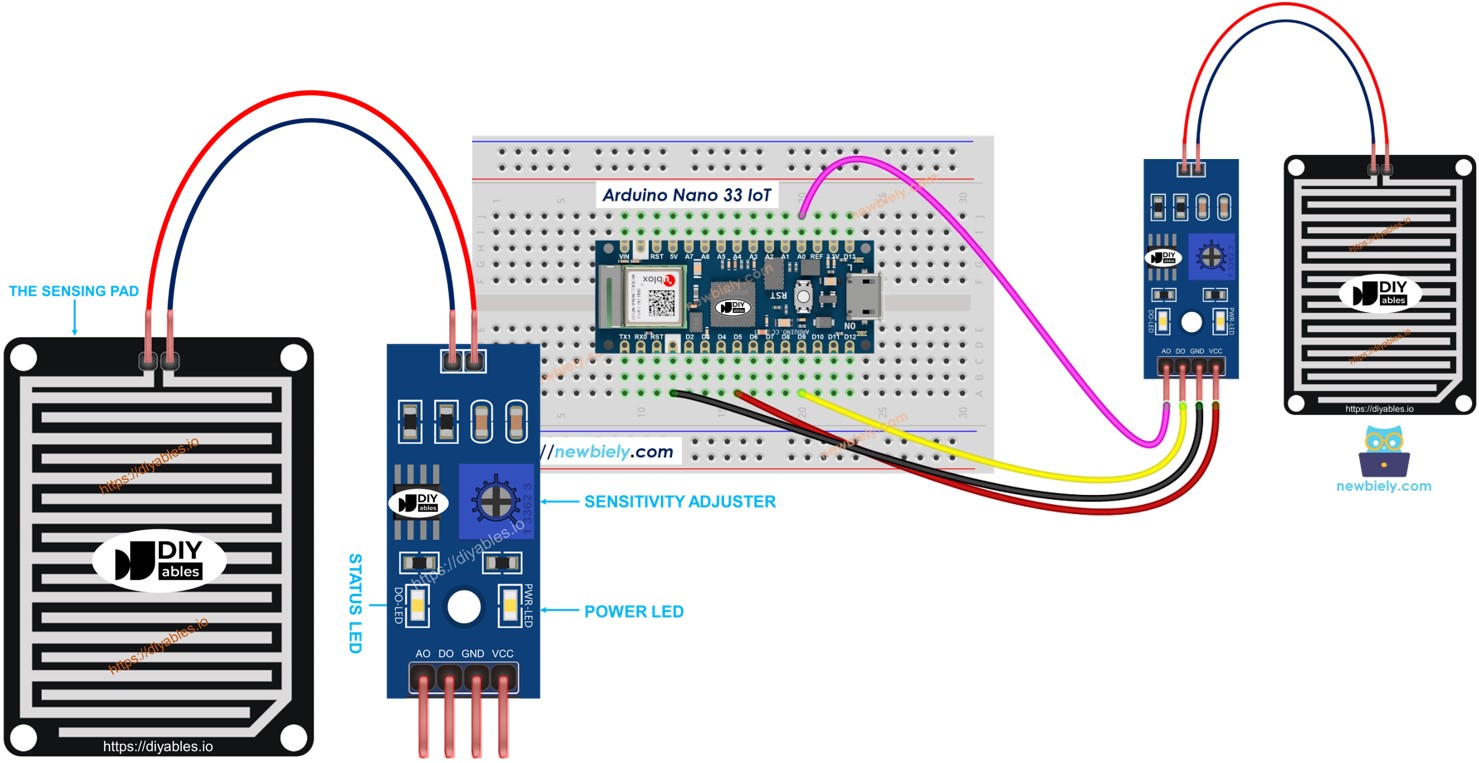
- Wiring diagram showing how to connect the Arduino Nano 33 IoT with the rain sensor using both the analog (AO) and digital (DO) pins.
This image is created using Fritzing. Click to enlarge image
※ NOTE THAT:
Please note that the Arduino Nano 33 IoT pins A4 and A5 have built-in pull-up resistors for I2C communication:
- This can affect analog readings, so it is recommended to avoid using these pins with any devices/sensors that relies on ADC.
- Although these pins can be used as digital input pins, it is recommended to avoid using them for digital input. If you must use them, do NOT use internal or external pull-down resistors for these pins.
Arduino Nano 33 IoT Code - Read value from DO pin
Detailed Instructions
If you are new to the Arduino Nano 33 IoT, be sure to check out our Getting Started with Arduino Nano 33 IoT tutorial. Then, follow these steps:
- Connect the components to the Arduino Nano 33 IoT board as depicted in the diagram.
- Use a USB cable to connect the Arduino Nano 33 IoT board to your computer.
- Launch the Arduino IDE on your computer.
- Select the Arduino Nano 33 IoT board and choose its corresponding COM port.
- Copy the code above and open it in the Arduino IDE.
- Click the Upload button in the Arduino IDE to send the code to your Arduino Nano 33 IoT.
- Put a little water on the rain sensor.
- Check the result in the Serial Monitor.
Remember, if you see the LED light staying on all the time or off, even when it’s raining, you can adjust the knob (called a potentiometer) to change how sensitive the sensor is.
Arduino Nano 33 IoT Code - Read value from AO pin
Detailed Instructions
- Copy the code above and open it in the Arduino IDE.
- Click the Upload button in the Arduino IDE to send the code to your Arduino Nano 33 IoT.
- Put a little water on the rain sensor.
- See the results on the Serial Monitor.