Arduino Nano 33 IoT - NeoPixel LED Strip
A NeoPixel strip is a row of colorful RGB lights, and you can change the color and brightness of each light individually. In this guide, we will show you how to use an Arduino Nano 33 IoT to control the NeoPixel RGB light strip. You only need one pin on the Arduino Nano 33 IoT to control all of the lights on the strip.
Hardware Preparation
Or you can buy the following kits:
| 1 | × | DIYables Sensor Kit (18 sensors/displays) |
Disclosure: Some of the links provided in this section are Amazon affiliate links. We may receive a commission for any purchases made through these links at no additional cost to you.
Additionally, some of these links are for products from our own brand, DIYables .
Additionally, some of these links are for products from our own brand, DIYables .
Overview of NeoPixel RGB LED Strip
Pinout
The NeoPixel RGB LED strip comes with three connectors.
- GND pin: Connect this to ground (0V).
- VCC pin: Connect this to the 5V output of your external power supply.
- Din pin: This is the pin that receives the control signal. Connect it to a pin on the Arduino Nano 33 IoT.
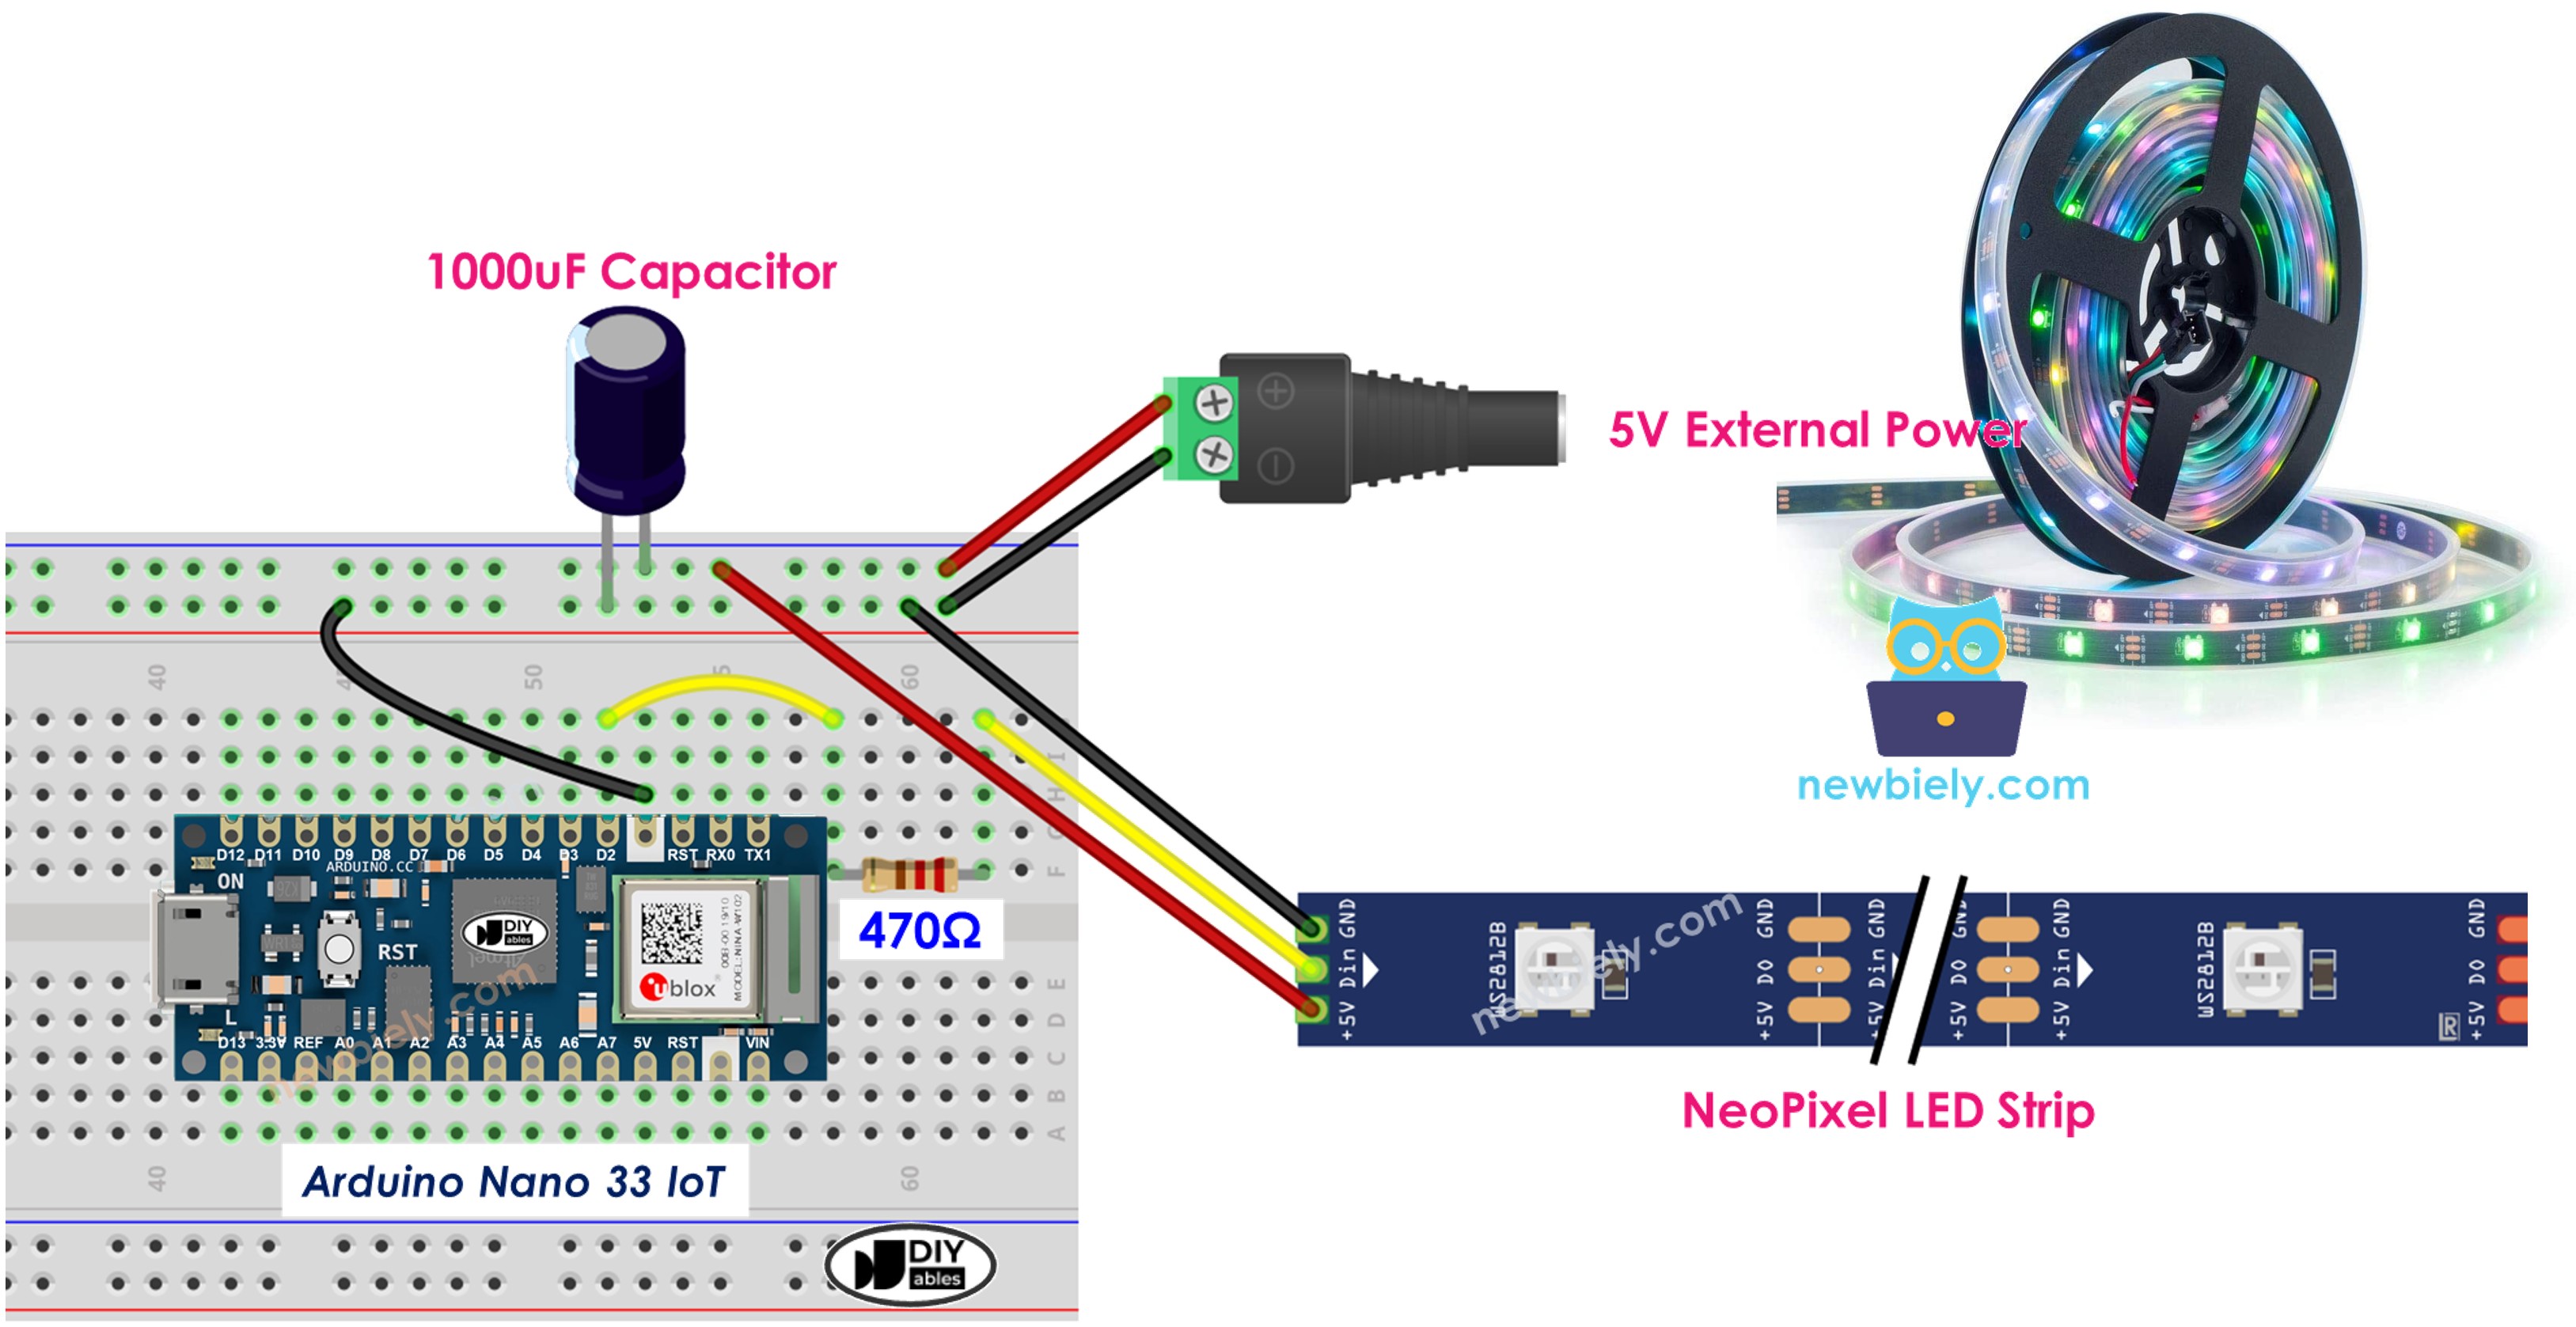
Wiring Diagram
This image is created using Fritzing. Click to enlarge image
How To Program For NeoPixel RGB LED Strip
- Create a NeoPixel object.
#define PIN_NEO_PIXEL D2 // Arduino Nano 33 IoT pin assigned to the NeoPixel data line
#define NUM_PIXELS 30 // Total count of NeoPixel LEDs to be used
Adafruit_NeoPixel NeoPixel(NUM_PIXELS, PIN_NEO_PIXEL, NEO_GRB + NEO_KHZ800); // Initialize NeoPixel with specified parameters
- Sets up the NeoPixel.
NeoPixel.begin(); // Set up the NeoPixel strip for operation (REQUIRED)
- Set the color for each LED (also known as a pixel).
NeoPixel.setPixelColor(pixel, NeoPixel.Color(255, 0, 0));
- Set the brightness for all the strips.
NeoPixel.setBrightness(200); // Set brightness level; valid range is 0 (off) to 255 (full brightness)
※ NOTE THAT:
- NeoPixel.setBrightness() changes the brightness for the whole LED strip. If you want to change the brightness of one LED, you need to adjust its color value individually.
- The changes you make with NeoPixel.setBrightness() and NeoPixel.setPixelColor() won't appear until you run NeoPixel.show().
Arduino Nano 33 IoT Code
The code below does these tasks:
- It changes each pixel to green one by one, with a small pause after each pixel. Then, it turns off all the pixels for two seconds. Next, it turns all the pixels red at the same time and keeps them red for one second. This process keeps repeating forever.
/*
* This Arduino Nano 33 IoT code was developed by newbiely.com
*
* This Arduino Nano 33 IoT code is made available for public use without any restriction
*
* For comprehensive instructions and wiring diagrams, please visit:
* https://newbiely.com/tutorials/arduino-nano-iot/arduino-nano-33-iot-neopixel-led-strip
*/
#include <Adafruit_NeoPixel.h>
#define PIN_NEO_PIXEL 2 // The Arduino Nano 33 IoT pin connected to NeoPixel
#define NUM_PIXELS 30 // The number of LEDs (pixels) on NeoPixel LED strip
Adafruit_NeoPixel NeoPixel(NUM_PIXELS, PIN_NEO_PIXEL, NEO_GRB + NEO_KHZ800);
void setup() {
NeoPixel.begin(); // initialize NeoPixel strip object (REQUIRED)
}
void loop() {
NeoPixel.clear(); // set all pixel colors to 'off'. It only takes effect if pixels.show() is called
// turn pixels to green one-by-one with delay between each pixel
for (int pixel = 0; pixel < NUM_PIXELS; pixel++) { // for each pixel
NeoPixel.setPixelColor(pixel, NeoPixel.Color(0, 255, 0)); // it only takes effect if pixels.show() is called
NeoPixel.show(); // update to the NeoPixel Led Strip
delay(500); // 500ms pause between each pixel
}
// turn off all pixels for two seconds
NeoPixel.clear();
NeoPixel.show(); // update to the NeoPixel Led Strip
delay(2000); // 2 seconds off time
// turn on all pixels to red at the same time for two seconds
for (int pixel = 0; pixel < NUM_PIXELS; pixel++) { // for each pixel
NeoPixel.setPixelColor(pixel, NeoPixel.Color(255, 0, 0)); // it only takes effect if pixels.show() is called
}
NeoPixel.show(); // update to the NeoPixel Led Strip
delay(1000); // 1 second on time
// turn off all pixels for one seconds
NeoPixel.clear();
NeoPixel.show(); // update to the NeoPixel Led Strip
delay(1000); // 1 second off time
}
Detailed Instructions
If you are new to the Arduino Nano 33 IoT, be sure to check out our Getting Started with Arduino Nano 33 IoT tutorial. Then, follow these steps:
- Connect the components to the Arduino Nano 33 IoT board as depicted in the diagram.
- Use a USB cable to connect the Arduino Nano 33 IoT board to your computer.
- Launch the Arduino IDE on your computer.
- Select the Arduino Nano 33 IoT board and choose its corresponding COM port.
- Open the Library Manager by clicking the Library Manager icon on the left side of the Arduino IDE.
- Type Adafruit NeoPixel in the search box, and then select the NeoPixel library made by Adafruit.
- Click the Install button to add the NeoPixel library.
- Copy the code above and open it in the Arduino IDE.
- Click the Upload button in the Arduino IDE to send the code to your Arduino Nano 33 IoT.
- Look at what happens with the LED strip.