Arduino Nano 33 IoT - Soil Moisture Sensor Pump
In this guide, we'll learn how to use the Arduino Nano 33 IoT to control a pump based on the reading from a soil moisture sensor.
Hardware Preparation
Or you can buy the following kits:
| 1 | × | DIYables Sensor Kit (18 sensors/displays) |
Additionally, some of these links are for products from our own brand, DIYables .
Buy Note: Many soil moisture sensors available in the market are unreliable, regardless of their version. We strongly recommend buying the sensor with TLC555I Chip from the DIYables brand using the link provided above. We tested it, and it worked reliably.
Overview of soil moisture sensor and Pump
If you're new to using the soil moisture sensor, Pump, and Arduino Nano 33 IoT, please check out these tutorials:
- Arduino Nano 33 IoT - Controls Pump tutorial
These tutorials explain how soil moisture sensor and Pump work, their pinouts, how to connect them to the Arduino Nano 33 IoT, and how to program Arduino Nano 33 IoT to work with the soil moisture sensor and Pump.
How It Works
Arduino Nano 33 IoT regularly checks the reading from the capacitive soil moisture sensor. Depending on how wet the soil is, it will perform these actions:
- If the soil moisture is lower than a certain level, the Arduino Nano 33 IoT automatically turns on a relay to start the pump. Otherwise, it automatically turns off the relay to stop the pump.
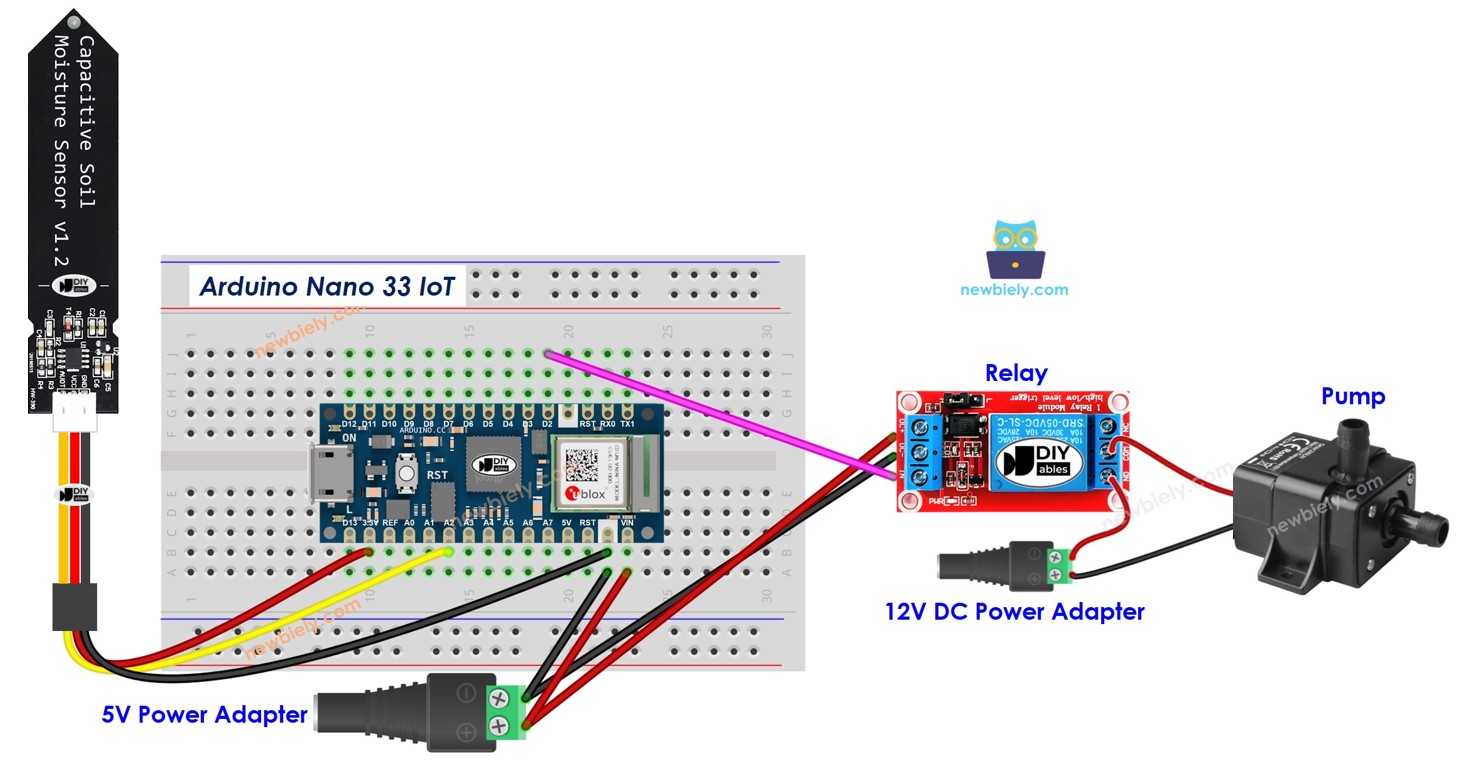
Wiring Diagram
This image is created using Fritzing. Click to enlarge image
※ NOTE THAT:
Please note that the Arduino Nano 33 IoT pins A4 and A5 have built-in pull-up resistors for I2C communication. This can affect analog readings, so it is recommended to avoid using these pins with any devices/sensors that relies on ADC.
Arduino Nano 33 IoT Code
Detailed Instructions
If you are new to the Arduino Nano 33 IoT, be sure to check out our Getting Started with Arduino Nano 33 IoT tutorial. Then, follow these steps:
- Connect the components to the Arduino Nano 33 IoT board as depicted in the diagram.
- Use a USB cable to connect the Arduino Nano 33 IoT board to your computer.
- Launch the Arduino IDE on your computer.
- Select the Arduino Nano 33 IoT board and choose its corresponding COM port.
- Do a calibration to find the right wet-dry threshold. You can see how in Arduino Nano 33 IoT - Soil Moisture Sensor tutorial.
- Change the calibrated value to THRESHOLD in the code.
- Open the Serial Monitor in the Arduino IDE.
- Upload the code to your Arduino Nano 33 IoT.
- Look at the result on the Serial Monitor.
Code Explanation
Read the explanation in each comment line of the source code!