
Arduino Mega - NTC Thermistor Temperature Sensor
How hot is a fresh cup of tea, and how fast does it cool down? A 10K NTC thermistor probe can tell you, and the Arduino Mega needs only one analog pin to read it. The probe is a tiny resistor sealed in a steel cap. It has no chip inside, and it needs no library. This tutorial shows the Arduino Mega turning the resistance of the probe into a temperature you can read. Here is what we will go through in detail:
- How the steel probe is made, and the job of the extra 10K resistor
- Which three Arduino Mega pins the circuit uses (5V, A0 and GND), and where the resistor goes
- How to program the Arduino Mega so that one analog reading becomes a resistance, then a temperature in °C and °F
- How to try it with a mug of hot tea, and how fine the steps of the Mega's ADC really are
We suggest:
- Reading the Arduino Mega - Temperature Sensor tutorial to use a DS18B20 instead. That probe has a chip inside that does the converting, and several of them can share one data pin.
- Reading the Arduino Mega - MAX6675 Thermocouple Module tutorial for heat this probe cannot take: anything above 105°C, like a kiln, a smoker or the tip of a soldering iron.
Hardware Preparation
Or you can buy the following kits:
| 1 | × | DIYables Sensor Kit (18 sensors/displays) |
Additionally, some of these links are for products from our own brand, DIYables .
Overview of NTC Thermistor Temperature Sensor and Its Pinout
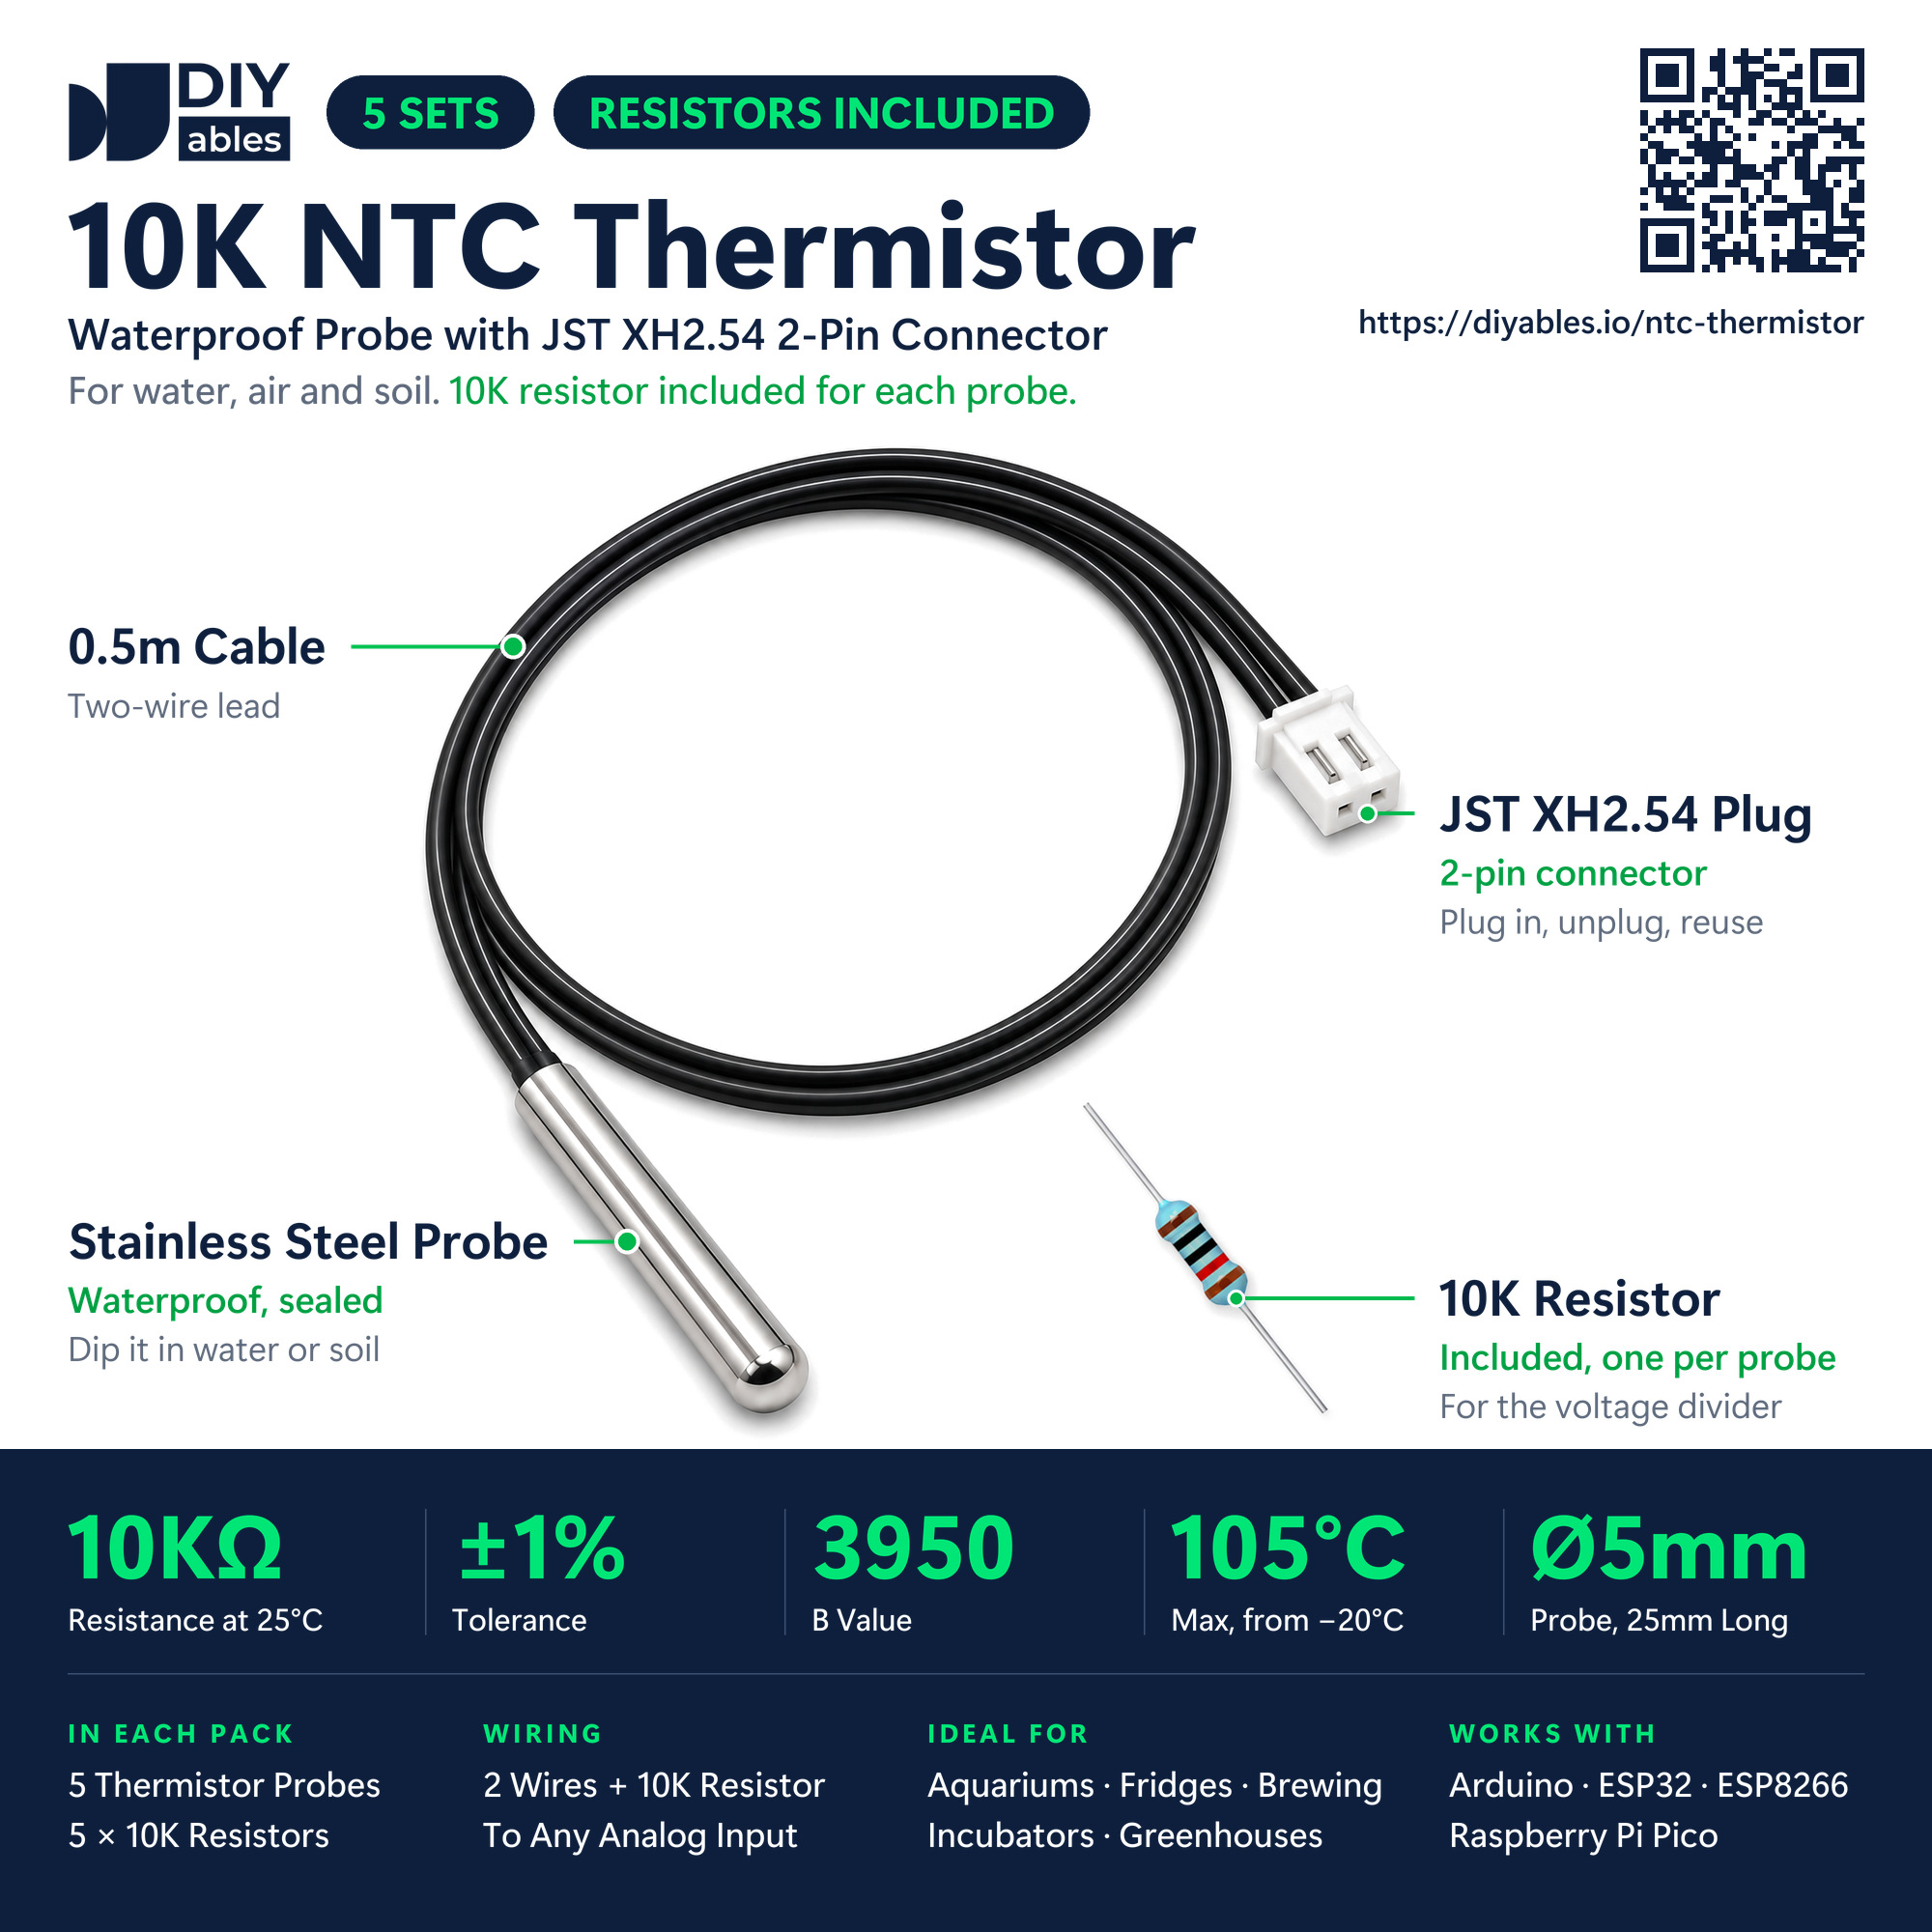
Think of this sensor as a thermometer without a display. At one end there is a sealed stainless-steel cap, 25mm long and 5mm across, with a rounded tip. The 10K NTC thermistor is hidden inside that cap. Half a meter of thin black cable leads away from it and ends in a little white two-hole connector, a JST XH2.54. That is the whole sensor: no circuit board, no chip and nothing to solder. The DIYables product is a set of five probes, and a matching 10K resistor is packed for every probe, so there is nothing extra to order.
| DIYables 10K NTC Thermistor Probe | |
|---|---|
| Thermistor | NTC, 10kΩ at 25°C (±1%) |
| Beta (B) value | 3950 |
| Temperature range | -20°C to +105°C |
| Probe | waterproof stainless steel, 5mm x 25mm, round tip |
| Lead | 0.5m black cable with two wires |
| Plug | white JST XH2.54, 2 pins |
| Wire polarity | none |
| Insulation resistance | more than 100MΩ |
| Output | a resistance, turned into a voltage by the 10K resistor |
Both wires in the cable are black and identical. Each of the two holes in the connector accepts the pin of a male jumper wire. Then:
- Probe wire #1 (any of the two): must be connected to 5V on the power header of the Mega
- Probe wire #2: must be connected to A0, one of the sixteen analog inputs of the Arduino Mega
- Kit resistor (10K): must be connected between A0 and one of the Mega's GND pins (0V). At A0 it meets probe wire #2
※ NOTE THAT:
The holes of the JST connector are small. Push each jumper pin all the way in, then pull it gently to check that it holds. A pin that is only half inside is the most common reason for a jumpy or missing reading. Which wire goes where does not matter, because a thermistor has no + or - side.
Reading a Resistance with the Mega
Put simply, a thermistor is a resistor built to react to heat. In an NTC type, the value goes down when the tip gets warmer. The Arduino Mega cannot read ohms directly, because its analog pins only see volts. That is where the 10K resistor comes in. The probe and the resistor sit in a row between 5V and GND and share the 5V between them. A0 is the point in the middle. When the tip warms up, the probe loses resistance, A0 gets a bigger part of the 5V, and analogRead() returns a bigger number.
Some places where you might use the probe, and what the Mega sees there:
| Place | Temperature | Probe resistance | Voltage on A0 | analogRead() |
|---|---|---|---|---|
| Home freezer | -18°C | about 93.3kΩ | 0.48V | about 99 |
| Fridge shelf | 4°C | about 27.3kΩ | 1.34V | about 274 |
| Living room | 20°C | about 12.5kΩ | 2.22V | about 454 |
| Hot bath water | 45°C | about 4.3kΩ | 3.48V | about 713 |
| Fresh cup of tea | 85°C | about 1.1kΩ | 4.51V | about 923 |
The sketch walks this path backwards. From the analogRead() value it finds the resistance R of the probe. The beta (B-parameter) equation then returns the temperature T in kelvin:
1/T = 1/T0 + (1/B) × ln(R/R0)
In this equation, B is 3950, R0 is 10000Ω, and T0 is 298.15K, which equals 25°C. The ln part is the natural logarithm. Take T minus 273.15, and the result is in °C. A more exact formula with three coefficients exists, called the Steinhart-Hart equation, but for a 1% hobby probe like this one the simpler B formula does the job. Near 20 to 25°C, a reading is normally within about 1°C of the truth. Any extra error comes from the tolerance of the 10K resistor and from the Mega's ADC.
Wiring Diagram
Only three Mega pins are used: 5V, A0 and GND. The A0 point is shared by probe wire #2 and one leg of the resistor.
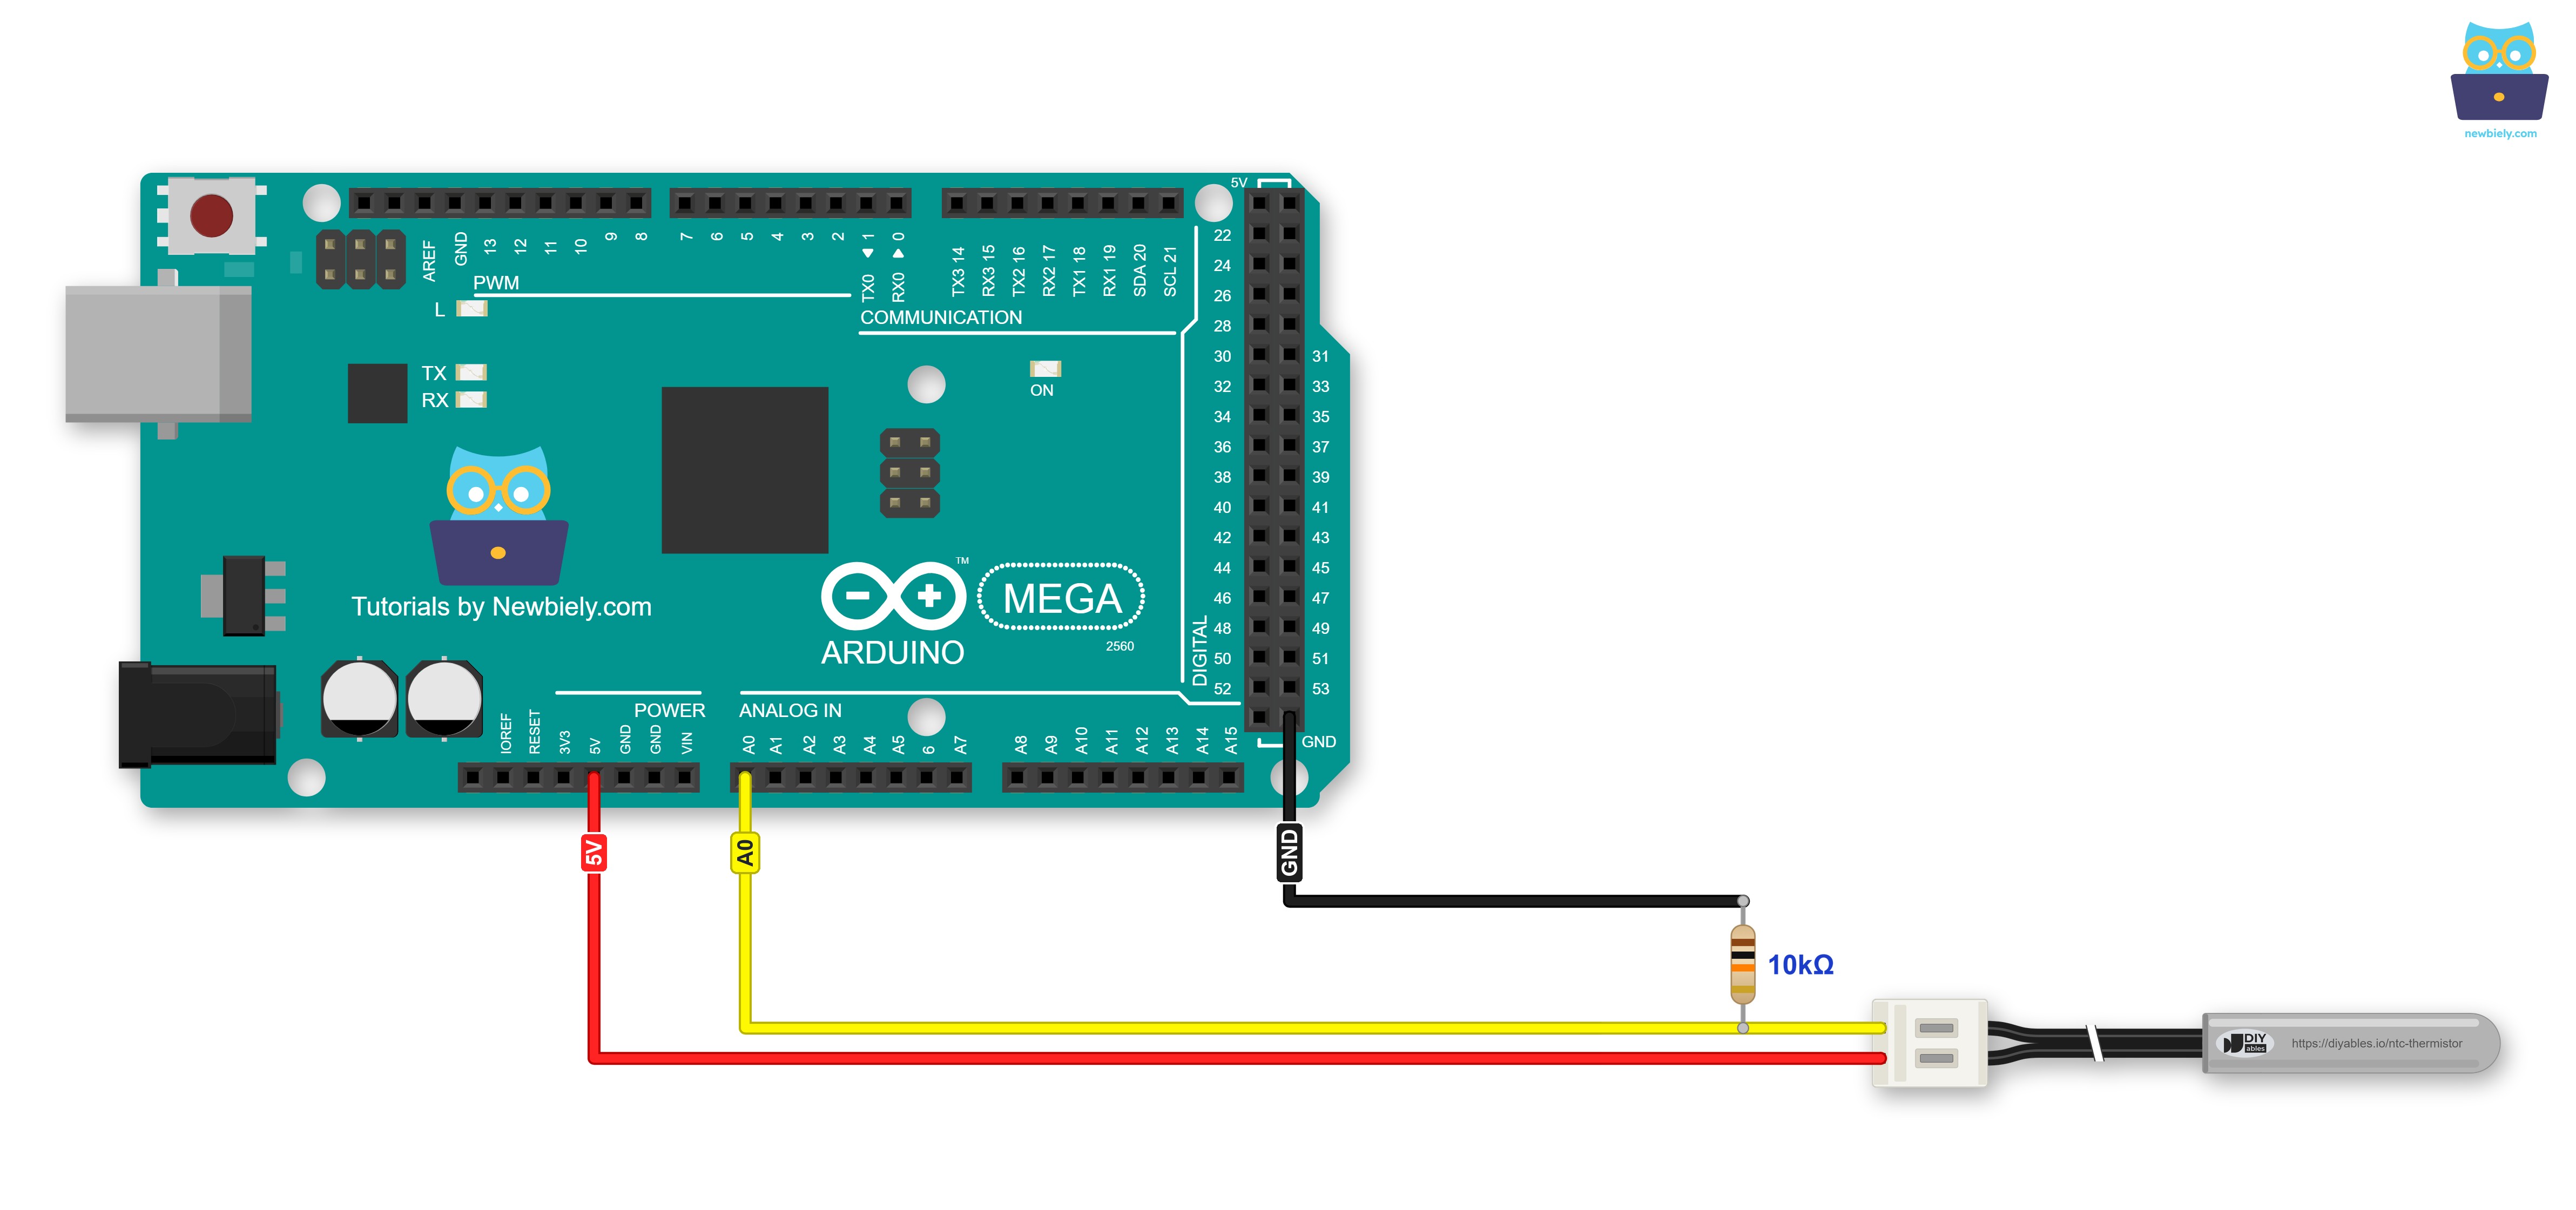
This image is created using Fritzing. Click to enlarge image
| Part of the Circuit | Arduino Mega Pin |
|---|---|
| Either probe wire | 5V |
| The other probe wire | A0 |
| 10K resistor, leg A | A0 |
| 10K resistor, leg B | GND |
The drawing shows the resistor fixed right onto the wires that run to A0 and GND. In practice, a few holes of a small breadboard make that joint easy. For a permanent build, solder the resistor straight onto the two wire ends and seal the joint with heat-shrink tubing.
Why 5V? By default, the Mega's ADC uses its own 5V as the ruler for every reading. When the probe hangs from the same 5V, the result depends only on the two resistances, not on the exact supply voltage. If your USB port gives 4.85V, the ruler and the divider both shrink together, and the temperature stays the same.
How To Program For NTC Thermistor
This sketch uses no library at all. The natural-log function, log(), comes with the Arduino core.
- The first step is to label the analog pin where the probe and the resistor meet:
- Store the numbers of the probe and the circuit as constants:
- Read A0 ten times and work out the average. One reading can jump by a step or two, and the average is calmer:
- Change the average into the resistance of the probe. Because the probe and the ADC use the same 5V, the ratio is all you need, not the voltage:
- Feed the resistance into the beta equation (log() here means ln), then convert kelvin to °C and °F:
Arduino Mega Code for NTC Thermistor Temperature Sensor
Below is the complete sketch. Roughly once a second, it shows the probe resistance, the averaged ADC count, and the temperature in both units. Two sanity checks run first. An average close to 0 tells the Mega that the probe is unplugged: with nothing on the 5V side, the 10K resistor drags A0 to 0V. An average close to 1023 means A0 is stuck at 5V, which happens when the probe wires touch each other or the resistor is missing. Either way, you get a plain hint on the Serial Monitor, not a meaningless inf or nan.
Detailed Instructions
- New to the Arduino Mega? Follow how to set up the environment for Arduino Mega in the Arduino IDE before you start.
- Make the three connections shown in the wiring diagram.
- Plug the Arduino Mega into your computer with the USB A/B cable.
- Start the Arduino IDE.
- Choose Arduino Mega or Mega 2560 as the board, then pick its COM port.
- Copy the sketch into a new IDE window and press Upload.
- Set the Serial Monitor to 9600 baud and open it. For the first few lines, the probe just rests on the desk.
- Now make a mug of tea and dip the steel tip into it. The white connector and the resistor must stay far from the liquid.
The first three lines are a cool kitchen at about 19.6°C. Then the tip goes into the tea. The resistance drops from about 12.8kΩ to less than 1.5kΩ, and the temperature shoots up by more than 50°C in about ten seconds. After that, each line adds less and less, because the steel cap needs some time to warm through. In this test it settled at about 79°C some seconds later. Lift the probe out, and the numbers start to fall at once. A good habit: wait for three or four matching lines before you write down a value.
The message "No probe on A0" means a jumper pin came out of the white connector. The message "A0 is stuck at 5V" means you should look at the resistor: one leg must reach A0, the other GND. Do the numbers move the wrong way, colder while the tip sits in hot tea? Then the probe and the resistor have swapped places. The probe belongs between 5V and A0.
Once the readings look right, the Arduino Mega has plenty of free pins for the next step. It can beep a buzzer when a freezer climbs above -15°C, show the temperature on an LCD, switch a heater for a fish tank or a fermentation bucket with a relay, or log a fridge, a freezer and the kitchen at the same time, with one probe, one 10K resistor and one analog pin each.
Additional Knowledge
How Fine Is One Step of the Mega ADC?
The Arduino Mega turns 0 to 5V into 1024 steps. Because the thermistor curve bends, the value of one step changes with the temperature:
| Temperature | analogRead() change per 1°C | About 1 ADC step equals |
|---|---|---|
| -18°C | about 5.4 steps | 0.18°C |
| 0°C | about 9.6 steps | 0.10°C |
| 25°C | about 11.4 steps | 0.09°C |
| 80°C | about 3.2 steps | 0.31°C |
| 100°C | about 1.8 steps | 0.57°C |
It is evident that the probe and the Mega work best around room temperature, where one step is less than a tenth of a degree. Near the ends of the range the steps get bigger. In the tea test above, each step was already worth about 0.3°C, which is one more reason why the sketch averages ten readings.
Keep analogReference() at DEFAULT
The Mega can also measure against an internal 1.1V or 2.56V reference, with analogReference(INTERNAL1V1) or analogReference(INTERNAL2V56). That trick helps with small signals, but do not use it with this circuit. A0 is already at 2.5V at 25°C and goes higher on a warm day, so a 2.56V ruler would cut off every reading above about 26°C. The ratio formula also needs the divider and the ADC to share the same 5V. Leave the reference at its default, and the code never needs to know a voltage at all.
A last practical tip: only the steel cap is waterproof. In a fish tank or a brewing bucket, let the cable hang over the edge, so the connector and the resistor joint stay dry. And never put the probe into anything hotter than 105°C.