Arduino Nano 33 IoT - MQ3 Alcohol Sensor
This tutorial shows how to use Arduino Nano 33 IoT with the MQ3 alcohol sensor for measuring and detecting ethanol and alcohol vapor in the air. The MQ3 sensor is perfect for creating breath testing devices, alcohol detection alarms, and environmental monitoring systems.
You will learn:
- How to interface the MQ3 alcohol sensor module with Arduino Nano 33 IoT
- How to write code for Arduino Nano 33 IoT to detect and measure alcohol levels
Hardware Preparation
Or you can buy the following kits:
| 1 | × | DIYables Sensor Kit (18 sensors/displays) |
Additionally, some of these links are for products from our own brand, DIYables .
Overview of MQ3 Alcohol Sensor
Functioning as a Metal Oxide Semiconductor (MOS) Chemiresistor, the MQ3 identifies alcohol through changes in its sensing material's resistance. This module is engineered for ethanol vapor detection with reliable sensitivity across various concentrations.
The sensor's core element uses Tin Dioxide (SnO2) deposited on an Aluminum Oxide ceramic base. Thermal activation makes the SnO2 respond to alcohol molecules in the air. A protective stainless steel mesh surrounds the sensor, shielding the heating element while permitting gas diffusion to the sensing area.
Applications include DIY breathalyzer construction, impaired driving sensors, alcohol concentration alarms, and ambient alcohol level tracking systems.
Technical Specifications
- Operating Voltage: 5V DC
- Load Resistance: 200 KΩ
- Heater Resistance: 33Ω ± 5%
- Heating Consumption: < 800mW
- Sensing Resistance: 1 MΩ – 8 MΩ
- Detection Range: 25 – 500 ppm (parts per million)
- Preheat Time: 24-48 hours for first use
What is ppm? The measurement ppm (parts-per-million) represents the ratio between target gas molecules and total molecules present. As an example, 500 ppm signifies 500 alcohol molecules among every 1,000,000 total gas molecules, with the other 999,500 being ambient air.
Pinout
Four terminals are available on the MQ3 sensor module:
- VCC pin: Supply +5V power here.
- GND pin: Connect to ground (0V).
- DO pin: Digital output transitions to LOW above the alcohol threshold, HIGH below it. Threshold adjustment via onboard potentiometer.
- AO pin: Analog output generates voltage based on alcohol concentration. Higher alcohol produces higher voltage.
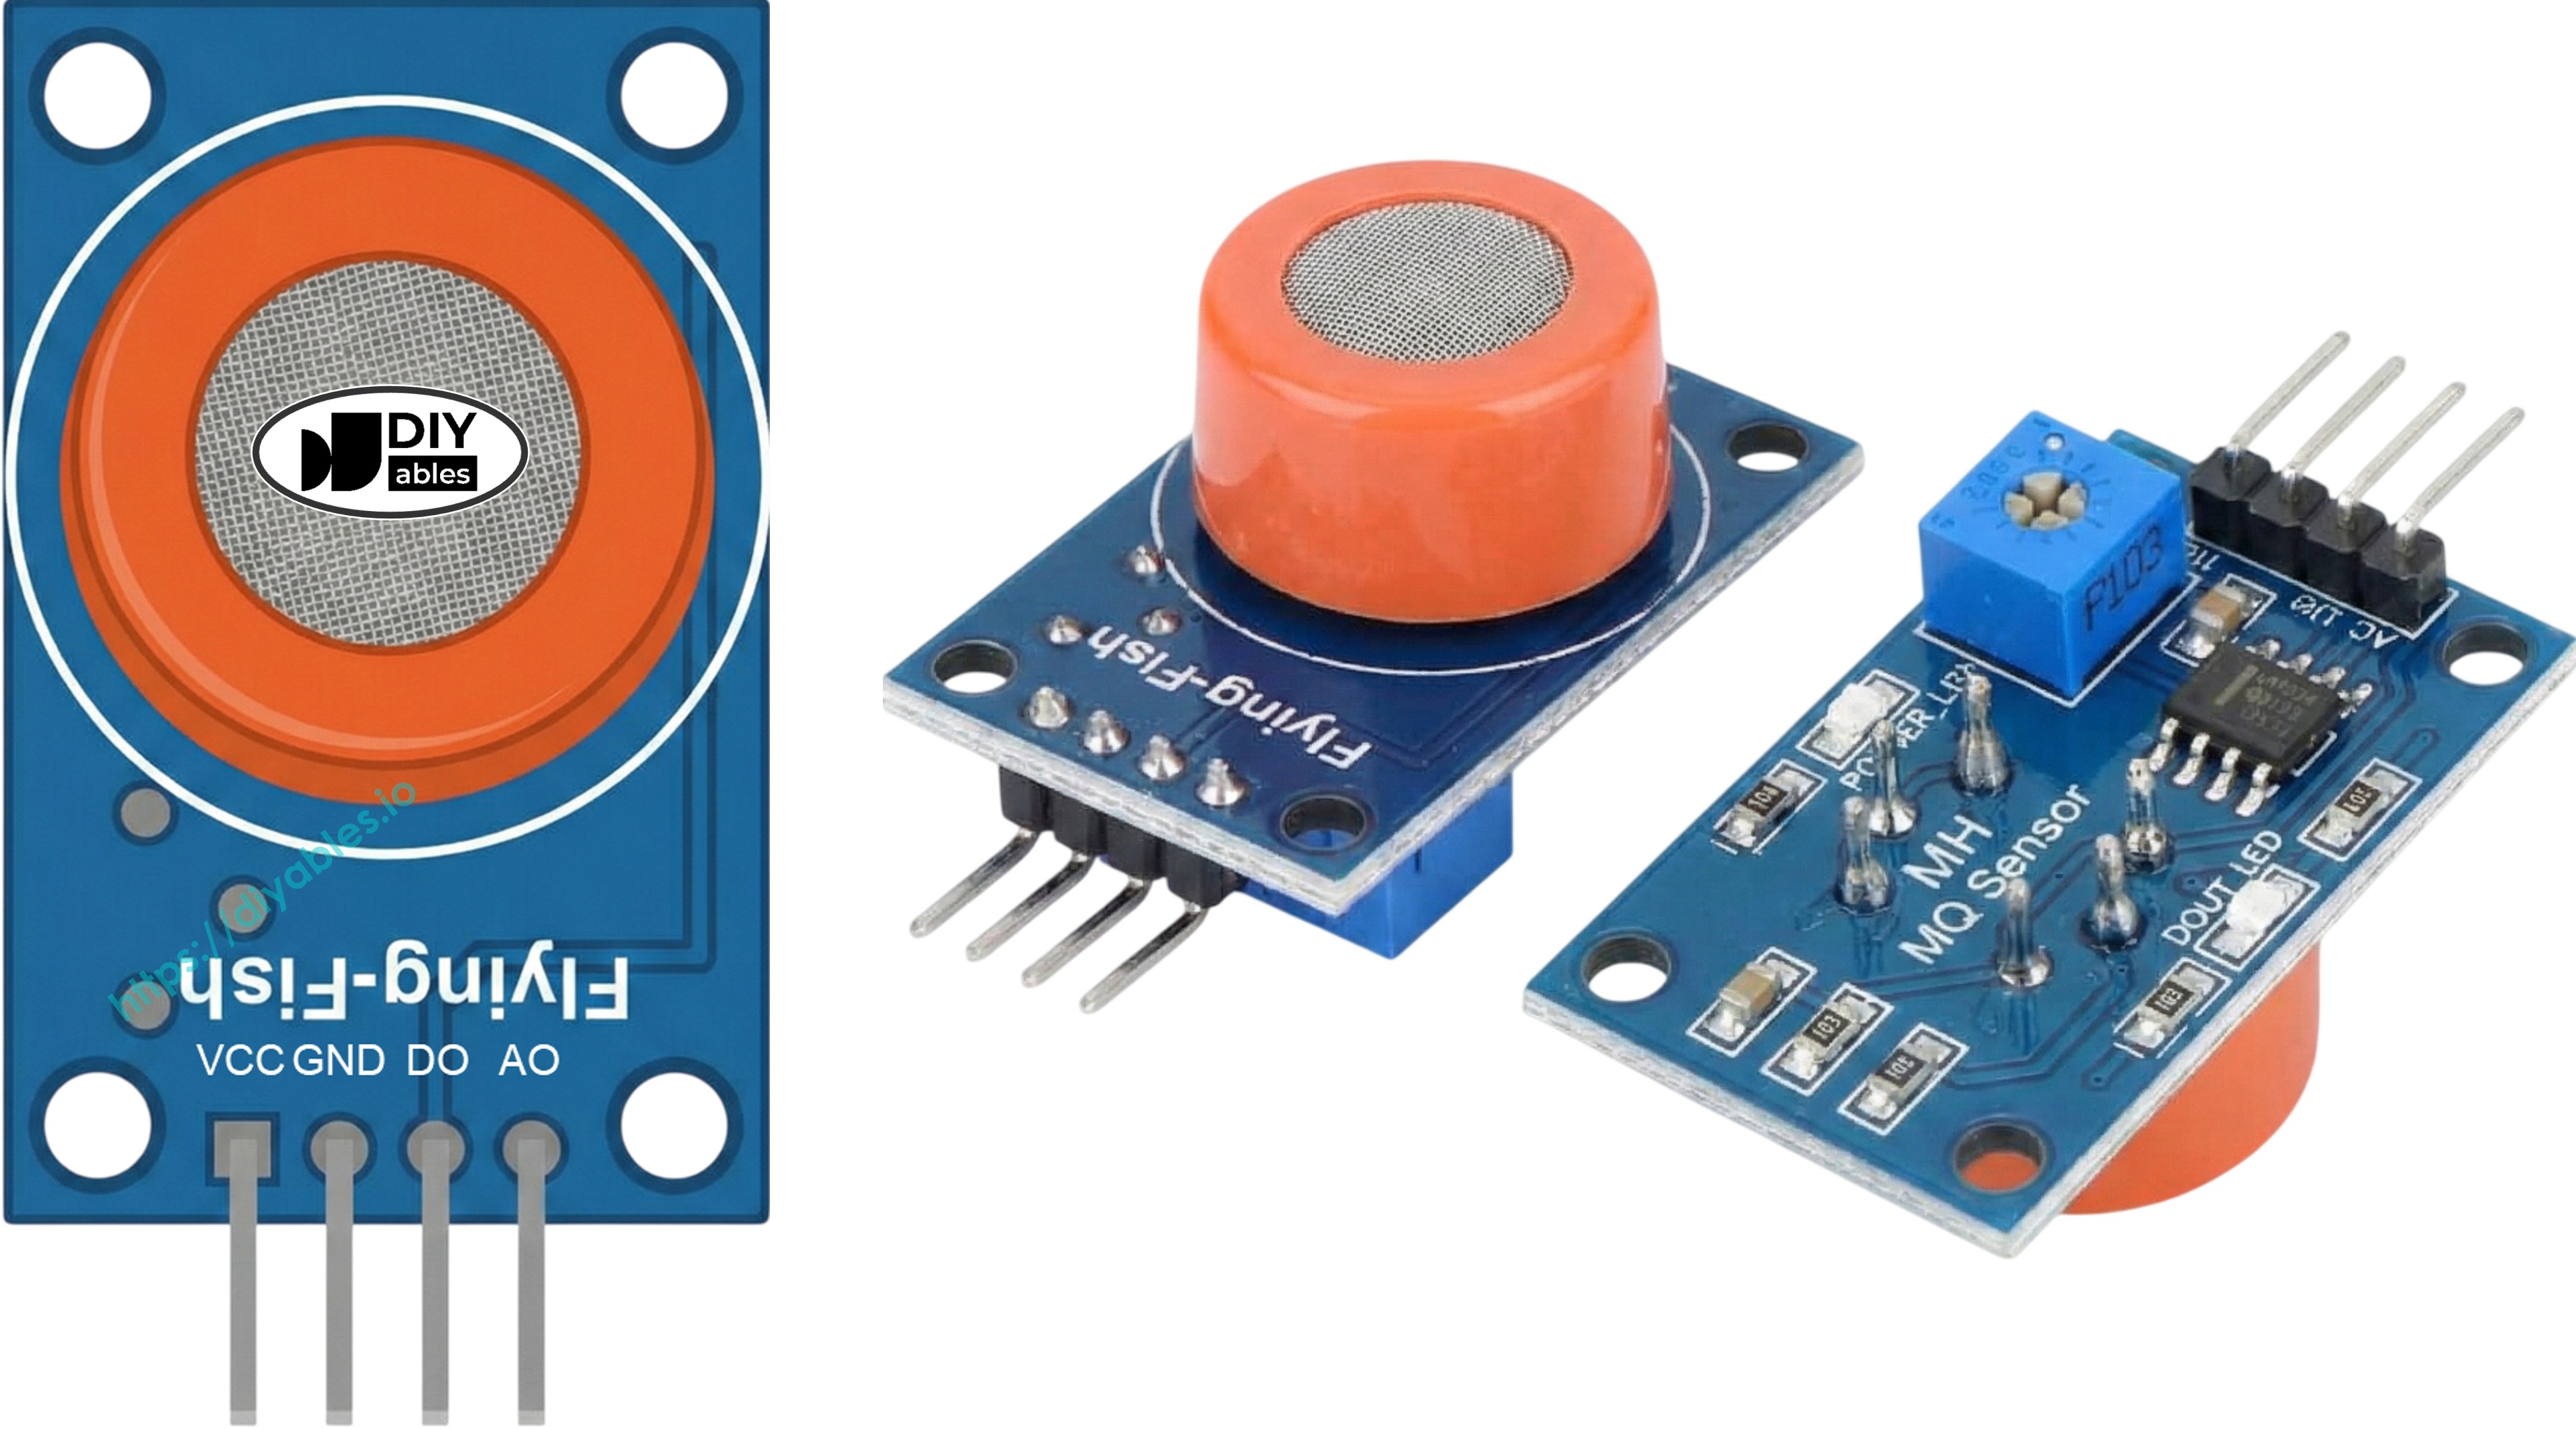
Two LED indicators provide status information:
- PWR-LED: Lights when module receives power.
- DO-LED: Matches digital output state—on when detecting alcohol, off otherwise.
How It Works
The MQ3's operating principle is based on resistance changes in its Tin Dioxide (SnO2) semiconductor:
In fresh air: Heated SnO2 attracts oxygen molecules to its surface, capturing electrons and forming a depletion layer. These trapped electrons establish a conduction barrier, maintaining high electrical resistance.
With alcohol present: Alcohol molecules react with surface oxygen, releasing trapped electrons back into the tin dioxide structure. This release boosts conductivity significantly—higher alcohol levels create lower resistance.
Two output configurations are available:
Digital Output (DO pin):
- The onboard trim potentiometer sets the threshold point.
- Alcohol above the threshold drives DO to LOW and lights the LED.
- Alcohol below the threshold maintains DO at HIGH with LED off.
Analog Output (AO pin):
- Voltage output scales with alcohol concentration.
- More alcohol vapor = higher voltage reading.
- Less alcohol vapor = lower voltage reading.
- Note: Potentiometer adjustment impacts only digital threshold, not analog values.
Warm-up and Calibration
Pre-heating Requirements
Proper heating ensures accurate MQ3 sensor performance:
- First time use or extended storage (30+ days): Provide 24-48 hours of continuous heating to stabilize the sensor for consistent measurements.
- Regular operation: A short 5-10 minute warm-up suffices. Early readings may start high but will settle quickly.
Heat the sensor by connecting VCC and GND to 5V and ground—use a power supply or connect directly to Arduino Nano 33 IoT power pins.
Finding Your Threshold Values
Heating element sensors like the MQ3 can drift during storage. For breathalyzer uses, calibrate threshold values through this process:
- Establish clean air reference: Run the sensor in fresh air and record the analog output (generally 100-150).
- Introduce alcohol vapor: Hold isopropyl alcohol or hand sanitizer near (avoiding contact with) the sensor, letting vapor reach it. Note the higher readings (typically 400-900 depending on vapor density).
- Create threshold zones: From your data, define detection ranges:
- No alcohol: Values below baseline + 20 (example: < 120)
- Light detection: Mid-level values (example: 120-400)
- Strong detection: Values above mid-level (example: > 400)
Critical: Each sensor and environment produces different readings. Always perform calibration with your actual setup before use.
Setting the Digital Threshold
Adjust the DO pin threshold via the module's potentiometer:
- Bring alcohol vapor near the sensor.
- Turn potentiometer clockwise until LED lights.
- Slowly turn counterclockwise until LED just turns off.
- Threshold is now set.
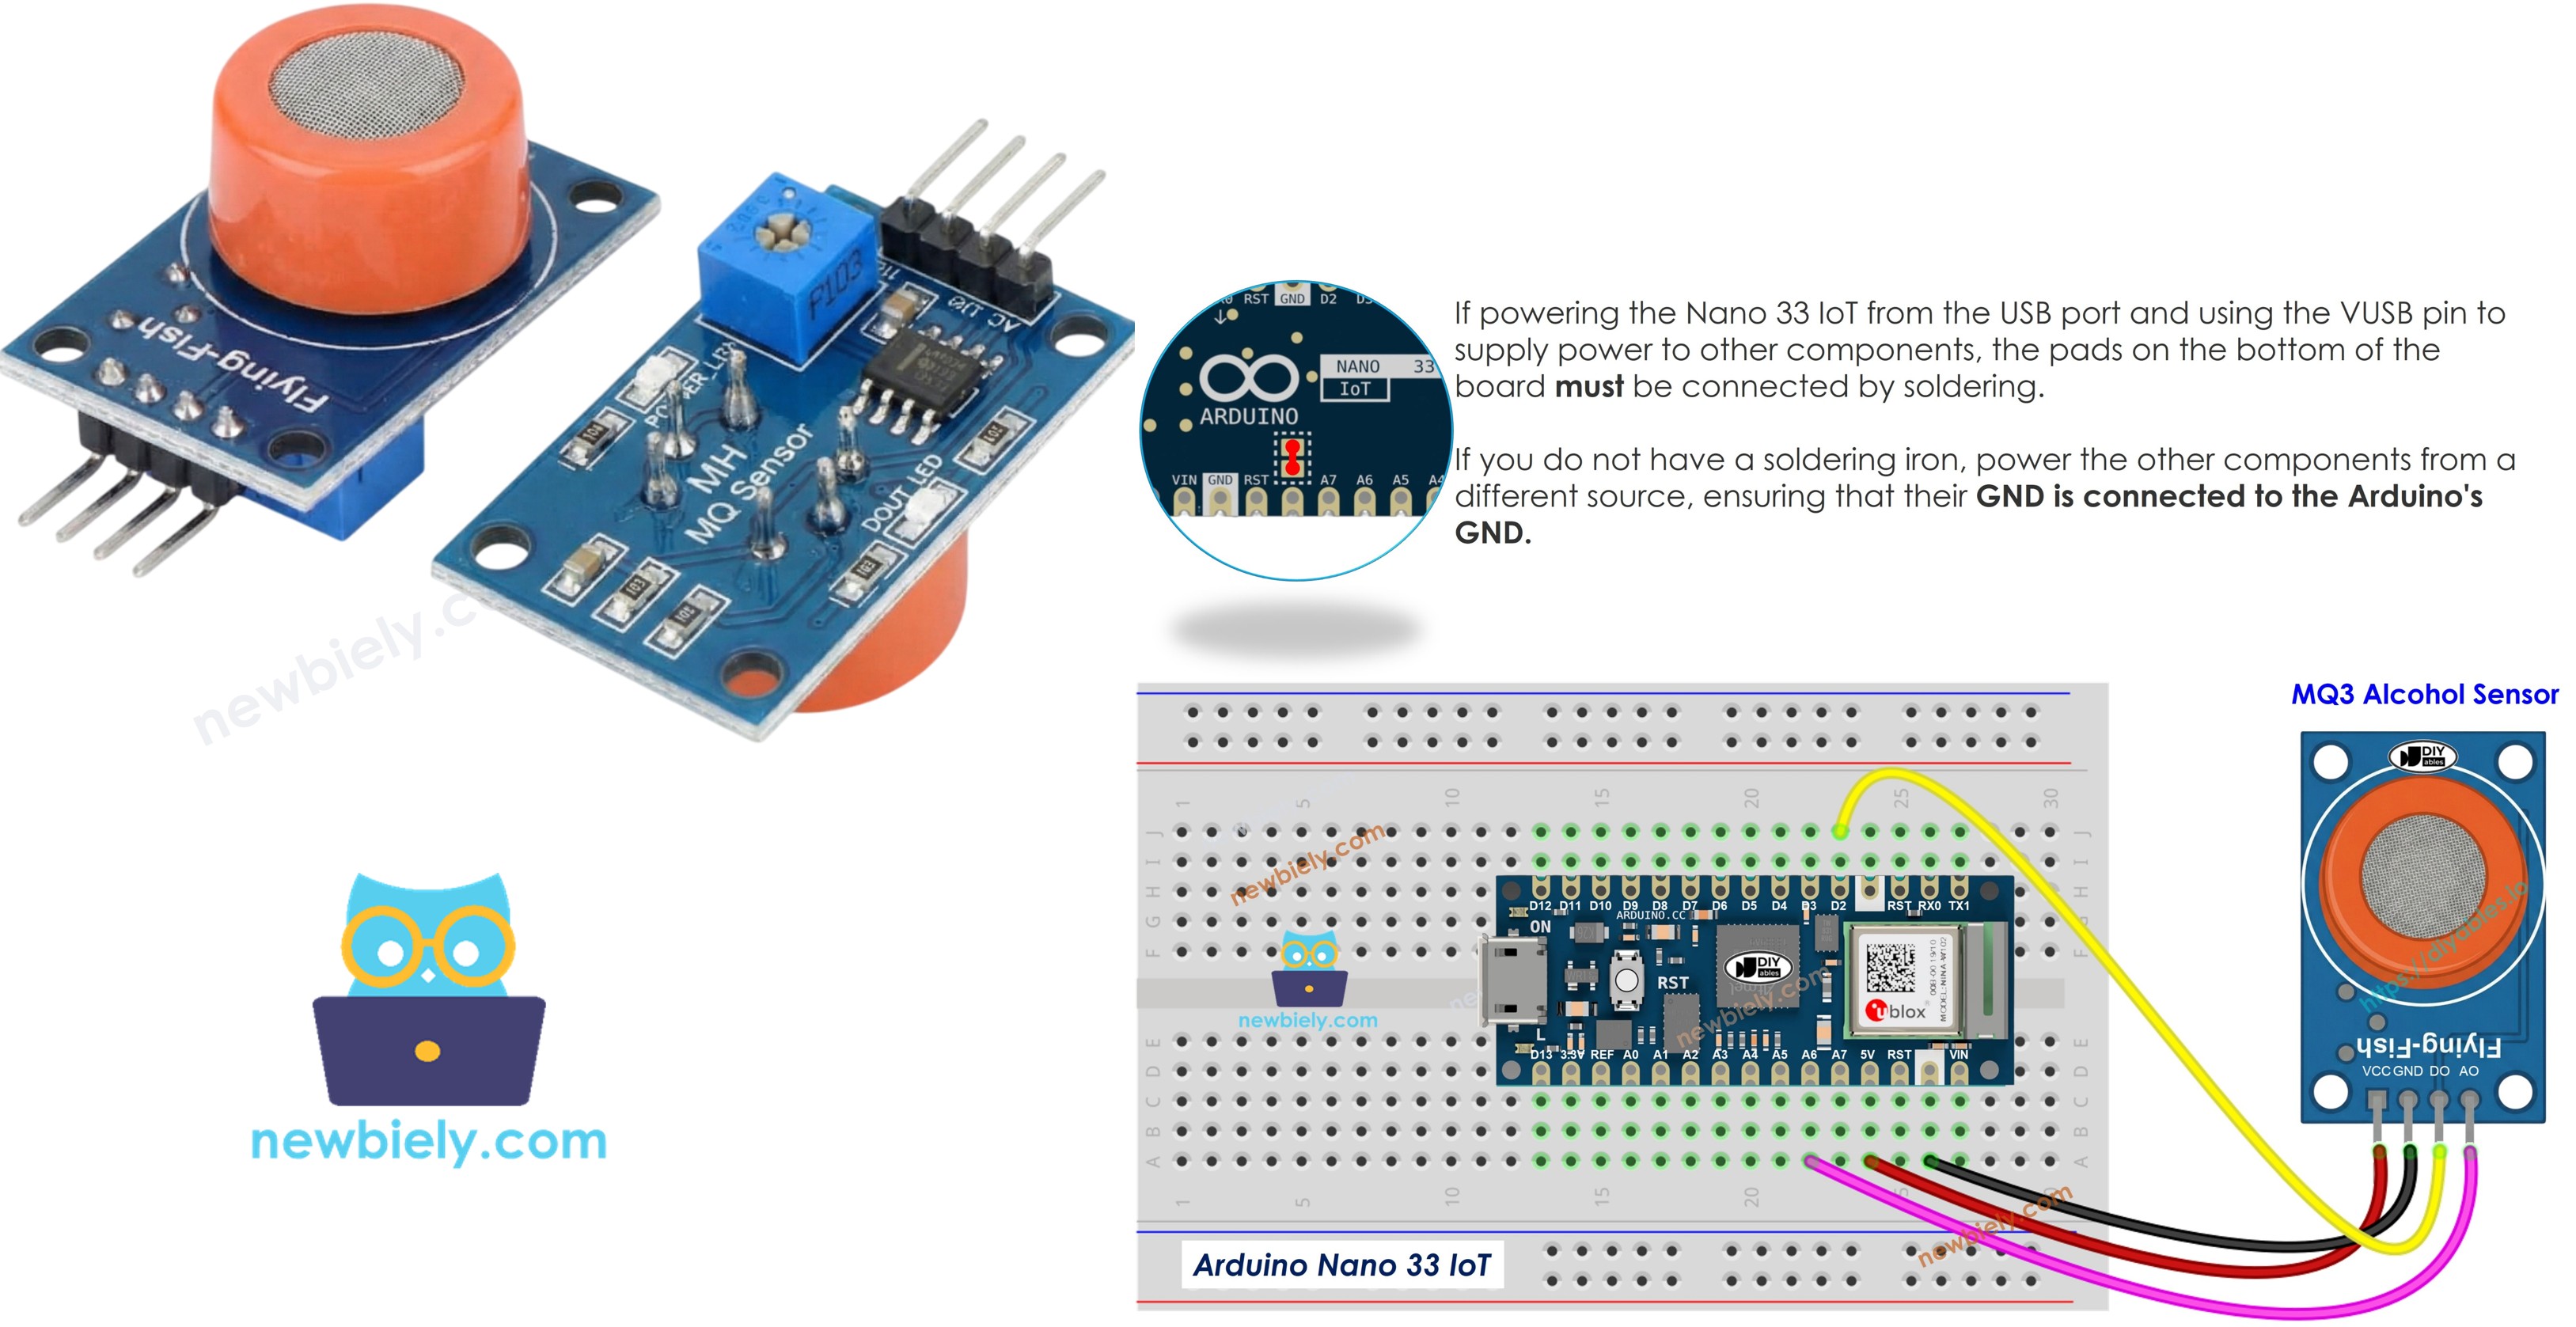
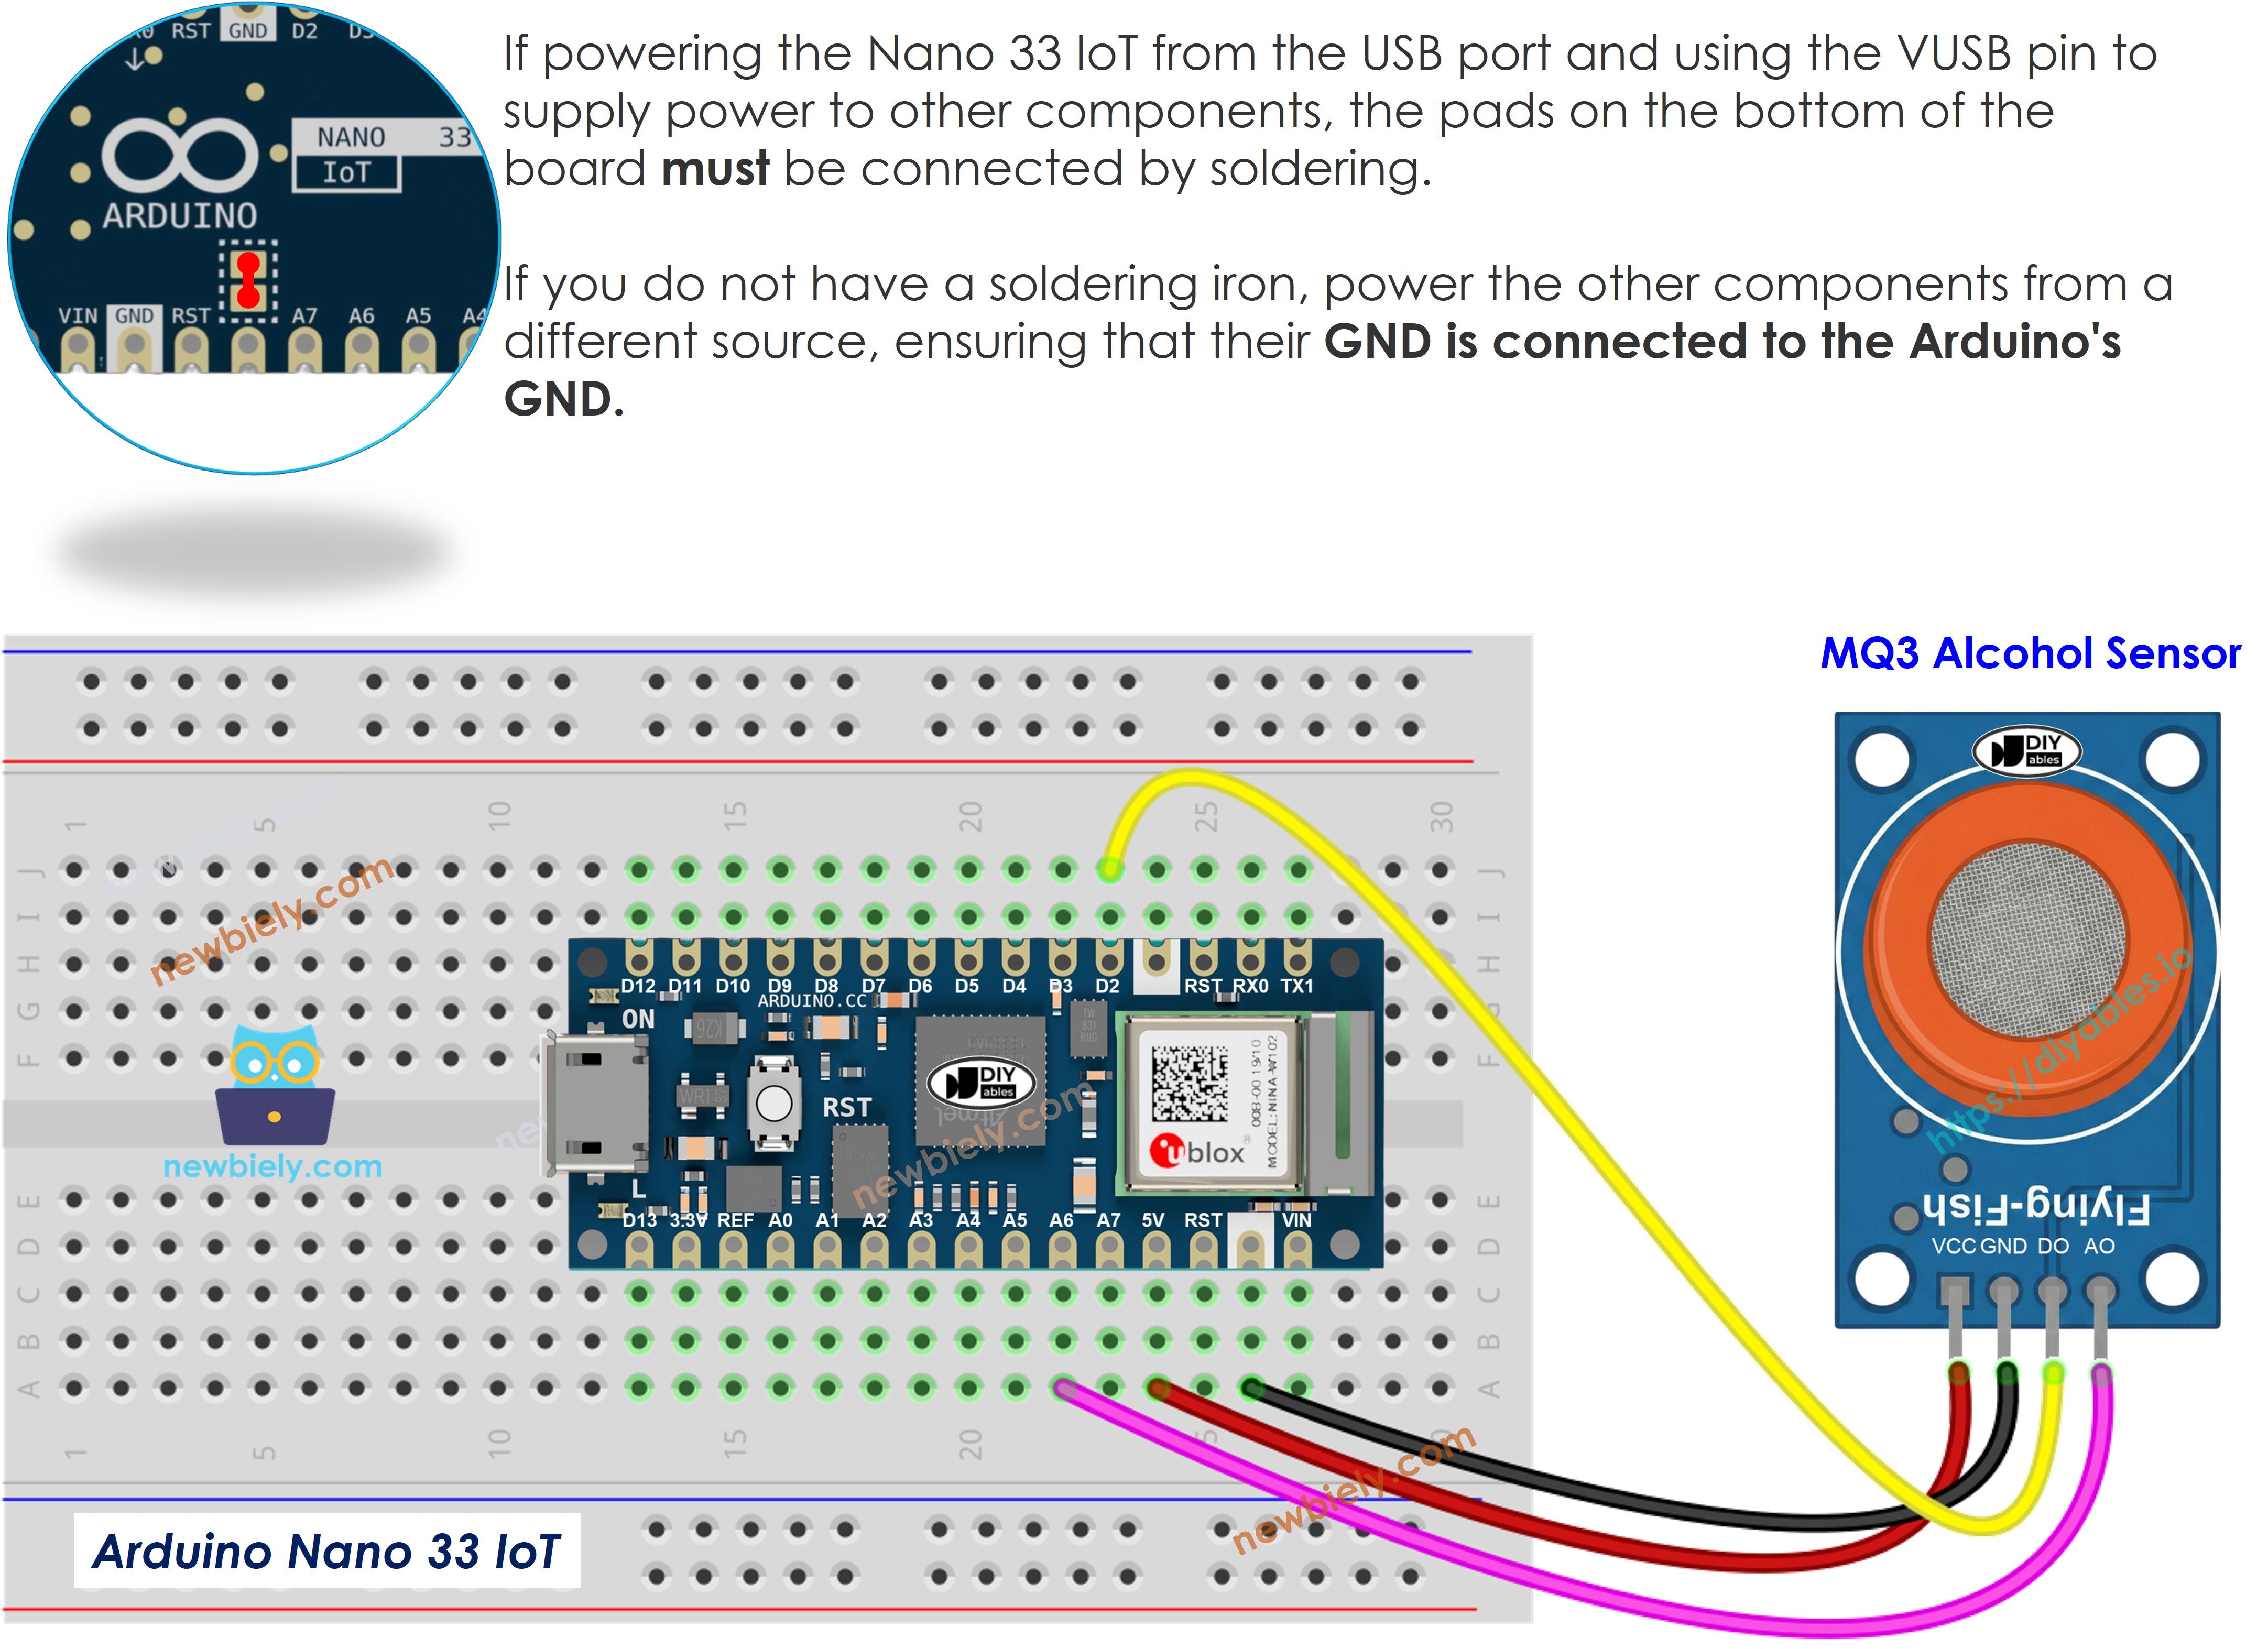
Wiring Diagram
The MQ3 module has both digital and analog outputs available. Choose one output or use both simultaneously based on your needs.
- Wiring diagram for connecting the Arduino Nano 33 IoT to the MQ3 alcohol sensor using the USB port for power.
This image is created using Fritzing. Click to enlarge image
- A wiring diagram showing how to connect the Arduino Nano 33 IoT and the MQ3 alcohol sensor using the Vin power pin.
This image is created using Fritzing. Click to enlarge image
| MQ3 Alcohol Sensor | Arduino Nano 33 IoT |
|---|---|
| VCC | 5V |
| GND | GND |
| DO | 2 |
| AO | A6 |
Arduino Nano 33 IoT Code - Digital Output Reading
Detailed Instructions
- Open the code in Arduino IDE
- Upload to Arduino Nano 33 IoT via the Upload button
- Place alcohol vapor near the MQ3 sensor (use hand sanitizer or rubbing alcohol on cotton)
- Check detection results in Serial Monitor
Remember, if detection results are incorrect (always on or always off), rotate the potentiometer to adjust sensor sensitivity.
Arduino Nano 33 IoT Code - Analog Output Reading
Detailed Instructions
- Copy the code into Arduino IDE
- Click the Upload button to upload to Arduino Nano 33 IoT
- Place alcohol vapor near the sensor (hand sanitizer or isopropyl alcohol)
- Watch the values in Serial Monitor
From digital or analog outputs, you can build threshold logic to activate alarms, control warning lights, or log data for breathalyzer functionality.
Arduino Nano 33 IoT Code - Breathalyzer with Threshold Detection
This example demonstrates using analog output with calibrated thresholds to determine alcohol consumption levels.
Detailed Instructions
- Required: Calibrate your sensor first using the analog reading code to find correct threshold values for your hardware.
- Update the SOBER_THRESHOLD and DRUNK_THRESHOLD values in the code with your calibrated numbers.
- Upload the modified code to Arduino Nano 33 IoT
- Test with alcohol vapor (isopropyl alcohol or hand sanitizer vapor)
- View status messages in Serial Monitor
Disclaimer: This project is for educational purposes only. Never use this device as a legal breathalyzer or for driving safety decisions.