
ESP32 C3 Super Mini - Touch Sensor
A touch sensor lets you control your ESP32 C3 Super Mini with a light touch of your finger. It works like a button, but it has no moving part, so it never wears out. This ESP32 C3 Super Mini touch sensor tutorial shows you the wiring and the code in simple steps.
In this tutorial, you'll learn:
- What a touch sensor (touch switch, touch button) is
- What the GND, VCC and SIGNAL pins do
- How to wire a touch sensor to the ESP32 C3 Super Mini
- How to read the touched / not-touched state in code
- How to detect the moment the sensor is touched
WARNING
The ESP32 C3 chip does NOT have the built-in capacitive touch pins that the classic ESP32, ESP32-S2 and ESP32-S3 chips have. The touchRead() and touchAttachInterrupt() functions do NOT work on the ESP32 C3 Super Mini. To add touch input to this board, use an external touch sensor module (TTP223) and read it with digitalRead(), exactly as this tutorial does.
Hardware Preparation
| 1 | × | ESP32 C3 Super Mini | |
| 1 | × | USB Cable Type-A to Type-C (for USB-A PC) | |
| 1 | × | USB Cable Type-C to Type-C (for USB-C PC) | |
| 1 | × | Touch Sensor | |
| 1 | × | Breadboard | |
| 1 | × | Jumper Wires | |
| 1 | × | Optionally, DC Power Jack |
Or you can buy the following kits:
| 1 | × | DIYables Sensor Kit (18 sensors/displays) |
Additionally, some of these links are for products from our own brand, DIYables .
Overview of Touch Sensor
A touch sensor is a small module (based on the TTP223 chip) that gives a digital HIGH signal when your finger touches its pad.
Key Features:
- No moving part: Nothing to press, nothing to break.
- Simple output: One digital pin, HIGH or LOW.
- Reads like a button: Works with digitalRead(), no library needed.
- Works through plastic: It can sense a finger through a thin case or sticker.
- Low power: It uses only a few milliamps.
Technical Specifications:
- Chip: TTP223 capacitive touch chip.
- Pins: 3 pins (GND, VCC, SIGNAL).
- Supply voltage: 2.0V to 5.5V. Use the 3.3V pin of the ESP32 C3 Super Mini.
- Output level: The SIGNAL pin follows the supply, so at 3.3V supply it outputs 3.3V logic - safe for the ESP32 C3 Super Mini.
- Response time: About 60 ms in fast mode.
Touch Sensor Pinout
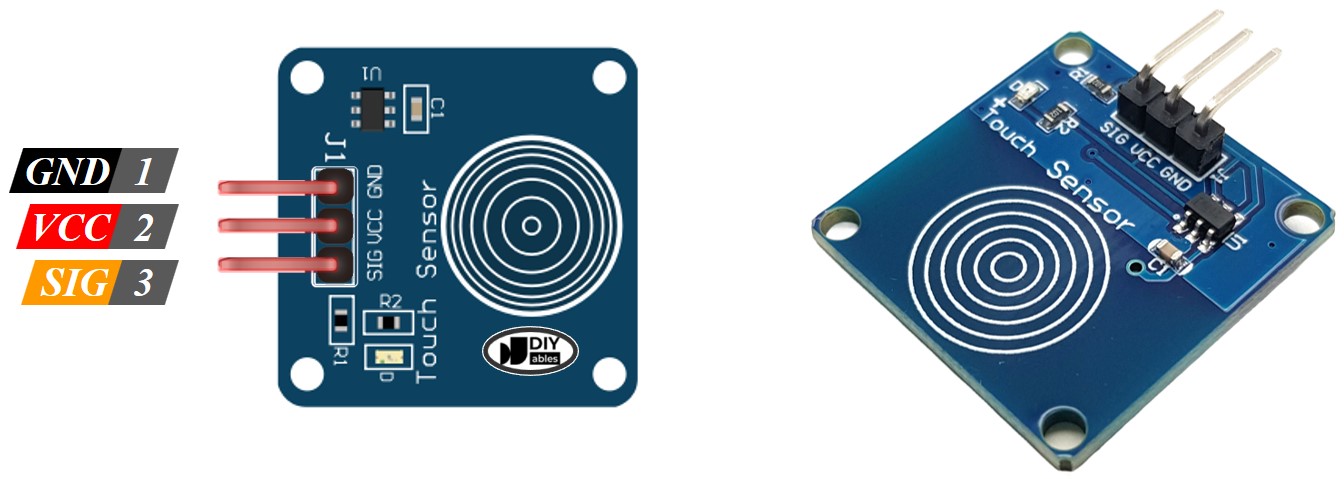
The touch sensor has 3 pins.
- GND pin: Connect this pin to GND (0V).
- VCC pin: Connect this pin to VCC (3.3V on the ESP32 C3 Super Mini).
- SIGNAL pin: This is an output pin. It is LOW when NOT touched and HIGH when touched. Connect it to an input pin of the ESP32 C3 Super Mini.
How Touch Sensor Works
The sensor watches the tiny change of capacitance made by your finger.
- Not touched: The state of the SIGNAL pin is LOW.
- Touched: The state of the SIGNAL pin is HIGH.
- Released: The SIGNAL pin goes back to LOW.
ESP32 C3 Super Mini - Touch Sensor
We connect the touch sensor's SIGNAL pin to an input pin of the ESP32 C3 Super Mini, and use the ESP32 C3 Super Mini code to read the state of the touch sensor.
WARNING
The ESP32 C3 Super Mini works at 3.3V logic only. Power the touch sensor from the 3.3V pin, never from 5V. A 5V supply makes the SIGNAL pin output 5V, which can damage a GPIO pin of the board.
Wiring Diagram between Touch Sensor and ESP32 C3 Super Mini
Connect the sensor's SIGNAL pin to GPIO7 on the ESP32 C3 Super Mini.
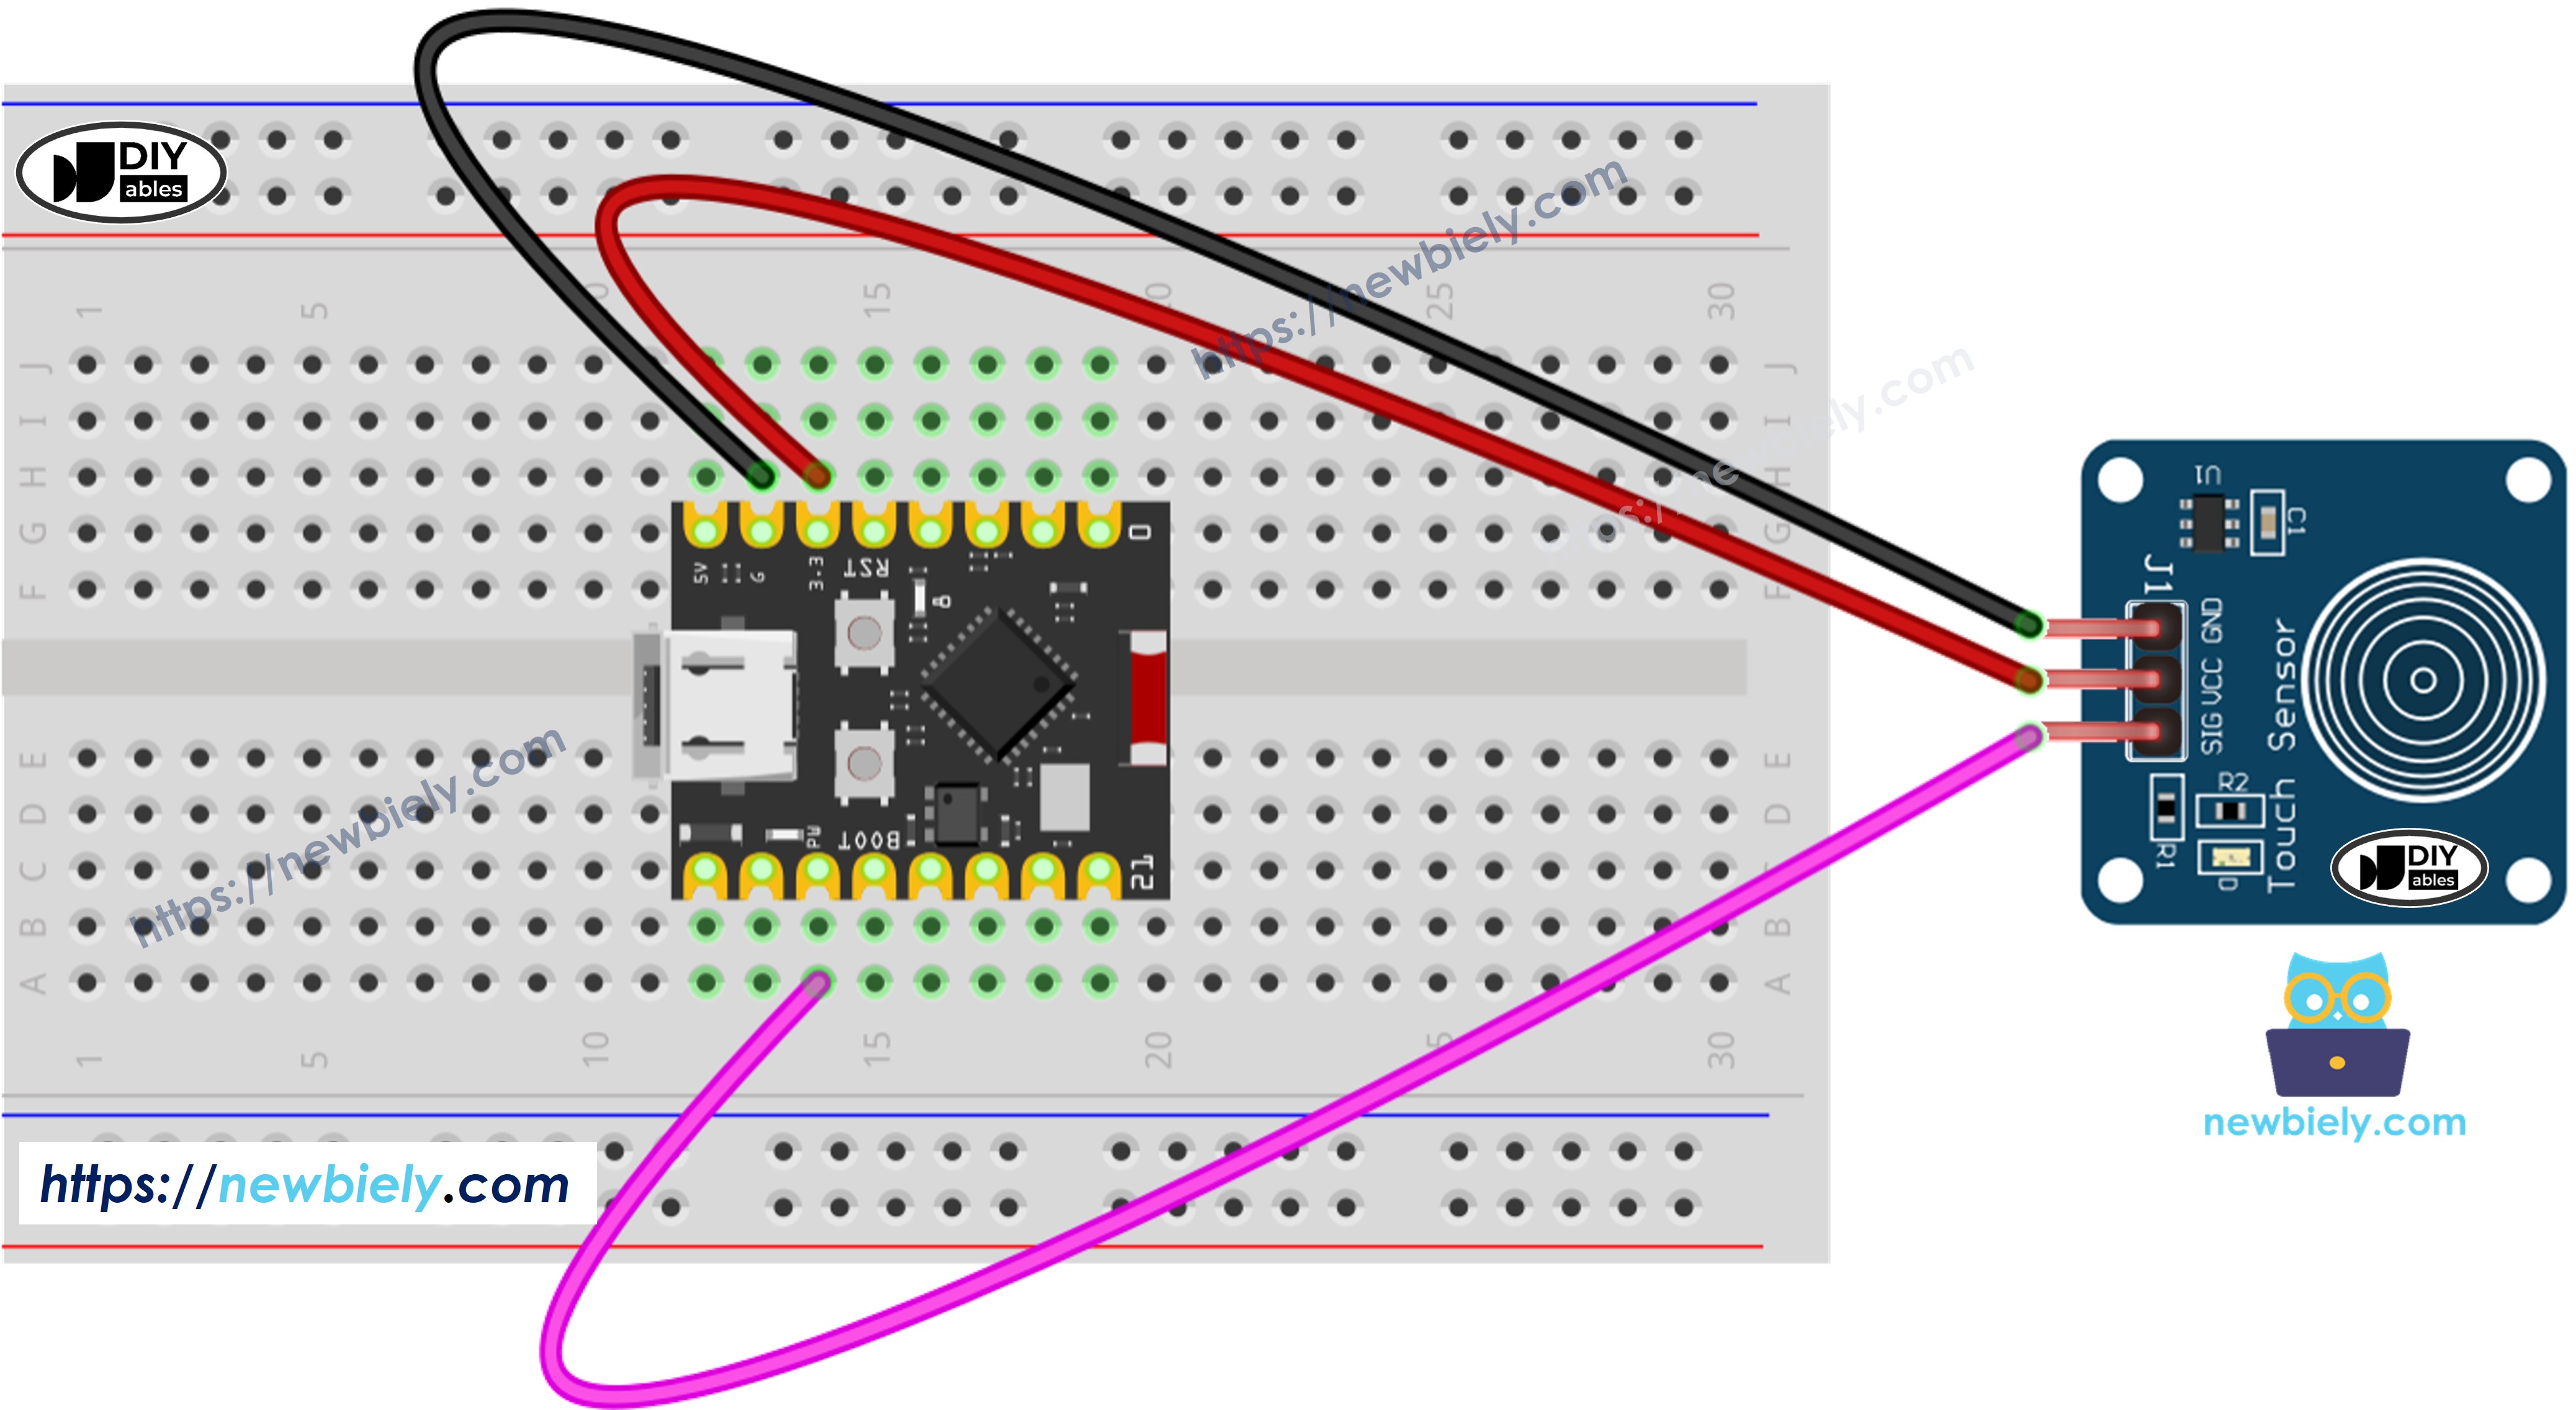
This image is created using Fritzing. Click to enlarge image
| Touch Sensor Pin | ESP32 C3 Super Mini Pin |
|---|---|
| VCC | 3.3V |
| GND | GND |
| SIGNAL | GPIO7 |
- Note: GPIO7 is a free pin. Do not use GPIO8 (built-in LED), GPIO9 (boot pin), GPIO20 or GPIO21 (Serial Monitor UART).
- Note: No external resistor is needed. The module already drives the SIGNAL pin HIGH and LOW.
- Note: Keep the wires short. Long wires near the touch pad can make the sensor trigger by itself.
- Note: Do not put your finger on the back of the module while it powers up. The chip calibrates itself at power-on.
How To Program Touch Sensor
Reading the touch sensor takes only two functions.
- Initialize the ESP32 C3 Super Mini pin as a digital input with the pinMode() function. For example, GPIO7:
- Read the state of the ESP32 C3 Super Mini pin with the digitalRead() function.
Touch Sensor - ESP32 C3 Super Mini Code
The code below reads the state of the touch sensor and prints it to the Serial Monitor.
What This Code Does:
- Sets GPIO7 as a digital input.
- Starts the Serial Monitor at 115200 baud.
- Reads the SIGNAL pin in every loop.
- Prints 1 when the sensor is touched and 0 when it is not.
Detailed Instructions
- New to ESP32 C3 Super Mini? Complete our Getting Started with ESP32 C3 Super Mini tutorial first to set up your development environment.
- Wire the parts: Follow the wiring diagram above to connect the touch sensor to the ESP32 C3 Super Mini.
- Connect the board: Plug the ESP32 C3 Super Mini into your PC with a USB Type-C cable.
- Open the IDE: Start the Arduino IDE software.
- Select the board: Make sure ESP32 C3 Super Mini is selected in Tools > Board.
- Select the port: Pick the COM port of your board in Tools > Port.
- Copy the code: Copy the code above and paste it into the Arduino IDE.
- Upload the code: Click the Upload button in the Arduino IDE.
- Open Serial Monitor: Set the baud rate to 115200.
- Test it: Touch the sensor pad with your finger, then release it.
- Check the output: Watch the numbers change on the Serial Monitor.
- Pro Tip: If the value is always 1, move your hand and the wires away from the pad and reset the board, so the chip can calibrate again.
How to detect the state change from LOW to HIGH
Most projects need the moment of the touch, not the state itself.
What This Code Does:
- Saves the previous state of the SIGNAL pin.
- Compares the previous state with the new state in every loop.
- Prints a message only when the state goes from LOW to HIGH.
- Ignores the long time your finger stays on the pad.
※ NOTE THAT:
Two common use cases for a touch sensor are:
- The first use case: If the sensor is touched, perform a certain action. If it is not touched, perform the opposite action.
- The second use case: If the sensor's state changes from NOT touched to touched, perform a specific action, such as toggling an LED.
Line-by-line Code Explanation
The ESP32 C3 Super Mini code above contains line-by-line explanation. Please read the comments in the code!
Application/Project Ideas
A touch sensor is a clean and modern way to give a command to your ESP32 C3 Super Mini.
- Touch Lamp: Turn an LED or a relay lamp on and off with one touch.
- Doorbell: Play a tone on a buzzer when someone touches the pad.
- Secret Switch: Hide the module behind a wooden panel and open a lock.
- Touch Counter: Count the touches and show the total on an LCD.
- Wake-up Button: Use a touch to wake the ESP32 C3 Super Mini from deep sleep.
- Waterproof Panel: Put the sensor under glass for a kitchen or bathroom project.
Challenge Yourself
Try these small projects to practice with the touch sensor and the ESP32 C3 Super Mini.
- Easy: Turn the built-in LED on GPIO8 ON while the sensor is touched.
- Easy: Print TOUCHED and RELEASED instead of 1 and 0.
- Medium: Toggle an external LED on GPIO3 every time the sensor is touched.
- Medium: Use two touch sensors on GPIO7 and GPIO6 to make a volume up / volume down pair.
- Advanced: Measure how long the pad is touched, and act differently for a short press and a long press.