
ESP32 C3 Super Mini - LED Matrix
An LED matrix display, also called a dot matrix display, is a cheap and easy way to show text and numbers. This tutorial shows you how to drive a MAX7219 LED matrix with the ESP32 C3 Super Mini using only three signal wires.
In this tutorial, you'll learn:
- What an LED matrix is and how the MAX7219 driver works
- How to connect an 8x8 LED matrix to the ESP32 C3 Super Mini
- How to connect a 32x8 LED matrix to the ESP32 C3 Super Mini
- How to display text, numbers and animated effects
- How to scroll a long message across the display
After that, you can easily adapt the code for other sizes such as a 16x8 or 64x8 LED matrix.
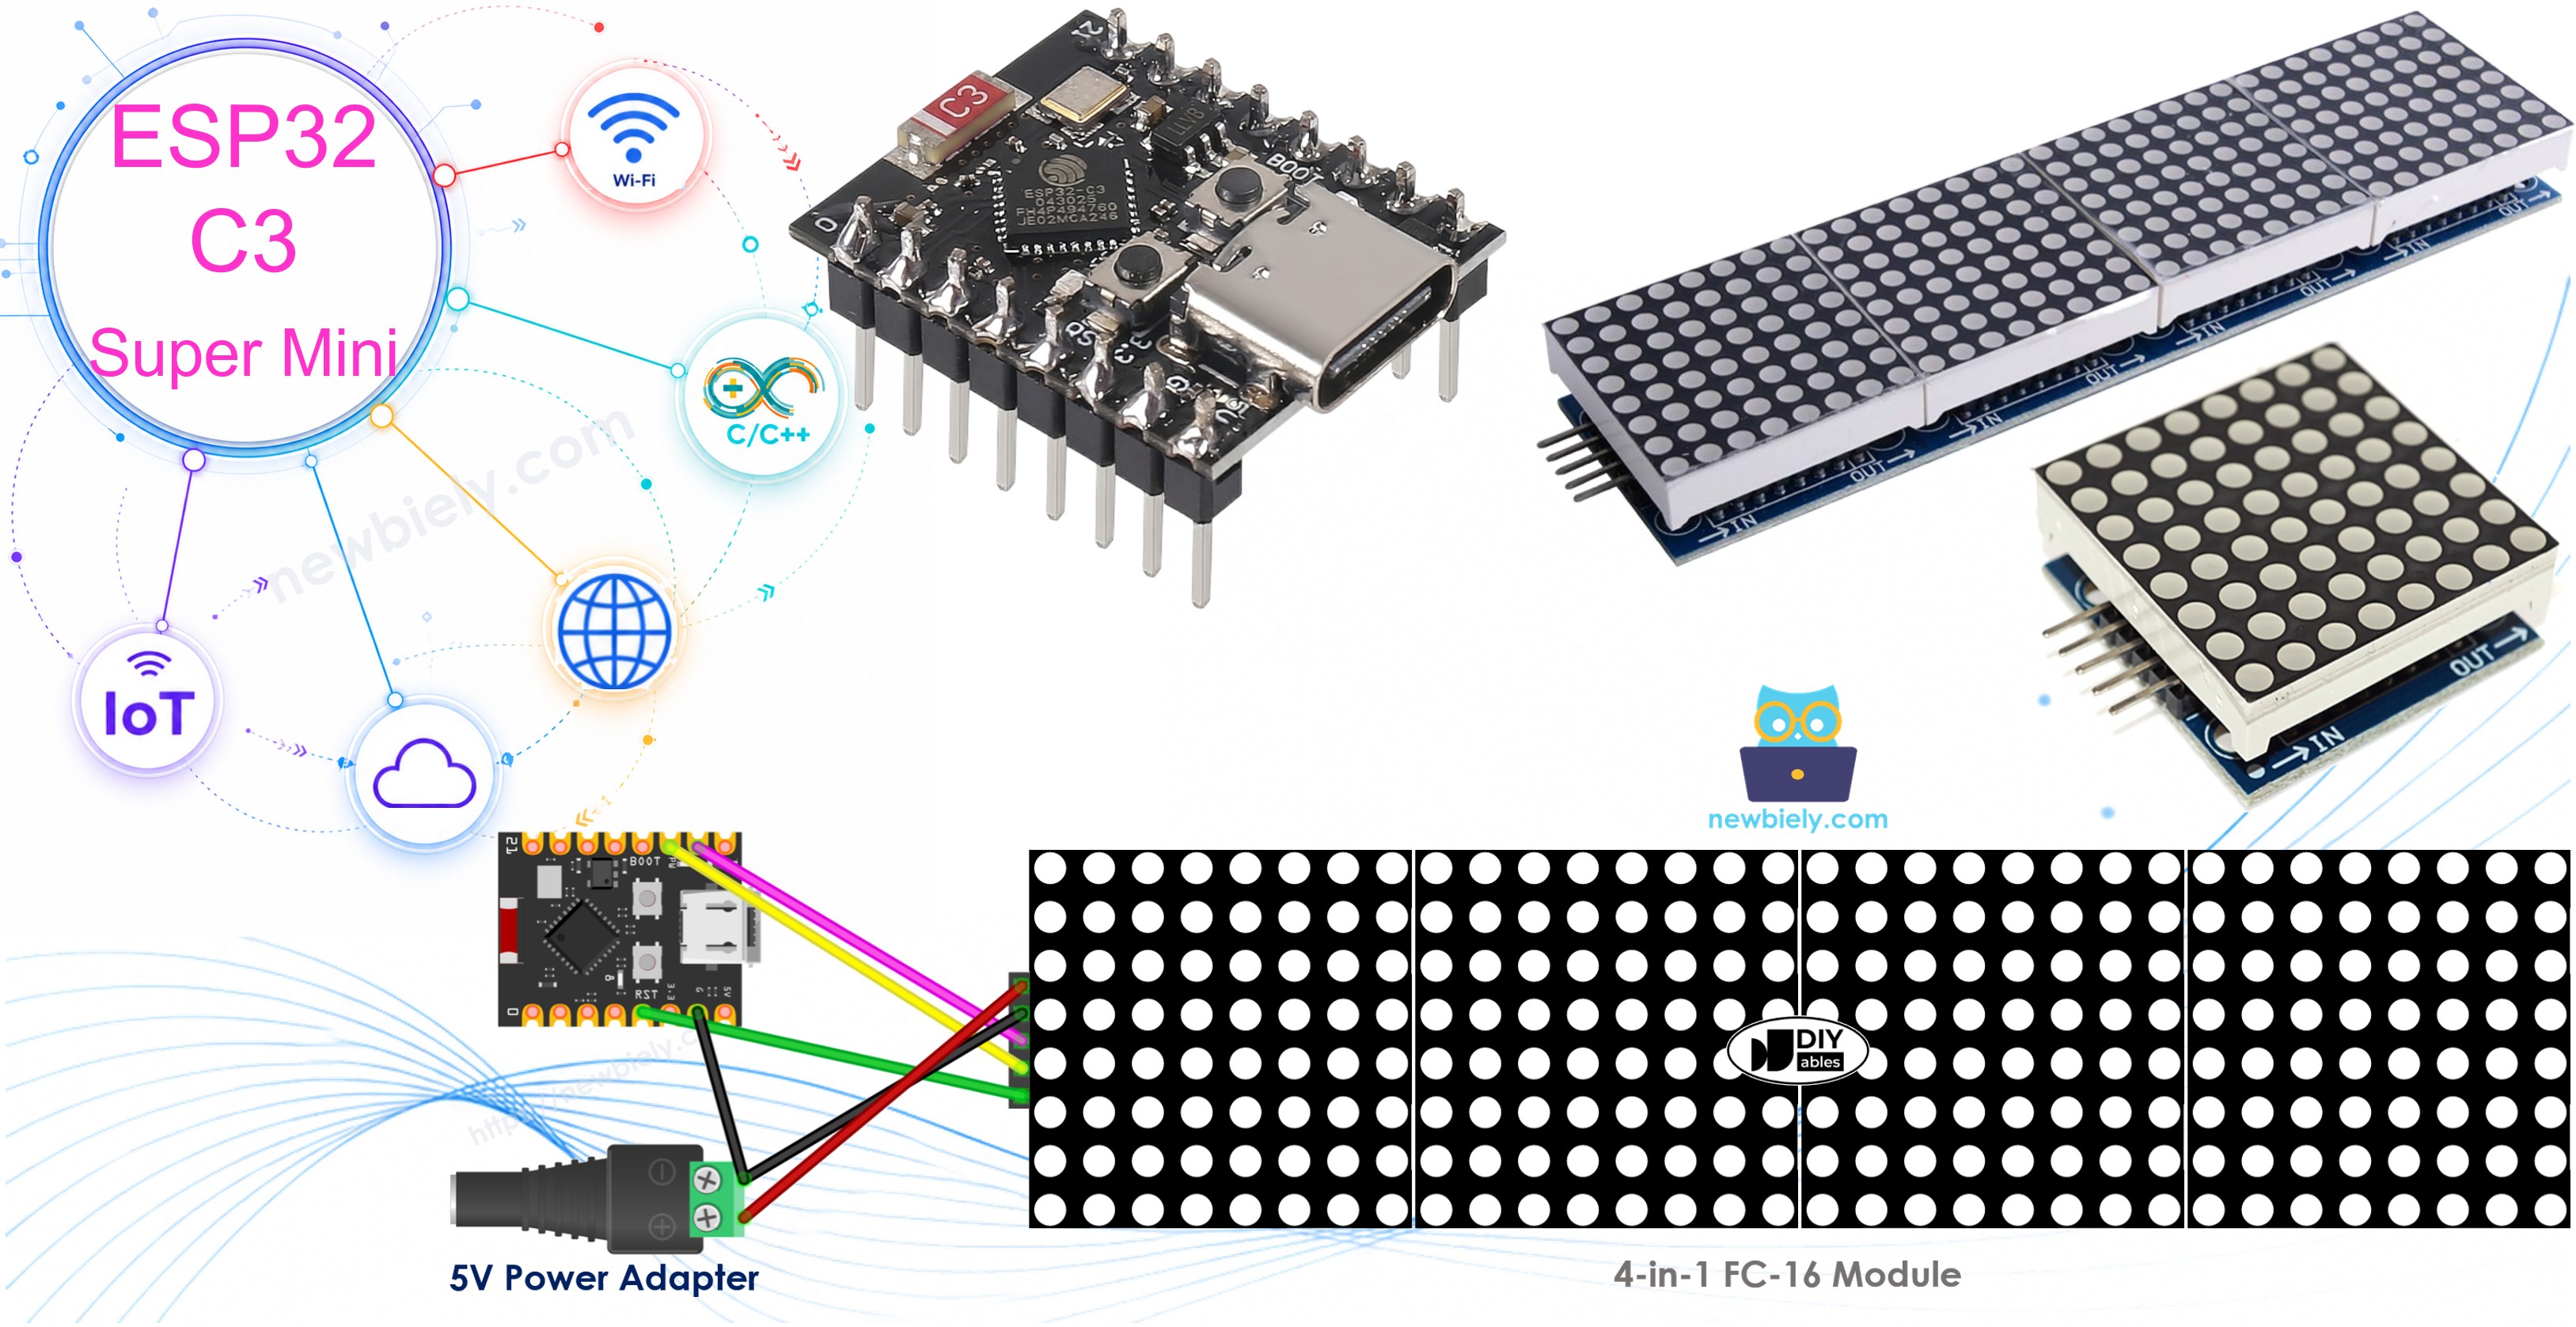
Hardware Preparation
Or you can buy the following kits:
| 1 | × | DIYables Sensor Kit (18 sensors/displays) |
Additionally, some of these links are for products from our own brand, DIYables .
Overview of LED Matrix
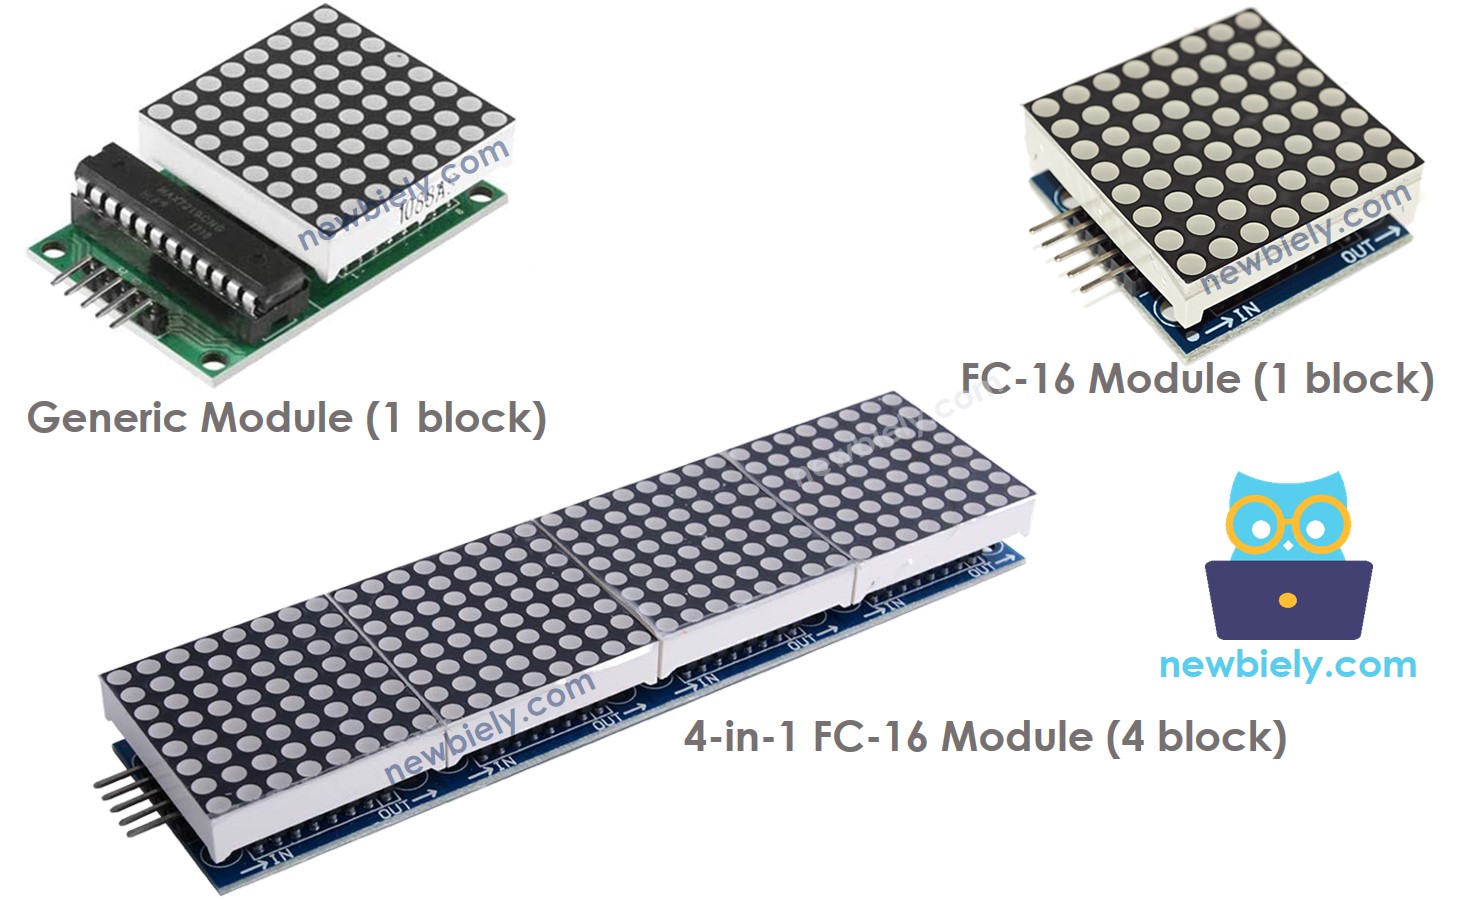
An LED matrix is a grid of LEDs driven by a small chip so you can control every dot. With the ESP32 C3 Super Mini, the MAX7219-based LED matrix is the most popular choice.
Key Features:
- Block: The base unit of an LED matrix is one block.
- Inside a block: Each block has an 8x8 LED matrix (64 LEDs) and one MAX7219 driver.
- Two forms: There are two popular block forms, the generic module and the FC-16 module.
- Single or many: An LED matrix can be one block, or many blocks in a daisy-chain.
- Ready-made: You can buy a pre-built multi-block LED matrix (for example 4-in-1 or 8-in-1).
- Build your own: You can also buy separate blocks and wire them into any size you want.
- In code: You declare the size of the LED matrix in the ESP32 C3 Super Mini code.
Technical Specifications:
- Driver chip: MAX7219
- Supply voltage: 5V
- Logic level: works with the 3.3V signals of the ESP32 C3 Super Mini
- Interface: SPI (three signal wires: DIN, CS, CLK)
- Brightness levels: 16 steps, from 0 to 15
- Current draw: up to about 1A per display at full brightness
Pinout
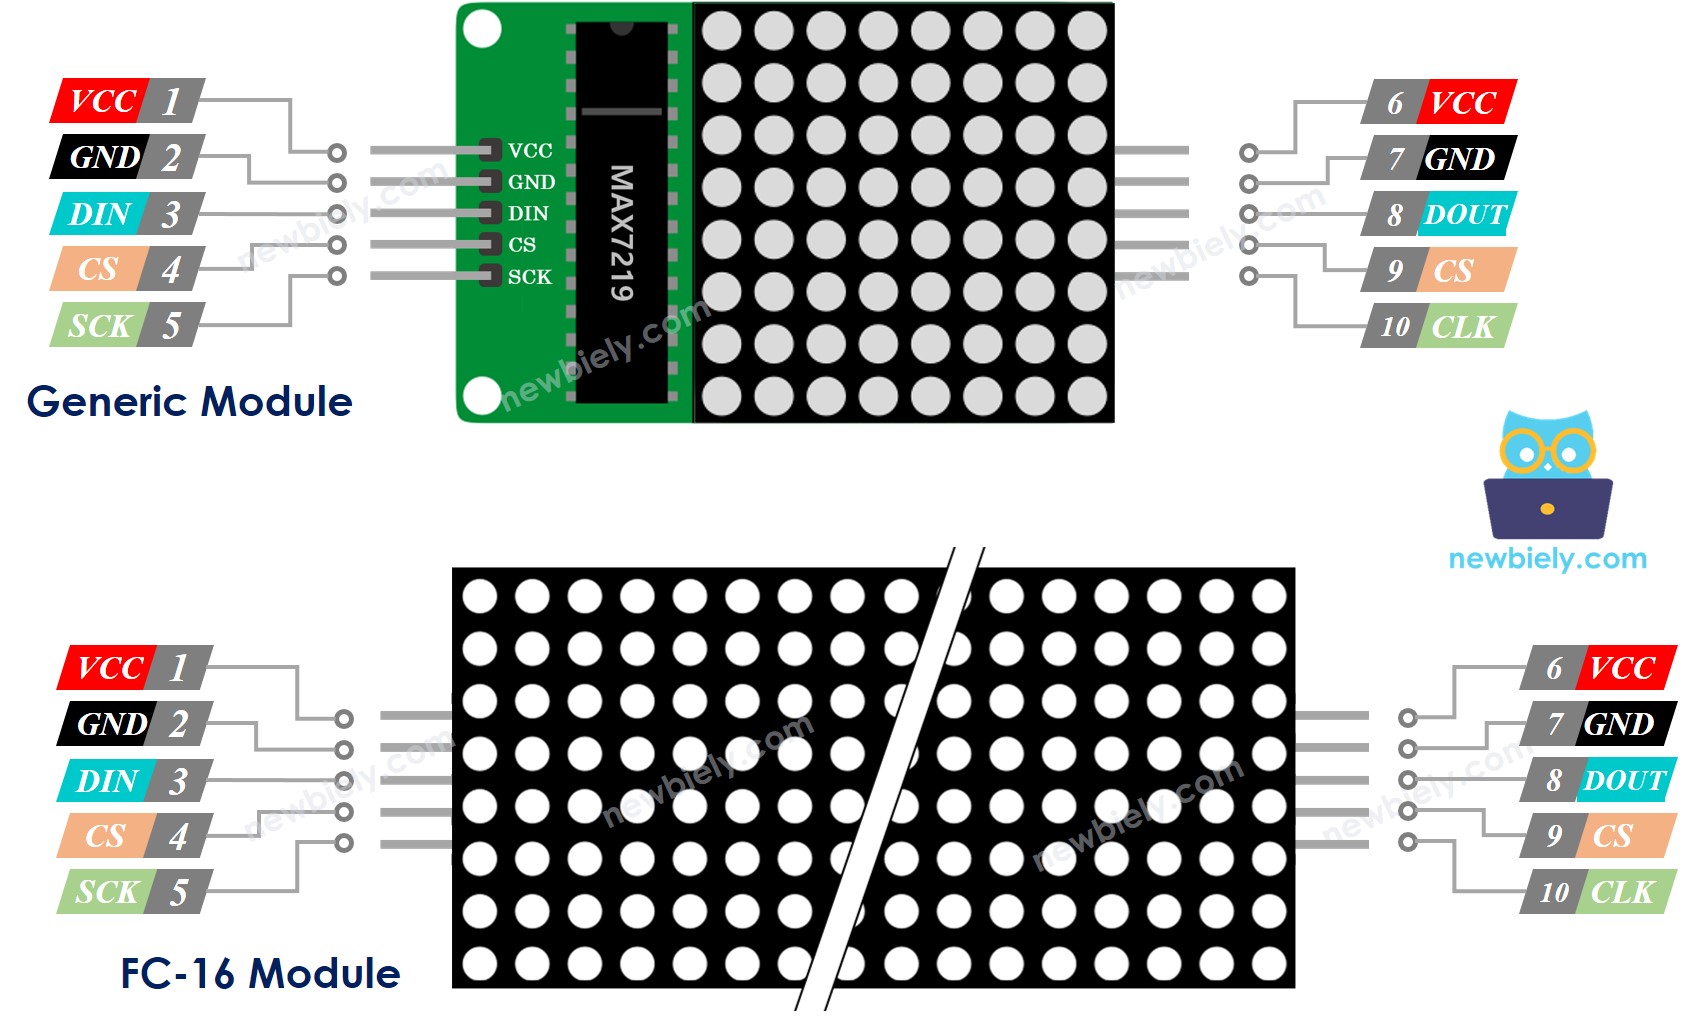
An LED matrix is formed by one or more blocks. Each block has two groups of pins.
Input pins group:
- VCC: connects to 5V.
- GND: connects to GND.
- DIN: Data pin. Connect it to a GPIO pin of the ESP32 C3 Super Mini.
- CS: Chip Select. Connect it to a GPIO pin of the ESP32 C3 Super Mini.
- CLK: Clock pin. Connect it to a GPIO pin of the ESP32 C3 Super Mini.
Output pins group:
- VCC: connects to VCC of the input pins group on the next module.
- GND: connects to GND of the input pins group on the next module.
- DOUT: Data Out, connects to the DIN pin of the input pins group of the next module.
- CS: connects to CS of the input pins group on the next module.
- CLK: connects to CLK of the input pins group on the next module.
Wiring Diagram
The ESP32 C3 Super Mini talks to the LED matrix over SPI, so only three signal wires are needed.
| LED Matrix Pin | ESP32 C3 Super Mini Pin |
|---|---|
| VCC | 5V (external supply) |
| GND | GND |
| DIN | GPIO6 (MOSI) |
| CS | GPIO7 |
| CLK | GPIO4 (SCK) |
- Note: GPIO4 (SCK) and GPIO6 (MOSI) are the hardware SPI pins. Keep them as they are.
- Note: GPIO7 is the CS pin. You can change it to another free GPIO pin if you also change it in the code.
- Note: The GND of the ESP32 C3 Super Mini and the GND of the power supply must be joined together.
- Note: Always check VCC and GND twice before you power the display on.
If the LED matrix is made of a single block:
- Connect the input pins group to the ESP32 C3 Super Mini
- Leave the output pins group unconnected
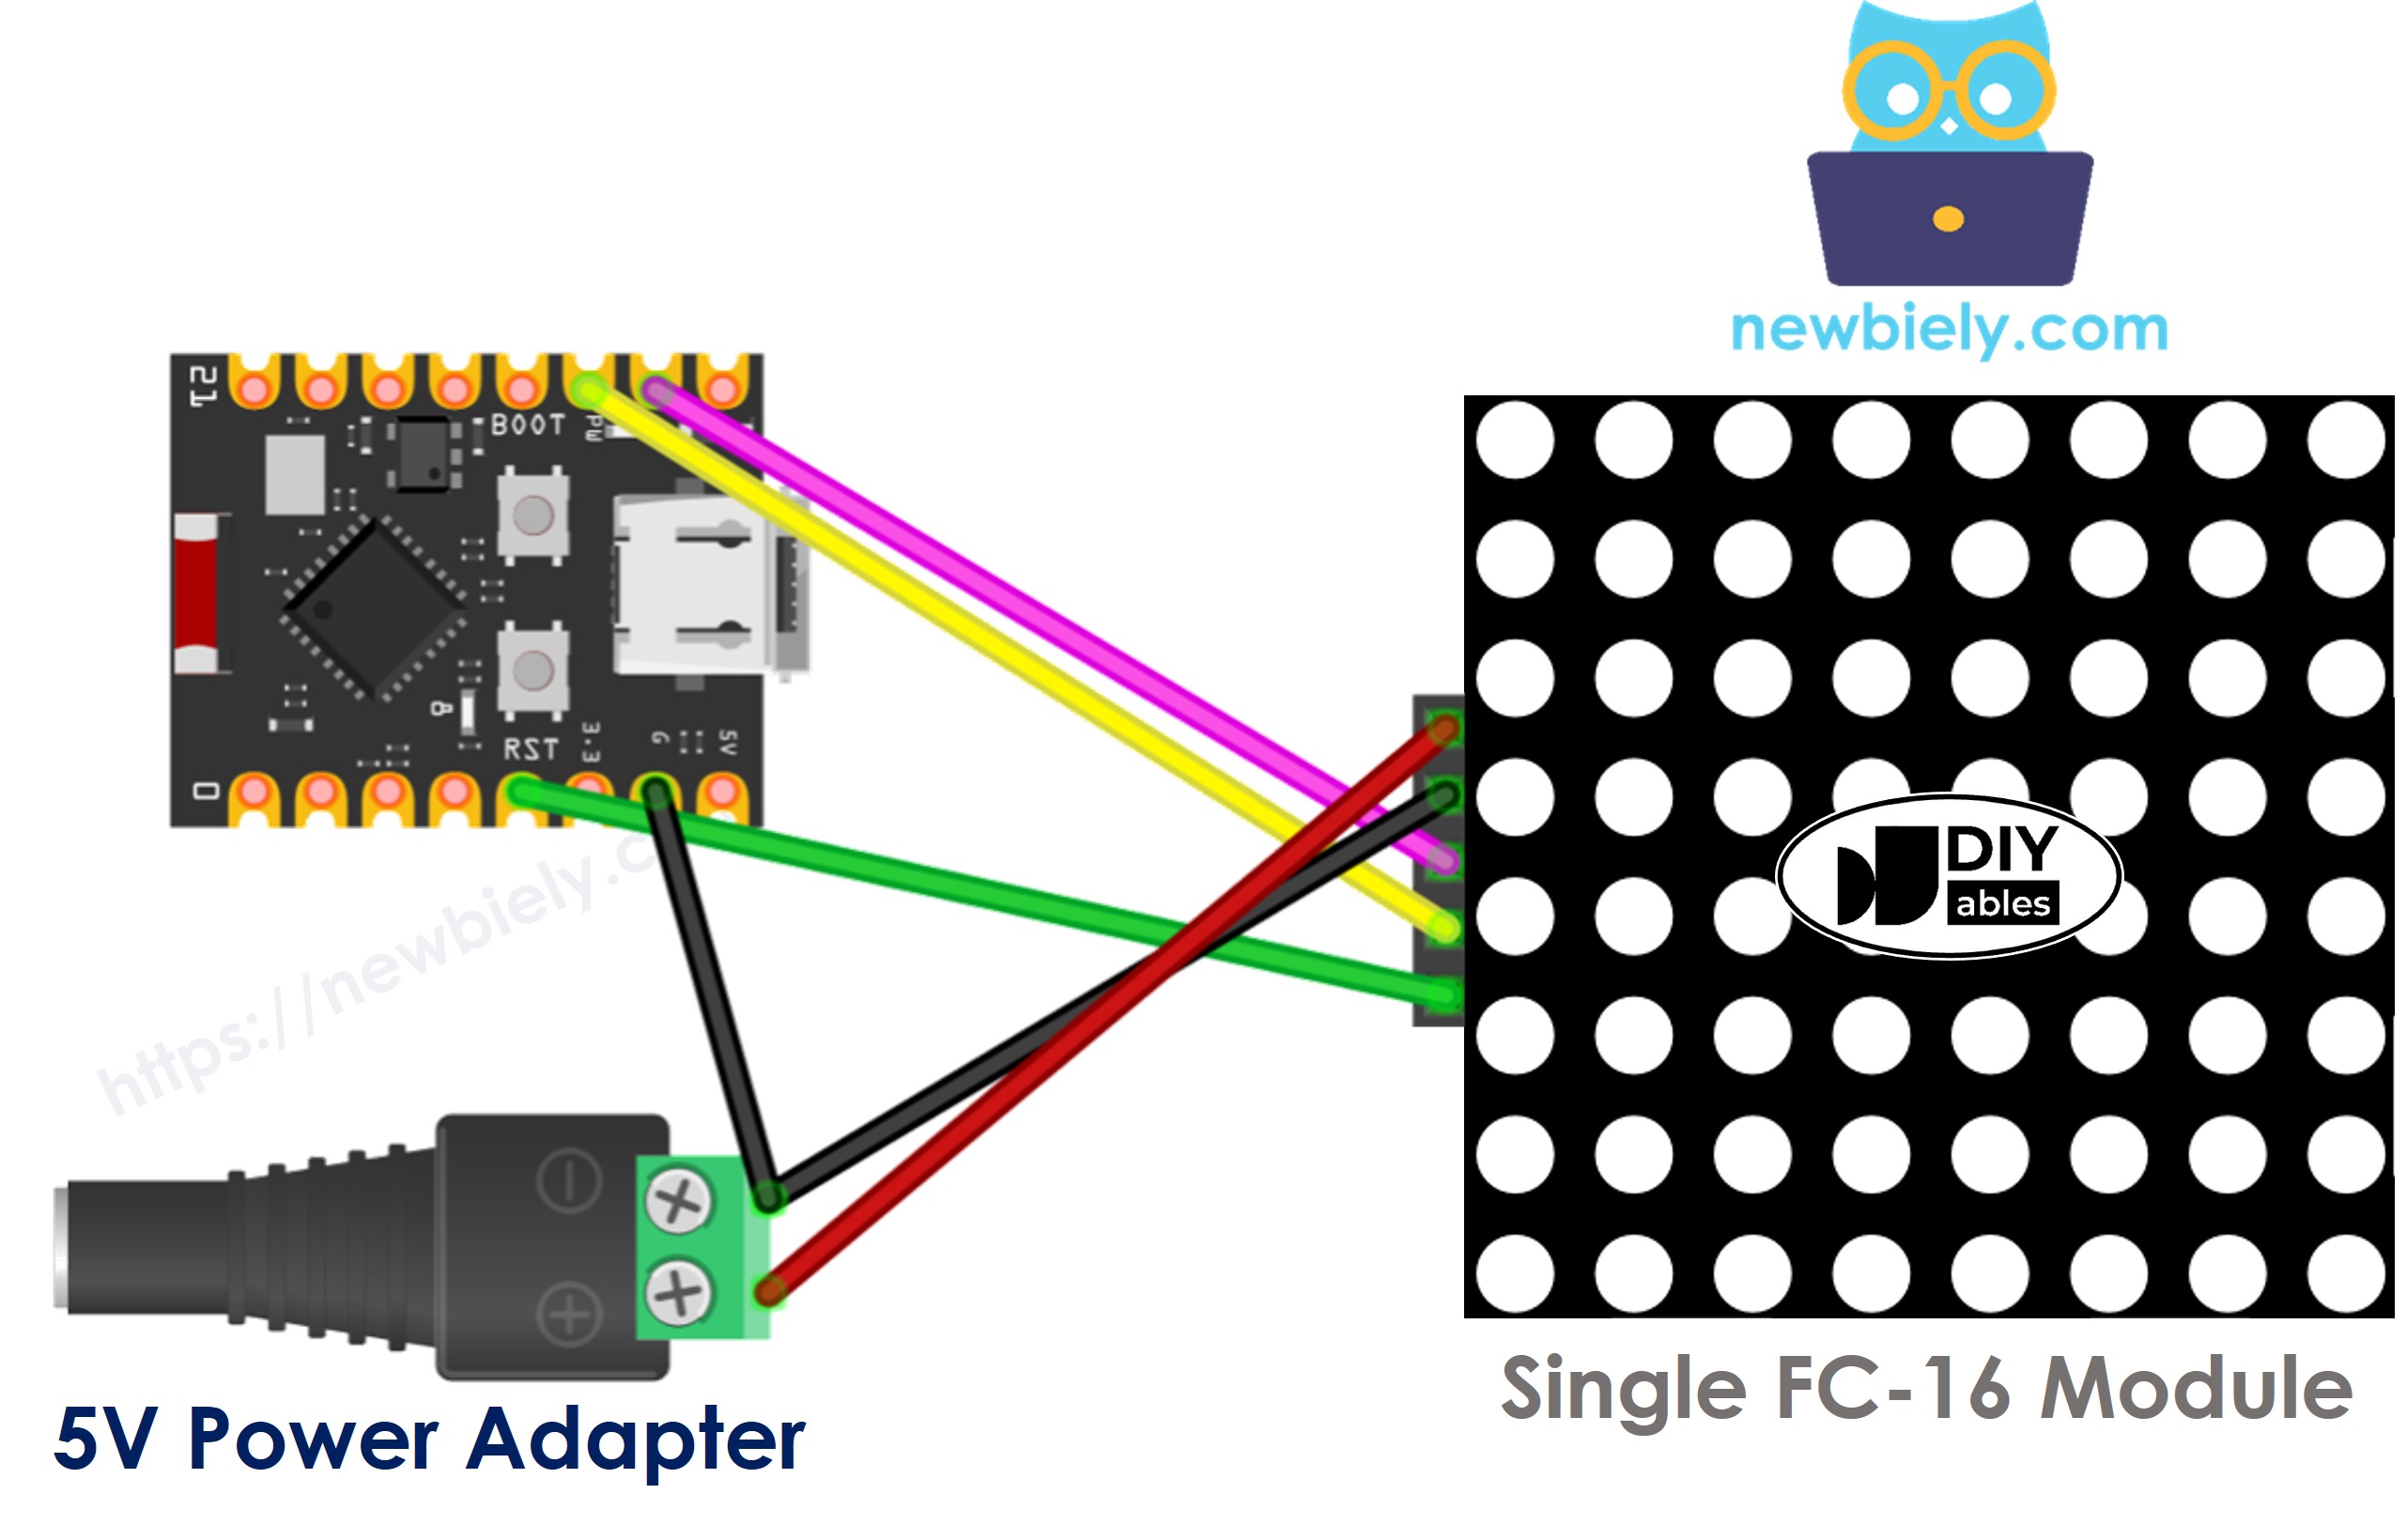
This image is created using Fritzing. Click to enlarge image
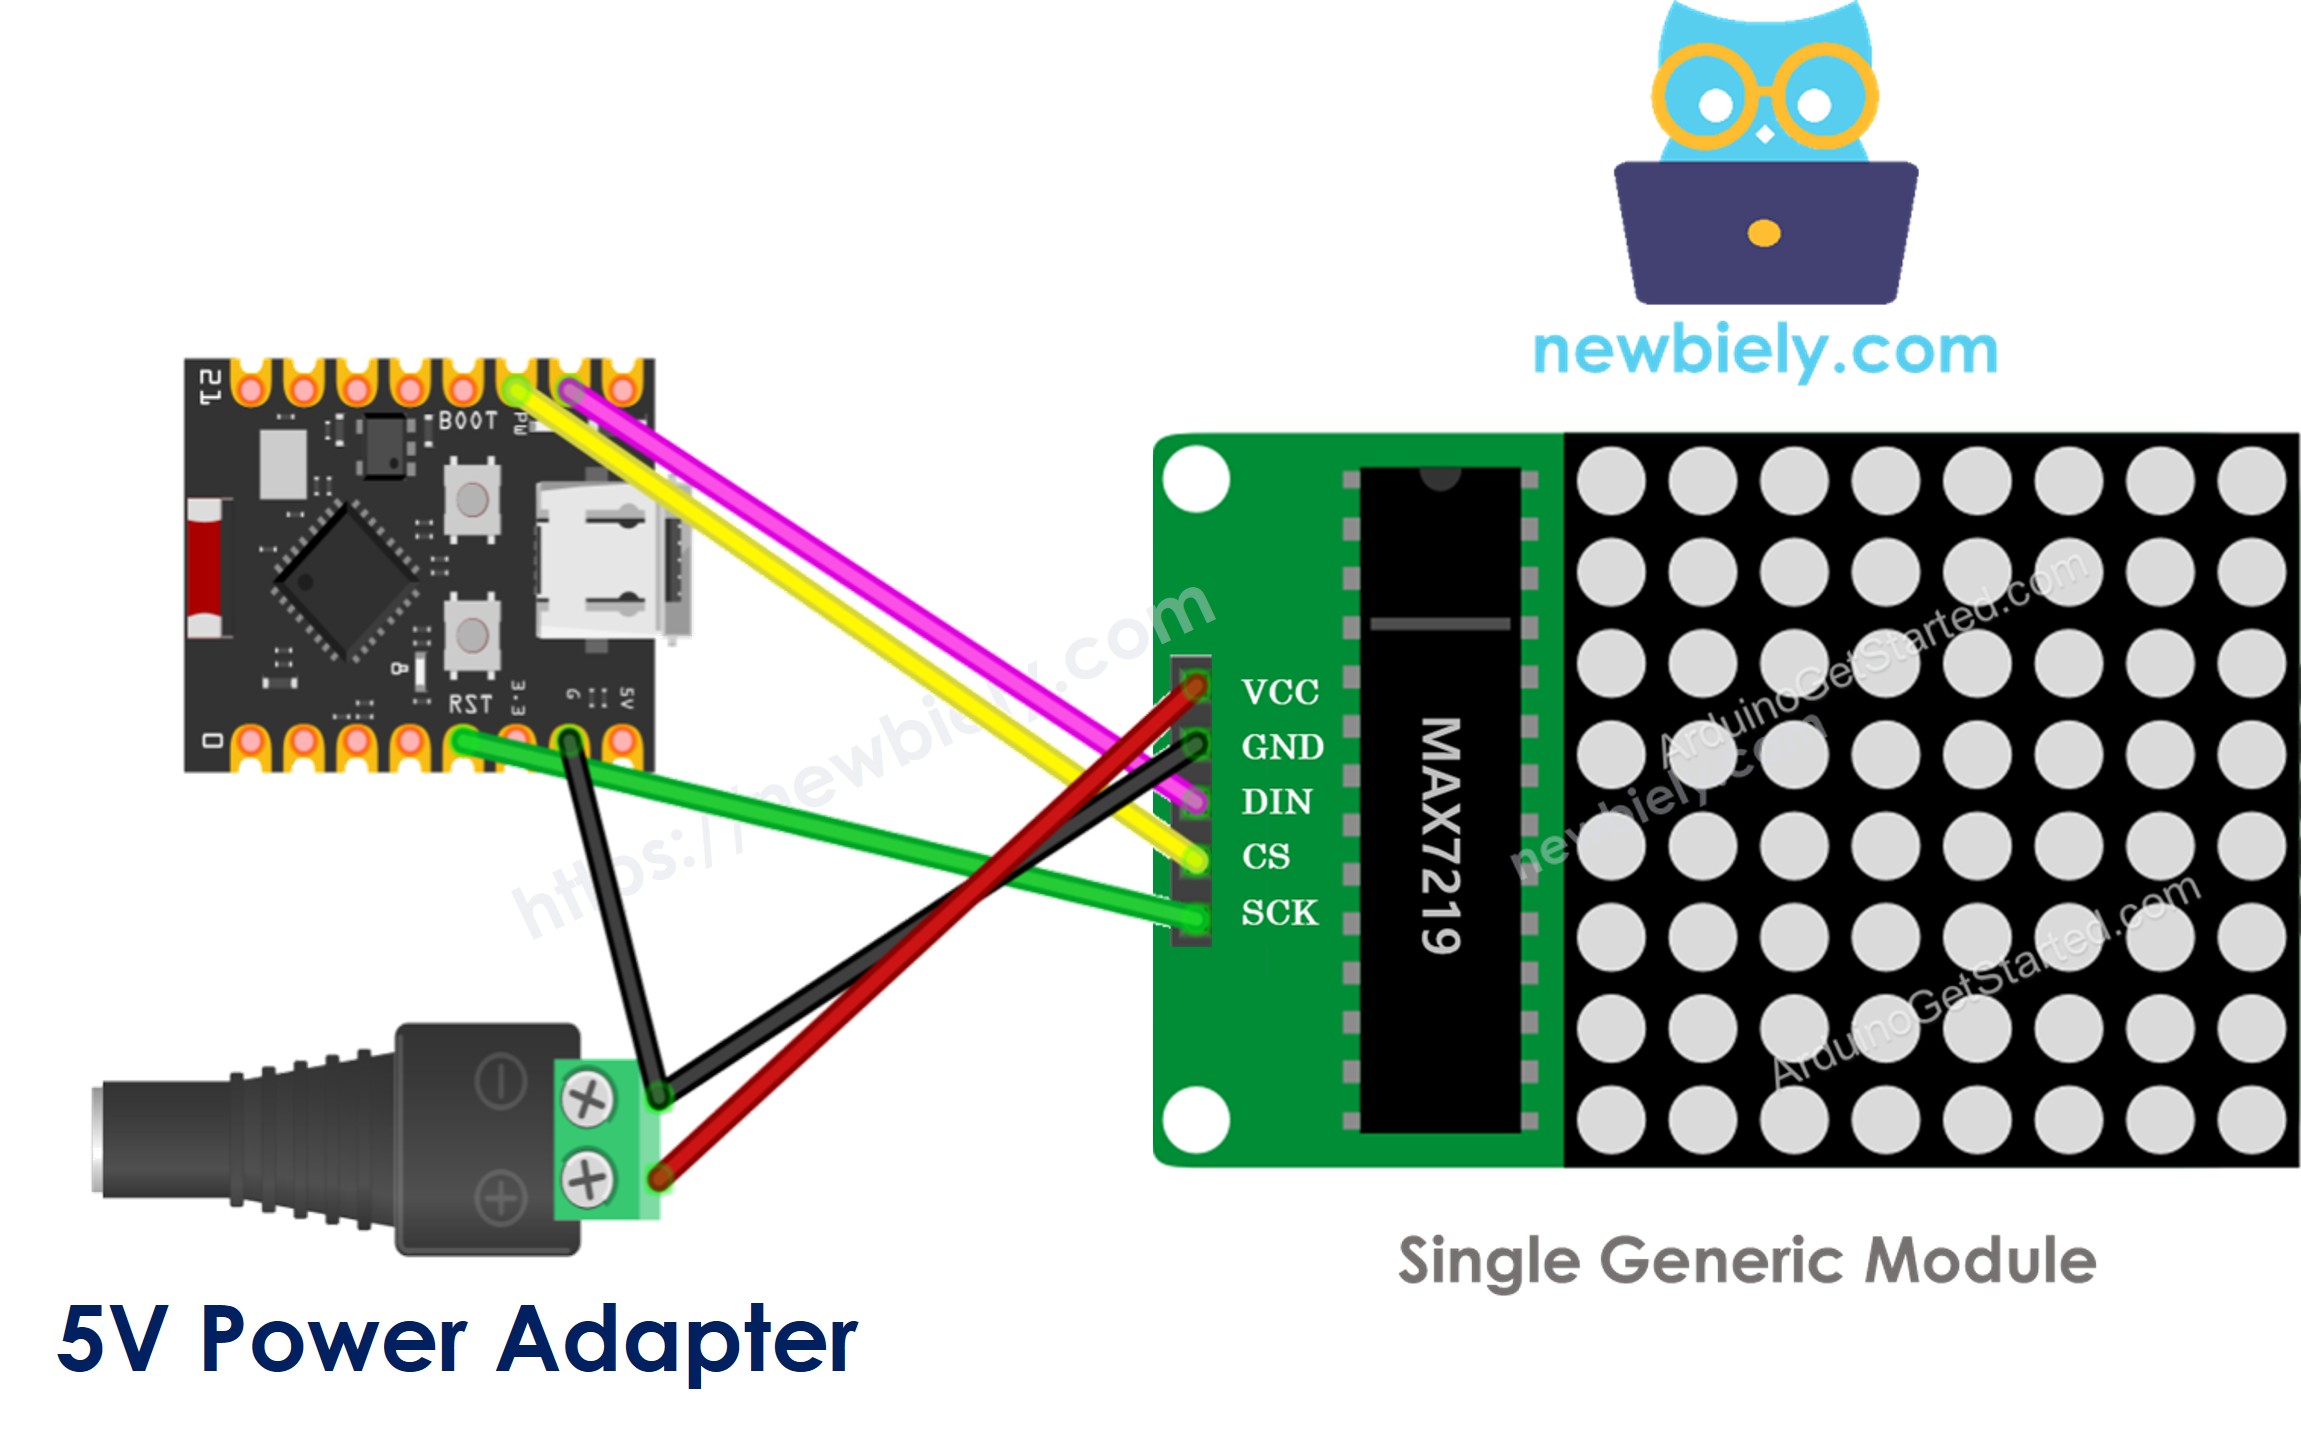
This image is created using Fritzing. Click to enlarge image
If the LED matrix is a pre-built multi-block module:
- Connect the input pins group to the ESP32 C3 Super Mini
- Leave the output pins group unconnected
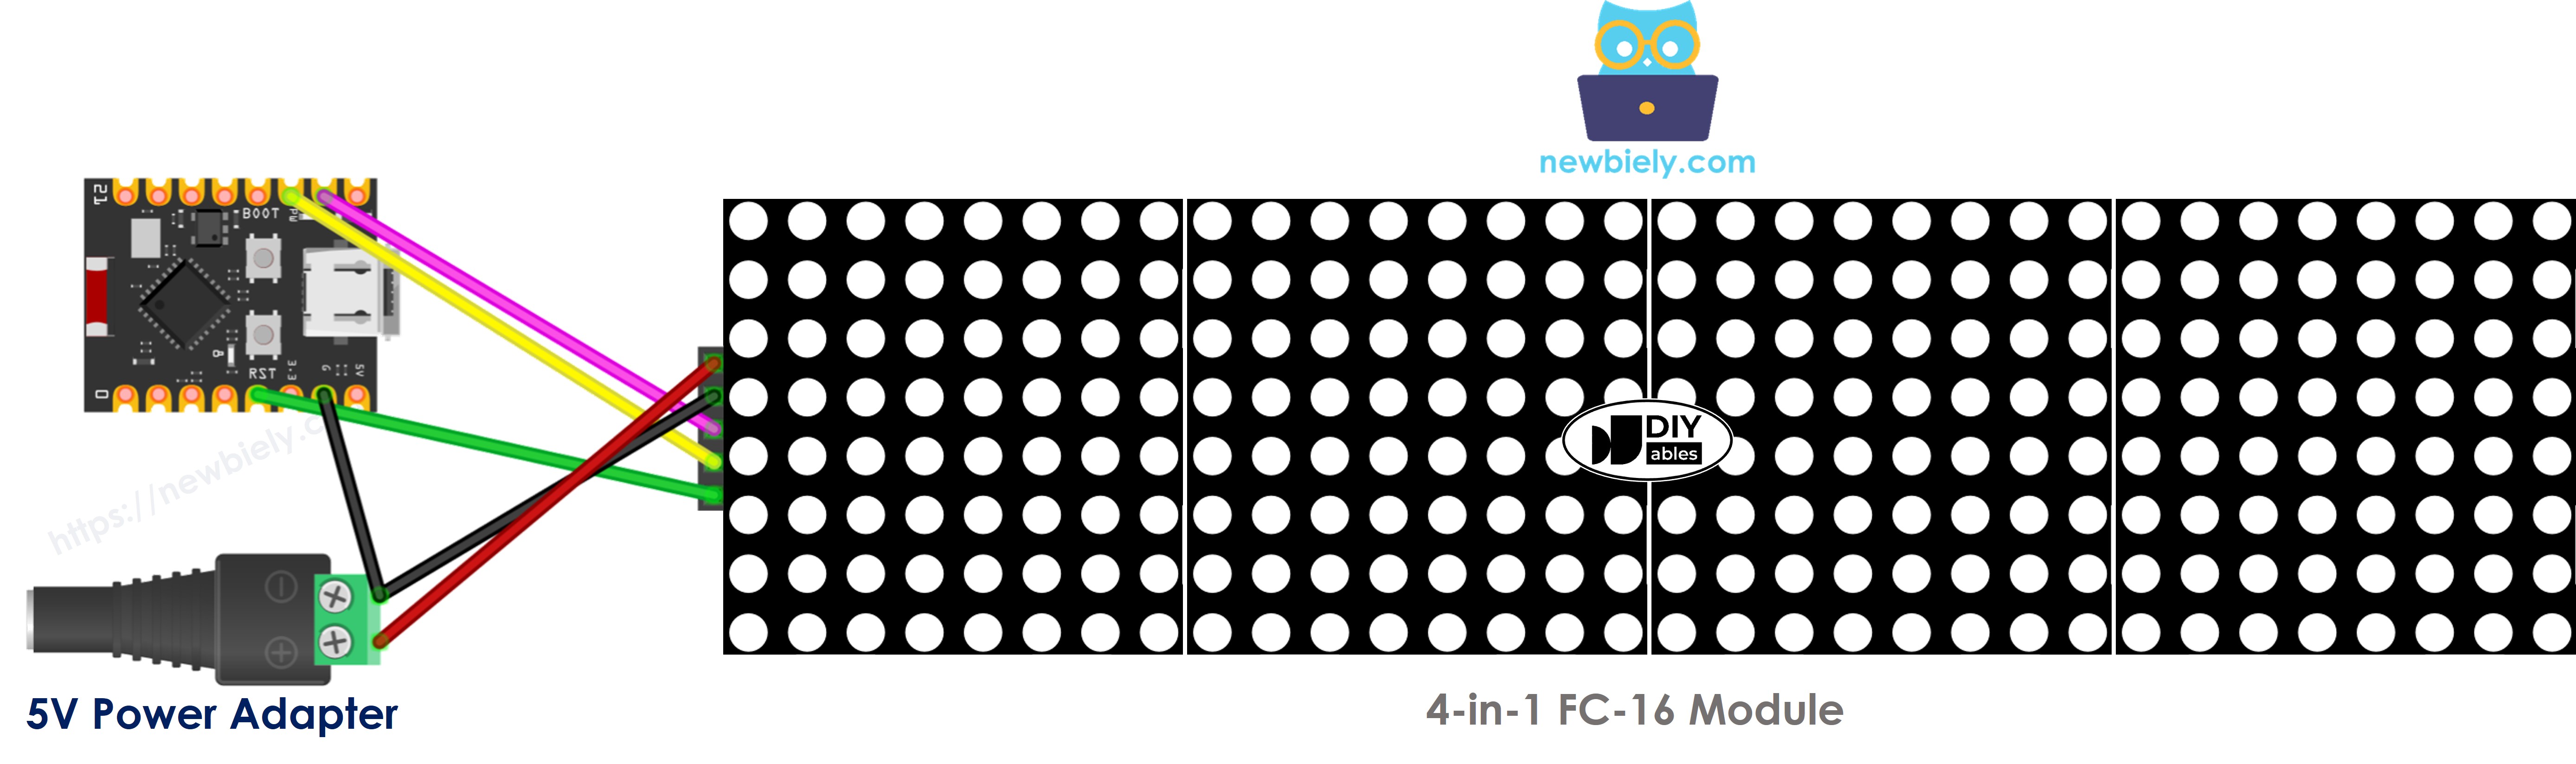
This image is created using Fritzing. Click to enlarge image
If you build the LED matrix from several blocks yourself:
- Connect the input pins group of the first block to the ESP32 C3 Super Mini
- Connect the output pins group of each block to the input pins group of the next block
- Leave the output pins group of the last block unconnected
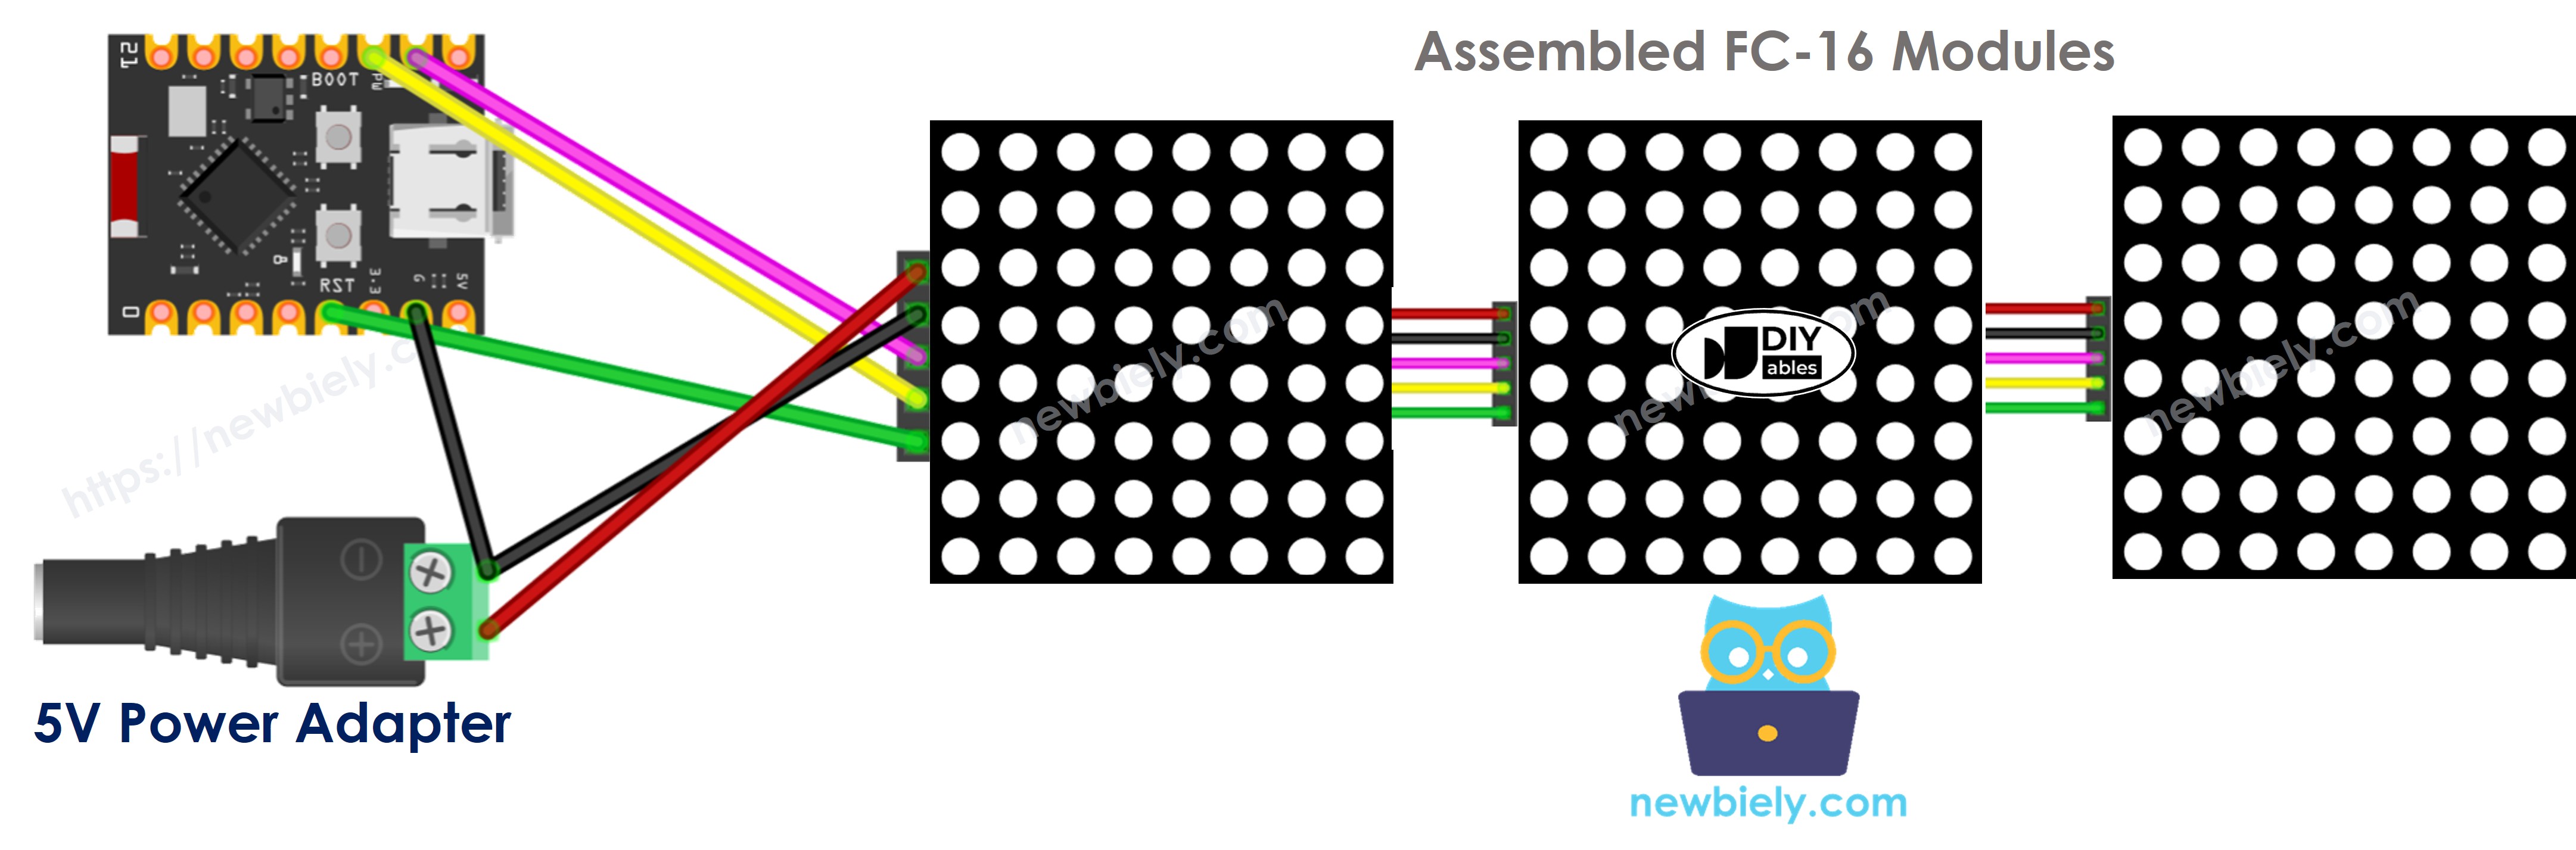
This image is created using Fritzing. Click to enlarge image
WARNING
The display draws a lot of current, up to 1A at maximum brightness.
- Do not power the LED matrix from the 5V pin of the ESP32 C3 Super Mini.
- Use an external 5V power supply instead.
- The ESP32 C3 Super Mini and the LED matrix can share the same 5V power adapter.
How To Program For LED Matrix
Controlling a MAX7219 by hand is hard, but a library makes it simple. Below are the steps to write ESP32 C3 Super Mini code for the LED matrix.
- Include the libraries:
- Tell the library which hardware you have: GENERIC_HW or FC16_HW.
- Set how many LED blocks are used. For example, a 4-in-1 LED matrix has 4 blocks.
- Set the ESP32 C3 Super Mini pin that goes to the CS pin of the LED matrix, for example GPIO7.
- Create a new instance of the MD_Parola class for the LED matrix display.
- Write the setup() function:
- Display text, numbers and animated effects: see the next part.
※ NOTE THAT:
The DIN and CLK pins are handled by the hardware SPI of the ESP32 C3 Super Mini, so you never name them in the code. Only the CS pin is written in the sketch.
ESP32 C3 Super Mini - LED Matrix Code
The code below is for a 32x8 FC-16 LED matrix display (4 blocks), but you can easily adapt it for 8x8, 16x8, 64x8 and other sizes.
What This Code Does:
- Sets the CS pin to GPIO7 on the ESP32 C3 Super Mini
- Tells the library the display has 4 FC-16 blocks
- Starts the display and sets the brightness to the maximum, 15
- Shows the same text aligned left, center and right
- Shows inverted text, then the number 1234
Detailed Instructions
- New to ESP32 C3 Super Mini? Complete our Getting Started with ESP32 C3 Super Mini tutorial first to set up your development environment.
- Wire the parts: Connect the LED matrix to the ESP32 C3 Super Mini as shown in the diagram above.
- Power the display: Use an external 5V supply and join the grounds together.
- Connect the board: Plug the ESP32 C3 Super Mini into your computer with the USB Type-C cable.
- Open the IDE: Launch the Arduino IDE on your computer.
- Select the board: Make sure ESP32 C3 Super Mini is selected in Tools > Board.
- Select the port: Pick the COM port of your ESP32 C3 Super Mini.
- Open Library Manager: Click the Library Manager icon on the left navigation bar of the Arduino IDE.
- Search the library: Type “MD_Parola”, then find the MD_Parola library.
- Install it: Click the Install button.
- Search for MD_Parola created by majicDesigns and click the Install button.
- Install the dependency: You will be asked to install the “MD_MAX72XX” library. Click the Install All button.
- Copy the code: Copy the code above and open it in the Arduino IDE.
- Upload: Click the Upload button to send the code to the ESP32 C3 Super Mini.
- Watch: See the text and numbers appear on the LED matrix display.
- Serial Monitor: If you add Serial output later, set the Serial Monitor baud rate to 115200.
- Pro Tip: If the characters look mirrored or cut in half, change HARDWARE_TYPE from FC16_HW to GENERIC_HW.
ESP32 C3 Super Mini LED Matrix Code – Scrolling Text
A long message does not fit on a small LED matrix, so you can scroll it instead.
The ESP32 C3 Super Mini code below scrolls a message across the LED matrix display.
What This Code Does:
- Uses the same GPIO7 CS pin and the same 4-block setup
- Calls displayScroll() once in setup() with the text and the speed
- Scrolls the message from right to left across the whole display
- Calls displayAnimate() in loop() to move the text one step at a time
- Resets the animation so the message repeats forever
- Note: The last number in displayScroll() is the speed in milliseconds. A smaller number scrolls faster.
For more text effects, please visit MD_Parola Library Reference.
Applications and Project Ideas
Here are some easy projects you can build with an ESP32 C3 Super Mini and an LED matrix.
- Scrolling name badge: Show your name or a greeting on a wearable display.
- Desk clock: Show the time on the LED matrix using Wi-Fi time from the ESP32 C3 Super Mini.
- Weather ticker: Pull the temperature from the internet and scroll it across the display.
- Room thermometer: Show a DHT11 or DHT22 reading in big digits.
- Countdown timer: Display a kitchen or workout countdown that anyone can read from far away.
- Notification board: Scroll new messages sent from your phone over Wi-Fi.
Challenge Yourself
Try these small challenges to practice with the ESP32 C3 Super Mini and the LED matrix.
- Easy: Change the displayed text to your own name.
- Easy: Change setIntensity() from 15 to 3 and see the display get dimmer.
- Medium: Make a counter that shows numbers from 0 to 99, one per second.
- Medium: Change the scroll direction to PA_SCROLL_RIGHT and change the speed.
- Advanced: Add a push button on GPIO3 that switches between two different messages.
- Advanced: Connect the ESP32 C3 Super Mini to Wi-Fi and scroll a message you type in a web page.