
ESP32 C3 Super Mini - Door Sensor
A door sensor is a tiny, cheap part that tells your ESP32 C3 Super Mini when a door or window is open or closed. It is the heart of almost every DIY home security project. This tutorial shows you, step by step, how to wire and program a door sensor with the ESP32 C3 Super Mini.
In this tutorial, you'll learn:
- What a door sensor is and how the magnet and reed switch work together
- How to wire a door sensor to the ESP32 C3 Super Mini
- How to read the door state (open or closed) in your code
- How to detect the door-opening and door-closing events
- Why a pull-up resistor is required, and how to use the built-in one
Hardware Preparation
| 1 | × | ESP32 C3 Super Mini | |
| 1 | × | USB Cable Type-A to Type-C (for USB-A PC) | |
| 1 | × | USB Cable Type-C to Type-C (for USB-C PC) | |
| 1 | × | Door Sensor | |
| 1 | × | Optionally, DC Power Jack | |
| 1 | × | Breadboard | |
| 1 | × | Jumper Wires |
Or you can buy the following kits:
| 1 | × | DIYables Sensor Kit (18 sensors/displays) |
Additionally, some of these links are for products from our own brand, DIYables .
Overview of Door Sensor
A door sensor is a magnetic switch that opens or closes a circuit when a magnet moves near it or away from it.
Other names for it:
- Entry sensor
- Contact sensor
- Window sensor
- Magnetic contact switch
Key Features:
- Very cheap and very easy to use
- No power supply needed by the sensor itself
- Works like a simple button for your ESP32 C3 Super Mini
- No moving parts to wear out
- Easy to hide inside a door frame
Technical Specifications:
- Type: Normally-open reed switch plus a magnet
- Output: Simple ON/OFF contact (no voltage, no data)
- Working distance: About 15-25 mm between magnet and switch
- Logic level: Safe for the 3.3V-only ESP32 C3 Super Mini pins
- Wires: 2 wires, not polarized
Door Sensor Pinout
The door sensor has two separate parts.
- Magnet: The movable part. No wires.
- Reed switch: The fixed part. It has two wires.
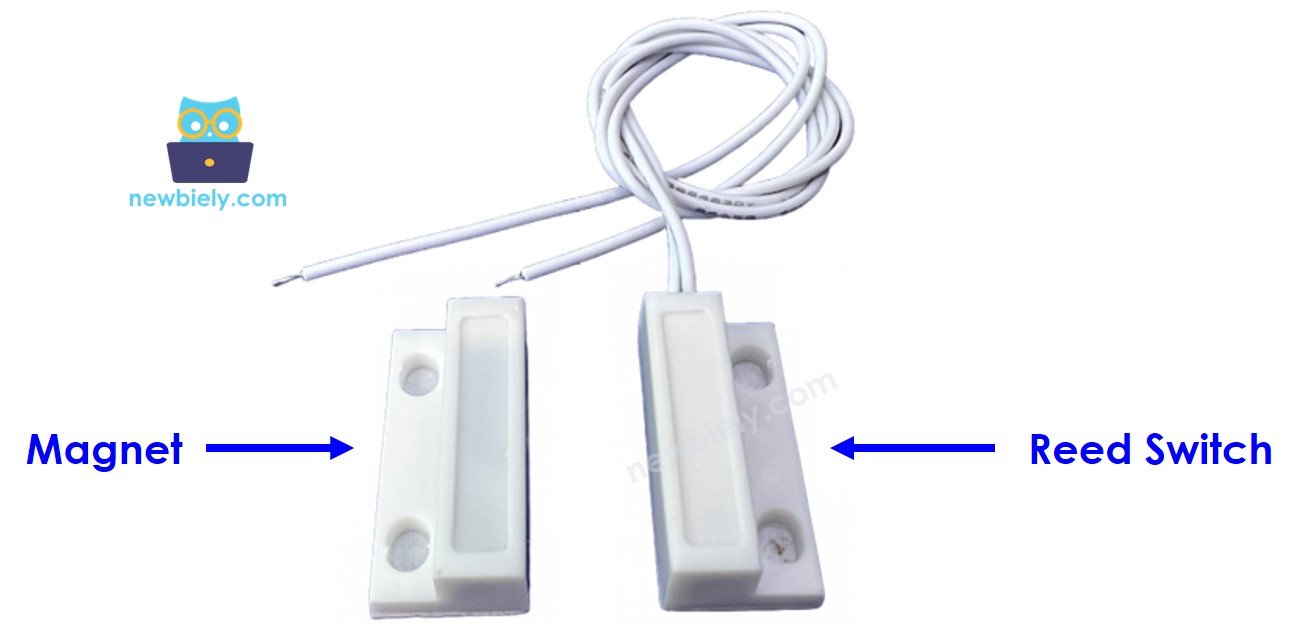
- Wire 1: No polarity. Can go to GND or to the ESP32 C3 Super Mini pin.
- Wire 2: No polarity. Can go to GND or to the ESP32 C3 Super Mini pin.
Just like a button, we do NOT need to tell the two wires of the reed switch apart.
How Door Sensor Works
The magnet and the reed switch are mounted so that they sit side by side when the door is closed.
- Magnet: Attach it to the door or the window (the part that moves)
- Reed switch: Attach it to the door frame (the part that stays still)
- Door closed: The two parts are close together
- Door open: The two parts are far apart
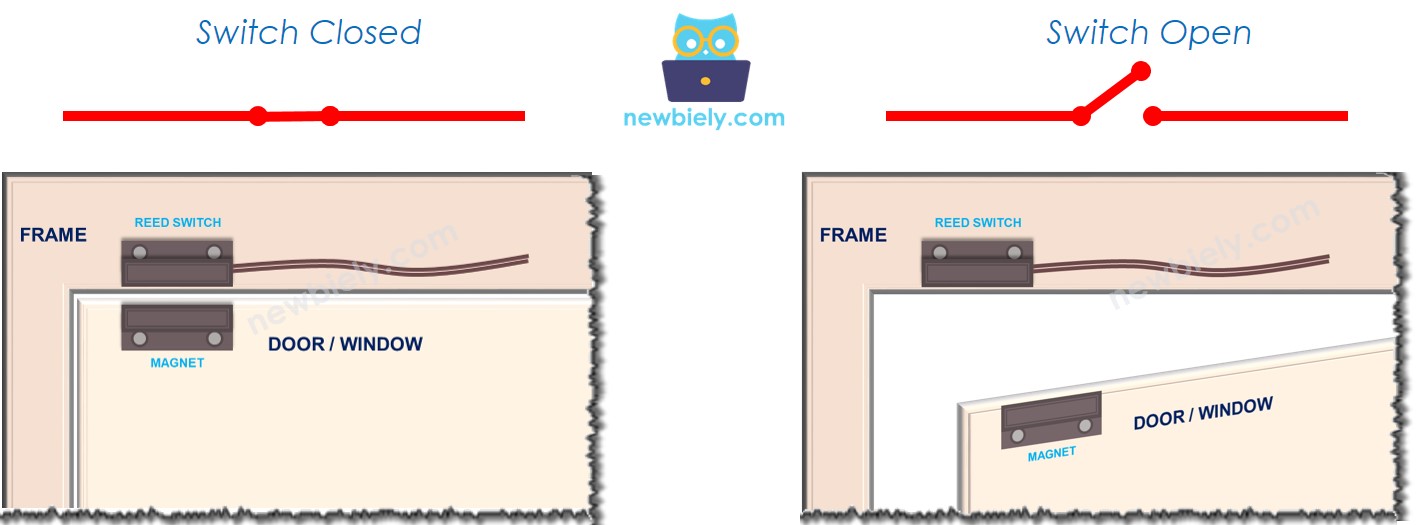
What happens inside the reed switch:
- Magnet near: The circuit is closed (the two wires are connected)
- Magnet far: The circuit is open (the two wires are not connected)
※ NOTE THAT:
Just like a button, we MUST use a pull-up or pull-down resistor on the ESP32 C3 Super Mini pin that connects to the reed switch. Without it, the pin state is random. The good news: the ESP32 C3 Super Mini has a built-in pull-up resistor, so you do not need an extra part.
If we wire the reed switch with one wire to GND and the other to an ESP32 C3 Super Mini input pin with a pull-up resistor:
- Magnet near the reed switch: The input pin is LOW
- Magnet far from the reed switch: The input pin is HIGH
So, in your code:
- Pin is LOW: The door is closed
- Pin is HIGH: The door is open
- Pin changes LOW to HIGH: The door is opening
- Pin changes HIGH to LOW: The door is closing
Wiring Diagram between Door Sensor and ESP32 C3 Super Mini
Wiring a door sensor to the ESP32 C3 Super Mini takes only two wires.
- Note: The ESP32 C3 Super Mini works at 3.3V only. Never feed a 5V signal into a GPIO pin.
- Note: The reed switch has no polarity, so the two wires can be swapped.
- Note: Keep the magnet and the reed switch within about 15 mm when the door is closed.
- Note: Do not use GPIO8 or GPIO9. They are boot strapping pins.
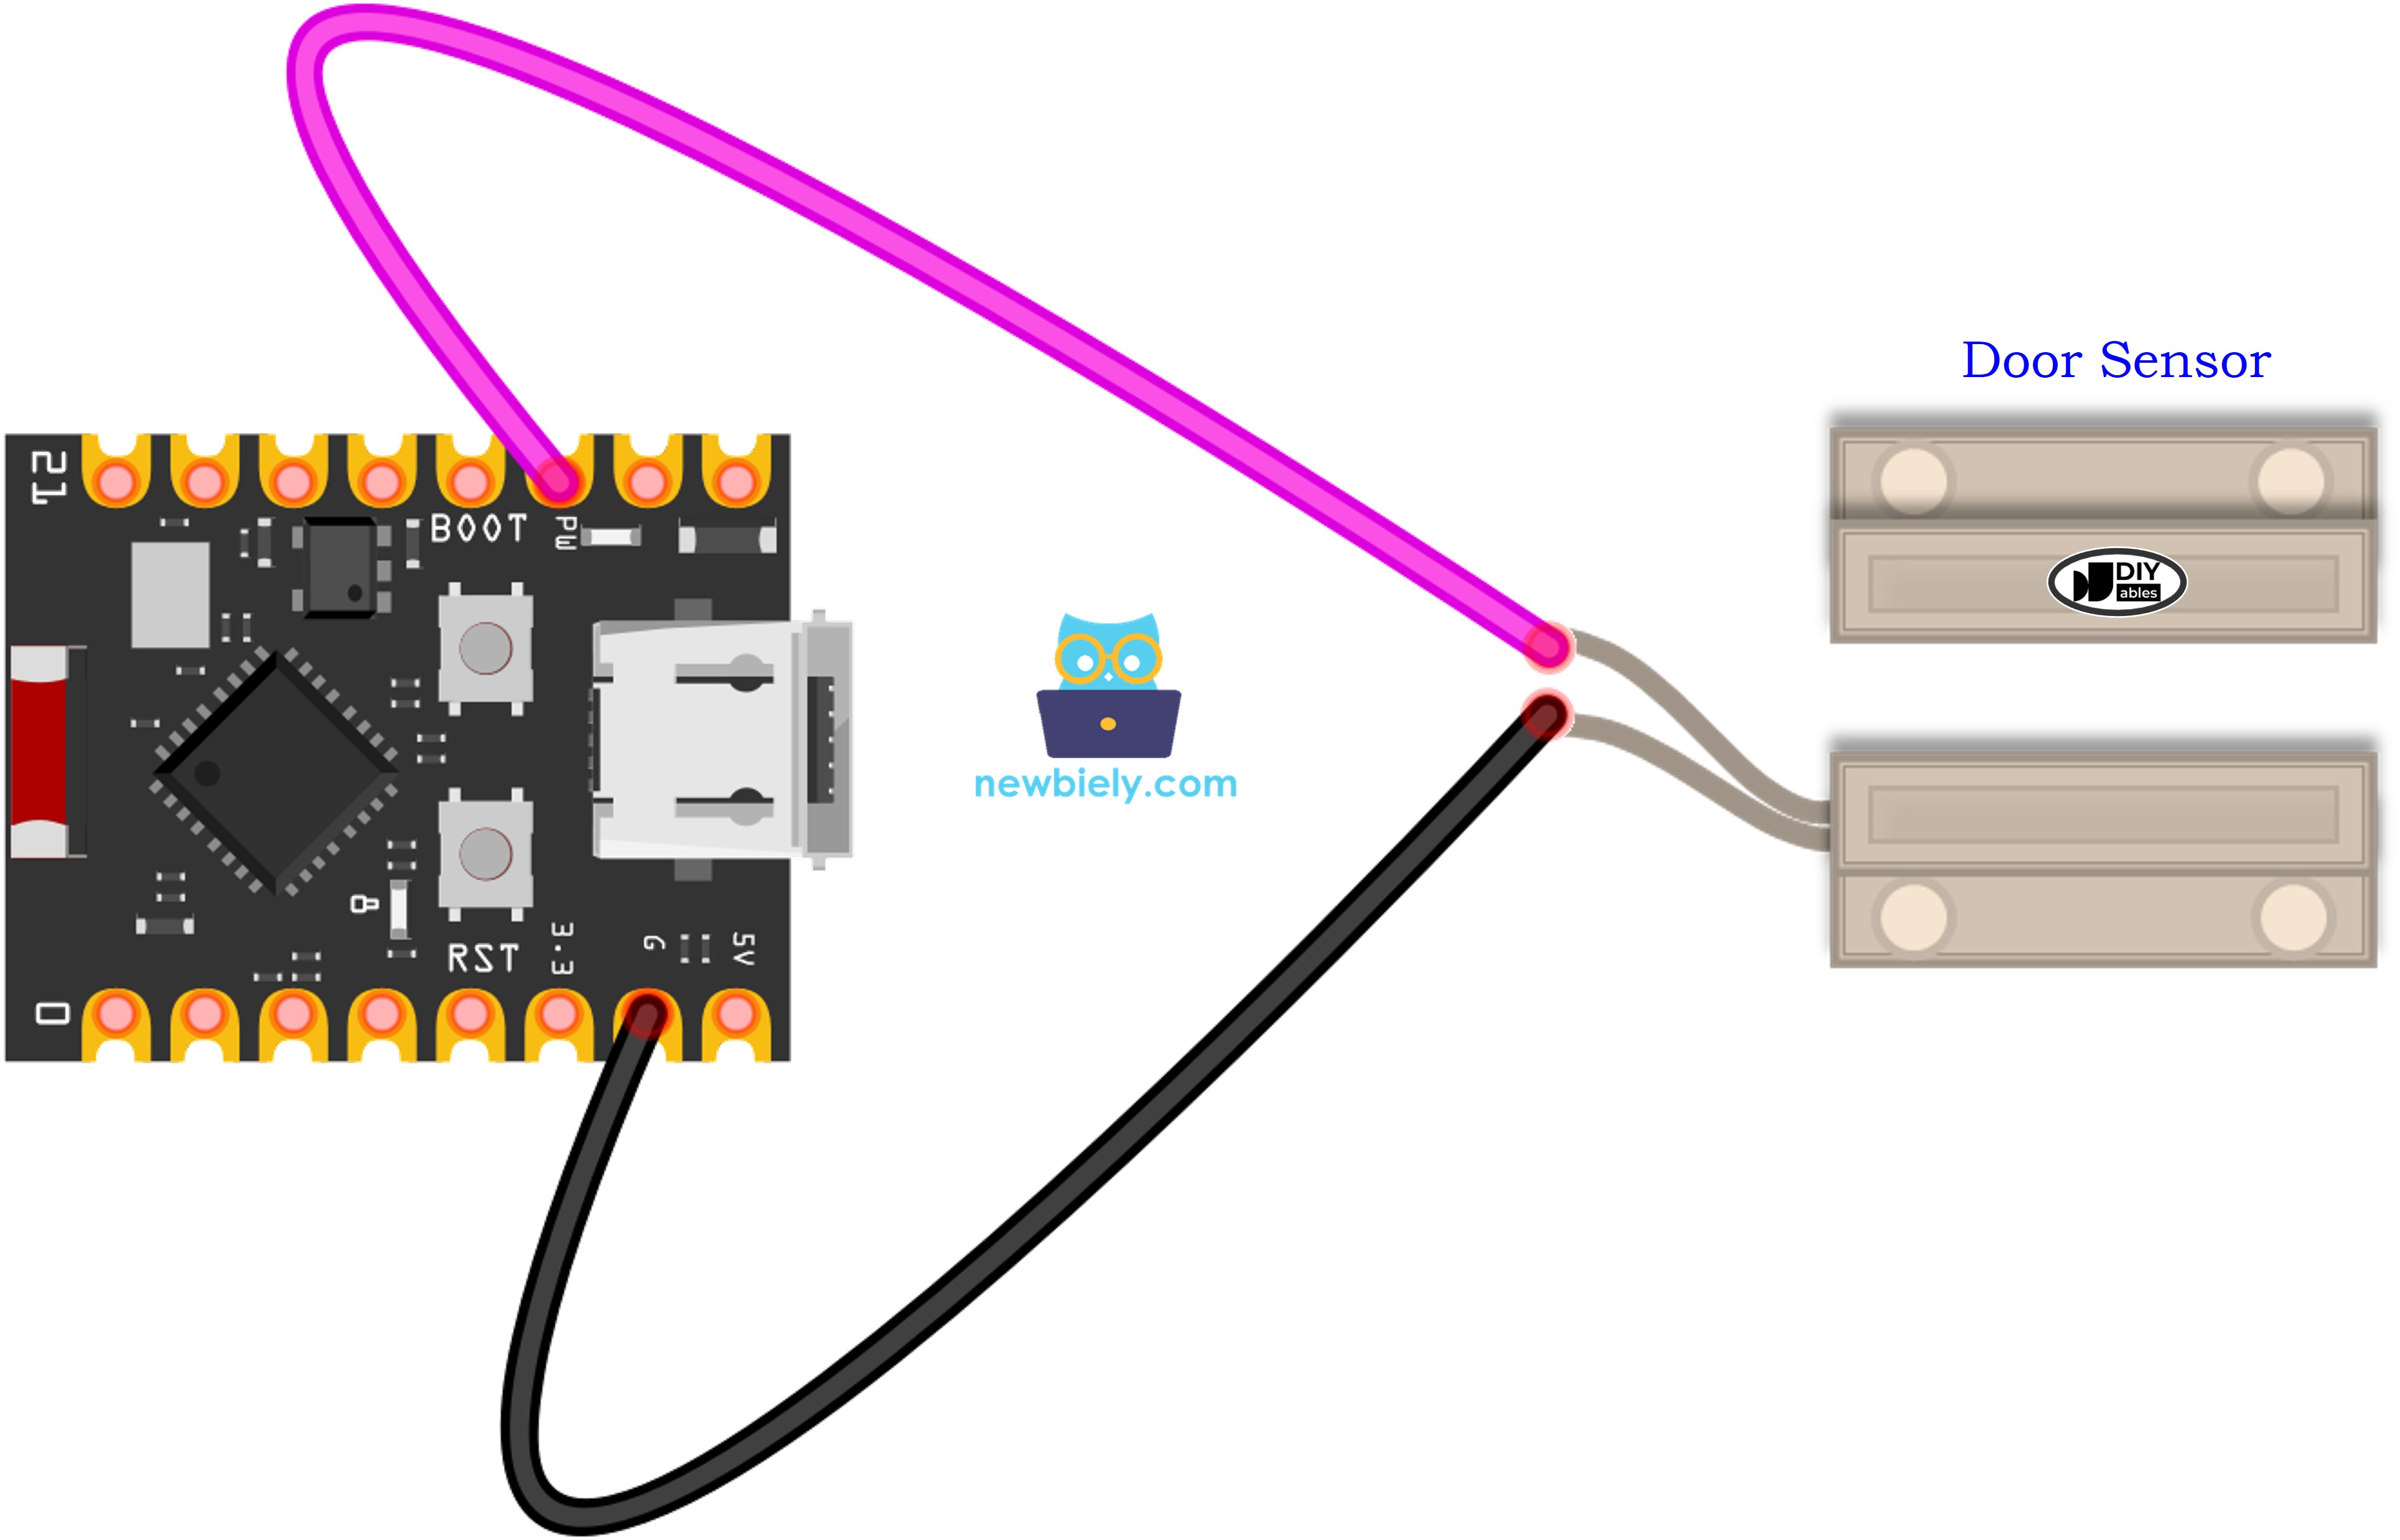
This image is created using Fritzing. Click to enlarge image
| Door Sensor Pin | ESP32 C3 Super Mini Pin |
|---|---|
| Reed Switch Wire 1 | GPIO7 |
| Reed Switch Wire 2 | GND |
How To Program Door Sensor
Programming a door sensor on the ESP32 C3 Super Mini needs only two functions.
- Set the pin as an input with the built-in pull-up by using the pinMode() function. For example, GPIO7:
- Read the state of the pin by using the digitalRead() function:
- Tip: INPUT_PULLUP turns on the resistor inside the ESP32 C3 Super Mini, so no extra resistor is needed.
ESP32 C3 Super Mini Code - Check Door Open and Close State
This first example prints the door state again and again on the Serial Monitor.
What This Code Does:
- Sets GPIO7 as an input with the internal pull-up resistor
- Reads the door sensor state in every loop
- Prints "The door is open" when the pin is HIGH
- Prints "The door is closed" when the pin is LOW
Detailed Instructions
- New to ESP32 C3 Super Mini? Complete our Getting Started with ESP32 C3 Super Mini tutorial first to set up your development environment.
- Wire the parts: Follow the wiring diagram above. Reed switch to GPIO7 and GND.
- Connect the board: Plug the ESP32 C3 Super Mini into your computer with a USB Type-C cable.
- Open Arduino IDE: Start the software on your computer.
- Select the board: Make sure ESP32 C3 Super Mini is selected in Tools > Board.
- Select the port: Pick the COM port of your board in Tools > Port.
- Copy the code: Paste the code above into Arduino IDE.
- Upload the code: Click the Upload button in Arduino IDE.
- Open Serial Monitor: Set the baud rate to 115200.
- Test it: Move the magnet close to the reed switch, then move it far away.
- Check the result: Watch the Serial Monitor. It looks like the output below.
- Pro Tip: If the state never changes, move the magnet closer. Most reed switches need it within about 15 mm.
ESP32 C3 Super Mini Code - Detect Door-opening and Door-closing Events
The first code tells you the state. This second code tells you the moment the state changes.
What This Code Does:
- Saves the door state from the previous loop
- Reads the new door state from GPIO7
- Prints a message once when the door starts to open (LOW to HIGH)
- Prints a message once when the door starts to close (HIGH to LOW)
- Gives you a clean place to add an alarm, a light or a notification
Detailed Instructions
- New to ESP32 C3 Super Mini? Complete our Getting Started with ESP32 C3 Super Mini tutorial first to set up your development environment.
- Keep the same wiring: The reed switch stays on GPIO7 and GND.
- Copy the code: Paste the code above into Arduino IDE.
- Select the board: Make sure ESP32 C3 Super Mini is selected in Tools > Board.
- Upload the code: Click the Upload button in Arduino IDE.
- Open Serial Monitor: Set the baud rate to 115200.
- Test it: Move the magnet close to the reed switch, then move it far away.
- Check the result: Only one line is printed for each change.
- Pro Tip: Look for the // TODO comments in the code. That is where you add your buzzer or your LED.
Line-by-line Code Explanation
The ESP32 C3 Super Mini code above contains line-by-line explanation. Please read the comments in the code!
Application/Project Ideas
Here are some fun ways to use a door sensor with your ESP32 C3 Super Mini.
- Door Alarm: Sound a buzzer when the door opens while you are away.
- Entry Counter: Count how many times the door was opened today.
- Auto Light: Turn on an LED strip the moment a cupboard door opens.
- Fridge Watcher: Warn you if the fridge door stays open too long.
- Mailbox Alert: Send a message when the mailbox lid is opened.
- Window Monitor: Check every window before you go to bed.
Challenge Yourself
Try these small projects to practice with the door sensor and the ESP32 C3 Super Mini.
- Easy: Turn on an LED on GPIO3 while the door is open.
- Easy: Print the door state only when it changes, not in every loop.
- Medium: Add a buzzer that beeps three times on each door-opening event.
- Medium: Count the door openings and print the total on the Serial Monitor.
- Advanced: Start a timer when the door opens, and sound an alarm if it is still open after 30 seconds.
- Advanced: Use the ESP32 C3 Super Mini WiFi to send a phone notification on each door-opening event.