
ESP32 C3 Super Mini - RS485
RS485 is a serial standard that sends data over long wires with strong noise protection. With a cheap TTL to RS485 module, the ESP32 C3 Super Mini can talk to devices hundreds of meters away. This tutorial shows you how to wire and program RS485 communication on the ESP32 C3 Super Mini.
In this tutorial, you will learn:
- What RS485 is and why it beats plain TTL serial
- How to connect a TTL to RS485 module to the ESP32 C3 Super Mini
- How to program the ESP32 C3 Super Mini to read data from RS485
- How to program the ESP32 C3 Super Mini to send data to RS485
- How to send data from your PC to the ESP32 C3 Super Mini over RS485, and back
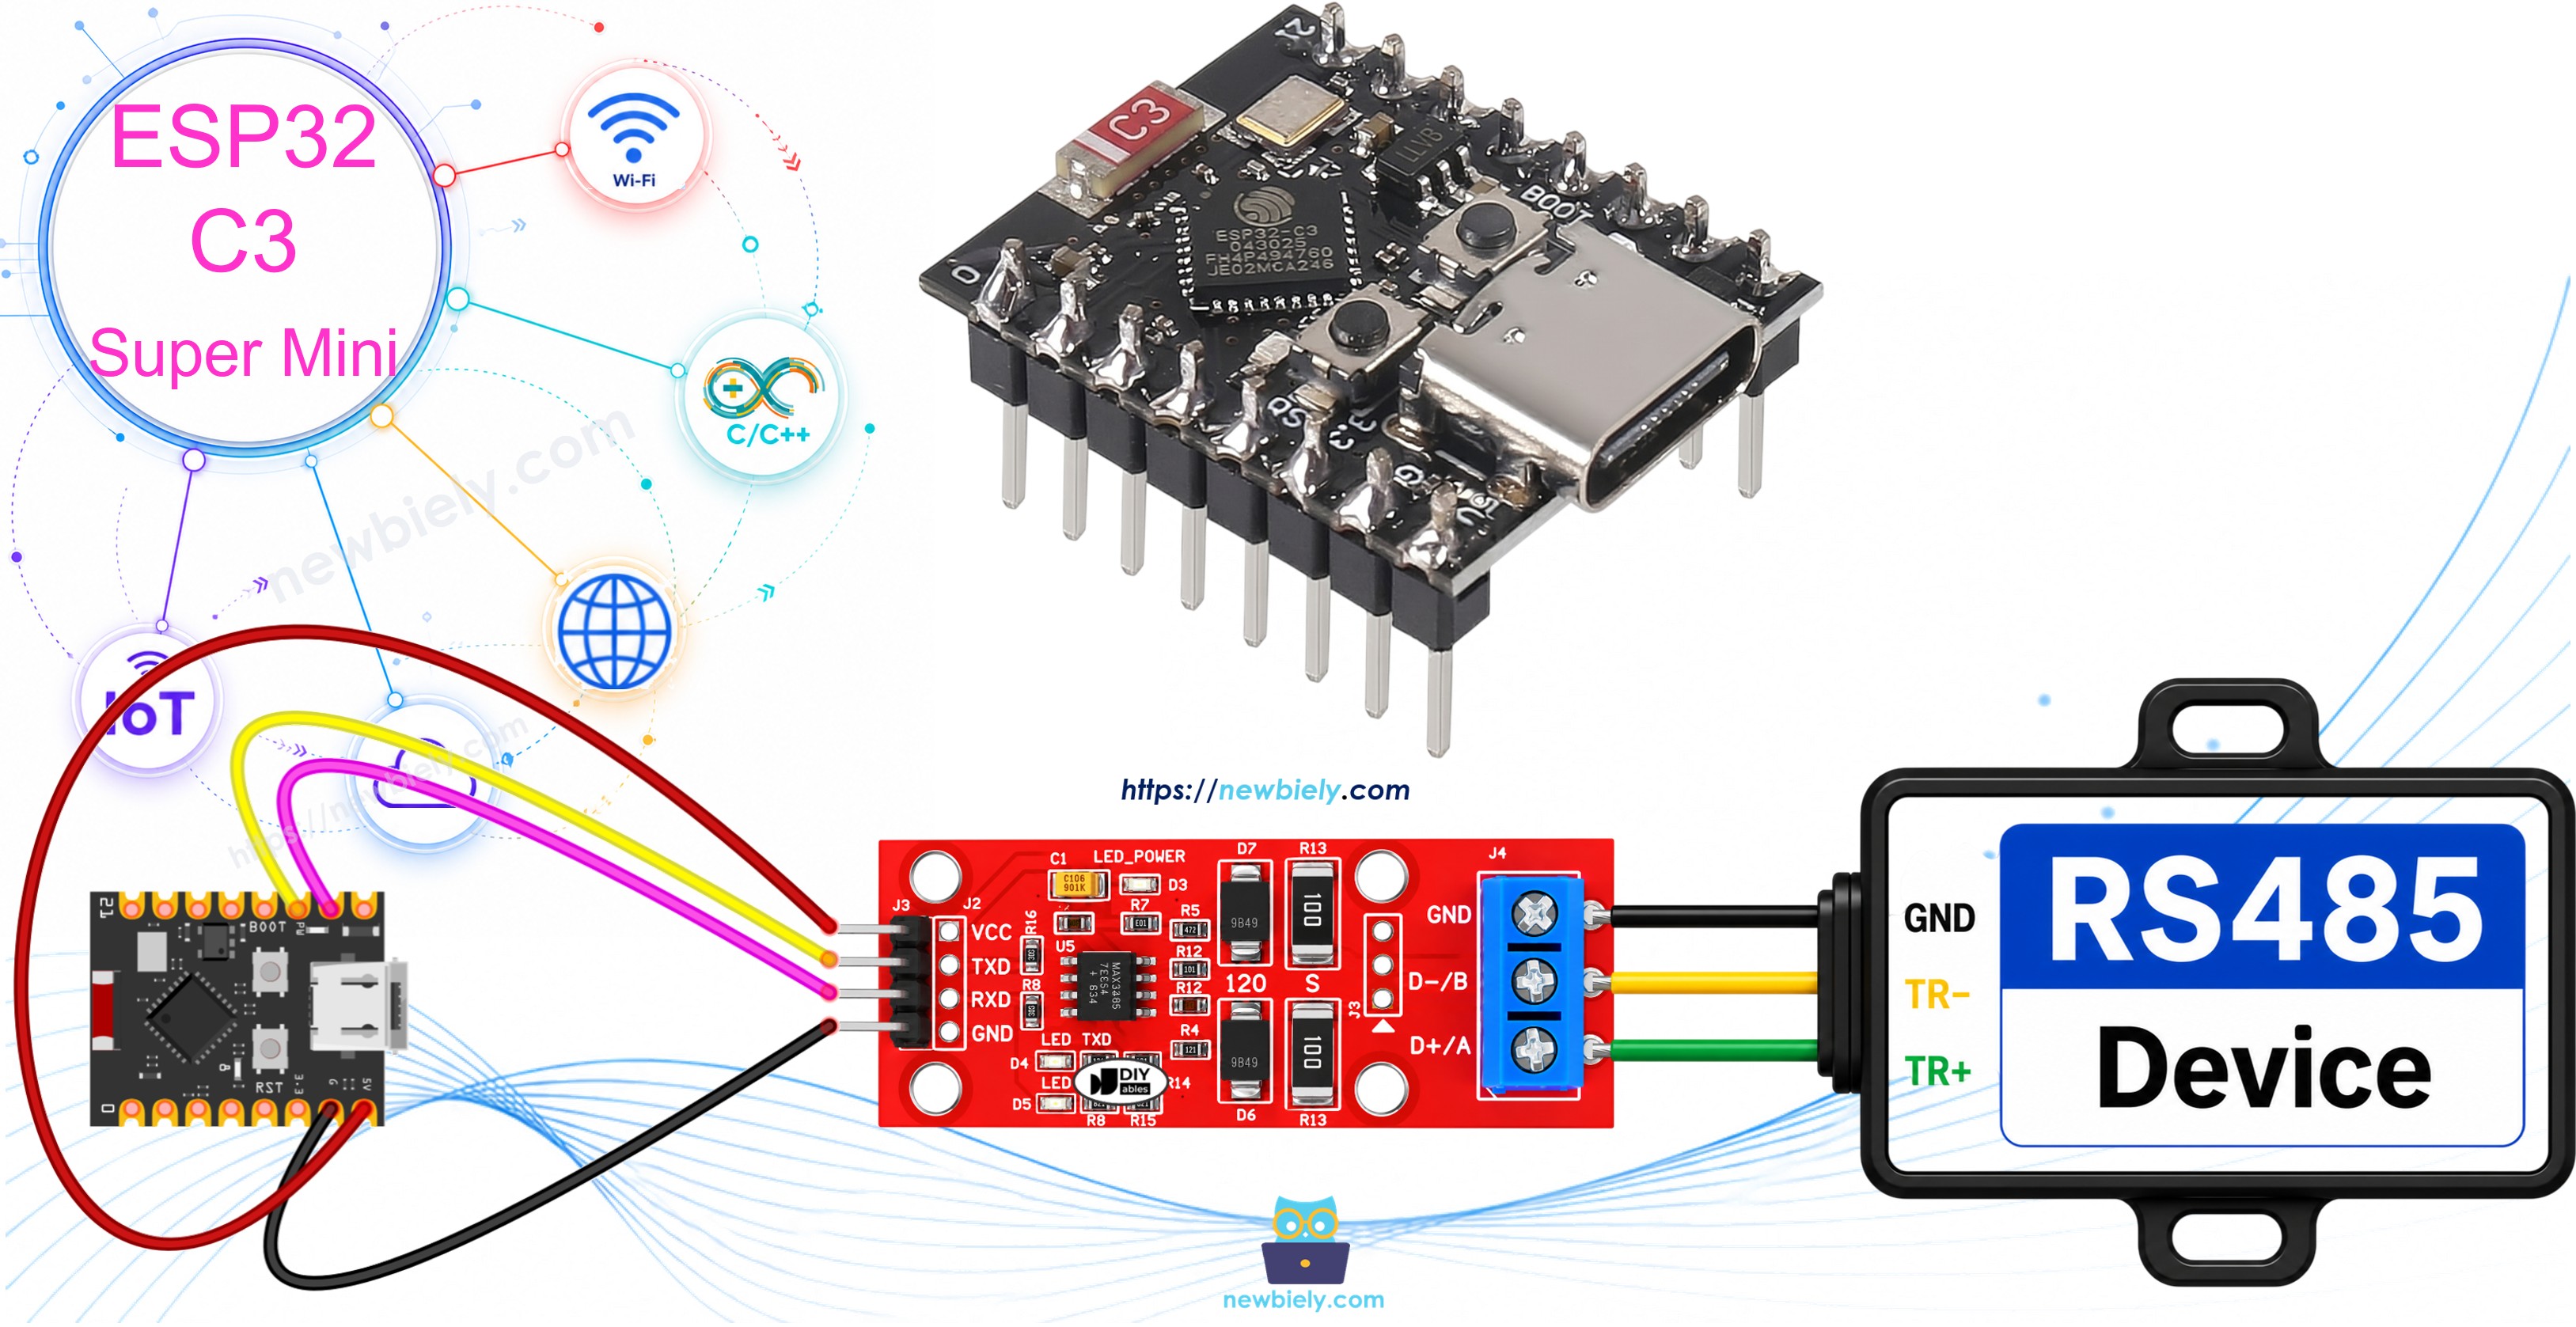
Hardware Preparation
Or you can buy the following kits:
| 1 | × | DIYables Sensor Kit (18 sensors/displays) |
Additionally, some of these links are for products from our own brand, DIYables .
Overview of TTL to RS485 Module
A TTL to RS485 module is a small board that changes the TTL serial signal of the ESP32 C3 Super Mini into an RS485 signal, and back again.
The ESP32 C3 Super Mini sends serial data on a TX pin and receives it on an RX pin. These pins use TTL level, which only works over a short wire. For a long cable you must convert TTL to a stronger standard like RS232, RS485 or RS422.
Key Features:
- Long distance: Works up to about 1200 meters on a good cable
- Noise proof: Uses two wires with opposite signals, so noise cancels out
- Multi-device: Many devices can share the same pair of wires
- Simple to use: Plain serial code, no special library needed
- 3.3V friendly: Most modules run fine from the 3.3V pin of the ESP32 C3 Super Mini
Technical Specifications:
- Common chips: MAX13487, MAX3485, SP3485, MAX485
- Supply voltage: 3.3V or 5V, depending on the module
- Logic level: Must be 3.3V for the ESP32 C3 Super Mini
- Cable type: One twisted pair, plus a GND wire
- Termination: 120 ohm resistor at each end of a long cable
- Typical speed: 9600 to 115200 baud
WARNING
The ESP32 C3 Super Mini is a 3.3V board. Only use a TTL to RS485 module with 3.3V logic, or add a level shifter. A 5V TXD/RO output sent straight into a GPIO pin can damage the chip. On the RS485 side, always run A and B in the SAME twisted pair of the cable, keep A to A and B to B, and put a 120 ohm resistor at both ends of a long cable.
Pinout
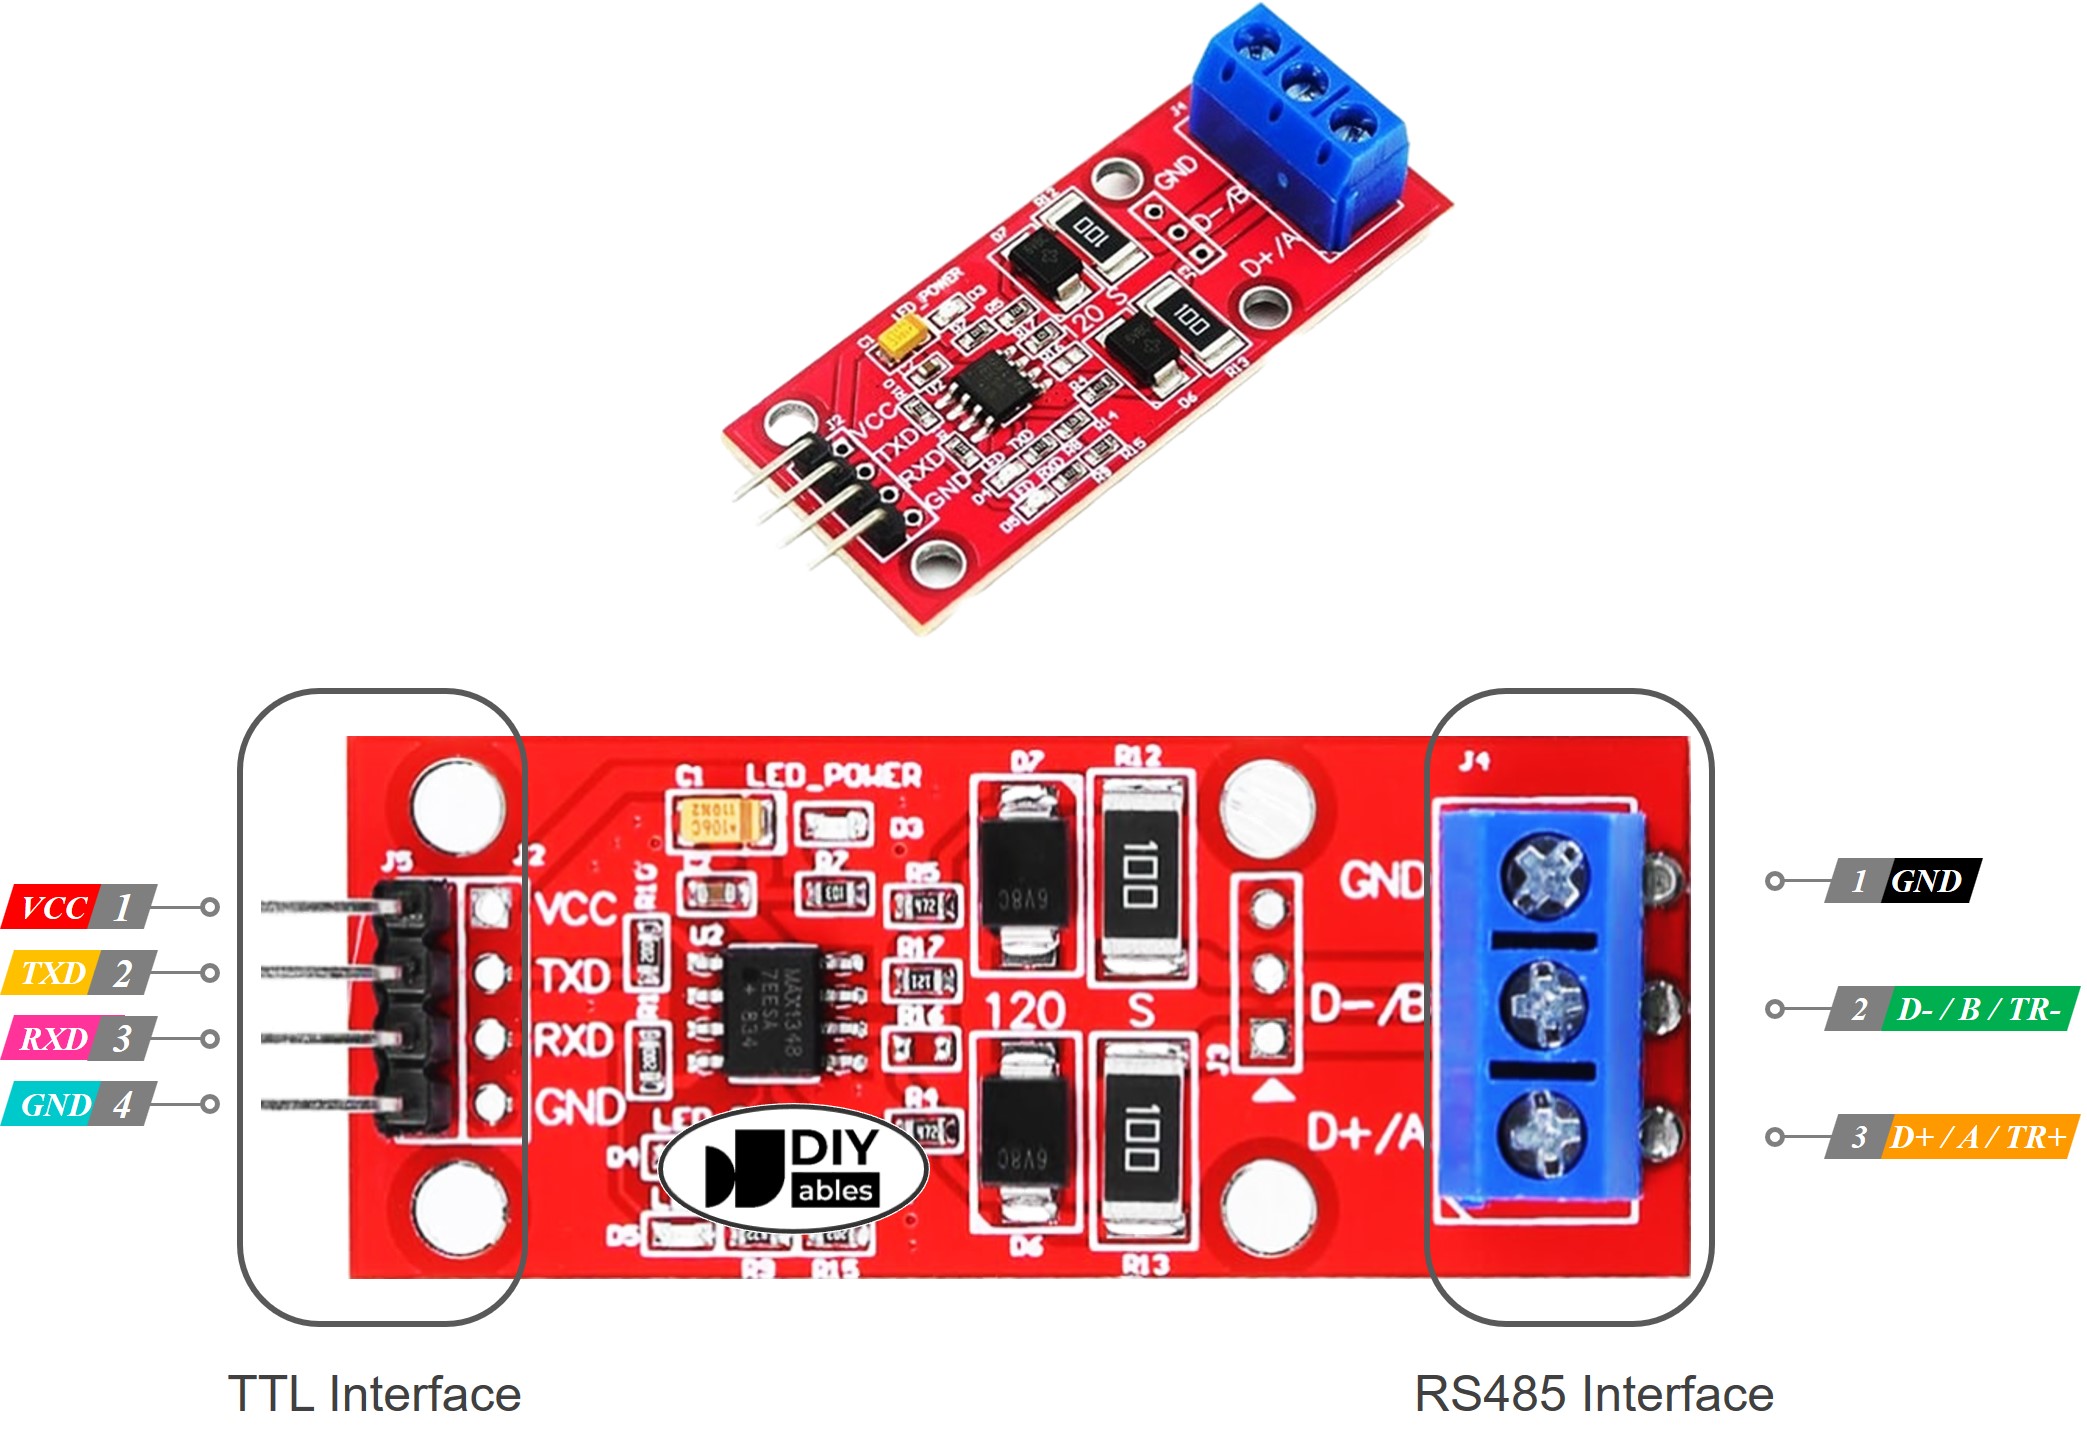
The RS485 to TTL module has two sides: a TTL side for the board and an RS485 side for the long cable.
- VCC Pin: Power input, connect to 3.3V of the ESP32 C3 Super Mini
- GND Pin: Ground (0V), shared with the ESP32 C3 Super Mini
- RXD Pin (DI): Data input of the module, connect to a TX pin of the ESP32 C3 Super Mini
- TXD Pin (RO): Data output of the module, connect to an RX pin of the ESP32 C3 Super Mini
- D+ Pin (A or TR+): One wire of the RS485 pair, used for data communication
- D- Pin (B or TR-): The other wire of the RS485 pair, used for data communication
- GND Pin (RS485 side): Optional but strongly recommended, it lowers noise problems
- DE/RE Pin (some modules only): Direction control, HIGH to send and LOW to receive
※ NOTE THAT:
Many modules, like the MAX13487 type, change direction by themselves and have no DE/RE pin. If your module does have one, connect it to GPIO5 of the ESP32 C3 Super Mini, set it HIGH before sending and LOW to listen.
Wiring Diagram
Connect the TTL side of the module to the ESP32 C3 Super Mini, and the RS485 side to your long cable.
- Note: Use 3.3V logic only. Never feed a 5V signal into a GPIO pin.
- Note: GPIO20 and GPIO21 are the UART used by the Serial Monitor, so keep them free.
- Note: RXD of the module goes to a TX pin of the board, and TXD goes to an RX pin. They cross over.
- Note: Do not use GPIO8 or GPIO9 — they are boot strapping pins.
- Note: Share GND between the module and the ESP32 C3 Super Mini, or nothing will work.
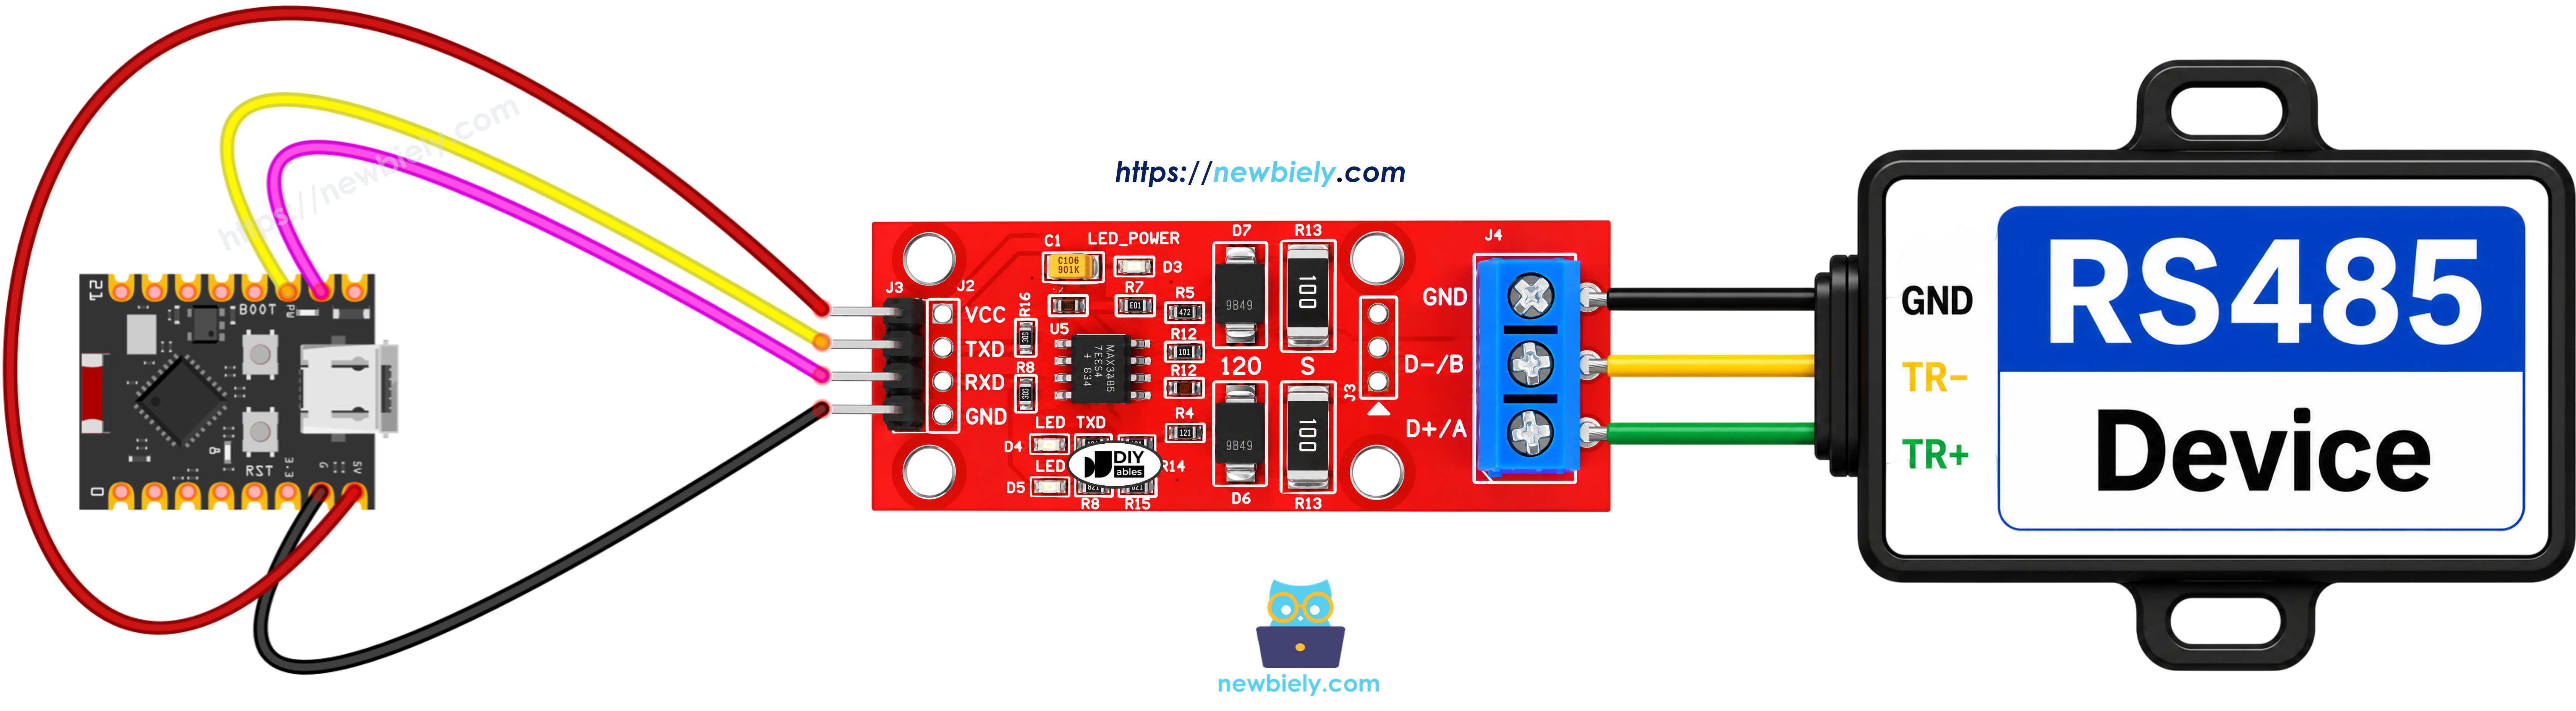
This image is created using Fritzing. Click to enlarge image
| RS485 Module Pin | ESP32 C3 Super Mini Pin |
|---|---|
| VCC | 3.3V |
| GND | GND |
| RXD (DI) | GPIO6 |
| TXD (RO) | GPIO7 |
| DE/RE (only if your module has it) | GPIO5 |
How To Program ESP32 C3 Super Mini to use the RS485 module
The ESP32 C3 Super Mini has more than one hardware UART, so we use a second one for RS485.
※ NOTE THAT:
The SoftwareSerial library does NOT exist on the ESP32 C3 Super Mini. Use the built-in HardwareSerial class instead. It is faster, more reliable, and it uses no extra CPU time. GPIO20 and GPIO21 belong to the first UART, which the Serial Monitor needs, so the RS485 module gets its own pins.
- Define the RS485 serial pins:
- Create a second hardware serial port:
- Start the Serial Monitor and the RS485 port:
- To read data that comes from RS485, you can use the following functions:
- To write data to RS485, you can use the following functions:
- Call them on your own port name, for example rs485Serial.read() and rs485Serial.print().
- And more functions to use with RS485 in the Serial reference
ESP32 C3 Super Mini Code - RS485
This sketch echoes every character it gets from RS485 and also prints it to the Serial Monitor.
What This Code Does:
- Starts the Serial Monitor at 115200 baud on the board's own UART
- Starts a second hardware UART for RS485 at 9600 baud on GPIO7 (RX) and GPIO6 (TX)
- Checks all the time if a new character arrived from RS485
- Sends the same character back to the RS485 sender, which is a simple echo test
- Prints the character on the Serial Monitor so you can see it on your PC
Detailed Instructions
- New to ESP32 C3 Super Mini? Complete our Getting Started with ESP32 C3 Super Mini tutorial first to set up your development environment.
- Wire the parts: Follow the wiring diagram above to connect the RS485 module to the ESP32 C3 Super Mini.
- Connect the board: Plug the ESP32 C3 Super Mini into your PC with a USB Type-C cable.
- Open Arduino IDE: Launch the Arduino IDE software.
- Select the board: Make sure ESP32 C3 Super Mini is selected in Tools > Board.
- Select the port: Pick the COM port of your ESP32 C3 Super Mini in Tools > Port.
- Upload the code: Copy the code above, paste it into the Arduino IDE, then click the Upload button.
- Open Serial Monitor: Set the baud rate to 115200.
- Send some data: Send a few characters from the other RS485 device.
- See the result: Watch the characters show up in the Serial Monitor.
- Pro Tip: If you see nothing, swap the A and B wires. A crossed pair is the most common RS485 mistake.
Line-by-line Code Explanation
The ESP32 C3 Super Mini code above contains line-by-line explanation. Please read the comments in the code!
Testing
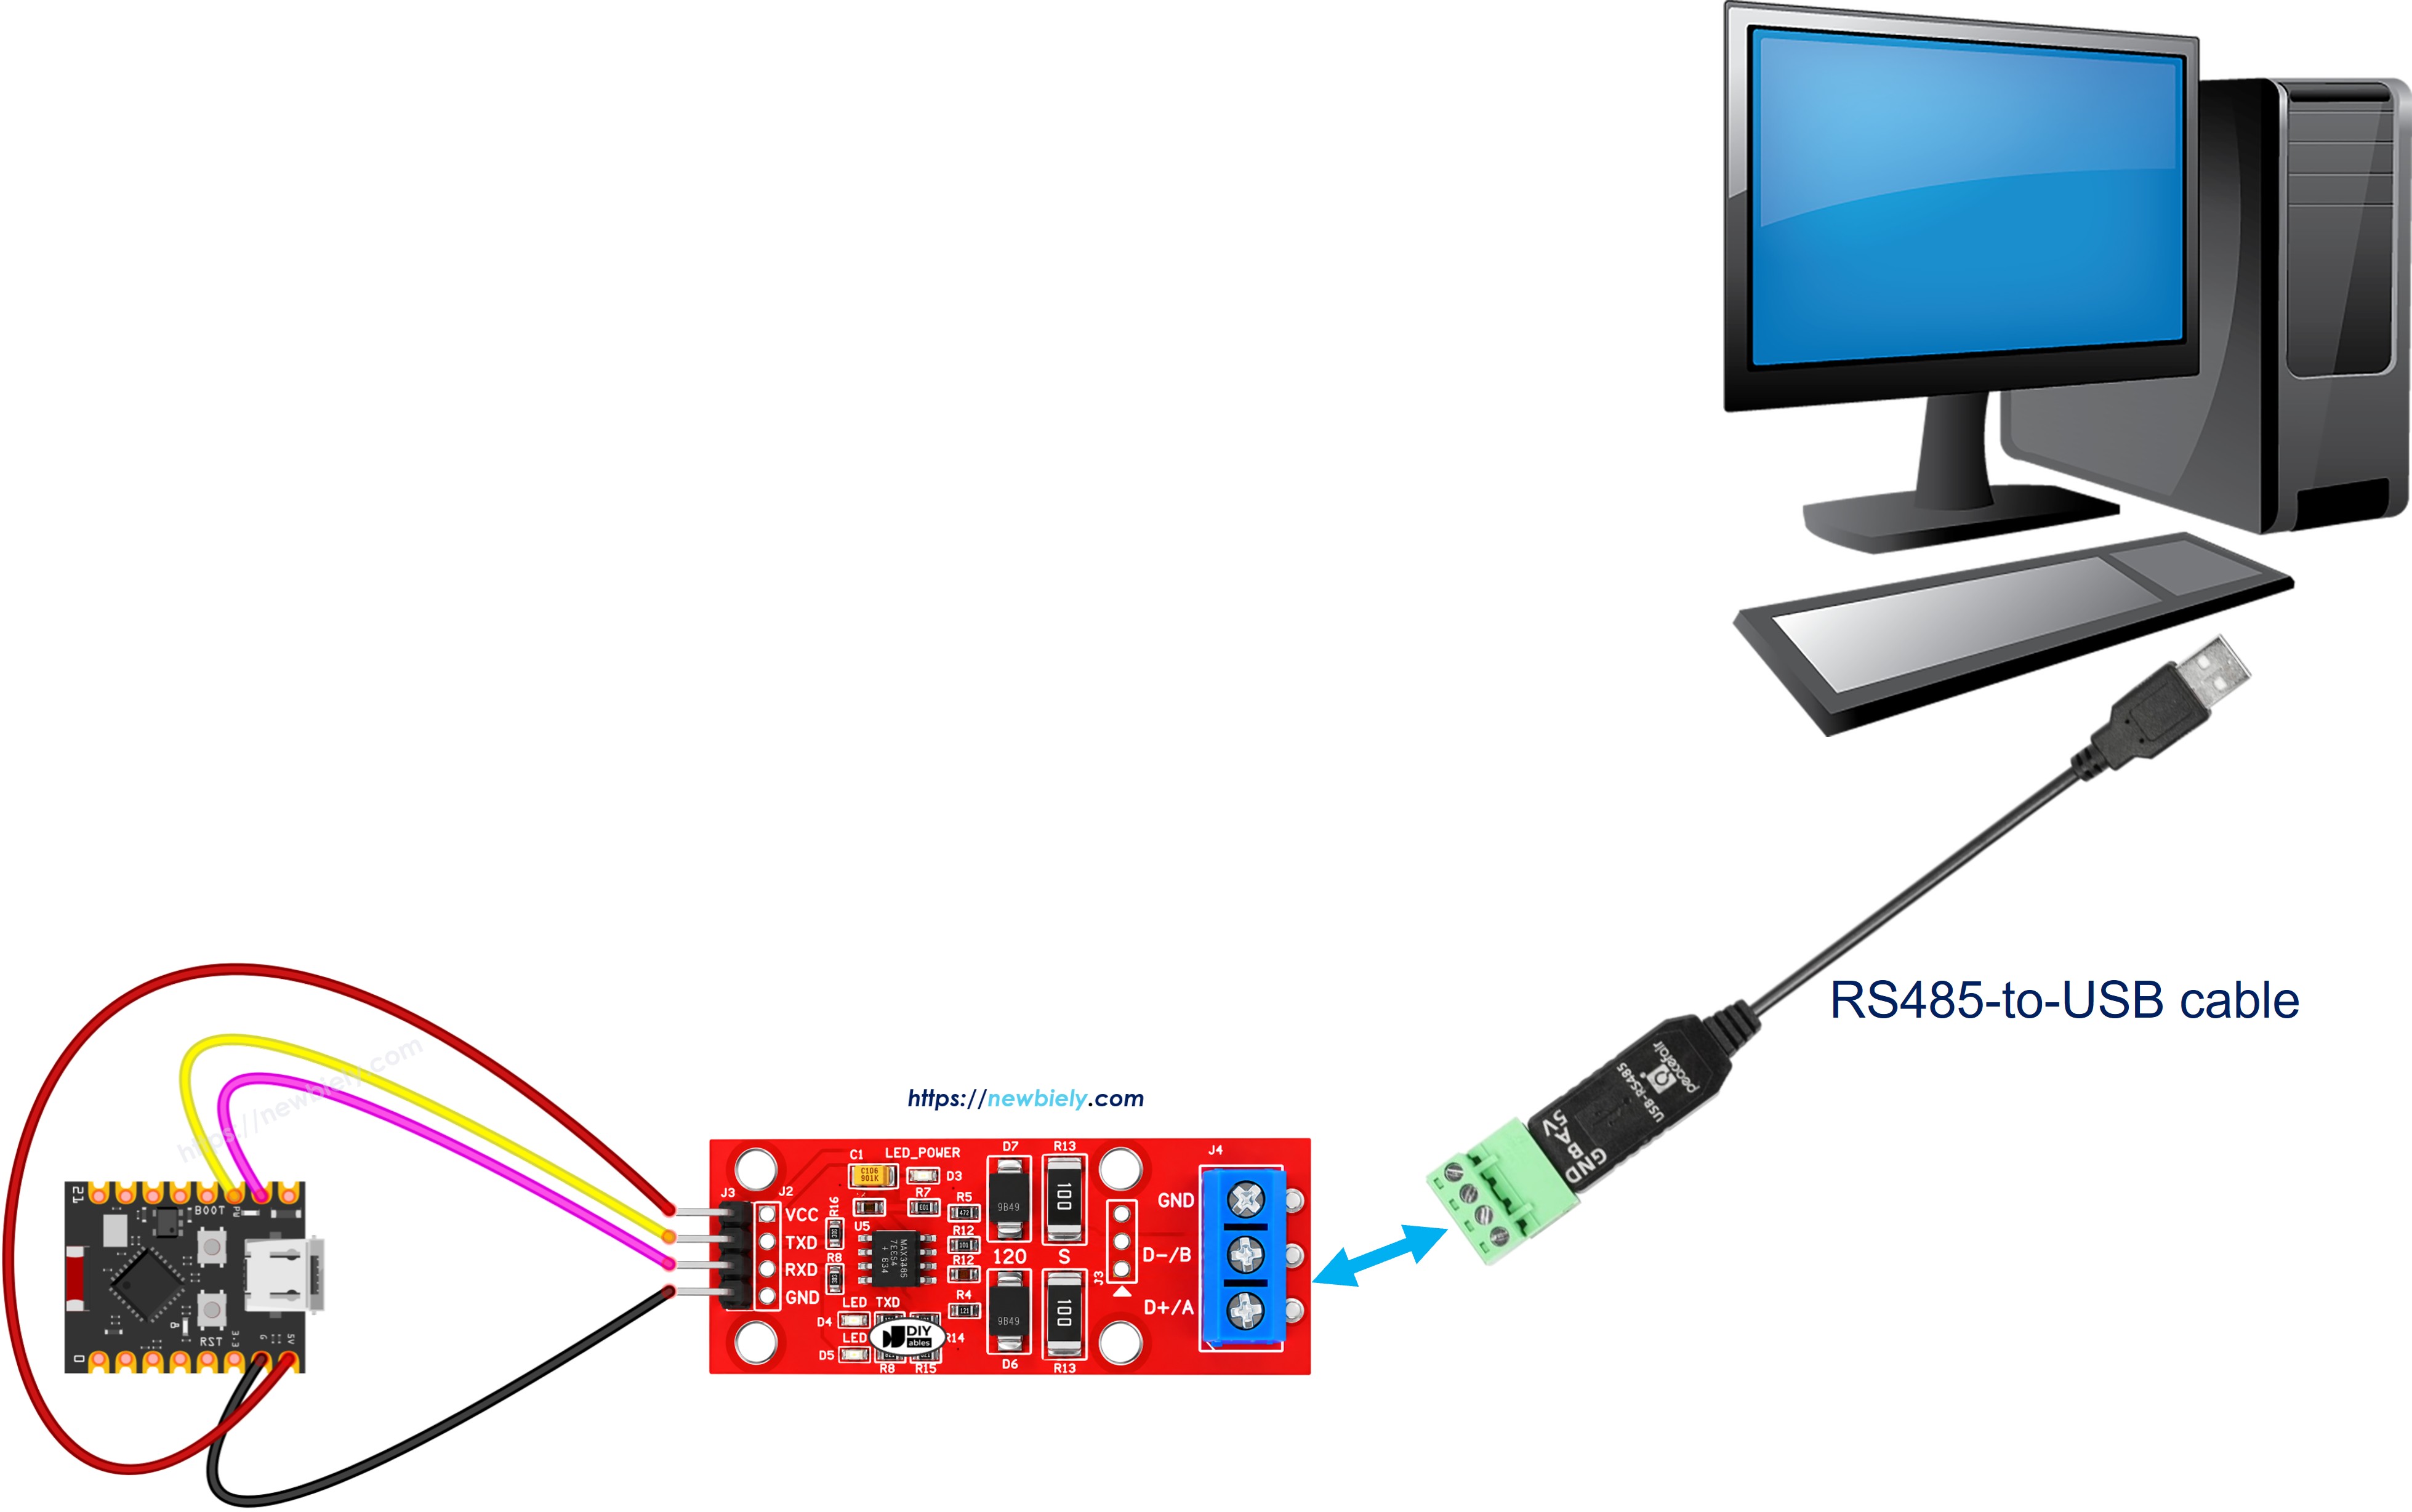
You can test the setup by sending data from your PC to the ESP32 C3 Super Mini over RS-485, and back. Follow these steps:
- Connect the hardware: Link the ESP32 C3 Super Mini to your PC with an RS485-to-USB cable, as shown below.
- Set the parameters: Open the terminal and choose the COM port and the baud rate 9600.
- Type some data: Send a few characters from the terminal to the ESP32 C3 Super Mini.
- Check the echo: If it works, the same characters come back in the terminal.
- Check the board side: The same characters also show up in the Arduino IDE Serial Monitor at 115200.
※ NOTE THAT:
The RS485 link runs at 9600 baud and the Serial Monitor runs at 115200 baud. The two numbers are different on purpose, and that is fine. Just make sure both ends of the RS485 cable use the same speed.
Application/Project Ideas
Here are simple ways to use RS485 with the ESP32 C3 Super Mini.
- Long-Distance Sensor: Read a temperature sensor placed 500 meters away.
- Modbus RTU Master: Talk to industrial meters and motor drives that speak Modbus.
- Multi-Board Network: Connect many ESP32 C3 Super Mini boards on one pair of wires.
- Farm Monitoring: Send soil and weather data from a field back to the house.
- Access Control: Read RFID readers spread around a big building.
- Solar Inverter Logger: Pull energy data from an inverter and post it online.
Challenge Yourself
Try these ideas to go further with RS485 on the ESP32 C3 Super Mini.
- Easy: Blink the built-in LED on GPIO8 every time a character arrives.
- Easy: Change the RS485 speed from 9600 to 19200 on both ends.
- Medium: Read a whole line with rs485Serial.readStringUntil() instead of one character.
- Medium: Add a DE/RE pin on GPIO5 and switch the direction in your own code.
- Advanced: Give each board an address, so only the right board answers.
- Advanced: Send the RS485 data to a web page over Wi-Fi.