
ESP32 C3 Super Mini - RS422
The ESP32 C3 Super Mini is a tiny 3.3V board that can talk over long cables when you add a TTL to RS422 module. RS422 is a rugged serial standard used in factories, boats and building systems. This tutorial shows you how to wire it and how to send and receive data with simple code.
In this tutorial, you'll learn:
- What a TTL to RS422 module is and what each pin does.
- How to connect the ESP32 C3 Super Mini to the TTL to RS422 module.
- How to program the ESP32 C3 Super Mini to receive data from the RS422 bus.
- How to program the ESP32 C3 Super Mini to send data to the RS422 bus.
- How to send data between your PC and the ESP32 C3 Super Mini over RS422 in both directions.
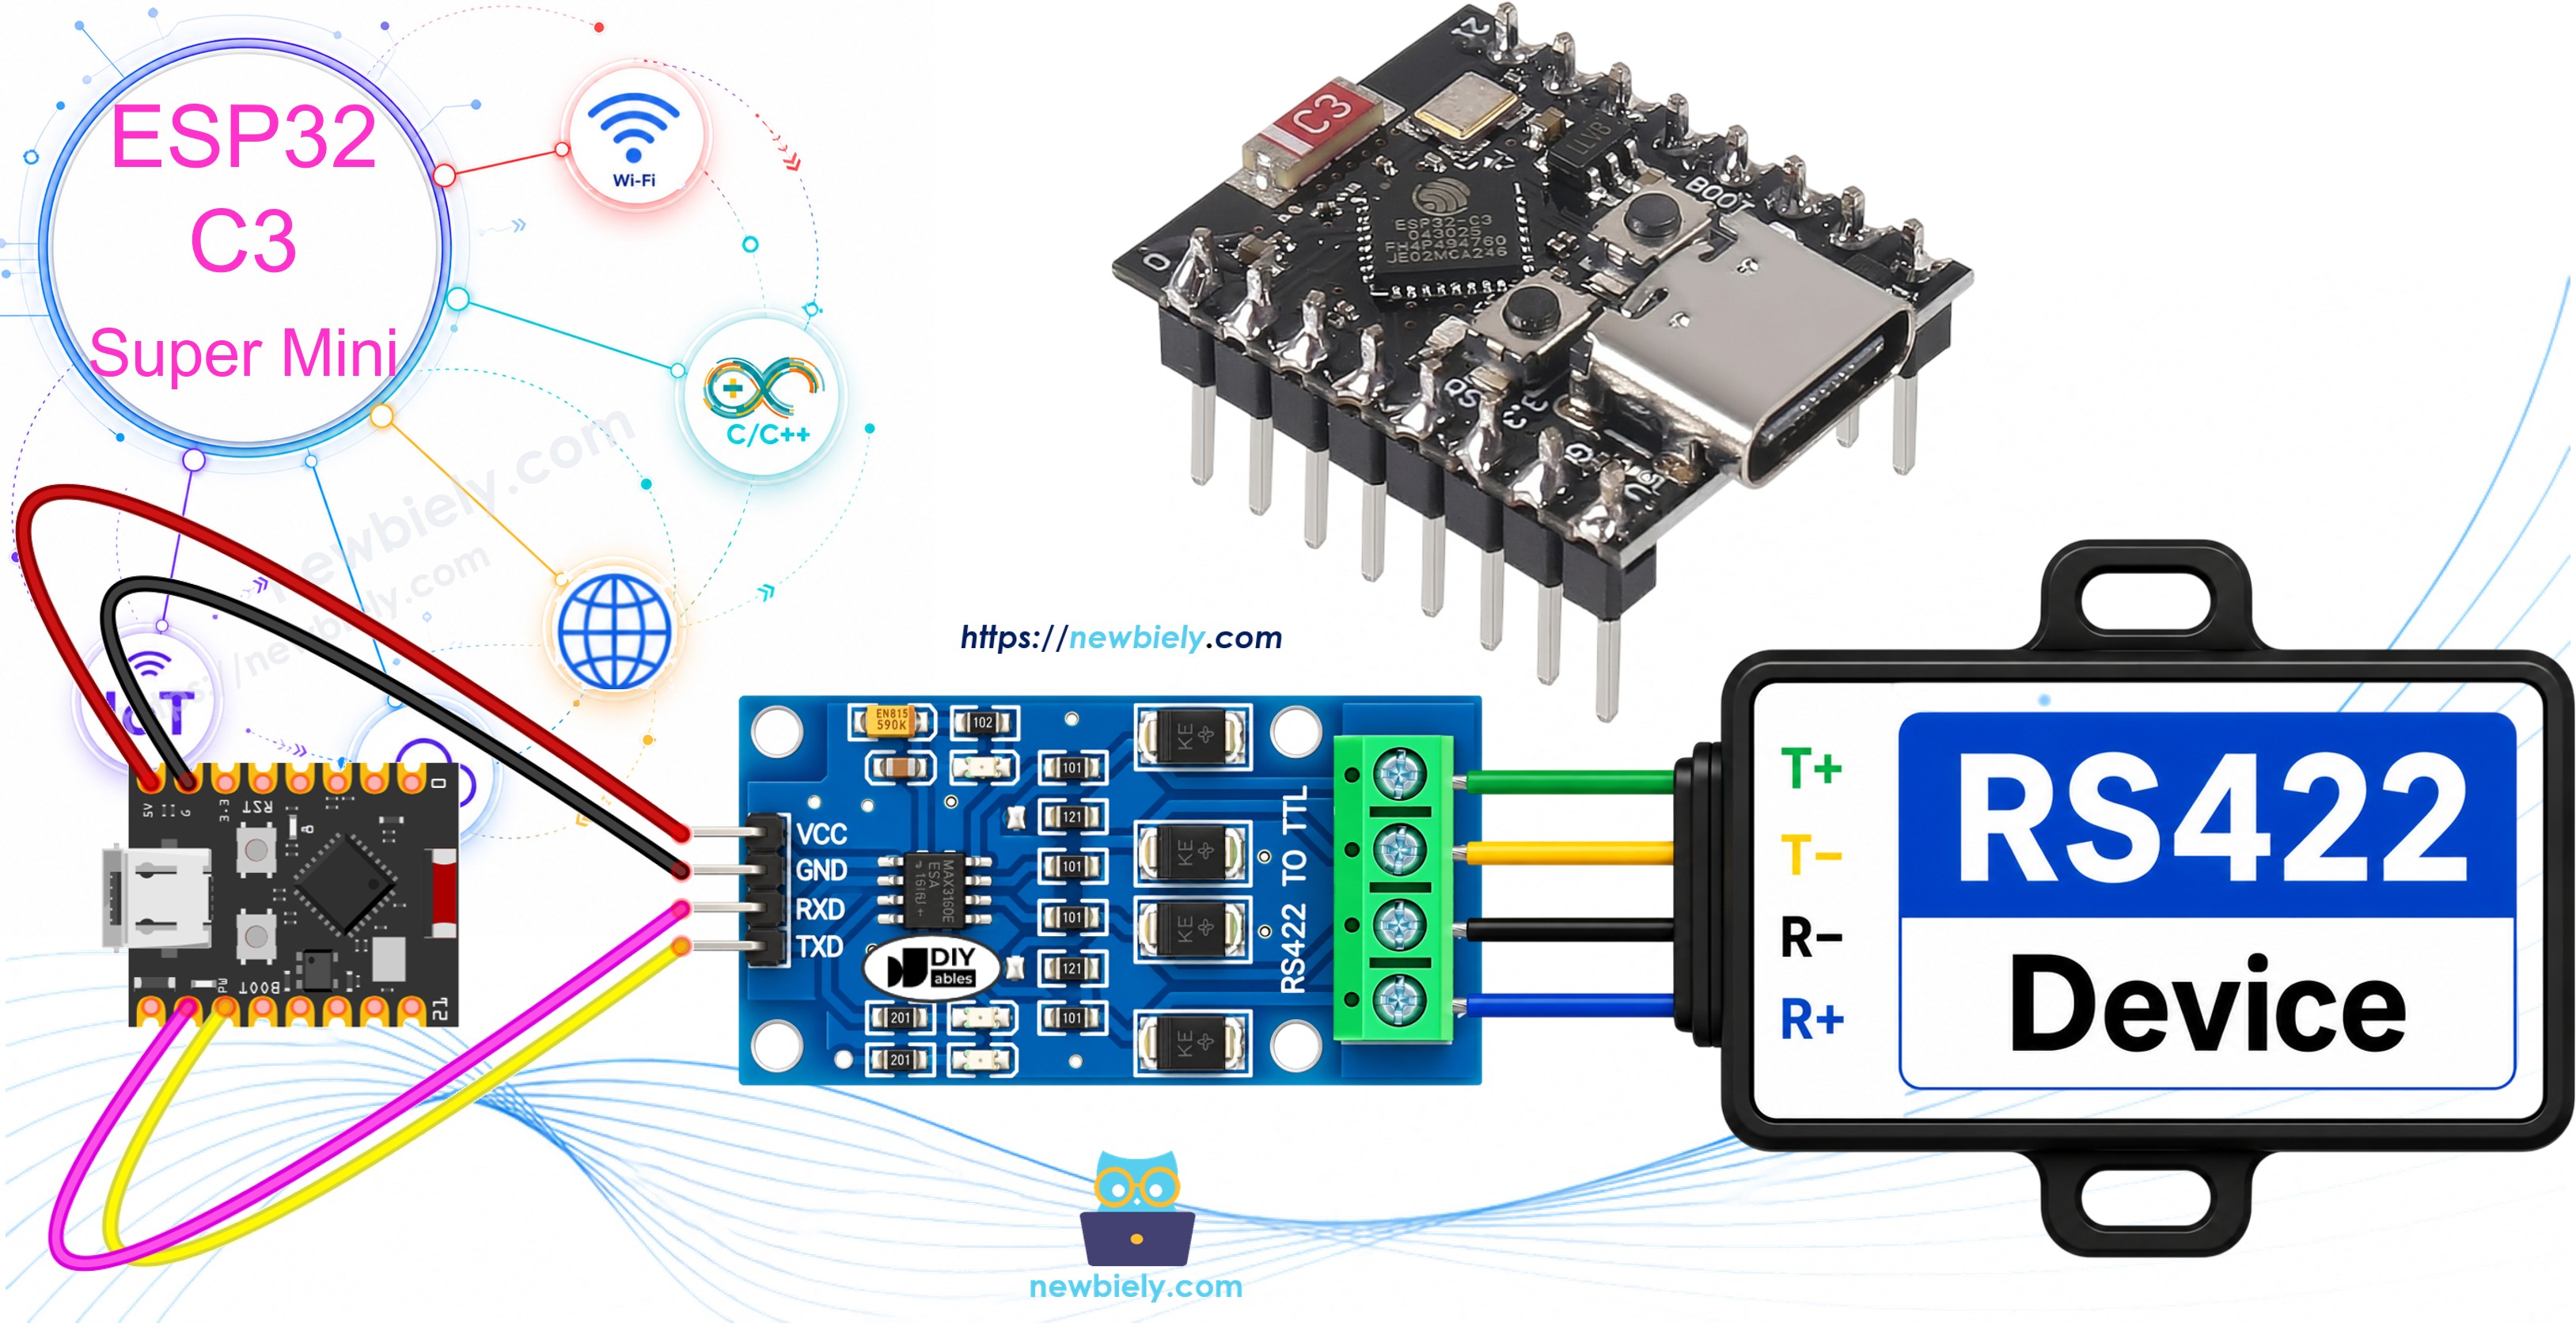
Hardware Preparation
| 1 | × | ESP32 C3 Super Mini | |
| 1 | × | USB Cable Type-A to Type-C (for USB-A PC) | |
| 1 | × | USB Cable Type-C to Type-C (for USB-C PC) | |
| 1 | × | TTL to RS422 Module | |
| 1 | × | Jumper Wires | |
| 1 | × | Optionally, RS422 to USB Cable |
Or you can buy the following kits:
| 1 | × | DIYables Sensor Kit (18 sensors/displays) |
Additionally, some of these links are for products from our own brand, DIYables .
Overview of TTL to RS422 Module
A TTL to RS422 module is a small converter that changes the ESP32 C3 Super Mini's TTL serial signals into RS422 signals, and back again.
Why you need it:
- The ESP32 C3 Super Mini's TX and RX pins use TTL level (3.3V) signals.
- TTL signals only travel a short distance, about 1 meter on a breadboard wire.
- RS422 uses two wire pairs with opposite voltages, so noise cancels out.
- This lets your data travel much further, with far fewer errors.
Key Features:
- Full duplex: RS422 sends and receives at the same time, on two separate pairs.
- Long distance: Up to about 1200 m (4000 ft) at a low baud rate.
- Noise resistant: Differential signalling ignores electrical noise from motors and relays.
- Multi-drop receive: One transmitter can feed up to 10 receivers.
- No driver needed: The module converts the signals in hardware, with no extra software.
Technical Specifications:
- TTL side voltage: 3.3V or 5V. Use 3.3V for the ESP32 C3 Super Mini.
- Signal type: Differential, two pairs. One pair sends, one pair receives.
- Typical chips: MAX13487, MAX3422 and similar RS422 transceivers.
- Max cable length: About 1200 m at a low baud rate, shorter at high speeds.
- Common baud rates: 9600, 19200, 38400, 57600, 115200.
Pinout
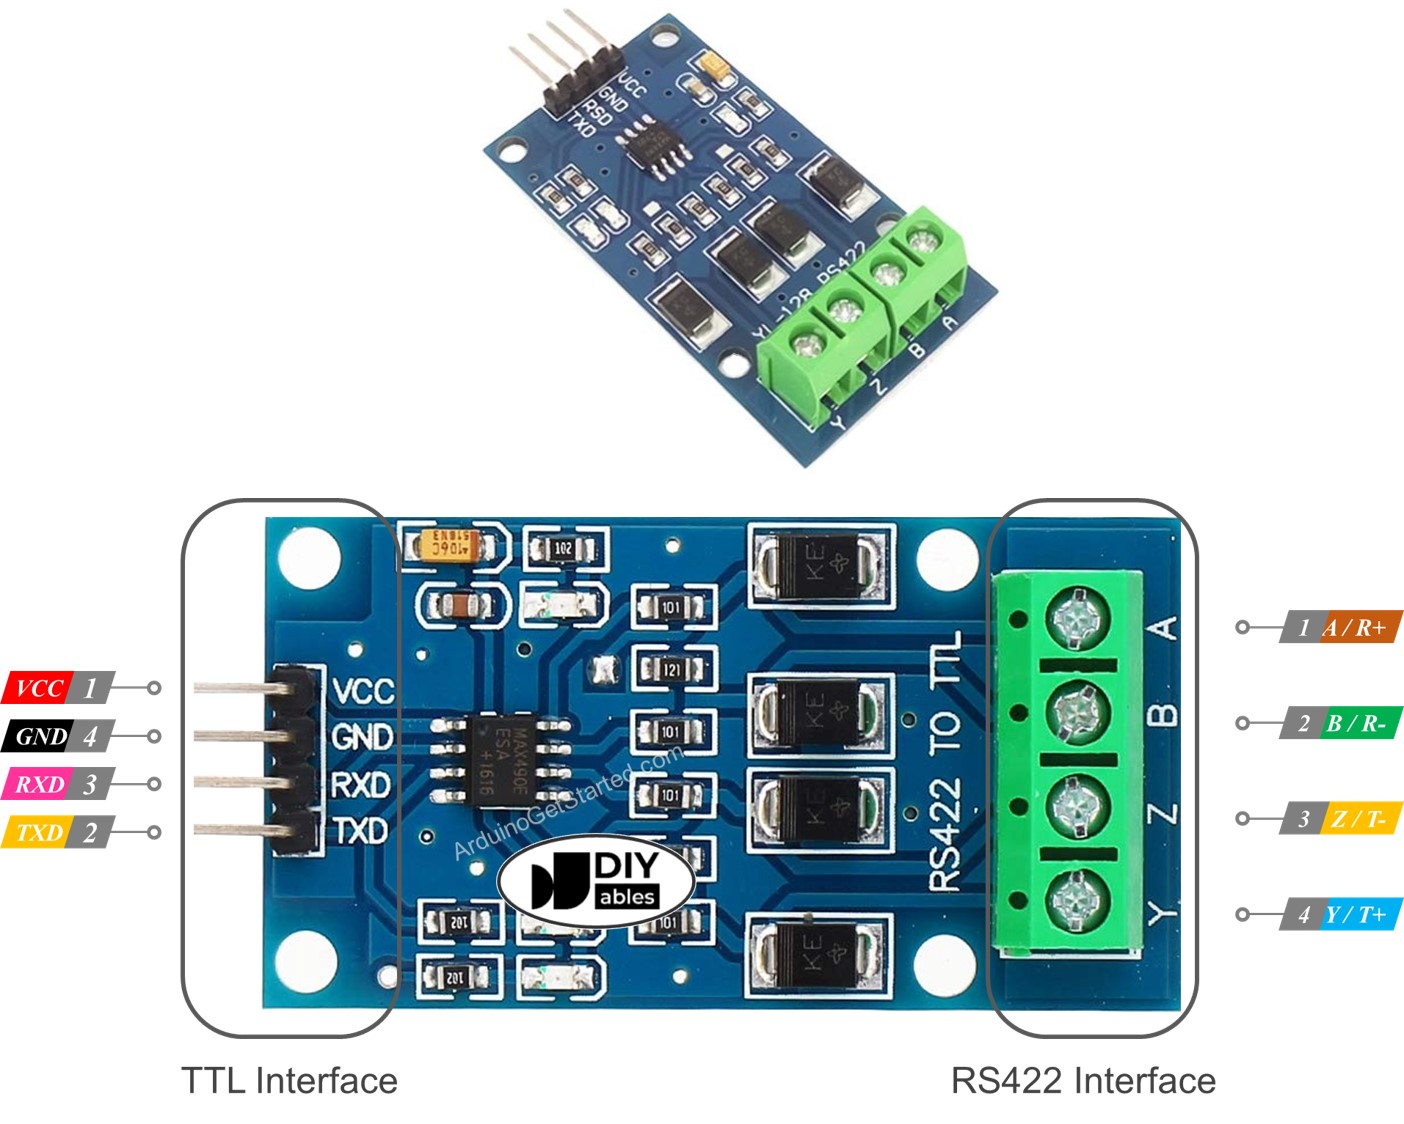
The RS422 to TTL module has two sides: a TTL side that faces your board, and an RS422 side that faces the long cable.
TTL Interface (connected to the ESP32 C3 Super Mini):
- VCC: Power pin. Connect to 3.3V on the ESP32 C3 Super Mini.
- GND: Ground pin (0V). Connect to GND.
- RXD (DI): Data input. Connect to a TX pin of the ESP32 C3 Super Mini.
- TXD (RO): Data output. Connect to an RX pin of the ESP32 C3 Super Mini.
RS422 Interface (the long cable side):
- A (R+): The RX+ pin of the module. Connect to the TX+ pin (T+ or Y pin) of the other RS422 device.
- B (R-): The RX- pin of the module. Connect to the TX- pin (T- or Z pin) of the other RS422 device.
- Y (T+): The TX+ pin of the module. Connect to the RX+ pin (R+ or A pin) of the other RS422 device.
- Z (T-): The TX- pin of the module. Connect to the RX- pin (R- or B pin) of the other RS422 device.
Wiring Diagram
Connect the module's TTL side to the ESP32 C3 Super Mini, then connect the RS422 side to the other device with twisted-pair cable.
- Note: GPIO20 and GPIO21 are the Serial Monitor UART. Leave them free, or you lose your debug messages.
- Note: We use a second hardware serial port on GPIO6 and GPIO7 instead.
- Note: TX always goes to RX, and RX always goes to TX. Swapping them is the most common mistake.
- Note: The ESP32 C3 Super Mini and the module must share a common GND.
| TTL to RS422 Module Pin | ESP32 C3 Super Mini Pin |
|---|---|
| VCC | 3.3V |
| GND | GND |
| RXD (DI) | GPIO6 |
| TXD (RO) | GPIO7 |
WARNING
The ESP32 C3 Super Mini is a 3.3V board. Its GPIO pins are NOT 5V tolerant. Power the module from the 3.3V pin, and never feed a 5V TTL signal into GPIO6 or GPIO7. It can damage the chip. If your module only works at 5V, put a logic level shifter on the TXD line.
On the RS422 side you must follow the pairs. RS422 is full duplex, so it uses TWO twisted pairs: one pair for Y/Z (TX+ and TX-), and one pair for A/B (RX+ and RX-). Y and Z must share one twisted pair. A and B must share the other twisted pair. Mixing wires from different pairs kills the noise rejection. On a long cable, add one 120 ohm termination resistor across each pair, at the RECEIVING end of that pair only. Putting resistors at both ends, or on the wrong pair, makes the signal weak.
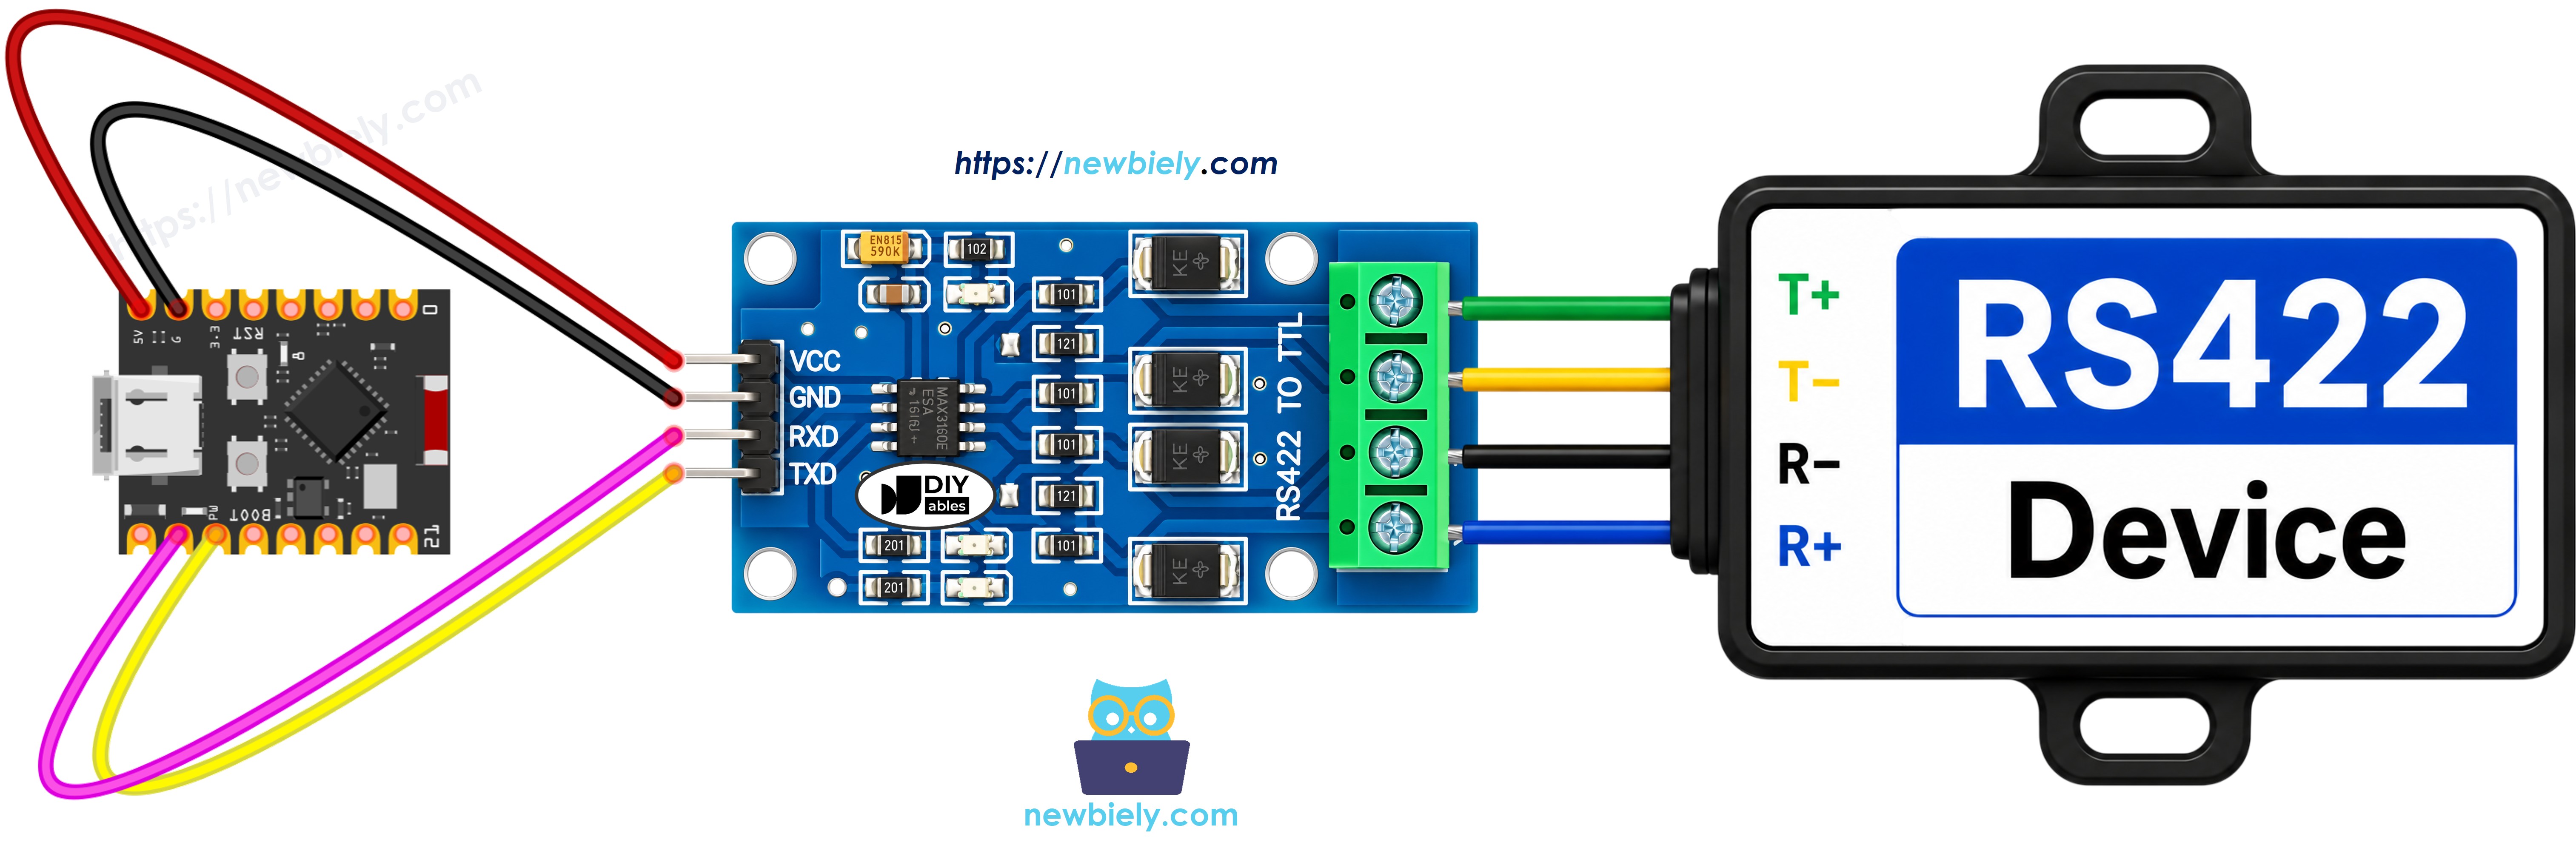
This image is created using Fritzing. Click to enlarge image
How To Program ESP32 C3 Super Mini to use the RS422 module
The ESP32 C3 Super Mini has no SoftwareSerial library, so we use a second hardware UART instead.
- Create a hardware serial port and define the two pins:
- Initialize the RS422 serial port inside setup():
※ NOTE THAT:
Use HardwareSerial, not SoftwareSerial. The SoftwareSerial library does not exist on the ESP32 C3 Super Mini, so a sketch copied from an AVR board will not compile. The good news: the ESP32 C3 can map a real hardware UART to almost any free GPIO, which is faster and more reliable than software serial.
- Keep the Serial Monitor on its own port at 115200 baud:
- The RS422 baud rate (9600 here) must match the other RS422 device exactly.
- To read data coming from RS422, you can use the following functions:
- To write data to RS422, you can use the following functions:
- And more functions to use with RS422 in Serial reference
ESP32 C3 Super Mini Code
This sketch echoes every character that arrives from RS422 back to the sender, and also prints it on the Serial Monitor.
What This Code Does:
- Starts the Serial Monitor at 115200 baud for debugging.
- Starts a second hardware UART at 9600 baud on GPIO7 (RX) and GPIO6 (TX) for RS422.
- Checks whether any RS422 data has arrived.
- Echoes each character back to the RS422 sender.
- Prints the same character on the Serial Monitor so you can see it.
Detailed Instructions
- New to ESP32 C3 Super Mini? Complete our Getting Started with ESP32 C3 Super Mini tutorial first to set up your development environment.
- Wire the module: Follow the wiring table above. Check that RXD goes to GPIO6 and TXD goes to GPIO7.
- Check the power: Use the 3.3V pin, not 5V.
- Connect the board: Plug the ESP32 C3 Super Mini into your PC with a USB Type-C cable.
- Open the IDE: Launch the Arduino IDE on your computer.
- Select the board: Make sure ESP32 C3 Super Mini is selected in Tools > Board.
- Select the port: Pick the COM port of your board in Tools > Port.
- Upload the code: Copy the code above into the editor and click Upload.
- Open Serial Monitor: Set the baud rate to 115200.
- Send some data: Send characters from the other RS422 device and watch them appear.
- Pro Tip: If you see nothing, swap the A/B wires first, then the Y/Z wires. A reversed differential pair is the second most common RS422 mistake.
Serial Monitor Output
Testing
You can test the link by sending data from your PC to the ESP32 C3 Super Mini over RS-422, and back again.
- Connect the cable: Link the ESP32 C3 Super Mini to your PC with an RS422-to-USB cable, as shown below.
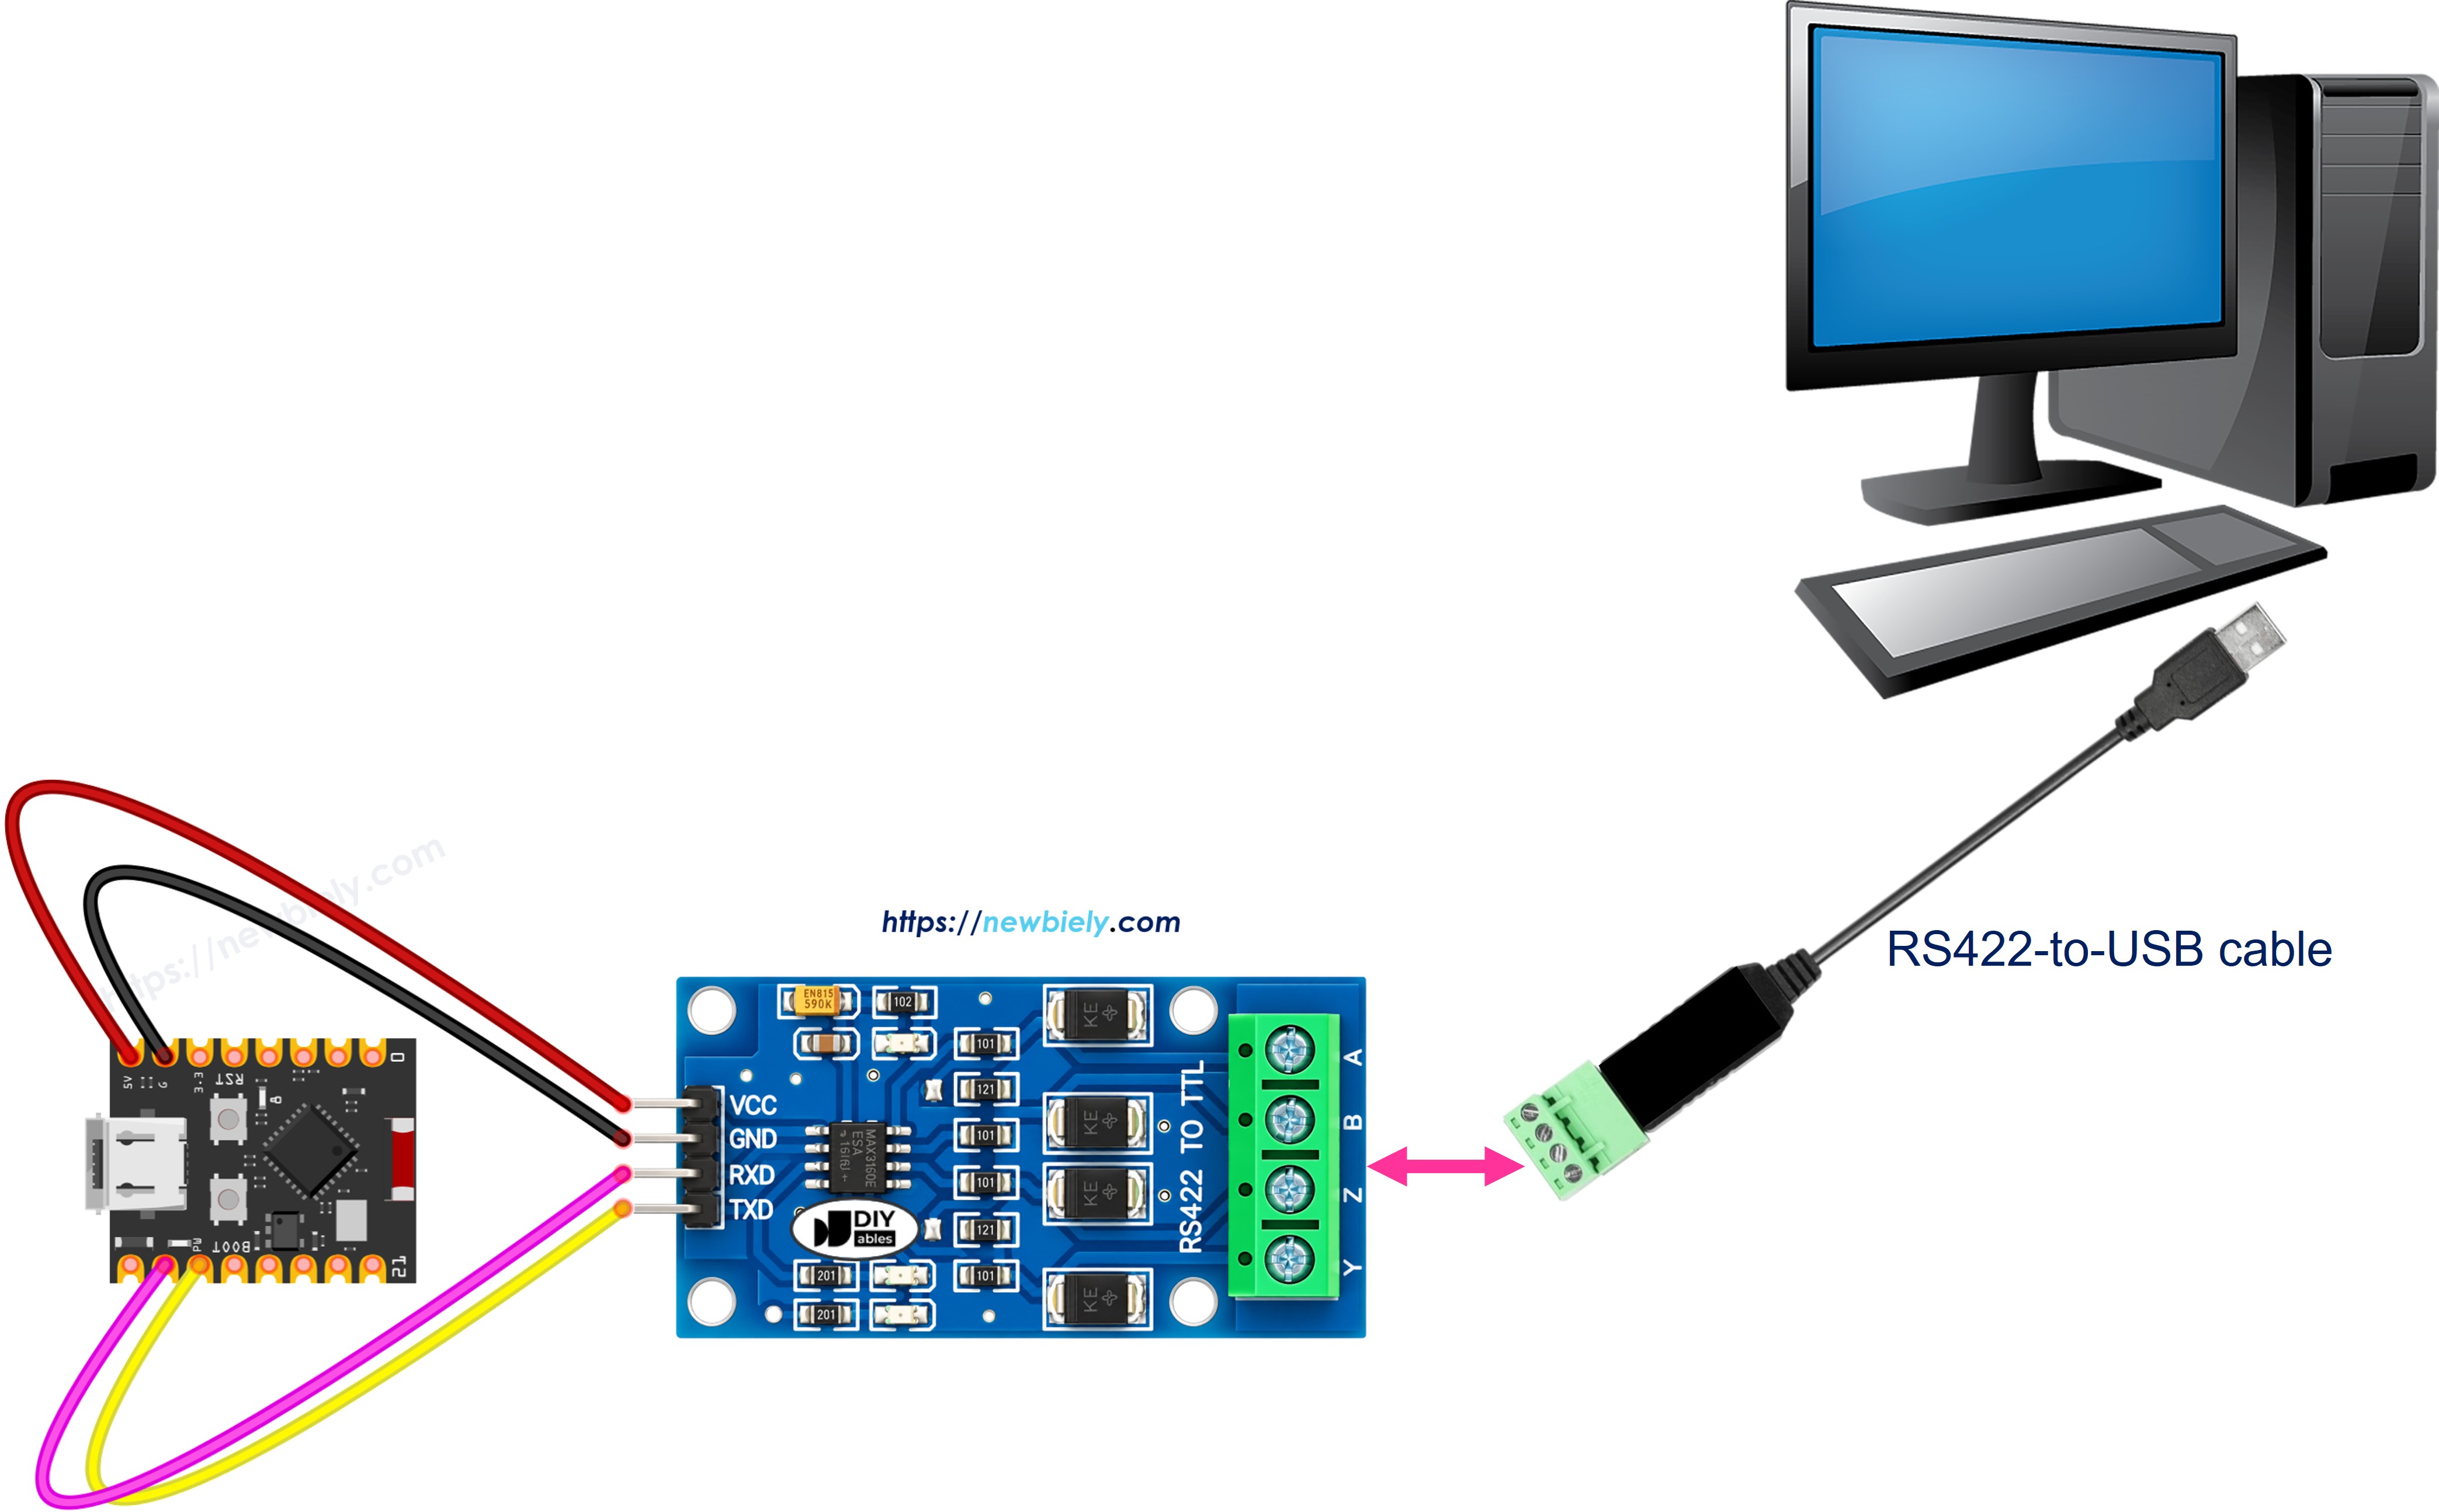
- Set the parameters: Open the terminal, then pick the COM port and 9600 baud, 8 data bits, no parity, 1 stop bit.
- Type some data: Send a few characters from the terminal to the ESP32 C3 Super Mini.
- Check the echo: If it works, the same characters come straight back to the terminal.
- Check the monitor: The same characters also show up in the Arduino Serial Monitor at 115200 baud.
※ NOTE THAT:
Your RS422-to-USB cable gets its own COM port, separate from the ESP32 C3 Super Mini's USB port. You can open both at the same time: one terminal on the RS422 port at 9600, and the Arduino Serial Monitor on the board's port at 115200.
Application and Project Ideas
RS422 with the ESP32 C3 Super Mini is great whenever your cable is long or the area is electrically noisy.
- Remote sensor node: Read a sensor 100 m away and send the values back over RS422.
- Factory machine link: Talk to an industrial controller or motor drive that only offers RS422.
- Boat or RV panel: Carry data between a helm display and an engine sensor box.
- Greenhouse monitor: Connect several far-apart temperature and humidity stations to one hub.
- Building automation: Link door, light and HVAC controllers across different floors.
- Scale or printer reader: Read a bench weighing scale or label printer that uses an RS422 port.
Challenge Yourself
Try these small upgrades to get more comfortable with RS422 on the ESP32 C3 Super Mini.
- Easy: Change the RS422 baud rate to 19200 on both ends and check that it still works.
- Easy: Print a short prompt on the Serial Monitor every time a full line arrives.
- Medium: Collect a whole line with readStringUntil() and echo it back in upper case.
- Medium: Send a temperature reading over RS422 every 2 seconds, in the form TEMP:24.6.
- Advanced: Build a small command protocol so LED:ON and LED:OFF over RS422 switch the built-in LED on GPIO8.
- Advanced: Add a checksum byte to every message and ignore any message whose checksum is wrong.