
ESP32 C3 Super Mini - MP3 Player
Learn how to build a small MP3 player with the ESP32 C3 Super Mini, a serial MP3 player module, a Micro SD Card, and a speaker. Your songs live on the Micro SD Card, and the ESP32 C3 Super Mini sends simple serial commands to tell the module what to play. This beginner-friendly ESP32 C3 Super Mini MP3 player project only needs a few wires and a short sketch.
In this tutorial, you'll learn:
- How a serial MP3 player module works
- How to wire the MP3 player module and speaker to ESP32 C3 Super Mini
- How to program ESP32 C3 Super Mini to play a song from the Micro SD Card
- How to add play, pause, next, and previous buttons
- How to extend the project with a volume control
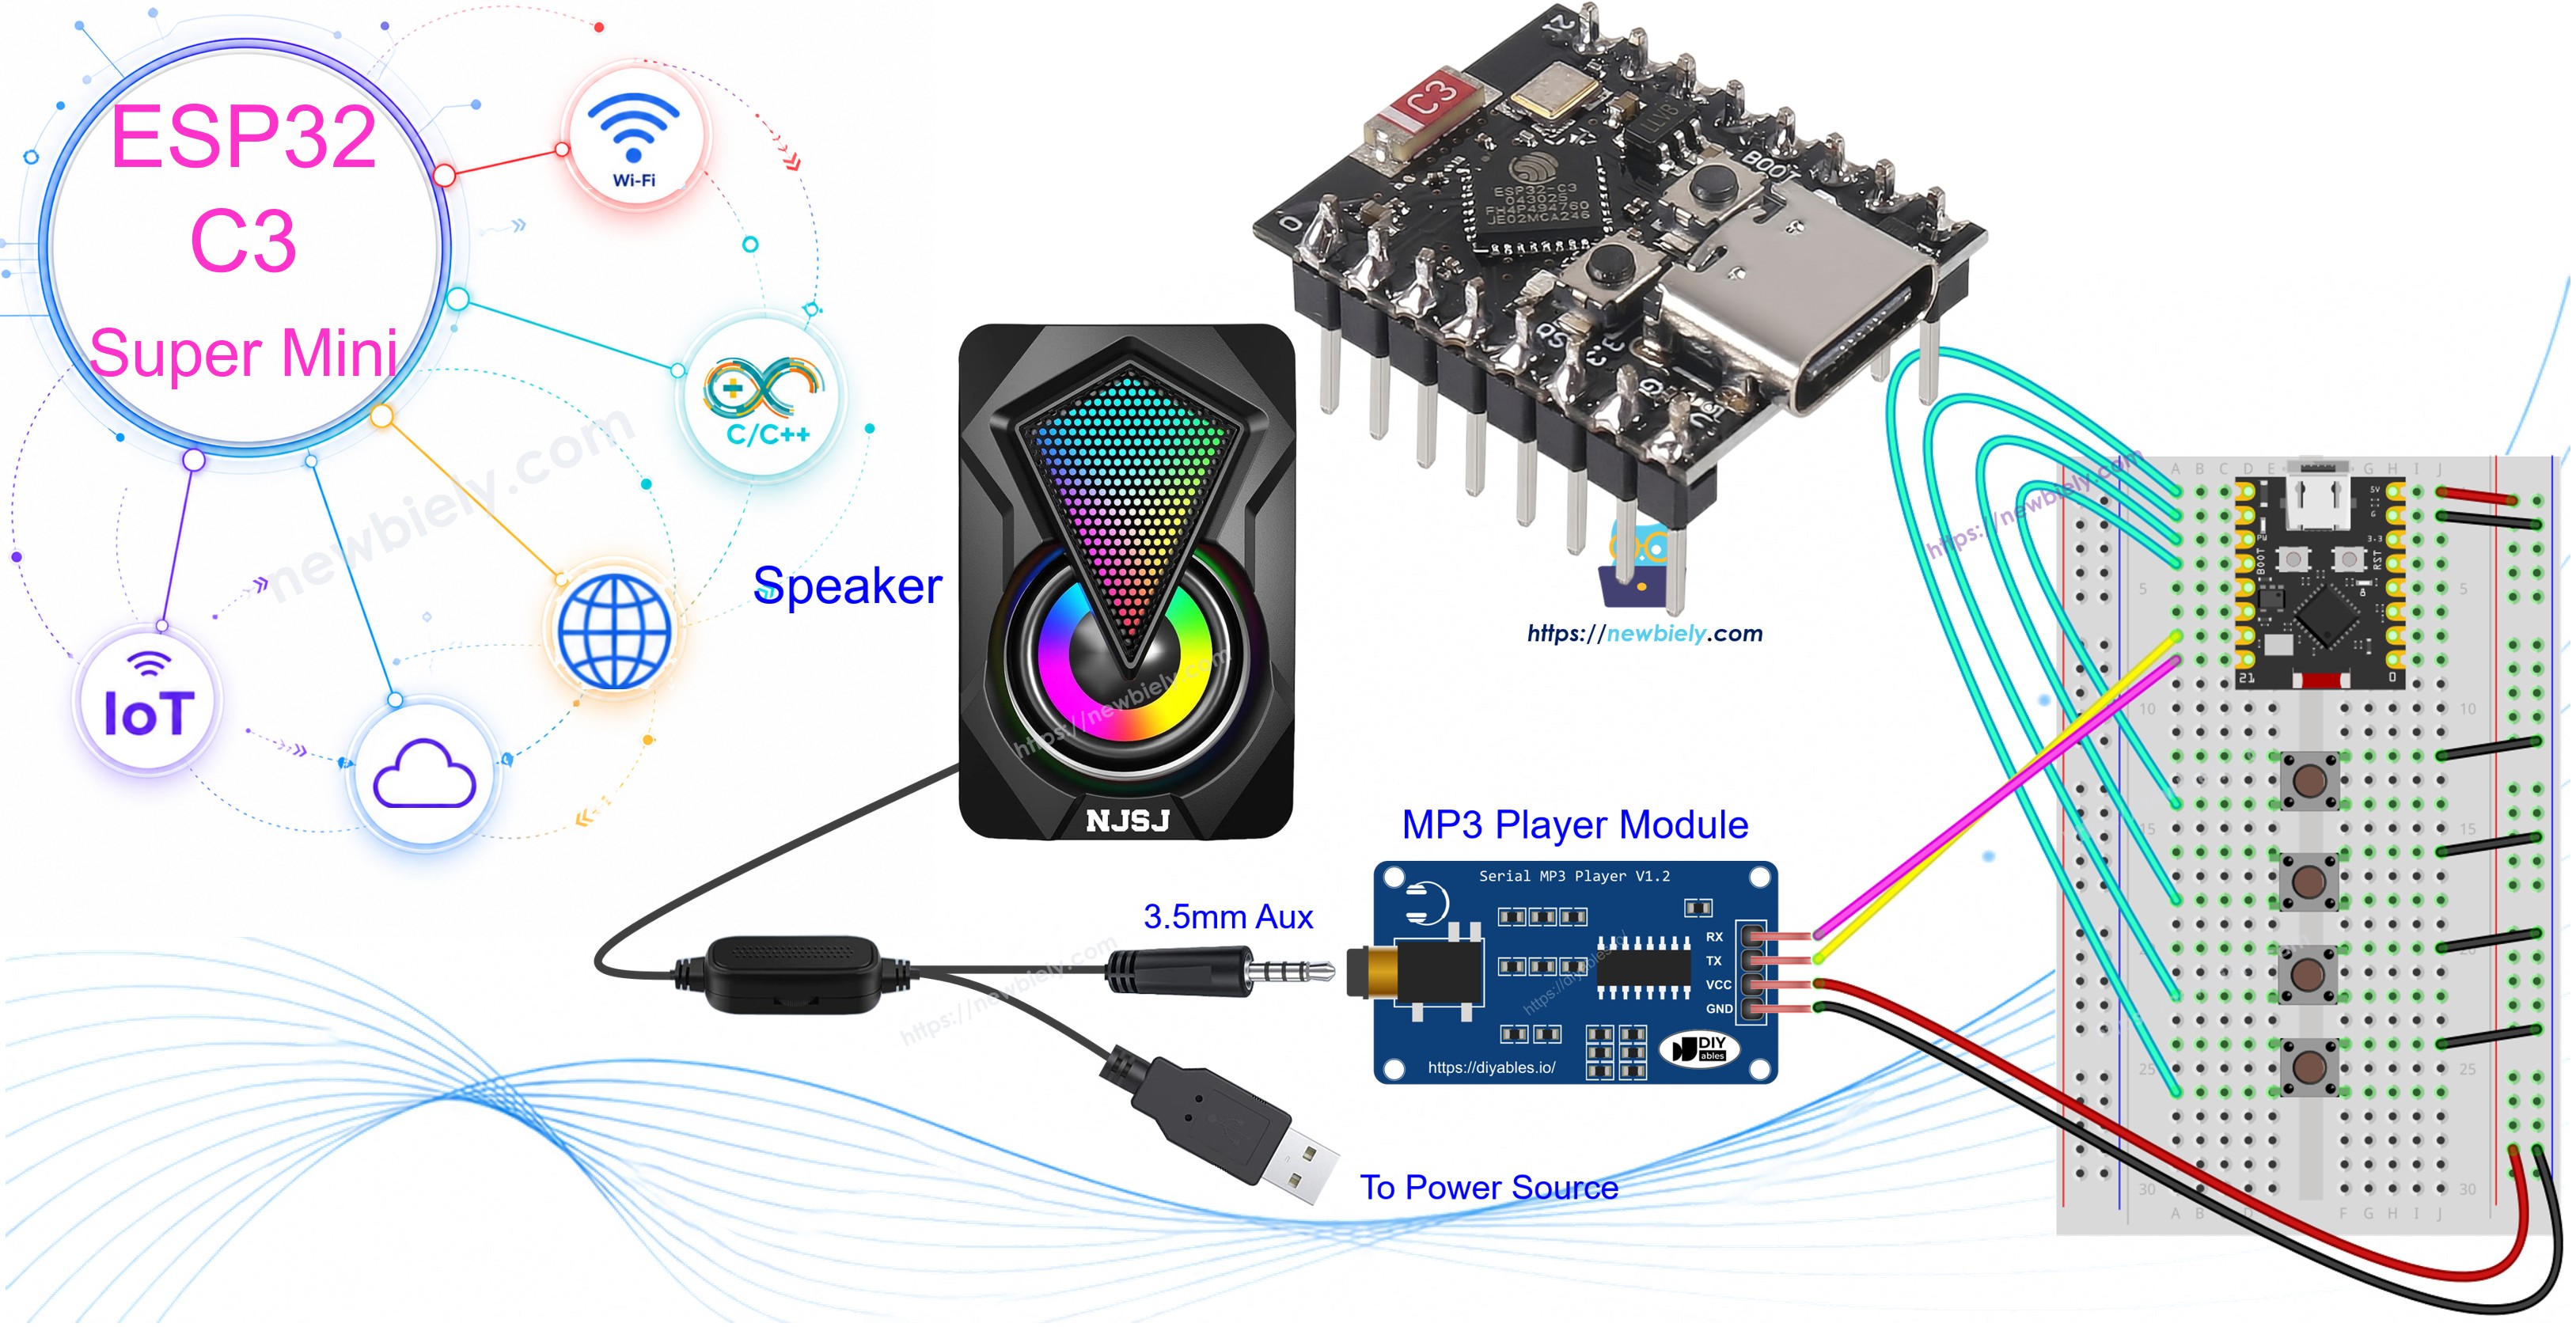
Hardware Preparation
Or you can buy the following kits:
| 1 | × | DIYables Sensor Kit (18 sensors/displays) |
Additionally, some of these links are for products from our own brand, DIYables .
Overview of Serial MP3 Player Module and Speaker
The serial MP3 player module is a small audio player that reads MP3 files from a Micro SD Card and turns them into sound.
Key Features:
- Plays MP3 files stored on a Micro SD Card
- Controlled by simple serial (UART) commands
- Has a built-in amplifier and a 3.5mm Aux output
- Can play, pause, skip, repeat, and change volume
- Works well with the ESP32 C3 Super Mini
Technical Specifications:
- Power supply: 5V
- Serial speed: 9600 baud, 8 data bits, no parity, 1 stop bit
- Logic level on RX: 3.3V friendly, but a series resistor is recommended
- Storage: Micro SD Card (FAT16 / FAT32)
- Audio output: 3.5mm Aux female jack
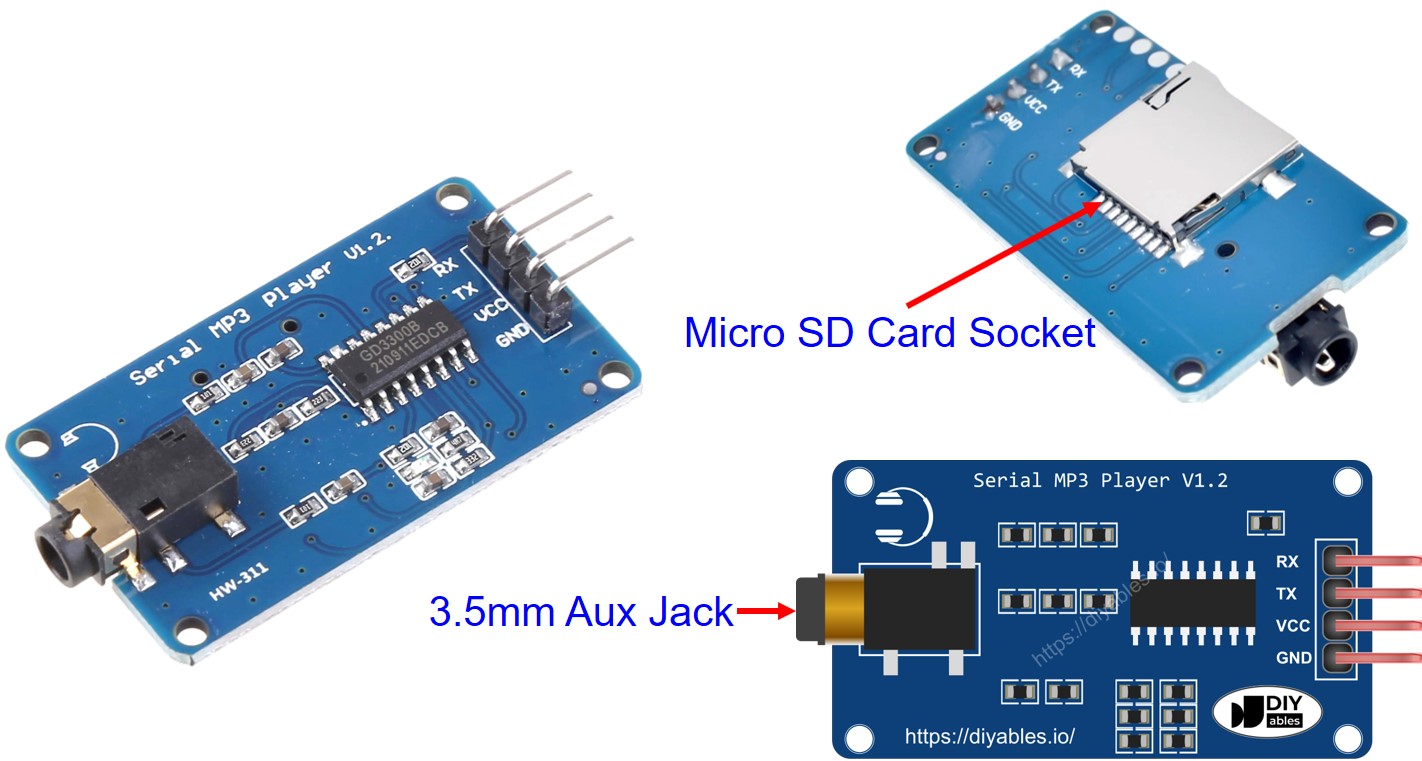
Serial MP3 Player Module Pinout
The module has three interfaces.
- The interface to the ESP32 C3 Super Mini includes 4 pins:
- RX pin: data pin, connect it to a TX pin of the ESP32 C3 Super Mini
- TX pin: data pin, connect it to an RX pin of the ESP32 C3 Super Mini
- VCC pin: power pin, connect it to 5V
- GND pin: power pin, connect it to GND (0V)
- The interface to the speaker is a 3.5mm Aux output female jack.
- The interface to the Micro SD Card is a Micro SD Card socket on the back of the module.
Speaker Pinout
A speaker usually has two interfaces.
- Audio signal interface: a 3.5mm Aux male connector that plugs into the MP3 player module
- Power interface: it can be USB, a 5V power adapter, or any other power source
How It Works
Getting sound out of the ESP32 C3 Super Mini MP3 player takes only a few steps.
- Prepare the card: Copy the songs or recorded audio you want to play onto a Micro SD Card.
- Insert the card: Push the Micro SD Card into the socket on the MP3 player module.
- Wire it up: Connect the MP3 player module to the ESP32 C3 Super Mini, and plug the speaker into the module.
- Power the speaker: Make sure the speaker has its own power source.
Each MP3 file on the Micro SD Card gets an ID, starting from 0. The ESP32 C3 Super Mini can then tell the module to do these things:
- Play: Start playing the selected song.
- Pause: Pause the song.
- Play Next: Move to the next song.
- Play Previous: Go back to the previous song.
- Change Volume: Adjust how loud the music is.
When the MP3 player module gets a command, it reads the MP3 file from the Micro SD Card, turns it into an audio signal, and sends that signal to the speaker through the 3.5mm Aux connection.
※ NOTE THAT:
The ESP32 C3 Super Mini uses GPIO20 and GPIO21 for the Serial Monitor. Those two pins must stay free. That is why this tutorial uses a second hardware serial port on GPIO6 and GPIO7 for the MP3 player module.
Wiring Diagram
Wire the MP3 player module to the ESP32 C3 Super Mini as shown below.
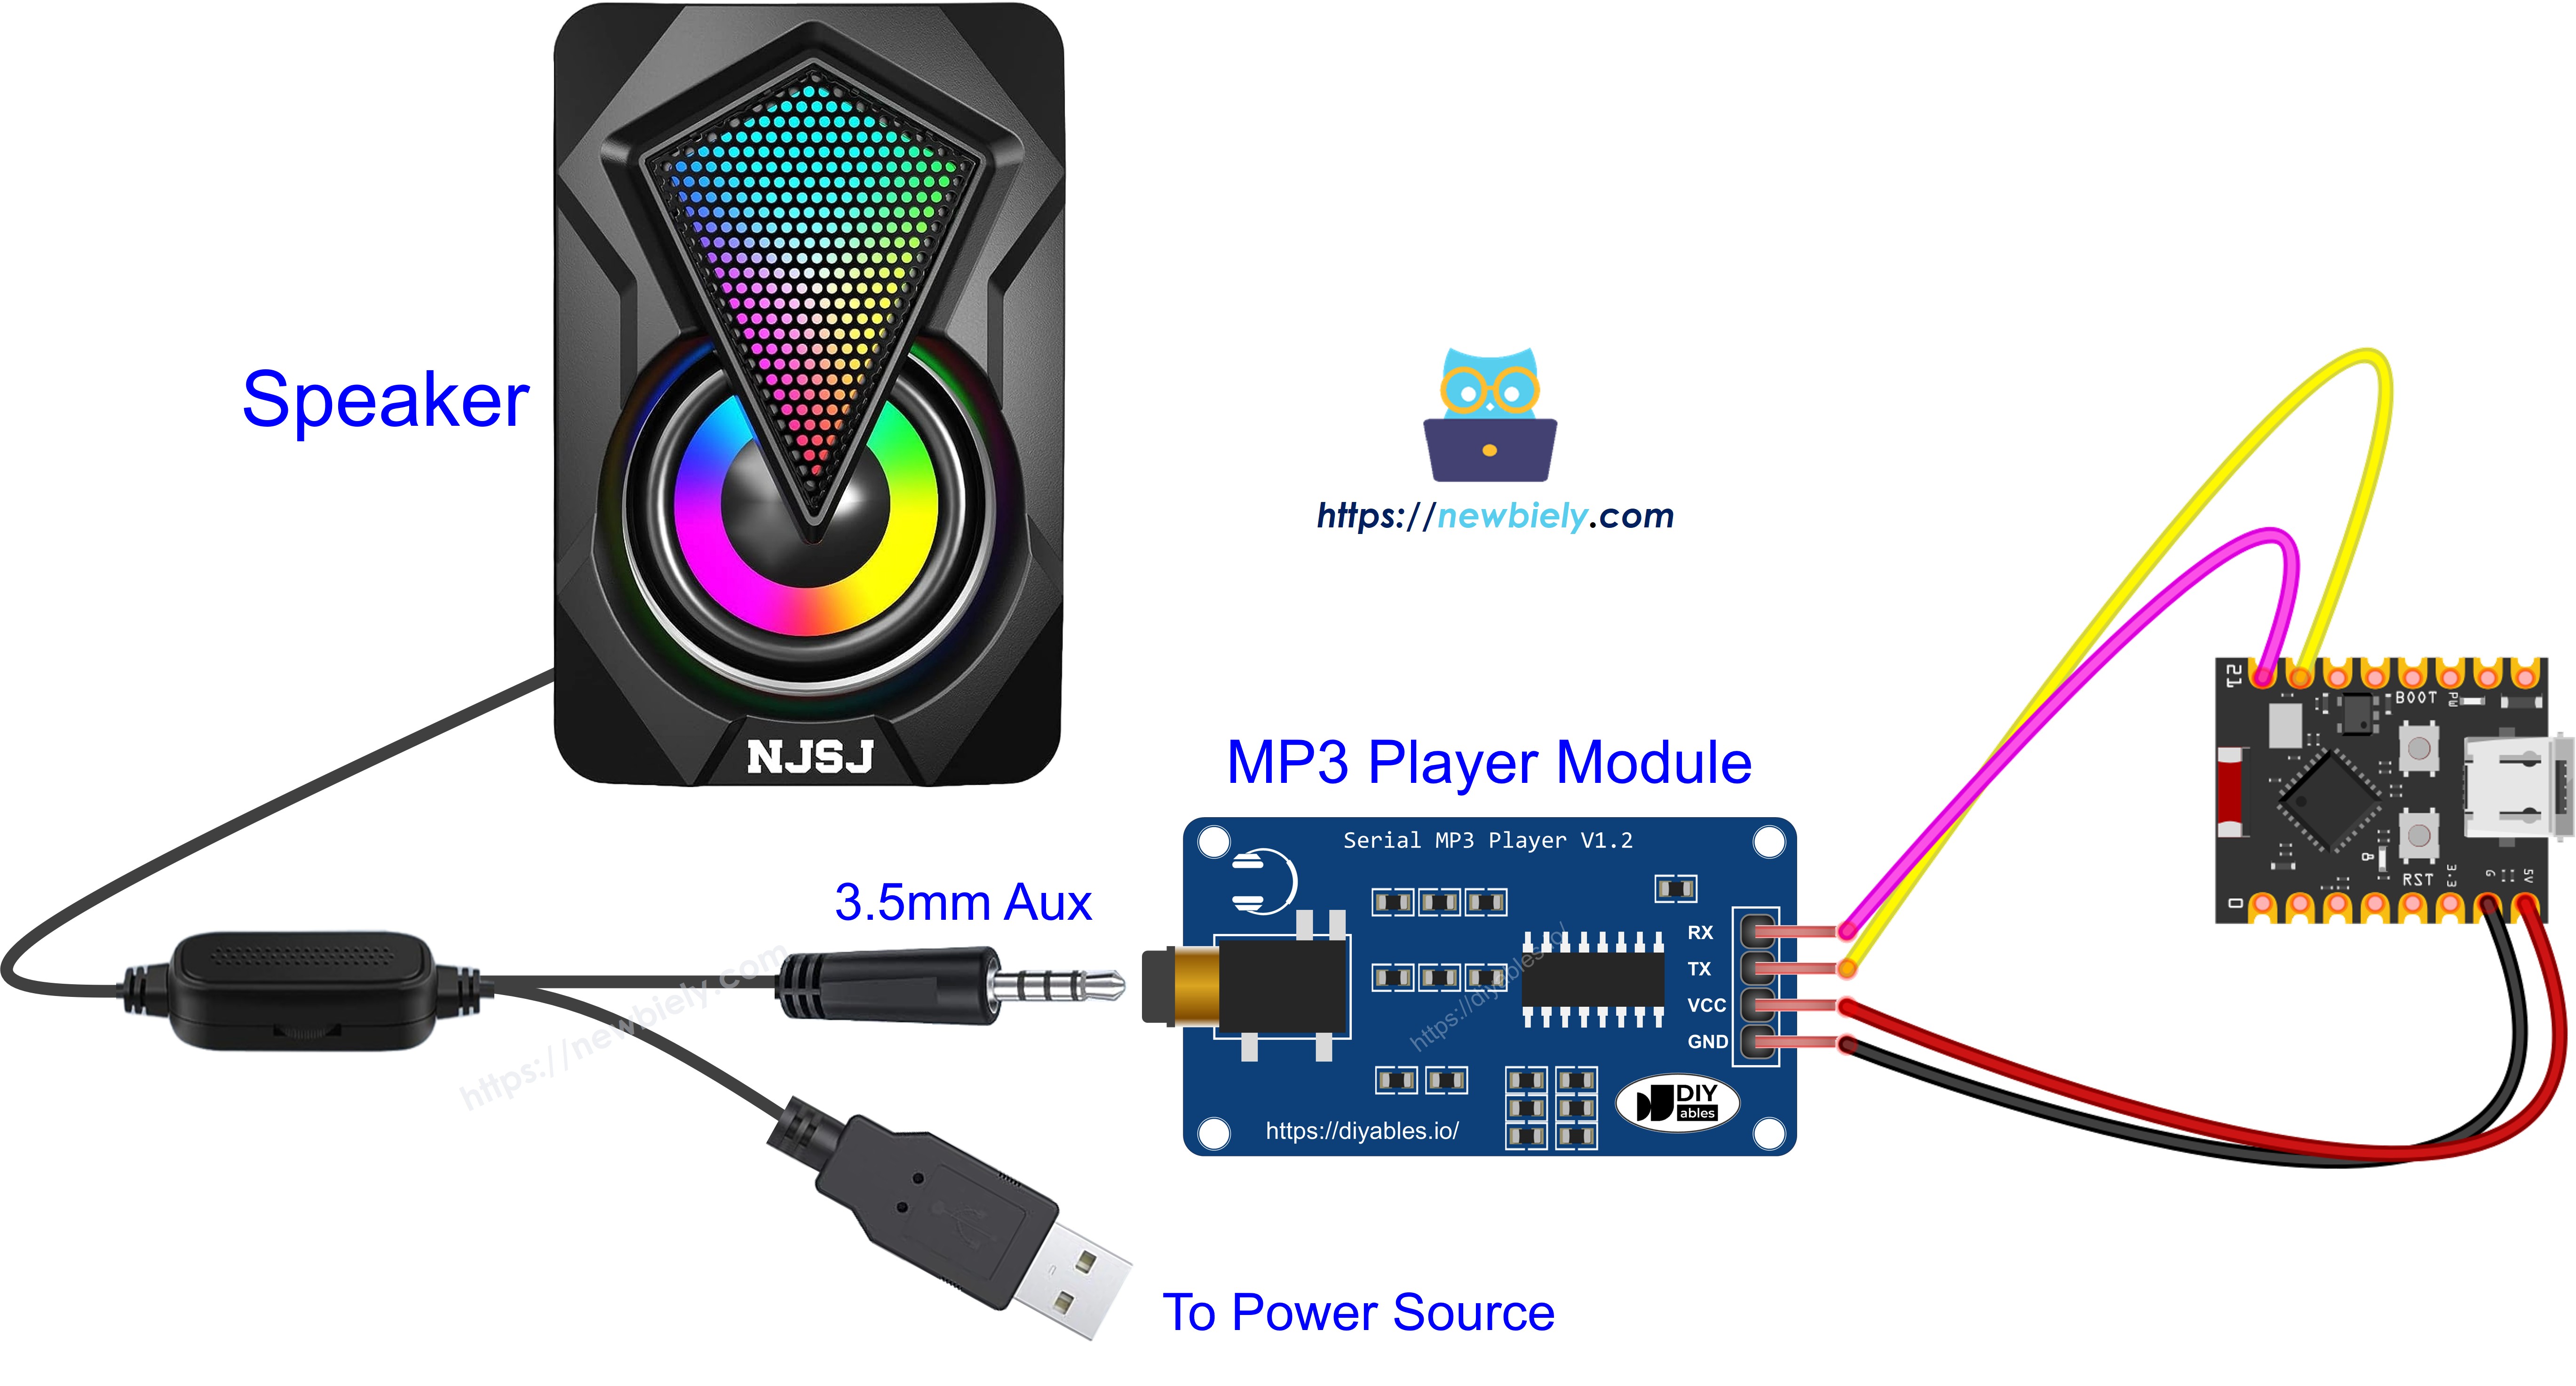
This image is created using Fritzing. Click to enlarge image
- Note: TX goes to RX and RX goes to TX. Crossing these two wires is the most common mistake.
- Note: Power the module from 5V, not 3.3V. It needs 5V to drive the speaker.
- Note: Do not connect any module pin to GPIO20 or GPIO21 — they belong to the Serial Monitor.
| Serial MP3 Player Module Pin | ESP32 C3 Super Mini Pin |
|---|---|
| VCC | 5V |
| GND | GND |
| RX | GPIO6 (ESP32 TX) |
| TX | GPIO7 (ESP32 RX) |
※ NOTE THAT:
The Serial MP3 Player module needs 5V power, but its RX pin expects 3.3V logic. The ESP32 C3 Super Mini is a 3.3V board, so its TX level is already safe. To protect the module and keep the signal clean, it is recommended to put a 1kΩ resistor in series on the RX line, between the ESP32 C3 Super Mini GPIO6 pin and the module RX pin.
ESP32 C3 Super Mini Code - Play Music
This first sketch plays the first song stored on the Micro SD Card.
What This Code Does:
- Starts the Serial Monitor at 115200 baud
- Starts a second hardware serial port on GPIO6 (TX) and GPIO7 (RX) at 9600 baud
- Tells the module to use the Micro SD Card as the storage device
- Sends a Play command so the first song starts right away
- Builds each command as an 8-byte frame the module understands
Detailed Instructions
- New to ESP32 C3 Super Mini? Complete our Getting Started with ESP32 C3 Super Mini tutorial first to set up your development environment.
- Prepare the card: Copy a few MP3 files to the Micro SD Card and insert it into the module.
- Wire the parts: Follow the wiring diagram above, and plug the speaker into the module's Aux jack.
- Connect the board: Plug the ESP32 C3 Super Mini into your computer with the USB Type-C cable.
- Select the board: Make sure ESP32 C3 Super Mini is selected in Tools > Board.
- Select the port: Pick the right COM port in Tools > Port.
- Upload the code: Copy the code above into Arduino IDE and click the Upload button.
- Open Serial Monitor: Set the baud rate to 115200 to watch the messages.
- Enjoy the music: The first song on the card starts playing through the speaker.
- Pro Tip: If you hear nothing, swap the RX and TX wires first — crossed data lines are the usual cause.
ESP32 C3 Super Mini Code - Play Music with Control Buttons
This second sketch is an upgrade of the first one. It adds four buttons so you can control the ESP32 C3 Super Mini MP3 player by hand.
What This Code Does:
- Reads four buttons with the ezButton library, with 50 ms debounce
- Sends a Play command when the button on GPIO2 is pressed
- Sends a Pause command when the button on GPIO3 is pressed
- Sends a Play Next command when the button on GPIO4 is pressed
- Sends a Play Previous command when the button on GPIO5 is pressed
- Prints what it is doing to the Serial Monitor
The wiring diagram for the above code:
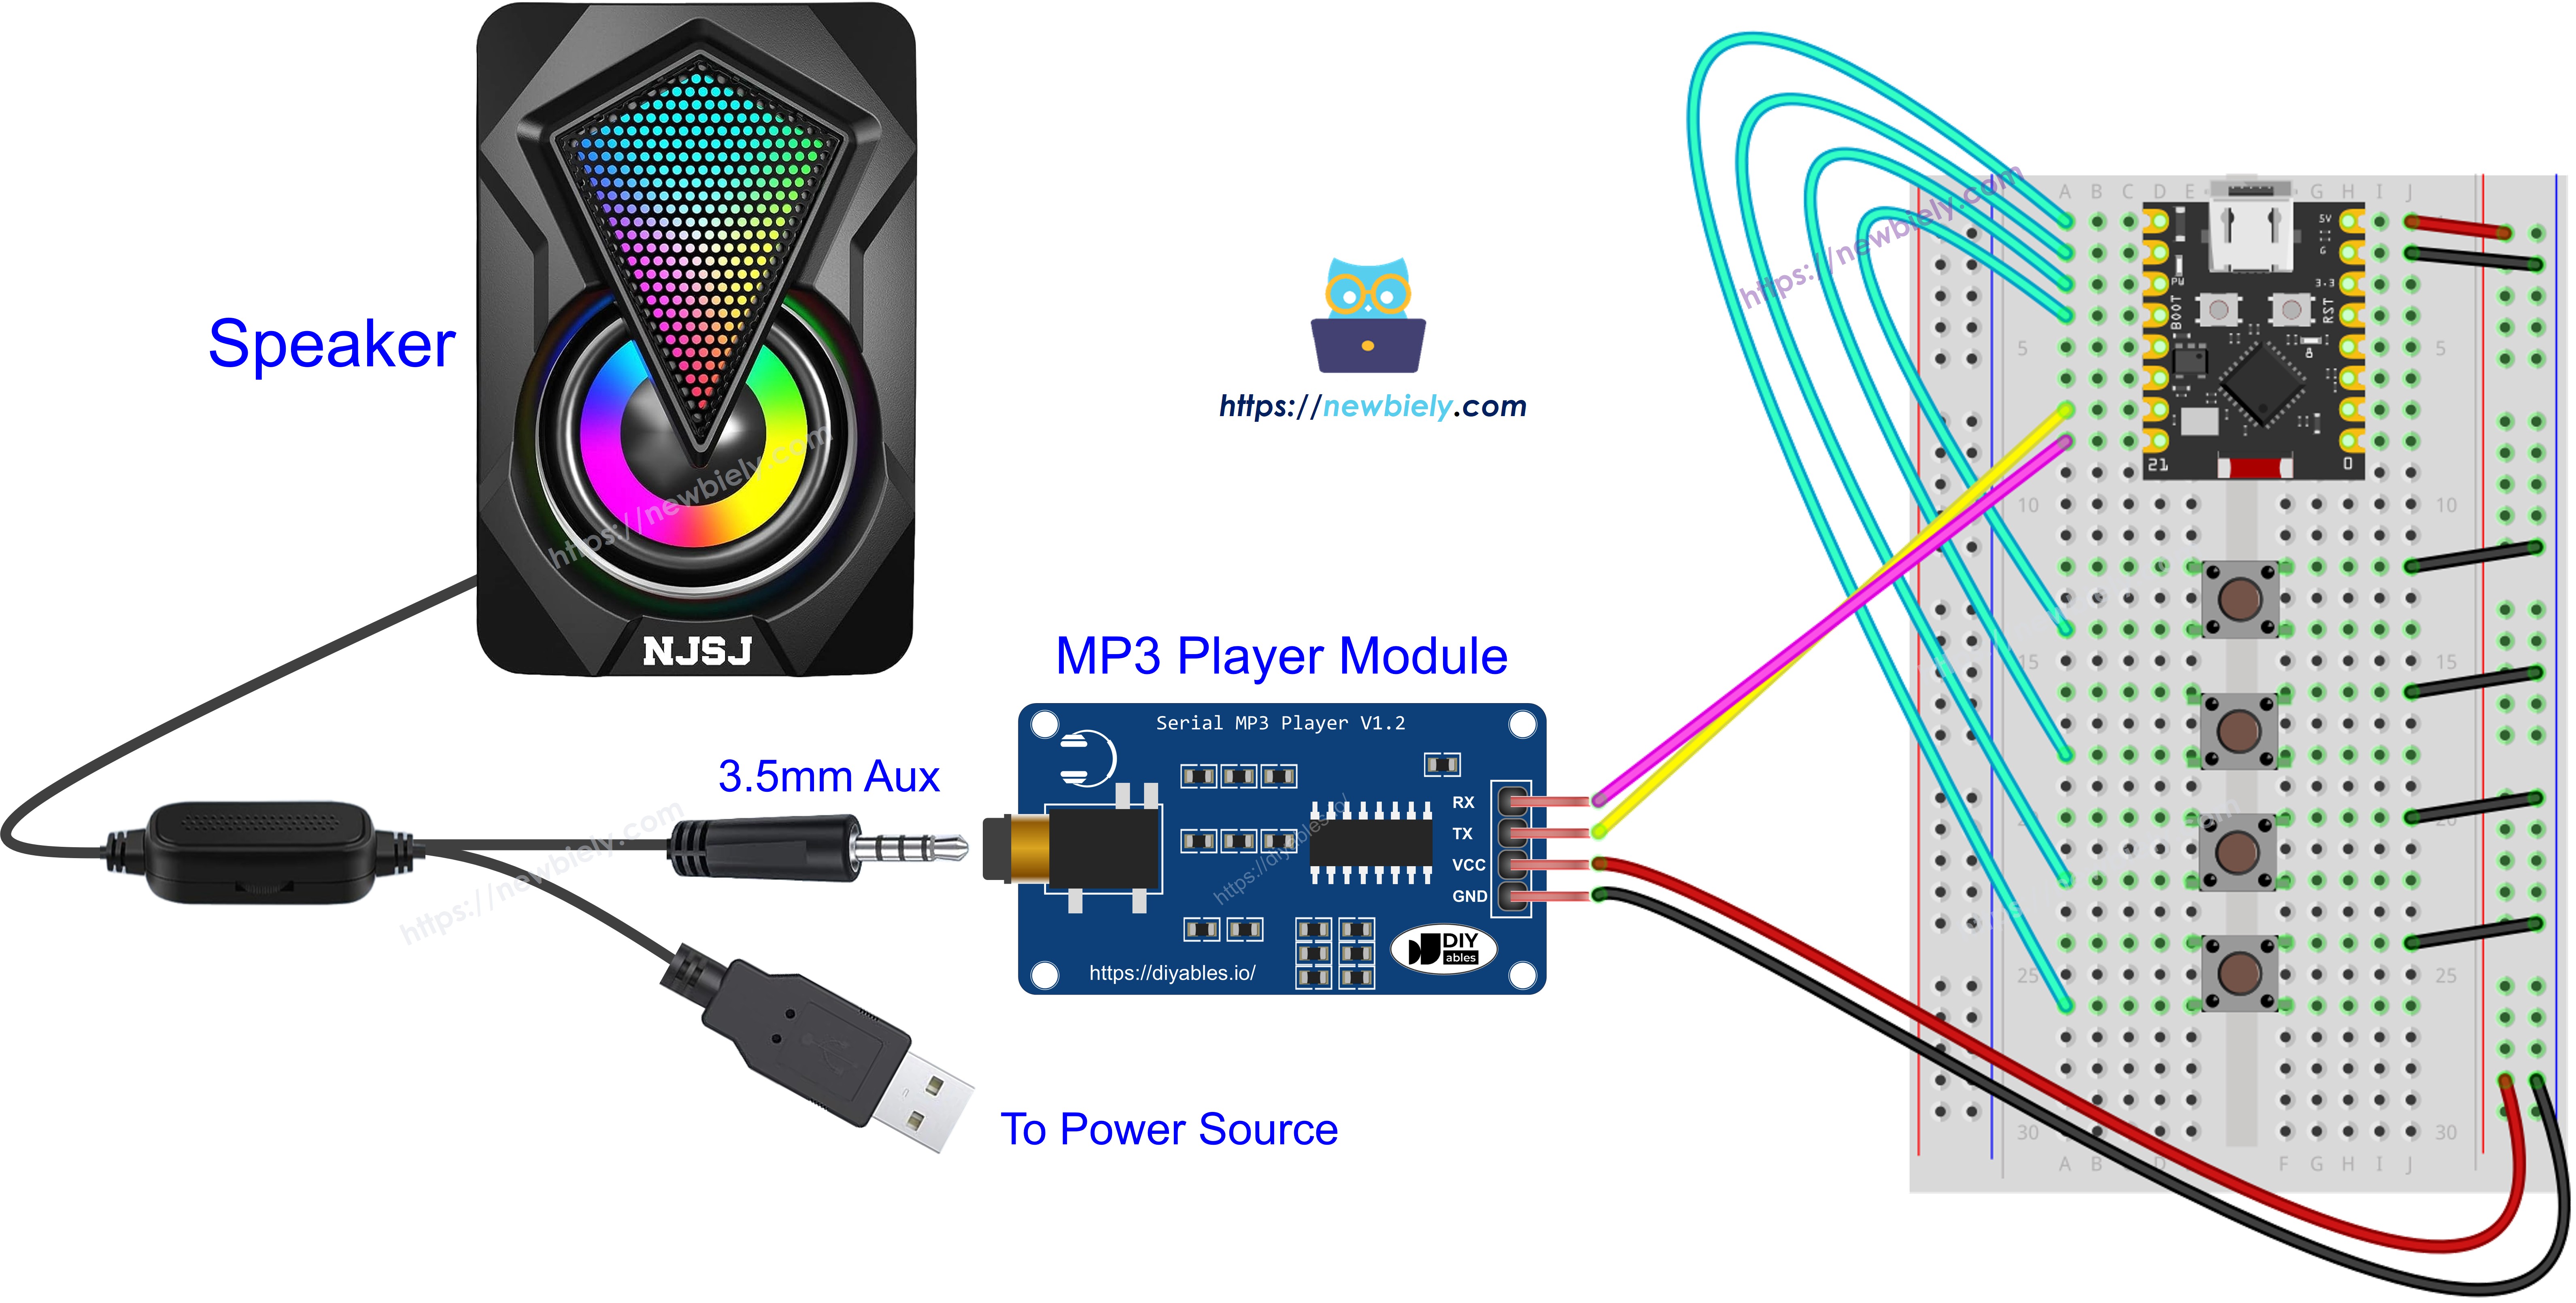
This image is created using Fritzing. Click to enlarge image
| Button | ESP32 C3 Super Mini Pin |
|---|---|
| Play button | GPIO2 |
| Pause button | GPIO3 |
| Next button | GPIO4 |
| Previous button | GPIO5 |
| Other side of every button | GND |
- Note: Each button connects between its GPIO pin and GND. The ezButton library turns on the internal pull-up for you.
- Note: The MP3 module still uses GPIO6 and GPIO7, so do not reuse those pins for buttons.
Serial Monitor Output
Press the buttons and you will see messages like this at 115200 baud.
※ NOTE THAT:
You may NOT see the first line on the Serial Monitor if your upload finishes before you open the Serial Monitor. Just press a button again.
Now you can extend the ESP32 C3 Super Mini MP3 player with more features, for example:
- Volume knob: Add a potentiometer to control the volume, see the ESP32 C3 Super Mini Potentiometer tutorial
- Remote control: Add an IR remote controller so you can change songs from across the room
- RFID player: Add an RFID reader and cards to make an RFID MP3 player, see the ESP32 C3 Super Mini RFID tutorial
Applications and Project Ideas
Here are some fun things you can build with an ESP32 C3 Super Mini MP3 player.
- Kids story box: Play a bedtime story when a big button is pressed.
- Doorbell: Play a custom tune or a recorded greeting when someone rings.
- Museum guide: Play the right audio clip for each RFID tag.
- Alarm clock: Wake up to your own music instead of a beep.
- Talking robot: Play recorded voice lines while your robot moves.
- Shop announcer: Play a welcome message when a motion sensor sees a customer.
Challenge Yourself
Try these small upgrades to learn more.
- Easy: Change the code to start playing song number 3 instead of song number 1.
- Easy: Set the volume in setup() with the CMD_SET_VOLUME command.
- Medium: Add a fifth button that turns single-song repeat on and off.
- Medium: Use a potentiometer on GPIO4 to set the volume in real time.
- Advanced: Add an OLED display that shows the current track number.
- Advanced: Control the MP3 player over WiFi from a web page on the ESP32 C3 Super Mini.