Arduino Nano ESP32 - Obstacle Sensor

This tutorial instructs you on how to use Arduino Nano ESP32 with the infrared obstacle avoidance sensor to detect the presence of the obstacle.

Hardware Preparation

1×Arduino Nano ESP32
1×USB Cable Type-C
1×IR Obstacle Avoidance Sensor
1×Breadboard
1×Jumper Wires
1×(Optional) DC Power Jack
1×(Recommended) Screw Terminal Adapter for Arduino Nano

Or you can buy the following sensor kits:

1×DIYables Sensor Kit (30 sensors/displays)
1×DIYables Sensor Kit (18 sensors/displays)
Disclosure: Some of the links provided in this section are Amazon affiliate links. We may receive a commission for any purchases made through these links at no additional cost to you. We appreciate your support.

Overview of IR Obstacle Avoidance Sensor

The IR (infrared) obstacle sensor is used to if any obstacle is present in front of the sensor module by using the IR signal. The detection range is from 2cm to 30cm and is adjustable by a built-in potentiometer.

Pinout

An IR obstacle avoidance sensor has three pins:

  • GND pin: connect this pin to GND (0V)
  • VCC pin: connect this pin to VCC (5V or 3.3v)
  • OUT pin: is an output pin: LOW if an obstacle is present, HIGH if no obstacle is present. This pin needs to be connected to ESP32's input pin.
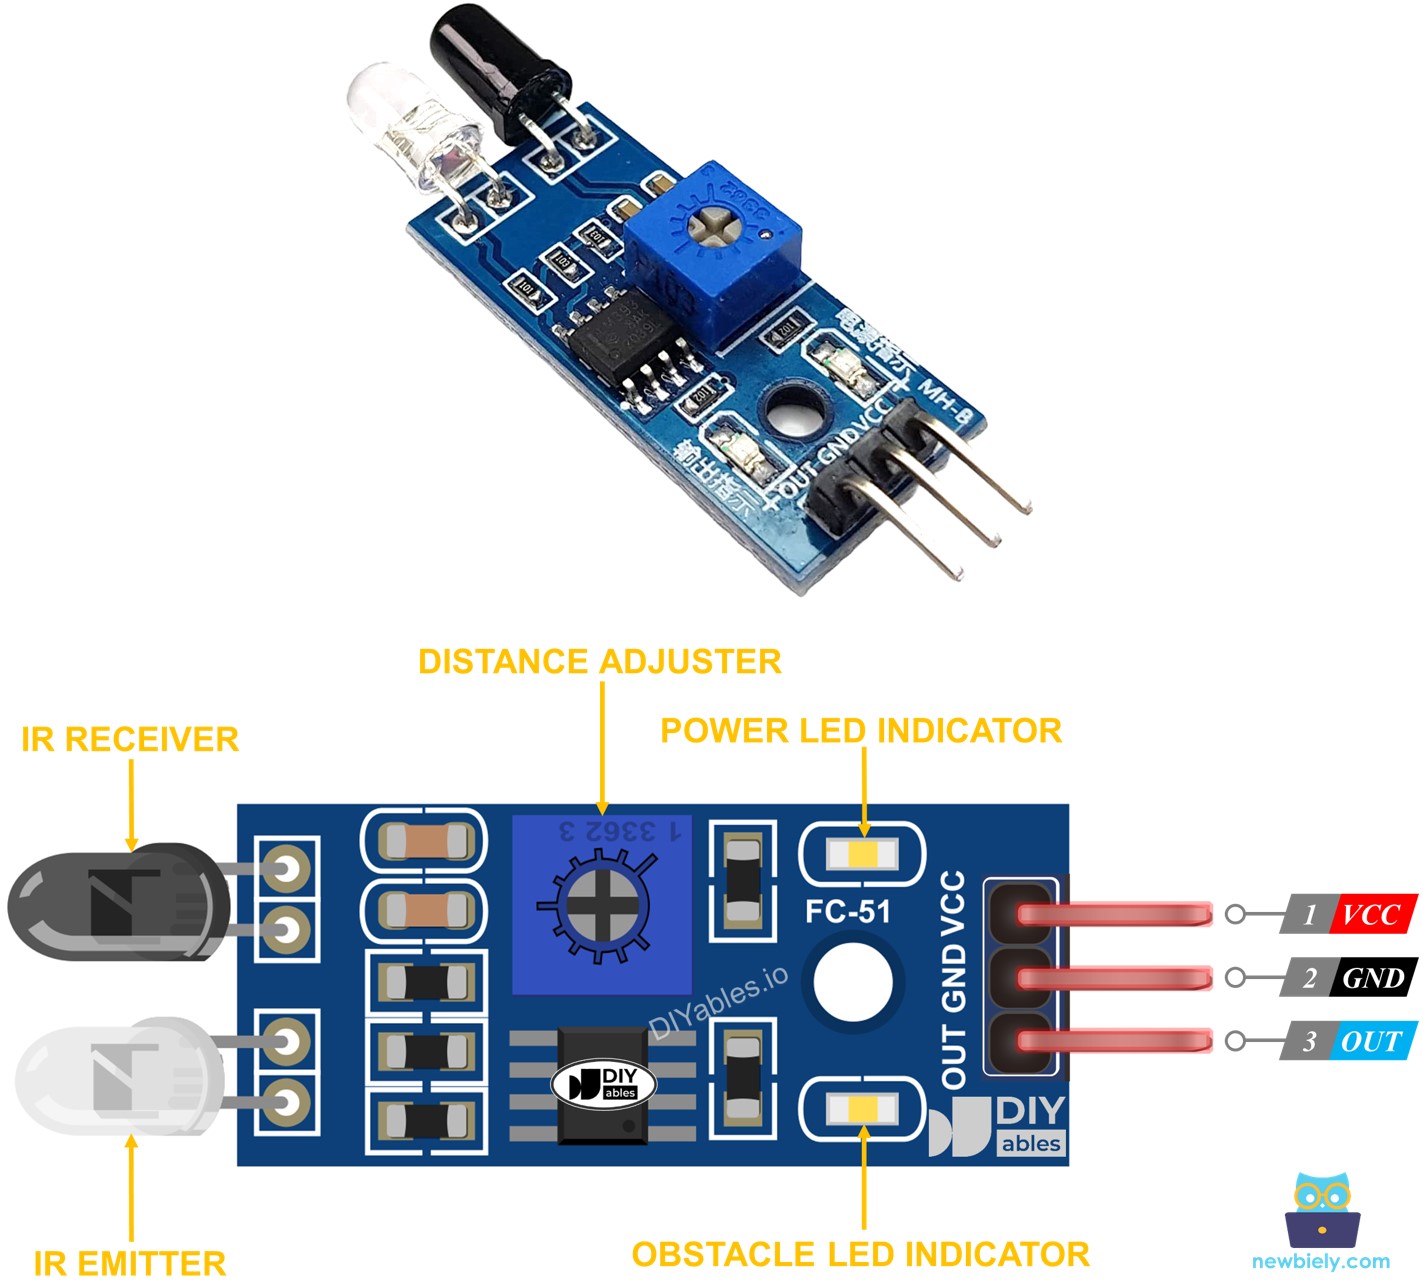
IR Obstacle Avoidance Sensor Pinout

How It Works

An infrared obstacle sensor module consists of an IR transmitter and an IR receiver. The IR transmitter emits the IR signal while the IR receiver searches for the reflected IR signal to determine if the object is present or not. The presence of obstacle is reflected in the OUT pin:

  • If the obstacle is present, the sensor's OUT pin is LOW
  • If the obstacle is NOT present, the sensor's OUT pin is HIGH

※ NOTE THAT:

During shipment, the sensor may get deformed, which can cause it to malfunction. If the sensor is not working properly, adjust the IR transmitter and receiver to ensure they are parallel.

Wiring Diagram

The wiring diagram between Arduino Nano ESP32 and IR obstacle avoidance sensor

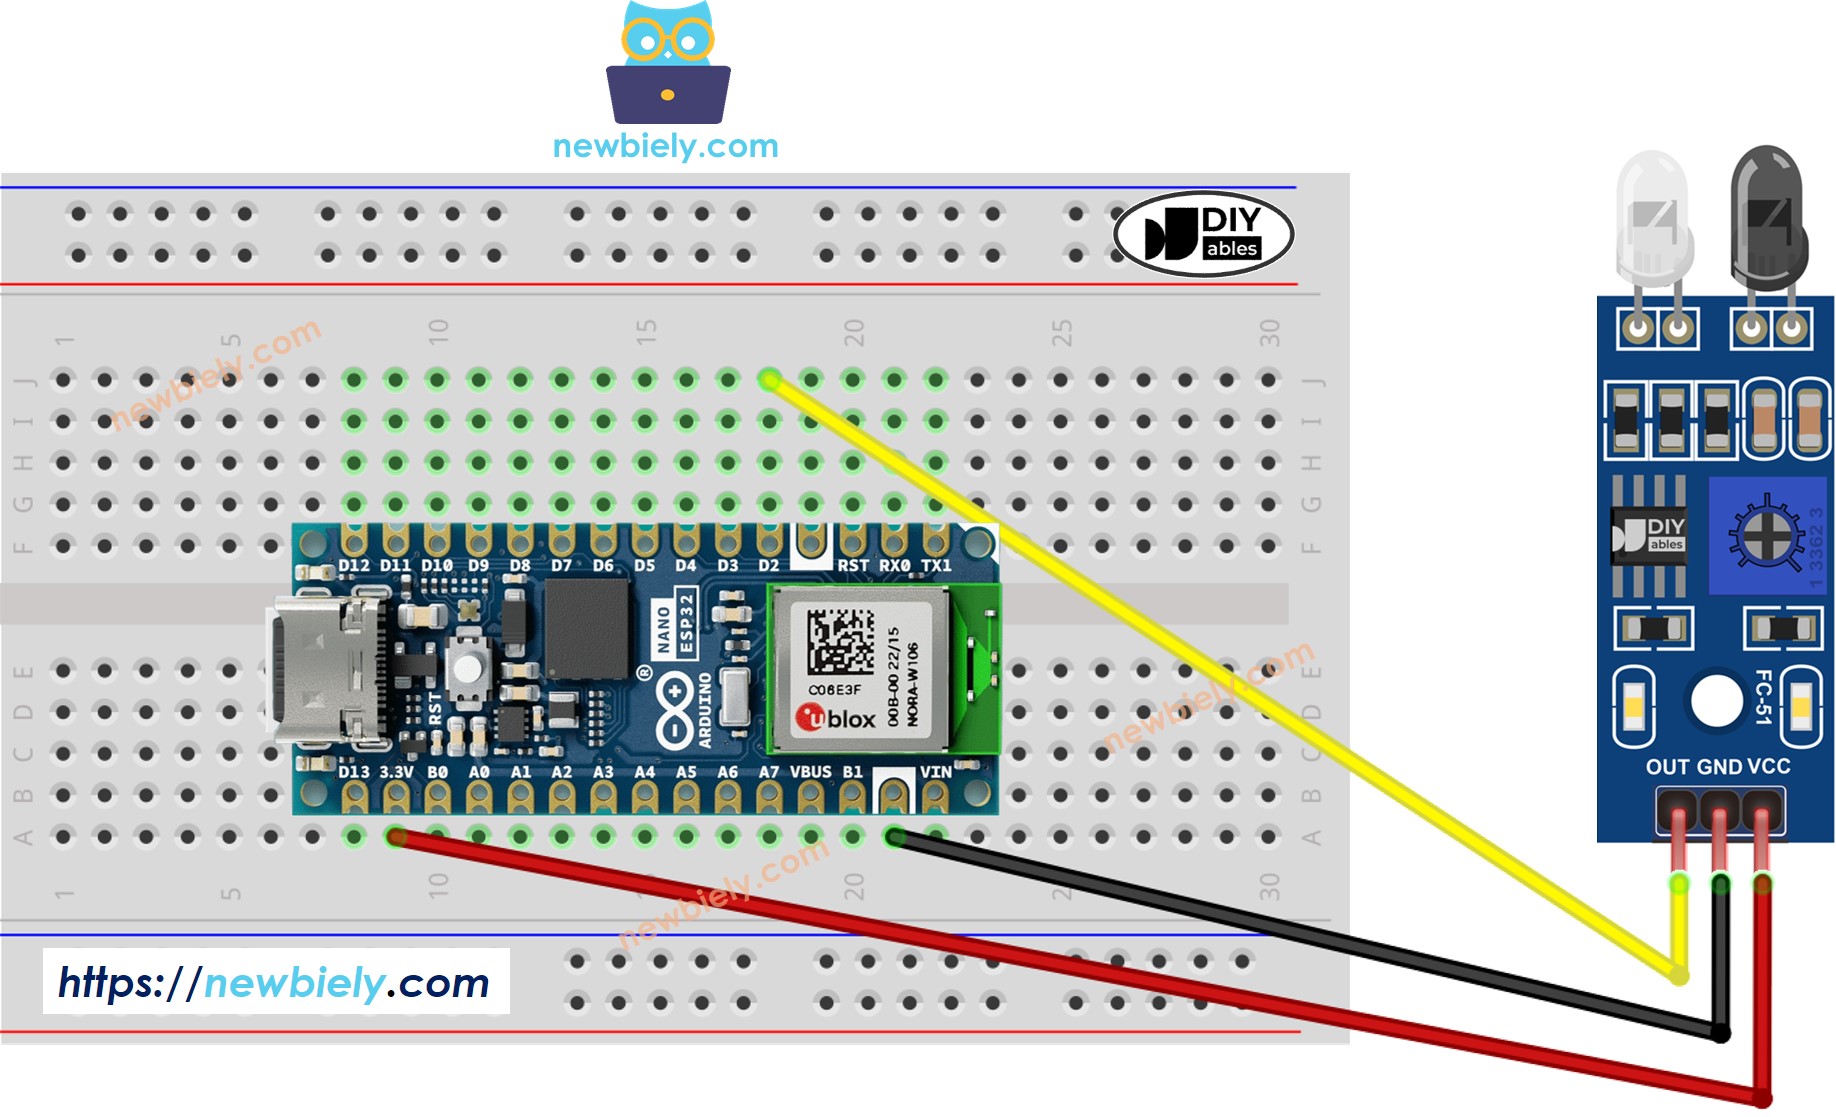
This image is created using Fritzing. Click to enlarge image

How To Program For IR Obstacle Avoidance Sensor

  • Initializes the Arduino Nano ESP32 pin to the digital input mode by using pinMode() function. For example, pin D2
pinMode(D2, INPUT_PULLUP);
  • Reads the state of the Arduino Nano ESP32 pin by using digitalRead() function.
int state = digitalRead(D2);

Arduino Nano ESP32 Code

There are two use cases to implement an obstacle avoidance application:

  • Take actions while the obstacle is present or not present
  • Take actions when the obstacle is detected or cleared

Arduino Nano ESP32 code for checking if the obstacle is present

/* * This Arduino Nano ESP32 code was developed by newbiely.com * * This Arduino Nano ESP32 code is made available for public use without any restriction * * For comprehensive instructions and wiring diagrams, please visit: * https://newbiely.com/tutorials/arduino-nano-esp32/arduino-nano-esp32-obstacle-sensor */ #define SENSOR_PIN D2 // The Arduino Nano ESP32 pin connected to OUT pin of IR obstacle avoidance sensor void setup() { // Initialize the Serial to communicate with the Serial Monitor. Serial.begin(9600); // initialize the Arduino Nano ESP32 pin as an input pinMode(SENSOR_PIN, INPUT); } void loop() { // read the state of the the input pin: int state = digitalRead(SENSOR_PIN); if (state == LOW) Serial.println("The obstacle is present"); else Serial.println("The obstacle is NOT present"); delay(100); }

Detailed Instructions

  • If this is the first time you use Arduino Nano ESP32, see how to set up environment for Arduino Nano ESP32 on Arduino IDE.
  • Copy the above code and paste it to Arduino IDE.
  • Compile and upload code to Arduino Nano ESP32 board by clicking Upload button on Arduino IDE
  • Place an obstacle in front of the sensor for a while, and then withdraw it.
  • Check out the result on the Serial Monitor. It looks like the below:
COM6
Send
The obstacle is NOT present The obstacle is NOT present The obstacle is NOT present The obstacle is NOT present The obstacle is NOT present The obstacle is present The obstacle is present The obstacle is present The obstacle is present The obstacle is NOT present The obstacle is NOT present
Autoscroll Show timestamp
Clear output
9600 baud  
Newline  

Arduino Nano ESP32 code for detecting obstacle

/* * This Arduino Nano ESP32 code was developed by newbiely.com * * This Arduino Nano ESP32 code is made available for public use without any restriction * * For comprehensive instructions and wiring diagrams, please visit: * https://newbiely.com/tutorials/arduino-nano-esp32/arduino-nano-esp32-obstacle-sensor */ #define SENSOR_PIN D2 // The Arduino Nano ESP32 pin connected to OUT pin of IR obstacle avoidance sensor int prev_state = HIGH; // The previous state from the input pin int obstacle_state; // The current reading from the input pin void setup() { // Initialize the Serial to communicate with the Serial Monitor. Serial.begin(9600); // initialize the ESP32's pin as an input pinMode(SENSOR_PIN, INPUT); } void loop() { // read the state of the the input pin: obstacle_state = digitalRead(SENSOR_PIN); if (prev_state == HIGH && obstacle_state == LOW) Serial.println("The obstacle is detected"); else if (prev_state == LOW && obstacle_state == HIGH) Serial.println("The obstacle is cleared"); delay(50); // save the the last state prev_state = obstacle_state; }

Detailed Instructions

  • Copy the above code and paste it to Arduino IDE.
  • Compile and upload code to Arduino Nano ESP32 board by clicking Upload button on Arduino IDE
  • Place an obstacle in front of the sensor for a while, and then withdraw it.
  • Check out the result on the Serial Monitor. It looks like the below:
COM6
Send
The obstacle is detected The obstacle is cleared
Autoscroll Show timestamp
Clear output
9600 baud  
Newline  

Video Tutorial

Learn More

※ OUR MESSAGES

  • As freelancers, We are AVAILABLE for HIRE. See how to outsource your project to us
  • Please feel free to share the link of this tutorial. However, Please do not use our content on any other websites. We invested a lot of effort and time to create the content, please respect our work!