In this tutorial, we will learn how to control LED matrix signboard via web interface using Arduino Nano ESP32. In detail, we will program Arduino Nano ESP32 to become a web server that does the following:
Returns a web interface to users when receiving a request from a web browser.
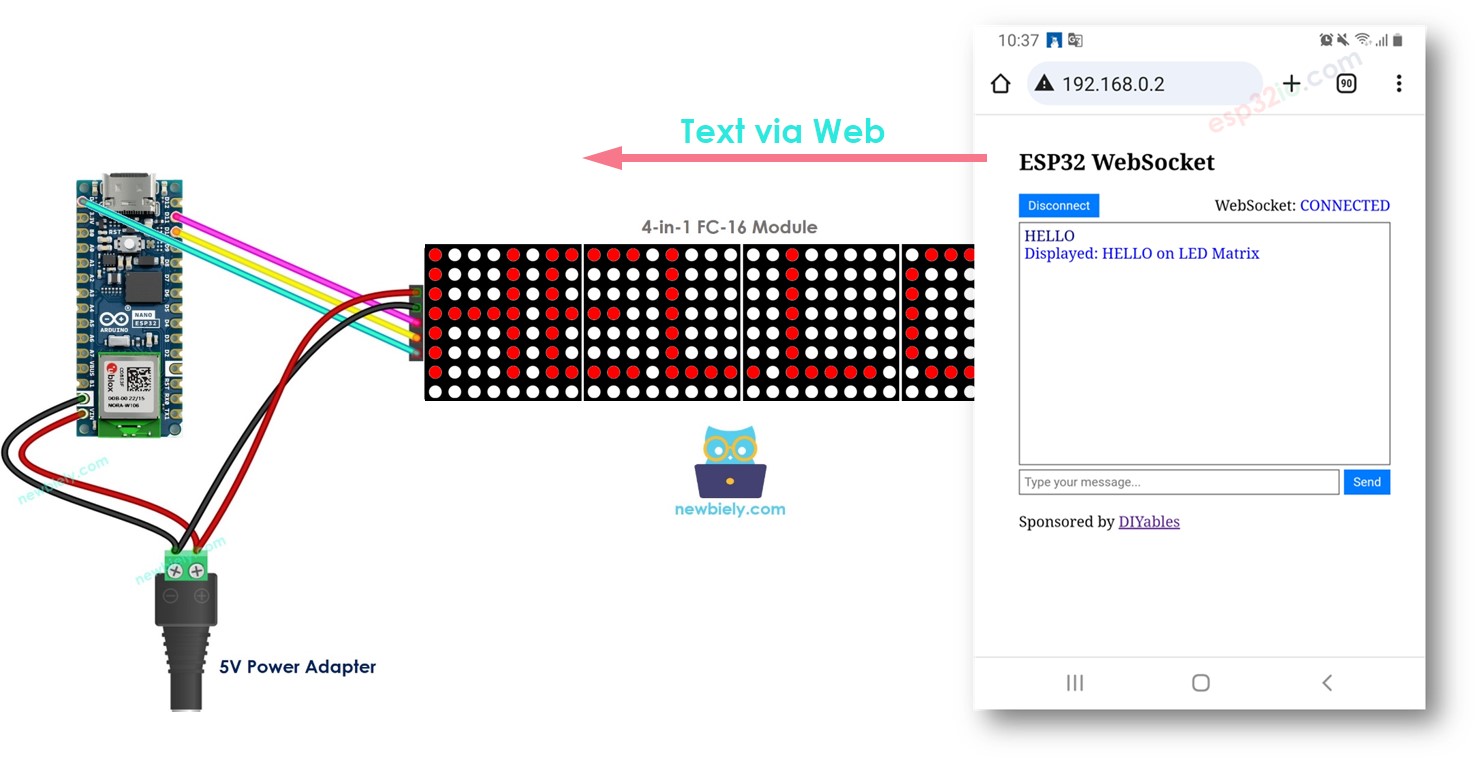
Provides the web interface that users can send the message to Arduino Nano ESP32
Displays the messages on the LED matrix once receiving the message.
Disclosure: Some of the links provided in this section are Amazon affiliate links. We may receive a commission for any purchases made through these links at no additional cost to you. Additionally, some of these links are for products from our own brand, DIYables .
Overview of LED Matrix and Web Server
We can use a pure HTTP to send a text from web interface to Arduino Nano ESP32. However, using WebSocket makes it looks more responsive and does not add much difficuity, So in this tutorial, we will use the WebSocket.
Unfamiliar with LED Matrix and Web Server and WebSocket, including their pinouts, functionality, and programming? Explore comprehensive tutorials on these topics below:
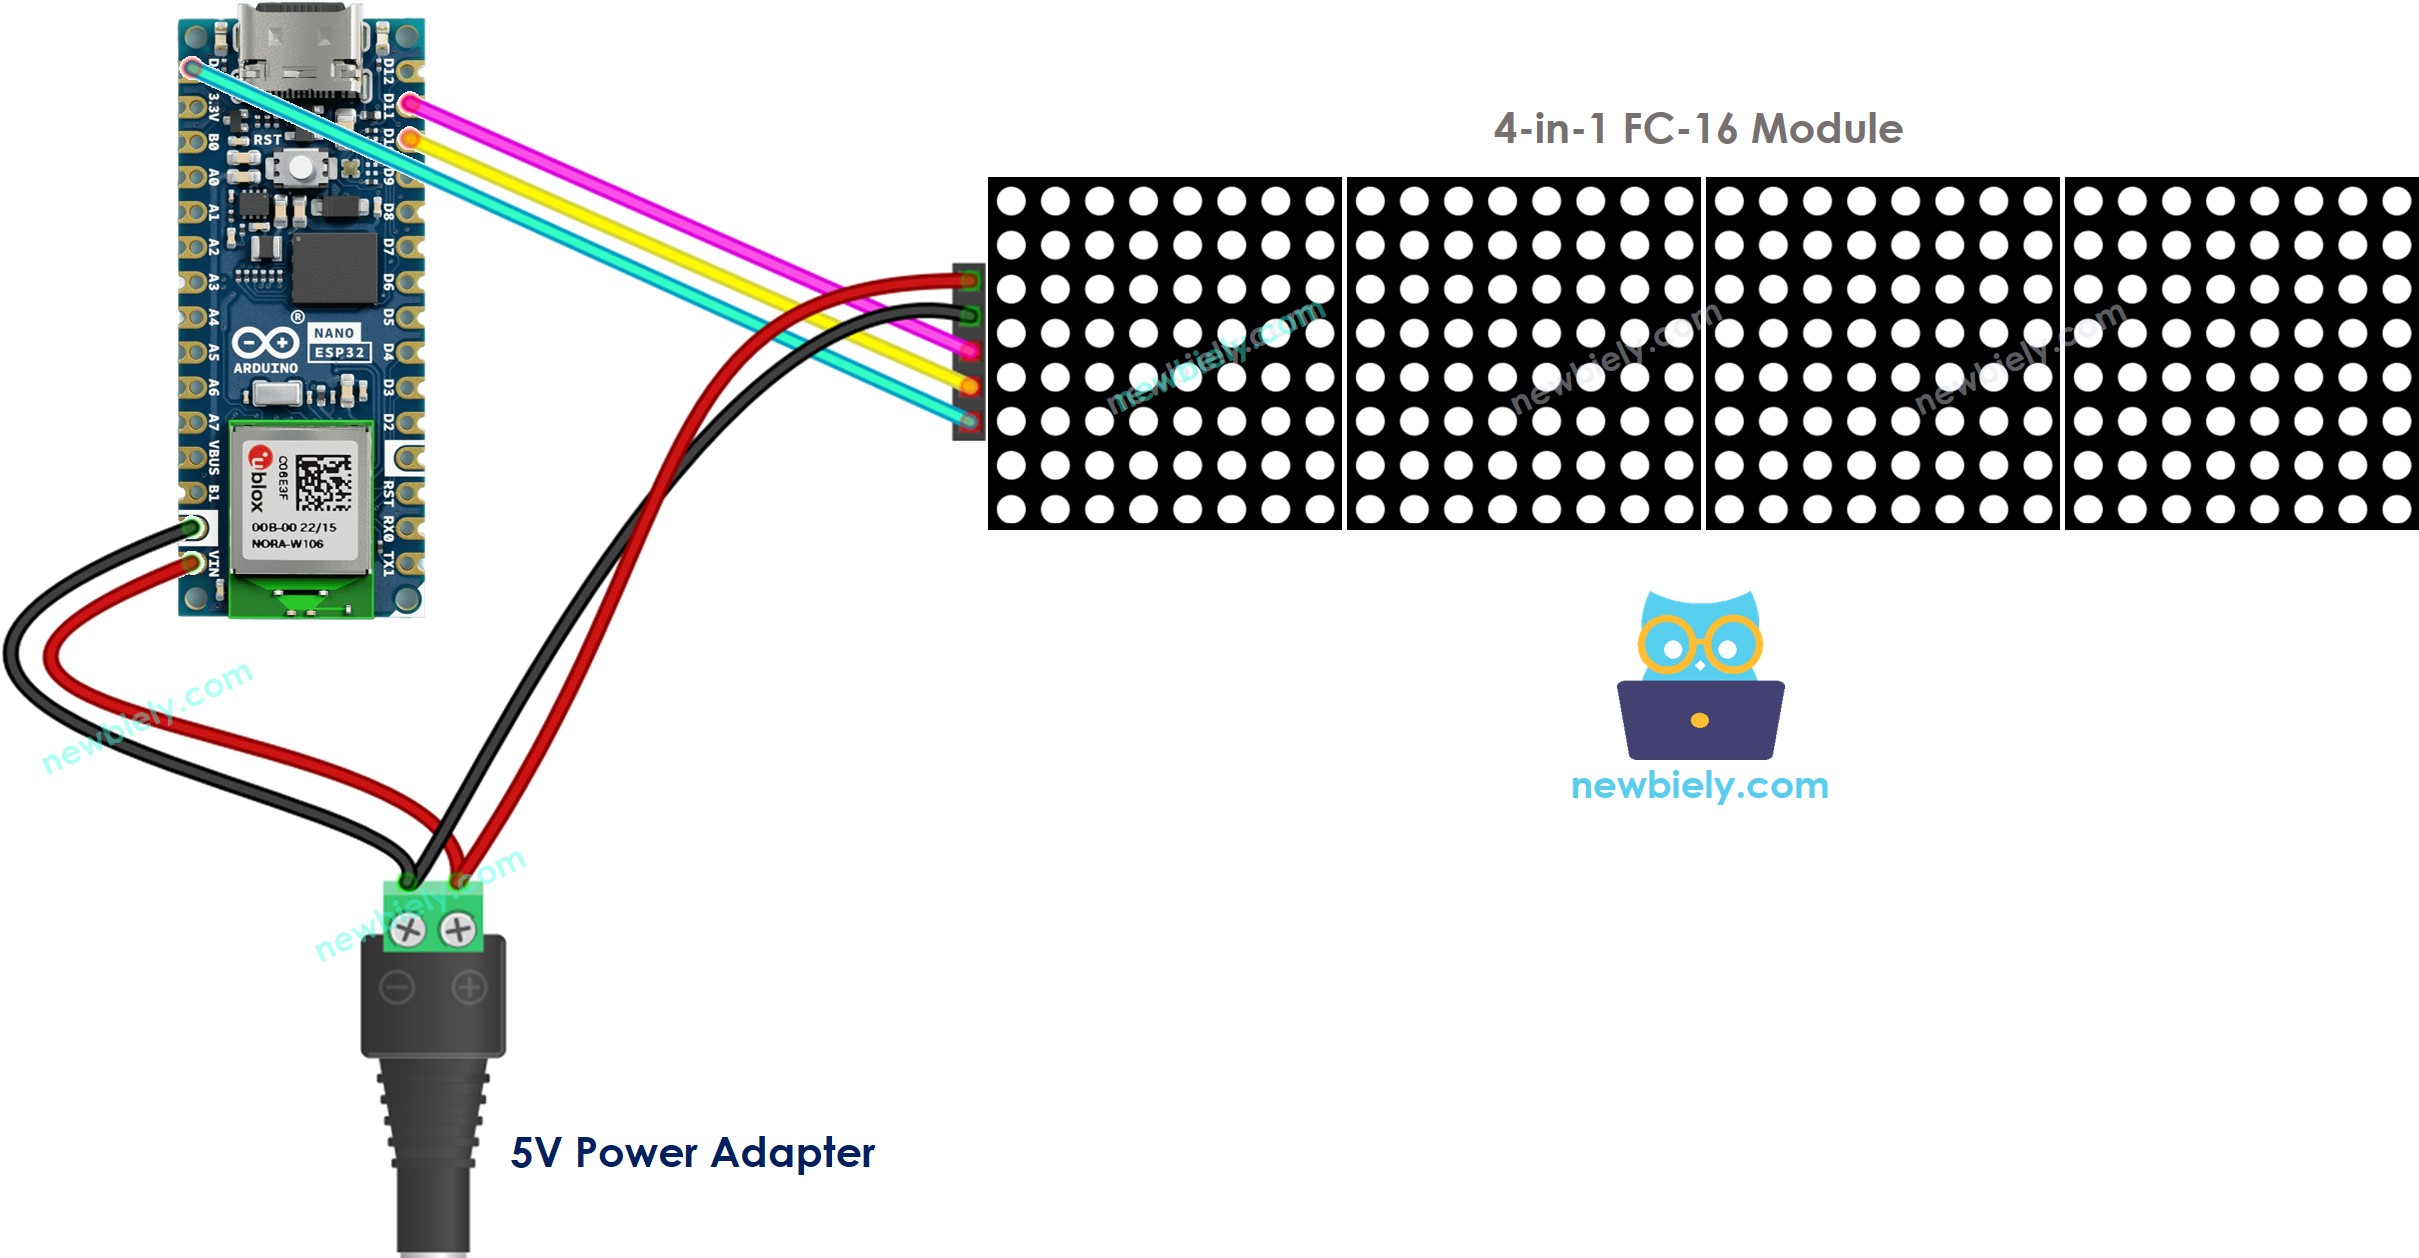
Connect the Arduino Nano ESP32 board to your PC via a micro USB caweb server
Open Arduino IDE on your PC.
Select the right Arduino Nano ESP32 board (e.g. Arduino Nano ESP32 and COM port.
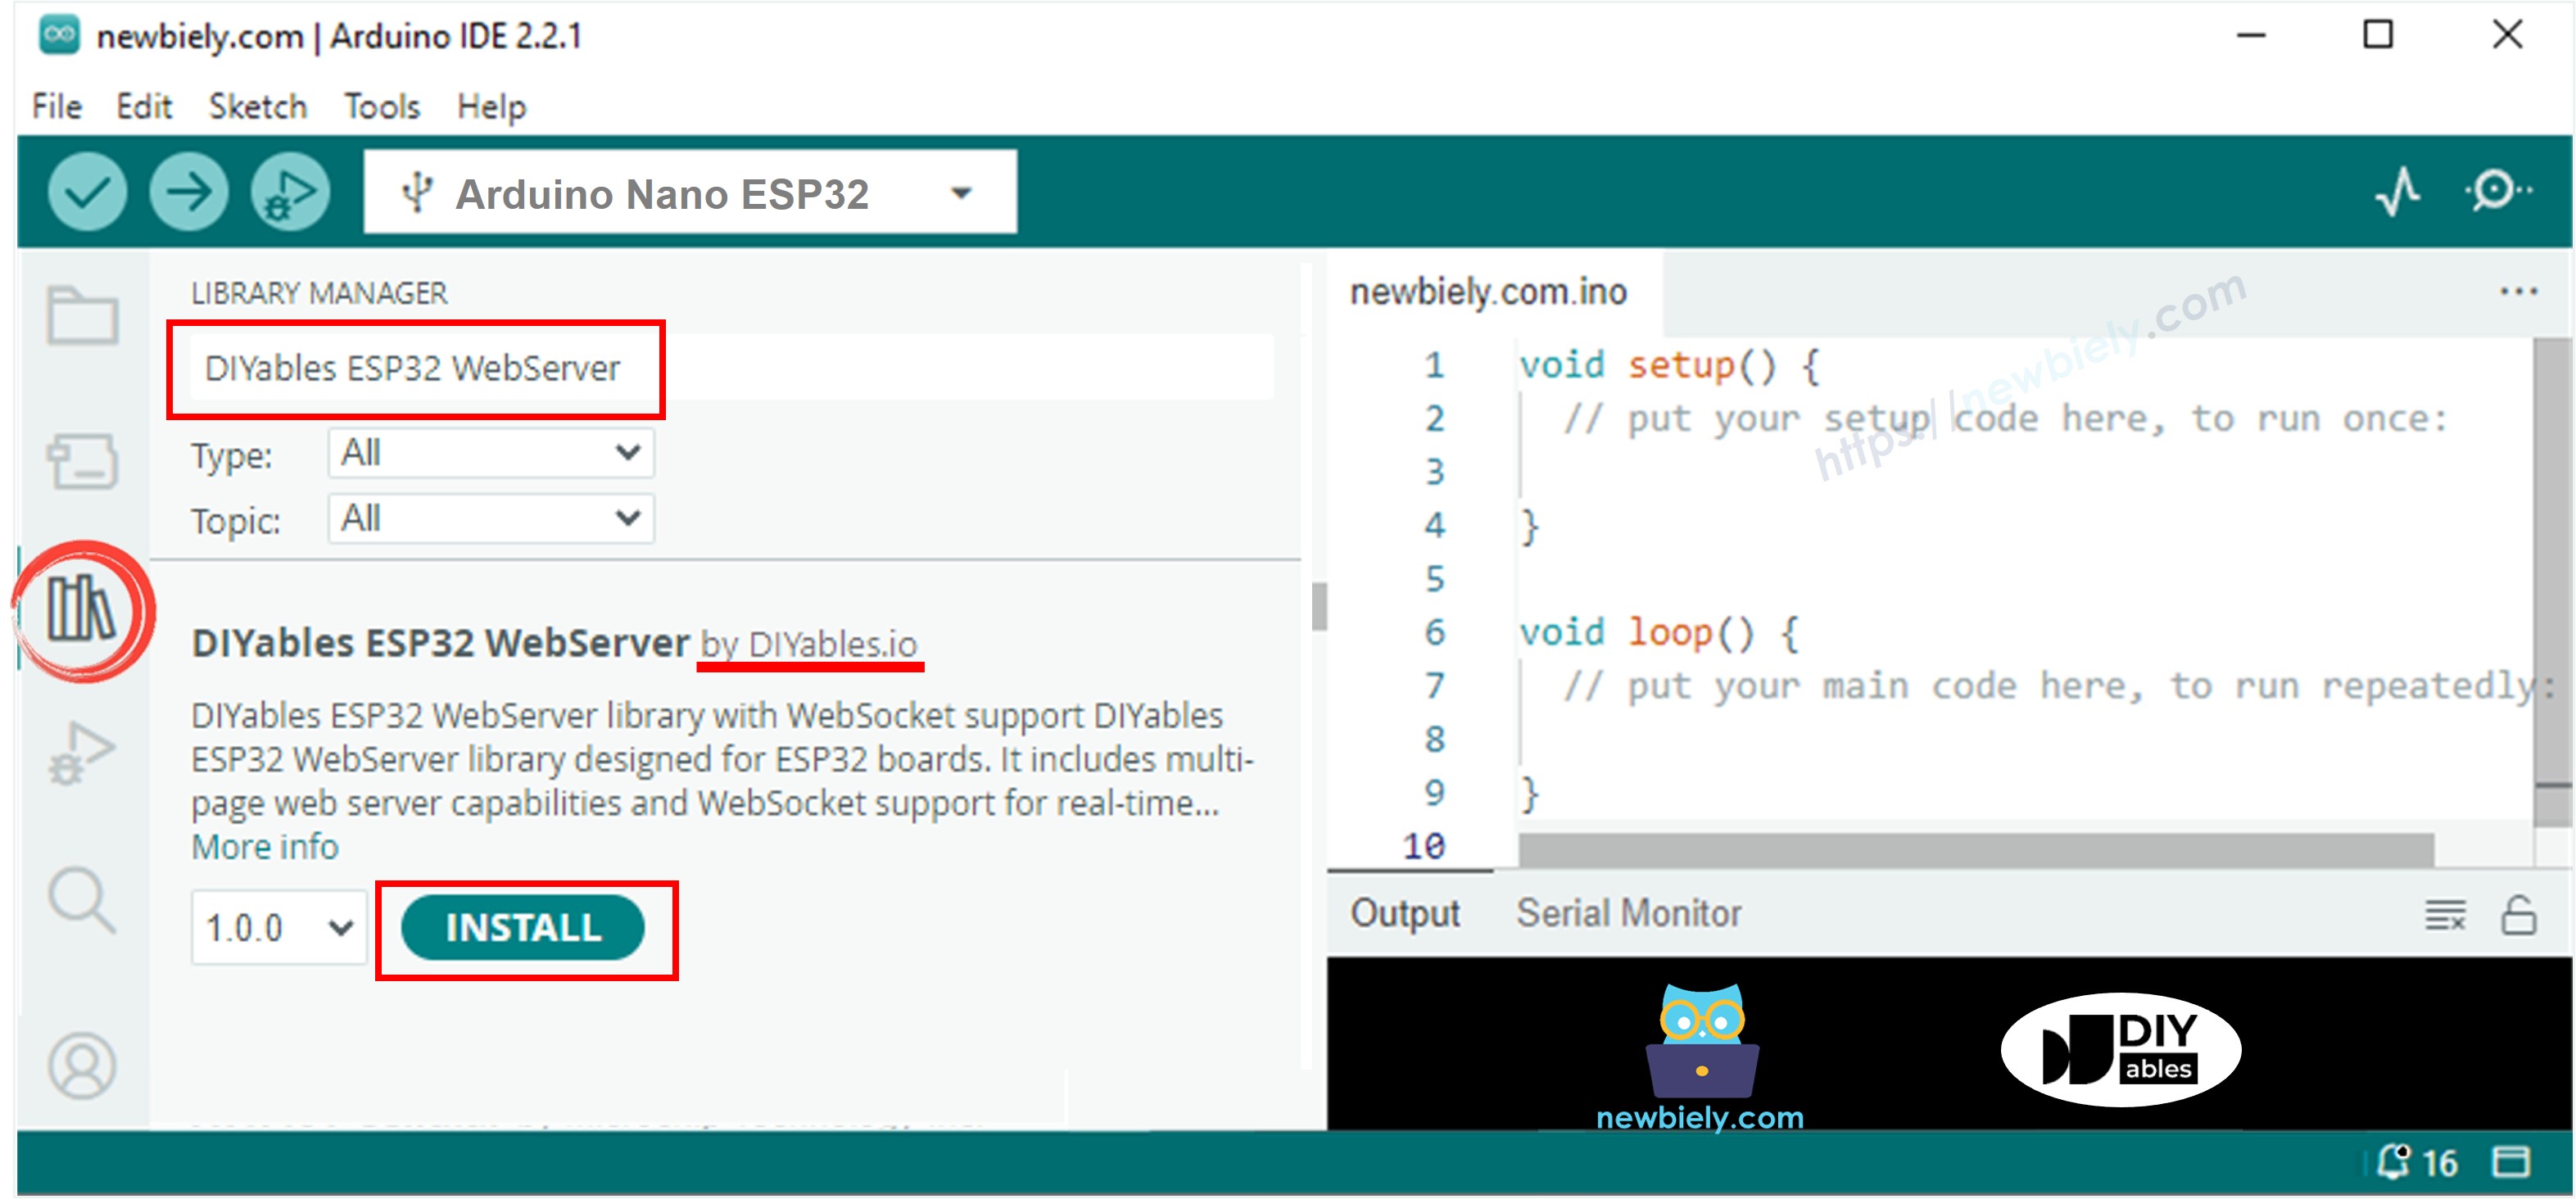
Open the Library Manager by clicking on the Library Manager icon on the left navigation bar of Arduino IDE.
Search “DIYables ESP32 WebServer”, then find the Web Server library created by DIYables.
Click Install button to install the Web Server library.
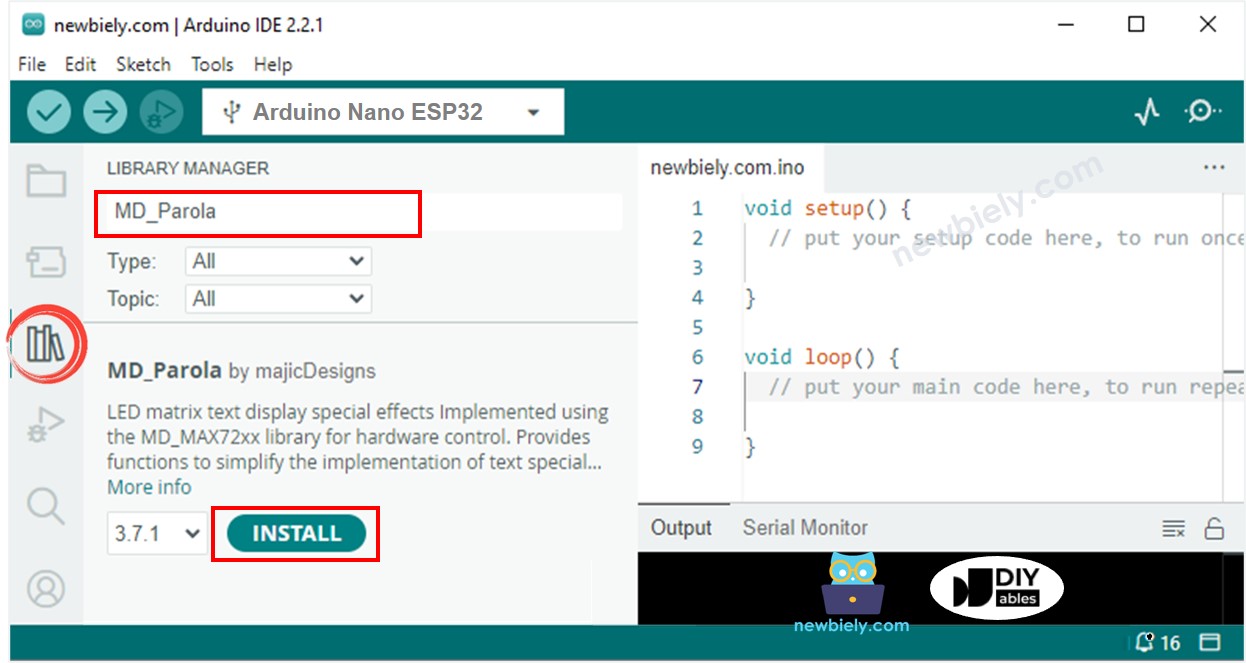
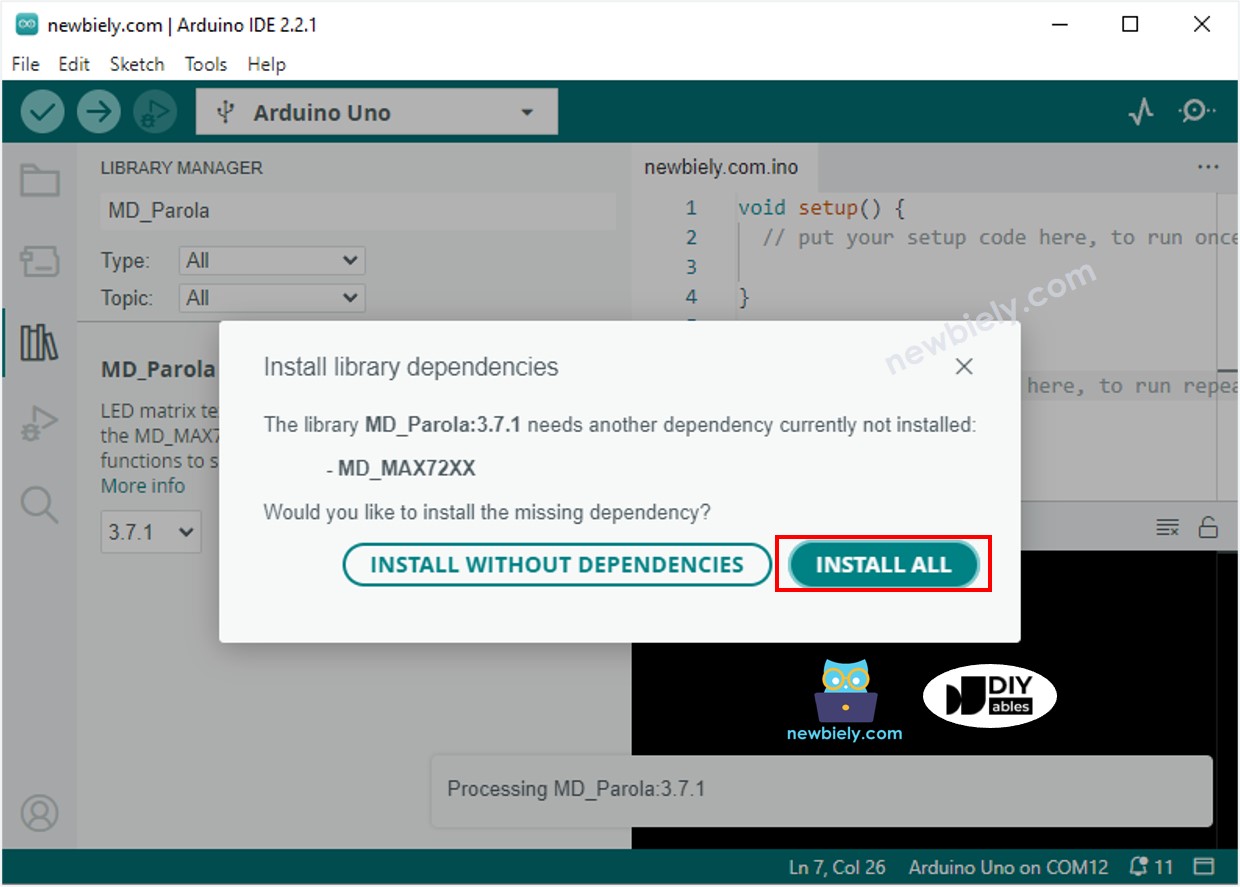
Search “MD_Parola”, then find the MD_Parola library
Click Install button.
You will be asked to install the “MD_MAX72XX” library
Click Install All button to install the dependency.
On Arduino IDE, create new sketch, Give it a name, for example, newbiely.com.ino
Copy the below code and open with Arduino IDE
/* * This Arduino Nano ESP32 code was developed by newbiely.com * * This Arduino Nano ESP32 code is made available for public use without any restriction * * For comprehensive instructions and wiring diagrams, please visit: * https://newbiely.com/tutorials/arduino-nano-esp32/arduino-nano-esp32-led-matrix-via-web */#include <DIYables_ESP32_WebServer.h>#include"index.h"#include <MD_Parola.h>#include <MD_MAX72xx.h>#define HARDWARE_TYPE MD_MAX72XX::FC16_HW#define MAX_DEVICES 4 // 4 blocks#define CS_PIN D10 // The Arduino Nano ESP32 pin// WiFi credentialsconstchar WIFI_SSID[] = "YOUR_WIFI_SSID";constchar WIFI_PASSWORD[] = "YOUR_WIFI_PASSWORD";// Create web server instanceDIYables_ESP32_WebServer server;DIYables_ESP32_WebSocket* webSocket;// create an instance of the MD_Parola classMD_Parola ledMatrix = MD_Parola(HARDWARE_TYPE, CS_PIN, MAX_DEVICES);// Web Page handlersvoid handleHome(WiFiClient& client, const String& method, const String& request, const QueryParams& params, const String& jsonData) { server.sendResponse(client, HTML_CONTENT);}// WebSocket event handlersvoid onWebSocketOpen(net::WebSocket& ws) {Serial.println("New WebSocket connection");// Send welcome messageconstchar welcome[] = "Connected to ESP32 WebSocket Server!";}void onWebSocketMessage(net::WebSocket& ws, const net::WebSocket::DataType dataType, const char* message, uint16_tlength) {Serial.print("WebSocket Received (");Serial.print(length);Serial.print(" bytes): ");Serial.println(message); ledMatrix.displayClear(); // clear led matrix display ledMatrix.displayScroll(message, PA_CENTER, PA_SCROLL_LEFT, 100);// Broadcast response to all connected clients using the libraryif (webSocket != nullptr) {String response = "Displayed: " + String(message) + "on LED Matrix"; webSocket->broadcastTXT(response);Serial.print("WebSocket sent (");Serial.print(response.length());Serial.print(" bytes): ");Serial.println(response); }}void onWebSocketClose(net::WebSocket& ws, const net::WebSocket::CloseCode code, const char* reason, uint16_tlength) {Serial.println("WebSocket client disconnected");}voidsetup() {Serial.begin(9600);delay(1000);Serial.println("Arduino Nano ESP32 Web Server and WebSocket Server"); ledMatrix.begin(); // initialize the object ledMatrix.setIntensity(15); // set the brightness of the LED matrix display (from 0 to 15) ledMatrix.displayClear(); // clear led matrix display ledMatrix.displayScroll("newbiely.com", PA_CENTER, PA_SCROLL_LEFT, 100);// Configure web server routes server.addRoute("/", handleHome);// Start web server with WiFi connection server.begin(WIFI_SSID, WIFI_PASSWORD);// Enable WebSocket functionality webSocket = server.enableWebSocket(81);if (webSocket != nullptr) {// Set up WebSocket event handlers webSocket->onOpen(onWebSocketOpen); webSocket->onMessage(onWebSocketMessage); webSocket->onClose(onWebSocketClose); } else {Serial.println("Failed to start WebSocket server"); }}voidloop() {// Then handle HTTP requests server.handleClient();// Handle WebSocket server.handleWebSocket();if (ledMatrix.displayAnimate()) { ledMatrix.displayReset(); }}
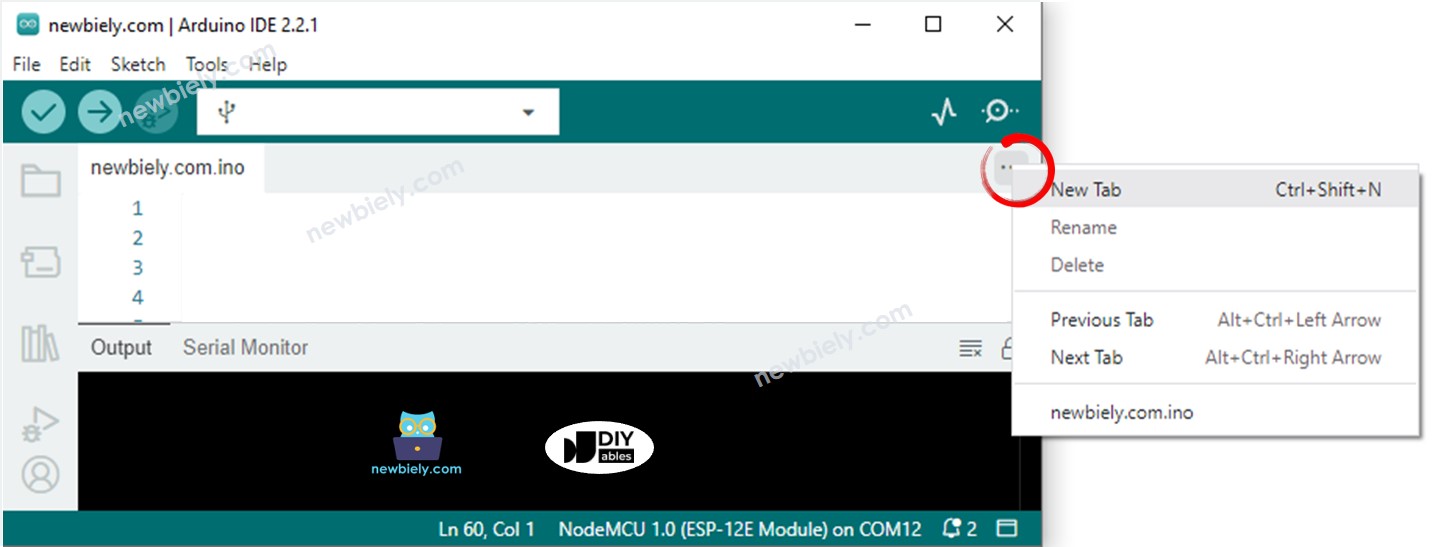
Create the index.h file On Arduino IDE by:
Either click on the button just below the serial monitor icon and choose New Tab, or use Ctrl+Shift+N keys.
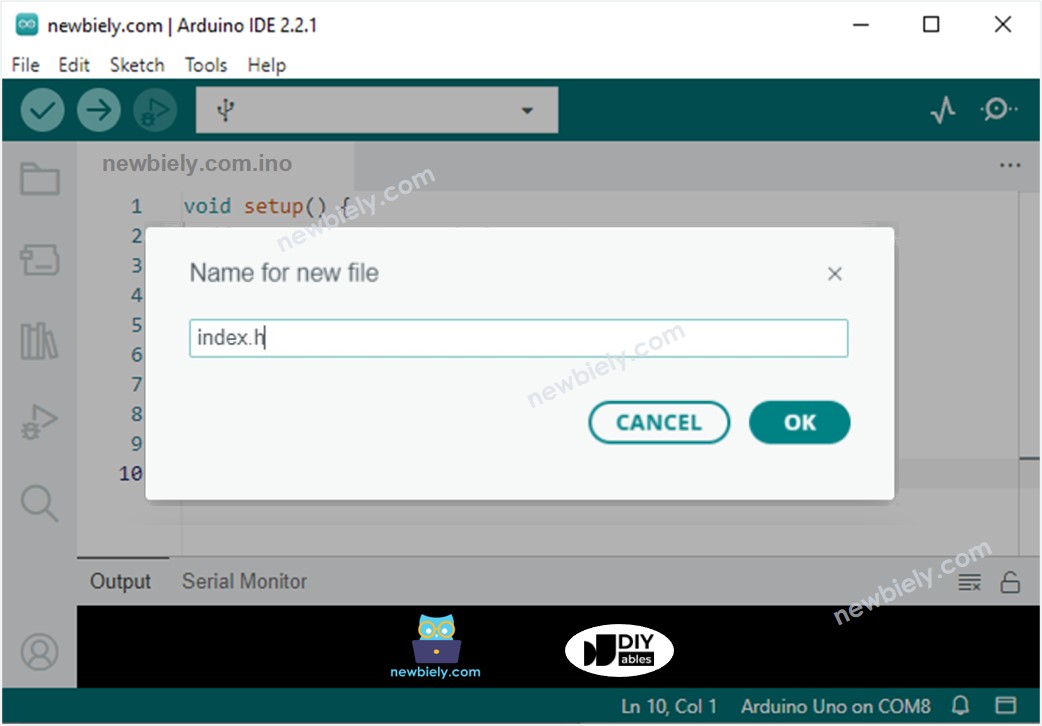
Give the file's name index.h and click OK button
Copy the below code and paste it to the index.h.
/* * This Arduino Nano ESP32 code was developed by newbiely.com * * This Arduino Nano ESP32 code is made available for public use without any restriction * * For comprehensive instructions and wiring diagrams, please visit: * https://newbiely.com/tutorials/arduino-nano-esp32/arduino-nano-esp32-led-matrix-via-web */constchar *HTML_CONTENT = R"=====(<!DOCTYPE html><!-- saved from url=(0019)http://192.168.0.2/ --><html><head><meta http-equiv="Content-Type" content="text/html; charset=windows-1252"><title>Arduino Nano ESP32 WebSocket</title><meta name="viewport" content="width=device-width, initial-scale=0.7"><link rel="icon" href="https://diyables.io/images/page/diyables.svg"><style>/* Add some basic styling for the chat window */body { font-size: 16px;}.chat-container { width: 400px; margin: 0 auto; padding: 10px;}.chat-messages { height: 250px; overflow-y: auto; border: 1px solid #444; padding: 5px; margin-bottom: 5px;}.user-input {display: flex; margin-bottom: 20px;}.user-input input { flex: 1; border: 1px solid #444; padding: 5px;}.user-input button { margin-left: 5px; background-color: #007bff; color: #fff; border: none; padding: 5px 10px;cursor: pointer;}.websocket {display: flex; align-items: center; margin-bottom: 5px;}.websocket button { background-color: #007bff; color: #fff; border: none; padding: 5px 10px;cursor: pointer;}.websocket .label { margin-left: auto;}</style><script>var ws;var wsm_max_len = 4096; /* bigger length causes uart0 buffer overflow with low speed smart device */function update_text(text) { var chat_messages = document.getElementById("chat-messages"); chat_messages.innerHTML += text + '<br>'; chat_messages.scrollTop = chat_messages.scrollHeight;}function send_onclick() {if(ws != null) { var message = document.getElementById("message").value;if (message) { document.getElementById("message").value = ""; ws.send(message + "\n"); update_text('<span style="color:navy">' + message + '</span>');// You can send the message to the server or process it as needed } }}function connect_onclick() { if(ws == null) { ws = new WebSocket("ws://" + window.location.host + ":81"); document.getElementById("ws_state").innerHTML = "CONNECTING"; ws.onopen = ws_onopen; ws.onclose = ws_onclose; ws.onmessage = ws_onmessage; } else ws.close();}function ws_onopen() { document.getElementById("ws_state").innerHTML = "<span style='color:blue'>CONNECTED</span>"; document.getElementById("bt_connect").innerHTML = "Disconnect"; document.getElementById("chat-messages").innerHTML = "";}function ws_onclose() { document.getElementById("ws_state").innerHTML = "<span style='color:gray'>CLOSED</span>"; document.getElementById("bt_connect").innerHTML = "Connect"; ws.onopen = null; ws.onclose = null; ws.onmessage = null; ws = null;}function ws_onmessage(e_msg) { e_msg = e_msg || window.event; // MessageEvent console.log(e_msg.data); update_text('<span style="color:blue">' + e_msg.data + '</span>');}</script></head><body> <div class="chat-container"> <h2>Arduino Nano ESP32 WebSocket</h2> <div class="websocket"> <buttonclass="connect-button" id="bt_connect" onclick="connect_onclick()">Connect</button> <span class="label">WebSocket: <span id="ws_state"><span style="color:blue">CLOSED</span></span></span> </div> <div class="chat-messages" id="chat-messages"></div> <div class="user-input"> <input type="text" id="message" placeholder="Type your message..."> <button onclick="send_onclick()">Send</button> </div> <div class="sponsor">Sponsored by <a href="https://amazon.com/diyables">DIYables</a></div></div></body></html>)=====";
Now you have the code in two files: newbiely.com.ino and index.h
Click Upload button on Arduino IDE to upload code to Arduino Nano ESP32.
Open the Serial Monitor
Check out the result on Serial Monitor.
Newbiely | Arduino IDE 2.3.8
──
☐
✕
File
Edit
Sketch
Tools
Help
Arduino Nano ESP32
Newbiely.ino
···
8Serial.println("Hello World!");
Output
Serial Monitor
Message (Enter to send message to 'Arduino Nano ESP32' on 'COM15')
New Line
9600 baud
Connecting to WiFi...
Connected to WiFi
Arduino Nano ESP32 Web Server's IP address IP address: 192.168.0.2
Ln 11, Col 1
Arduino Nano ESP32 on COM15
2
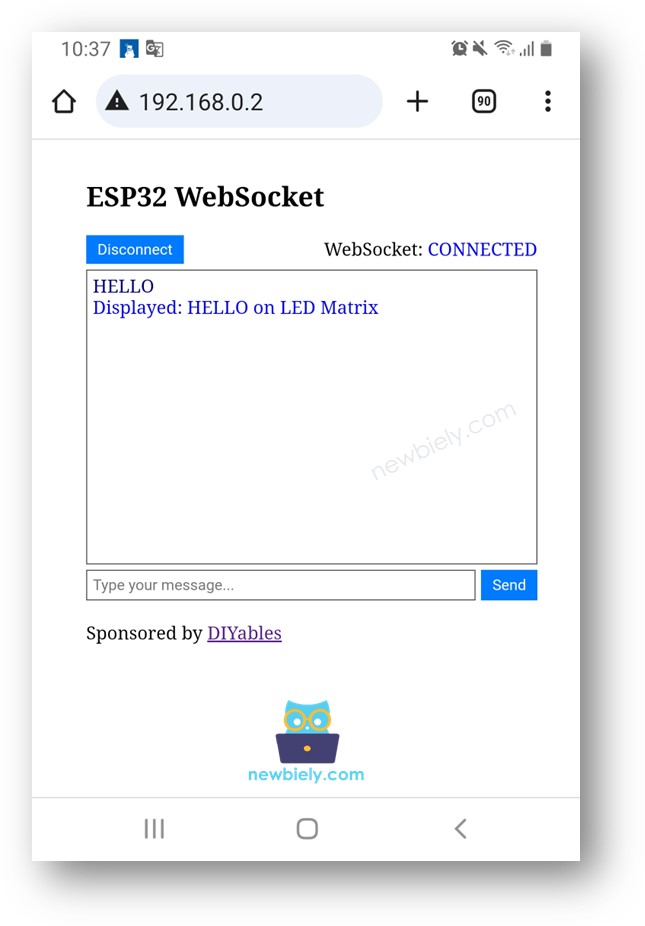
Take note of the IP address displayed, and enter this address into the address bar of a web browser on your smartphone or PC.
You will see the webpage it as below:
Click the CONNECT button to connect the webpage to Arduino Nano ESP32 via WebSocket.
Type some words and send them to Arduino Nano ESP32.
You will see the response from Arduino Nano ESP32.
※ NOTE THAT:
If you modify the HTML content in the index.h and does not touch anything in newbiely.com.ino file, when you compile and upload code to ESP32, Arduino IDE will not update the HTML content.
To make Arduino IDE update the HTML content in this case, make a change in the newbiely.com.ino file (e.g. adding empty line, add a comment....)
Line-by-line Code Explanation
The above Arduino Nano ESP32 code contains line-by-line explanation. Please read the comments in the code!
Please feel free to share the link of this tutorial. However, Please do not use our content on any other websites. We invested a lot of effort and time to create the content, please respect our work!