Arduino Nano ESP32 - WebSocket

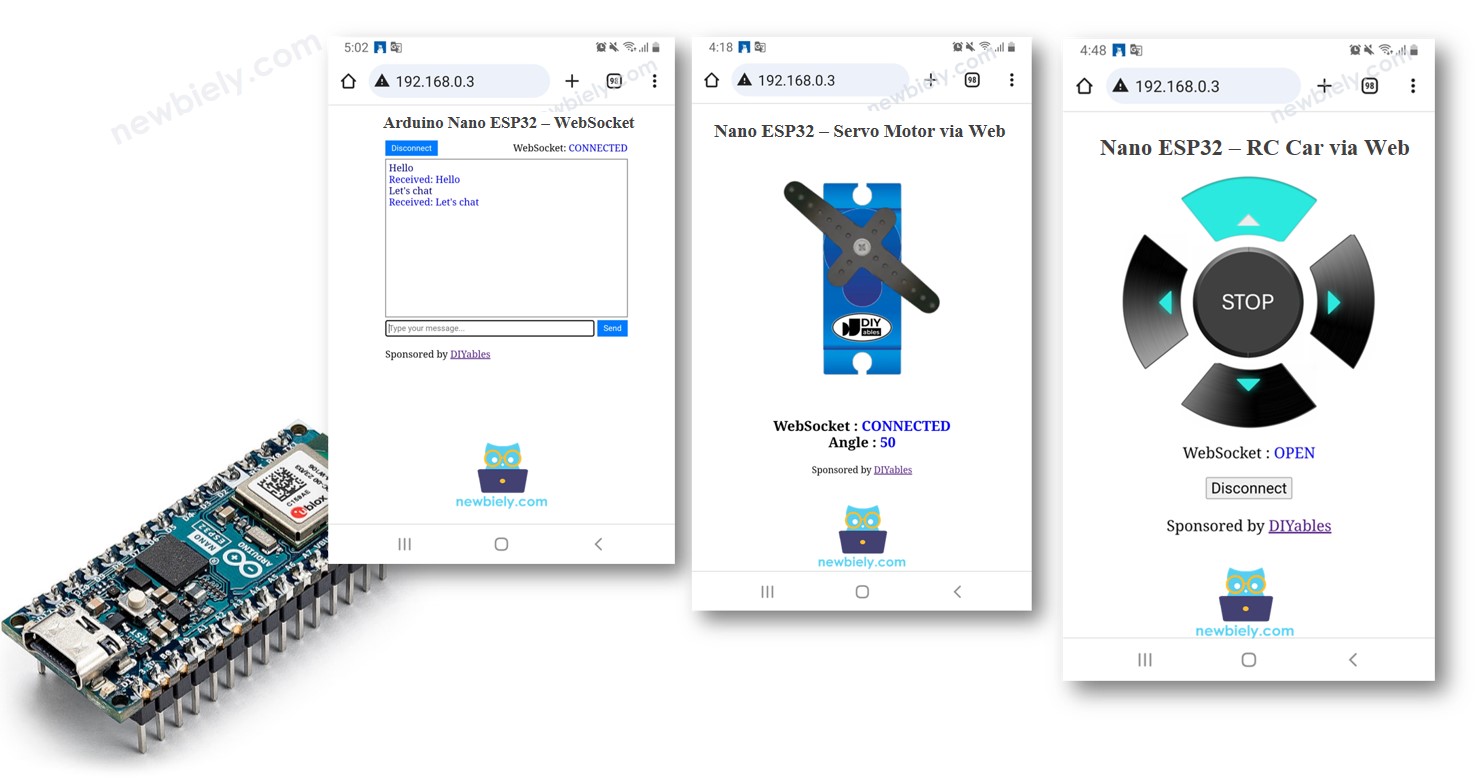
In this tutorial, we will learn what WebSocket is, why we need to use it to smoothly control ESP32, and how to use WebSocket with Arduino Nano ESP32. In a practical example, we will learn how to create a chat application between the web browser and ESP32, allowing you to:

Arduino Nano ESP32 websocket

Hardware Preparation

1×Arduino Nano ESP32
1×USB Cable Type-C
1×(Recommended) Screw Terminal Adapter for Arduino Nano

Or you can buy the following sensor kits:

1×DIYables Sensor Kit (30 sensors/displays)
1×DIYables Sensor Kit (18 sensors/displays)
Disclosure: Some of the links provided in this section are Amazon affiliate links. We may receive a commission for any purchases made through these links at no additional cost to you. We appreciate your support.

What is Arduino Nano ESP32 Websocket?

Now, you might be asking, "What's WebSocket?" It's pretty simple: WebSocket is a technology that lets a web browser talk directly to a web server in real-time.

  • Without WebSocket, you have to refresh the webpage to get updates. That's not very convenient.
  • With WebSocket, the webpage and the server stay connected all the time. This means they can share information instantly without having to reload the page.

You probably run into WebSocket in everyday web apps like online games, instant messaging, and stock market updates.

Why we need WebSocket to smoothly control ESP32?

Imagine you want to control your remote-controlled car using a web interface on your phone or computer. Without WebSocket, every time you want to change the car's direction or speed, you'd need to refresh the web page. It's like having to press a "reload" button each time you want your command to reach the car.

Now, with WebSocket, it's like having a continuous and direct connection between your phone or computer and the car. You no longer need to refresh the page every time you want to steer the car or adjust its speed. It's as if the car is always listening to your commands in real-time, without any delays caused by constant page reloading.

In general, WebSocket allows you to:

  • Send data from the web browser to Arduino Nano ESP32 without reloading the webpage.
  • Send data from Arduino Nano ESP32 to the web browser without reloading the webpage.

This enables two-way communication in real-time manner.

Benefits of WebSocket with ESP32:

  • Real-Time Control: WebSocket enables instant communication with the ESP32, ensuring quick responses to commands for a seamless user experience.
  • Persistent Connection: Maintain a continuous link without refreshing the control page, creating an always-ready line of communication for immediate instructions.
  • Efficiency: Experience prompt responses without the need for constant page reloading, enhancing overall user enjoyment and efficiency.

Web Chat with Arduino Nano ESP32 via WebSocket

The webpage's content (HTML, CSS, JavaScript) are stored separately on an index.h file. So, we will have two code files on Arduino IDE:

  • An .ino file that is Arduino Nano ESP32 code, which creates a web sever and WebSocket server
  • An .h file, which contains the webpage's content.

Detailed Instructions

  • If this is the first time you use Arduino Nano ESP32, see how to setup environment for Arduino Nano ESP32 on Arduino IDE.
  • Connect the Arduino Nano ESP32 board to your PC via a USB cable
  • Open Arduino IDE on your PC.
  • Select the right Arduino Nano ESP32 board (e.g. Arduino Nano ESP32) and COM port.
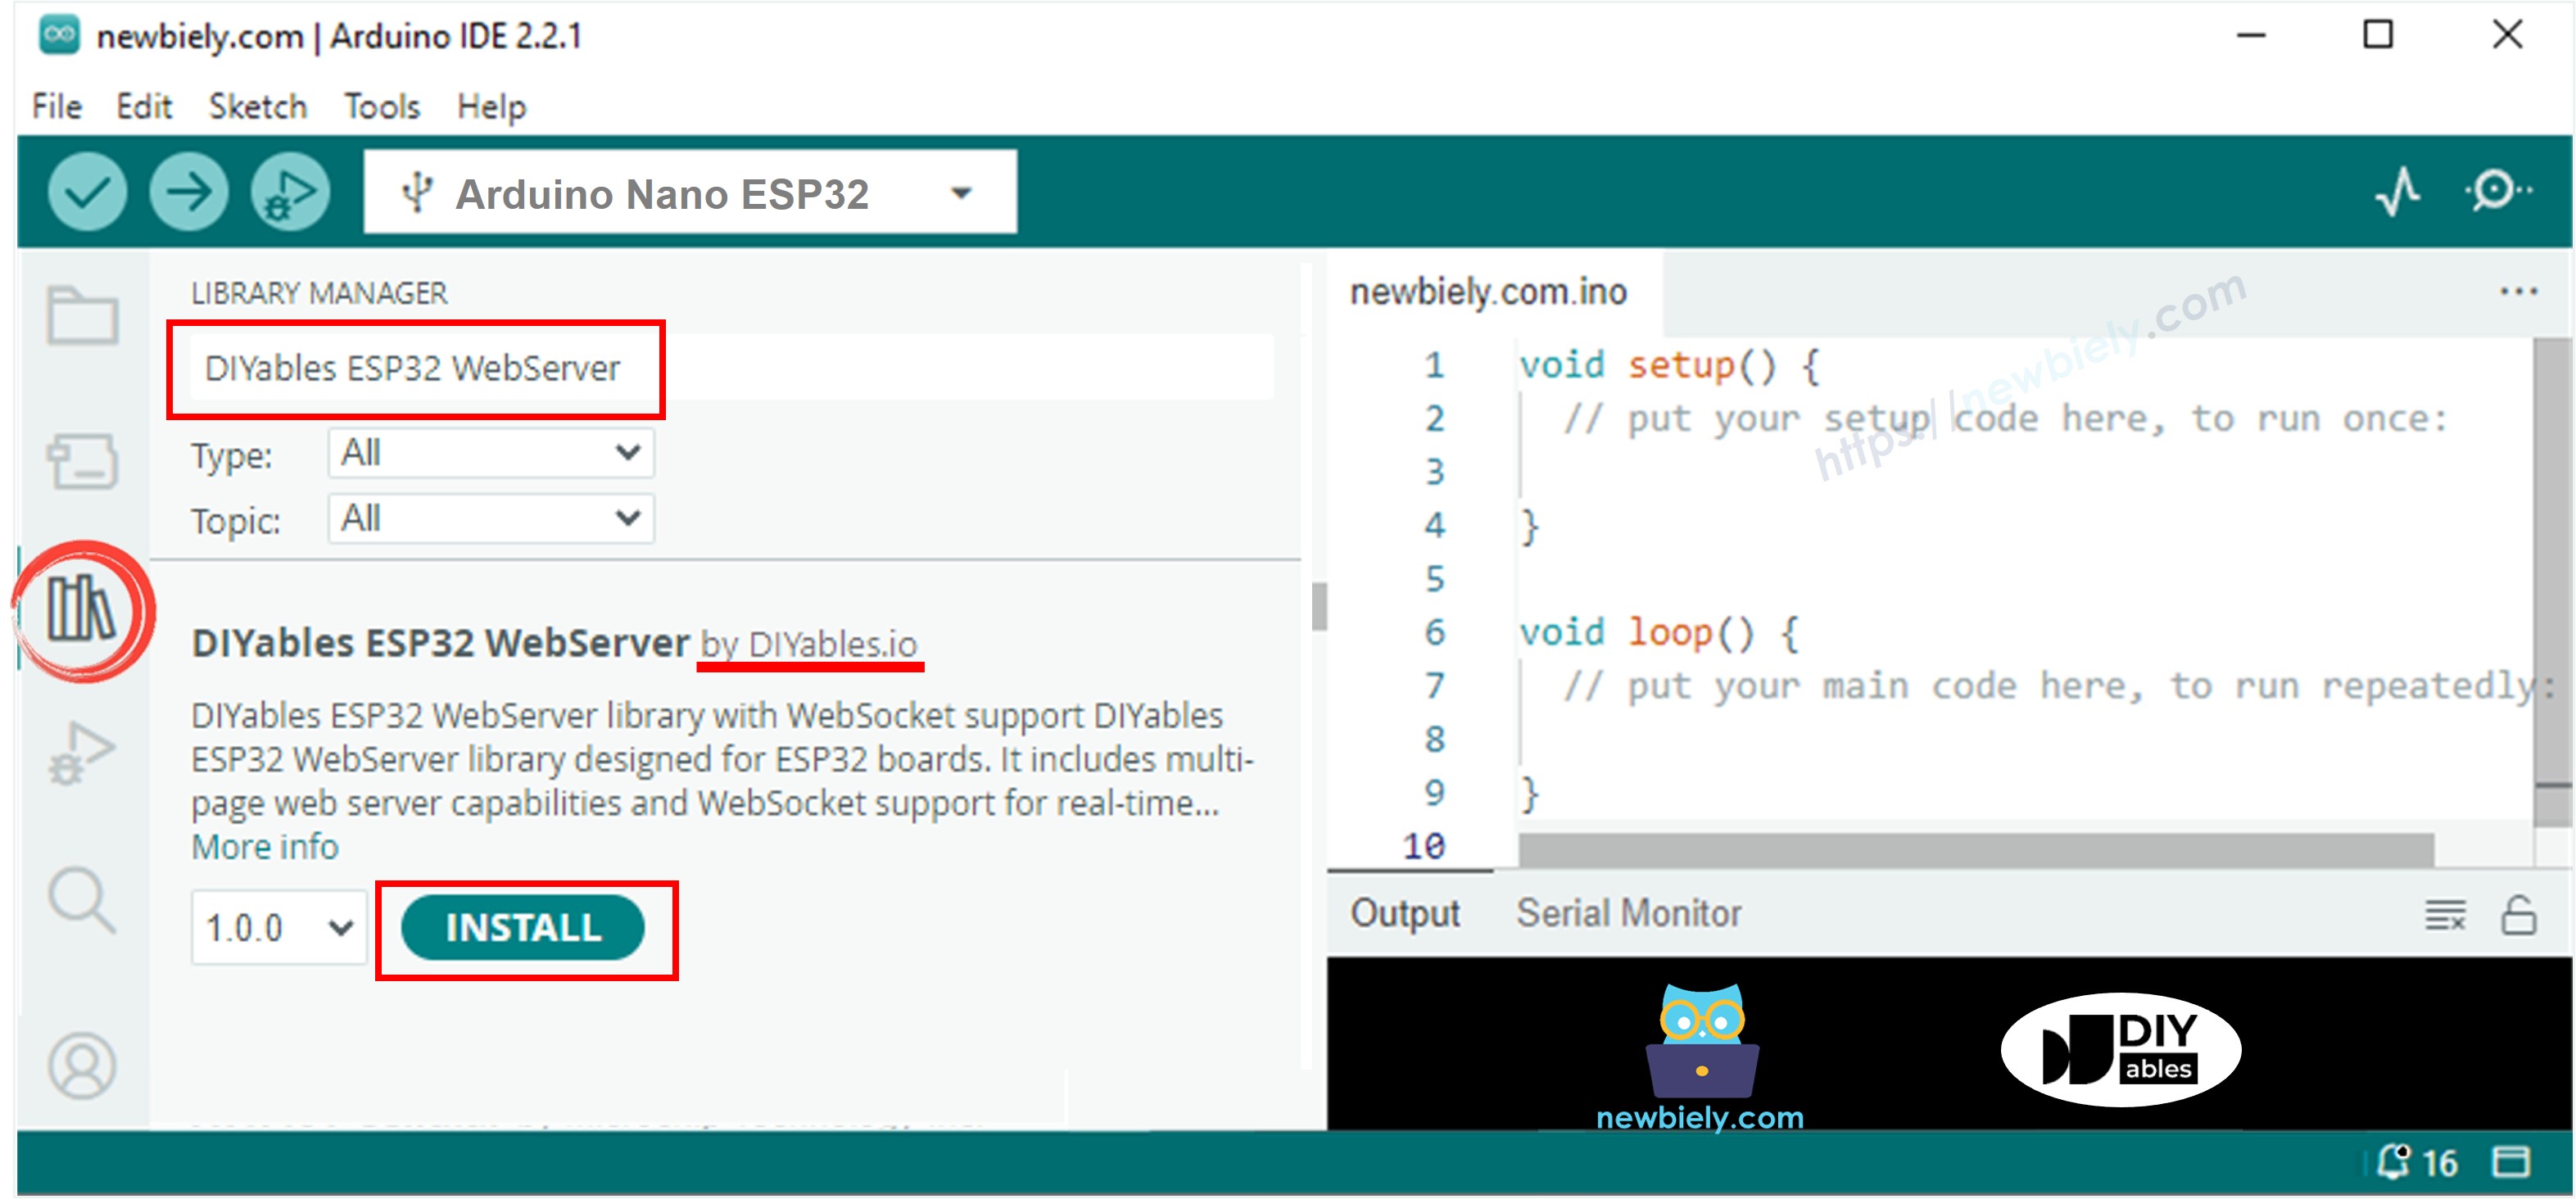
  • Open the Library Manager by clicking on the Library Manager icon on the left navigation bar of Arduino IDE.
  • Search “ESPAsyncWebServer”, then find the ESPAsyncWebServer created by lacamera.
  • Click Install button to install ESPAsyncWebServer library.
Arduino Nano ESP32 ESPAsyncWebServer library
  • You will be asked to install the dependency. Click Install All button.
Arduino Nano ESP32 ESPAsyncWebServer dependencies library
  • Search “WebSockets”, then find the WebSockets created by Markus Sattler.
  • Click Install button to install WebSockets library.
Arduino Nano ESP32 WebSockets library
  • On Arduino IDE, create new sketch, Give it a name, for example, newbiely.com.ino
  • Copy the below code and open with Arduino IDE
/* * This Arduino Nano ESP32 code was developed by newbiely.com * * This Arduino Nano ESP32 code is made available for public use without any restriction * * For comprehensive instructions and wiring diagrams, please visit: * https://newbiely.com/tutorials/arduino-nano-esp32/arduino-nano-esp32-websocket */ #include <WiFi.h> #include <ESPAsyncWebServer.h> #include <WebSocketsServer.h> #include "index.h" const char* ssid = "YOUR_WIFI_SSID"; // CHANGE IT const char* password = "YOUR_WIFI_PASSWORD"; // CHANGE IT AsyncWebServer server(80); WebSocketsServer webSocket = WebSocketsServer(81); // WebSocket server on port 81 void webSocketEvent(uint8_t num, WStype_t type, uint8_t* payload, size_t length) { switch (type) { case WStype_DISCONNECTED: Serial.printf("[%u] Disconnected!\n", num); break; case WStype_CONNECTED: { IPAddress ip = webSocket.remoteIP(num); Serial.printf("[%u] Connected from %d.%d.%d.%d\n", num, ip[0], ip[1], ip[2], ip[3]); } break; case WStype_TEXT: Serial.printf("[%u] Received text: %s\n", num, payload); // Send a response back to the client webSocket.sendTXT(num, "Received: " + String((char*)payload)); break; } } void setup() { Serial.begin(9600); delay(1000); // Connect to Wi-Fi WiFi.begin(ssid, password); while (WiFi.status() != WL_CONNECTED) { delay(1000); Serial.println("Connecting to WiFi..."); } Serial.println("Connected to WiFi"); // Initialize WebSocket server webSocket.begin(); webSocket.onEvent(webSocketEvent); // Serve a basic HTML page with JavaScript to create the WebSocket connection server.on("/", HTTP_GET, [](AsyncWebServerRequest* request) { Serial.println("Web Server: received a web page request"); String html = HTML_CONTENT; // Use the HTML content from the index.h file request->send(200, "text/html", html); }); server.begin(); Serial.print("Arduino Nano ESP32 Web Server's IP address: "); Serial.println(WiFi.localIP()); } void loop() { webSocket.loop(); // TODO: Your code here }
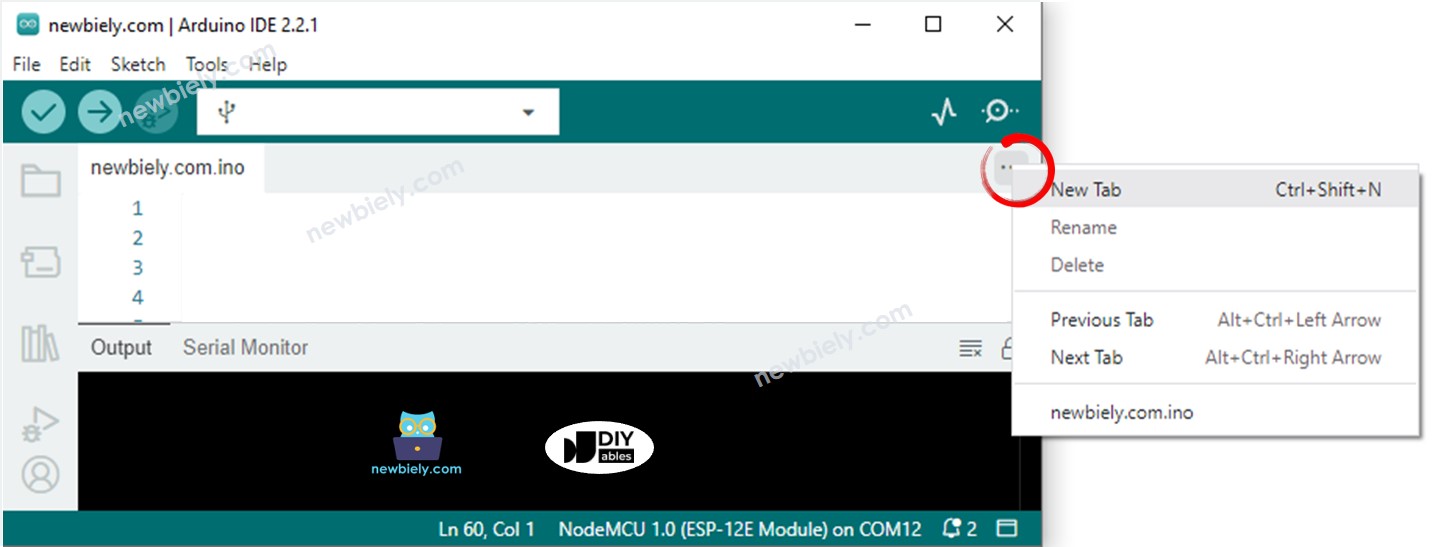
  • Create the index.h file On Arduino IDE by:
    • Either click on the button just below the serial monitor icon and choose New Tab, or use Ctrl+Shift+N keys.
    Arduino IDE 2 adds file
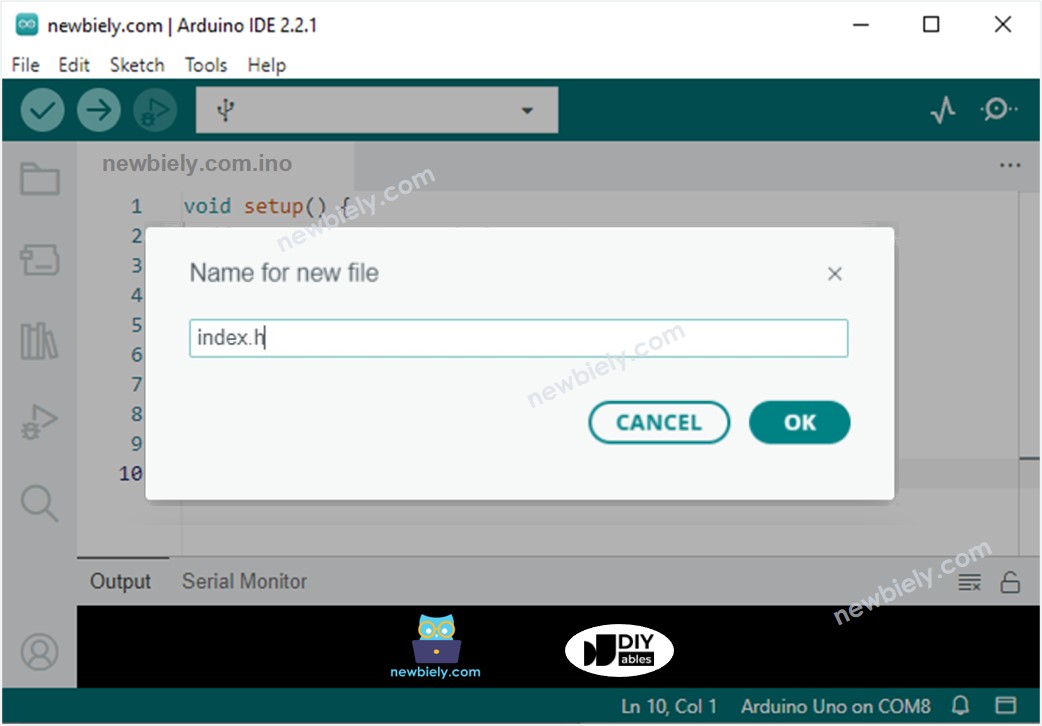
    • Give the file's name index.h and click OK button
    Arduino IDE 2 adds file index.h
    • Copy the below code and paste it to the index.h.
    /* * This Arduino Nano ESP32 code was developed by newbiely.com * * This Arduino Nano ESP32 code is made available for public use without any restriction * * For comprehensive instructions and wiring diagrams, please visit: * https://newbiely.com/tutorials/arduino-nano-esp32/arduino-nano-esp32-websocket */ const char *HTML_CONTENT = R"=====( <!DOCTYPE html> <!-- saved from url=(0019)http://192.168.0.2/ --> <html><head><meta http-equiv="Content-Type" content="text/html; charset=windows-1252"> <title>Arduino Nano ESP32 WebSocket</title> <meta name="viewport" content="width=device-width, initial-scale=0.7"> <link rel="icon" href="https://diyables.io/images/page/diyables.svg"> <style> /* Add some basic styling for the chat window */ body { font-size: 16px; } .chat-container { width: 400px; margin: 0 auto; padding: 10px; } .chat-messages { height: 250px; overflow-y: auto; border: 1px solid #444; padding: 5px; margin-bottom: 5px; } .user-input { display: flex; margin-bottom: 20px; } .user-input input { flex: 1; border: 1px solid #444; padding: 5px; } .user-input button { margin-left: 5px; background-color: #007bff; color: #fff; border: none; padding: 5px 10px; cursor: pointer; } .websocket { display: flex; align-items: center; margin-bottom: 5px; } .websocket button { background-color: #007bff; color: #fff; border: none; padding: 5px 10px; cursor: pointer; } .websocket .label { margin-left: auto; } </style> <script> var ws; var wsm_max_len = 4096; /* bigger length causes uart0 buffer overflow with low speed smart device */ function update_text(text) { var chat_messages = document.getElementById("chat-messages"); chat_messages.innerHTML += text + '<br>'; chat_messages.scrollTop = chat_messages.scrollHeight; } function send_onclick() { if(ws != null) { var message = document.getElementById("message").value; if (message) { document.getElementById("message").value = ""; ws.send(message + "\n"); update_text('<span style="color:navy">' + message + '</span>'); // You can send the message to the server or process it as needed } } } function connect_onclick() { if(ws == null) { ws = new WebSocket("ws://" + window.location.host + ":81"); document.getElementById("ws_state").innerHTML = "CONNECTING"; ws.onopen = ws_onopen; ws.onclose = ws_onclose; ws.onmessage = ws_onmessage; } else ws.close(); } function ws_onopen() { document.getElementById("ws_state").innerHTML = "<span style='color:blue'>CONNECTED</span>"; document.getElementById("bt_connect").innerHTML = "Disconnect"; document.getElementById("chat-messages").innerHTML = ""; } function ws_onclose() { document.getElementById("ws_state").innerHTML = "<span style='color:gray'>CLOSED</span>"; document.getElementById("bt_connect").innerHTML = "Connect"; ws.onopen = null; ws.onclose = null; ws.onmessage = null; ws = null; } function ws_onmessage(e_msg) { e_msg = e_msg || window.event; // MessageEvent console.log(e_msg.data); update_text('<span style="color:blue">' + e_msg.data + '</span>'); } </script> </head> <body> <div class="chat-container"> <h2>Arduino Nano ESP32 WebSocket</h2> <div class="websocket"> <button class="connect-button" id="bt_connect" onclick="connect_onclick()">Connect</button> <span class="label">WebSocket: <span id="ws_state"><span style="color:blue">CLOSED</span></span></span> </div> <div class="chat-messages" id="chat-messages"></div> <div class="user-input"> <input type="text" id="message" placeholder="Type your message..."> <button onclick="send_onclick()">Send</button> </div> <div class="sponsor">Sponsored by <a href="https://amazon.com/diyables">DIYables</a></div> </div> </body></html> )=====";
    • Now you have the code in two files: newbiely.com.ino and index.h
    • Click Upload button on Arduino IDE to upload code to Arduino Nano ESP32.
    • Open the Serial Monitor
    • Check out the result on Serial Monitor.
    COM6
    Send
    Connecting to WiFi... Connected to WiFi Arduino Nano ESP32 Web Server's IP address IP address: 192.168.0.2
    Autoscroll Show timestamp
    Clear output
    9600 baud  
    Newline  
    • Take note of the IP address displayed, and enter this address into the address bar of a web browser on your smartphone or PC.
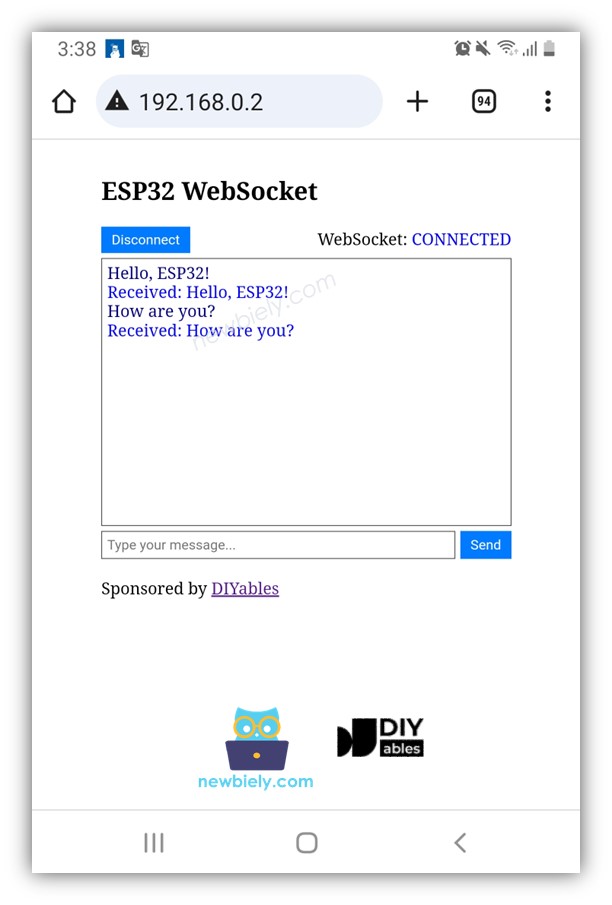
    • You will see the webpage it as below:
    Arduino Nano ESP32 websocket web browser
    • Click the CONNECT button to connect the webpage to Arduino Nano ESP32 via WebSocket.
    • Type some words and send them to Arduino Nano ESP32.
    • You will see the response from Arduino Nano ESP32.
    Arduino Nano ESP32 websocket chat server

    ※ NOTE THAT:

    • If you modify the HTML content in the index.h and does not touch anything in newbiely.com.ino file, when you compile and upload code to ESP32, Arduino IDE will not update the HTML content.
    • To make Arduino IDE update the HTML content in this case, make a change in the newbiely.com.ino file (e.g. adding empty line, add a comment....)

    Line-by-line Code Explanation

    The above Arduino Nano ESP32 code contains line-by-line explanation. Please read the comments in the code!

How the System Operates

The Arduino Nano ESP32 code functions by creating both a web server and a WebSocket Server. The process unfolds as follows:

  • When you input the ESP32's IP address into a web browser, a request is made for the webpage (User Interface) from the Arduino Nano ESP32.
  • The ESP32's web server responds by transmitting the content of the webpage (HTML, CSS, JavaScript).
  • Subsequently, your web browser displays the webpage.
  • When you click the CONNECT button, the JavaScript code embedded in the webpage establishes a WebSocket connection to the WebSocket server on the Arduino Nano ESP32.
  • With the WebSocket connection established, when you type something and click the SEND button, the JavaScript code send that text to to the Arduino Nano ESP32 through the WebSocket connection in the background.
  • Upon receiving the angle value, the WebSocket server sends back a reply to the webpage.

You can learn other Arduino Nano ESP32 WebSocket examples below:

※ OUR MESSAGES

  • As freelancers, We are AVAILABLE for HIRE. See how to outsource your project to us
  • Please feel free to share the link of this tutorial. However, Please do not use our content on any other websites. We invested a lot of effort and time to create the content, please respect our work!