Arduino Nano ESP32 - AWS IoT
This tutorial instructs you how to connect Arduino Nano ESP32 to AWS IoT Core. In detail, we will learn:
- How to connect the Arduino Nano ESP32 to AWS IoT Core.
- How to program the Arduino Nano ESP32 to send messages to AWS IoT Core.
- How to program the Arduino Nano ESP32 to receive the messages from AWS IoT Core.
Hardware Preparation
Or you can buy the following kits:
| 1 | × | DIYables Sensor Kit (18 sensors/displays) |
Additionally, some of these links are for products from our own brand, DIYables .
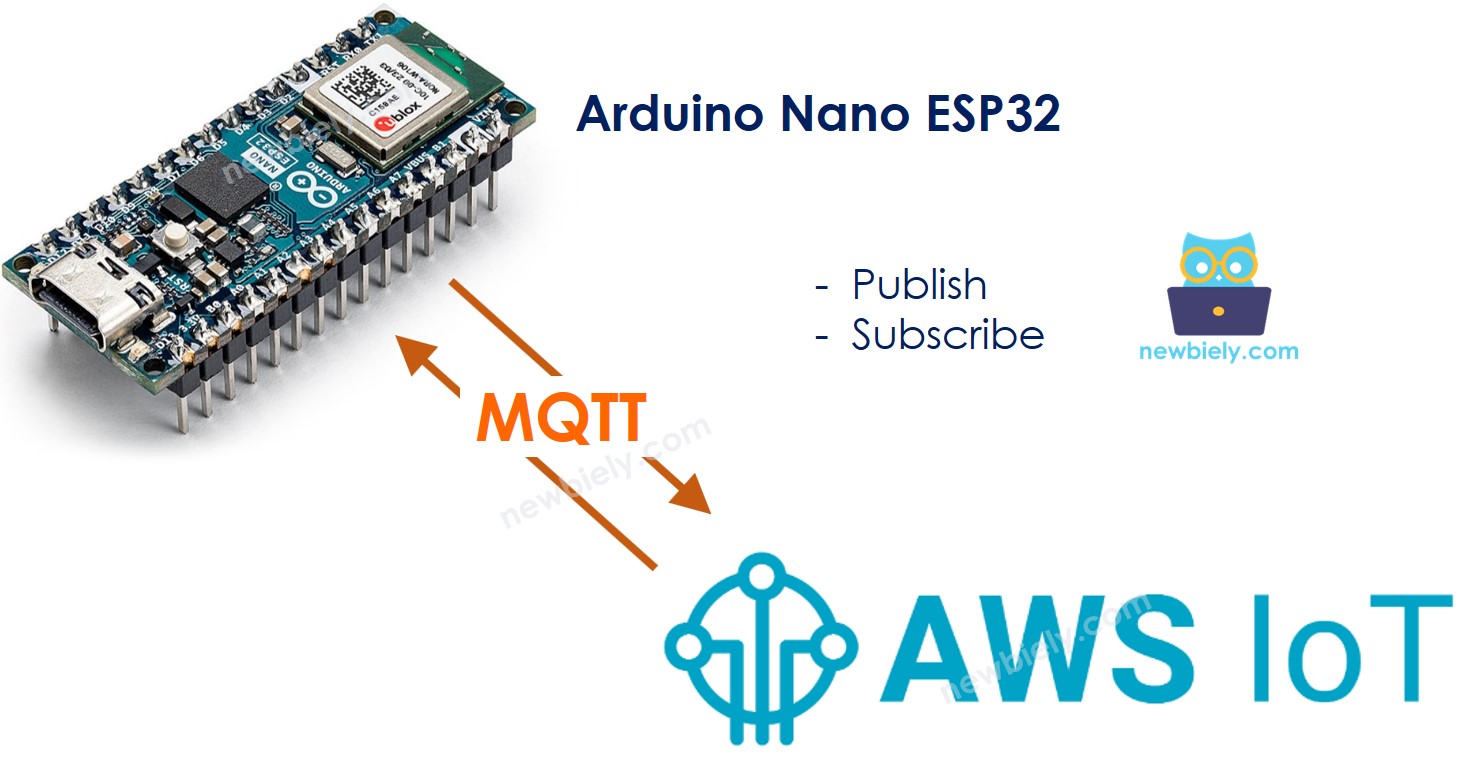
Overview of Arduino Nano ESP32 and AWS IoT
Arduino Nano ESP32 connects to AWS IoT Core via the MQTT protocol. This is not a big deal because the libraries are available, making it easy to use.
However, it is not as easy as connecting the Arduino Nano ESP32 to an MQTT broker like Mosquitto installed on your PC. This is because AWS IoT Core strictly enforces security measures. Configuration is necessary on AWS IoT Core to obtain authentication credentials and authorization before writing the Arduino Nano ESP32 code. In summary, we need to take two major steps:
- Step 1: Configuring AWS IoT Core. After this step, we will obtain the authentication credentials, which will be used in the Arduino Nano ESP32 code.
- Step 2: Writing the Arduino Nano ESP32 code.
Let's go into detail
Configuring AWS IoT Core for use with Arduino Nano ESP32
The purposes of this step are:
- Creating a representation of the Arduino Nano ESP32 on AWS IoT Core (called a Thing).
- Configuring the authorization that gives permission for the Arduino Nano ESP32 to connect/publish/subscribe to/from AWS IoT Core (called a Policy).
- Generating the AWS credentials that will be used for authentication (called Certificates). Once created, we will download the credentials and place them in the Arduino ESP32 code.
The below show how to configure the AWS IoT Core for use with Arduino Nano ESP32 via AWS IoT Console. Please note that User Interface may be changed by AWS over time, but it will be similar to the below:
- Sign in to the AWS IoT Console
- Create a Thing by navigating to Manage All devices Things
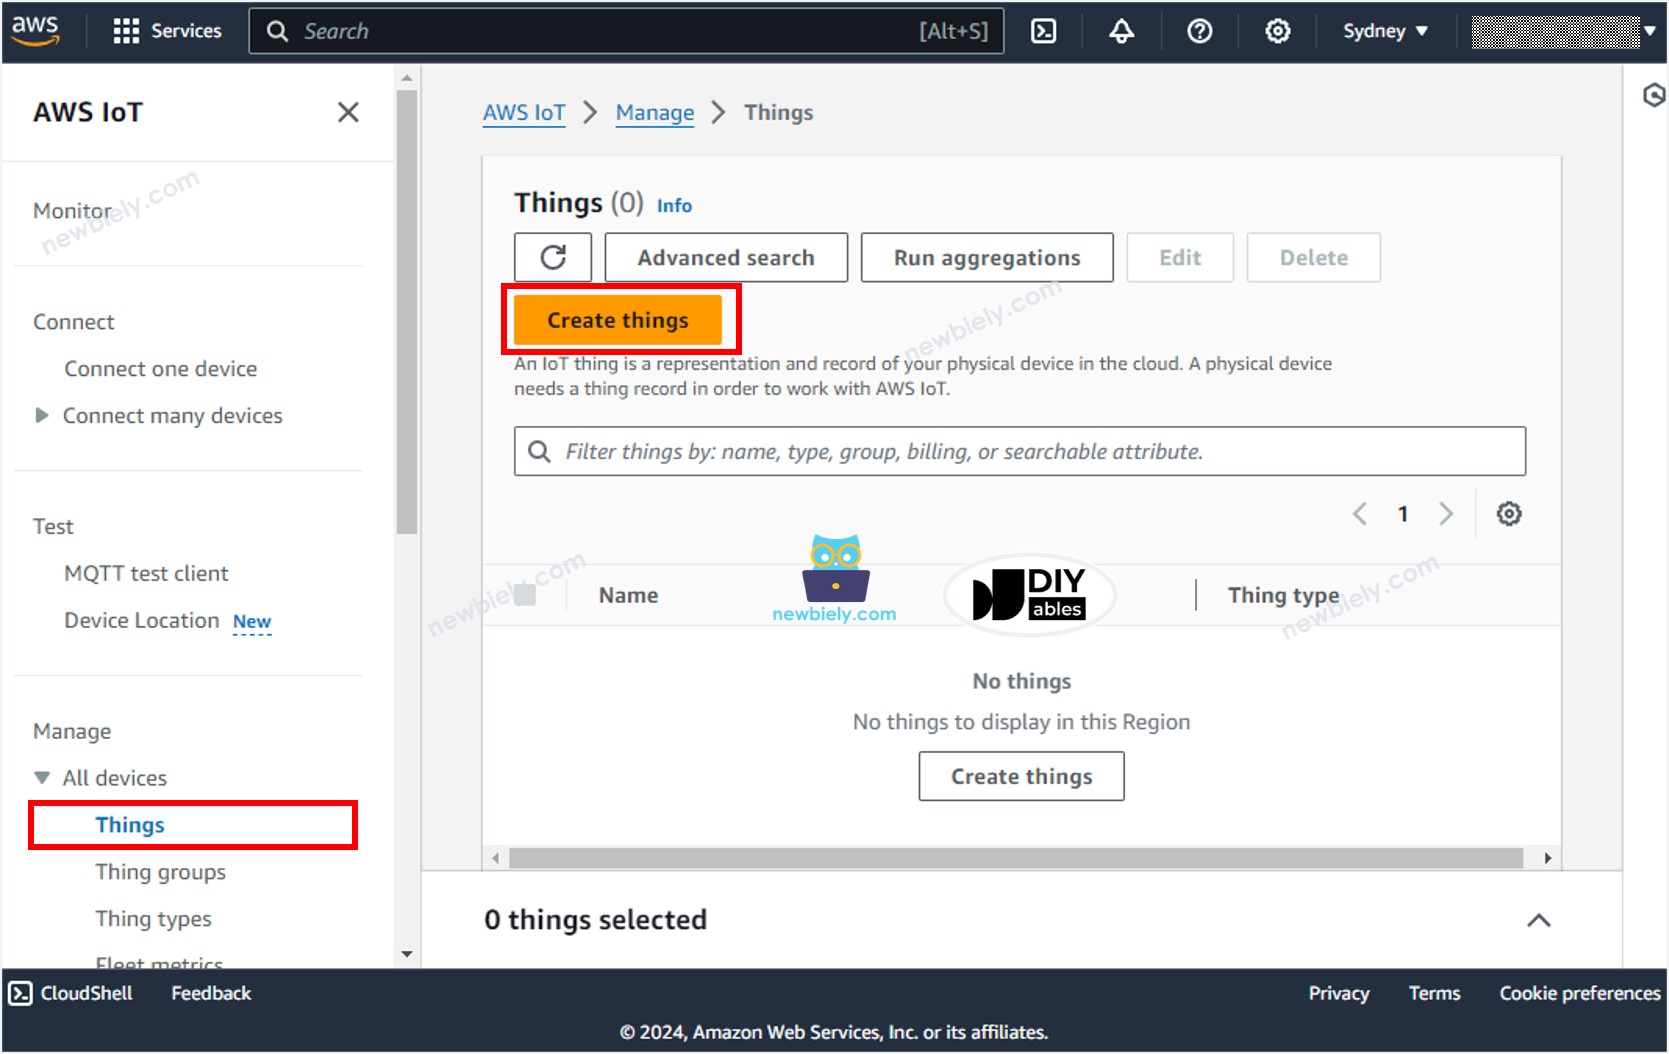
- Click the Create things button.
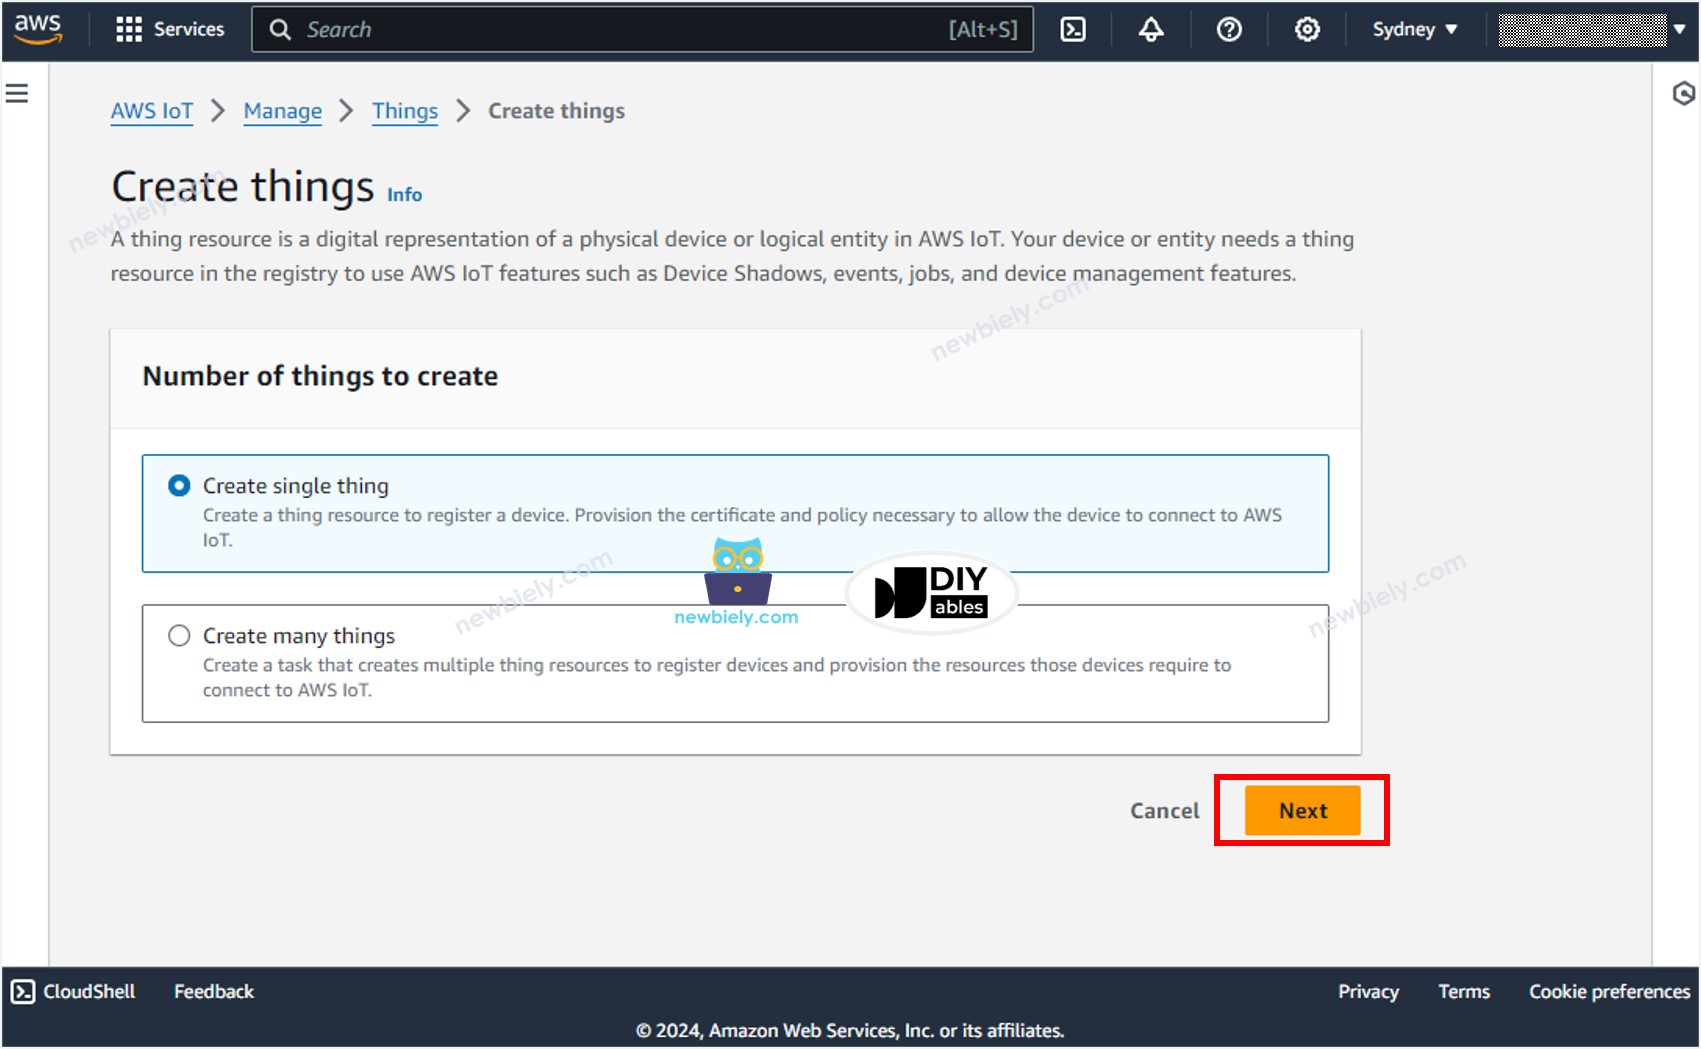
- Select Create single things and click the Next button.
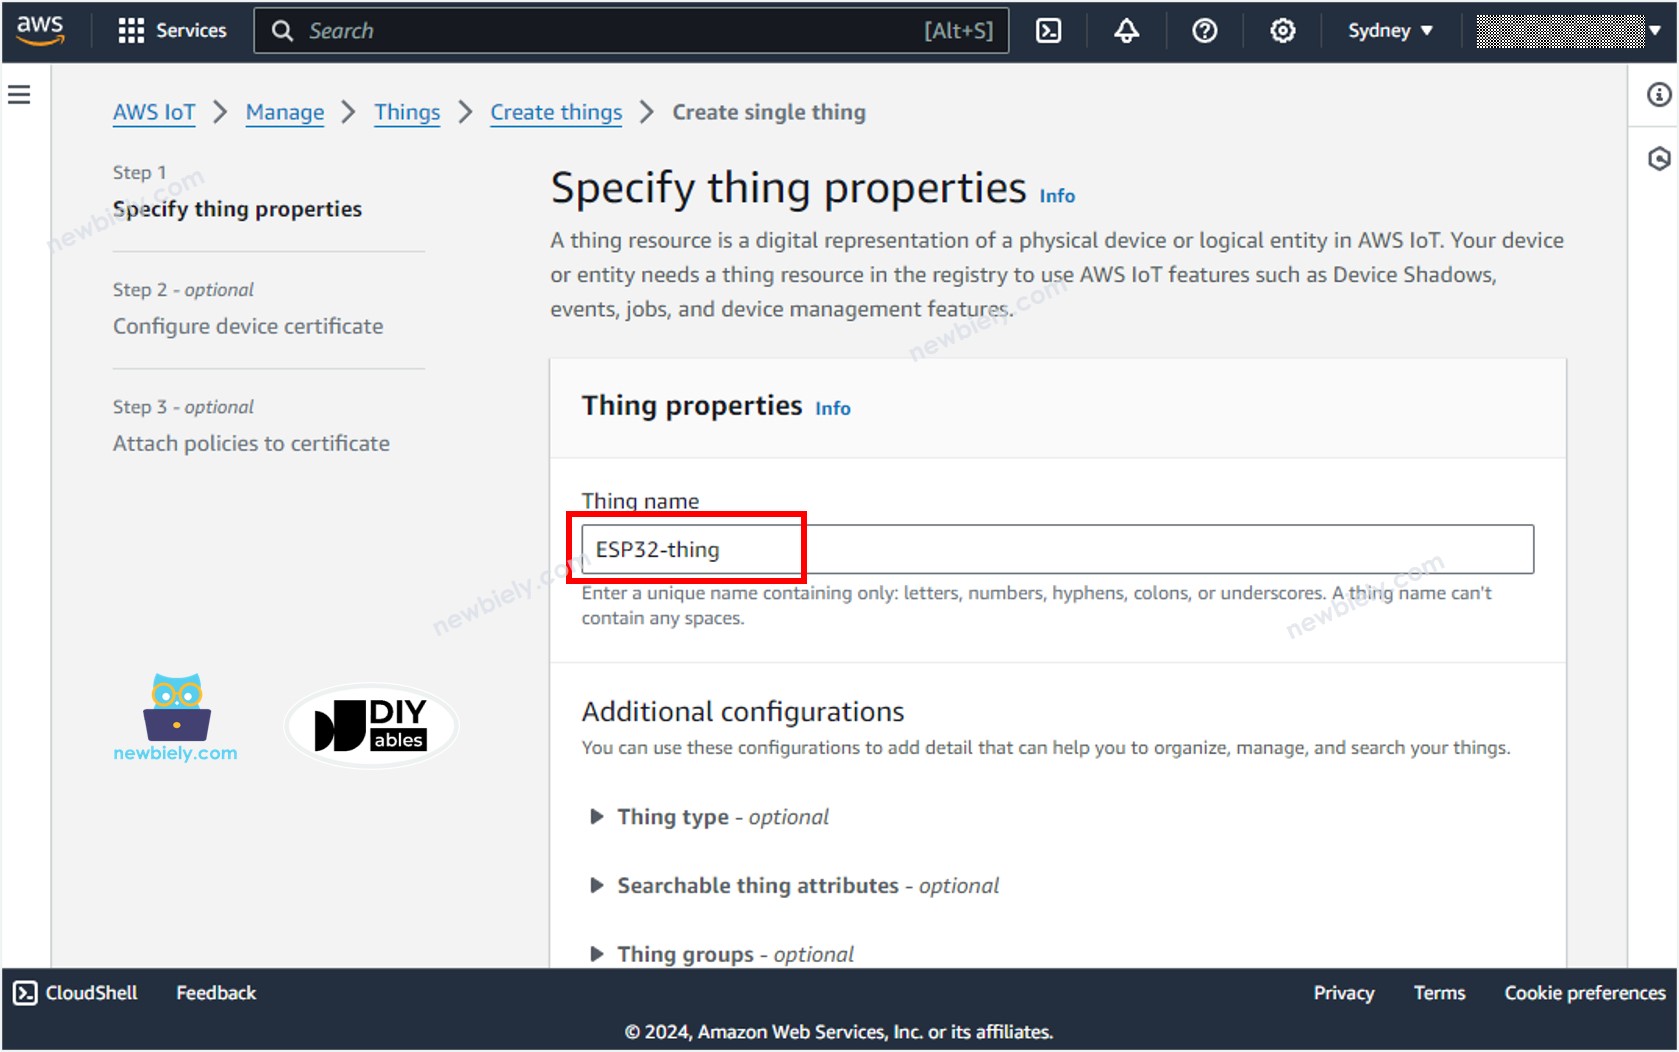
- Specify the Thing name, for example, ESP32-thing and click the Next button at the bottom of the page.
- Generate the credentials by selecting the Auto-generate a new certificate option, and click the Next button.
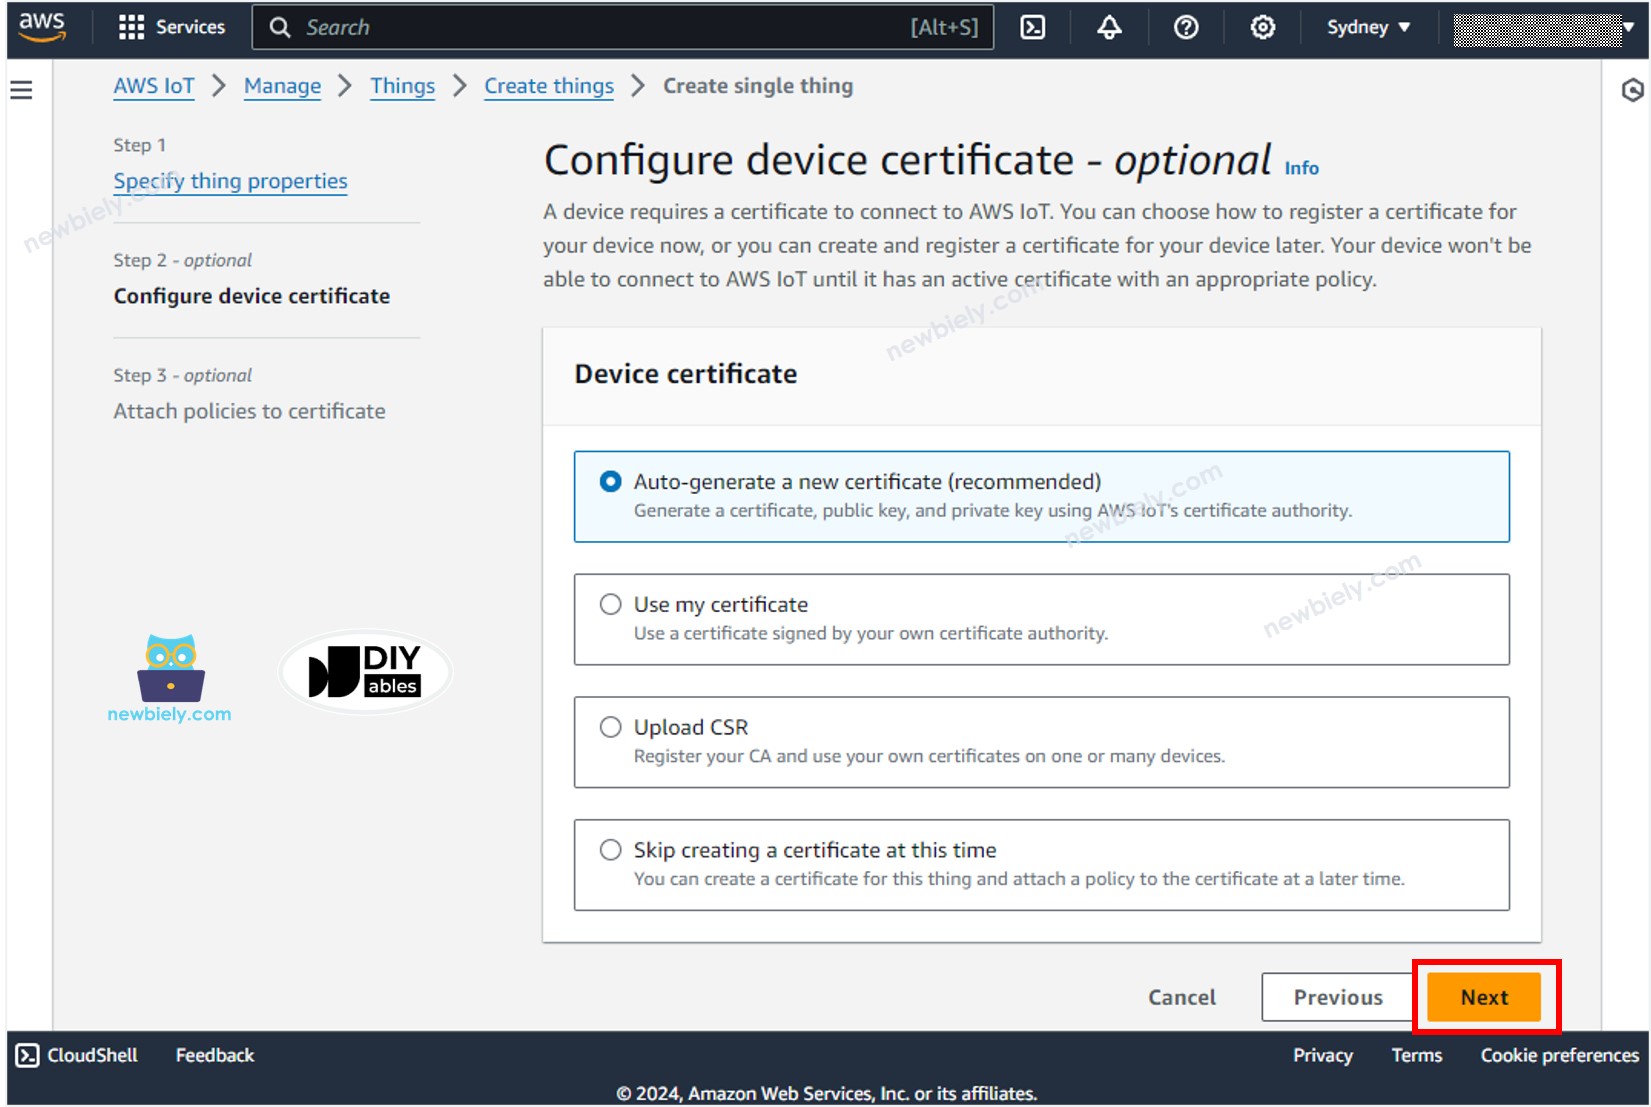
- Now, a Certificate is created and linked to the Thing.
- Create a policy by clicking the Create policy button.
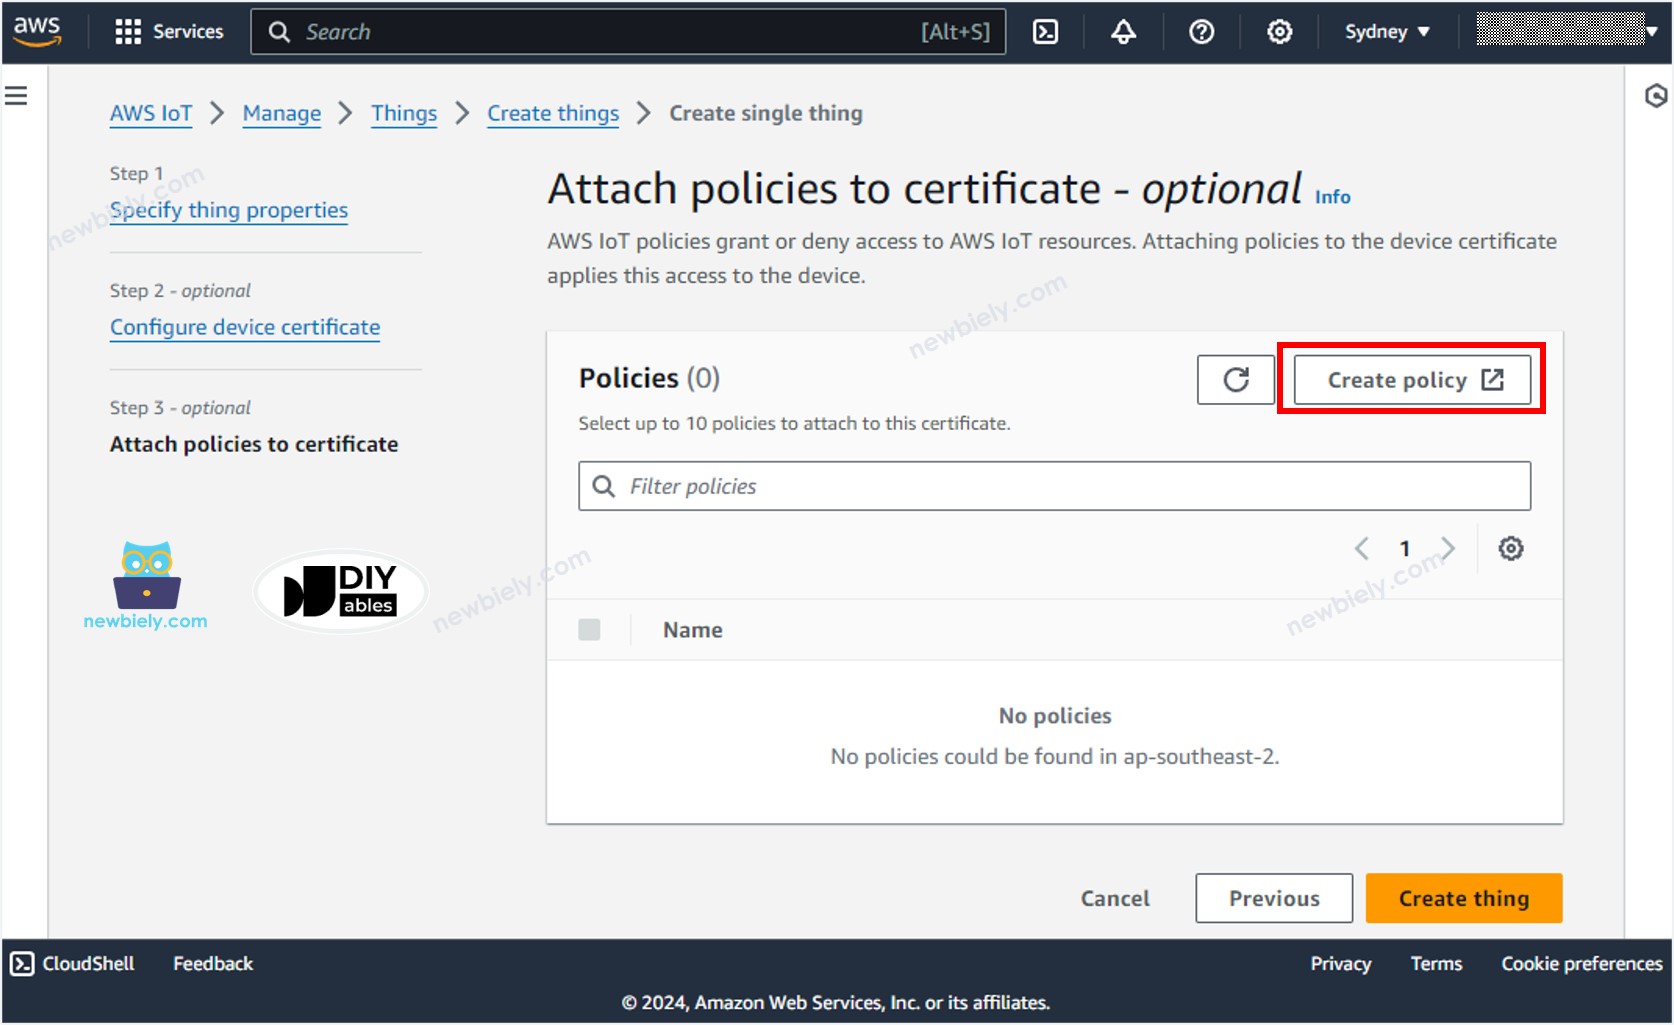
- A new tab will be opened
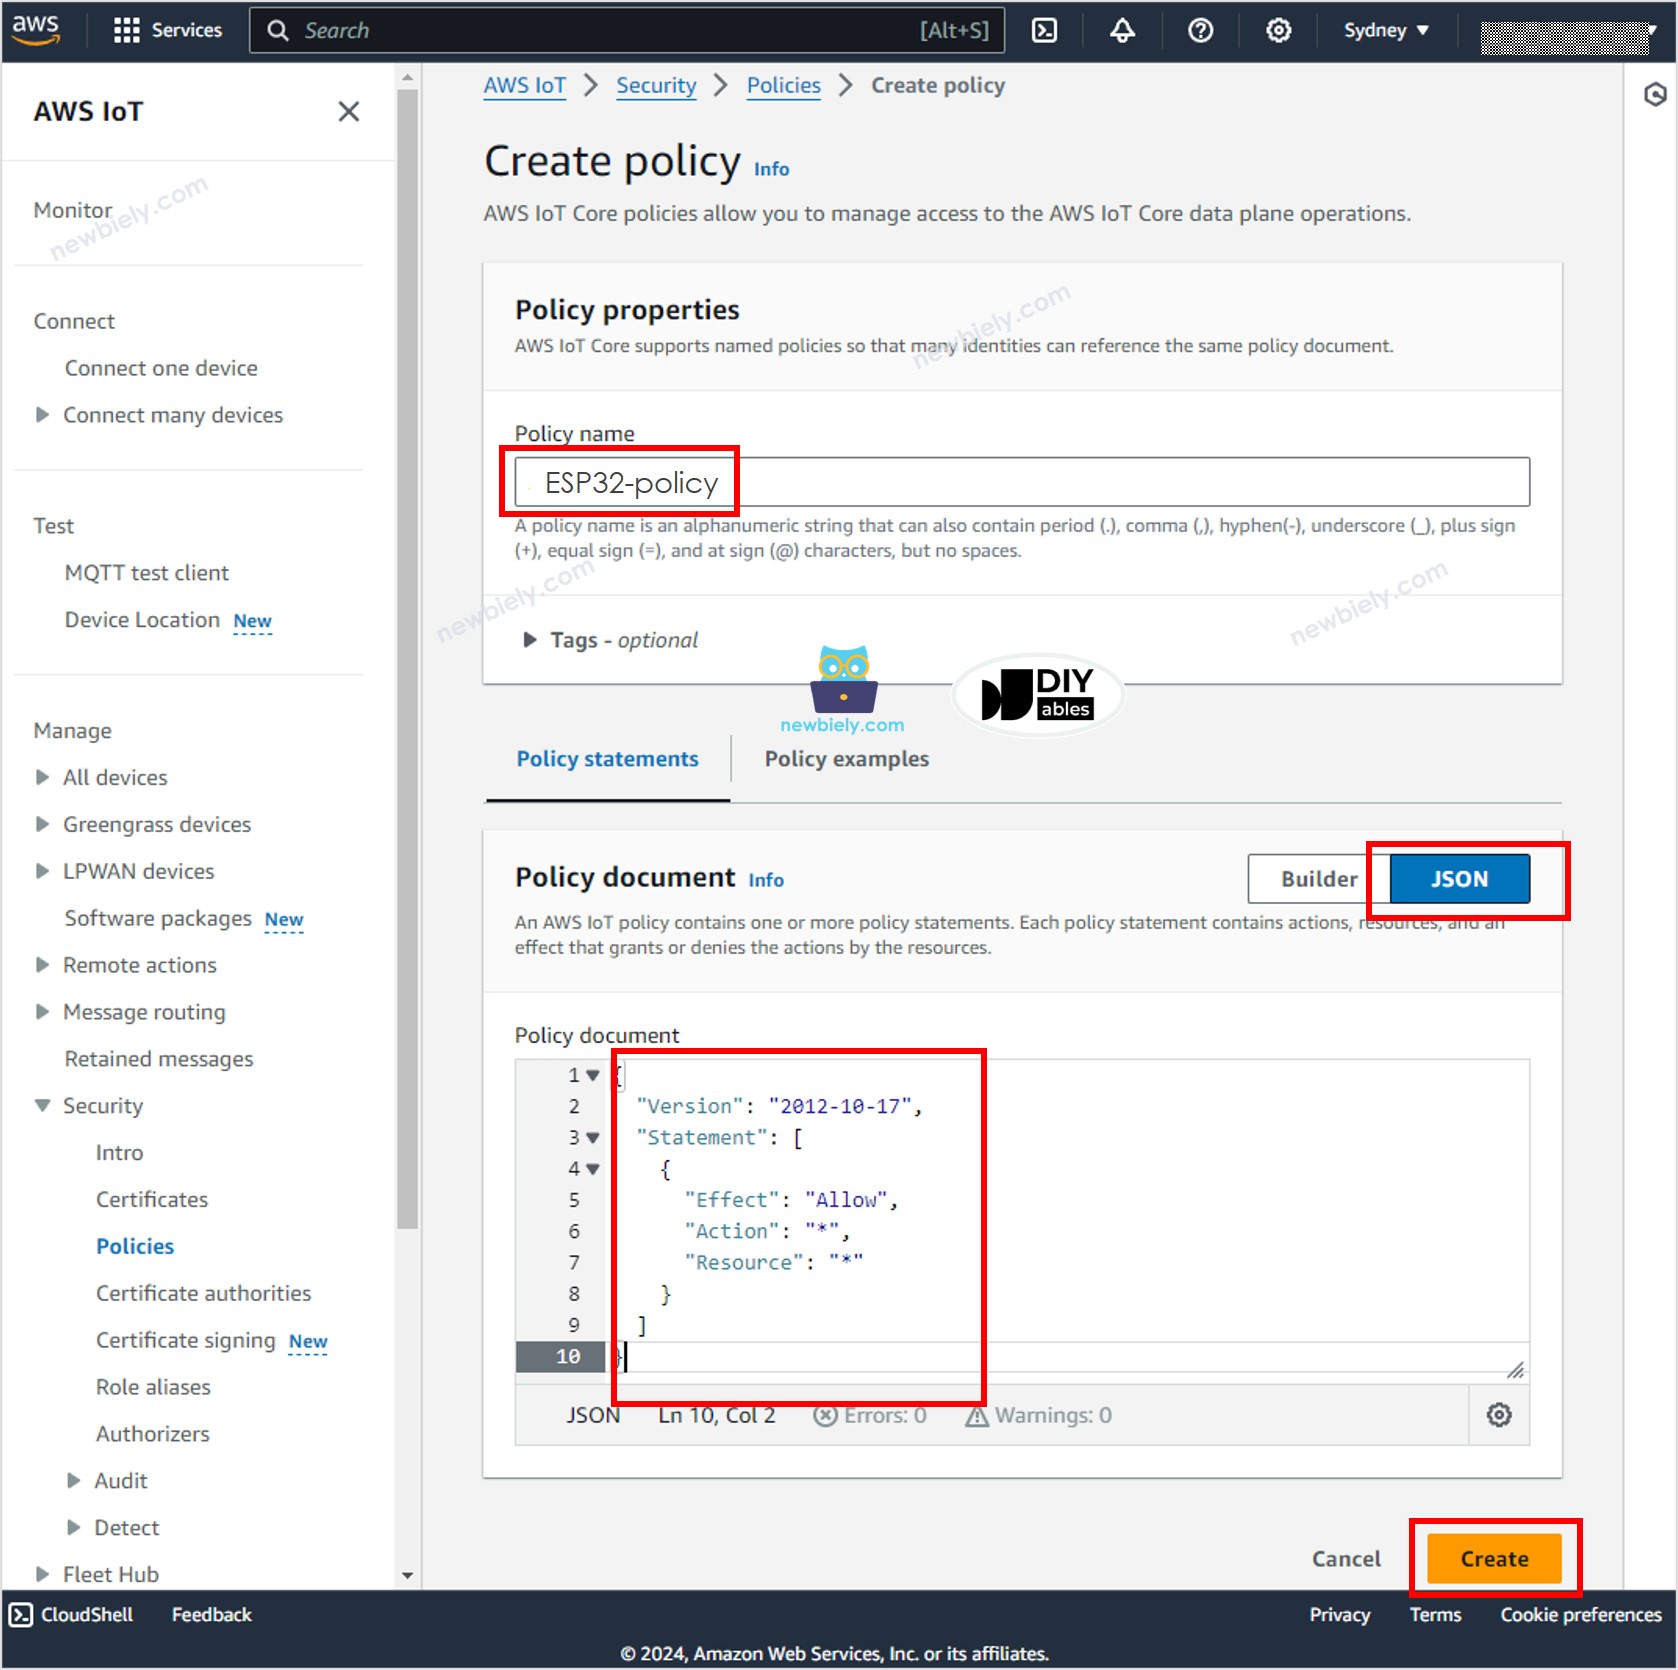
- Specify the Policy name, for example, ESP32-policy and click the JSON button.
- Copy the below JSON policy content and paste it to the Policy document area:
- Click the Create button at the bottom of the page to create the policy.
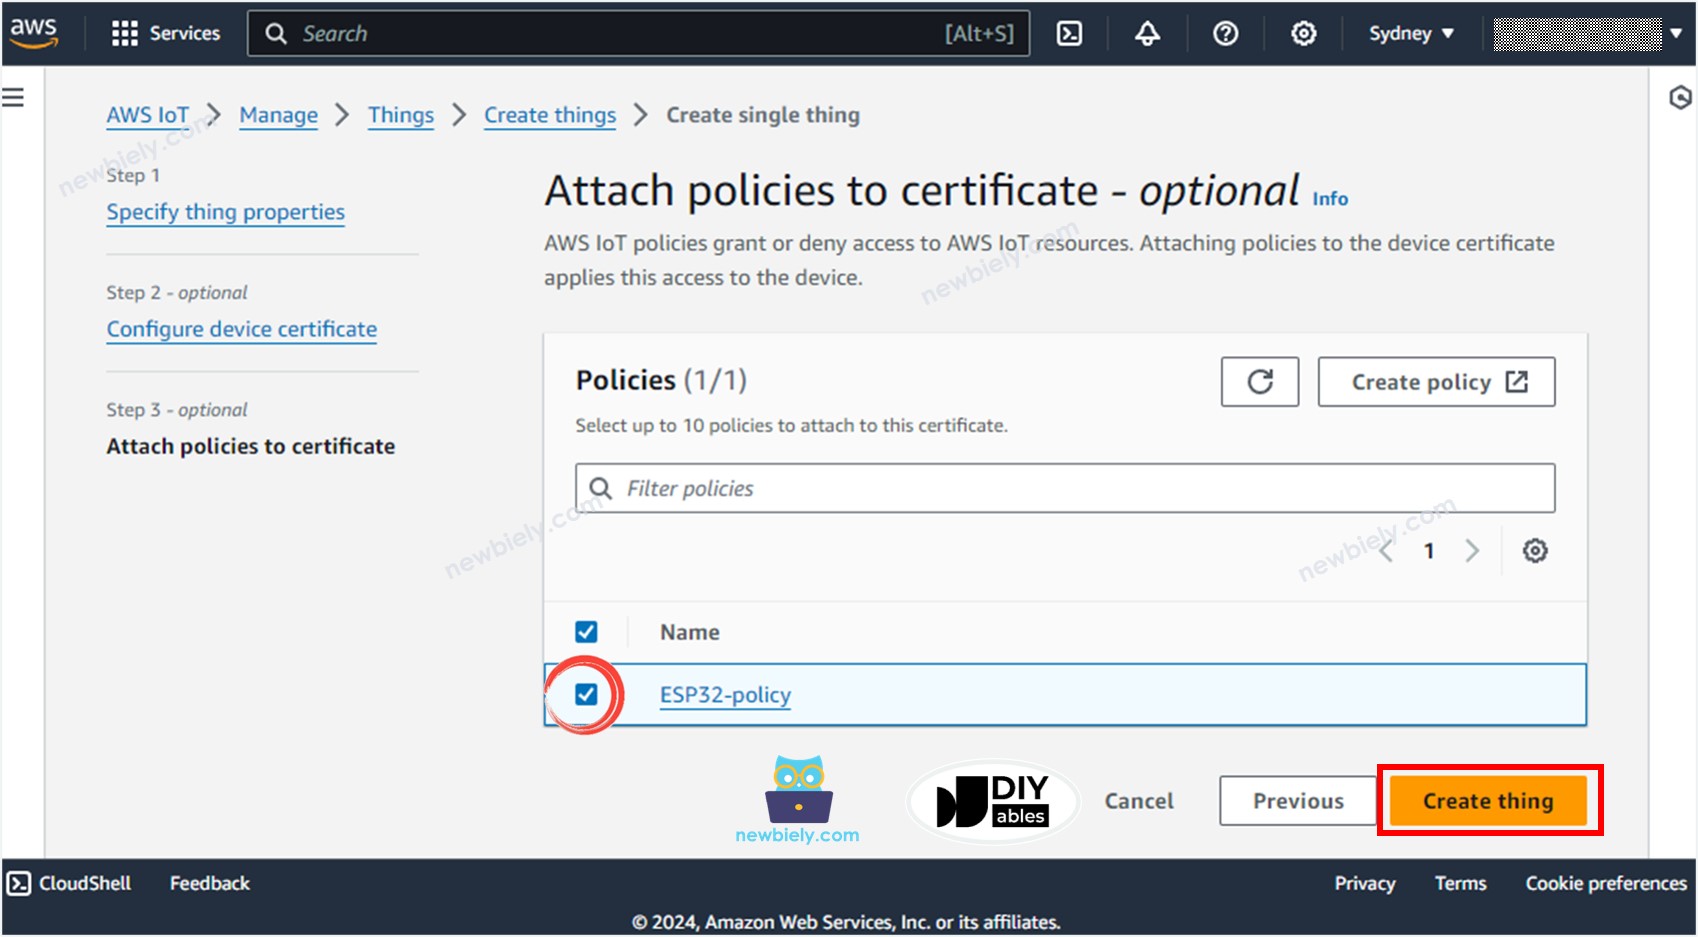
- Now, a Policy is created and attached to the Certificate. Close that page and back to the Thing page.
- Check the the ESP32-policy and Click the Create thing button to create the Thing.
- A popup window appears that allows you to download the credentials files. Download all files and store them in a safe location on your PC and keep them confidentially.
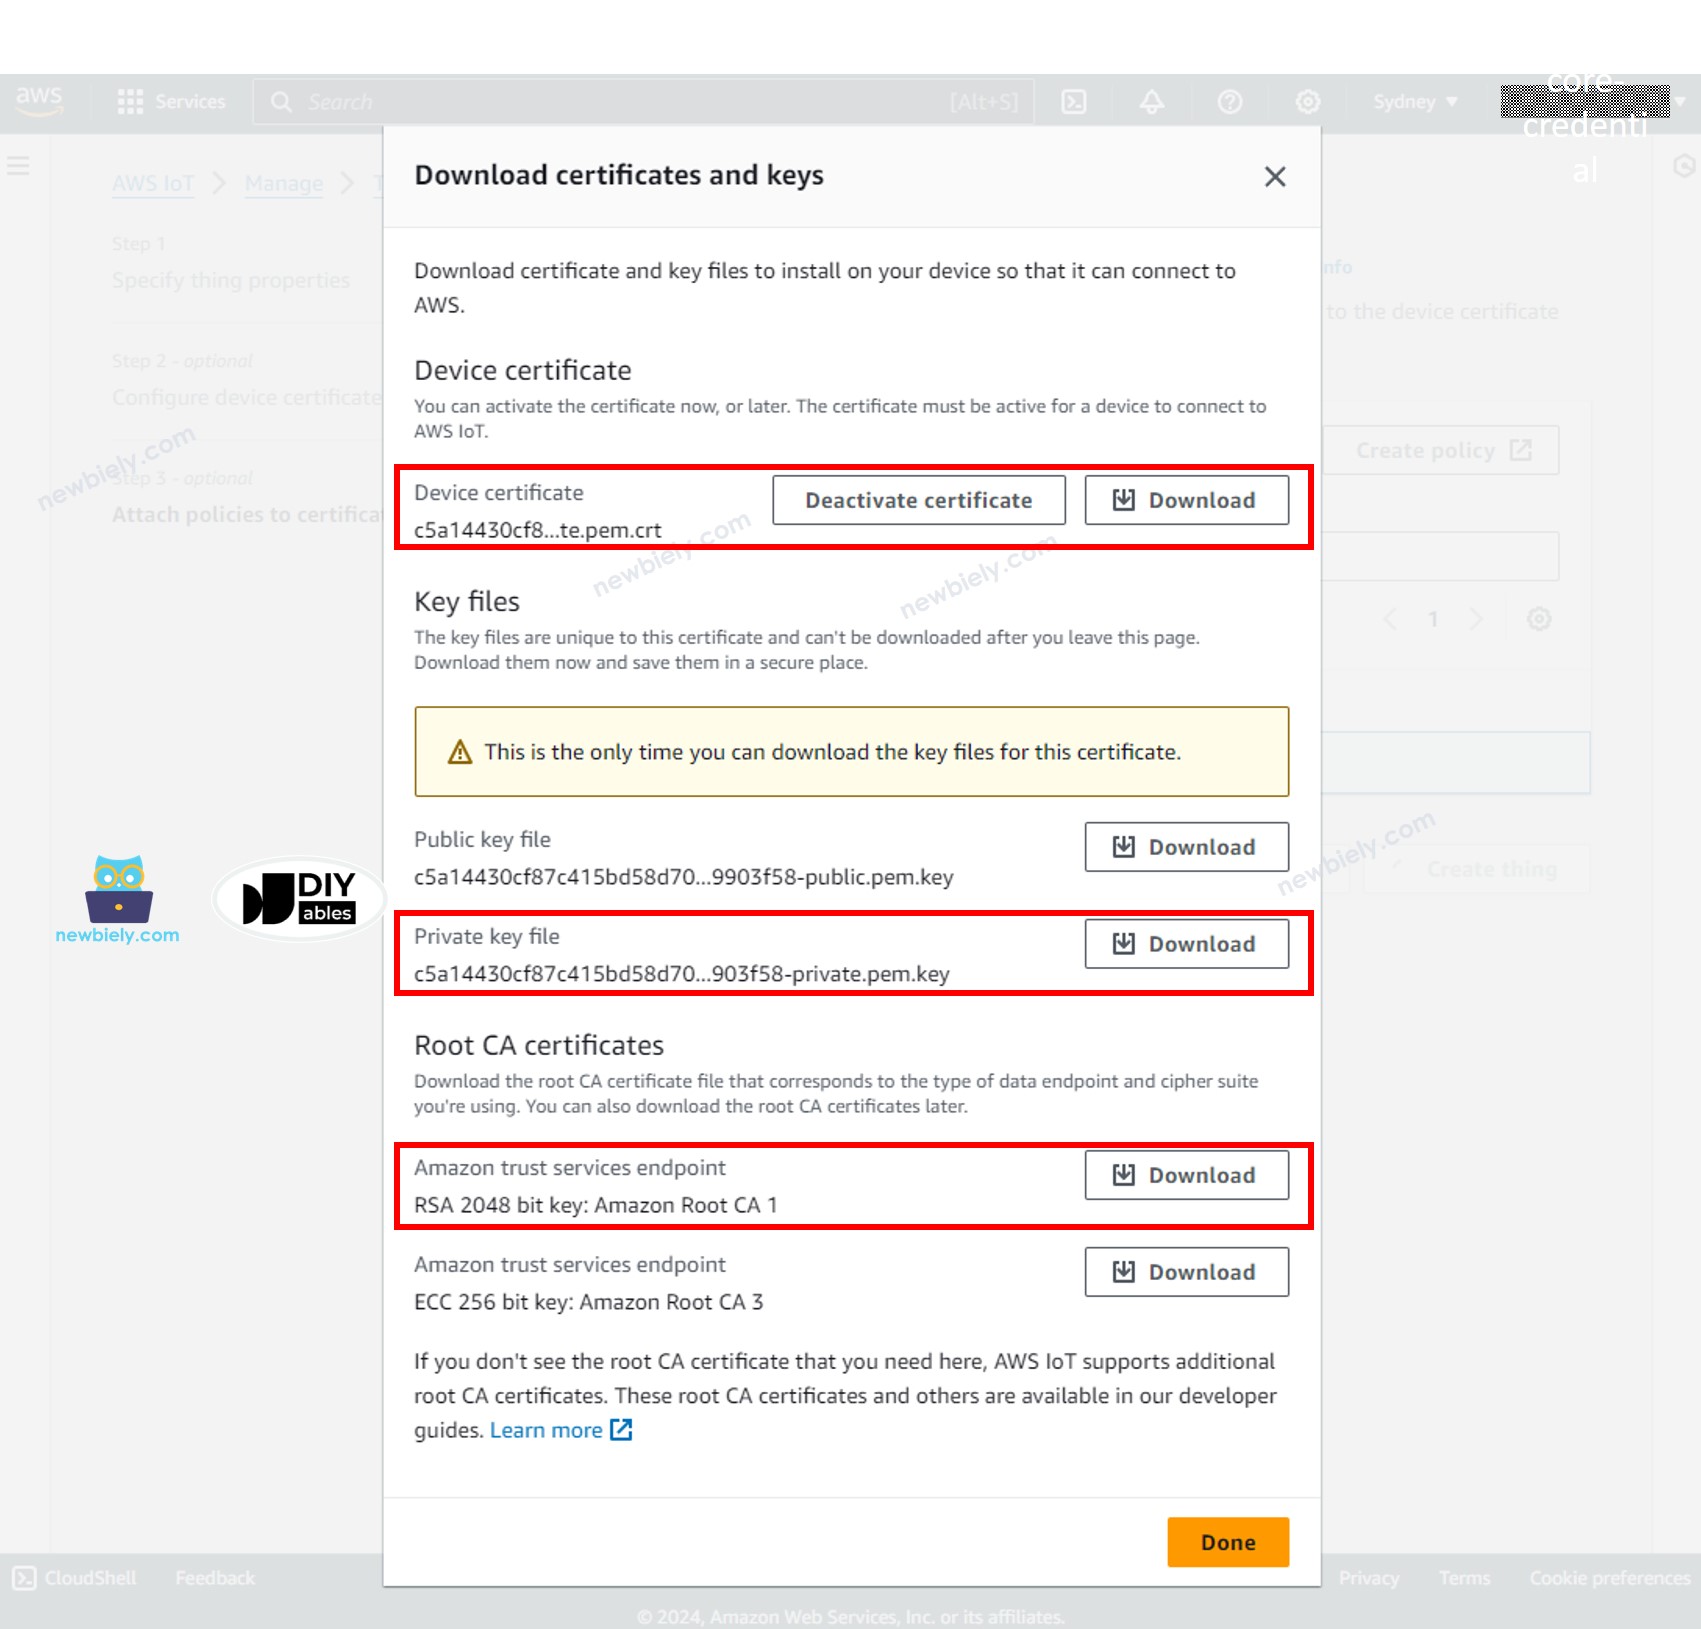
- Then, click the Done button.
Among downloaded files, there are three files will be used in the Arduino Nano ESP32 code in the next steps:
- xxxxxxxxxx-certificate.pem.crt
- xxxxxxxxxx-private.pem.key
- AmazonRootCA1.pem
These files can be opened with any text editor, such as Notepad or Notepad++.
Writing the Arduino Nano ESP32 code to connect to AWS IoT Core
Detailed Instructions
- If this is the first time you use Arduino Nano ESP32, see how to setup environment for Arduino Nano ESP32 on Arduino IDE.
- Open the Library Manager by clicking on the Library Manager icon on the left navigation bar of Arduino IDE
- Type MQTT on the search box, then look for the MQTT library by Joel Gaehwiler.
- Click Install button to install MQTT library.

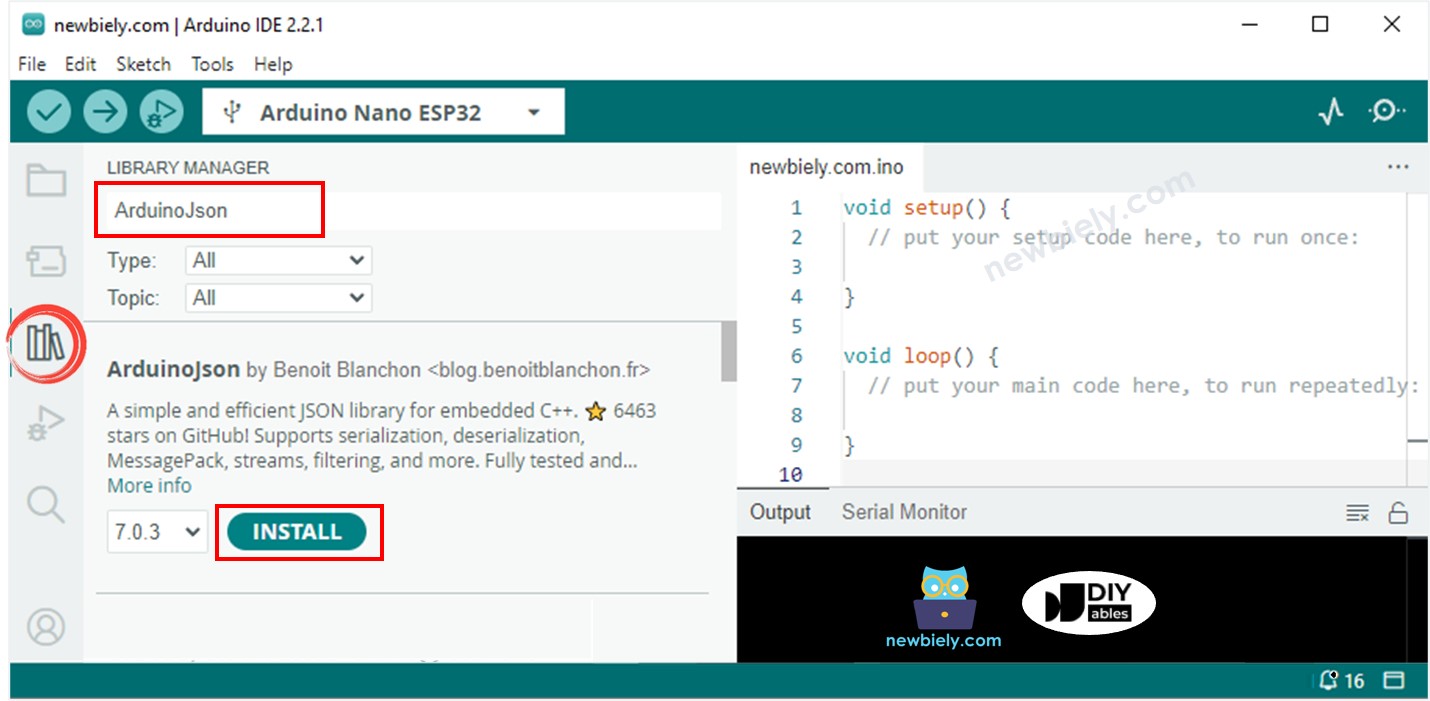
- Type ArduinoJson on the search box, then look for the ArduinoJson library by Benoit Blanchon.
- Click Install button to install ArduinoJson library.
- Copy the above code and paste it to Arduino IDE.
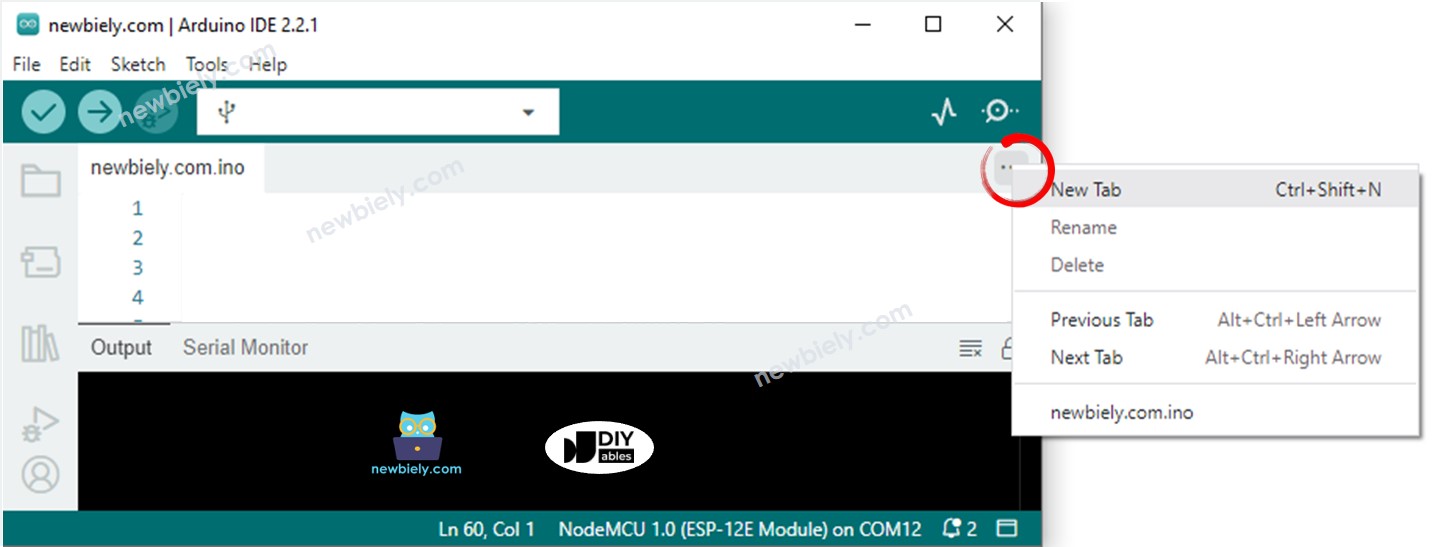
- Create the secrets.h file On Arduino IDE by:
- Either click on the button just below the serial monitor icon and choose New Tab, or use Ctrl+Shift+N keys.
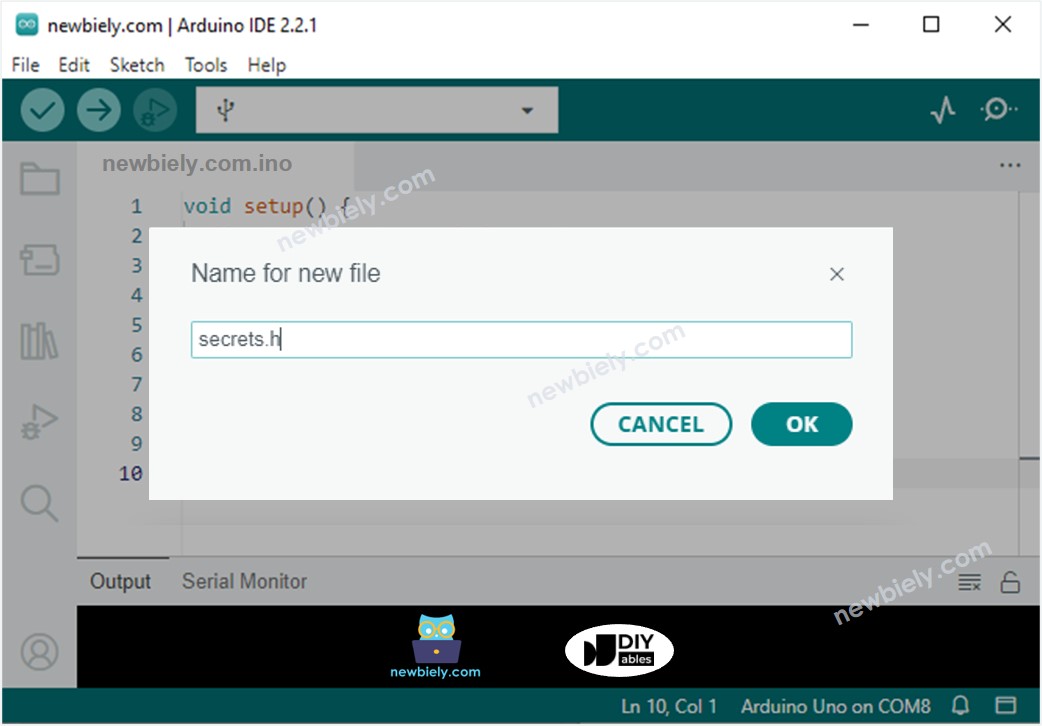
- Give file's name secrets.h and click OK button
- Copy the below code and paste it to the created secrets.h file.
- Update the following information in the secrets.h
- The WIFI_SSID and WIFI_PASSWORD of your WiFi network
- The AWS_CERT_CA, AWS_CERT_CRT, and AWS_CERT_PRIVATE. These infornation are in the files you downloaded in the previous step.
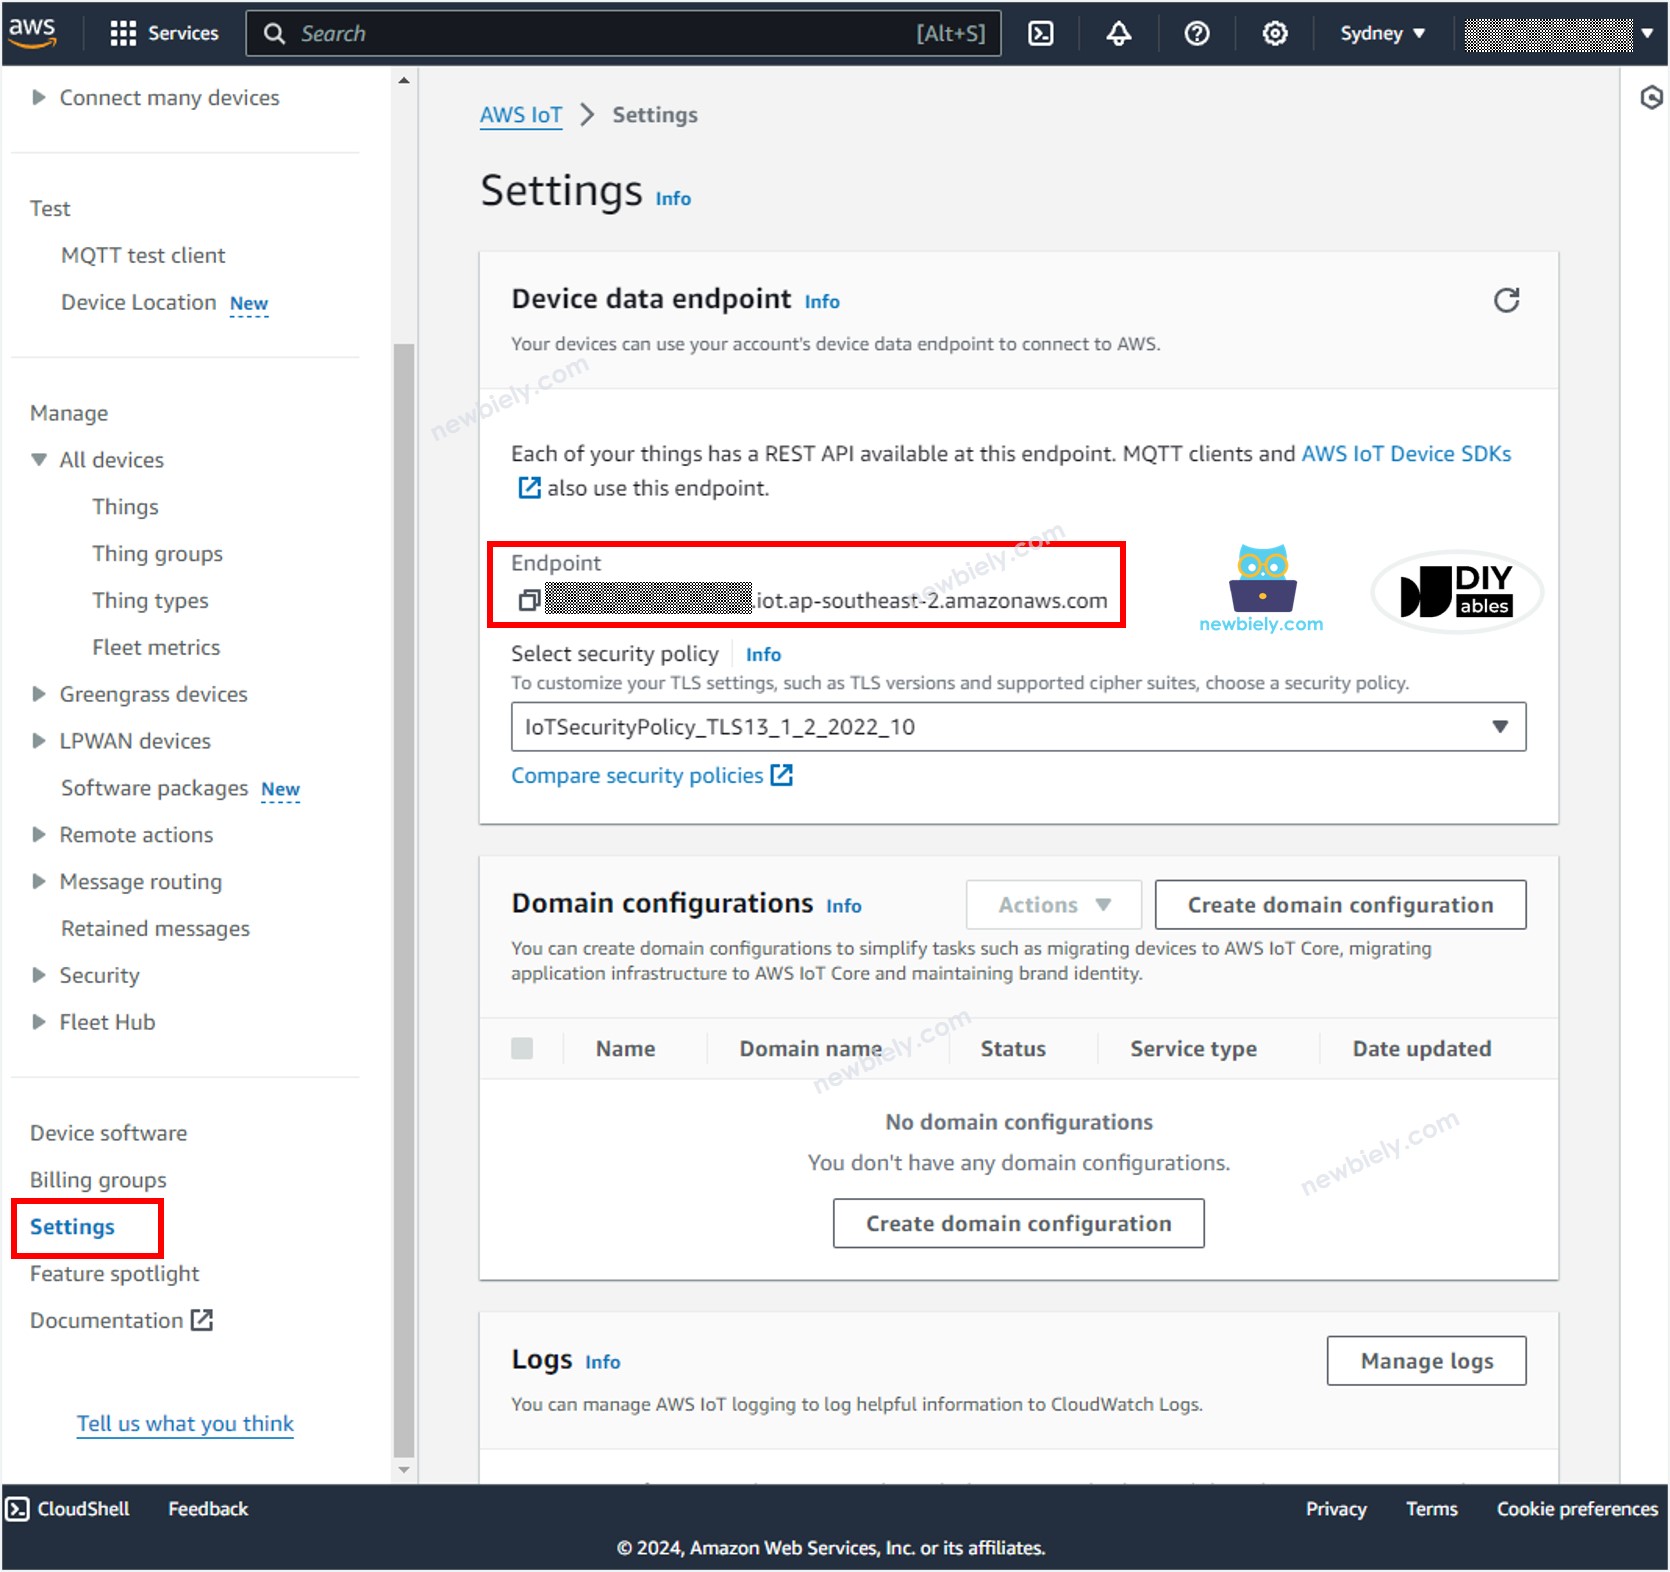
- The AWS_IOT_ENDPOINT. This information can be found on AWS IoT Console by navigating to Setting as below image:
- Compile and upload code to Arduino Nano ESP32 board by clicking Upload button on Arduino IDE
Sending data from Arduino Nano ESP32 to AWS IoT
The above Arduino Nano ESP32 code periodically read data from an analog pin and send it to AWS IoT every 4 seconds. If opening the Serial Monitor on Arduino IDE, you will see the log like below:
To check if the data are received by AWS IoT or not, do the following steps:
- In AWS IoT Console, navigate to Test MQTT Test Client
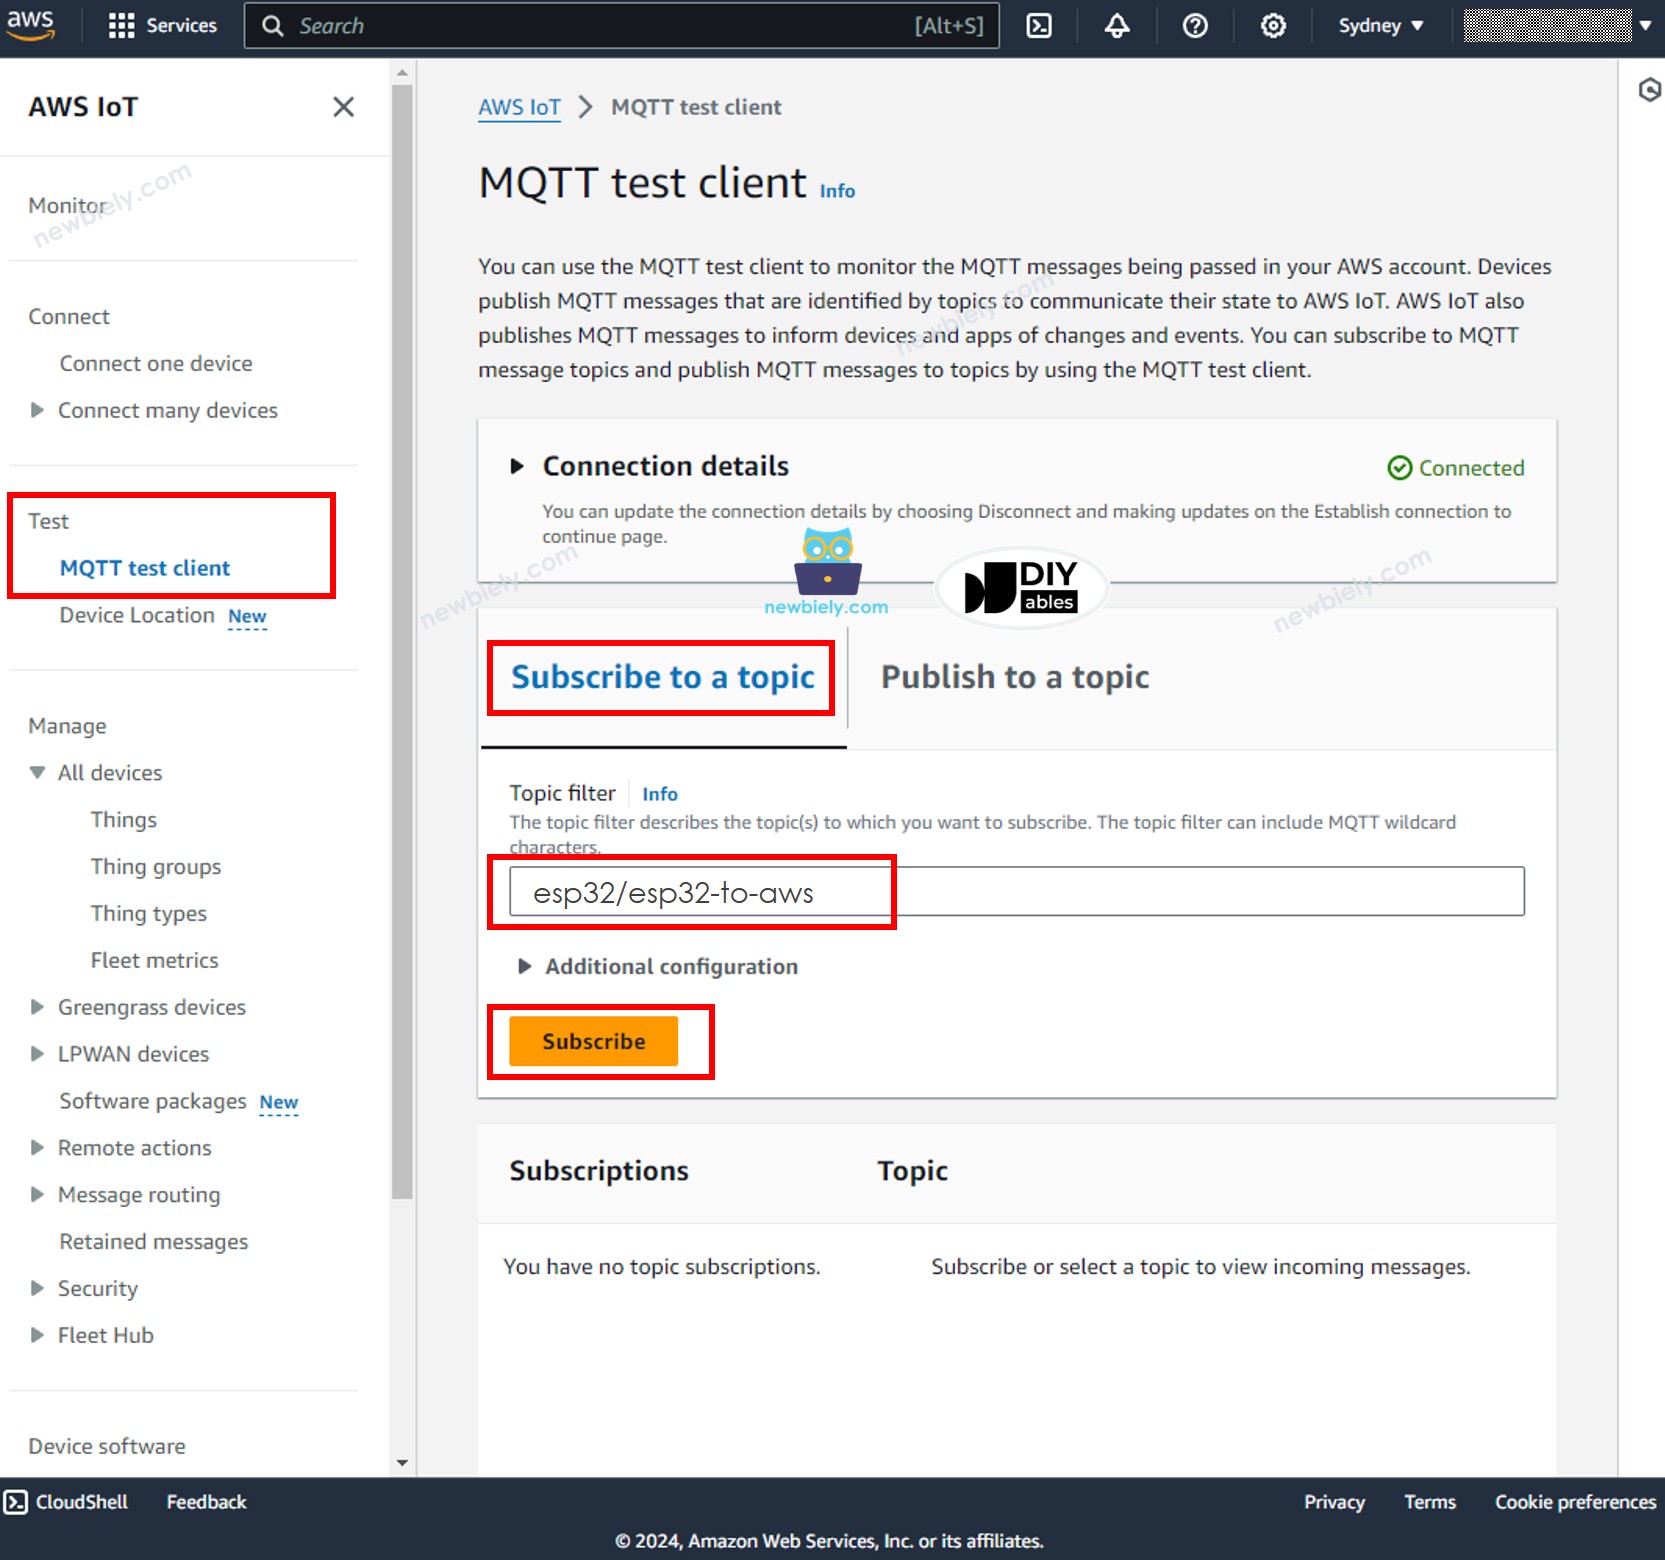
- Click the Subcribe to a topic button.
- Type esp32/esp32-to-aws to the Topic filter. You can change the topic but MUST be matched the topic on the Arduino Nano ESP32 code.
- Click the Subcribe button.
- You will be able to see the data sent from Arduino Nano ESP32 on the AWS IoT Console.
Sending data from AWS IoT to Arduino Nano ESP32
You are able to send the data from AWS IoT Console to the Arduino Nano ESP32 by doing the following steps:
- On Arduino IDE, Open the Serial Monitor
- On AWS IoT Console, navigate to Test MQTT Test Client
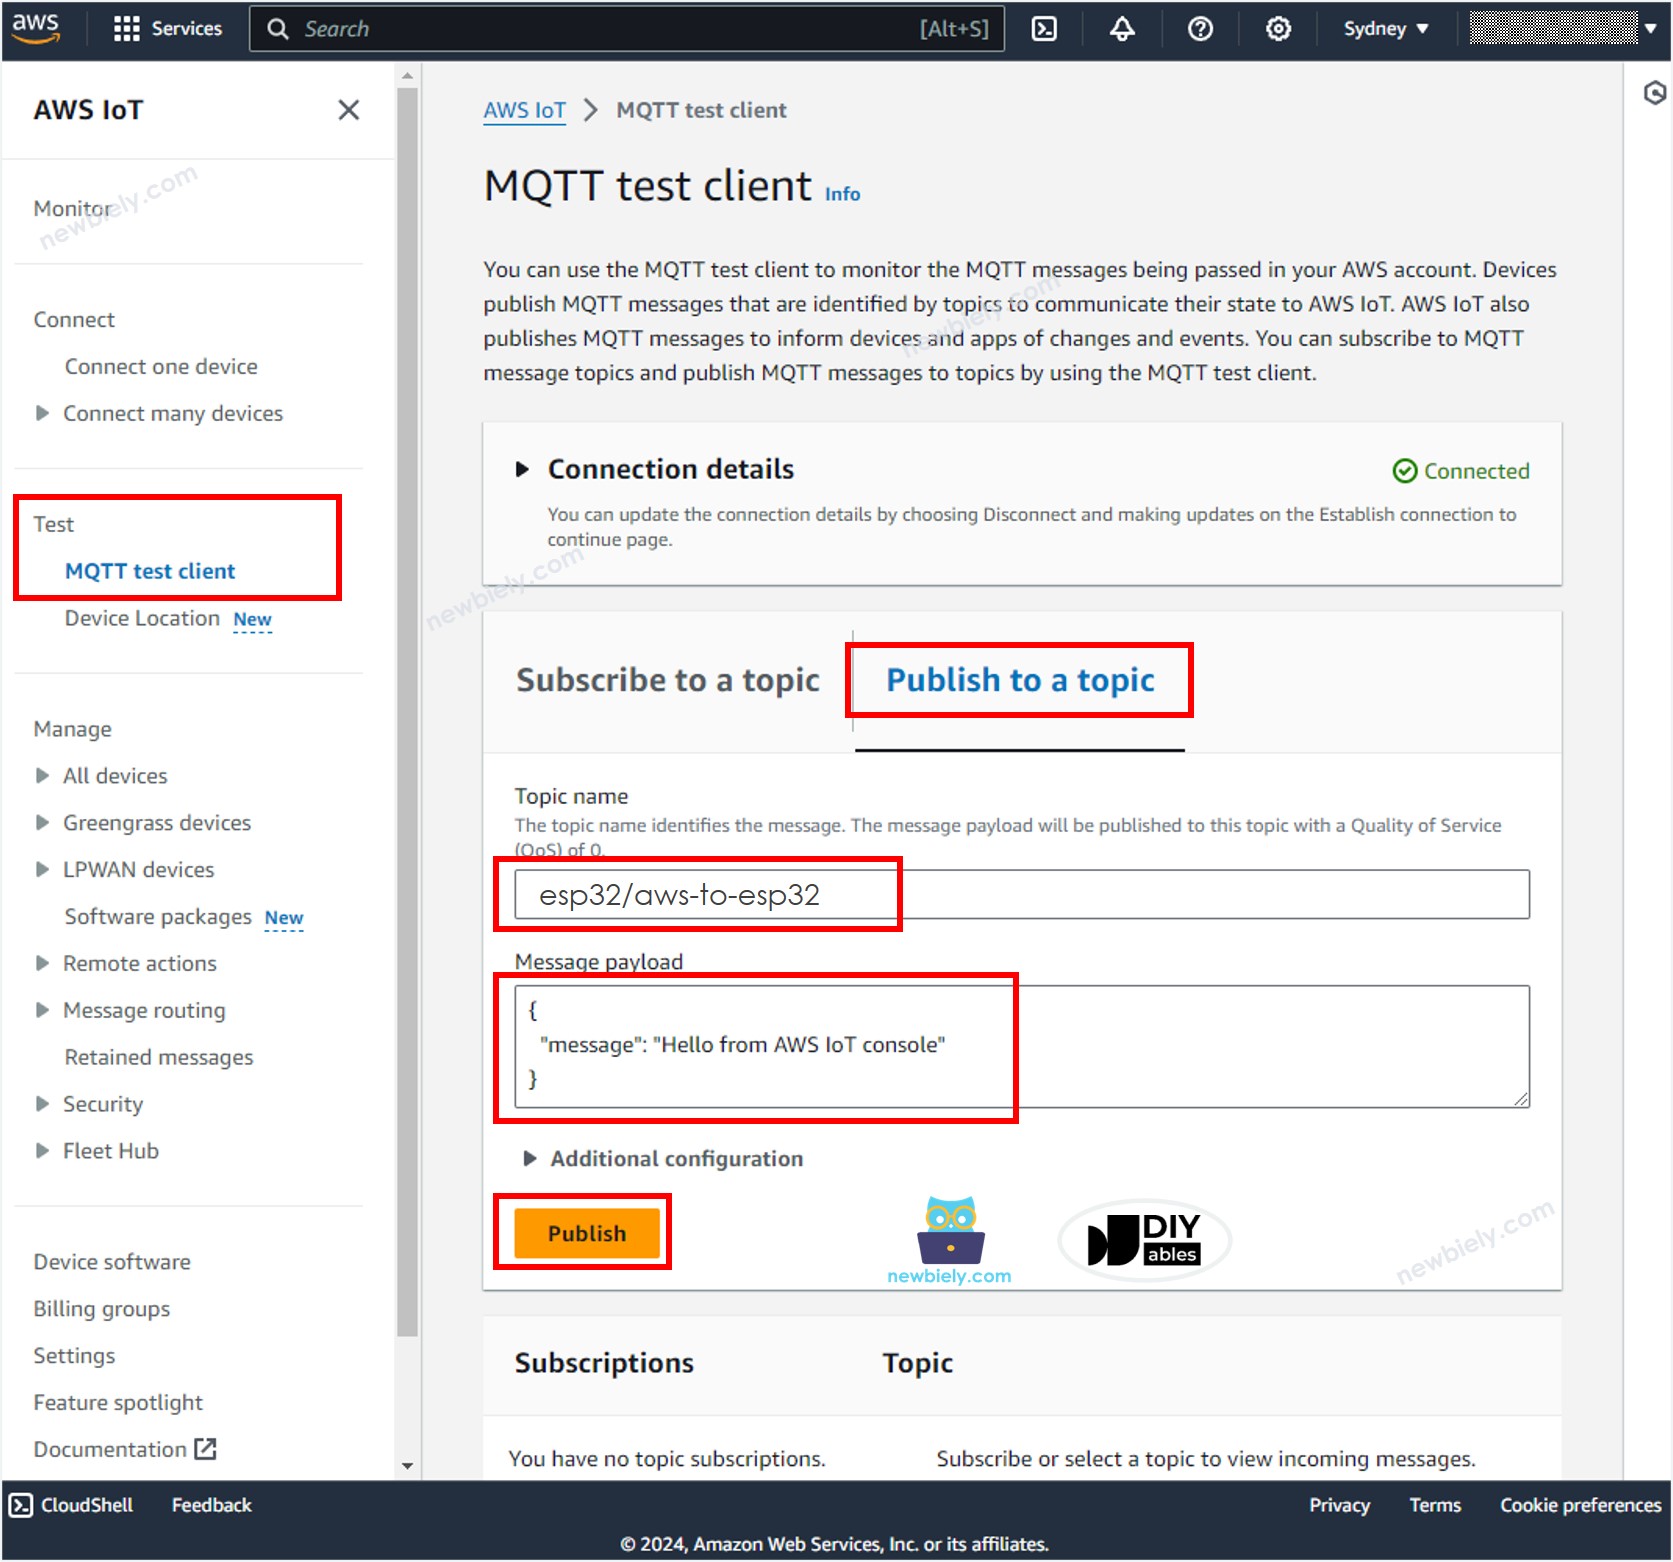
- Click the Publish to a topic button.
- Type esp32/aws-to-esp32 to the Topic name. You can change the topic but MUST be matched the topic on the Arduino Nano ESP32 code.
- Optionally, you can change the message payload, or just keep it as default.
- Click the Publish button.
- Check out the Serial Monitor on Arduino IDE, you will see the message sent from AWS IoT Console.
Do more with AWS
Now you are able to send data from the Arduino Nano ESP32 to the AWS IoT Core and vice versa. Then, you can set up IoTRule to connect the Arduino Nano ESP32 to other AWS services such as Lambda, DynamoDB, Amplify, RDS...