Arduino Nano ESP32 - WS2812B LED Strip
In this tutorial, we are going to learn how to use Arduino Nano ESP32 to control WS2812B RGB LED strip. With a single Arduino Nano ESP32 pin:
- Arduino Nano ESP32 can control the color of each LED on the led strip individual
- Arduino Nano ESP32 can change the brightness of each LED on the led strip individual
Hardware Preparation
Or you can buy the following kits:
| 1 | × | DIYables Sensor Kit (18 sensors/displays) |
Disclosure: Some of the links provided in this section are Amazon affiliate links. We may receive a commission for any purchases made through these links at no additional cost to you.
Additionally, some of these links are for products from our own brand, DIYables .
Additionally, some of these links are for products from our own brand, DIYables .
Overview of WS2812B RGB LED Strip
Pinout
the WS2812B RGB LED Strip has three pins:
- GND pin: needs to be connected to GND (0V)
- VCC pin: needs to be connected to 5V of external power supply
- Din pin: is pin that receives the control signal. It should be connected to a Arduino Nano ESP32 pin.
※ NOTE THAT:
The order of pins can vary between manufacturers. ALWAYS use the labels printed on the LED Strip.
Wiring Diagram
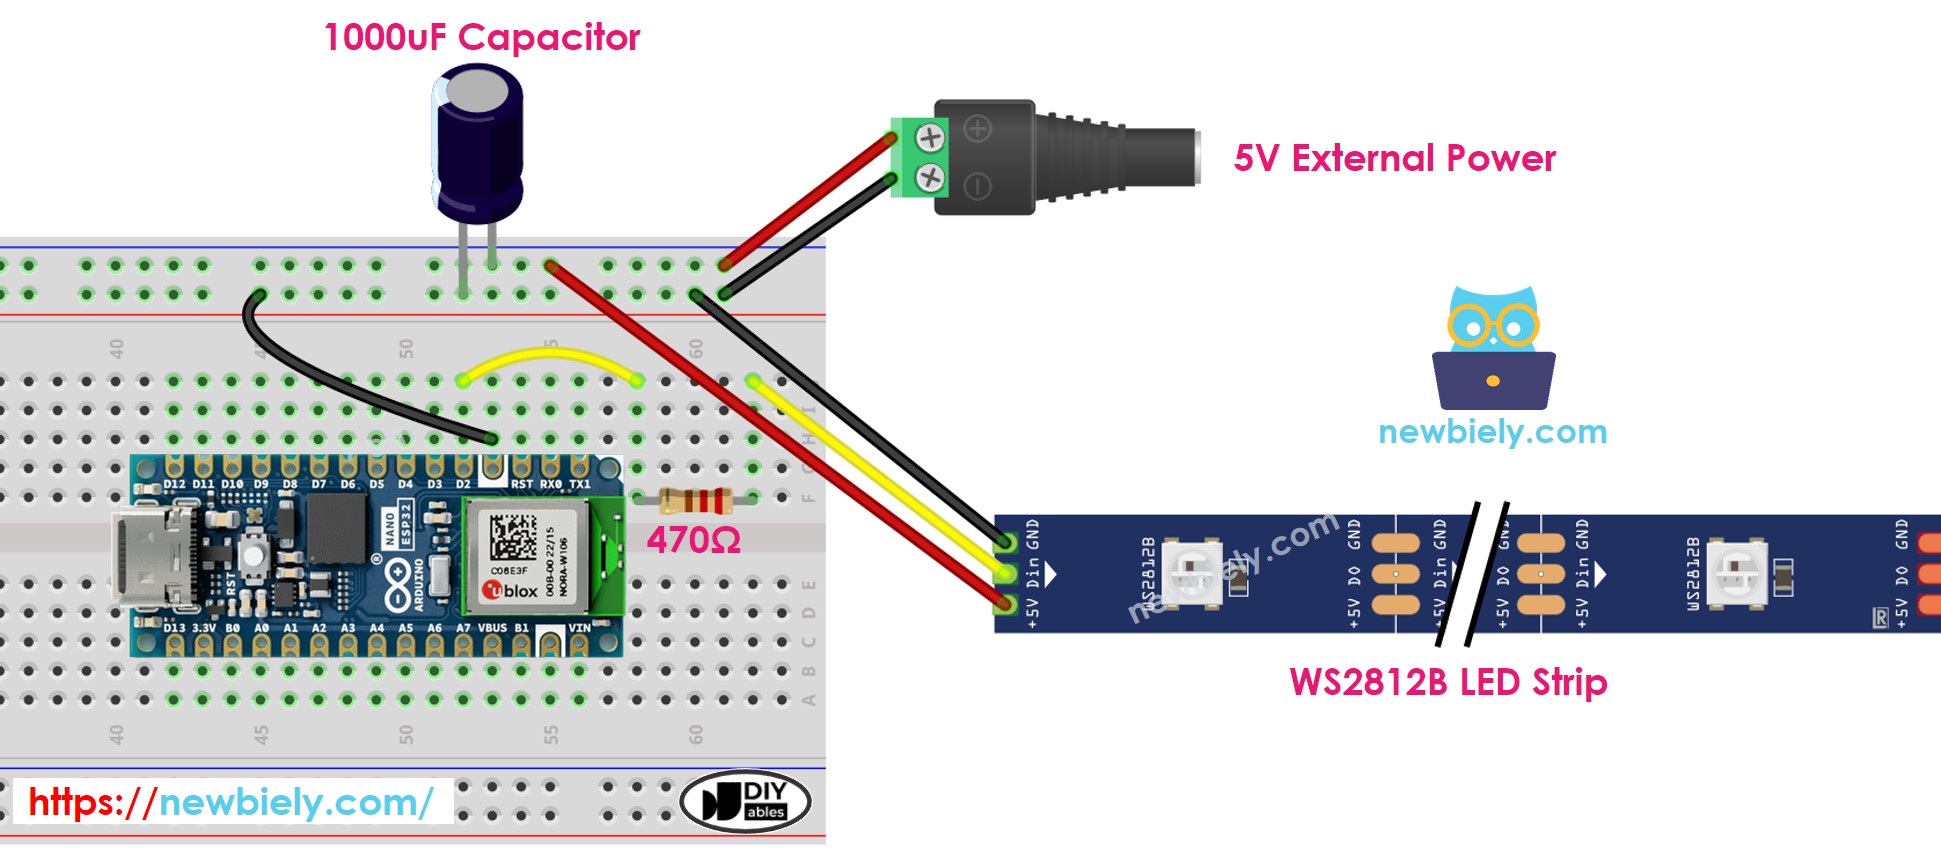
This image is created using Fritzing. Click to enlarge image
How To Program For WS2812B RGB LED Strip
- If this is the first time you use Arduino Nano ESP32, see how to setup environment for Arduino Nano ESP32 on Arduini IDE.
There are two libraries can be used to control WS2812B led strip:
- Adafruit NeoPixel library.
- FastLED library.
This tutorial will use the Adafruit NeoPixel library
- Declare a WS2812B object
#define PIN_WS2812B D2 // The Arduino Nano ESP32 pin that connects to WS2812B
#define NUM_PIXELS 30 // The number of LEDs (pixels) on WS2812B
Adafruit_NeoPixel WS2812B(NUM_PIXELS, PIN_WS2812B, NEO_GRB + NEO_KHZ800);
- Initializes the WS2812B
WS2812B.begin(); // INITIALIZE WS2812B strip object (REQUIRED)
- Set color of each individual LED (called pixel).
WS2812B.setPixelColor(pixel, WS2812B.Color(255, 0, 0));
- Set brightness of all strip.
WS2812B.setBrightness(100); // a value from 0 to 255
※ NOTE THAT:
- WS2812B.setBrightness() is used for all pixel on LED strip. To set the brightness for each individual pixel, we can scale the color value.
- The values set by WS2812B.setBrightness() and WS2812B.setPixelColor() only take effect when WS2812B.show() is called.
Arduino Nano ESP32 Code
The below code does:
- Turn pixels to green one by one with a delay between each pixel
- Turn off all pixels for two seconds
- Turn on all pixels to red at the same time for two seconds
- Repeat the above process infinitely
/*
* This Arduino Nano ESP32 code was developed by newbiely.com
*
* This Arduino Nano ESP32 code is made available for public use without any restriction
*
* For comprehensive instructions and wiring diagrams, please visit:
* https://newbiely.com/tutorials/arduino-nano-esp32/arduino-nano-esp32-ws2812b-led-strip
*/
#include <Adafruit_NeoPixel.h>
#define PIN_WS2812B D2 // The Arduino Nano ESP32 pin connected to WS2812B
#define NUM_PIXELS 30 // The number of LEDs (pixels) on WS2812B LED strip
Adafruit_NeoPixel ws2812b(NUM_PIXELS, PIN_WS2812B, NEO_GRB + NEO_KHZ800);
void setup() {
ws2812b.begin(); // initialize WS2812B strip object (REQUIRED)
}
void loop() {
ws2812b.clear(); // set all pixel colors to 'off'. It only takes effect if pixels.show() is called
// turn pixels to green one-by-one with delay between each pixel
for (int pixel = 0; pixel < NUM_PIXELS; pixel++) { // for each pixel
ws2812b.setPixelColor(pixel, ws2812b.Color(0, 255, 0)); // it only takes effect if pixels.show() is called
ws2812b.show(); // update to the WS2812B Led Strip
delay(500); // 500ms pause between each pixel
}
// turn off all pixels for two seconds
ws2812b.clear();
ws2812b.show(); // update to the WS2812B Led Strip
delay(2000); // 2 seconds off time
// turn on all pixels to red at the same time for two seconds
for (int pixel = 0; pixel < NUM_PIXELS; pixel++) { // for each pixel
ws2812b.setPixelColor(pixel, ws2812b.Color(255, 0, 0)); // it only takes effect if pixels.show() is called
}
ws2812b.show(); // update to the WS2812B Led Strip
delay(1000); // 1 second on time
// turn off all pixels for one seconds
ws2812b.clear();
ws2812b.show(); // update to the WS2812B Led Strip
delay(1000); // 1 second off time
}
Detailed Instructions
- Open the Library Manager by clicking on the Library Manager icon on the left navigation bar of Arduino IDE
- Search “Adafruit NeoPixel”, then find the WS2812B library by Adafruit
- Click Install button to install NeoPixel library.
- Copy the above code and open with Arduini IDE
- Click Upload button on Arduini IDE to upload code to Arduino Nano ESP32
- See the LED effect
※ NOTE THAT:
For any complicated LED effect, we offer the paid programming service