Arduino Nano ESP32 - Dotstar LED Strip
In this tutorial, we are going to learn how to use Arduino Nano ESP32 to control DotStar RGB LED strip. In detail, we will learn:
- How to connect Arduino Nano ESP32 to the DotStar LED Strip
- How to program Arduino Nano ESP32 control the color and brightness of each individual LED on the led strip
- How to program Arduino Nano ESP32 to create the comet effect for the DotStar LED strip
Hardware Preparation
Or you can buy the following kits:
| 1 | × | DIYables Sensor Kit (18 sensors/displays) |
Disclosure: Some of the links provided in this section are Amazon affiliate links. We may receive a commission for any purchases made through these links at no additional cost to you.
Additionally, some of these links are for products from our own brand, DIYables .
Additionally, some of these links are for products from our own brand, DIYables .
Overview of DotStar RGB LED Strip
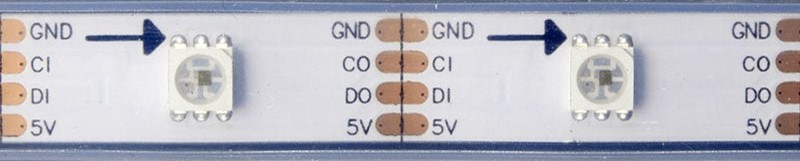
Pinout
the DotStar RGB LED Strip has three pins:
- GND pin: needs to be connected to GND (0V)
- CI pin: Clock pin that receives the clock signal. It should be connected to an Arduino Nano ESP32 pin.
- DI pin: Data pin that receives the control signal. It should be connected to an Arduino Nano ESP32 pin.
- 5V pin: needs to be connected to 5V of external power supply
Wiring Diagram
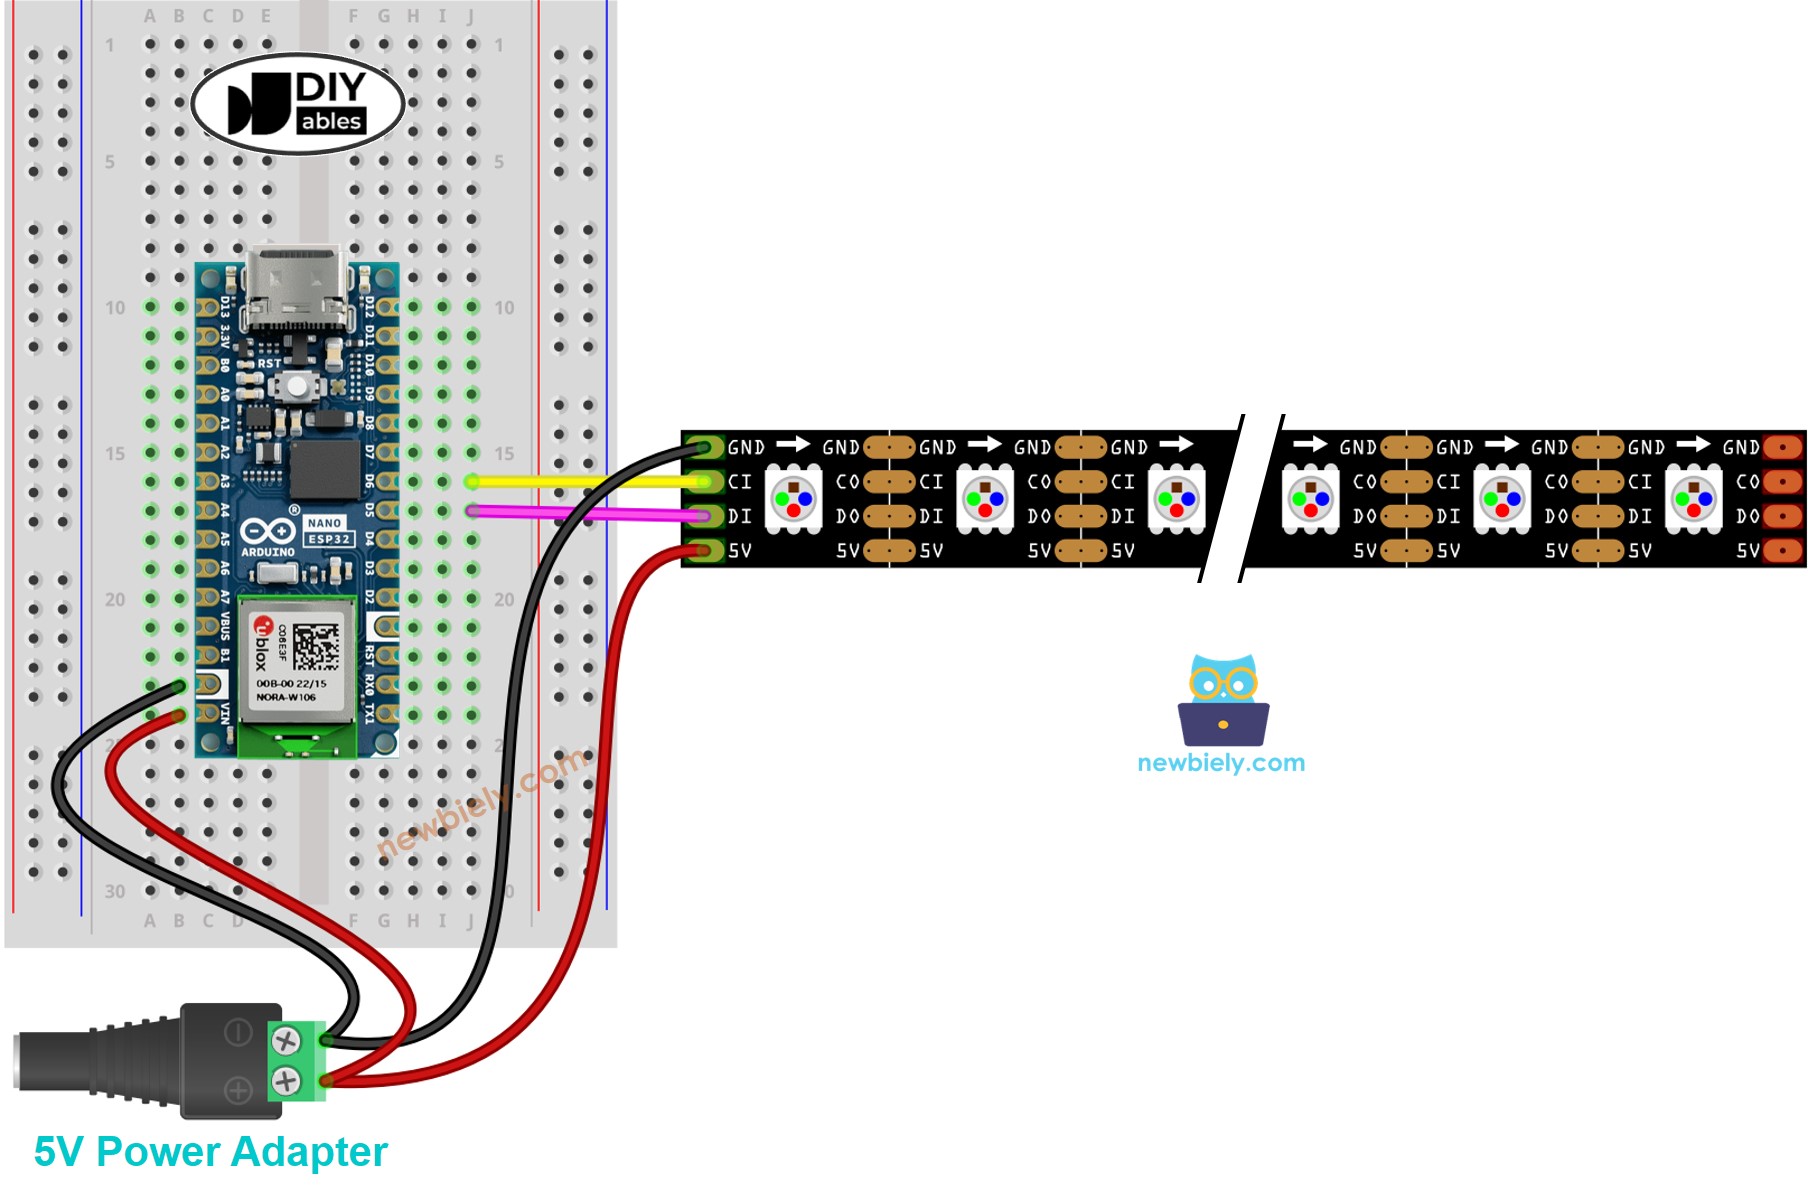
This image is created using Fritzing. Click to enlarge image
How To Program For DotStar RGB LED Strip
- Include a DotStar library
#include <Adafruit_DotStar.h>
#include <SPI.h> // COMMENT OUT THIS LINE FOR GEMMA OR TRINKET
- Declare a DotStar object
#define NUMPIXELS 144 // Number of LEDs in strip
// Here's how to control the LEDs from any two pins:
#define DATAPIN D5 // The Arduino Nano pin
#define CLOCKPIN D6 // The Arduino Nano pin
Adafruit_DotStar strip(NUMPIXELS, DATAPIN, CLOCKPIN, DOTSTAR_BRG);
- Initializes the DotStar
strip.begin(); // Initialize pins for output
strip.setBrightness(255);
strip.show(); // Turn all LEDs off ASAP
- Set color (r. g, b) of each individual LED (called pixel) .
strip.setPixelColor(pixel, g, r, b);
- Set brightness of all strip.
strip.setBrightness(100); // a value from 0 to 255
※ NOTE THAT:
- DotStar.setBrightness() is used for all pixel on LED strip. To set the brightness for each individual pixel, we can scale the color value.
- The values set by DotStar.setBrightness() and DotStar.setPixelColor() only take effect when DotStar.show() is called.
Arduino Nano ESP32 Code
The below code turns pixels to red one by one with a delay between each pixel
/*
* This Arduino Nano ESP32 code was developed by newbiely.com
*
* This Arduino Nano ESP32 code is made available for public use without any restriction
*
* For comprehensive instructions and wiring diagrams, please visit:
* https://newbiely.com/tutorials/arduino-nano-esp32/arduino-nano-esp32-dotstar-led-strip
*/
#include <Adafruit_DotStar.h>
#include <SPI.h> // COMMENT OUT THIS LINE FOR GEMMA OR TRINKET
#define NUMPIXELS 144 // Number of LEDs in strip
// Here's how to control the LEDs from any two pins:
#define DATAPIN D5 // The Arduino Nano ESP32 pin
#define CLOCKPIN D6 // The Arduino Nano ESP32 pin
Adafruit_DotStar strip(NUMPIXELS, DATAPIN, CLOCKPIN, DOTSTAR_BRG);
void setup() {
Serial.begin(9600);
strip.begin(); // INITIALIZE NeoPixel strip object (REQUIRED)
strip.show(); // Turn OFF all pixels ASAP
strip.setBrightness(255);
}
void loop() {
for (int pixel = 0; pixel < NUMPIXELS; pixel++) {
// red color
int r = 255; // CHANGE COLOR AS YOUR DESIRE
int g = 0; // CHANGE COLOR AS YOUR DESIRE
int b = 0; // CHANGE COLOR AS YOUR DESIRE
strip.clear(); // turn off all pixel
strip.setPixelColor(pixel, g, r, b); // turn on a single pixel
strip.show();
delay(1000); // keep each pixel on 1 seconds
}
}
Detailed Instructions
To get started with Arduino Nano ESP32, follow these steps:
- If you are new to Arduino Nano ESP32, refer to the tutorial on how to set up the environment for Arduino Nano ESP32 in the Arduino IDE.
- Wire the components according to the provided diagram.
- Connect the Arduino Nano ESP32 board to your computer using a USB cable.
- Launch the Arduino IDE on your computer.
- Select the Arduino Nano ESP32 board and its corresponding COM port.
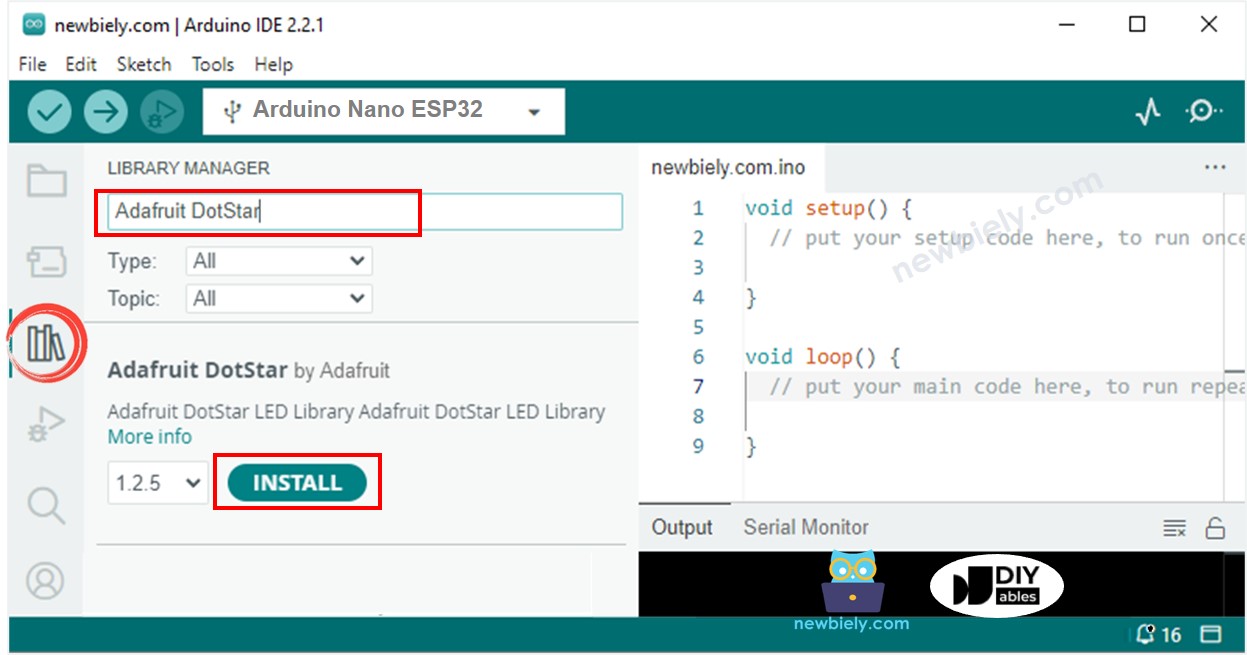
- Open the Library Manager by clicking on the Library Manager icon on the left navigation bar of Arduino IDE
- Search “Adafruit DotStar”, then find the DotStar library by Adafruit
- Click Install button to install DotStar library.
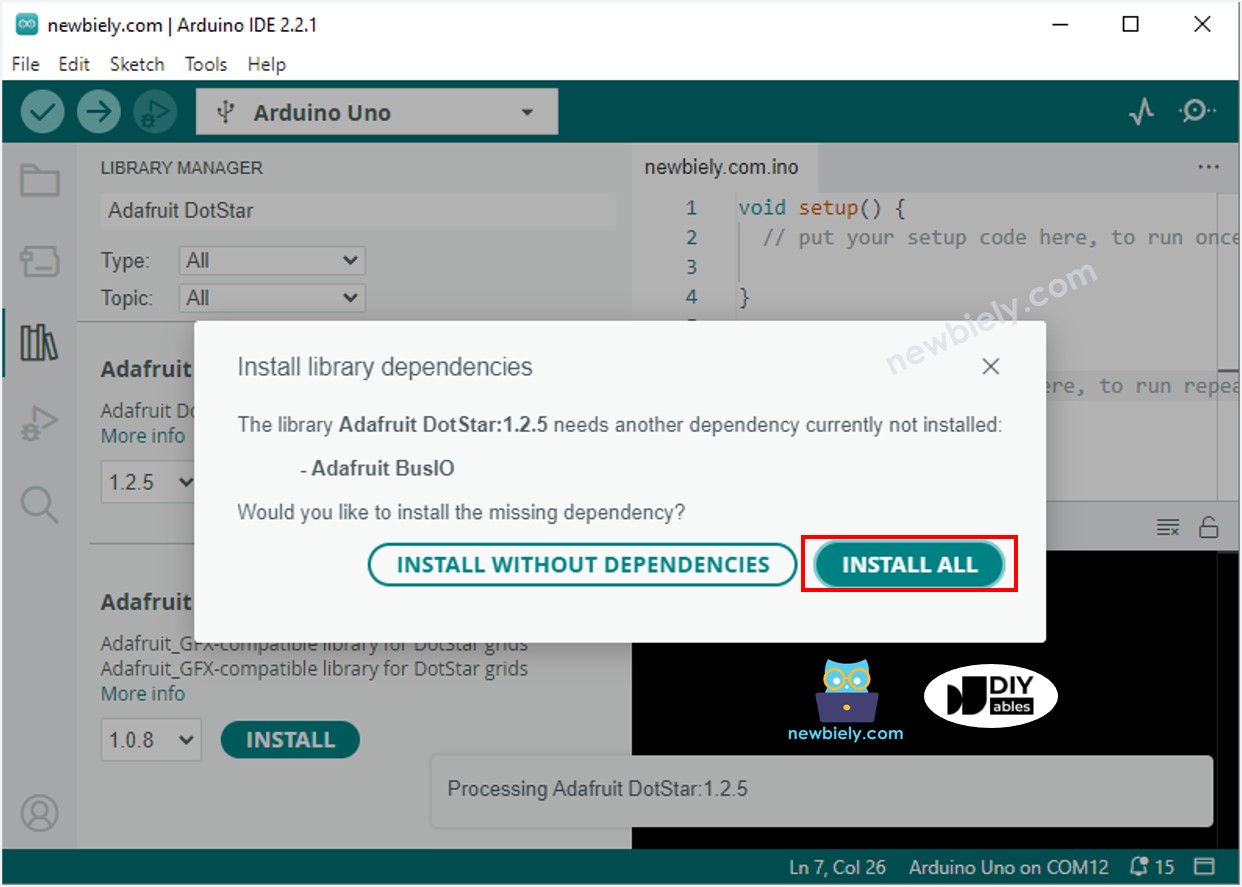
- You will be asked to install the dependency. Click Install All button.
- Copy the above code and open with Arduino IDE
- Click Upload button on Arduino IDE to upload code to Arduino Nano ESP32
- See the LED effect
Arduino Nano ESP32 Code - LED Strip Comet Effect
The below code provides the comet effect for the DotStar LED strip
/*
* This Arduino Nano ESP32 code was developed by newbiely.com
*
* This Arduino Nano ESP32 code is made available for public use without any restriction
*
* For comprehensive instructions and wiring diagrams, please visit:
* https://newbiely.com/tutorials/arduino-nano-esp32/arduino-nano-esp32-dotstar-led-strip
*/
#include <Adafruit_DotStar.h>
#include <SPI.h> // COMMENT OUT THIS LINE FOR GEMMA OR TRINKET
#define COMET_LENGTH_ALL 30 // in pixel COMET_LENGTH_ALL = COMET_LENGTH_BODY + COMET_LENGTH_HEAD
#define COMET_LENGTH_BODY 25 // in pixel
#define COMET_LENGTH_HEAD 5 // in pixel
#define TWO_COMET_DISTANCE 10 // in pixel
#define COMET_SPEED 2000 // in millisecond, the time need to move through 144 pixels
#define COMET_COLOR_R 204 // color
#define COMET_COLOR_G 255 // color
#define COMET_COLOR_B 255 // color
#define COMET_BRIGHTNESS_MIN 1
#define COMET_BRIGHTNESS_MAX 200
#define COMET_BRIGHTNESS_HEAD 80
#define FLICKER_MAX 255
#define FLICKER_MIN 100
#define FLICKER_SPEED 800 // in millisecond
#define NUMPIXELS 144 // Number of LEDs in strip
// Here's how to control the LEDs from any two pins:
#define DATAPIN D5 // The Arduino Nano ESP32 pin
#define CLOCKPIN D6 // The Arduino Nano ESP32 pin
Adafruit_DotStar strip(NUMPIXELS, DATAPIN, CLOCKPIN, DOTSTAR_BRG);
int pos_head = 0;
unsigned long cometTimeStart;
unsigned long flickerTimeStart;
unsigned long progress;
unsigned long cometBrightness;
unsigned long flickerBrightness;
unsigned long TIME_PER_PIXEL;
void setup() {
Serial.begin(9600);
strip.begin(); // INITIALIZE NeoPixel strip object (REQUIRED)
strip.show(); // Turn OFF all pixels ASAP
strip.setBrightness(255);
TIME_PER_PIXEL = map(1, 0, NUMPIXELS, 0, COMET_SPEED);
cometTimeStart = millis();
flickerTimeStart = millis();
}
void loop() {
progress = millis() - flickerTimeStart;
if (progress >= 2 * FLICKER_SPEED) {
progress = 2 * FLICKER_SPEED;
flickerTimeStart = millis();
}
if (progress > FLICKER_SPEED)
progress = 2 * FLICKER_SPEED - progress;
flickerBrightness = map(progress, 0, FLICKER_SPEED, FLICKER_MIN, FLICKER_MAX);
strip.setBrightness(flickerBrightness);
progress = millis() - cometTimeStart;
if (progress >= TIME_PER_PIXEL) {
pos_head++;
pos_head %= (COMET_LENGTH_ALL + TWO_COMET_DISTANCE);
int offset = COMET_LENGTH_ALL - pos_head;
for (int pixel = 0; pixel < NUMPIXELS; pixel++) {
int pos_offset = pixel + offset;
pos_offset %= (COMET_LENGTH_ALL + TWO_COMET_DISTANCE);
if (pos_offset < COMET_LENGTH_BODY)
cometBrightness = map(pos_offset, 0, COMET_LENGTH_BODY - 1, COMET_BRIGHTNESS_MIN, COMET_BRIGHTNESS_MAX);
else if (pos_offset >= COMET_LENGTH_BODY && pos_offset < COMET_LENGTH_ALL)
cometBrightness = map(pos_offset - COMET_LENGTH_BODY + 1, 0, COMET_LENGTH_ALL - COMET_LENGTH_BODY, COMET_BRIGHTNESS_MAX, COMET_BRIGHTNESS_HEAD);
else
cometBrightness = 0;
int r = (COMET_COLOR_R * cometBrightness) >> 8;
int g = (COMET_COLOR_G * cometBrightness) >> 8;
int b = (COMET_COLOR_B * cometBrightness) >> 8;
strip.setPixelColor(pixel, g, r, b);
}
strip.show();
cometTimeStart = millis(); // new circle
}
}
※ NOTE THAT:
For any other LED effects, we offer the paid programming service