Arduino Nano ESP32 - Multiple Button

This tutorial instructs you how to program an Arduino Nano ESP32 to work with multiple buttons at the same time without using the delay() function. The tutorial offers code in two different ways:

We will use three buttons as examples. You can easily modify it to adapt for two buttons, four buttons, or even more.

Hardware Preparation

1×Arduino Nano ESP32
1×USB Cable Type-C
1×PCB-mount Button
1×Panel-mount Button
1×Breadboard
1×Jumper Wires
1×(Optional) 9V Power Adapter for Arduino Nano ESP32
1×(Recommended) Screw Terminal Adapter for Arduino Nano

Or you can buy the following sensor kits:

1×DIYables Sensor Kit (30 sensors/displays)
1×DIYables Sensor Kit (18 sensors/displays)
Disclosure: Some of the links provided in this section are Amazon affiliate links. We may receive a commission for any purchases made through these links at no additional cost to you. We appreciate your support.

Overview of Button

If you are unfamiliar with button (pinout, how it works, how to program ...), the following tutorials can provide you with more information:

Wiring Diagram

The wiring diagram between Arduino Nano ESP32 and multiple button

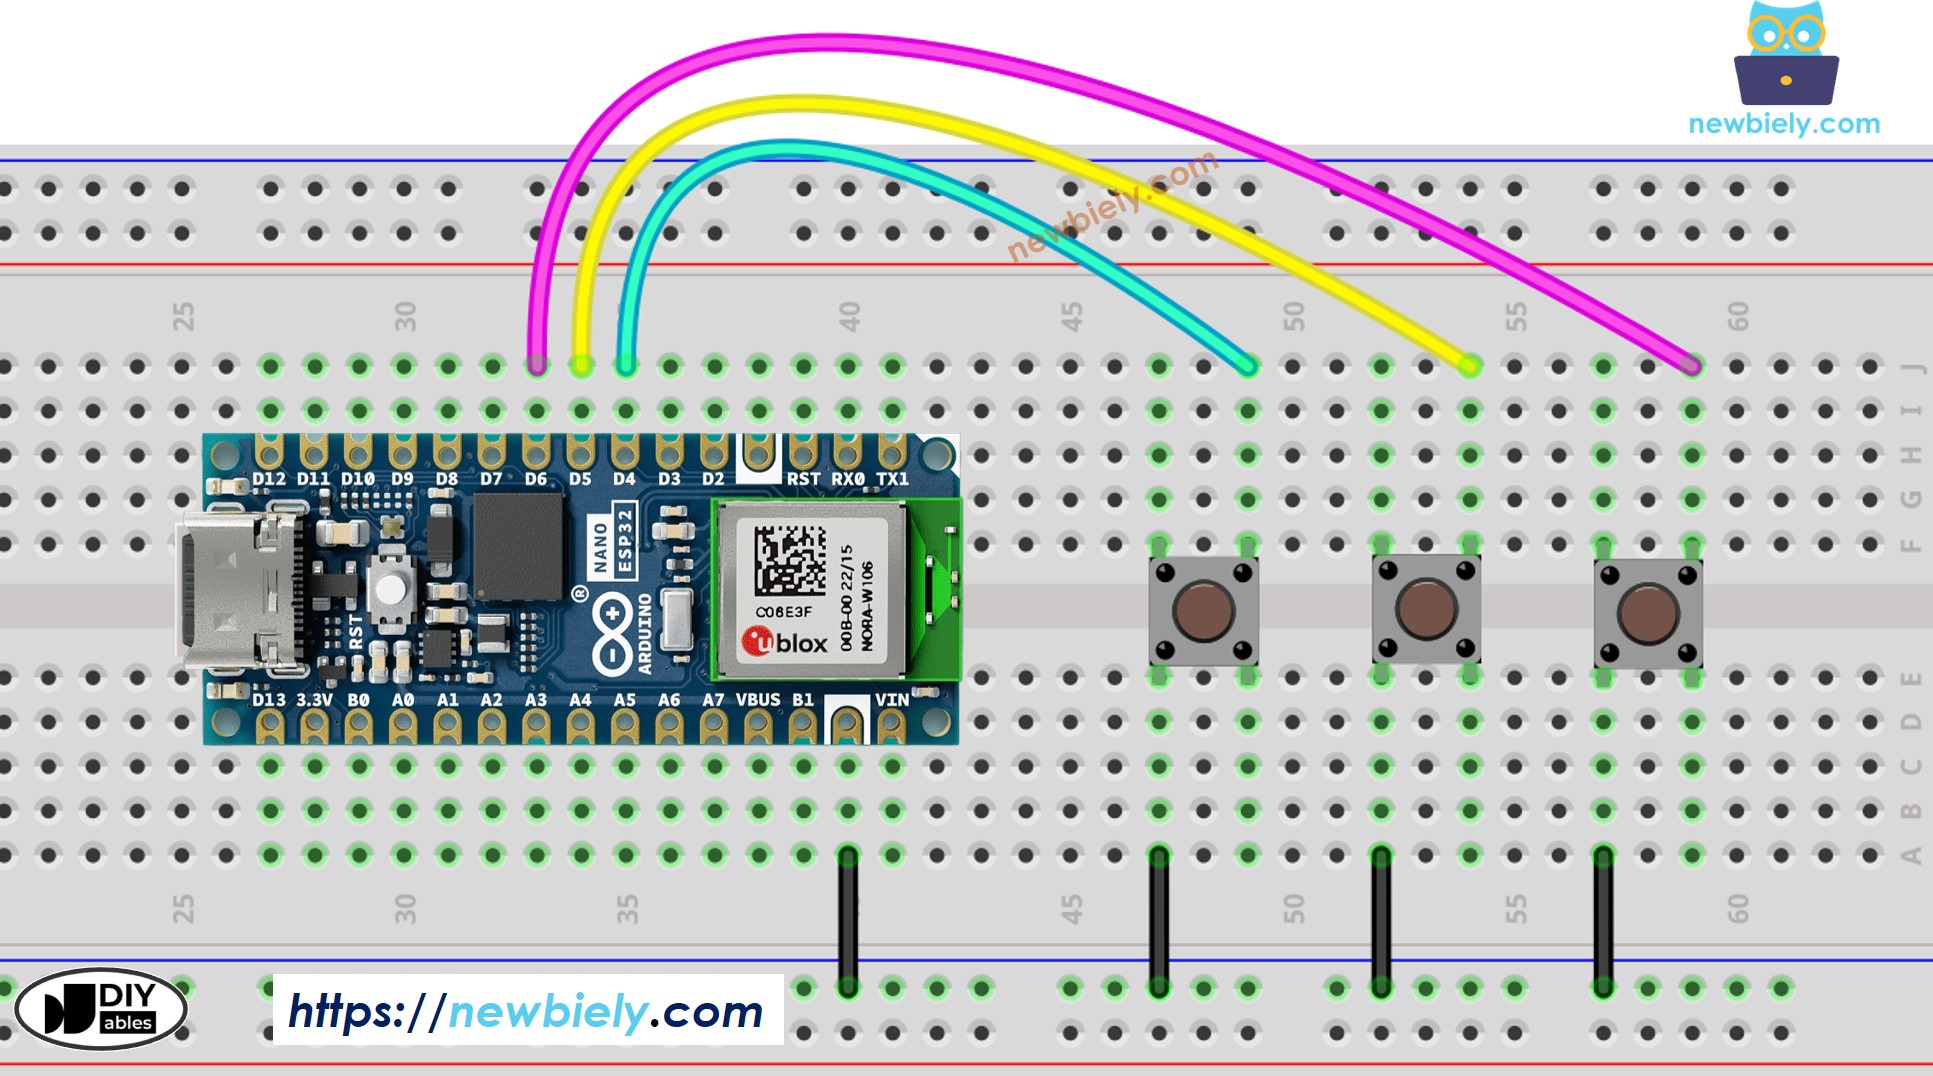
This image is created using Fritzing. Click to enlarge image

Arduino Nano ESP32 Code - Multiple Buttons with debounce

When using multiple buttons, things can get complicated in certain scenarios:

Thankfully, the ezButton library streamlines this process by internally managing debounce and button events. This relieves users from the task of managing timestamps and variables when utilizing the library. Additionally, employing an array of buttons can enhance code clarity and brevity.

/* * This Arduino Nano ESP32 code was developed by newbiely.com * * This Arduino Nano ESP32 code is made available for public use without any restriction * * For comprehensive instructions and wiring diagrams, please visit: * https://newbiely.com/tutorials/arduino-nano-esp32/arduino-nano-esp32-multiple-button */ #include <ezButton.h> #define BUTTON_PIN_1 D4 // The Arduino Nano ESP32 pin connected to the button 1 #define BUTTON_PIN_2 D5 // The Arduino Nano ESP32 pin connected to the button 2 #define BUTTON_PIN_3 D6 // The Arduino Nano ESP32 pin connected to the button 3 ezButton button1(BUTTON_PIN_1); // create ezButton object for button 1 ezButton button2(BUTTON_PIN_2); // create ezButton object for button 2 ezButton button3(BUTTON_PIN_3); // create ezButton object for button 3 void setup() { Serial.begin(9600); button1.setDebounceTime(100); // set debounce time to 100 milliseconds button2.setDebounceTime(100); // set debounce time to 100 milliseconds button3.setDebounceTime(100); // set debounce time to 100 milliseconds } void loop() { button1.loop(); // MUST call the loop() function first button2.loop(); // MUST call the loop() function first button3.loop(); // MUST call the loop() function first // get button state after debounce int button1_state = button1.getState(); // the state after debounce int button2_state = button2.getState(); // the state after debounce int button3_state = button3.getState(); // the state after debounce /* Serial.print("The button 1 state: "); Serial.println(button1_state); Serial.print("The button 2 state: "); Serial.println(button2_state); Serial.print("The button 3 state: "); Serial.println(button3_state); */ if (button1.isPressed()) Serial.println("The button 1 is pressed"); if (button1.isReleased()) Serial.println("The button 1 is released"); if (button2.isPressed()) Serial.println("The button 2 is pressed"); if (button2.isReleased()) Serial.println("The button 2 is released"); if (button3.isPressed()) Serial.println("The button 3 is pressed"); if (button3.isReleased()) Serial.println("The button 3 is released"); }

Detailed Instructions

To get started with Arduino Nano ESP32, follow these steps:

  • If you are new to Arduino Nano ESP32, refer to the tutorial on how to set up the environment for Arduino Nano ESP32 in the Arduino IDE.
  • Wire the components according to the provided diagram.
  • Connect the Arduino Nano ESP32 board to your computer using a USB cable.
  • Launch the Arduino IDE on your computer.
  • Select the Arduino Nano ESP32) board and its corresponding COM port.
  • Do the wiring as above image.
  • Connect the Arduino Nano ESP32 board to your PC via a USB cable
  • Open Arduino IDE on your PC.
  • Select the right Arduino Nano ESP32 board (e.g. Arduino Nano ESP32 Uno) and COM port.
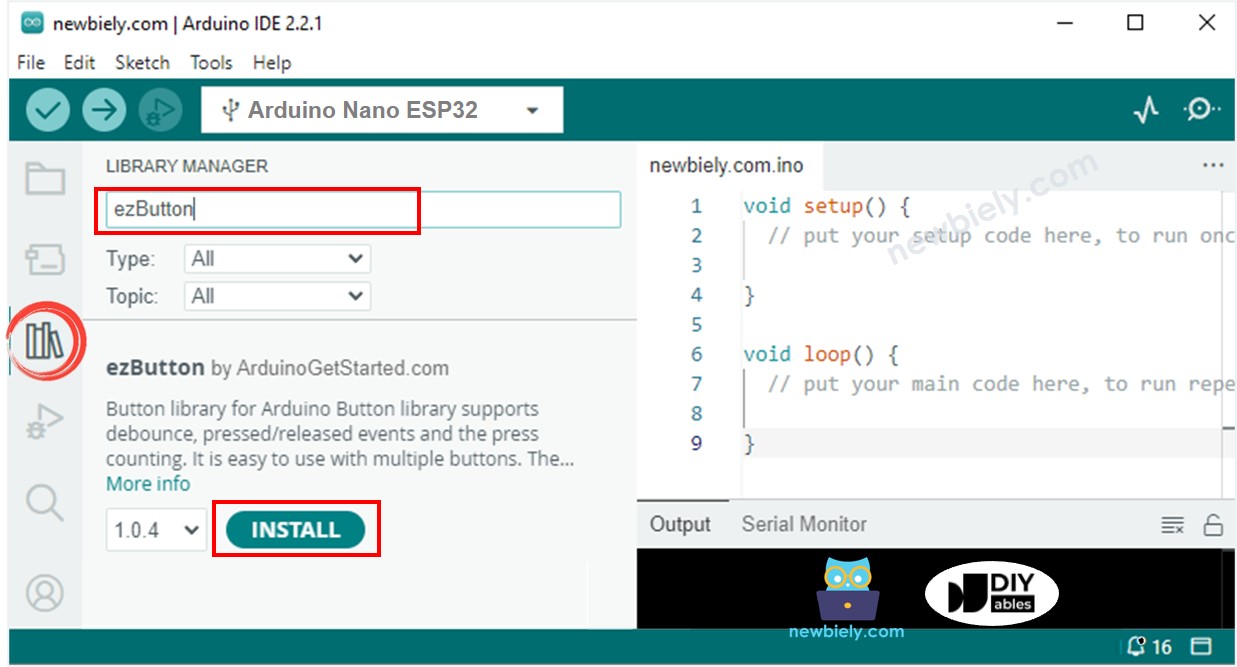
  • Click to the Libraries icon on the left bar of the Arduino IDE.
  • Search “ezButton”, then find the button library by Arduino Nano ESP32GetStarted
  • Click Install button to install ezButton library.
Arduino Nano ESP32 button library
  • Copy the above code and paste it to Arduino IDE.
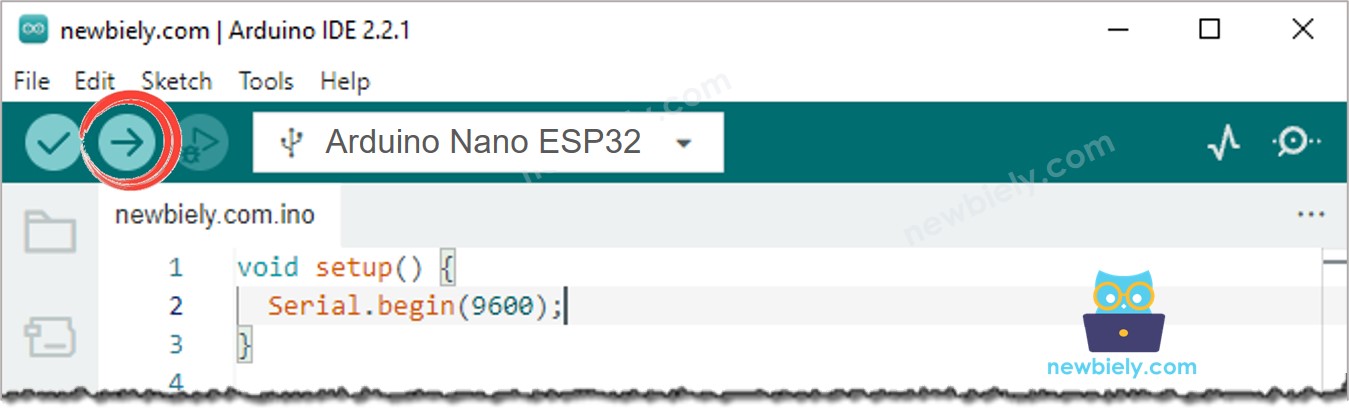
  • Compile and upload code to Arduino Nano ESP32 board by clicking Upload button on Arduino IDE
How to upload Arduino Nano ESP32 code on Arduino IDE
  • Open Serial Monitor on Arduino IDE
  • Press and release the button one by one
COM6
Send
The button 1 is pressed The button 1 is released The button 2 is pressed The button 2 is released The button 3 is pressed The button 3 is released
Autoscroll Show timestamp
Clear output
9600 baud  
Newline  

Arduino Nano ESP32 Code - Multiple Buttons using array

We can improve the code above by employing an array of buttons. The following code utilizes this array to handle button objects.

/* * This Arduino Nano ESP32 code was developed by newbiely.com * * This Arduino Nano ESP32 code is made available for public use without any restriction * * For comprehensive instructions and wiring diagrams, please visit: * https://newbiely.com/tutorials/arduino-nano-esp32/arduino-nano-esp32-multiple-button */ #include <ezButton.h> #define BUTTON_NUM 3 // the number of buttons #define BUTTON_PIN_1 D4 // The Arduino Nano ESP32 pin connected to the button 1 #define BUTTON_PIN_2 D5 // The Arduino Nano ESP32 pin connected to the button 2 #define BUTTON_PIN_3 D6 // The Arduino Nano ESP32 pin connected to the button 3 ezButton buttonArray[] = { ezButton(BUTTON_PIN_1), ezButton(BUTTON_PIN_2), ezButton(BUTTON_PIN_3) }; void setup() { Serial.begin(9600); for (byte i = 0; i < BUTTON_NUM; i++) { buttonArray[i].setDebounceTime(100); // set debounce time to 100 milliseconds } } void loop() { for (byte i = 0; i < BUTTON_NUM; i++) buttonArray[i].loop(); // MUST call the loop() function first for (byte i = 0; i < BUTTON_NUM; i++) { // get button state after debounce int button_state = buttonArray[i].getState(); // the state after debounce /* Serial.print("The button "); Serial.print(i + 1); Serial.print(": "); Serial.println(button_state); */ if (buttonArray[i].isPressed()) { Serial.print("The button "); Serial.print(i + 1); Serial.println(" is pressed"); } if (buttonArray[i].isReleased()) { Serial.print("The button "); Serial.print(i + 1); Serial.println(" is released"); } } }

Video Tutorial

※ OUR MESSAGES

  • As freelancers, We are AVAILABLE for HIRE. See how to outsource your project to us
  • Please feel free to share the link of this tutorial. However, Please do not use our content on any other websites. We invested a lot of effort and time to create the content, please respect our work!