Arduino Nano ESP32 - DIP Switch
In electronics, DIP (Dual In-line Package) switches find widespread use for configuration tasks, such as device addresses, communication settings, security codes. This tutorial will explore how to use the DIP switch with Arduino Nano ESP32. Specifically, we'll cover:
- How DIP switches work
- Establishing connections between the DIP switch and Arduino Nano ESP32
- Programming Arduino Nano ESP32 to rea the ON/OFF states of the DIP switch
- Programming Arduino Nano ESP32 to interpret the integer value configured by the DIP switch

Hardware Preparation
Or you can buy the following kits:
| 1 | × | DIYables Sensor Kit (30 sensors/displays) | |
| 1 | × | DIYables Sensor Kit (18 sensors/displays) |
Additionally, some of these links are for products from our own brand, DIYables .
Overview of DIP Switch
DIP switches serve as essential tools for configuring devices, enabling users to adjust parameters like device address, communication settings, security codes, operational modes, and system preferences across various industries and applications.
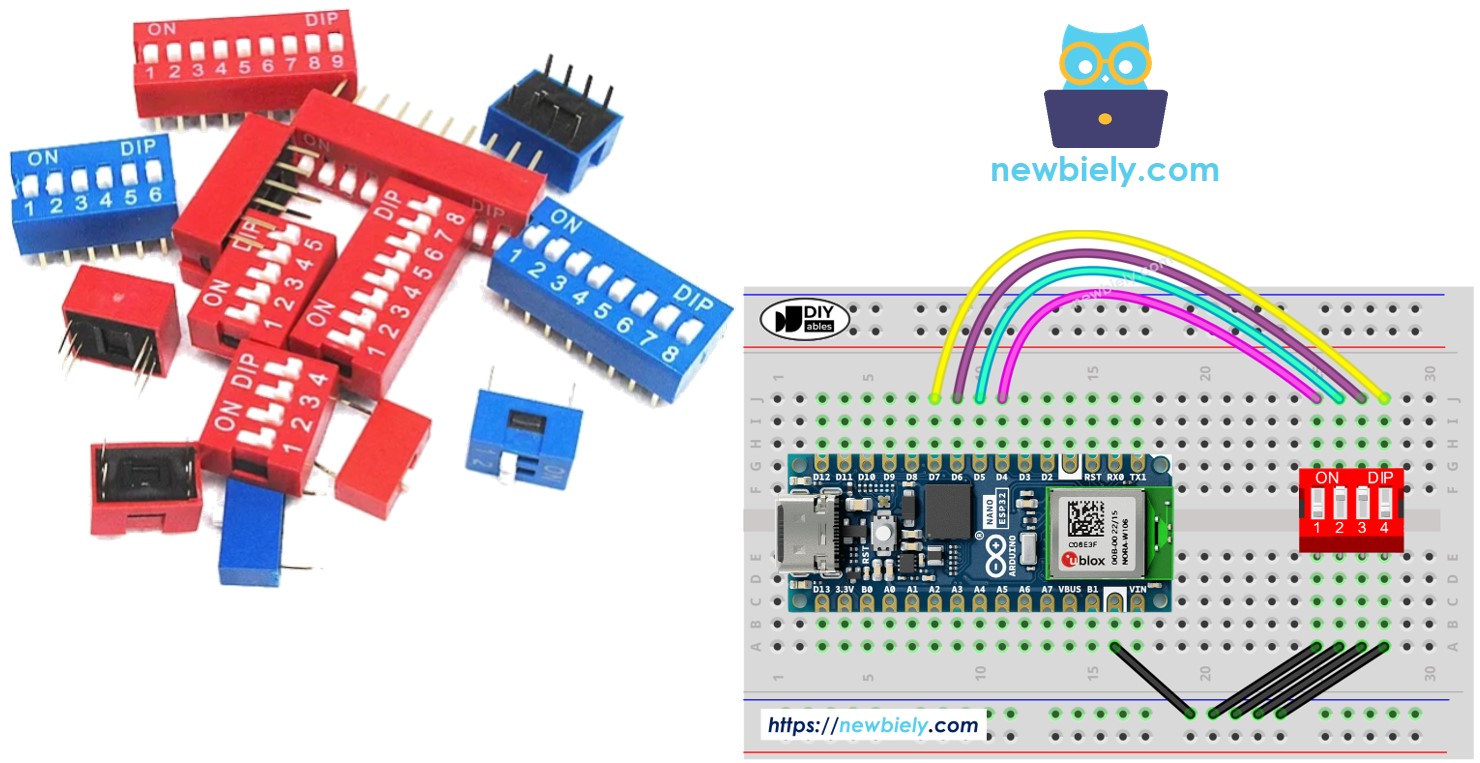
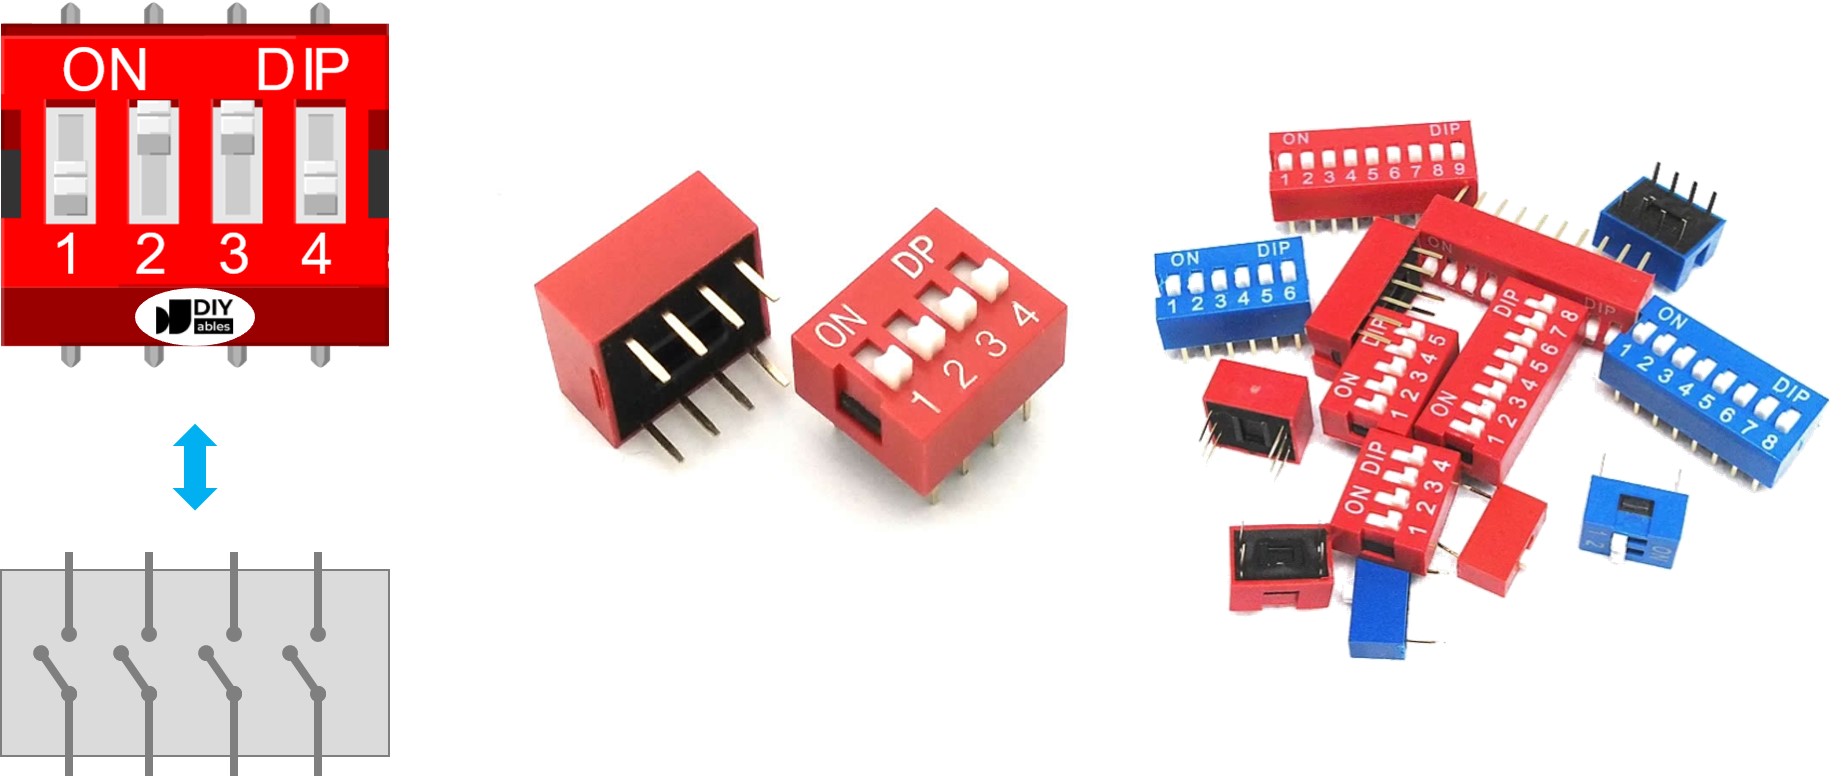
A DIP switch is comprised of multiple small slide switches bundled together, with each switch referred to as a "position". These switches are available in different types based on the number of positions they offer. For instance, there are 2-position, 4-position, 5-position, 6-position, 8-position, and 10-position DIP switches.
Each position on a DIP switch represents a configurable bit of a number. By toggling these positions between ON and OFF, users can set the desired numeric value they wish to configure.
Pinout

A DIP switch is made up of two rows of pins, where the number of pins in each row matches the number of switch positions available. For instance, a 4-position DIP switch has a total of 8 pins, evenly divided with 4 pins on each side. Inside the DIP switch setup, each pair of opposite pins represents a slide switch. Importantly, there's no need to differentiate between pins on the two sides as they can be used interchangeably.
How It Works
In DIP switches, when a switch is in the ON position, it indicates that the switch is engaged or closed. This implies that there is an electrical connection established, enabling the flow of current through the switch.
Conversely, when a switch is in the OFF position, it signifies that the switch is disengaged or open. In this state, the electrical connection is severed, preventing the flow of current through the switch.
To clarify:
- ON position: Establishes a closed circuit, allowing current to pass through.
- OFF position: Creates an open circuit, blocking the flow of current.
When one side of a switch is connected to ground (GND) and the other side to an Arduino Nano ESP32 pin, and the Arduino Nano ESP32 pin is configured as a pull-up digital input, the table below illustrates the relationship between the switch position and the values read from the Arduino Nano ESP32:
| DIP switch position | Binary representation | Circuit state | Arduino Nano ESP32 pin state |
|---|---|---|---|
| ON | 1 | CLOSED | LOW |
| OFF | 0 | OPEN | HIGH |
In the next parts, we will use 4-position DIP switch for example. You can easily to adapt for 2-position DIP switches, 3-position DIP switches, 5-position DIP switches, 6-position DIP switches, 8-position DIP switches, and 10-position DIP switches...
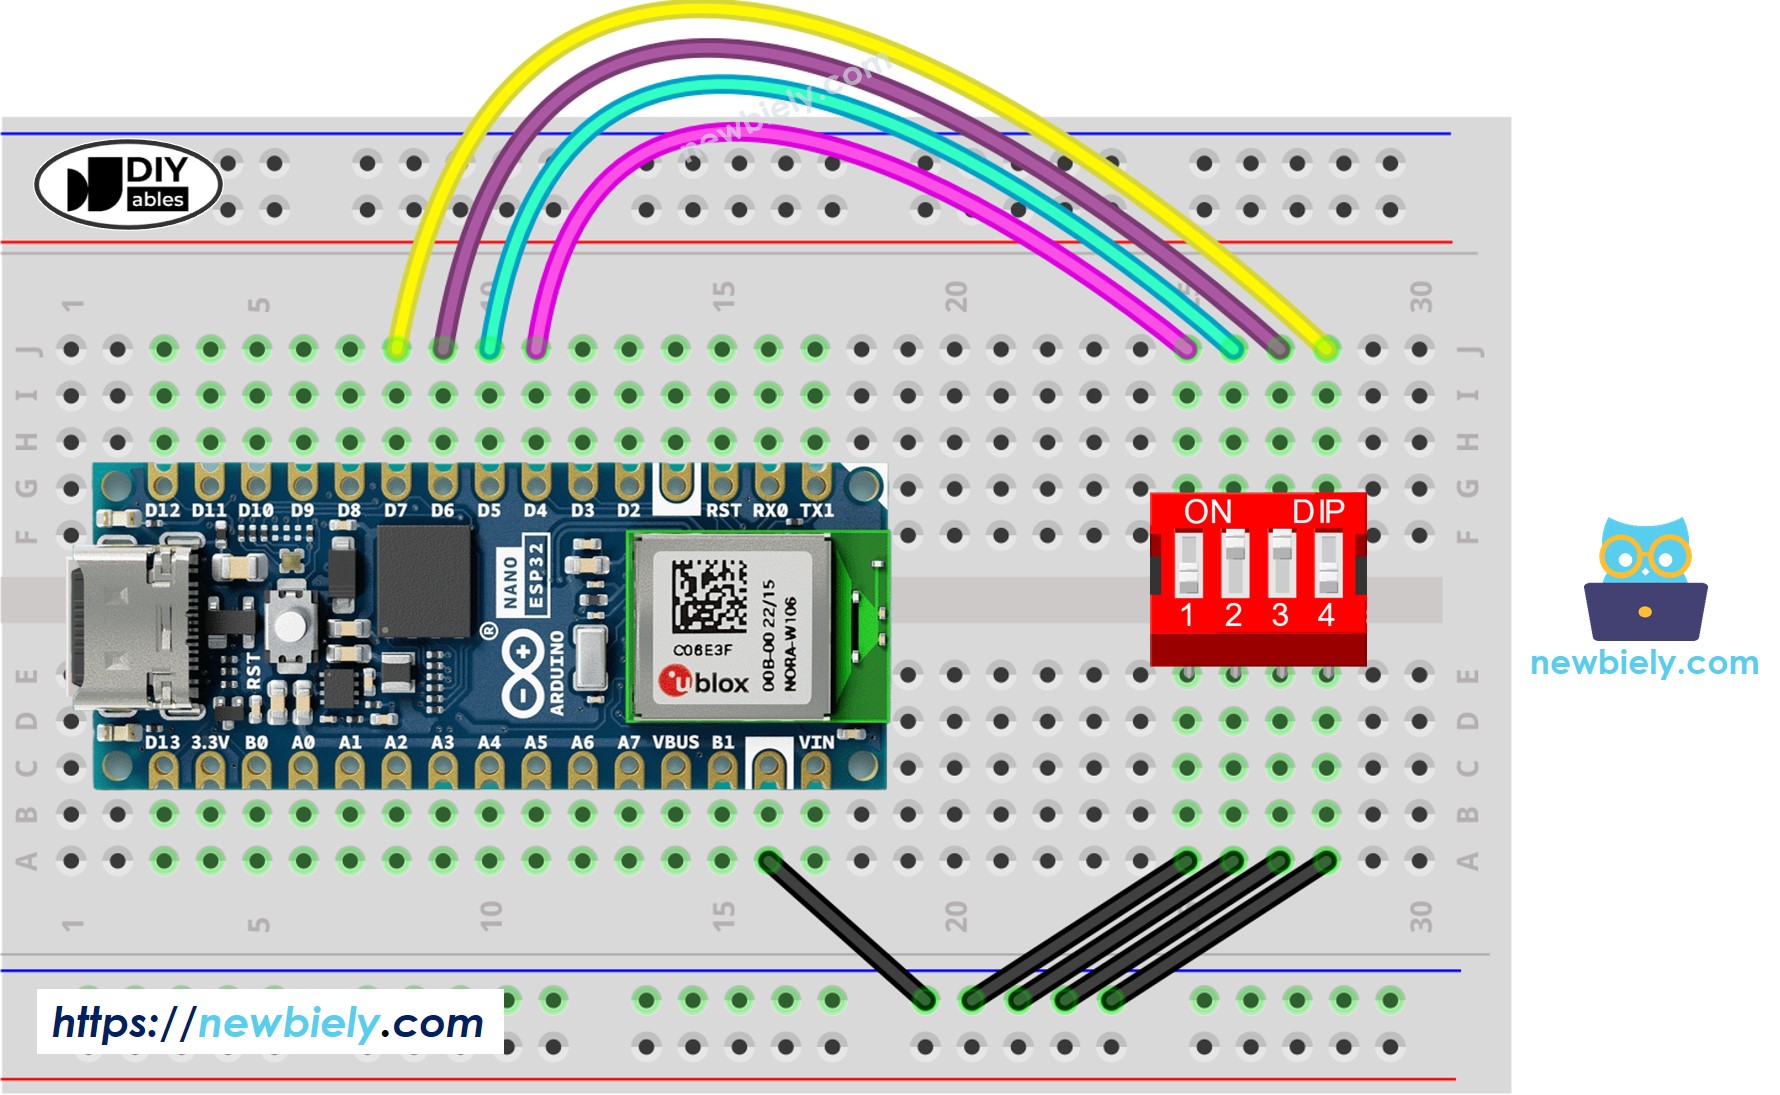
Wiring Diagram

This image is created using Fritzing. Click to enlarge image
Arduino Nano ESP32 Code - DIP Switch
We will learn through two pieces of code:
- Reading the ON/OFF state of individual position on the DIP switch.
- Encoding the positions into a number.
Arduino Nano ESP32 code - Reading the ON/OFF state of the DIP switch
Detailed Instructions
To get started with Arduino Nano ESP32, follow these steps:
- If you are new to Arduino Nano ESP32, refer to the tutorial on how to set up the environment for Arduino Nano ESP32 in the Arduino IDE.
- Wire the components according to the provided diagram.
- Connect the Arduino Nano ESP32 board to your computer using a USB cable.
- Launch the Arduino IDE on your computer.
- Select the Arduino Nano ESP32 board and its corresponding COM port.
- Do wiring as above wiring diagram
- Connect Arduino Nano ESP32 to PC via USB cable
- Open Arduino IDE
- Select the right board and port
- Click Upload button on Arduino IDE to upload code to Arduino Nano ESP32
- Switch each position on the DIP Switch to ON one by one.
- See the result on Serial Monitor.
Arduino Nano ESP32 code - Encoding the states of DIP switch into a number
Detailed Instructions
To get started with Arduino Nano ESP32, follow these steps:
- If you are new to Arduino Nano ESP32, refer to the tutorial on how to set up the environment for Arduino Nano ESP32 in the Arduino IDE.
- Wire the components according to the provided diagram.
- Connect the Arduino Nano ESP32 board to your computer using a USB cable.
- Launch the Arduino IDE on your computer.
- Select the Arduino Nano ESP32 board and its corresponding COM port.
- Upload the above code to Arduino Nano ESP32
- Switch each position on the DIP switch to ON one by one.
- See the result on Serial Monitor, it look like below.
Please note that the value depends on positions of each slide switches. The below table shows the mapping between ON/OFF position and the integer value for 4-position DIP switch:
| Position-1 | Position-2 | Position-3 | Position-4 | Binary Value | Decimal Value |
|---|---|---|---|---|---|
| OFF | OFF | OFF | OFF | 0000 | 0 |
| OFF | OFF | OFF | ON | 0001 | 1 |
| OFF | OFF | ON | OFF | 0010 | 2 |
| OFF | OFF | ON | ON | 0011 | 3 |
| OFF | ON | OFF | OFF | 0100 | 4 |
| OFF | ON | OFF | ON | 0101 | 5 |
| OFF | ON | ON | OFF | 0110 | 6 |
| OFF | ON | ON | ON | 0111 | 7 |
| ON | OFF | OFF | OFF | 1000 | 8 |
| ON | OFF | OFF | ON | 1001 | 9 |
| ON | OFF | ON | OFF | 1010 | 10 |
| ON | OFF | ON | ON | 1011 | 11 |
| ON | ON | OFF | OFF | 1100 | 12 |
| ON | ON | OFF | ON | 1101 | 13 |
| ON | ON | ON | OFF | 1110 | 14 |
| ON | ON | ON | ON | 1111 | 15 |
